Chapter 4
Configuring Docker and Containers on Windows Server 2019
IN THIS CHAPTER
 Introducing Dockerfile
Applying custom metadata to containers and other objects
Configuring containers
Configuring the Docker daemon with daemon.json
Installing containers is the easy part, and you can certainly have some fun while doing it. In an enterprise environment, however, you’ll be asked to configure the containers so that they can do useful things and provide value to the business.
In this chapter, you find out how to configure and customize your containers so that your organization can really reap the benefits of containerization.
Working with Dockerfile
A dockerfile allows you to specify how a container should be built. It identifies the container image that you’ll use and contains any commands that you may want to run. The changes that you make to the container image are saved as a layer on top of the original container image.
When you create a dockerfile on Windows, you need to ensure that it does not have a file extension. You can do this by saving it as "dockerfile" with the quotes and change Save as Type to All Files, as shown in Figure 4-1.
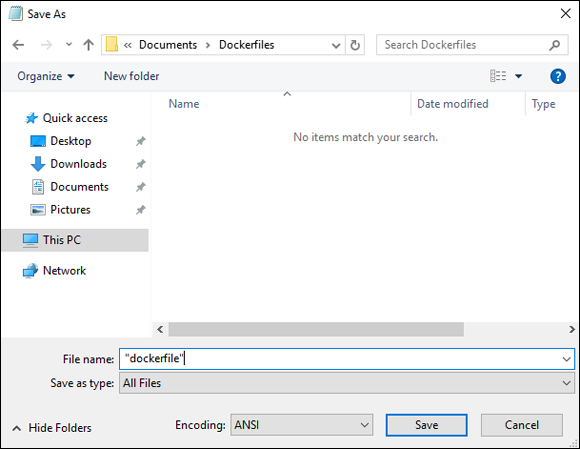
FIGURE 4-1: Creating the dockerfile with no extension in Notepad.
Inside the dockerfile, you'll add the instructions that will be used to build your container. These instructions are shown in Table 4-1.
TABLE 4-1 Docker Instructions
|
Name |
Description |
|
|
Used to specify which container image your image will be built from. |
|
|
Labels are used to organize your objects within Docker. Labels are stored in key-value pairs as strings. |
|
|
Used to run commands within the operating system (OS) like PowerShell, the Command Prompt, or any other executable that can be called. |
|
|
Used to set a default command that will be run any time the container is created and deployed. |
|
|
Copies files or folders from the specified source to the specified destination. The files or folders must be in a location with the dockerfile or relative to it; otherwise, it won't be able to copy. |
|
|
Similar to the |
|
|
Allows you to set your working directory, which may be needed to things with the |
You may be ready to build your first dockerfile. I'll walk you through creating a simple dockerfile that will pull the Windows Server Nano Image and install Internet Information Services (IIS). Then you’ll create a simple “Hello World” style of page that will be placed in the default website.
 The hash symbol (
#)is used to make comments in the dockerfile, which can make it easier to revisit later and make changes if needed.
Open Notepad and type the following, or copy the dockerfile from the GitHub repo for this book, available at https://github.com/sara-perrott/Server2019PowerShell.
# Sets the base container image to Windows Server 2019 Core
FROM microsoft/windowsservercore
# Metadata indicating an image maintainer.
LABEL "version" = "1.0" "Description" = "Core with IIS"
# Use dism.exe to install IIS
RUN dism.exe /online /enable-feature /all /featurename:iis-webserver /NoRestart
# Creates the Hello World file and adds our message to it.
RUN echo "Hello World – I was created from a Dockerfile!" > c:\inetpub\wwwroot\index.html
When you’re ready to create your container from the dockerfile, open PowerShell and navigate to the directory that your dockerfile is saved in. In my case, it’s saved in a folder named dockerfiles. When you're in the correct folder, type the following command:
docker build -t coreiis .
This command creates a container image named coreiis, built from the dockerfile you created. Note that the dot (.) tells it that the dockerfile is in the current directory. You can also put a whole path into the command instead. In Figure 4-2, you can see the commands from the dockerfile as they kick off. Note that I have specified the --isolation=hyperv because my preview release of Windows Server 2019 does not have a matching kernel to the container that was downloaded.
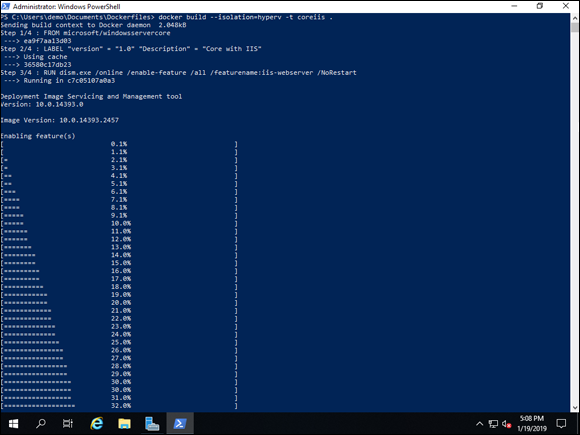
FIGURE 4-2: The docker build command allows you to build a container from the instructions in a dockerfile.
If the container image is not already downloaded, it could take a while to download. At the time of this writing, Server Core is a little over 4GB in size. So, take a break and come back in 15 minutes or so.
Applying Custom Metadata to Containers and Other Objects
When you hear the word metadata in relation to containers, you should automatically think “labels.” You can use labels to organize different kinds of objects in Docker — everything from images and containers to networks and volumes.
A label is a key-value pair. The key of a label is on the left side of the key-value pair and is typically the thing being used to group your objects. For instance, if you've made some special container images for a particular project (and this happens often), you may create a key of Project. The value, which goes to the right side of the key-value pair, would in this case be the name of the project. Let’s call the project “NewApp.” So, the full key-value pair that you would attach to these special container images would be Project = NewApp. Container images can use more than one label so you add a description label with the project stakeholder's name or any other relevant information. The sky’s really the limit on this one.
If your container image’s parent (specified by FROM in the dockerfile) has labels, your container image will inherit the labels that are set on the parent. If you set a newer value for a label that already exists, your newer value will overwrite the existing value.
Labels are created in the dockerfile that you use for your image. In this section, I walk you through how to set labels and how to view labels after they’re set.
Creating labels
Creating labels within the dockerfile is pretty simple. Here is an example based on the scenario I mentioned in the introduction to this section.
Single label
For the example of a single label, the entry in the dockerfile would look something like this:
LABEL "Project" = "NewApp"
Multiple labels
If you wanted to create multiple labels, you can follow the same format as the single label — you just use a space to separate labels:
LABEL "Project" = "NewApp" "Author" = "John Doe" "version" = "1.0"
If you find that your labels are getting too long and are wrapping around the screen, you can increase the readability with the forward slash. This is the same example, just edited to look more readable with the slashes.
LABEL "Project" = "NewApp" \
"Author" = "John Doe" \
"version" = "1.0"
Viewing labels
If you ever want to view what labels are set on a container image, you can type the following:
docker inspect <containername>
This command lists any labels that are associated with the container image. In Figure 4-3, you can view the labels attached to the container image that you created in the dockerfile section of this chapter.
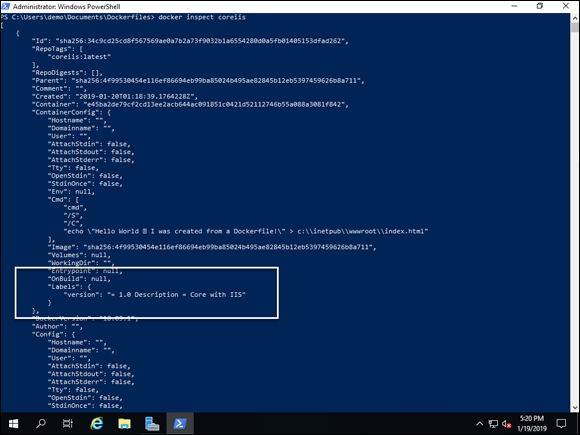
FIGURE 4-3: The docker inspect command allows you to view the metadata of a container image, including the labels that are currently assigned.
Configuring Containers
At this point, you've played with a dockerfile and deployed a container image. There are some other forms of configuration that you may be interested in as well. I cover a few of these topics in this section.
Starting containers automatically
For containers that are running important services, you may want to make sure that they stay up and running. When a container exits, for instance, you can use restart policies to ensure that the container restarts automatically.
To use the restart policy, you need to manually start the container, and that container has to be up for at least 10 seconds. At that point in time, Docker is able to monitor it. You can still manually stop a container, and Docker will not use the restart policy if you’ve stopped a container.
You can tell Docker that you want to use a restart policy with the --restart flag. The command looks something like this:
docker run -dit --restart <policy> coreiis
You’re telling docker to set a restart policy for the coreiis containers, this is the container image you created previously if you’ve been following along. You’ve also specified that it will run in detached mode (-d), keep a connection open even when it is not attached (-i), and create a remote terminal session (-t). There are four different kinds of restart policies, shown in Table 4-2.
TABLE 4-2 Restart Policy Flags
|
Flag Name |
Description |
|
|
Enforces the default behavior in Docker, which is to not automatically restart the container. |
|
|
Great for error handling. If the container exits due to an issue, it will be restarted automatically. |
|
|
Unless you manually stop the container, it will automatically restart if it exits for any reason. |
|
|
Use carefully. The container will automatically restart, even if it was stopped manually by an administrator. |
Limiting a container's resources
This is possibly one of the most important configurations to understand and know how to implement. When you’re running multiple containers on a container host, you may need to limit what resources the container can use. This prevents the container from taking all the resources and potentially starving the other containers or the container host of resources. In the following sections, I show you how to limit both the CPU and memory.
Memory
When you create a container, you can specify the amount of memory that the container is allowed to use with the --memory flag. For instance, to restrict our coreiis containers to 512MB of ram, the command would look like this:
docker run -it --memory 512m coreiis
CPU
CPU can be limited in much the same way that memory can. The flag is --cpus. If you wanted to ensure that your container could only use 1 CPU and 512 MB of RAM, the command would look like this:
docker run -it --cpus 1 --memory=512m coreiis
Configuring the Docker Daemon with daemon.json
The last topic that I want to cover is the configuration file for the Docker daemon, which is the server component of Docker. Modifying this file allows you a great deal of customization, but it's worth noting that at the time of this writing, the daemon.json file for the Docker daemon on Windows Server operating systems does not support all the configuration options available. The configuration options available in the daemon.json file are shown in Table 4-3. Note that you don't need to add all these parameters to the daemon.json file. You only need to add the parameters that you want to make changes to. The daemon.json file is located by default at C:\ProgramData\docker\config\daemon.json.
TABLE 4-3 Allowed Configuration Options in the Windows Docker daemon.json File
|
Parameter |
Description |
|
|
Allows you to specify the name or location of an additional authorization source by name or by the location of its specification file. |
|
|
Allows you to specify specific DNS servers for all the containers. |
|
|
Allows you to set options to use with your DNS servers. |
|
|
Sets the DNS search domain for all the containers. |
|
|
Lets you specify options for runtime execution. |
|
|
Allows you to select which storage driver you would like to use. Windows Server container hosts support either windowsfilter for Windows containers or lcow for Linux containers running on your Windows host. |
|
|
Allows you to set options specific to the storage driver that you've chosen to use. Windowsfilter has one configuration item that can be set with |
|
|
Replaces the labels from the daemon with a new set of labels. |
|
|
The default driver for logs from the containers. |
|
|
Allows you to specify the maximum transmission unit (MTU) that the container network will use. |
|
|
Lets you set the path for the daemon's pidfile. Note: The pidfile contains the process identification (pid) number of the daemon. This allows other programs to locate the process id. |
|
|
Tells Docker where you want to store containers and their images. If this is not used, the default location of |
|
|
Points the container to the system and port it can use to get a certificate to support transport layer security (TLS) communication in the cluster. With the cluster-store-opt flag, you can tell it where the |
|
|
Specifies the IP address and the port number that the daemon should use to advertise itself to a cluster. |
|
|
Will swap the daemon into debug mode if it's set to true. You should only do this if you’re actively troubleshooting an issue. |
|
|
Lets you set the IP address and port number of systems for the Docker daemon to connect to. |
|
|
Allows you to change the logging level of the daemon. Valid values are |
|
|
Uses TLS to verify the remote connection. |
|
|
Tells the daemon which certificate authority it can trust certificates from. |
|
|
Specifies the location of the of TLS certificate file. |
|
|
Specifies the location of the TLS key file. |
|
|
Allows you to change the group used for connections. The default group is docker. |
|
|
Sets the default ulimit for each container. If a ulimit is not specified when a container is built, it will use the setting specified by this parameter. ulimit sets the number of open files allowed at any one time. The default is 1,024 open files in a Docker container. |
|
|
Attaches your containers to a network bridge. |
|
|
Sets the IPv4 subnet for your containers. |
|
|
Ensures that logs have full timestamps and no American National Standards Institute (ANSI) coloring. |
|
|
Lets you select Docker registry mirrors that you want to use. |
|
|
Allows you to communicate with registries that are not considered to be secure. This is typically because they're only listening on HTTP and don’t support TLS, or because they’re using an untrusted certificate. |
 A daemon is a process that runs continuously in the background, whose sole purpose is to fulfill requests from services. Users do not interact directly with a daemon.
Now that you have an idea of which options are available to you, let’s create a simple daemon.json file.
The first thing you’ll need to specify is which port you want Docker to accept incoming communications on. In this example, you don’t care where the connections come from, only the port that they’re coming in on. That line looks like this:
"hosts": ["tcp://0.0.0.0:2375"]
Next, let’s change the storage location for your containers and your images so that it isn’t on the system drive. You need a second slash in the file location, so don’t forget it!
"data-root": "D:\\DockerStuff"
When these items are put together into the json file, they look like this:
{
"hosts": ["tcp://0.0.0.0:2375"]
"data-root": "D:\\DockerStuff"
}
That’s all there is to creating a daemon.json file to configure your Docker daemon. There are a lot of options — the best way to learn is to start playing around, so I encourage you to build out a lab environment and start practicing!