Chapter 5
Managing Container Images
IN THIS CHAPTER
 Making and saving changes to images
 Pushing images to Docker Hub
 Pulling images from Docker Hub
 Image versioning
As you make changes to your container images, you’ll get to the point where you’re happy with where the current container image is and you want to save the changes so that people can simply launch your new container image instead of having to run the image from a dockerfile and configure and tweak the image from there.
In this chapter, I show you how to save changes that you’ve made to your container images. I also explain more about pulling and pushing images to repositories.
Making Changes to Images and Saving the Changes You Make
When you launch containers, you can interact with them on a similar level to a regular system from the command line. You can create users and groups, and you can run PowerShell to install roles and features. After you’ve made these changes, you may decide you don’t need them anymore. The great thing about containers is that when you don’t need them anymore, you can exit out of the container and launch a new one with a fresh container image. But what if you like the changes that you made, and you want to create a new container image that contains those changes? This is where the docker commit command comes in.
The docker commit command creates a new container image that contains all the changes you made from the base container image. When you use the command, you specify the name of the running container that you want to save, and the name of the new container image that you want to create.
In the following sections, I walk you through the steps of creating a Docker container, connecting to the container, making some changes, and then saving the changes.
Create the container
To be able to modify the container, you need to actually create it first. So let's create a container. I’m going to assume that you have Docker installed and have the PowerShell window open.
- At the PowerShell prompt, run the command
docker images. -
Locate the container image you want to use.
In my case, I’ll use the
microsoft/windowsservercoreimage. - Type the following command to create the container and a session to it:
docker run -dit microsoft/windowsservercore - Press Enter.
- When the PowerShell prompt returns, type docker ps and press Enter.
-
Note the name that was assigned to the container, found in the last row.
In my case, the name of the container is
serene_lewin.
You can see the container creation steps in Figure 5-1. Note that I'm using --isolation=hyperv in my command. This is because the kernel of the container that I’m using does not match the kernel of my container host, so I’m having to build this as a Hyper-V container. This will not affect the rest of the instructions.
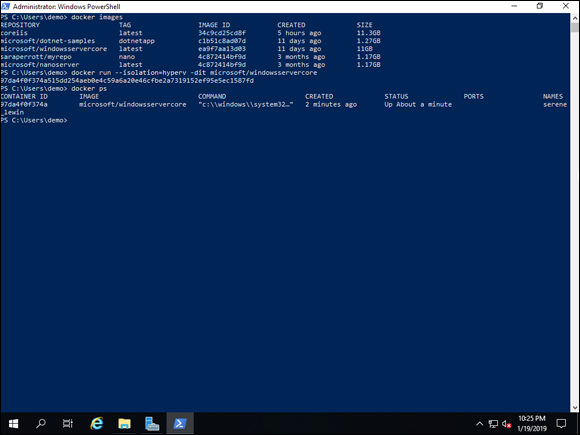
FIGURE 5-1: Creating the container is as simple as identifying the container image and issuing the command to create the container from that image.
Connecting to the container and making changes
Now that you’ve created your container, you’re ready to connect to it to interact with it. You use the docker exec command in this case to connect to the cmd.exe on the container that you just created. You need the name of the container that you took note of in the previous section. The command should look like this:
docker exec -it <containername> powershell.exe
In my case, I'll type the following command:
docker exec -it serene_lewin powershell.exe
After you press Enter, you’re connected to the container. You can validate this by running the hostname command. You get a string of letters and numbers that are randomly generated.
On this container that I’ve run, I want to install Internet Information Services (IIS). So, from inside the container, I’ll run the following PowerShell command:
Install-WindowsFeature Web-Server
After the web server is installed, I’ll type exit and then press Enter, which will drop me back out to the container host. The commands I’ve run in the container are shown in Figure 5-2.
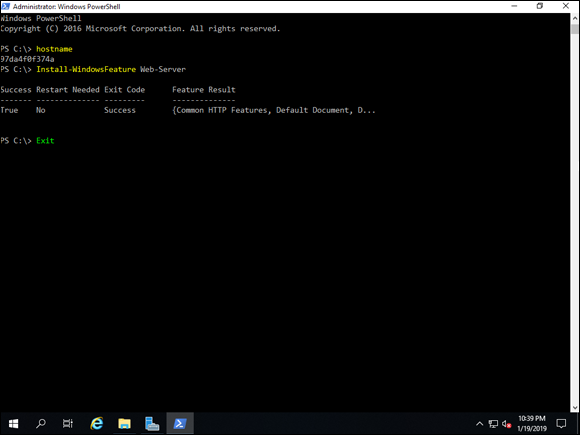
FIGURE 5-2: After you connect to a container, you can make changes to it like adding/removing directories, installing roles and features, and so on.
Saving the changes to the container
Now that you’ve installed IIS, the next step is to save the container as a container image so that you don’t have to repeat these steps the next time you need to launch a Server Core with IIS container.
First, you have to stop the container because you can’t do a commit against a running container in Windows. The command to stop the container is similar to the following:
docker stop <containername>
After the container is stopped, you can do the commit. The command follows the format of:
docker commit <containername> <reponame>:<imagename>
You can see these commands start to finish in Figure 5-3.
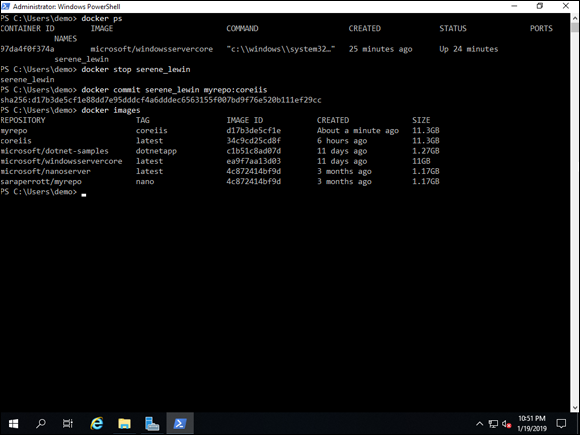
FIGURE 5-3: After you stop the container, you can commit the changes you have made to it.
Pushing Images to Docker Hub
When you issue a docker push command, it’s assumed that you’re targeting Docker Hub unless you specify a different registry. If you ever need to log in to a different registry, you specify the registry address in the docker login command. It would look like this:
docker login some.registry.com:8000
You're prompted for your username and password, and then you’ll be connected.
If you ever need to rename your images to make them suitable to upload to a repository, you can use the docker tag command. For example, when I’m working with a container image, I use short names so that they’re easier to work with. So my container image may be myrepo:coreiis. When I log in to Docker Hub, I need to specify my repository name, which in this case is a combination of my Docker ID and myrepo and then the image name. The command ends up looking like this:
docker tag myrepo:coreiis <dockerid>/myrepo:coreiis
After this is complete, I can push the container image with a simple docker push command. See “Pushing to a repository,” later in this section, to see how to use docker push to push the image to a private or public repository.
Understanding private versus public repositories
On Docker Hub, you're given the option of creating a private repository or a public repository. For both types, you need a valid login to push images, but when you pull images there are differences between the two.
Public repositories don’t require a login to pull an image. You can simply enter the docker pull command with the proper repo and image name and your container image will be downloaded. Private repositories require a valid login before you can view the contents of the repository or pull an image. Private repos are great for businesses who want to store their container images in a repo but don’t want those images to be available to the public. After you log in with the docker login command, you can do a docker pull to download the image. Assuming that you have permissions to pull the container image, it will be downloaded for you.
Pushing to a repository
Pushing to a repository requires a login for a user who is authorized to upload to the repository; this is true of both private and public repositories. You log in, and then you do the docker push command.
To log in to the repo, type the following:
docker login
Fill in your username and your password. After you're logged in successfully, you can push the container image to your repository.
docker push <dockerid>/reponame:imagename
The image in Figure 5-4 shows you what the process looks like from start to finish.
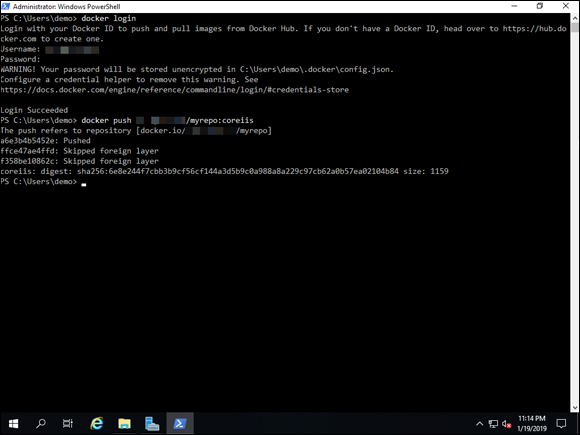
FIGURE 5-4: You can use the docker push command to push to your private repository after you’re logged in.
Pulling Images from Docker Hub
Repositories are a great way to make container images available. You may be making container images available to people in your organization, or you may be taking advantage of repositories set up by other companies like Microsoft. Having a central location for container images makes it far simpler to maintain your images and ensure that your customers are always getting the most up-to-date image from you.
Pulling from a public repository
Pulling from a public repository is one of the simplest things to do. One of the things I love about Docker Hub, especially for people just getting started with container technology is that you can click an image, and you’re presented with the docker pull command to get the container image, as shown in Figure 5-5.
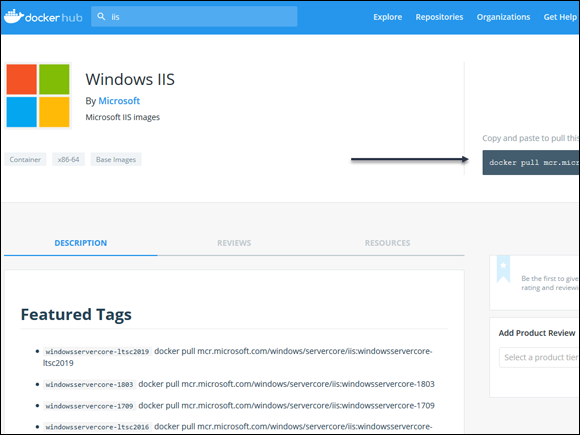
FIGURE 5-5: Docker Hub makes it easy to get started pulling container images because it gives you the pull command in the container image's page.
For instance, the command to pull down a Windows Server Core container with IIS is available to be copied. It looks like this:
docker pull mcr.microsoft.com/windows/servercore/iis
You can copy and paste this directly into the PowerShell window of your Docker container host, and it will pull the container image for you.
Pulling from a private repository
A private repository uses the same commands as a public repository does. The only difference is that you must log in first with the docker login command.
Private repo on Docker Hub
When you don’t specify a registry, it’s assumed that you want to connect to Docker Hub. So you log in with the docker login command; then you do your pull just as you would do with a public repository.
Private repo with a different registry
Because the docker login command assumes that you want to connect to Docker Hub, you need to specify which registry service you want to connect to. You can do that with the docker login command as well, with a slight modification, as follows:
docker login some.registry.com:8000
After that, you can issue the pull command as you normally would and it will be able to successfully pull the image from your repository on the other registry service.
Handling Image Versioning
As you create new versions of your container images, you may want a way to track the version of the container that you're on. One of the most common ways to do this is to utilize tags to track new container image versions. For instance, you may have the first version of your container image in production, and then you need to update a few settings on it. You save the new version of the container image with docker commit, and you want to make sure that people who perform a docker pull get the latest version. This is when you apply a tag to the container image. The syntax of the command is this:
docker tag <image_id> image/tag
Here's how you can tag an image. First, get the image ID number. To get the image ID, you run the docker images command.
docker images
Take note of the image ID. In this case, I’m going to use the container image that has an image ID of 34c9cd25cd8f, which is my coreiis container image. Now tag the image as a v1.0 image:
docker tag 34c9cd25cd8f coreiis:v1.0
Now when you run docker images again, you can see the new tag. This section is shown in Figure 5-6. Using tags for version numbers, build dates, and so on is one of the most common use cases for this feature.
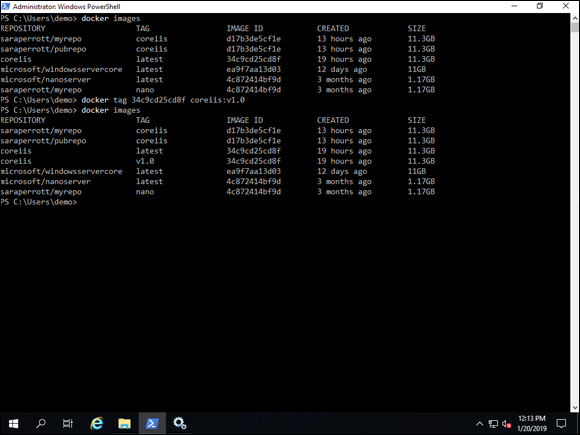
FIGURE 5-6: You can use tags to track version numbers on your container images.