Chapter 6
Container Networking
IN THIS CHAPTER
 Looking at types of network connections
 Viewing your network adapters and virtual switches
 Configuring a NAT network connection
 Configuring a transparent network connection
 Configuring an overlay network connection
 Configuring an l2bridge network connection
 Configuring an l2tunnel network connection
 Connecting to a network
Foundational to most server concepts is networking, and containers are no exception to that. Containers are configured by default to use a Network Address Translation (NAT) connection, but you can change that to customize your container environment.
In this chapter, you learn the ins and outs of container networking, what types of network connections you can make, why you would use them, and how to configure them.
Considering the Different Types of Network Connections
With Windows container networking, there are five different modes that you can use:
- NAT: NAT is the default network mode that is configured for your containers the first time that Docker is run on your system. If a different network is not specified when a container is run, it will be assigned to the NAT network and assigned an IP address from the NAT’s internal IP address range, which is 172.16.0.0/16. The NAT connection is useful when you want a container to be able to communicate with the container host, and potentially the other containers on the host. This is typically used by developers or for home labs.
- Overlay: Overlay networks allow containers to communicate with other containers on other container hosts when the Docker Engine has been configured to run in Swarm mode. Your container host must be at least Windows Server 2016 to use this type of network. Overlay networks are required if you’re using Docker Swarm in a multi-node architecture.
- Transparent: Transparent networks give you a more traditional network connection. Containers are given a connection to an external virtual switch, which allows them to connect and communicate directly over a physical network. Transparent networks are good for developers or for small-scale deployments.
- L2bridge: L2bridge networks are an interesting concept. The containers exist within the same subnet as their container hosts, but they’re also connected to the physical network via an external switch. This type of network is typically used for Kubernetes and for Microsoft Software Defined Networking (SDN).
- L2tunnel: L2tunnel networks are a special case. They work similarly to l2bridge networks, but they’re designed with the Microsoft Cloud Stack in mind and can be used in conjunction with SDN policies. This type of network can only be used in Azure.
Viewing Your Network Adapters and Virtual Switches
When you first log on to your container host, you may want to validate that the virtual switches you expect to have configured are there and that the container networks you need are present as well.
By running the docker network ls command, you can list all the networks that you've defined for your containers. If you haven’t configured any, you’ll see the default NAT connection that is created when the Docker Engine is run for the first time, shown in Figure 6-1.
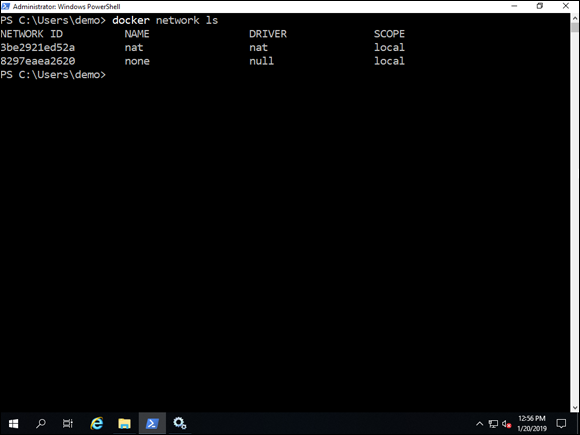
FIGURE 6-1: When you run the Docker Engine for the first time, a NAT network connection is created; by default, all containers are connected to the NAT network connection.
If you want to see the virtual switches that are on the machine currently, you can run the command Get-VMSwitch. If this is a fresh installation, you’ll only have one virtual switch. It’s an internal virtual switch, and it will be named NAT, as shown in Figure 6-2.
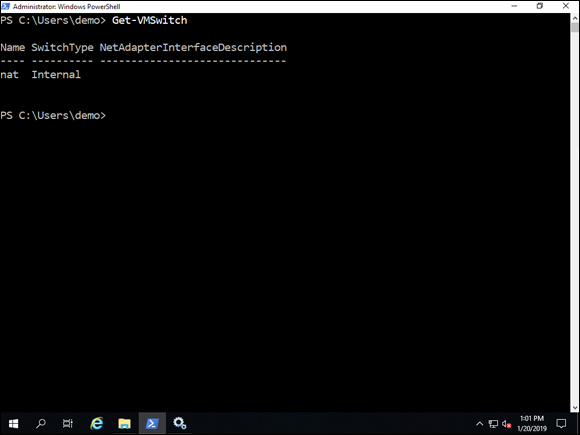
FIGURE 6-2: You can check to see which virtual switches are defined on your container host already by running the Get-VMSwitch command.
Configuring a Network Address Translation Network Connection
The network address translation (NAT) network is the simplest to use because one is created by default. But you're limited to the IP range that Microsoft assigns to it, which is 172.16.0.0/16. That is a very large subnet, and you may want to define a smaller subnet. You can do that when you configure your own NAT. Here’s the command to create the NAT connection:
docker network create -d nat --subnet=<subnet with cidr> --gateway=<network_gwaddress> <nat_network_name>
When you run this command, your NAT connection is created, and you can view it using the docker network ls command, shown in Figure 6-3.
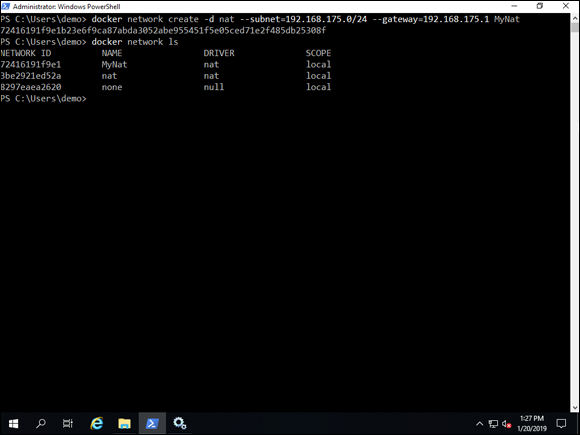
FIGURE 6-3: You can create a NAT network for container hosts with the docker network create command.
In my example, you can see the NAT network called MyNat was created. It was listed after I ran the docker network ls command.
Configuring a Transparent Network Connection
The transparent network connection is similar to the traditional network connection in that your containers can interact directly with the outside world. The command to create a transparent network is simpler than the one used to create a NAT network, because you don't need to define a subnet or default gateway. Here’s the command:
docker network create -d transparent <network_name>
This creates the transparent network and corresponding external virtual switch if you didn’t have one already. The virtual switch is given a random name of letters and numbers (see Figure 6-4).
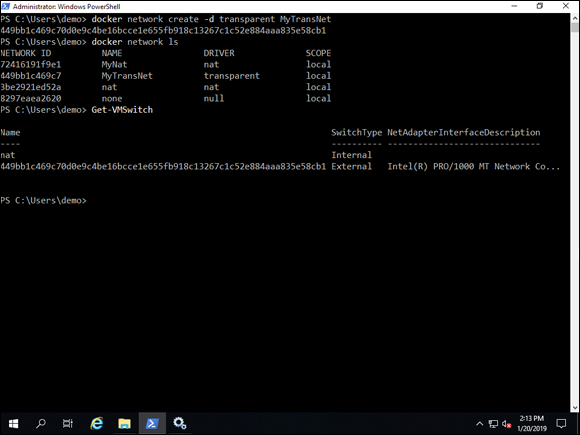
FIGURE 6-4: Creating a transparent network connection automatically creates the corresponding external virtual switch to support the desired communication to outside physical networks.
You can also choose to bind to a specific network interface if you want to control which network adapter your container traffic is able to go through.
docker network create -d transparent -o com.docker.network.windowsshim.interface="net_adpater_name" <network_name>
Configuring an Overlay Network Connection
Overlay networks are used to support container-to-container communication across container hosts when using Docker Swarm. This book does not cover Docker Swarm; just know that it allows system administrators to manage whole clusters of Docker nodes.
docker network create -d overlay <network_name>
To support overlay communications, you need to open the following firewall ports on the container hosts to allow the nodes to talk to one another:
- TCP 2377: Cluster management traffic
- TCP/UDP 7946: Inter-node communication
- UDP 4789: Overlay network communication
Configuring an l2bridge Network Connection
The l2bridge network creates containers within the same subnet as the container host but also allows them to communicate directly to the outside physical network via an external virtual switch. The command is very similar to the NAT command that you used before.
docker network create -d l2bridge --subnet=192.168.1.0/24 --gateway 192.168.1.1 BridgeNet
After you’ve run the command, you can verify that the network connection was created properly by running docker network ls and Get-VMSwitch. These commands show you your new network, as well as your new virtual switch, as shown in Figure 6-5.
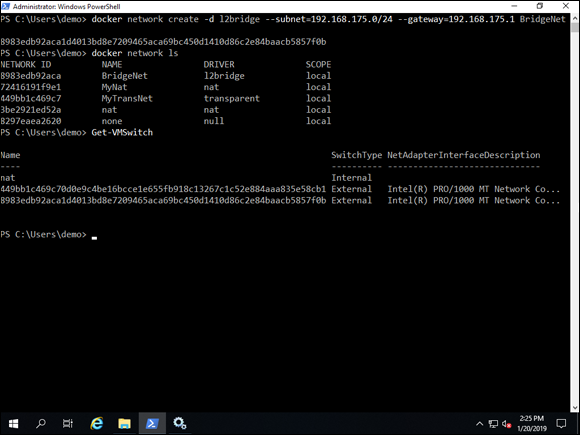
FIGURE 6-5: The creation of the l2bridge is very similar to the creating of the NAT connection in that you must specify a subnet and default gateway for your containers to use.
Configuring an l2tunnel Network Connection
The l2tunnel connection is designed specifically for the Microsoft Cloud Stack and Microsoft Azure. It's similar to l2bridge, but there is one big difference: All of the communication between two containers is sent to the physical Hyper-V host. This is the case regardless of whether there are containers in other subnets or on different virtual container hosts.
Configuring the l2tunnel connection is very similar to creating the l2bridge connection:
docker network create -d l2tunnel --subnet=192.168.1.0/24 --gateway 192.168.1.1 TunnelNet
As usual, you can validate the creation of the new network with docker network ls, and the creation of the new external virtual switch with Get-VMSwitch, shown in Figure 6-6.
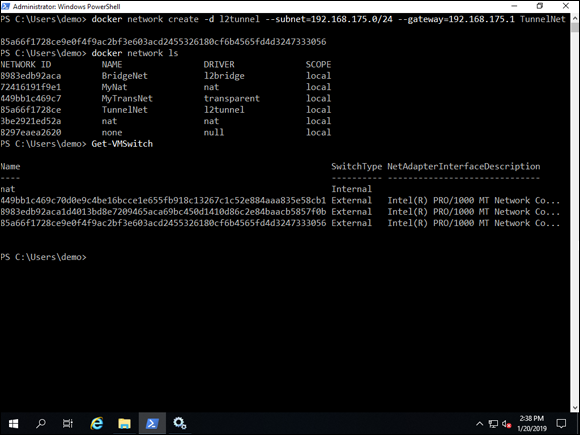
FIGURE 6-6: The docker network create command can be used to create the l2tunnel network and is similar in structure to the l2bridge command.
Connecting to a Network
You can specify which network you want your container to connect to at runtime with the following command:
docker run -d --network=<network_name> <image_name>
This command runs the container in detached mode, which allows it to run in the background, and will connect the container to the network specified in the <network_name> field. The container will be launched from whichever container image was specified by the <image_name> field (see Figure 6-7).
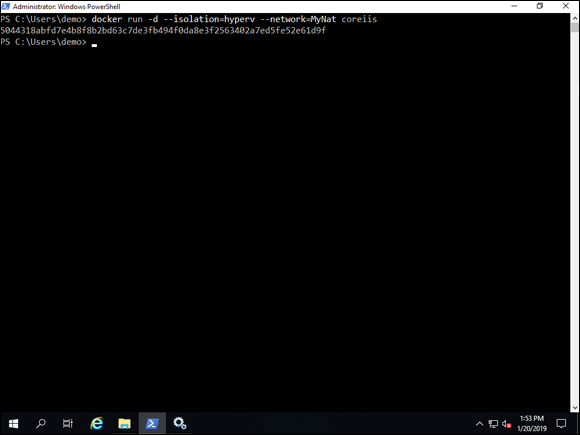
FIGURE 6-7: You can specify your desired network connection at runtime with the --network flag.
Get-VMNetworkAdapter -VMName <container_host_name> | Set-VMNetworkAdapter -MacAddressSpoofing On
 At the time of this writing, it should be noted that encrypted overlay networks are not supported on Windows. If you put a Windows node on an encrypted overlay network, you won’t get any errors — but you won’t get any communication either.
  For some types of network connections, you may have to enable Media Access Control (MAC) spoofing because all the containers may be sharing the host’s MAC address. MAC spoofing allows the virtual machine to change the outgoing packets to a different MAC address than their own. In this case, the virtual machine assigns the MAC address of the container host. The modes that typically require this are transparent and l2bridge (if the container host is a virtual machine). To enable MAC address spoofing on the container host, run the following command: