Chapter 7
Container Storage
IN THIS CHAPTER
 Introducing container storage
 Creating a volume inside of a container
 Working with persistent volumes
The last chapter of this book covers another foundational topic of computing: storage. Creating containers is fine, but sometimes you need to add storage to your individual container images. Maybe you need to create a new volume inside the container, or maybe you just want to add external storage so that the container has a defined area to copy files from when it’s launching from a dockerfile.
This chapter is all about container storage. I cover what kinds of storage are available and why you should (or shouldn’t) use a type of storage with containers.
Getting Acquainted with Container Storage
Storage in Windows containers is referred to as layer storage because the changes being made to a container are a layer on top of the base container image. Layers are stored by default within the image and windowsfilter directories located under C:\ProgramData\docker.
Creating a Volume Inside of a Container
The whole idea of a container is to be a self-contained and easily deployable object that contains all the dependencies to run a particular application. If your application has a dependency that requires its own volume, you can create the volume at run time. This allows you to support the needs of the application and can be used to add additional storage space if needed (which is great if you need to save data from the container to work with later). The volume points to a location on the container host, so the volume doesn't technically live inside the container.
To create a volume inside the container, run the following command.
docker run -it -v <volumepath> <imagename>
This command creates a symbolic link that makes the container think it has a volume named Data under its C: drive, when in fact the volume lives on the container host. You can still interact with the directory just as you normally would. For instance, if I run the following command:
docker run -it -v C:\Data coreiis
Docker will create a container for me based on my coreiis container image and will create a symbolic link (symlink) to the physical location on the host within the container. This is visible by running the dir command inside the container when it launches, as shown in Figure 7-1.
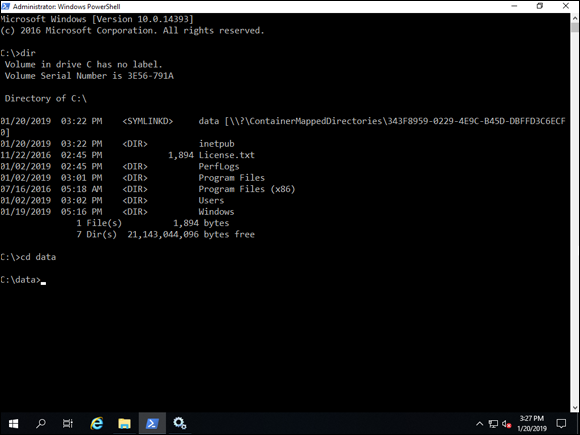
FIGURE 7-1: A symbolic link maps the volume that you created on the container to the physical location on the container host.
The physical location on the host is within Docker's directory. By default, volumes are stored in C:\ProgramData\docker\volumes\volID\_data. As you can see in Figure 7-2, I created the file inside the container while in the symlink C:\Data location, and it appeared on the container host under the _data folder.
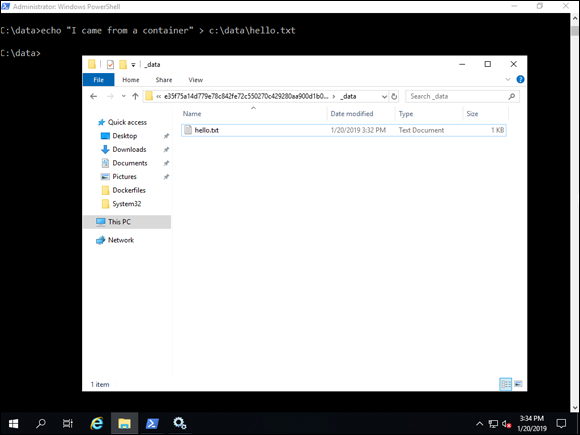
FIGURE 7-2: Volumes created for containers reside on the container host within Docker's directories.
If you need to see which volumes are on the container host, you can always run docker volume ls. To get more detailed information on the volume (like its storage location), you can run docker volume inspect <volumeid>, as shown in Figure 7-3.
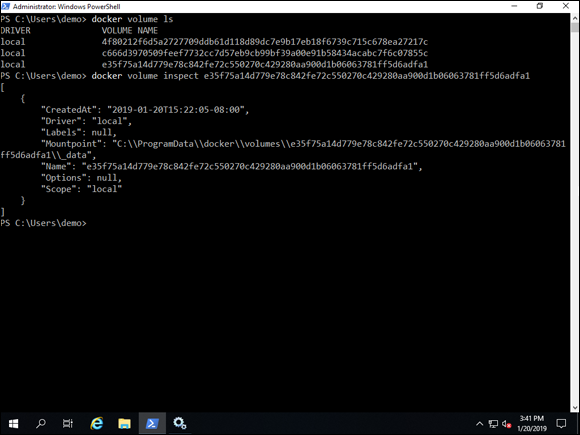
FIGURE 7-3: You can get more information on container volumes with the docker volume ls and docker volume inspect commands.
You may have noticed that if you don't specify names for things, they tend to get long, ugly, auto-generated names. That can make keeping track of volumes difficult because you don’t know what a volume maps to. The good news is, you can choose a name. I recommend the name of the container and the drive letter. In my example, I stuck with MyVolume to demonstrate:
docker run -it -v MyVolume:c:\data coreiis
On the server that the preceding command created, you can see that the symlink looks the same on the container (see Figure 7-4), but now when I check the storage location on the container host, I can see my volume with the name I specified, rather than the long globally unique identifier (GUID) that was assigned to the other volumes.
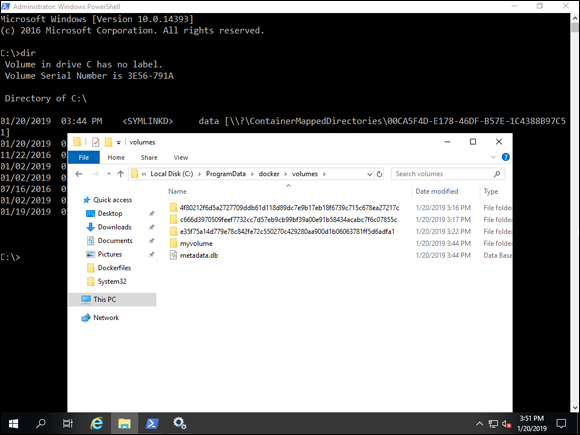
FIGURE 7-4: By using a custom name on my volume, I can more easily know which volume is the one that I just created.
Working with Persistent Volumes
Volumes are the preferred method of making data available to containers. Using persistent volumes can enable multiple containers to potentially share the same volume, and it ensures that the data persists (it’s in the name!) as containers are created or destroyed.
Looking at volume types
There are two types of volumes that you can work with when creating volumes for containers. Volumes can be configured as a bind mounts or as named volumes.
Bind mounts
Bind mounts are great when storage needs the best performance possible. The storage on the host is mounted onto the container. The downside to bind mounts is that they don’t have as much functionality as volumes do.
Note that in the following examples, C:\ContainerData is the actual location on the host that you’re binding the storage to, and C:\Data is where the symlink will be on the container.
By default, bind mounts are read/write enabled so you don't need to do anything other than specify the binding. Here’s an example:
docker run -v c:\ContainerData:c:\data
If you only want the containers to have read access, you must specify that as part of the binding command:
docker run -v c:\ContainerData:c:\data:RO
Figure 7-5 shows an example where I have run both commands. The first command created a read-write binding, and the second created a read-only binding.
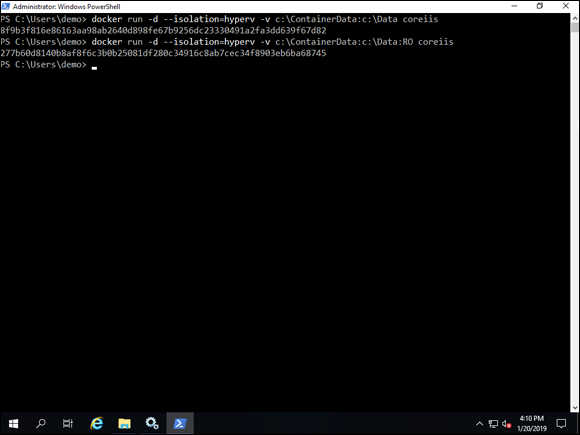
FIGURE 7-5: I’ve created a bind mount at run time for two containers; the first is a read-write binding, and the second is a read-only binding.
Named volumes
Named volumes are the preferred method for storing data outside of containers. Bind mounts are very much dependent on the container host, but named volumes are managed completely by Docker and can be shared across multiple containers.
You can create a named volume without having to start a container at the same time. This is done with the following command:
docker volume create Volume1
When you run a container, you can specify a volume that already exists by name, or if the volume does not exist it will be created. Previously, you created a volume named Volume1, so let’s look at the command to create a container and tell it to use the volume.
docker run -d -v Volume1:\C:\Data coreiis
An example of this method is shown in Figure 7-6 along with a listing of the volumes so that you can see that it used the volume that was created earlier.
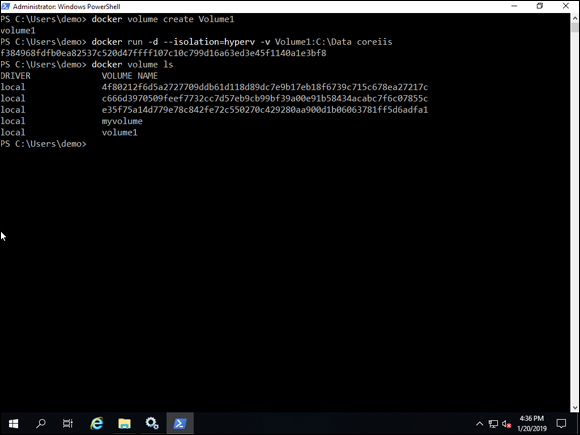
FIGURE 7-6: You can create a container and attach it to a previously created named volume.
Removing volumes
The day will inevitably come when you need to do some cleanup on your container host. One of the cleanup tasks may be to remove volumes that are no longer in use.
You may want to issue the docker volume ls command to see all your volumes first; then you can issue the rm command using the volume name.
The command to remove the volume has the following format:
docker volume rm <volume_name>
So, to remove Volume1 from earlier, I would type the following:
docker volume rm Volume1
 You can change the storage location by putting a data-root entry into the Docker Engine's configuration file,
  Don’t make changes to the layers directly through the file system. You’ll most likely break something. Instead, use the Docker commands (like