Let's follow the steps listed here to display basic shapes in our Qt window:
- First, let's create a new Qt Widgets Application project.
- Open up mainwindow.ui and remove the menuBar, mainToolBar, and statusBar objects so that we get a clean, empty main window. Right-click on the bar widgets and select Remove Menu Bar from the pop-up menu:

- Then, open up mainwindow.h file and add the following code to include the QPainter header file:
#include <QMainWindow>
#include <QPainter>
- Then, declare the paintEvent() event handler below the class destructor:
public:
    explicit MainWindow(QWidget *parent = 0);
    ~MainWindow();
    virtual void paintEvent(QPaintEvent *event);
- Next, open up mainwindow.cpp file and define the paintEvent() event handler:
void MainWindow::paintEvent(QPaintEvent *event) {}
- After that, we will add text to the screen using the QPainter class inside the paintEvent() event handler. We set the text font settings before drawing it on the screen at the position of (20, 30):
QPainter textPainter;
textPainter.begin(this);
textPainter.setFont(QFont("Times", 14, QFont::Bold));
textPainter.drawText(QPoint(20, 30), "Testing");
textPainter.end();
- Then, we will draw a straight line that starts from (50, 60) and ends at (100, 100):
QPainter linePainter;
linePainter.begin(this);
linePainter.drawLine(QPoint(50, 60), QPoint(100, 100));
linePainter.end();
- We can also easily draw a rectangle by calling the drawRect() function using a QPainter class. This time, however, we also apply a background pattern to the shape before drawing it:
QPainter rectPainter;
rectPainter.begin(this);
rectPainter.setBrush(Qt::BDiagPattern);
rectPainter.drawRect(QRect(40, 120, 80, 30));
rectPainter.end();
- Next, declare a QPen class, set its color to red, and set its drawing style to Qt::DashDotLine. Then, apply the QPen class to QPainter, and draw an ellipse shape at (80, 200) with a horizontal radius of 50 and a vertical radius of 20:
QPen ellipsePen;
ellipsePen.setColor(Qt::red);
ellipsePen.setStyle(Qt::DashDotLine);

QPainter ellipsePainter;
ellipsePainter.begin(this);
ellipsePainter.setPen(ellipsePen);
ellipsePainter.drawEllipse(QPoint(80, 200), 50, 20);
ellipsePainter.end();
- We can also use the QPainterPath class to define a shape before passing it over to the QPainter class for rendering:
QPainterPath rectPath;
rectPath.addRect(QRect(150, 20, 100, 50));

QPainter pathPainter;
pathPainter.begin(this);
pathPainter.setPen(QPen(Qt::red, 1, Qt::DashDotLine, Qt::FlatCap, Qt::MiterJoin));
pathPainter.setBrush(Qt::yellow);
pathPainter.drawPath(rectPath);
pathPainter.end();
- You can also draw any other shapes by using QPainterPath, such as an ellipse:
QPainterPath ellipsePath;
ellipsePath.addEllipse(QPoint(200, 120), 50, 20);

QPainter ellipsePathPainter;
ellipsePathPainter.begin(this);
ellipsePathPainter.setPen(QPen(QColor(79, 106, 25), 5, Qt::SolidLine, Qt::FlatCap, Qt::MiterJoin));
ellipsePathPainter.setBrush(QColor(122, 163, 39));
ellipsePathPainter.drawPath(ellipsePath);
ellipsePathPainter.end();
- QPainter can also be used to draw an image file onto the screen. In the following example, we load an image file called tux.png and draw it on the screen at the (100, 150) position:
QImage image;
image.load("tux.png");

QPainter imagePainter(this);
imagePainter.begin(this);
imagePainter.drawImage(QPoint(100, 150), image);
imagePainter.end();
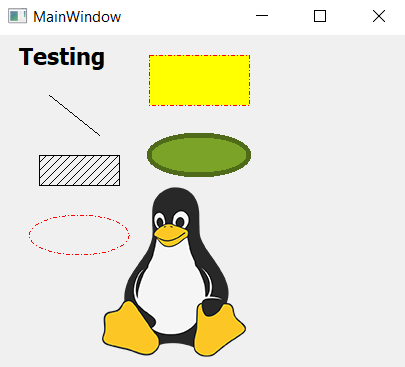
- The final result should look something like this: