Let's get started by following these steps:
- Create a new Qt Quick application – Empty project and open up qml.qrc with Qt Creator. Add six images, home.png, map.png, profile.png, search.png, settings.png, and arrow.png to the project as follows:

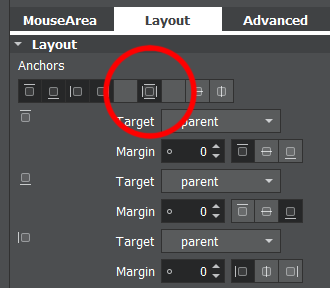
- After that, create and open MainForm.ui.qml as we did in all previous examples. Drag a List View widget from under the Qt Quick – Views category in the Library window onto the canvas. Then, set its Anchors setting to fill the parent size by clicking on the button located in the middle of the Layout window as shown in the following screenshot:
- Next, switch over to the script editor, as we will define what the list view will look like as follows:
import QtQuick 2.9

Rectangle {
    id: rectangle1

    property alias listView1: listView1
    property double sizeMultiplier: width / 480
- We will continue to write the code by adding the list view as follows:
    ListView {
        id: listView1
        y: 0
        height: 160
        orientation: ListView.Vertical
        boundsBehavior: Flickable.StopAtBounds
        anchors.fill: parent
        delegate: Item {
            width: 80 * sizeMultiplier
            height: 55 * sizeMultiplier
- We will continue to add rows to the list view as follows:
            Row {
                id: row1
                Rectangle {
                    width: listView1.width
                    height: 55 * sizeMultiplier
                    gradient: Gradient {
                        GradientStop { position: 0.0; color: "#ffffff" }
                        GradientStop { position: 1.0; color: "#f0f0f0" }
                    }
                    opacity: 1.0
- We then add a mouse area and an image as shown in the following code snippet:
                    MouseArea {
                        id: mouseArea
                        anchors.fill: parent
                    }
                    Image {
                        anchors.verticalCenter: parent.verticalCenter
                        x: 15 * sizeMultiplier
                        width: 30 * sizeMultiplier
                        height: 30 * sizeMultiplier
                        source: icon
                    }
- Then, continue to add two text objects as follows:
                    Text {
                        text: title
                        font.family: "Courier"
                        font.pixelSize: 17 * sizeMultiplier
                        x: 55 * sizeMultiplier
                        y: 10 * sizeMultiplier
                    }
                    Text {
                        text: subtitle
                        font.family: "Verdana"
                        font.pixelSize: 9 * sizeMultiplier
                        x: 55 * sizeMultiplier
                        y: 30 * sizeMultiplier
                    }
- After that, add an image object as follows:
                    Image {
                        anchors.verticalCenter: parent.verticalCenter
                        x: parent.width - 35 * sizeMultiplier
                        width: 30 * sizeMultiplier
                        height: 30 * sizeMultiplier
                        source: "arrow.png"
                    }
                }
            }
        }
- Using the following code, we will then define the list model:
        model: ListModel {
            ListElement {
                title: "Home"
                subtitle: "Go back to dashboard"
                icon: "home.png"
            }

            ListElement {
                title: "Map"
                subtitle: "Help navigate to your destination"
                icon: "map.png"
            }
- We will continue to write the code:
            ListElement {
                title: "Profile"
                subtitle: "Customize your profile picture"
                icon: "profile.png"
            }

            ListElement {
                title: "Search"
                subtitle: "Search for nearby places"
                icon: "search.png"
            }
- We will now add the final list element, as shown in the following code:
            ListElement {
                title: "Settings"
                subtitle: "Customize your app settings"
                icon: "settings.png"
            }
        }
    }
}
- After that, open up main.qml and replace the code with the following:
import QtQuick 2.9
import QtQuick.Window 2.3
Window {
    visible: true
    width: 480
    height: 480
    MainForm {
        anchors.fill: parent
        MouseArea {
            onPressed: row1.opacity = 0.5
            onReleased: row1.opacity = 1.0
        }
    }
}
- Build and run the program, and now your program should look like this:
