Chapter 14
Saving and Printing Images

You can save your images so that you can use them in another application or on the web. You can also print your images to have a hard copy of your work. This chapter shows you how.
Save an Image for Use in Another Application
Add Descriptive and Copyright Information
Save in the Photoshop Format
You can save your image in Photoshop’s native image format. This format enables you to retain multiple layers in your image, if it has them. This is the best format in which to save your images if you still need to edit them. Because saving in Photoshop’s native image format retains all of Photoshop’s information about the image file, it results in a much larger file size than saving in a compressed format, such as JPEG or GIF.
Photoshop PDF and TIFF files also support multiple layers.
Save in the Photoshop Format

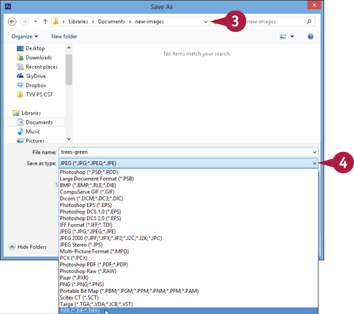
 Click File.
 Click Save As.
A If you have named and saved your image previously and just want to save changes, you can click File and then Save.
The Save As dialog box opens.

 Click here (
 ) to choose a folder in which to save the image file.
 Click here () to choose the Photoshop file format.

 Type a name for the image file.
Photoshop automatically assigns a .psd extension if you do not specify an extension.
B To save a copy of the file and keep the existing file open, you can click As a Copy ( changes to
  ).
).
C To merge the multiple layers of your image into one layer, you can click Layers ( changes to ).
 Click Save.
The Photoshop Format Options dialog box opens.

 Click OK to make sure your image is compatible with other applications.
Photoshop saves the image file.
D The name of the file appears in the image’s title bar.
TIP
What are the shortcuts for saving an image in Photoshop?
You can use several keyboard commands to save your image.
|
Command |
Windows Shortcut |
Mac Shortcut |
|
Save |
|
|
|
Save As |
|
|
|
Save for Web |
|
|


Save an Image for Use in Another Application
You can save your image in a format that can be opened and used in other imaging or page layout applications. If you are working with images that will be used in flyers or other printed material, you may need to use the TIFF or EPS format. TIFF (Tagged Image File Format) and EPS (Encapsulated PostScript) are standard printing formats that many applications on both Windows and Mac platforms support.
BMP, or bitmap, is a popular Windows image format. Most image formats — with the exception of Photoshop PSD, Photoshop PDF, Large Document, and TIFF — do not support layers.
Save an Image for Use in Another Application

Click File.
Click Save As.
The Save As dialog box opens.
Click here () to choose a folder in which to save the image file.
Click here () to choose a file format.
If you are saving a multilayer image and you select a file format that does not support layers, an alert icon appears. Photoshop saves a flattened copy of the image.
Note: See the previous section, “Save in the Photoshop Format,” to save a multilayer image. For more on flattening, see Chapter 8.

Type a filename.
Photoshop automatically assigns an appropriate extension for the file format, such as .tif for TIFF or .eps for EPS, if you do not specify an extension.
Click Save.
A dialog box opens with options specific to the format in which you are saving — the TIFF format, in this example.

Click OK.
Photoshop saves the image.
If a flattened copy is saved, the original multilayer version remains in the image window.
Save an Image for the Web
You can save a file for the web in one of a number of formats. These formats shrink the file size of images so that they can be efficiently transmitted online. When saving for the web in Photoshop, you can also resize the dimensions of your image.
The JPEG — Joint Photographic Experts Group — format is the preferred web format for saving photographic images. Many digital cameras also use it for saving their photos. If you are saving a nonphotographic image, such as a line drawing or illustration with lots of solid color, consider saving your image in the GIF or PNG-8 formats. See the tips for more details.
Save an Image for the Web

Click File.
Click Save for Web.
The Save for Web dialog box opens.

Click the 2-Up tab to view original and optimized versions of your image.
Click here to select the optimized version.
Click here () to choose a file format.
This example shows a photo saved in the JPEG format.

Select optimization settings to specify a quality and file size for your image. The higher the quality setting, the larger the resulting file size.
A You can resize the resulting image by typing dimensions or a percentage in the Image Size settings.
Check that the file quality and file size are acceptable in the preview pane.
 Click Save.
The Save Optimized As dialog box opens.

 Click here () to choose a folder in which to save the file.
 Type a filename.
Photoshop automatically assigns the correct extension if you do not specify an extension.
 Click Save.
Photoshop saves the image file, and the original image file remains open.
Add Descriptive and Copyright Information
You can store title, author, description, and copyright information with your saved image. You may find this useful if you plan on publishing the images online and want them to retain information about their source.
Some image-editing applications — such as Photoshop — can detect copyright information in an image and display it when the image is opened. Copyright laws give the creators of images certain rights to exclusively publish and distribute their works. Adding appropriate information to your images is one way to help protect your work.
Add Descriptive and Copyright Information

Click File.
Click File Info.
The File Info dialog box opens.

Type title and author information for the image.
Type a description for the image.
Type keywords for the image.

Click here ( ) to choose a copyright status.
Type a reference web address for the image.
Click OK.

A If you mark the image as copyrighted, Photoshop places a copyright symbol in the title bar.
To save the image, see the other sections in this chapter.
Save a Sliced Image
You can save an image that has been partitioned with the Slice tool. Photoshop saves the slices as separate images and also saves an HTML file that organizes the slices into a web page. Slices enable you to save different parts of an image as JPEGs, GIFs, or PNGs. This can result in a smaller overall file size for the image.
When deciding what format to use for each slice, remember to consider how the slices will look as a whole. If some slices are compressed more than others, you could see a visible difference between parts of your page.
Save a Sliced Image

Open your sliced image.
Note: For more on using the Slice tool, see Chapter 4.
Click File.
Click Save for Web.
The Save for Web dialog box opens.

Click the Optimized tab.
Click the Slice Select tool ( ).
).
Click one of the image slices.
Specify the optimization settings for the slice.
Repeat steps 6 and 7 for each of the slices.
Click Save.
The Save Optimized As dialog box opens.

In Windows, click here () to choose a folder in which to save the file.
On a Mac, use the Where pop-up menu or the File Browser to choose a folder.
In Windows, click here () to choose HTML and Images as the file type.
On a Mac, click the Format pop-up menu ( ) and then choose HTML and Images.
 Type the name of the HTML file that will organize the slices.
Photoshop saves the images by appending slice numbers to the original image name.
 Click Save.
You can access the HTML and image files in the folder that you specified in step 10.

A The image files are saved in a separate images subfolder.
B To view the web page, you can double-click the HTML file. The file opens in a web browser.
Print by Using a PC
You can use your printed images in many creative ways. You can print copies of your Photoshop images to paper on a PC by using an inkjet, laser, or another type of printer. You can then frame your photos or add them to a physical photo album. You can also print your images onto stickers, or onto transfer paper which can then be applied to shirts or other items.
You can preview your printout — as well as adjust the size and positioning of your printed image — before printing.
Print by Using a PC

Make sure the layers you want to print are visible.
Note: The visibility icon ( ) means that a layer is visible. For more on layers, see Chapter 8.
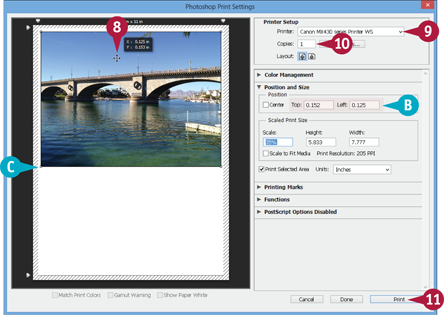
Click File.
Click Print.
A To quickly print a single copy without previewing, you can click Print One Copy.
The Photoshop Print Settings dialog box opens.

Type a percentage in the Scale box to shrink or enlarge the image.
To print only a selected area of the image, click Print Selected Area ( changes to ).
Handles appear around the page.
You can drag the handles ( ) to select the area to be printed.
Click Center to allow repositioning of the image ( changes to ).
Click and drag in the image window to reposition the image on the page.
B You can position your image precisely by typing values in the Top and Left fields.
C You can click and drag the handles ( ) on the image corners to scale the image by hand.
Click here () to choose a printer.
Type the number of copies to print.
Click Print.
The Print dialog box appears.

D You can set printer-specific options from the settings that appear.
Click Print.
Photoshop prints the image.
TIPs
How can I maximize the size of my image on the printed page?
In the Print dialog box, you can click Scale to Fit Media ( changes to ) to scale the image to the maximum size given the current print settings.
How can I print my image on a page in landscape orientation?
In landscape orientation, a rectangular piece of paper has its longer edge oriented horizontally. In the Print dialog box, you can click  to print in landscape orientation rather than the usual portrait orientation, which is with the longer side vertical.
Print by Using a Mac
You can print your Photoshop images in color or black and white on a Mac by using an inkjet, laser, or another type of printer. You can then frame your photos or add them to a physical photo album. Just as with a PC, you can print your images onto stickers, or onto transfer paper which can then be applied to shirts or other items.
You can preview your printout — as well as adjust the size and positioning of your printed image — before printing.
Print by Using a Mac

Make sure the layers you want to print are visible.
Note: The visibility icon () means that a layer is visible. For more on layers, see Chapter 8.
This example has a single Background layer.
Click File.
Click Print.
A To quickly print a single copy without previewing, you can click Print One Copy.
The Photoshop Print Settings dialog box opens.
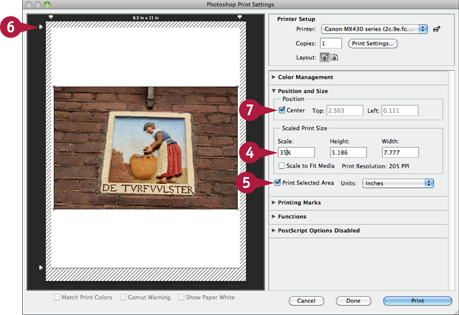
Type a percentage in the Scale box to shrink or enlarge the image.
To print only a selected area of the image, click Print Selected Area ( changes to
  ).
).
Handles appear around the page.
You can drag the handles () to select the area to be printed.
Click Center to allow repositioning of the image ( changes to ).

Click and drag in the image window to reposition the image on the page.
B You can position your image precisely by typing values in the Top and Left fields.
C You can click and drag the handles () on the image corners to scale the image by hand.
Click here () to choose a printer.
Type the number of copies to print.
Click Print.
The standard Mac print dialog box opens.
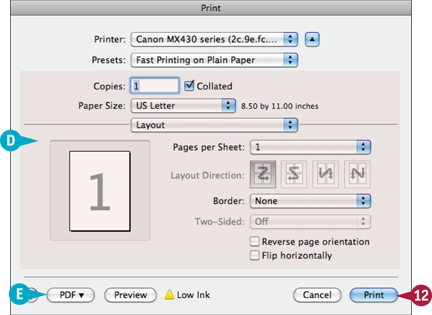
D You can set printer-specific options from the pop-up menus that appear.
Note: See the tip for re-creating a group of printer settings to make future print session setups fast and easy.
E You can optionally print to a PDF file by clicking here and selecting an option.
Click Print to print the image.