Chapter 1: Understanding Blacksmithing Basics
A Brief History of Blacksmithing
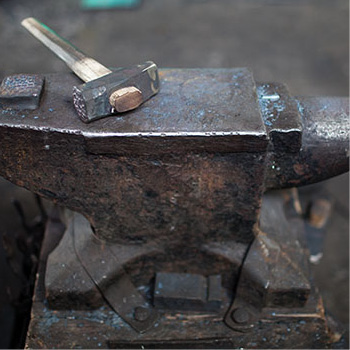
For new blacksmiths, knowing how our craft has evolved is extremely important in helping you set up your first forge without a lot of cost and time spent looking for materials. Ask a number of blacksmiths from around the world what the tools in a blacksmith’s forge should look like, and you will get a dozen different answers. This is because, over time, blacksmithing tools have evolved differently in different parts of the world. Ask a North American or European smith what an anvil should look like, and he or she will describe a stereotypical London-pattern anvil with a horn and a heel, straight from the cartoons. At the same time, an Asian smith may say that it is simply a square block of steel. If you went back to the Middle Ages, a European smith would give you the same answer as the Asian smith. Go back even further and any smith would point to a large, flat rock.
Today, beginner Western blacksmiths get caught up trying to find a London-pattern anvil, thinking that it is the only style of anvil that will work. This often leads to frustration, which can further lead a blacksmith to either purchase an inferior cast-iron anvil from the local welding shop or spend too much money when a simple block of steel would work. Others will spend more time looking for a good piece of railway steel, which has become the ubiquitous makeshift beginner anvil. I have used everything from Peter Wright and Hay-Budden anvils to simple steel cutoffs and hydraulic shafts stood on end. The railway anvils I have used are often as bad as cast iron because they don’t have the proper mass underneath the hammering surface to support heavy forging, instead flexing and absorbing too much of your hammer’s blow.

I discuss in more detail what to look for in an anvil in a later chapter, but I feel that a little blacksmithing history will help you choose your tools more easily—along with the understanding that it isn’t the tools that make you a blacksmith, but rather the techniques. Blacksmiths’ tools have changed with the need for and availability of fuel, iron, and science. Your forge can be the same: an evolution based on necessity and availability.
By around 1200 BC, iron was becoming the principal metal for tools and weapons, with some overlapping of the Bronze Age. Prior to this time, iron artifacts were scarce as different cultures experimented with the newly discovered technology. While iron is stronger and makes longer lasting tools, it was slow to become a commonly used metal—and eventually overtake bronze—because it was more difficult to produce iron from its rock ore, and it needed higher temperatures to work. Eventually, civilizations advanced their iron-smelting technologies and began using iron for more items, including art. Iron improved a society’s production, agricultural, and warfare abilities, and the blacksmith was considered the king of craftsmen because he created the tools for all other trades.
Each area of the world started forging iron with similar tools, likely either rocks or bronze hammers and the same anvils or boulders that they had been using to work bronze and copper. Until relatively recently, in the grand scheme of things, blacksmiths used blocks of steel or stake anvils and hammers that were fairly similar. Around the 1600s, Western European blacksmiths began to develop an anvil shape that most smiths are familiar with: the London or Continental pattern anvil. Unfortunately, this change from centuries past creates many issues for new blacksmiths today because usable antique anvils are hard to find and can be expensive, while good-quality new anvils are even more expensive. All the while, the original anvil shape—a simple block of steel—sits in the scrap yard, waiting to be melted down and recycled.
The forge is another part of the blacksmith’s shop that has changed significantly over the past centuries, both in design and in fuel source. An early forge was simply a fire pit fueled by charcoal, and the air supply was likely a pair of leather sacs opened and closed by the blacksmith’s assistant, with a wooden or reed pipe connecting the bellows to the fire pit. Over time, this side-draft forge was raised off the ground, and different styles of bellows evolved in different regions.
Eventually, as coal became a more prevalent fuel, bottom-blast forges with blast pipes (tuyeres), known as duck-nest tuyeres, became more common and were often sold in mail-order catalogs. Modern blacksmiths now have access to other forge fuels, such as propane and acetylene, as well as electric induction. Later in the book, I will go deeper into the different forge fuels and how to make your own charcoal so that you don’t waste time and money trying to find and buy blacksmithing coal.
Historically, blacksmiths forged pure iron, known as wrought iron. Wrought iron was created from iron ore with very little added carbon. These days, it is difficult to purchase pure wrought iron, so most blacksmiths use what is known as mild steel, a low-carbon steel alloy. Because of this, many smiths use the term “iron” for mild steel because it has replaced pure wrought iron as the most common metal for blacksmithing. This terminology allows for a differentiation between steel, which has enough carbon to harden properly for tools, and mild steel, which will not harden. Because you will be making your own tools for the forge and around the house and farm, this is an important distinction.
Now that you are armed with a brief history of what tools and fuels blacksmiths commonly used in the past, we can move on to understanding how metal moves. Once you understand how metal behaves when it’s forged, you can find many unconventional tools in scrap yards, just like the blacksmiths of old had to.
Same Techniques, Different Times
Did You Know?
The Physics of Moving Metal
Before we get into finding tools and the actual techniques of blacksmithing, it will be helpful to look at how iron behaves when forged, so that we can start to understand how the variously shaped tools move metal. By learning how shapes, rather than specific tools, move metal, your eyes will be opened as you wander through your local scrap yard. In my experience, most beginning blacksmiths end up reading a beginner’s blacksmithing book that leads off with a description of the tools in a typical post-1800s blacksmith shop that used coal—and then the new blacksmith spends all of his or her time searching for the tools in the book. Instead, new blacksmiths need to understand how metal can be controlled and then find the tools that have the shapes to do it. This makes setting up a shop much easier.
The great thing about iron is its immense strength when cool and its plasticity at higher temperatures—if you heat iron hot enough in a fire, it moves like clay and can be molded easily by a hammer and anvil. Because hot iron moves like clay, a great way to practice without wasting metal is to chill modeling clay in a refrigerator and then shape it into rods of “iron” to forge.
The tools that you use as a blacksmith have two types of shapes: shapes that force metal outward uniformly or shapes that move metal in two directions. Shapes that are uniform in all directions, such as a full-faced hammer or the peen on a ball-peen hammer, push the metal out in all directions. A fuller is any wedge-shaped tool that pushes the metal in two directions.
The thickness of the metal under your hammer affects how far the force of your hammer blow will penetrate. The force of your blow slowly dissipates as it travels through the metal. You will notice this effect when drawing or tapering thicker pieces of iron because the surface moves more than the center, leading to “fish lips,” as they are known in blacksmithing circles. To combat this effect, either the metal needs to be hotter, you need to use a heavier hammer, or you need to use a fuller to increase the amount of force per inch.
Blacksmithing is all about controlling how the metal moves so that you can make the most of the short time during which it’s hot enough to forge safely. Now that you understand how metal reacts to your tools, you will need to learn another skill to become a proficient blacksmith: hammer control.
Controlling Metal’s Movement

Your hammer face pushes the metal in all directions, as shown, while a fuller pushes the metal in only two directions.
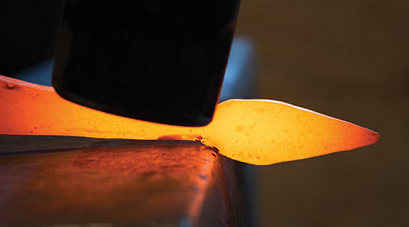
An efficient blacksmith makes the most out of his or her tools. The corners of your hammer and anvil create fullers to move the iron lengthwise rather than spreading it. They can also be used to isolate metal, as shown.
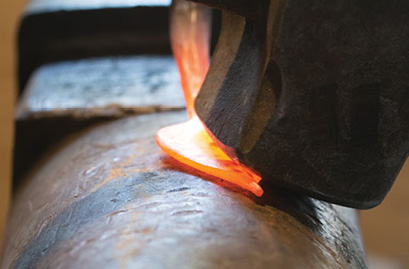
You can use a curved shape, like the horn of an anvil, to make the metal wider than it is long. This is very important when making leaf-shaped elements.
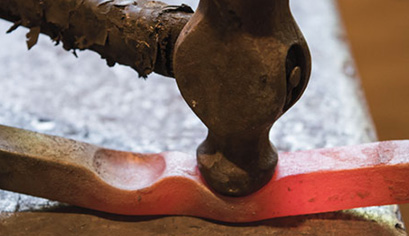
This is an exaggeration of what your hammer face does on the flat of the anvil, spreading the metal inefficiently in all directions. You’d then need to correct either the width or length, depending on the project, with heat and hammer blows.
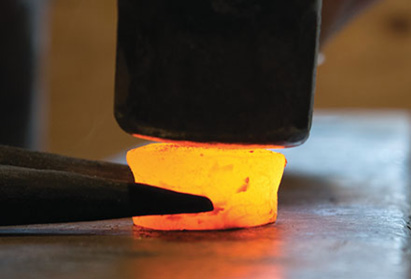
The force of your blow dissipates as it travels through the metal so that the metal closest to the point of contact spreads faster.
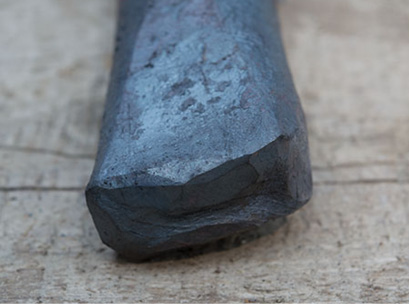
Because the force of your blow dissipates as it travels into the metal, beware of “fish lips” when working thicker pieces of metal because they can become cold shuts once you taper the metal down.
Hammer Control
You may find it strange to be discussing hammer control before setting up your shop, but I want it to be at the forefront in your mind, along with how metal moves under various shapes. New blacksmiths often get caught up in the need for special tooling and jigs, blaming a lack of jigs when they can’t make repetitive pieces, all the while forgetting that they need to practice their hammer control. A blacksmith needs to be efficient with his hammer to forge iron successfully for any length of time.
All blacksmiths are prone to developing repetitive-strain injuries in the hands, elbows, and shoulders of their hammer arms. On top of that, time is money—for blacksmiths, in the form of increased fuel costs. You need to maximize your productivity every time the iron is hot so you won’t need to spend time waiting for the iron to reheat.
Forging iron utilizes different hand-eye coordination than most people are used to, and you need to be precise to be efficient and end up with a good-looking project. Time spent practicing your hammer control comes back in spades when you are actually forging. I was fortunate enough to have grown up helping my father in construction, so I made a natural switch from hammering nails to hammering hot iron.
Traditionally, blacksmith apprentices were given repetitive tasks, such as making nails, to develop their hammer control when they were ready to begin learning to forge. Blacksmiths today can also practice hammering in nails with a hammer (try working up to using the rounded end of a ball-peen hammer) or making nails like they did in days gone by. The important thing is to focus on improving your hammer control, not just making projects. Too often, I see new smiths become frustrated that their projects don’t look as nice as those made by experienced smiths, but they won’t focus on their hammer control. Of course, it comes with practice, but only if you work at perfecting it; otherwise, you will be doomed to keep making the same mistakes (although you will become very good at those mistakes, I must say!).
What many smiths don’t realize is how many different tool shapes you have with a standard hammer and any anvil, including a block of steel. Once you learn proper hammer control, you won’t need to spend time making or using a fuller to move your metal efficiently—you’ll just use your hammer and anvil (although a few different fullers and other tools will make your life a lot easier). In fact, I made all of the projects in this book with minimal tooling.
I hope you’ve gained a basic understanding of how blacksmithing has evolved through the years and how metal responds to different tool shapes. Armed with this knowledge, it will be much easier for you to find blacksmithing tools, regardless of whether you are setting up your first shop or simply adding to your tool collection like every good smith does.
Hammer Control Begins with the Handle
Prep for Success
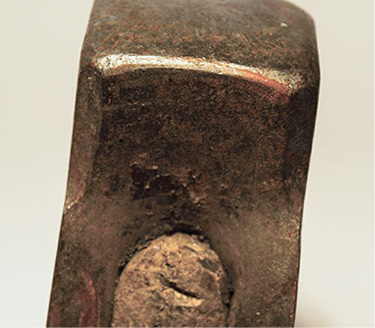
Hammer-Swing Ergonomics
The Many Fullers of a Hammer and Anvil
