Chapter 5: Advanced Blacksmithing Techniques
Now we that we’ve covered the more basic blacksmithing techniques, we can move on to some of the more advanced techniques.
Forge Welding
Forge welding is the most mystical part of blacksmithing—there is just something about those spraying sparks that grabs the attention of aspiring blacksmiths as well as everyone who sees a blacksmith at work. Forge welding is also one of the most common frustrations for novice blacksmiths who are trying to progress in the craft. One of the most common reasons that a beginner blacksmith has trouble with forge welding is that he or she is not getting the iron hot enough to weld. Familiarize yourself with the different temperature colors and make sure that your forge can burn steel of the size with which you are working. If it can’t, you need to look at your fire control or fuel source; rarely do problems occur because of a lack of air supply, although I have known a few mice who’ve decided to nest in a blower duct.
Forge welding is difficult to explain and also difficult to try the first time, but once you get it, you’ll wonder why it took so long to figure out. While, as I mentioned, one of the main obstacles in forge welding is that blacksmiths tend to underheat the metal, it’s just as common for a blacksmith to get overzealous and burn the metal. To forge weld, you need to heat the metal until it is almost molten and fuse the pieces by hammering them together. The metal needs to be clean—not oxidized—because scale prevents welding.
For proper heating, you need a good firebed that is free of clinker. Clinker robs heat from the fire, forcing you to add more air to get the fire hot enough, which increases the amount of scaling in the weld by increasing the height of the oxidizing layer of the forge. That being said, you can weld in a dirty fire with practice and proper fire control.
Because you need to force the metal together when forge welding, and because you will experience some iron loss from the high heat, you must upset the weld area to account for these losses. For a clean-looking weld, taper the edges so that they blend in seamlessly. The process of upsetting and tapering the edges is known as scarfing. A proper scarf is convex so that the flux and scale don’t get trapped and prevent the weld. The scarf is also important to minimize the amount of metal that ends up in a shearing plane that won’t forge weld together. Forge welding fuses only parallel, not perpendicular, planes, so the edges need to taper to a sharp point (this sharp point is what is called the “scarf”); otherwise, you end up with an unwelded cold shut.
Tips for Easier Forge Welds
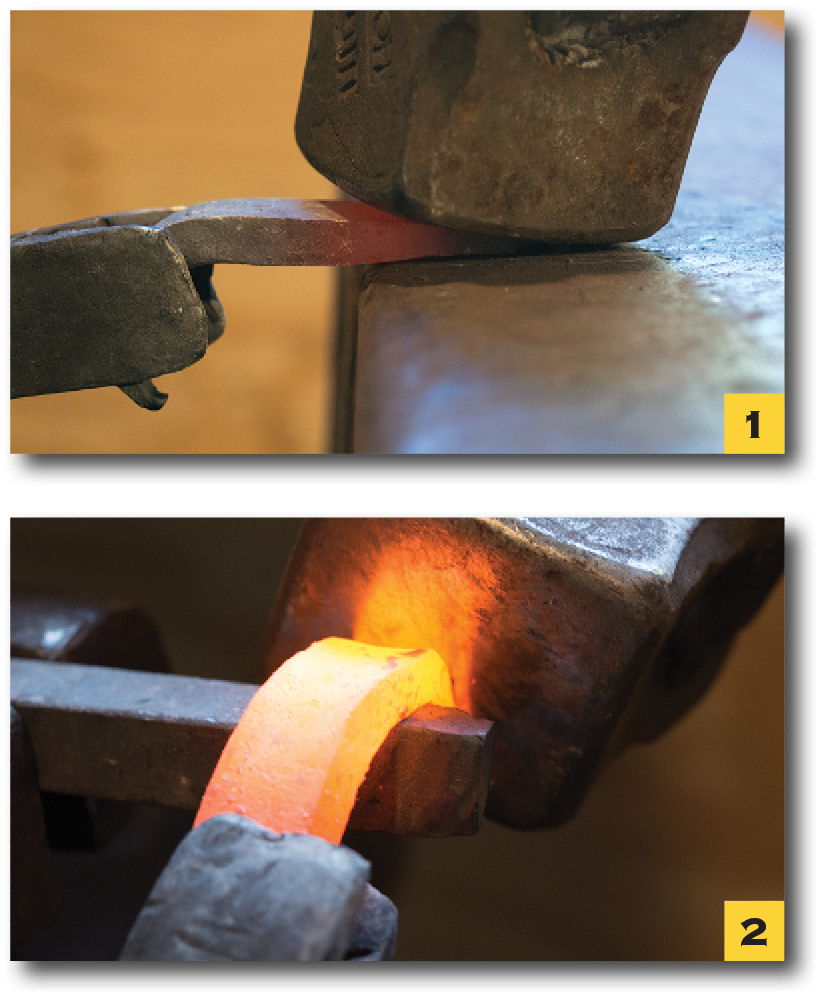
Scarfing

1. If you are scarfing the end of a rod, it is easier to upset the end by making a short bend over the far side of the anvil and forge the end back into itself. 2. Taper the edge over the far edge of the anvil to create a scarf. 3. Welding temperature is bright yellow. In this image, you can see the scarf and how it minimizes the amount of steel that is perpendicular to the welding plane.
Once your metal is red hot, wire-brush any scale off and flux the weld to prevent new scale from forming as you bring the metal up to welding heat. Make sure that your fire is deep and hot so that you can keep oxygen from getting to the metal. Slowly bring the steel up to a bright yellow—almost white—color so that the surface appears to soften, like butter just before melting.
If you are working with a larger piece of metal, cut the air back and let the piece soak in the heat to ensure that the whole piece of metal reaches welding heat. If just the surface is hot, the center will rob the surface of heat, preventing a weld. To help keep the pieces at welding heat, you must bring more than just the weld area up to welding heat to create a heat sink that will keep the scarf from cooling too quickly.
Punching and Drifting Holes
There will be many times when you need to either join things together by rivets or make holes for a handle, screw, or bolts. You can drill the holes, but you first must make sure that the metal is wide enough to have strong sidewalls. Punching and slitting holes is often easier than drilling and can maintain the amount of sidewall you need for strength around the hole.
A punch can be round, flattened, or anywhere in between, depending on the shape you want the hole to be. The tip can be flat, as in a standard punch; pointed for a center punch; or rounded off for decorative holes, as you will see in the various projects in this book.
Dropped-Tongs Welding
To punch a hole, begin by relatively lightly hitting the punch to set your mark. Do it lightly in case your mark ends up in the wrong place and you need to move it. If you hammer an incorrect mark too deeply, it will be hard to hide. Once you have your mark, proceed to heavy hammer blows and remove the punch to cool it after two or three hits. If you let the punch heat up too much, it will lose its temper and be more prone to riveting over. Trust me, you don’t want your punch riveting into a blind-ended hole!
For smaller metal, you can simply punch through from one side until you feel it get solid as the punch compresses the metal against the anvil face. Once you feel that, flip the metal over and punch the slug out over the pritchel or hardy hole, depending on the size of your punch. To find your mark, you should be able to see a cooler circle where the metal is the thinnest. In thicker metal in which you don’t want a large taper from the punch, alternate punching from both sides equally so that the slug ends up just past the middle on one side.
- Begin by punching through until the punch feels solid when you hammer on it. Cool the punch every couple of hits to prevent it from losing its temper.
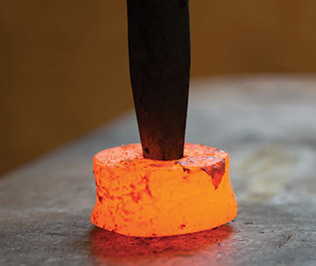
- Flip the metal over; locate the cool spot, which indicates the hole; and punch the slug out over the pritchel hole.
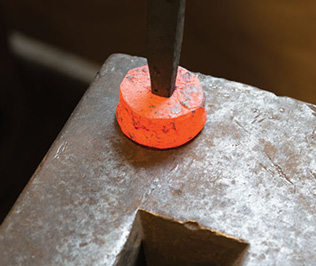
- The finished hole. In this case, I wanted a taper, so I left the hole as the punch made it.
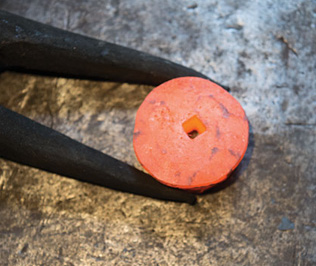
- If you have metal in which you want to make a large hole without losing sidewall strength, use an elongated flat punch or a chisel to make a long, narrow hole that you can then open up and make round to keep as much metal in the sides of the hole as possible.

- A slitting chisel, as shown, is a sharp, pointed chisel that you can use instead of a slot punch to create an elongated hole.
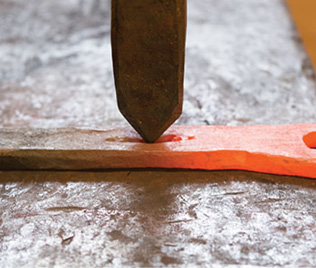
- Using a drift, which is a punch with a flattened tip to match the slit width, open up the hole and make it round.
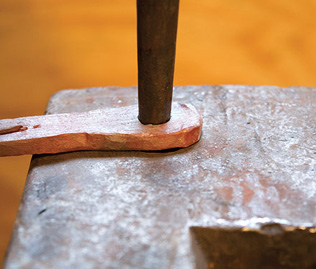
- We will be using a hammer mandrel, which is a large drift, later in the book to make the eye for a hammer handle, as shown.
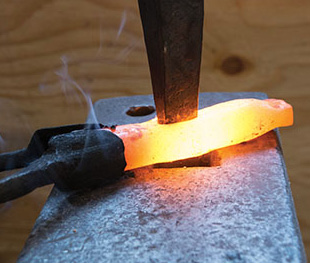
- Use two parallel slits (a) to create a strip that you can then drift into a loop (b).
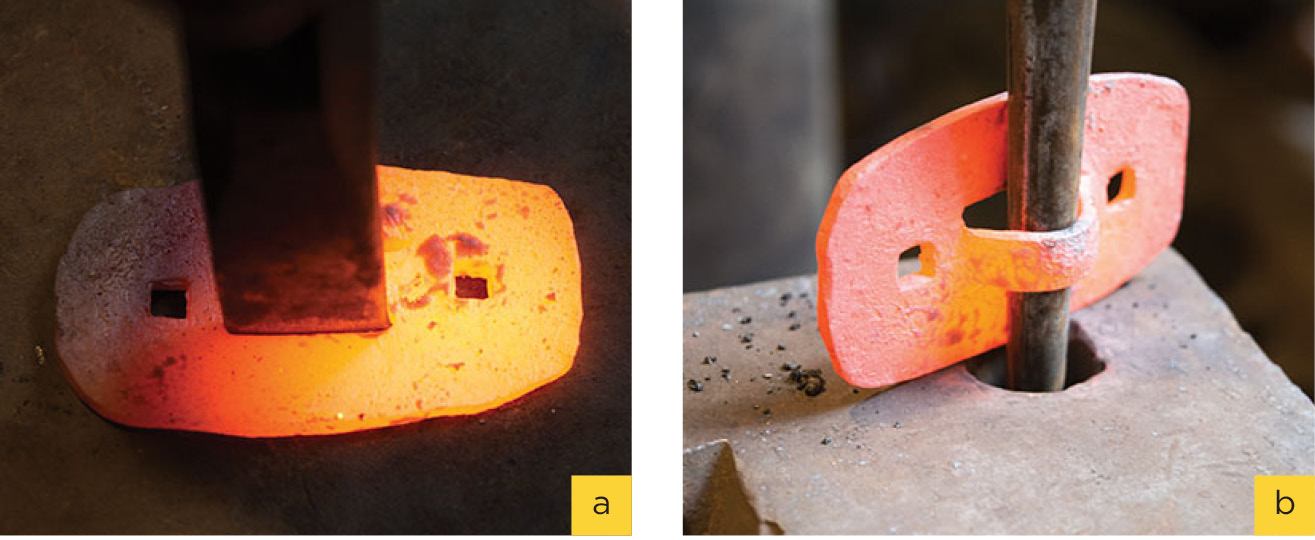
When punching and drifting, if you notice that one side is moving faster than the other and your hole is getting out of alignment, heat the slower side up more or quench the faster side. This makes the side that is slower more malleable so that it catches up to the other side.
Did You Know?
Riveting
Rivets used to be the way to fasten most items before welders became common. Rivets are also often used on tools requiring hinges, such as tongs or scissors. Getting a properly upset head is difficult and requires practice. To create a rivet, either forge down thicker stock to create a shoulder for the rivet header to catch when forming the head or use a rod with the same diameter as the hole. If you use the same diameter as the hole, you need to either have a spacer underneath to protect the extra shaft that will make up the other head, or you can begin in the vise. Most often, I end up simply starting the rivet in the vise and finishing the first head after I start the second head. If you do want to use a spacer, it is simply bar stock that is the same thickness as the rivet head material with a hole drilled in it that is the same diameter as the rivet shaft. Creating a rivet is upsetting, so you should heat only up to two times the diameter to make the rivet head; if you heat any more than that, the head will fold over and look ugly.
Creating a Rivet

Tenons
A tenon is essentially a rivet shaft on the end of a bar, with the bar making up one rivet head. It is often used to join parts together in gates and furniture. To create a tenon, you forge a sharp transition from the parent stock and then draw out the tenon; a spring fuller is a handy tool for this process. After drawing out the tenon, square up the shoulder so that the joint looks tight when finished. You can use a riveting plate and hammer the end down into it, or you can use a monkey tool.
Did You Know?
Monkey Tool

Making a Tenon, Step by Step

1. To make a tenon, begin by fullering down at the distance you need. Calculate how long the tenon will be once forged to the diameter you want. 2. Over the near side of the anvil, to protect the shoulder you created with the fuller, begin drawing out the tenon. Remember to always go square, and then octagon, and then round if you are making a round tenon. 3. Figure out how much tenon you need to span the pieces it will be riveting as well as the mass for a rivet head (1½–2 times the diameter, remember?). Proceed to cut it off. In this case, I used my hardy, but you can use a hacksaw or cut-off saw if it is cool when you measure and mark. 4. Square up the shoulders in either the piece itself, a plate with a hole of the same size diameter drilled in it, or a monkey tool. In this case, I am matching the pieces together by marking a side to keep it lined up consistently while I upset the tenon. 5. After heating the tenon and part of the shaft to keep the tenon warm longer, clamp the tenon in the vise and assemble the pieces to begin riveting. As you can see, it has begun to fold over slightly. To correct this, simply switch sides to hammer it back into alignment. 6. And there you have it, a finished tenon!
Collars and Wraps
Another way to join pieces together is by collaring or wrapping. You can also use a collar to add mass to an area by forge-welding the collar to the specific area. This is quite common for finials on a gate, where it is impractical to upset enough mass to forge that ball or large leaf. Collars can wrap around both of the pieces you wish to join or pass through a hole punched in one of the bars, which is quite common for screens or sign brackets.
There are two types of collars: overlapping and butt. An overlapping collar has two tapered ends that overlap on one side. A butt collar has the ends butting together without any tapering. Other than tapering the ends and using slightly different calculations to figure out how much length you need, they are made in the same way. Of course, you can also experiment with wire wraps. I will be showing you a method that requires no special tooling because you probably want to get to blacksmithing right away. If you are doing many collars, however, making a jig to quickly and consistently fold them will make your life easier.

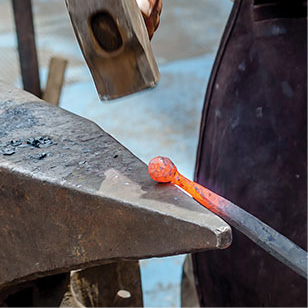
A forge-welded collar can be used to add mass to the end, as in this toilet paper holder.
Overlapping Collar
