Introduction
In the previous chapter, we focused on understanding the serverless model and getting started with AWS and Lambda, the first building blocks of a serverless application on AWS. You also learned about how the serverless model differs from traditional product development.
In this chapter, we will learn about other AWS capabilities such as S3, SNS, and SQS. You can start by asking students about different AWS serverless technologies that the students have heard about or have had the chance to work with. Talk to them briefly about different AWS services such as S3 storage, API Gateway, SNS, SQS, and DynamoDB services. We will discuss them in detail in this chapter.
Amazon S3
Amazon Simple Storage Service or S3 is nothing but a cloud storage platform that lets you store and retrieve any amount of data anywhere. Amazon S3 provides unmatched durability, scalability, and availability so that you can store your data in one of the most secure ways. This storage service is accessible via simple web interfaces, which can either be REST or SOAP. Amazon S3 is one of the most supported platforms, so either you can use S3 as a standalone service or you can integrate it with other AWS services.
Amazon S3 is an object storage unit that stores data as objects within resources called "buckets". Buckets are containers for your objects and serve multiple purposes. Buckets let you organize Amazon namespaces at the highest level and also play a key role in access control. You can store any amount of objects within a bucket, while your object size can vary from 1 byte to 5 terabytes. You can perform read, write, and delete operations on your objects in the buckets.
Objects in S3 consist of metadata and data. Data is the content that you want to store in the object. Within a bucket, an object is uniquely identified by a key and a version ID. The key is the name of the object.
When you add a new object in S3, a version ID is generated and assigned to the object. Versioning allows you to maintain multiple versions of an object. Versioning in S3 needs to be enabled before you can use it.
Note
If versioning is disabled and you try to copy the object with the same name (key), it will overwrite the existing object.
A combination of bucket, key, and version ID allows you to uniquely identify each object in Amazon S3.
For example, if your bucket name is aws-serverless and the object name is CreateS3Object.csv, the following would be the fully qualified path of an object in S3:

Figure 2.1: Fully qualified URL to access the aws-serverless bucket that has an object called CreateS3Object.csv
Key Characteristics of Amazon S3
Now, let's understand some of the key characteristics of using the Amazon S3 service:
- Durability and high availability: Amazon S3 provides durable infrastructure to store your data and promises a durability of Eleven 9s (99.999999999%). The Amazon S3 service is available in multiple regions around the world. Amazon S3 provides geographic redundancy within each region since your data gets copied automatically to at least three different availability zone locations within a region. Also, you have the option to replicate your data across regions. As we saw earlier, you can maintain multiple versions of your data as well, which can be used for recovery purposes later.
In the following diagram, you can see that when the S3 bucket in source-region-A goes down, route 53 is redirected to the replicated copy in source-region-B:

Figure 2.2: Amazon S3 Geographic Redundancy
Note
Geographic redundancy enables the replication of your data and stores this backup data in a separate physical location. You can always get your data back from this backup physical location just in case the main site fails.
- Scalability: Amazon S3 is a highly scalable service as it can scale up or scale down easily based on your business needs. Suppose, today, that you have an urgent need to run analytics on 500 GB of data and before you do analytics, you have to bring that data into the AWS ecosystem. Don't worry, as you can just create a new bucket and start uploading your data into it. All of the scalability work happens behind the scenes, without any impact on your business.
- Security: In Amazon S3, you can enable server-side encryption, which encrypts your data automatically while it is getting written on the S3 bucket. Data decryption happens by itself when someone wants to read the data. Amazon S3 also supports data transfer over SSL, and you can also configure bucket policies to manage object permissions and control access to your data using AWS Identity and Access Management (IAM). We will look at permissions in more detail in a later part of this chapter.
Note
Since it is server-side encryption, there is no user interference required. Hence, when a user tries to read the data, the server decrypts the data automatically.
- Integration: You can use Amazon S3 as a standalone service to store data or you can integrate it with other AWS services such as Lambda, Kinesis, and DynamoDB. We will look at some of these AWS services and their integration as part of our exercises in a later part of this chapter.
- Low cost: Like other AWS serverless services, Amazon S3 works on a pay-as-you-go model. This means that there are no upfront payments and you pay based on your usage. Since it is a serverless offering, you don't need to manage any underlying hardware or network resources. Therefore, there is no need to buy and manage expensive hardware. This helps to keep costs low with Amazon S3.
- Access via APIs: You can use the REST API to make requests to Amazon S3 endpoints.
Deploying a Static Website
With Amazon S3, you can host your entire static website at a low cost, while leveraging a highly available and scalable hosting solution to meet varied traffic demands.
Exercise 2: Setting up a Static Website with an S3 Bucket Using a Domain Name in Route 53
In this exercise, we'll look at doing the following:
- Creating an S3 bucket and providing required permissions
- Uploading a file onto an S3 bucket, which will be used to set the default page of your website
- Configuring your S3 bucket
So, let's get started. Here are the steps to perform this exercise:
- Log in to your AWS account using your credentials.
- Click on the dropdown next to Services on top-left side and type S3:
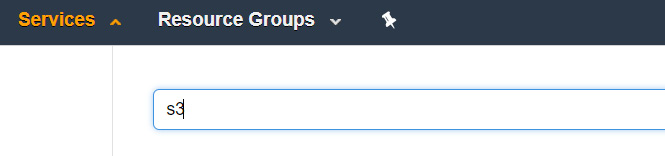
Figure 2.3: Searching Amazon S3 services via the dropdown option
- The Amazon S3 page will open. Click on Create Bucket:
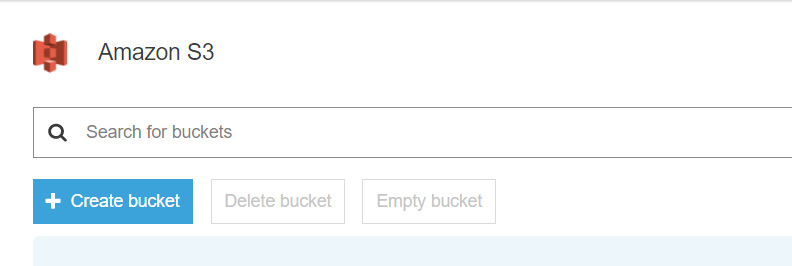
Figure 2.4: Creating an Amazon S3 bucket
- The Create bucket dialog box will open. You need to provide the following information:
Bucket Name: Enter a unique bucket name. For this book, we've used www.aws-serverless.tk since we will host a website using our S3 bucket. As per AWS guidelines, a bucket name must be unique across all existing bucket names in Amazon S3. So, you need to choose your individual bucket names.
Region: Click on the dropdown next to Region and select the region where you want to create the bucket. We will go with the default region, US-East (N. Virginia).
If you want to copy these settings from any other bucket and want to apply them to the new bucket, you can click on the dropdown next to Copy settings from an existing bucket. We will configure the settings for this bucket here, so we will leave this option blank:
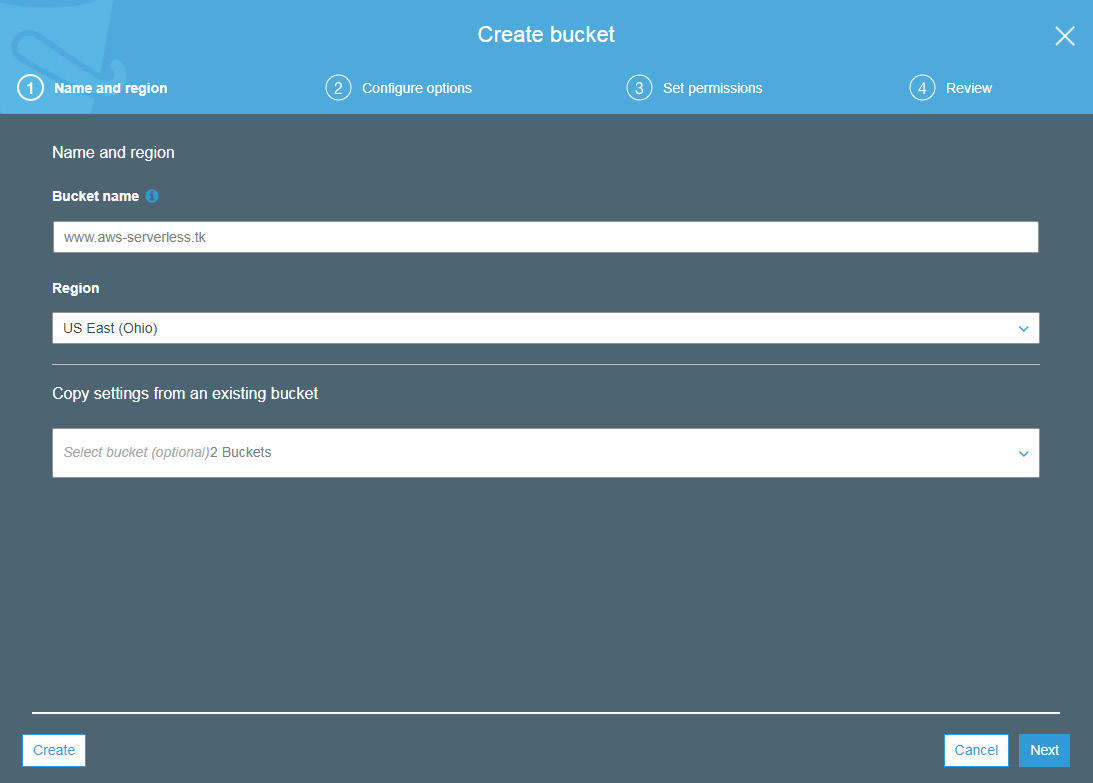
Figure 2.5: The Create bucket menu: Name and region section
- Click on Next. We will be taken to the Properties window. Here, we can set the following properties of the S3 bucket:
Versioning
Server access logging
Tags
Object-level logging
Default encryption
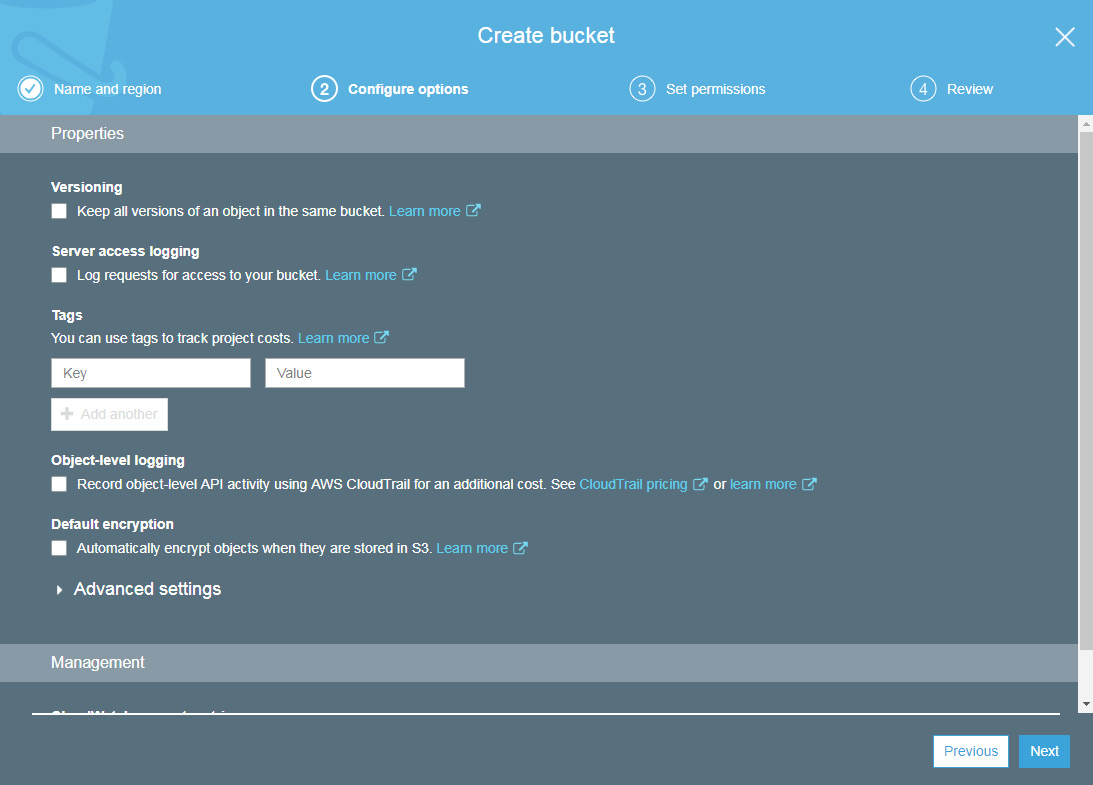
Figure 2.6: The Create bucket menu: Set properties section
For this exercise, go with the default properties and click on the Next button.
- The next window is Set permissions. Here, we grant read and write permissions for this bucket to other AWS users and manage public permissions as well. We can see in the following screenshot that the owner of the bucket has both read and write permissions by default. If you want to give permission for this bucket to any other AWS account as well, you can click on Add Account:

Figure 2.7: The Create bucket menu: Set permissions option
- Keep all of the checkboxes unchecked. We'll host a website using this S3 bucket.
- Keep Manage system permissions with the default settings and click on the Next button to go to the Review screen. Here, you can review all of the settings for your S3 bucket. If you want to change anything, click on the Edit button and change it. Alternatively, click on Create Bucket and your bucket will be created:

Figure 2.8: The Create bucket menu: Review section
- Click on the newly created bucket name and click on the second tab, Properties, and enable Static website hosting:

Figure 2.9: Enabling the Static website hosting option under the Properties section
- Select the Use this bucket to host a website option. Enter the name of the index document. This document will be used to display the home page of your website. You can also add an error.html file, which will be used to display the page in case of any error. We aren't adding an error.html file for this exercise. You can also set redirection rules to redirect requests for an object to another object in the same bucket or to an external URL. Click on the Save button to save it:

Figure 2.10: The Static website hosting menu
Note
At the top, note the Endpoint information. This will be the URL to access your website. In this case, it is http://www.aws-serverless.com.s3-website-us-east-1.amazonaws.com/.
- Next, click on the Overview tab.
- In the Overview tab, click on Upload. Click on Add files. Upload the index.html page (found in the Chapter02 folder of the code bundle) as an object into our S3 bucket. Now, click on the Next button:

Figure 2.11: Uploading the Index.html file to the Amazon S3 bucket
Note
The index.html file is a simple HTML file that contains basic tags, which are for demonstration purposes only.
- Under Manage Public Permissions, select Grant public read access to this object(s). Keep the rest of the settings as they are.
- Click on Next. Keep all of the properties to their default values on the Set properties screen. On the next screen, review the object properties and click on the Upload button.
Congratulations! You have just deployed your website using the Amazon S3 bucket.
- Go to a browser on your machine and go to the endpoint that we noted in step 10. You should see the home page (index.html) displayed on your screen:

Figure 2.12: Viewing the uploaded Index.html file on the browser
We have successfully deployed our S3 bucket as a static website. There are different use case scenarios for S3 services, such as media hosting, backup and storage, application hosting, software, and data delivery.
Enabling Versioning on S3 Bucket
Now, we'll look at enabling versioning on an S3 bucket. Here are the steps to do so:
- Log in to your AWS account.
- In the S3 bucket name list, choose the name of the bucket that you want to enable versioning for.
- Select Properties.
- Select Versioning.
- Choose Enable versioning or Suspend versioning and then click on Save.
S3 and Lambda Integration
Your Lambda function can be called using Amazon S3. Here, the event data is passed as a parameter. This integration enables you to write Lambda functions that process Amazon S3 events, for example, when a new S3 bucket gets created and you want to take an action. You can write a Lambda function and invoke it based on the activity from Amazon S3:

Figure 2.13: Demonstrating the integration of AWS S3 with AWS Lambda
Exercise 3: Writing a Lambda Function to Read a Text File
In this exercise, we will demonstrate AWS S3 integration with the AWS Lambda service. We will create an S3 bucket and load a text file. Then, we will write a Lambda function to read that text file. You will see an enhancement for this demonstration later in this chapter when we integrate it further with the API Gateway service to show the output of that text file as an API response.
Here are the steps to perform this exercise:
- Go to the AWS services console and open the S3 dashboard. Click on Create bucket and provide a bucket name. Let's call it lambda-s3-demo. Note that your bucket name must be unique:
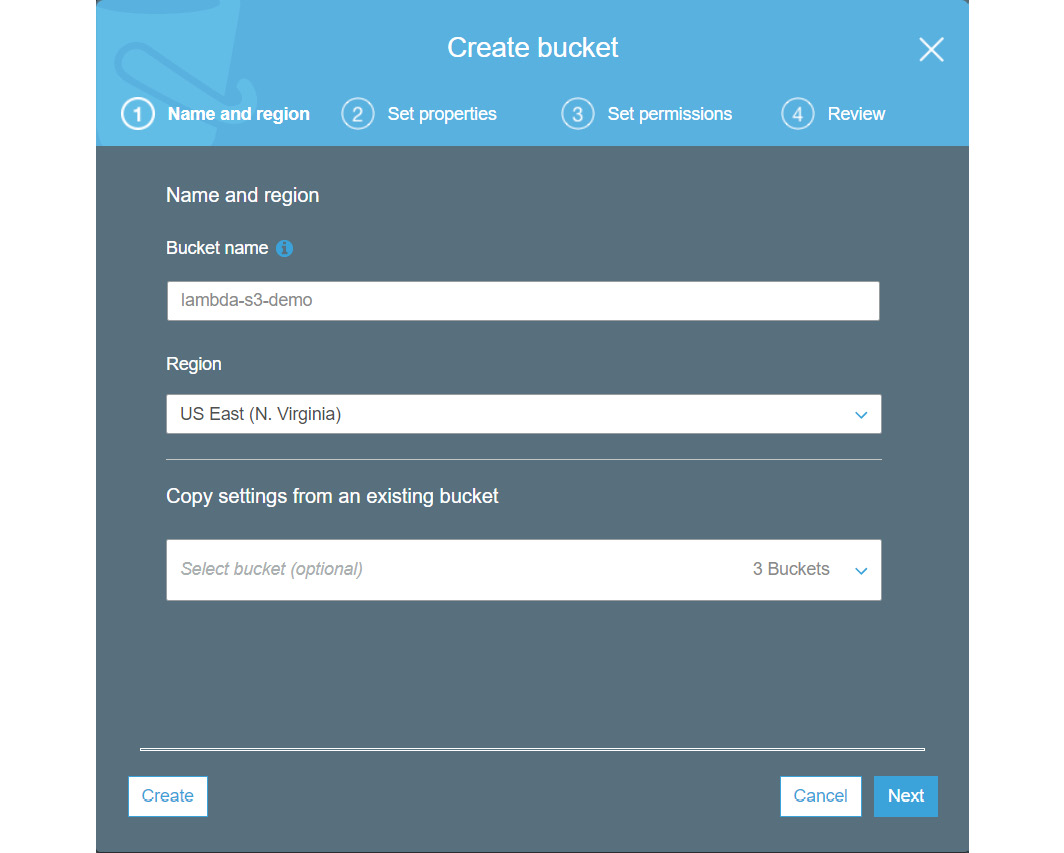
Figure 2.14: Creating an S3 bucket named lambda-s3-demo
- Click on Next and follow the instructions to create the bucket. Set all of the settings as default. Since we will write the Lambda function using the same account, we don't need to provide any explicit permission to this bucket.
- Create a file in your local disk and add the content Welcome to Lambda and S3 integration demo Class!! in the file. Save it as sample.txt.
- Drag and drop this file into the Upload window to upload it to the newly created S3 bucket.
- Click on Upload:
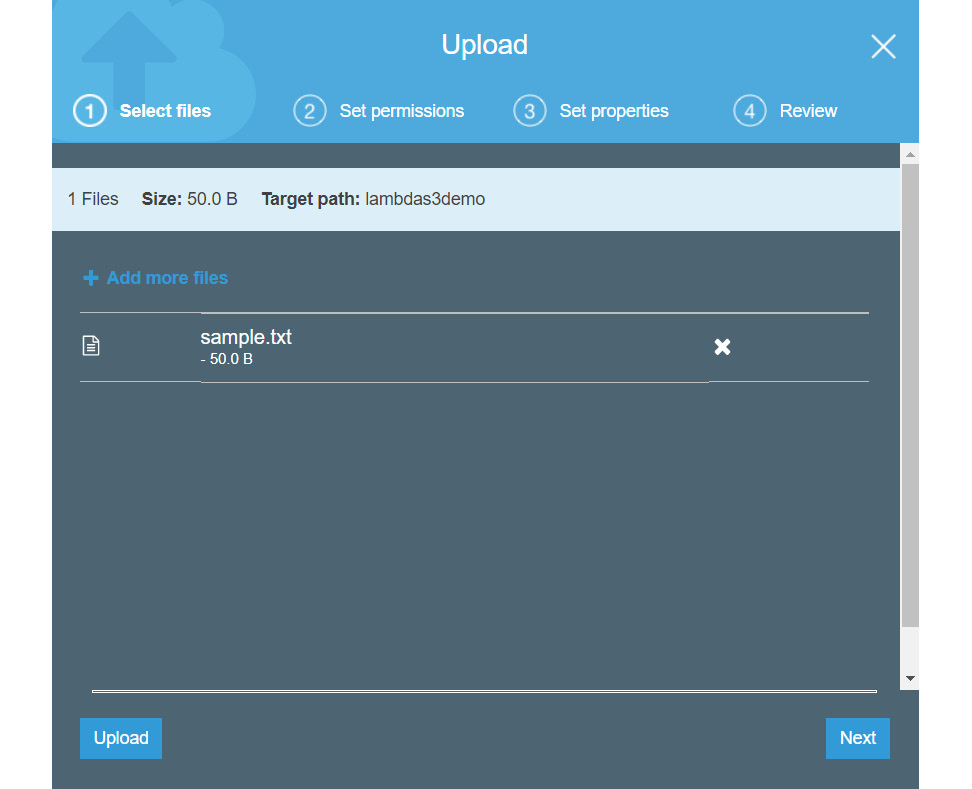
Figure 2.15: Uploading a sample text file to the newly created S3 bucket
Note
Observe the contents of this file's text message: Welcome to Lambda and S3 integration demo Class!!.
- Go to the AWS service portal, search for Lambda, and open the Lambda dashboard. Click on Create function and provide the following details:
Provide the name of the Lambda function. Let's name it read_from_s3.
Choose the runtime as Node.js 6.10.
Choose the Create a new role from one or more templates option. Provide the role name as read_from_s3_role.
Under policy templates, choose Amazon S3 object read-only permissions.
- Click on Create function.
- Once the Lambda function has been created, jump to the Function code section and replace the contents of the index.js file with the following code and save it. You can also copy this code from the s3_with_lambda.js file. In this script, we are creating two variables, src_bkt and src_key, which will contain the name of the S3 bucket and the name of the file that was uploaded to the bucket. Then, we will retrieve that file as an object from the S3 bucket using s3.getObject and return the contents of the file as an output of the Lambda function:
var AWS = require('aws-sdk');
var s3 = new AWS.S3();
exports.handler = function(event, context, callback) {
// Create variables the bucket & key for the uploaded S3 object
var src_bkt = 'lambdas3demo';
var src_key = 'sample.txt';
// Retrieve the object
s3.getObject({
Bucket: src_bkt,
Key: src_key
}, function(err, data) {
if (err) {
console.log(err, err.stack);
callback(err);
}
else {
console.log('\n\n' + data.Body.toString()+'\n');
callback(null, data.Body.toString());
}
});
};
Note that the default output of the data will be in binary format, so we are using the toString function to convert that binary output to a string:

Figure 2.16: Illustrating the use of the toString() function
- Click on the Save button to save the Lambda function.
- Test the function now. But, before you can test it, you will have to configure test events, like we have done in earlier exercises. Once a test event is configured, click on Test to execute the Lambda function.
Once the function has been executed, you should see the highlighted message Welcome to Lambda and S3 integration demo Class !!, as provided in the following screenshot. This message was the content of the sample.txt file that we uploaded into our S3 bucket in step 3:
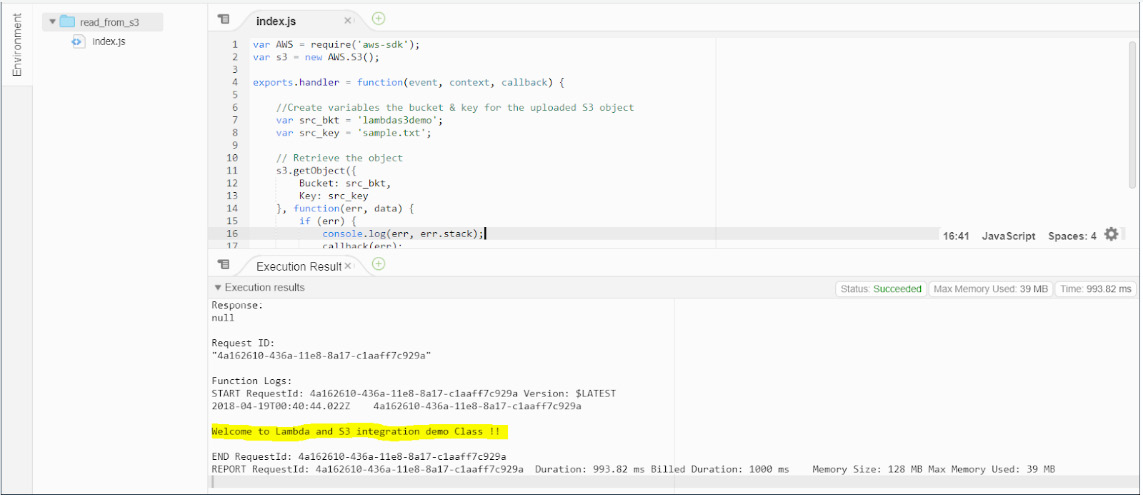
Figure 2.17: Demonstrating the Lambda function's execution
Now, we have completed our discussion about S3 integration with a Lambda function.
API Gateway
API development is a complex process, and is a process that is constantly changing. As part of API development, there are many inherent complex tasks, such as managing multiple API versions, implementation of access and authorization, managing underlying servers, and doing operational work. All of this makes API development more challenging and impactful on an organization's ability to deliver software in a timely, reliable, and repeatable way.
Amazon API Gateway is a service from Amazon that takes care of all API development-related issues (discussed previously) and enables you to make your API development process more robust and reliable. Let's look into this in more detail now.
What is API Gateway?
Amazon API Gateway is a fully managed service that focuses on creating, publishing, maintaining, monitoring, and securing APIs. Using API Gateway, you can create an API that acts as a single point of integration for external applications while you implement business logic and other required functionality at the backend using other AWS services.
With API Gateway, you can define your REST APIs with a few clicks in an easy-to-use GUI environment. You can also define API endpoints, their associated resources and methods, manage authentication and authorization for API consumers, manage incoming traffic to your backend systems, maintain multiple versions of the same API, and perform operational monitoring of API metrics as well. You can also leverage the managed cache layer, where the API Gateway service stores API responses, resulting in faster response times.
The following are the major benefits of using API Gateway. We have seen similar benefits of using other AWS services, such as Lambda and S3:
- Scalability
- Operational monitoring
- Pay-as-you-go model
- Security
- Integration with other AWS services
API Gateway Concepts
Let's understand certain concepts of the API Gateway and how they work. This will help you build a better understanding on how the API Gateway works:
- API endpoints: An API endpoint is one end of the communication, a location from where the API can access all the required resources.
- Integration requests: The integration request specifies how your frontend will communicate with the backend system. Also, requests may need to be transformed based on the type of backend system running. Possible integration types are Lambda, AWS service, HTTP, and Mock.
- Integration response: After the backend system processes the requests, API Gateway consumes it. Here, you specify how the errors/response codes received from backend systems are mapped to the ones defined in API gateway.
- Method request: The method request is a contract between the user (public interface) and the frontend system on what will be the request mode. This includes the API authorization and HTTP definitions.
- Method response: Similar to the API method request, you can specify the method response. Here, you can specify the supported HTTP status codes and header information.
Exercise 4: Creating a REST API and Integrating It with Lambda
Now, we will look at a demo of API Gateway and explore its different features. Along with this demo, we will also create a simple REST API using API Gateway and integrate it with a Lambda function. We will extend our earlier exercise on S3 integration with Lambda and create a REST API to show the contents of "sample.txt" as API response. This API will be integrated with Lambda to execute the function, and a GET method will be defined to capture the contents of the file and show it as the API response:

Figure 2.18: Illustrating the various feature integrations of API Gateway with Lambda functions
Here are the steps to perform this exercise:
- Open a browser and log in to the AWS console: https://aws.amazon.com/console/.
- Click on the dropdown next to Services or type API Gateway in the search box and click on the service:
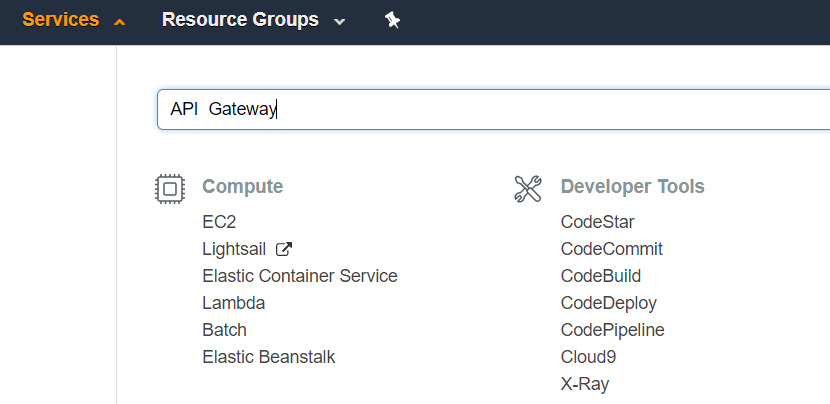
Figure 2.19: Searching for API Gateway from the Services section
- On the API Gateway dashboard, if you're visiting the page for the first time, click on Get Started. Otherwise, you will see the following Create New API screen:

Figure 2.20: The Create new API page
Here, you have three options for choose from:
New API
Import from Swagger
Example API
- Select New API and provide the following details:
API name: Enter read_from_S3_api
Description: Enter sample API
Endpoint Type: Choose Regional and click on Create API.
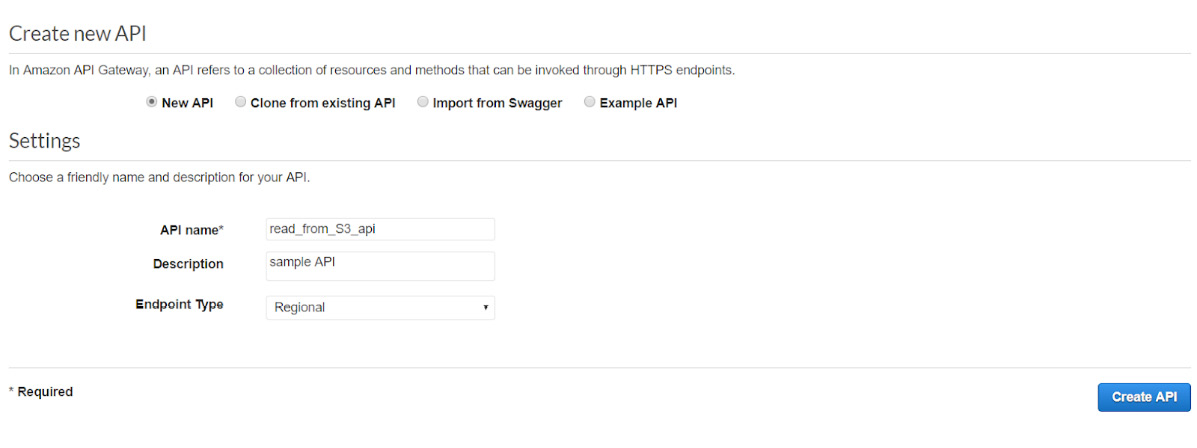
Figure 2.21: Creating a new API with the specified details
- On the next page, click on Actions. You will see some options listed as Resources and Methods. A resource works as a building block for any RESTful API and helps in abstracting the information. Methods define the kind of operation to be carried out on the resources. A resource has a set of methods that operate on it, such as GET, POST, and PUT.
We haven't created any resources yet as part of this exercise, so the AWS console will only have the root resource and no other resources.
- Now, create a resource. On the resource dashboard, provide the resource name and click on Create Resource from the dropdown of Action.
- Type read_file_from_s3 in the Resource Name field and click on Create Resource:

Figure 2.22: Creating a resource with the provided information
- Create a method to access the information. Select that resource and then click on Actions to create a method. Choose GET from the available methods and click on ✓ to confirm the GET method type:

Figure 2.23: Creating a method to access the available information
- Now, choose Lambda Function as the integration type:

Figure 2.24: Selecting Lambda Function as an integration type
- Once you click on Save, you will get following warning. Here, AWS is asking you to provide API Gateway permission to invoke the Lambda function:
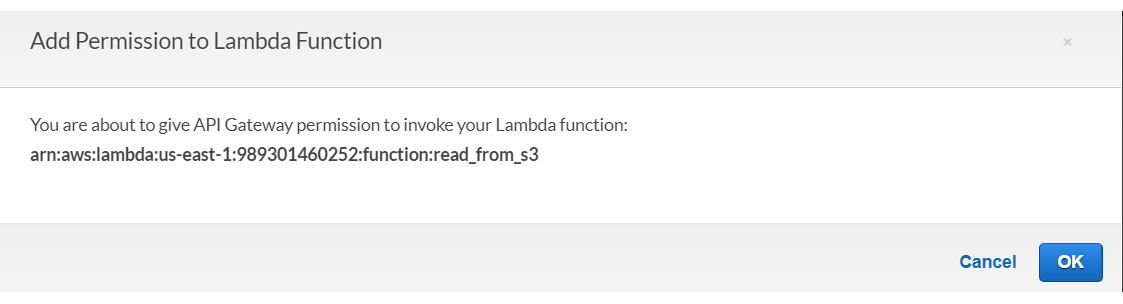
Figure 2.25: Warning notification to enable API Gateway's permission
- Click on the OK button. The following screen will appear, which shows the workflow of the API. The following are the steps taken by the API:
Your API will invoke the Lambda function.
The Lambda function gets executed and sends the response back to the API.
The API receives the response and publishes it:
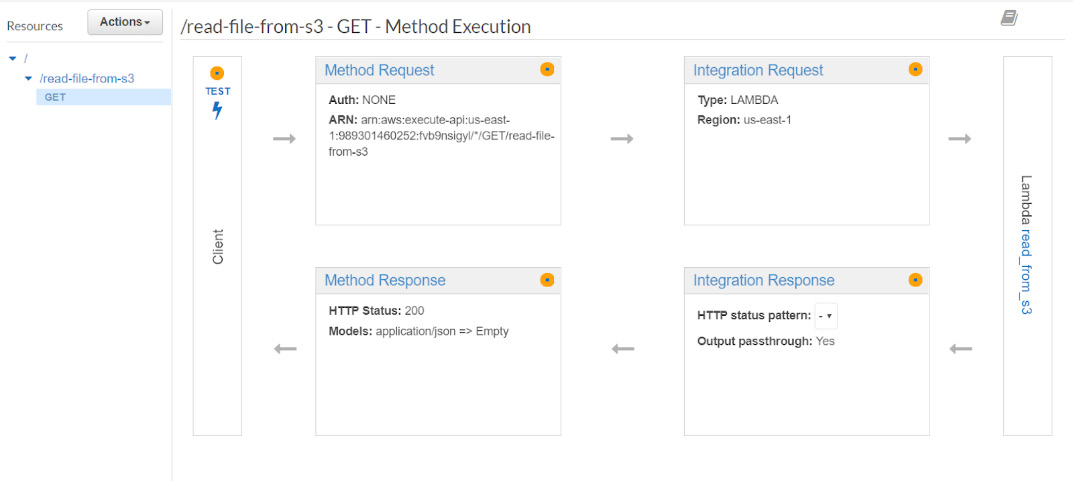
Figure 2.26: Illustrating the workflow of an API
- Now, it's time to deploy the API. Click on the Actions dropdown and select Deploy API:

Figure 2.27: The Deploy API menu
- Create a new deployment stage. Let's call it prod. Then, click on Deploy to deploy your API:

Figure 2.28: Creating a new deployment stage named prod
- Once the API has been deployed, you should see the following screen. This screen has a few advanced settings so that you can configure your API. Let's skip this:

Figure 2.29: The menu options of the deployed API
- Click on prod to open the submenu and select the GET method that you created for the API. Invoke the API URL that appears on the screen. You can access this link to access your API:

Figure 2.30: Invoking the API URL
This is what will appear on your screen:

Figure 2.31: Illustrating the web page of the invoked URL
Great! You have just integrated the API Gateway with Lambda and S3.
Other Native Services
We'll now turn our focus to other native services. We'll begin with Amazon SNS and then move on to Amazon SQS.
Amazon SNS
Amazon Simple Notification Services (SNS) is the cloud-based notification service that's provided by AWS that enables the delivery of messages to the recipients or to the devices. SNS uses the publisher/subscriber model for the delivery of messages. Recipients can either subscribe to one or more "topics" within SNS or can be subscribed by the owner of a particular topic. AWS SNS supports message deliveries over multiple transport protocols.
AWS SNS is very easy to set up and can scale very well depending on the number of messages. Using SNS, you can send messages to a large number of subscribers, especially mobile devices. For example, let's say you have set up the monitoring for one of your RDS instances in AWS, and once the CPU goes beyond 80%, you want to send an alert in the form of an email. You can set up an SNS service to achieve this notification goal:

Figure 2.32: Establishing the alert mechanism using the SNS services
You can set up AWS SNS using the AWS Management Console, AWS command-line interface, or using the AWS SDK. You can use Amazon SNS to broadcast messages to other AWS services such as AWS Lambda, Amazon SQS, and to HTTP endpoints, email, or SMS as well.
Let's quickly understand the basic components, along with their functions, of Amazon SNS:
- Topic: A topic is a communication channel that is used to publish messages. Alternatively, you can subscribe to a topic to start receiving messages. It provides a communication endpoint for publishers and subscribers to talk to each other.
- Publication of messages: Amazon SNS allows you to publish messages that are then delivered to all the endpoints that have been configured as subscribers for a particular topic.
Here are some of the applications of Amazon SNS:
- Subscription to messages: Using SNS, you can subscribe to a particular topic and start receiving all the messages that get published to that particular topic.
- Endpoints: With Amazon SNS, you publish messages to the endpoints, which can be different applications based on your needs. You can have an HTTP endpoint, or you can deliver your messages to other AWS services (as endpoints) such as SQS and Lambda. Using SNS, you can configure emails or mobile SMS as possible endpoints as well. Please note that the mobile SMS facility is available in limited countries. Please check the Amazon SNS documentation for more details.
Amazon SQS
In a simple message queue service, we have applications playing the roles of producers and consumers. The applications, known as producers, create messages and deliver them to the queues. Then, there is another application, called the consumer, which connects to the queue and receives the messages. Amazon SQL is a managed service adaptation of such message queue services.
Amazon Simple Queue Service (SQS) is a fully managed messaging queue service that enables applications to communicate by sending messages to each other:
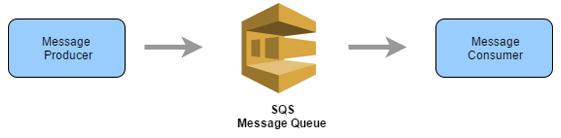
Figure 2.33: Enabling Amazon SQS for better communication between applications
Amazon SQS provides a secure, reliable way to set up message queues. Currently, Amazon SQS supports two types of message queues:
- Standard queues: Standard queues can support close to unlimited throughput, that is, an unlimited number of transactions per second. These queues don't enforce the ordering of messages, which means that messages may be delivered in a different order than they were originally sent. Also, standard queues work on the at-least-once model, in which messages are delivered at least once, but they may be delivered more than once as well. Therefore, you need to have a mechanism in place to handle message duplication. You should use standard queues, whose throughput is more important than the order of requests.
- FIFO queues: FIFO queues work on the First-In-First-Out message delivery model, wherein the ordering of messages is maintained. Messages are received in the same order in which they were sent. Due to ordering and other limitations, FIFO queues don't have the same throughput as what's provided by standard queues. Note that FIFO queues are available in limited AWS regions. Please check the AWS website for more details. You should use FIFO queues when the order of messages is important.
Note
There is a limit on the number of messages supported by FIFO queues.
- Dead Letter (DL) queues: DL queues are queues that can receive messages that can't be processed successfully. You can configure a dead letter queue as a target for all unprocessed messages from other queues.
Just like Amazon SNS, you can also set up the AWS SQS service using the AWS Management Console, AWS command-line interface, or using the AWS SDK.
DynamoDB
Amazon DynamoDB is a NoSQL database service that is fully managed. Here, you won't have to face the operative and scaling challenges of a distributed database. Like other serverless AWS services, with DynamoDB, you don't have to worry about hardware provisioning setup, configuration data replication, or cluster scaling.
DynamoDB uses the concept of partition keys to spread data across partitions for scalability, so it's important to choose an attribute with a wide range of values and that is likely to have evenly distributed access patterns.
With DynamoDB, you pay only for the resources you provision. There is no minimum fee or upfront payment required to use DynamoDB. The pricing of DynamoDB depends on the provisioned throughput capacity.
Throughput Capacity
In DynamoDB, when you plan to provision a table, how do you know the throughput capacity required to get optimal performance out of your application?
The amount of capacity that you provision depends on how many reads you are trying to execute per second, and also how many write operations you are trying to do per second. Also, you need to understand the concept of strong and eventual consistency. Based on your settings, DynamoDB will reserve and allocate enough Amazon resources to keep low response times and partition data over enough servers to meet the required capacity to keep the application's read and write requirements.
Note
Eventual consistency is a type of consistency where there is no guarantee that what you are reading is the latest updated data. Strong consistency is another type of consistency where you always read the most recent version of the data. Eventual consistent operations consume half of the capacity of strongly consistent operations.
Now, let's look at some important terms:
- Read capacity: How many items you expect to read per second. You also have to specify the item size of your request. Two kilobyte items consume twice the throughput of one kilobyte items.
- Write capacity: How many items you expect to write per second.
Note
You are charged for reserving these resources, even if you don't load any data into DynamoDB. You can always change the provisioned read and write values later.
DynamoDB Streams
DynamoDB Streams is a service that helps you capture table activity for DynamoDB tables. These streams provide an ordered sequence of item-level modifications in a DynamoDB table and store the information for up to 24 hours. You can combine DynamoDB Streams with other AWS services to solve different kinds of problems, such as audit logs, data replication, and more. DynamoDB Streams ensure the following two things:
- No duplicity of stream records, which ensures that each stream record will only appear once
- The ordered sequence of streams is maintained, which means that stream records appear in the same sequence as the modifications to the table
AWS maintains separate endpoints for DynamoDB and DynamoDB Streams. To work with database tables and indexes, your application must access a DynamoDB endpoint. To read and process DynamoDB Stream records, your application must access a DynamoDB Streams endpoint in the same region.
DynamoDB Streams Integration with Lambda
Amazon DynamoDB is integrated with AWS Lambda. This enables you to create triggers that can respond to events automatically in DynamoDB Streams. With triggers, you can build applications that react to data modifications in DynamoDB tables.
Integration with Lambda allows you to perform many different actions with DynamoDB Streams, such as storing data modifications on S3 or sending notifications using AWS services such as SNS.
Exercise 5: Creating an SNS topic and Subscribing to It
In this exercise, we'll create an SNS topic and subscribe to it. So, let's get started:
- Go to AWS services and type SNS in the search box. Once you click on Simple Notification Service (SNS), the following screen will appear. Click on Get started, which will take you to the SNS dashboard:

Figure 2.34: Creating a new SNS service
- Click on Topics on the left menu and click on Create new topic:
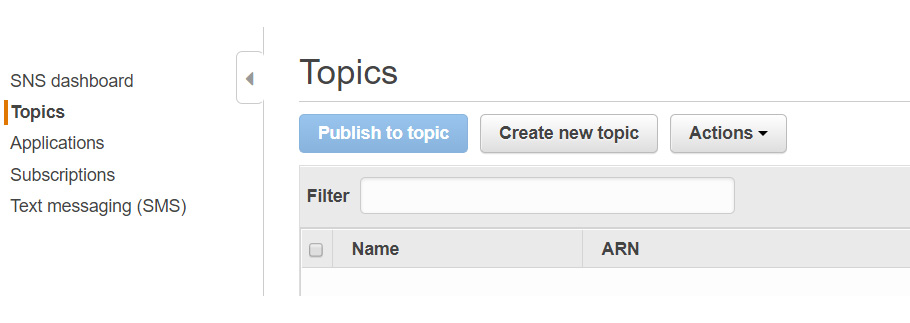
Figure 2.35: Creating a new topic from the Topics section
- Provide the Topic name as TestSNS and the Display name as TestSNS, and click on Create topic. The Topic name and Display name can be different as well:

Figure 2.36: Providing a Topic and Display name for the topic
- Once the topic has been created successfully, the following screen appears. This screen has the name of the topic and the topic's ARN.
Note
ARN stands for Amazon Resource Name, and it is used to identify a particular resource in AWS.
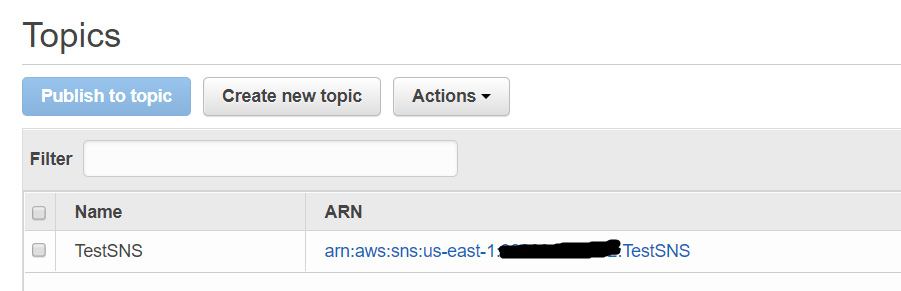
Figure 2.37: Summary page of the newly created topic
Note that if you need to reference a particular AWS resource in any other AWS service, you do so using the ARN.
We have successfully created a topic. Let's go ahead and create a subscription for this topic. We will set up an email notification as part of the subscription creation so that whenever something gets published to the topic, we will get an email notification.
- Click on Subscriptions on the left menu and then click on Create subscription:
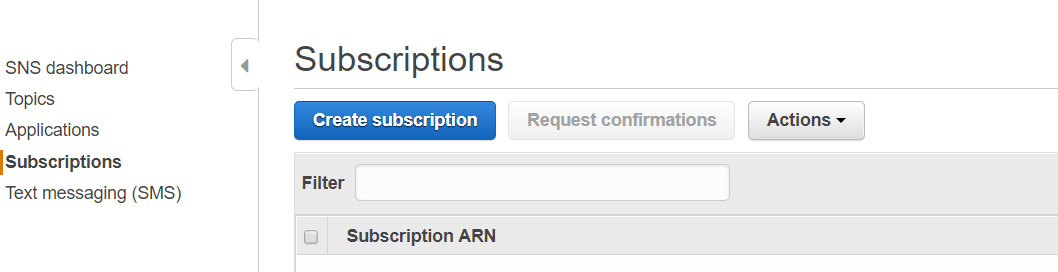
Figure 2.38: Creating a subscription for the SNS service
- Provide the ARN for the topic that we created in step 4. Click on the dropdown next to Protocol and choose Email. Provide an email address as a value for the endpoint. Then, click on Create subscription:

Figure 2.39: Providing details to create a new subscription
- Once the subscription has been created successfully, you should see the following screenshot. Note that the current status of the subscription is PendingConfirmation:

Figure 2.40: The summary of the newly created subscription
- Check your emails. You should have received an email notification from Amazon to confirm the subscription. Click on Confirm Subscription:

Figure 2.41: Verifying the subscription from the registered email address
Once the subscription is confirmed, you should see the following screenshot:

Figure 2.42: The Subscription confirmed message
- Now, go back to the Subscription page and you will notice that PendingConfirmation is gone. Click on the refresh button if you still see PendingConfirmation. It should now be gone:

Figure 2.43: Summary of the confirmed ARN subscription
So, you have successfully created an SNS topic and have successfully subscribed to that topic as well. Whenever anything gets published to this topic, you will get an email notification.
Exercise 6: SNS Integration with S3 and Lambda
In this exercise, we will see create a Lambda function and integrate it with SNS to send email notifications:

Figure 2.44: Integrating a Lambda function with SNS to enable an email subscription
Here are the steps to perform this exercise:
- Go to the AWS service console and type Lambda in the search box. Then, open the Lambda management page.
- Click on Create function and continue with the current selection, that is, Author from scratch:

Figure 2.45: Creating a Lambda function from scratch
- Now, provide the following details:
Name: Write lambda_with_sns.
Runtime: Keep it as Node.js.
Role: Select Create role from template from the dropdown. Here, we are creating a Lambda function to send an SNS notification.
Role name: Provide the role name as LambdaSNSRole.
Policy templates: Choose SNS publish policy:

Figure 2.46: The menu options to create a Lambda function from scratch
- Now, click on Create function. Once the function has been created successfully, you should see the following message:

Figure 2.47: The function created notification
- Let's jump to the function's code section. Go to the Git project and copy and paste the code in the code section of this page:

Figure 2.48: Adding code from the Git project to the code section of the function
The following is an explanation of the main parts of the code:
sns.publish: The publish action is used to send a message to an Amazon SNS topic. In our case, we have an email subscription on the topic, we are trying to publish onto. Therefore, a successful publishing here will result in an email notification.
Message: The message you want to send to the topic. This message text will be delivered to the subscriber.
TopicArn: The topic you want to publish to. Here, we are publishing to the "TestSNS" topic, which we created in our previous exercise. So, copy and paste the ARN of the topic that we created in the earlier exercise here.
- Click on the Save button on the top right corner. Now, we are ready to test the code.
- Click on the Test button. You need to configure the test event. Let's create a test event with the name TestEvent and click on the Save button:

Figure 2.49: Creating a test event named TestEvent
- Click on the Test button now, and you should see the following screen:

Figure 2.50: The test execution was successful notification
- Expand the execution result. Here, you can find more details about the function executions. Here, you can review the duration of the function's execution, the resources that have been configured, billed duration, and max memory used:
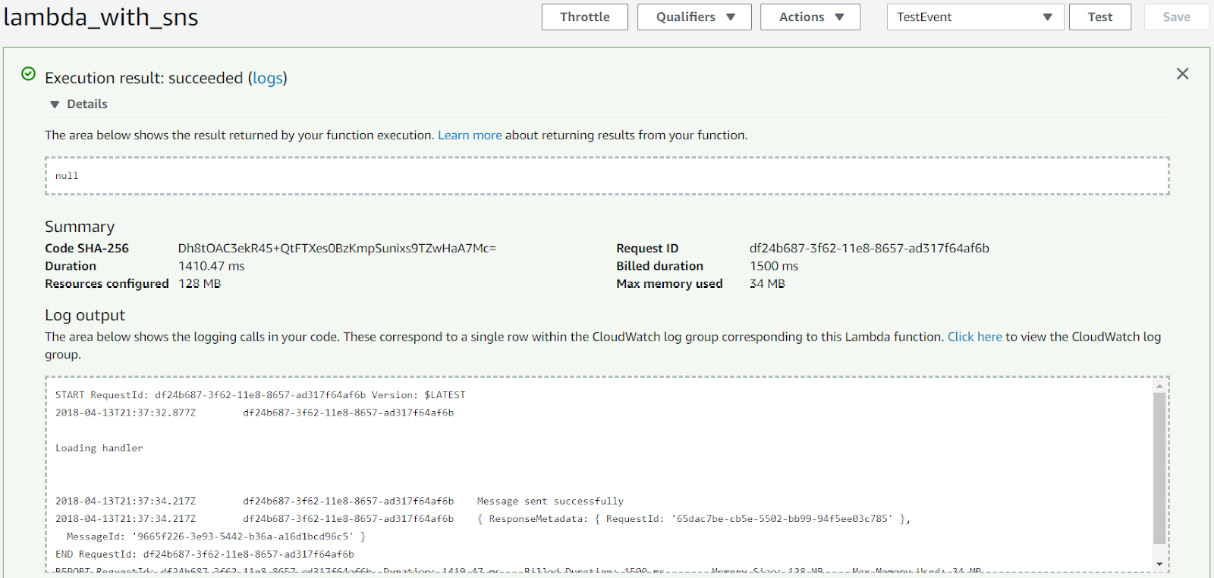
Figure 2.51: Summary of test execution
- Review the execution results under the Function code section as well:

Figure 2.52: Reviewing the test execution results under the function code
As we can see, the following message in the execution results is Message sent successfully. This confirms that the Lambda code was successful in sending a notification to the SNS topic.
Time to check your email account, which was configured as part of the subscriber in the preview exercise. You should see the following AWS notification message:

Figure 2.53: Sample email from the SNS service named TestSNS
This concludes our exercise on the simple integration of Lambda with Amazon SNS.
Activity 3: Setting Up a Mechanism to Get an Email Alert When an Object Is Uploaded into an S3 Bucket
In the last exercise, we showcased lambda integration with Amazon SNS. As part of the exercise, whenever our lambda function was executed, we got an email alert generated by SNS service.
Now, we will extend that exercise to perform an activity here.
Let's assume that you are processing certain events and whenever there is an error with processing of a particular event, you move the problematic event into a S3 bucket so you can process them separately. Also, you want to be notified via an email whenever any such an event arrives in the S3 bucket.
So, we will do an activity to create a new S3 bucket and set up a mechanism that enables you to get an email alert whenever a new object is uploaded into this S3 bucket. When a new object is added to the S3 bucket, it will trigger the Lambda function created in the earlier exercise which will send the required email alert using SNS service.
Here are the steps for completion:
- Go to AWS S3 service and click on Create bucket.
- Provide details such as name and region.
- Select the appropriate permissions.
- Go to the Lambda function created in the earlier exercise. Add S3 as a trigger under Lambda configuration section.
- Add the required details related to S3 bucket configuration, mainly the bucket name.
- Click on Add to add that S3 bucket as a trigger to execute Lambda function.
- Click on Save to save the changes to the Lambda function.
- Now, try to upload a new sample file to the S3 bucket. You should see an email alert in your mailbox.
Note
The solution for this activity can be found on page 154.
Summary
In this chapter, we looked at Amazon S3 and serverless deployments. We worked with API Gateway and its integration with AWS. We delved into fully managed services such as SNS, SQS, and DynamoDB. Finally, we integrated SNS with S3 and Lambda.
In the next chapter, we'll build an API Gateway that we covered in this chapter. A comparison with a traditional on-premises web application will be done as we replace traditional servers with serverless tools while making the application scalable, highly available, and performant.