Chapter 10
Creating Themes Using ThemeRoller
In This Chapter
 Getting started with ThemeRoller
 Working with ThemeRoller
 Using predefined themes directly
 Developing your own custom themes
 Placing themes on your system for local use
ThemeRoller (http://jqueryui.com/themeroller/) is a special kind of tool and plugin for jQuery that makes it possible to create a theme for your site. A theme is a mixture of fonts, color, and graphic styles that gives your site a particular feel. You can use ThemeRoller to perform tasks such as defining the appearance of buttons when a user hovers the mouse cursor over them. The output of ThemeRoller is a custom version of jQuery and jQuery UI that meets requirements that you specify. So you get the same combination of CSS and JavaScript that you'd get when using these two libraries, but the result meets your specific needs far better.
Of course, you may not want to take the time to create a theme entirely by hand, even if the process is automated using various screens on the ThemeRoller site. The ThemeRoller site also includes a number of predefined themes you can use. These themes are designed to meet most people’s needs and to provide a balanced and aesthetically pleasing appearance. As a consequence, you may want to check out ThemeRoller even if you have no desire to create a custom theme.
Understanding ThemeRoller
jQuery and jQuery UI are relatively complex libraries that provide a substantial amount of customization. The problem is that many developers have no idea how to perform the required customization and probably wouldn’t have time to do it if they did. The overall purpose of ThemeRoller is to simplify the task of customizing the appearance of the effects and widgets provided by these two libraries so that you can achieve a distinct appearance without a lot of work. In fact, there are methods of using these libraries so you don’t have to do any work at all.
However, using ThemeRoller has other, less obvious benefits. For example, by using ThemeRoller you can give your users access to multiple themes without much additional work at all. All you really need to do is provide a means of selecting a different link site for the required theme — the one that the user wants. Providing access to multiple themes makes it possible to address all sorts of user needs, such as making it possible for colorblind users to see the page with greater ease.
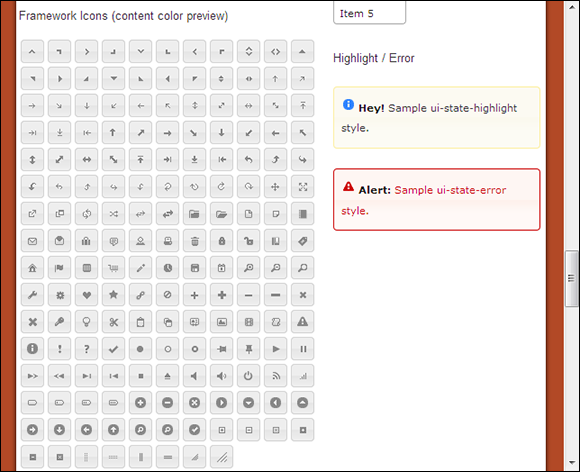
Figure 10-1: The framework icon listing is a way to see what’s available and what it’s called.
Using the ThemeRoller Interface
The ThemeRoller interface consists of the main page and a number of configuration pages, as shown in the examples in this chapter. The main page contains links to other jQuery UI functionality along the top, a ThemeRoller-specific menu along the left side, and examples of the various jQuery UI widgets in two columns on the right (as shown in Figure 10-2).
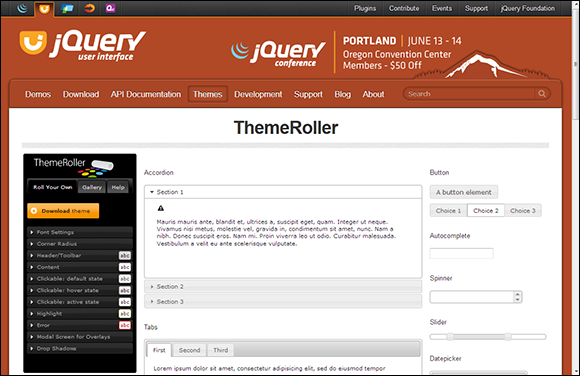
Figure 10-2: The main page provides access to the various configuration features.
The ThemeRoller menu shown in Figure 10-3 contains general options across the top (such as creating custom themes using the Roll Your Own option). The menu content changes depending on the tab you select. Figure 10-3 shows the content of the Roll Your Own tab, which I explain in the “Creating Custom Themes” section, later in this chapter. I discuss the Gallery options in the “Working with Predefined Themes” section, also later in this chapter.
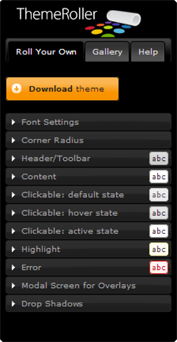
Figure 10-3: The ThemeRoller menu content changes depending on the tab selected.
The Help tab provides an overview of the purpose of ThemeRoller. It also provides links to the two main ways you can use ThemeRoller: to create custom themes or to use predefined themes. Later in the help section, you see information regarding plugin usage and the recommendation to read the CSS-specific information about jQuery UI before creating a new plugin. All plugin developers are supposed to test any of their applications that use themes to ensure that they work with ThemeRoller.
Working with Predefined Themes
The folks at jQuery UI realize that not everyone is an artist. For that matter, not everyone has a good sense of which colors go together. Most developers don’t have the schooling required to know which rules to follow when creating a theme. With this in mind, ThemeRoller provides a wealth of predefined themes. You can use these themes knowing that they provide you with a reasonably well-balanced page appearance and that the results will be aesthetically pleasing to your users. The following section describes predefined themes in more detail.
Viewing the predefined themes
To see the list of predefined themes, select the Gallery tab of the ThemeRoller menu shown in Figure 10-3. You see a listing of the themes by name as shown in Figure 10-4. Notice that each theme entry includes a snapshot of the theme, the theme name, and two buttons for downloading or editing the theme as needed. There are currently 24 predefined themes from which to choose (although the screenshot shows only two of the 24 possibilities).
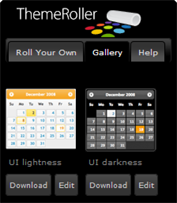
Figure 10-4: Each predefined theme provides a quick view of how the theme appears onscreen.
The iconic view of the theme only gives you a taste of how it will appear onscreen. If you really want to see the theme fully, select it by clicking its entry in the list. When you do so, the page changes so that you can see how the theme affects the overall appearance of the page.
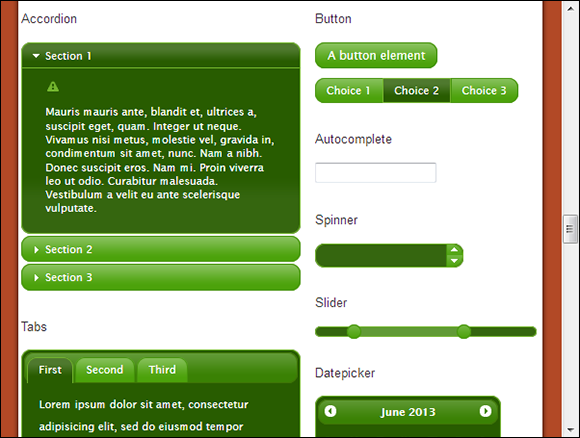
Figure 10-5: Some theme icons are misleading, so it pays to view each theme fully.
Accessing the predefined themes directly
After you find the predefined theme that best matches your requirements, you can add it to your application. The easiest way to perform this task is to use the quick access URLs. You see a sample of them at the bottom of the ThemeRoller page as shown in Figure 10-6.

Figure 10-6: Use the quick access URLs to add a predefined theme to your application.
The only problem is that the URL for the themes doesn’t change — it always shows the URL for the Smoothness theme. In order to use a theme in your application, you must have the correct URL for it, and the URL isn’t available on the ThemeRoller website. The following list presents the theme names followed by the requisite URL for that theme when using jQuery UI 1.10 — you add this URL to your code in order to use that theme in your application.
 UI lightness:
 http://code.jquery.com/ui/1.10.3/themes/ui-lightness/jquery-ui.css
 UI darkness:
 http://code.jquery.com/ui/1.10.3/themes/ui-darkness/jquery-ui.css
 Smoothness:
 http://code.jquery.com/ui/1.10.3/themes/smoothness/jquery-ui.css
 Start:
 http://code.jquery.com/ui/1.10.3/themes/start/jquery-ui.css
 Redmond:
 http://code.jquery.com/ui/1.10.3/themes/redmond/jquery-ui.css
 Sunny:
 http://code.jquery.com/ui/1.10.3/themes/sunny/jquery-ui.css
 Overcast:
 http://code.jquery.com/ui/1.10.3/themes/overcast/jquery-ui.css
 Le Frog:
 http://code.jquery.com/ui/1.10.3/themes/le-frog/jquery-ui.css
 Flick:
 http://code.jquery.com/ui/1.10.3/themes/flick/jquery-ui.css
 Pepper Grinder:
 http://code.jquery.com/ui/1.10.3/themes/pepper-grinder/jquery-ui.css
 Eggplant:
 http://code.jquery.com/ui/1.10.3/themes/eggplant/jquery-ui.css
 Dark Hive:
 http://code.jquery.com/ui/1.10.3/themes/dark-hive/jquery-ui.css
 Cupertino:
 http://code.jquery.com/ui/1.10.3/themes/cupertino/jquery-ui.css
 South Street:
 http://code.jquery.com/ui/1.10.3/themes/south-street/jquery-ui.css
 Blitzer:
 http://code.jquery.com/ui/1.10.3/themes/blitzer/jquery-ui.css
 Humanity:
 http://code.jquery.com/ui/1.10.3/themes/humanity/jquery-ui.css
 Hot Sneaks:
 http://code.jquery.com/ui/1.10.3/themes/hot-sneaks/jquery-ui.css
 Excite Bike:
 http://code.jquery.com/ui/1.10.3/themes/excite-bike/jquery-ui.css
 Vader:
 http://code.jquery.com/ui/1.10.3/themes/vader/jquery-ui.css
 Dot Luv:
 http://code.jquery.com/ui/1.10.3/themes/dot-luv/jquery-ui.css
 Mint Choc:
 http://code.jquery.com/ui/1.10.3/themes/mint-choc/jquery-ui.css
 Black Tie:
 http://code.jquery.com/ui/1.10.3/themes/black-tie/jquery-ui.css
 Trontastic:
 http://code.jquery.com/ui/1.10.3/themes/trontastic/jquery-ui.css
 Swanky Purse:
 http://code.jquery.com/ui/1.10.3/themes/swanky-purse/jquery-ui.css
The basic way for declaring a theme in your application works for every predefined theme that ThemeRoller provides. All you need to do is add the following code to your style sheet. Just replace the theme URL in the following code with URL for the theme you want to use.
<link
rel="stylesheet"
href="http://code.jquery.com/ui/1.10.3/themes/ui-lightness/jquery-ui.css" />
Creating Custom Themes
The 24 predefined themes provide a broad range of color, text, and other choices. However, it’s possible to create a significantly greater number of themes by using the custom approach. You could start with the default theme setup and work from there, but the best approach is to find a predefined theme that looks close to what you want and modify it instead. Not only will you do less work this way, but you may find that there aren’t that many features to change once you have a predefined theme in mind. The following sections help you create a custom theme using ThemeRoller.
Choosing a predefined theme as a starting point
Select any of the predefined themes located on the Gallery tab. When you find the theme you want to modify, click Edit. (Refer to Figure 10-4 to see the Edit button on the right side of each theme entry.) ThemeRoller automatically takes you to the Roll Your Own tab. However, the tab’s settings will contain the values required to create whatever theme you’ve selected.
Performing the configuration
Each theme consists of a number of settings. (Refer to Figure 10-3.) By changing a particular setting, you control the appearance of all the jQuery UI features, including all of the widgets. Each of these settings has a number of subsettings you can use to control the overall appearance of your theme. The following list provides an overview of these settings.
 Font Settings: Determines the overall appearance of text in the theme. You can choose the font family, weight, and size of the font.
 Corner Radius: Determines the size of the rounded corners used for the various elements. This setting won’t affect a browser that doesn’t support rounded corners, such as Internet Explorer 7.
 Header/Toolbar: Specifies the settings for the background and border used for all headers and toolbars.
When working with the background, you can choose the background color, texture, and percentage of coverage. A texture specifies how the background is patterned, such as the use of diagonals or diamonds. Clicking the texture field automatically displays a pictorial list of acceptable textures (as shown in Figure 10-7) — just choose the texture you want to try. Selecting the right texture can add pizzazz to your site.
The border settings control the border, text, and icon colors. When you click one of these fields, you see a color selection dialog box (as shown in Figure 10-8). However, you can also type a specific color value, using hexadecimal notation.
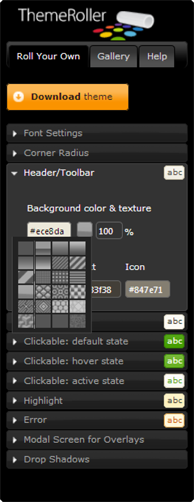
Figure 10-7: Select the texture you want to use from the pictorial list.
 Content: Provides the same background and border selections as those provided by the Header/Toolbar settings. The difference is that these settings affect the page content, rather than headings and toolbars.
 Clickable: default state: Provides the same background and border selections as those provided by the Header/Toolbar settings. The difference is that these settings affect controls that are in the default state, rather than headings and toolbars.
 Clickable: hover state: Provides the same background and border selections as those provided by the Header/Toolbar settings. The difference is that these settings affect controls that are in the hover state (when the mouse cursor is placed over the top of the control), rather than headings and toolbars.
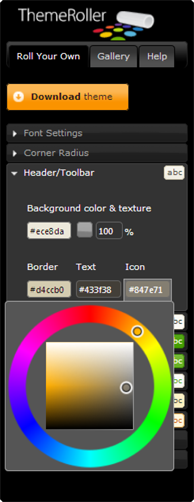
Figure 10-8: Choose the colors you want to use with your page.
 Clickable: active state: Provides the same background and border selections as those provided by the Header/Toolbar settings. The difference is that these settings affect controls that are in the active (selected) state, rather than headings and toolbars.
 Highlight: Provides the same background and border selections as those provided by the Header/Toolbar settings. The difference is that these settings affect anything the user has highlighted onscreen, rather than headings and toolbars.
 Error: Provides the same background and border selections as those provided by the Header/Toolbar settings. The difference is that these settings affect error messages (including content), rather than headings and toolbars.
 Modal Screen for Overlays: Defines the way in which overlays appear on screen. An overlay is information that is presented over the top of existing content in much the way a dialog box displays over the top of an application. The settings control the background and overlay appearance.
The background settings set the color, texture, and percentage of coverage of the background. The textures used for an overlay are completely different from those used for other elements, so you need to check them carefully. In every other respect, the background settings work the same as those used for the Header/Toolbar settings.
The Overlay Opacity setting controls how well you can see the underlying content. In most cases, ThemeRoller provides a modicum of show-through to give the page a glasslike appearance (found in some operating systems today). However, you can change this setting to provide various special effects. Setting this value too low tends to prove distracting for the reader because the original content is seen too easily.
 Drop Shadows: Modifies the appearance of drop shadows, which tend to give some page elements a 3D effect. You can control the background and the overall appearance of the drop shadow. The background controls are precisely the same as those used with Modal Screen Overlays.
The overall appearance of the drop shadow is defined by the shadow opacity, thickness, and offset from the shadowed element, as shown in Figure 10-9. You can also control the rounding of the shadow corners (when the feature is supported by the browser).
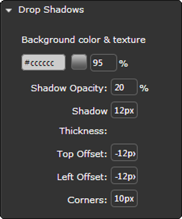
Figure 10-9: Control the drop shadows’ characteristics to obtain special effects.
Downloading Themes to Your System
It’s possible to use predefined themes directly from the ThemeRoller site. Downloading a predefined theme to your site will improve the speed of your application because the server won’t have to fetch the required files each time a user makes a request. However, if you want to use a custom theme, you must create and then download it for use on your site. In both cases, using a downloaded copy of the theme reduces potential security risks because everything needed for the application is downloaded from a single domain. The use of a single domain makes it possible for the administrator to lock down the browser better and reduce the risk of cross-site scripting problems.
Downloading a predefined theme
In order to obtain some additional speed from your application and to reduce the potential for security issues, you might decide to download the predefined theme to your system. The following steps help you perform this task. (Even though the steps show the UI lightness theme, the same steps work for any theme you want to download.)
1. Click Download under the theme you want to use.
Figure 10-4 shows predefined theme entries. You can see the Download button on the left side of each theme entry. ThemeRoller displays the Download Builder page shown in Figure 10-10.
2. Select the version of the theme you want to use.
The default version is the best option in most cases. However, you may need to download an older version to support older applications.
3. Select the features you want to use from the library.
 In most cases, you want to leave all the feature options checked when downloading a development version of the theme — because you don’t know, at the outset, which features you really need. When you complete the development process, you can create a smaller version of the theme by selecting only those features that your application actually uses. The smaller version will download faster so that the user sees results quicker.
4. (Optional) Type a value in the CSS Scope field.
The scope makes it possible to override internal CSS styles using an external .CSS file. You can read more about the use of scope at http://css-tricks.com/saving-the-day-with-scoped-css/ and http://updates.html5rocks.com/2013/03/What-s-the-CSS-scope-pseudo-class-for.
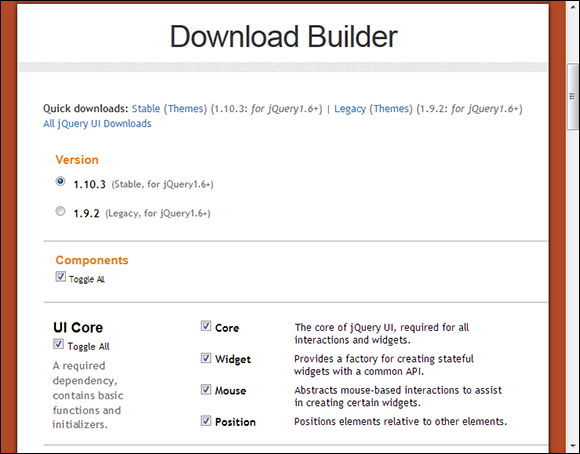
Figure 10-10: The Download Builder helps you customize the kind of download you want.
 Some developers have complained that the scoping feature doesn't work completely in ThemeRoller. You can see one such example at
 http://bugs.jqueryui.com/ticket/8095.
5. Click Download.
You see a download dialog box for your browser and platform. The file you receive is an archive that contains all the special features you requested during the configuration process.
Downloading a custom theme
In order to use a custom theme with your application, you must download it. There aren’t any URLs you can use to access the theme from the ThemeRoller site. The following procedure helps you download a custom theme.
1. Click Download Theme in the ThemeRoller menu.
ThemeRoller displays the Download Builder page shown in Figure 10-10.
2. Select the version of the theme you want to use.
The default version is the best option in most cases. However, you may need to download an older version to support older applications.
3. Select the features you want to use from the library.
Because this is a custom theme, you need to download all of the features for development purposes to ensure you have a complete setup. Unlike a predefined theme, a custom theme makes it harder to go back later and obtain items that at first you thought you wouldn’t need but ended up requiring. Yes, you can use the URL you saved during the creation process to reproduce the theme, but this means keeping the URL in a location that you can remember. When you come up with versions of the theme that you want to keep, saving them at the outset is always a better idea.
4. Type a name for your theme in the Theme Folder Name field.
Select a unique name for your theme that reflects the design or purpose of the theme. Otherwise you may end up with a number of custom themes that are hard to identify later.
5. (Optional) Type a value in the CSS Scope field.
The scope makes it possible to override internal CSS styles using an external .CSS file. You can read more about the use of scope at http://css-tricks.com/saving-the-day-with-scoped-css/ and http://updates.html5rocks.com/2013/03/What-s-the-CSS-scope-pseudo-class-for.
 Some developers have complained that the scoping feature doesn't work completely in ThemeRoller. You can see one such example at
 http://bugs.jqueryui.com/ticket/8095.
6. Click Download.
You see a download dialog for your browser and platform. The file you receive is an archive that contains all of the special features you requested during the configuration process.
Adding Custom Themes to Your Projects
A custom theme isn’t much good unless you use it in an application. However, before you use it in a custom application, it pays to become familiar with the appearance and functionality of the theme. The archive you download contains a customized version of jQuery, jQuery UI, and the CSS used to implement the theme. It also includes an overview of the theme you created, as well as individual examples of the various widgets. The following sections provide an overview of the contents of your archive and also show how to add the resulting theme to an application.
Viewing the index.html file
The topmost file in the archive is index.html. It provides you with an overview of the theme, along with some additional information about it. The first thing you should do after downloading the theme is to open this file to see how it looks on your local system. Figure 10-11 shows how the Le Frog theme looks as a custom download.
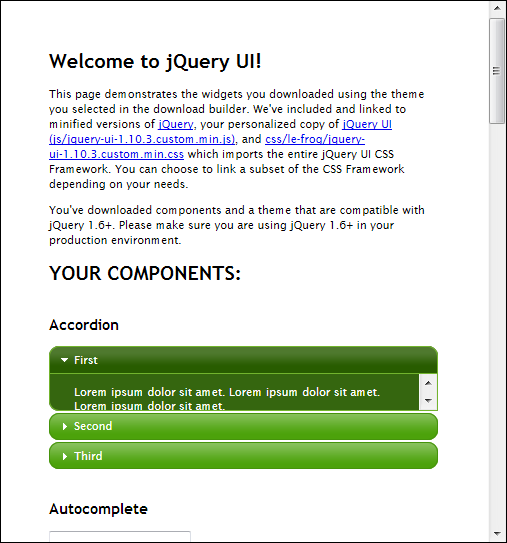
Figure 10-11: Review the theme you created as an overview before looking at specifics.
The top of the page contains instructions for working with the custom theme. In addition, it contains links to the locations of the various files you need. You can also find these links at the top of index.html. In fact, it’s a great idea to simply copy the links from index.html to your own project.
After the introductory material, you see a quick example of each of the widgets that the theme supports. The widgets are only there for show — you can’t actually do anything with them. However, viewing the widgets will tell you whether you have everything at least started correctly. If not, you can always make additional changes.
Viewing the interactive demos
The development-bundle folder contains a lot of useful material. One of the first pieces you should look at is the contents of the development-bundle\demos folder, which contains examples of how to use the various jQuery UI features with your theme. Unfortunately, none of these examples actually use the theme you created unless you modify them to do so. For example, the custom-icons.html example in the development-bundle\demos\accordion folder shows how to perform this task, but doesn't use your theme by default as shown in Figure 10-12.
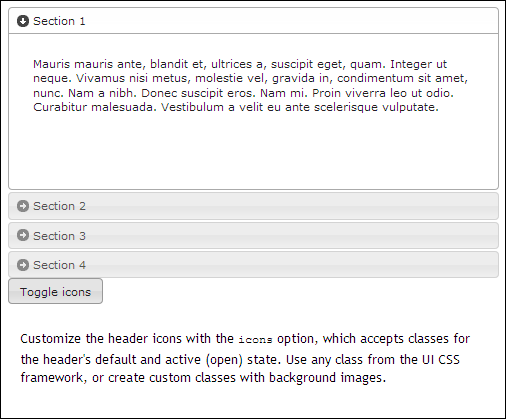
Figure 10-12: The examples are nice but don’t demonstrate functionality using your theme.
Fortunately, it's easy to modify the example so that it does appear with your theme in place. The following procedure tells you how to modify the custom-icons.html example — other examples follow the same pattern.
1. Remove the existing jQuery, jQuery UI, and style tags.
You need to remove the general tags shown here for this example.
<link rel="stylesheet"
href="../../themes/base/jquery.ui.all.css">
<script src="../../jquery-1.9.1.js"></script>
<script src="../../ui/jquery.ui.core.js"></script>
<script src="../../ui/jquery.ui.widget.js"></script>
<script src="../../ui/jquery.ui.accordion.js">
</script>
<script src="../../ui/jquery.ui.button.js"></script>
<link rel="stylesheet" href="../demos.css">
2. Add the updated jQuery, jQuery UI, and style tags shown here.
Make sure you use the links provided in index.html. Because this example is several layers deep in the hierarchy, you must add ../ for each folder level that the example is below the main level (normally three levels, as shown here).
<script
src="../../../js/jquery-1.9.1.js">
</script>
<script
src="../../../js/jquery-ui-1.10.3.custom.js">
</script>
<link
rel="stylesheet"
href="../../../css/le-frog/jquery-ui-1.10.3.custom.css" />
3. Reload the page.
You see the themed output. Figure 10-13 shows a typical example of what themed output might look like.
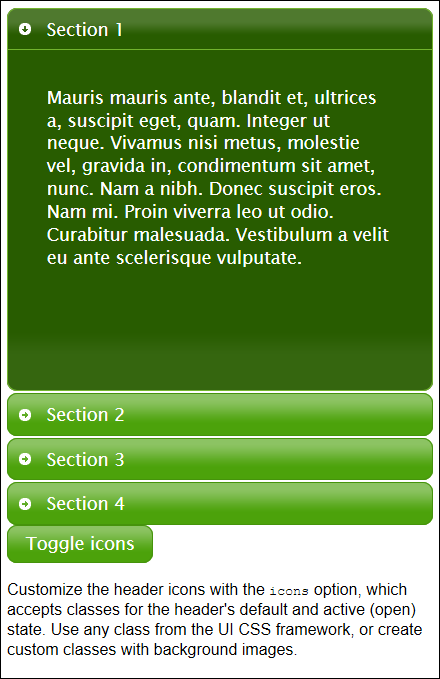
Figure 10-13: Seeing examples using your theme is really helpful.
Looking at the documentation
It's helpful to have documentation for your theme. You can find basic jQuery and jQuery UI documentation in the development-bundle\docs folder of the theme. Each of the files contains information about a particular widget, effect, or other library feature. For example, when you open accordion.html, you see information about the accordion widget (as shown in Figure 10-14).
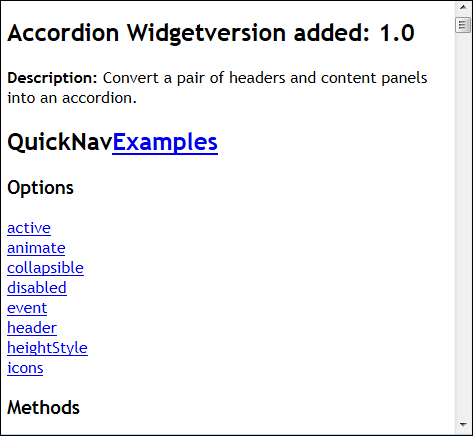
Figure 10-14: Most help files tell you about options, methods, and events.
The top half of the page contains links to specifics about a particular topic. For example, if you want to find out more about the active option, you click its link on the page. (Figure 10-15 shows typical content.) You see a short description of the feature, any required type information, and a coding example.
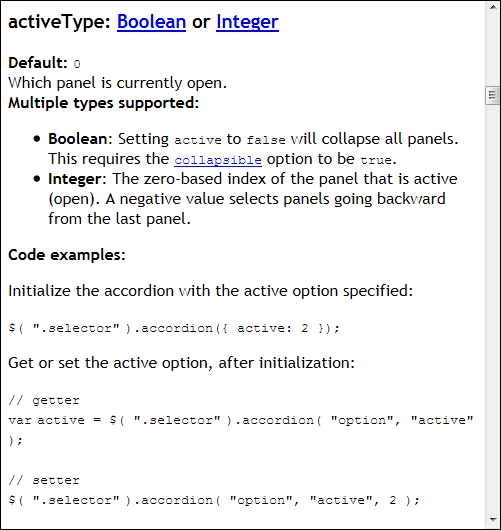
Figure 10-15: The documentation provides enough details for most developers to work with the option, method, or event.
Adding a custom theme to your own project
Seeing the vendor samples and working through the documentation are helpful, but most developers want to see a theme in action. Part IV of this book contains a number of jQuery and jQuery UI examples you can work with. In every case, the only thing you really need to modify is the <style> link. However, to ensure that the example works completely and reliably, you need to modify the jQuery and jQuery UI links as well. Copy the Accordion.HTML example to the same folder you've used for your theme. The following code shows the tags you should use to replace those used in Part IV when using the Le Frog theme (make sure you include the appropriate changes for your theme).
<script
src="js/jquery-1.9.1.js">
</script>
<script
src="js/jquery-ui-1.10.3.custom.js">
</script>
<link
rel="stylesheet"
href="css/le-frog/jquery-ui-1.10.3.custom.css" />
Load the example in your browser to see if the changes have worked. In most cases, you’ll see something like the example shown in Figure 10-16.
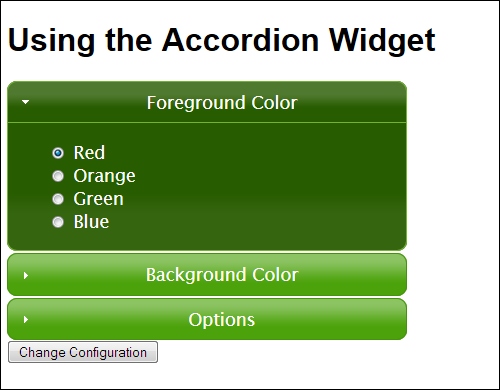
Figure 10-16: The updated example: Something’s not quite right.
The first thing you should notice is that the jQuery UI control does indeed use the new theme. However, the submission button doesn't use the style. This is because the example used a standard <input> button to perform the task. When working with themes, you need to use the full assortment of jQuery UI controls. You can fix this problem by adding a jQuery UI button to the script, as shown here in bold:
<script language="JavaScript">
$(function()
{
$("#Configuration").accordion();
$("input[type=submit]").button();
});
</script>
The page will now present the correct appearance. Because you haven’t attached any jQuery UI behaviors to the button, it will continue to work as it did before.
 jQuery and jQuery UI become even more powerful when you add other plugins to them. These libraries are popular enough that you can probably find a plugin for every need. Check out the list of plugins at