Chapter 16
Ten Phenomenal Places to Find Generators
Chapter 15 discusses libraries, which are collections of code you can use in your application. This chapter discusses generators, which are tools you can use to create, interact with, or test code. These tools include a wide range of specific types, including wizards, designers, Integrated Development Environments (IDEs), and a host of other items.
The following sections provide you with a quick overview of a number of truly amazing tools that help you generate code in some way. The idea is to create code that you can’t readily obtain from a library. Perhaps you have a unique need or the code just doesn’t lend itself to inclusion in a library.
It’s important to review each tool carefully because each tool has special characteristics. I also try to categorize the tool and help you understand why you might need a tool of this type. Even if you don’t think the tool will work for you (and everyone has unique needs), reading about these tools will make you better about finding tools that do meet your needs and provide the special features you require to do a great job of writing browser-based applications of your own.
Creating Animations Using Stylie
Getting an animation just right can be difficult. Each developer has different skills and ways of viewing tasks. Stylie (http://jeremyckahn.github.io/stylie/) is designed for developers who are more visually oriented. (See Figure 16-1.) You choose a starting and ending point for the animation, using the X and Y values. The R value determines the amount of rotation that the animated object performs. You can choose how long the animation occurs using the time values. In addition, the X, Y, and R values can each have an animation effect associated with them.

Figure 16-1: Use Stylie to visually design animations for your site.
The Motion tab defines characteristics of the animation, such as how many times you want the animation to execute (you can choose to make the execution an infinite loop) and how the object you’re animating should interact with the animation path. This is also the tab you use to define the easing used to make the animated effect flow smoothly. A straight line animation is simple, but the easing becomes important when you start working with animations that move in more than one direction.
After you finish configuring your animation, you click the CSS tab, which contains the CSS you use to create the animated effect in your application. The CSS tab lets you choose a name for the animation class. You can also select which vendors to include as part of the CSS and the animation quality level. The HTML tab contains sample tags you need to complete the animation. This is where you’d need to make modifications to include the object you want to animate in place of the simple circle supplied by Stylie.
Designing CSS Styles Using CSSDesk
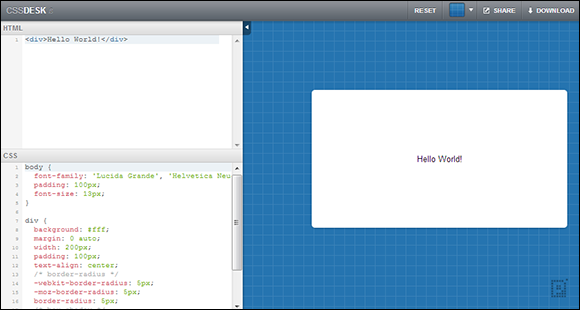
Most IDEs used to create HTML, CSS, and JavaScript files lack a designer interface, where you can immediately see the results of any code you create. Instead, you need to load the page to determine whether the coding changes you make actually create the effect you want. CSSDesk (http://cssdesk.com/) makes it possible to write code and immediately see the effect it has on the output (as shown in Figure 16-2).

Figure 16-2: See your code changes take effect as you make them with CSSDesk.
The right pane shows the output as you make it. The default setup shows a simple Hello World example within a <div> element, but the editor works fine with any HTML code you provide. The HTML code appears in the upper left pane, while the CSS code appears in the lower left pane.
<input type="button"
onclick="alert('Hello')"
value="Say Hello" />
produces the expected output, but calling an external function may not. In short, the JavaScript support is limited, so you might not always see the anticipated result when working with external libraries such as jQuery.
Making Applications Run Faster with yepnope.js
Part of the problem with browser-based applications is that you request a single resource from a library and end up with the entire library loaded. The process is slow, cumbersome, error-prone, and simply inefficient. You can use yepnope.js (http://yepnopejs.com/) to help overcome these issues. When working with yepnope.js, you provide a condition that the product then tests, and then loads resources only as needed to support a specific condition. You can use this product with CSS3 or JavaScript files.
Fortunately, the yepnope.js tool goes further than simply loading resources based on conditions. For example, some applications will mindlessly call a script with the same input parameters multiple times when only one output is possible using a particular set of inputs. The multiple calls can prove especially time-consuming when calling another URL. You can use yepnope.js to keep events like this from occurring. The tool helps make the application code smarter so high-latency calls are avoided whenever possible.
Another problem with scripts is that they can continue to run, even when there's no hope that they'll ever complete. After a while, the user clicks the Back button or goes to a different site. You can add timeouts for scripts individually with yepnope.js so that it becomes possible to detect the timeouts and handle them as errors. With this capability in place, it's potentially possible to recover from scripts that continue running when they shouldn't.
yepnope([{
test : /* A condition you want to test */,
yep : /* Tasks performed when true. */,
nope : /* Tasks performed when false */,
both : /* Tasks performed every time */,
load : /* Resources loaded every time */,
callback : /* A function to call during processing */,
complete : /* A function to call after processing */
}, ... ]);
The basic idea is that you create a scenario where tasks are performed based on specific needs so that the application doesn't spend time performing unnecessary tasks (and wasting both time and resources as a result). Of course, yepnope.js provides more functionality than presented in this overview, but the short version is that this is a smart resource loader.
Generating Templates Using Initializr
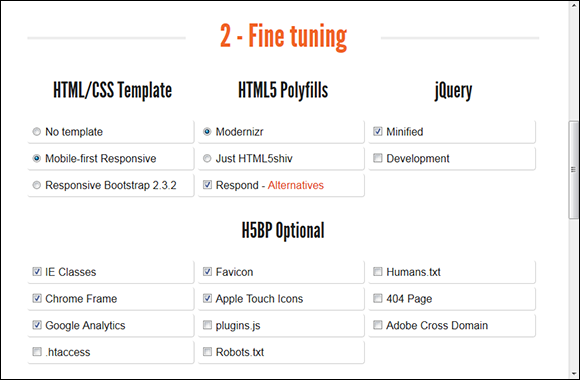
There are many ways to create the templates you need to produce applications. If you're just starting out with HTML5, CSS3, and JavaScript development, the Initializr (www.initializr.com/) template generator may be precisely what you need. It helps you create three basic types of templates (as shown in Figure 16-3), based on the answers you provide to the wizard.
Of course, you may not know which of the templates to use. Click the Demo button under each of the template types to give them a try in your browser. The site will load a page that helps you understand how that particular template works.
Once you decide on a particular template, you click its button and the page expands to show the wizard inputs you need to provide (as shown in Figure 16-4). If you need help with the options, click the Docs button beneath the template button for the template you chose.
The final step is to click Download It!. The download will provide you with everything needed to create the template look you requested. You can then fill the template with content and upload it to your site.

Figure 16-3: Initializr reduces the work required to start new projects that use HTML 5, CSS3, and JavaScript.

Figure 16-4: Provide any answers that the wizard requires to create the template you want.
Optimizing Applications to Work with Older Browsers with Modernizr
There are many different browsers and browser versions in use today. You can get some idea of just how many by looking at NetMarketShare (www.netmarketshare.com/browser-market-share.aspx?qprid=2&qpcustomd=0). Many people refuse to give up their old browsers for any reason. For example, at the time of this writing, 6.13 percent of people are still using Internet Explorer 6. Catering to this group would mean not using a wealth of libraries, special effects, and newer coding techniques. In fact, it would be hard to create anything close to a modern application. This is where Modernizr (http://modernizr.com/) comes into play. You use Modernizr to optionally perform tasks and include application features based on the browser that the user has installed. As a consequence, users with newer browsers can enjoy the full functionality that your site has to offer, but you can also include users with older browsers (just not at the same functionality level, in many cases).
Modernizr performs its task by using a number of techniques — not just the highly unreliable navigator.userAgent property — to detect a user's browser. It detects a wealth of browser features, and helps you avoid problems when a browser lacks a particular feature, using a yepnope.js paradigm. In fact, it checks for over 40 features that developers commonly use within their applications. You can read more about what Modernizr checks — and how it performs those checks — at http://modernizr.com/docs/.
Enhancing Selector Support Using Selectivizr
The CSS3 selector support in older browsers is nearly nonexistent. Of course, you have to have great selector support to make most special effects work properly. The answer to the problem is to use Selectivizr (http://selectivizr.com/) to overcome these issues. This tool is specifically designed to help with problems that crop up in Internet Explorer versions 6 through 8 — and it works with a number of libraries, including
 jQuery
 dojo
dojo
 prototype
 Yahoo!
 DOMAssistant
 MooTools
 NWMatcher
Designing Unusual List Presentations with Liffect
Developers use lists for a number of tasks when creating a page. For example, lists play an important part in creating many menus. Another purpose for lists is to display content. You can display all of the content at once, or make the content special by presenting one item at a time. The purpose of Liffect (http://ademilter.com/lab/liffect/) is to make it possible to create special effects for lists.
This tool generates custom code for animating your content list. All you do is define the kind of animation you want, the time the animation requires to complete, the delay between items, and whether you want items selected randomly (as shown in Figure 16-5). At the bottom of the page are selections for the kind of browsers you want to support.
After you make your selections, click Generate. The utility outputs the HTML, CSS3, and JavaScript code required to create the animated sequence. Of course, you still have to provide the content by modifying the HTML code (or providing some automated method for generating it). Otherwise all you need to do is copy and paste the resulting code to your application.

Figure 16-5: Liffect generates CSS and JavaScript to display list content as an animation.
Editing Code Using Komodo Edit
Yes, you can create any browser-based application you want by using a simple text editor. Any editor that outputs text without any formatting will work just fine. In fact, any method you have of producing pure text output will work. However, most developers opt for an environment that’s friendlier and easier to use — often in the form of an IDE. Using an IDE provides you with helpful information, such as the properties available when you’re working with CSS or the inputs required for a JavaScript call.
Komodo Edit (www.activestate.com/komodo-edit) provides good support for CSS3, HTML5, JavaScript and a host of other languages, including Perl, PHP, Python, Ruby and Tcl. The editor works on Windows, Macintosh, and Linux systems. The paid version of this product supports additional languages and a wealth of additional features, but the free version is perfectly usable for JavaScript coding. The biggest lack in the free version is a debugger, but you can easily use the debugger that comes with your browser to make up the difference.
Engineering Layer Effects Using LayerStyles
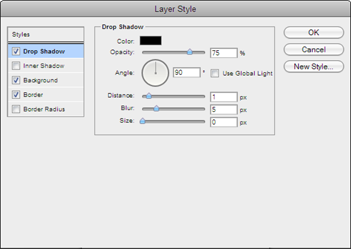
Creating the right appearance for a layer can be hard. A layer is composed of the outer shadow, border, and inner shadow of the elements (such as a <div>) that you create. LayerStyles (http://layerstyles.org/) makes it possible to visually design the layer effects that you create. You perform that task using a control panel (as shown in Figure 16-6).

Figure 16-6: Create and manage layer effects to produce just the right appearance on a page.
The control panel helps you modify all of the characteristics of the layer effect, including the source of light. All of the effects appear on a square in the center of the page, which you can see by moving the control panel to a more convenient location (simply click the title bar and drag the control panel anywhere you want to see it on the page).
When you finish creating your layer effect, you can click the CSS tab that appears in the lower-left corner of the page. This act displays a window that shows the code required to create the layer effect you designed. Simply click Copy to copy the information to the Clipboard. You can then paste the code into your IDE for use in your application. The resulting CSS should work fine with Internet Explorer, Firefox, Chrome, and most other browsers that support CSS3.
Testing Your Font Stacks Using FFFFALLBACK
In Chapter 3 I discuss a common problem that developers have in working with fonts — the issue of font support on the client system. In that chapter, you see one solution to the problem, but the solution may not produce precisely the result you want in everyday operation. In some cases, you want to create a custom font stack so that your page appears precisely as you want it to appear to the end user. Another solution to this problem is to use FFFFALLBACK (http://ffffallback.com/) — a tool that makes it possible to try various font combinations on the target page.
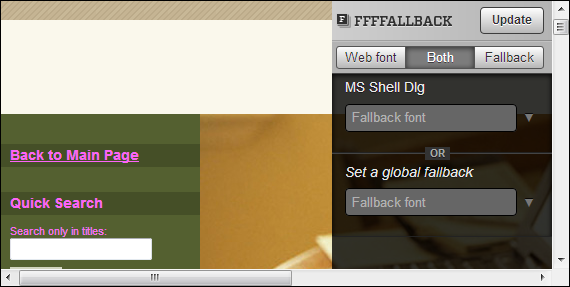
The page contains instructions for using this tool. You simply drag the bookmarklet to the toolbar of your browser, where it becomes a clickable button. Go to the site you want to modify, and then click the FFFFALLBACK button. The tool analyzes the CSS on the page and creates a clone of the page. You’ll also see a tool on the cloned page that you can use to test various fonts (as shown in Figure 16-7). To change the font, type the font name and press Enter in the field supplied.

Figure 16-7: Define custom font stacks for your site to convey the message you want.
The fallback font you choose appears in an alternative color, below and to the right of the original font. To see just the fallback font, click Fallback. Likewise, to see just the original font, click Web Font.
 Many animations move in more than one direction. Click the plus sign (+) to add another direction. This direction also has X, Y, and R values and you can set its duration and special effects as well. In short, you can use this interface to create incredibly complex animation effects that go in more than one direction.
 The main focus of this editor is creating the user interface for your application. However, you can modify the HTML pane to include