The vendor prepayment function gives a company's controller the ability to minimize the risk by applying the segregation of duties between company departments and control the prepayment process, where accounts payable does not perform the prepayment transaction without assigning the prepayment linked to the purchase order and harmonizing the business process between procurement and accounts payable. Assume that the company has agreed with a vendor to supply goods to the company and the vendor has a condition to receive a prepayment before executing the goods delivery, and this is a normal practice in the daily business.
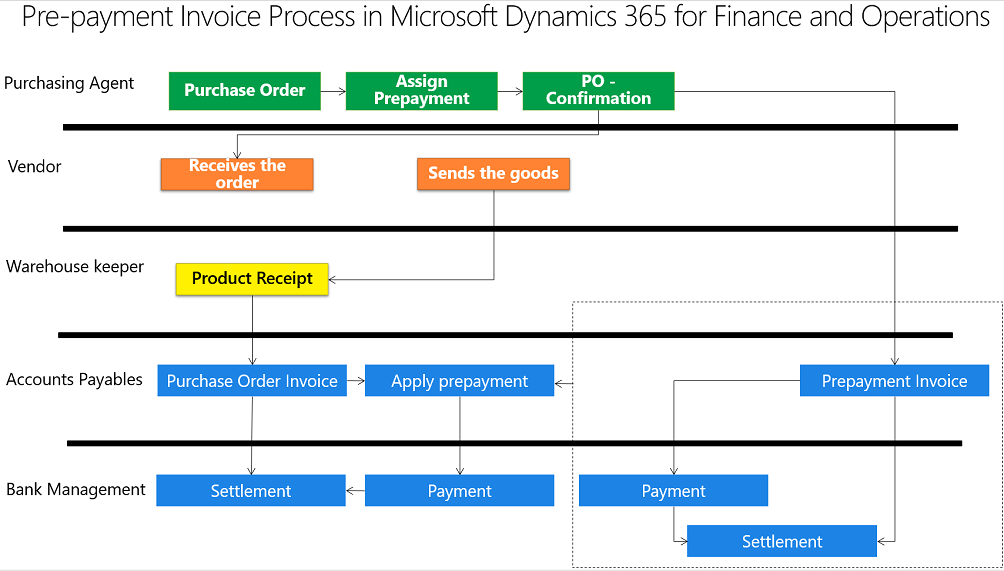
The vendor prepayment cycle is executed among the procurement agent, accounts payable, and bank accountants. The following diagram illustrates the business process of the prepayment:

From the preceding diagram, we can see that:
- The procurement agent creates a purchase order.
- The procurement agent assigns the prepayment to a purchase order as per the agreement. with the vendor; here, the prepayment is a fixed amount or a percentage from the total purchases of the PO.
- The procurement agent confirms the purchase order.
- The vendor issues a prepayment invoice.
- The accounts payable accountant posts the prepayment invoice, and the prepayment invoice amount is inherited from the previous prepayment assignment.
- Bank accountants have open invoices that need to be paid and settled against the payment.
- After the warehouse keeper receives the goods in the warehouse, the vendor sends the final invoice.
- The accounts payable accountant applies the prepayment to the final invoice and posts the PO invoice. If the AP accountant does not apply the prepayment invoice to the PO invoice, they can apply it later on.
- The bank accountant opens the invoice with a vendor residual balance that needs to be paid and settled against the payment.
To assign a prepayment invoice on a created purchase order, navigate to Accounts payable | Purchase orders | All purchase orders. Navigate to PURCHASE | Prepayment, as shown in the following screenshot:

The prepayment dialogue will pop up as shown in the following screenshot; enter the prepayment description, select whether the prepayment will be Fixed or Percent from the purchase cost, and select the procurement category:

As shown in the following screenshot, navigate to INVOICE and select Prepayment invoice in the purchase order form:

Navigate to Inventory management | Setup | Posting | Posting | Purchase order.
Then, post the prepayment invoice from the vendor invoice form, as shown in the following screenshot, and enter the invoice number and description:

The financial entry is automatically generated based on the inventory posting profile as follows:
- Dr. Prepayment
- Cr. Vendor balance
At this point, there is a liability on this particular vendor with the prepayment amount, and this liability appears in the open transactions, which are not settled yet. This form is Settle transactions; in order to access this form, navigate to Accounts payable | Vendors | All vendors, select a particular vendor, then go to the INVOICE ribbon and select Settle transactions, as shown in the following screenshot:

The prepayment invoice is ready to be paid; to perform a vendor payment transaction, navigate to Accounts payable | Payments | Payment journal, create a new journal number, and then go to Lines. Select the vendor code and then go to Functions | Settlement. The following screenshot illustrates the journal and its line along with the settlement access path:

As shown in the following screenshot, in the Settle transactions form, mark the invoice that will be paid and close the form:

The amount will be automatically populated in the voucher line on the debit side; validate and post the payment transactions. In this transaction, the vendor invoice has been settled against payment transactions and moved to closed transactions, as shown in the following screenshot:

The financial entry is automatically generated as follows:
- Dr. Vendor balance
- Cr. Bank account
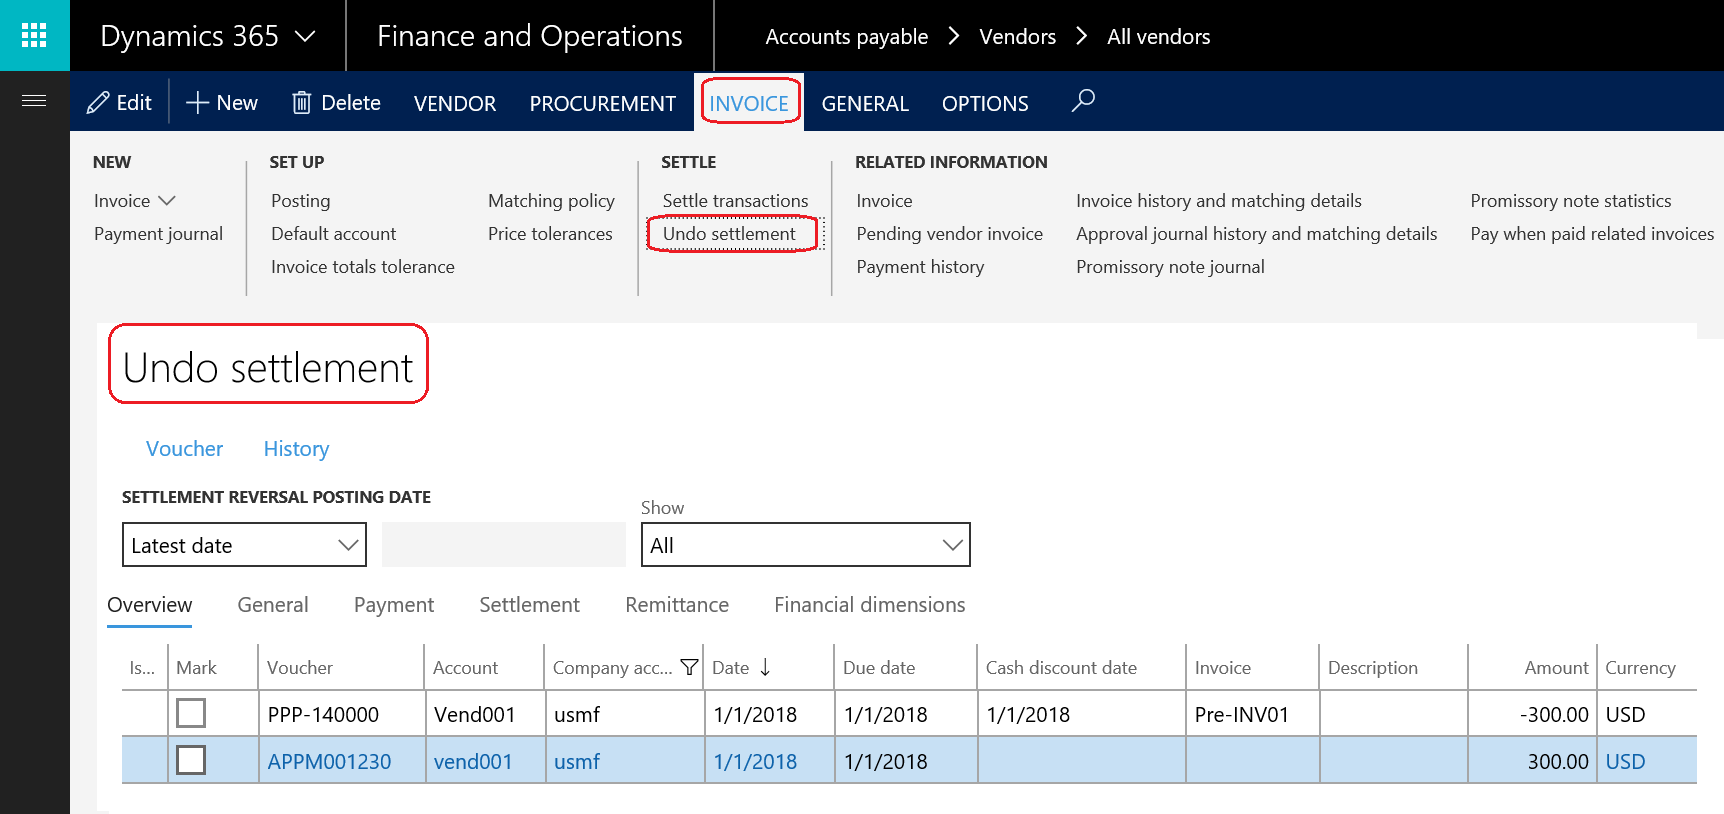
To access closed transactions, navigate to Accounts payable | Vendors | All vendors; select a particular vendor and then navigate to INVOICE | Undo settlement. The following screenshot shows the payment and the settled invoice against it:

Then, post the purchase order invoice and consider the prepayment amount by applying the prepayment on the final vendor invoice to get the realistic vendor liability; there are two scenarios here: apply the prepayment before a post-purchase order invoice or after posting the vendor invoice.
The prepayment has a transaction type as Prepayment application during apply prepayment transaction.
The following screenshot illustrates the prepayment application process before posting the purchase order invoice; navigate to Accounts payable | Purchase orders | All purchase orders, select the purchase order that needs to be invoiced, go to the INVOICE ribbon, and select Invoice:

The vendor invoice form will open up, enter the invoice number and invoice description. Then go to Apply prepayment. The Apply prepayment form with open up, select the Prepayments to apply, as shown in the following screenshot:

The applied prepayment amount appears in the invoice line with a negative sign; this will lead to the net invoice amount (total invoice amount—prepayment amount). As shown in the following screenshot, the total invoice (1,000) minus the prepayment amount (300) equals 700, so the net invoice amount is 700:

The invoice financial entry for a purchase order invoice that has a prepayment applied is generated; the entry consists of four lines; two lines for the prepayment application and the other two lines for the liability entry, as follows:
- Dr. Vendor balance (the prepayment amount)
- Cr. Prepayment (the prepayment amount)
- Dr. Purchase inventory receipt (the total purchase order amount)
- Cr. Vendor balance (the total purchase order amount)