14.6 Case Study: Traveler’s Companion Translation App
Suppose you’re traveling in a Spanish-speaking country, but you do not speak Spanish, and you need to communicate with someone who does not speak English. You could use a translation app to speak in English, and the app could translate that, then speak it in Spanish. The Spanish-speaking person could then respond, and the app could translate that and speak it to you in English.
Here, you’ll use three powerful IBM Watson services to implement such a traveler’s companion translation app,29 enabling people who speak different languages to converse in near real time. Combining services like this is known as creating a mashup. This app also uses simple file-processing capabilities that we introduced in the “Files and Exceptions” chapter.
 Self Check
(Fill-In) Combining services is known as creating a(n) ____________.
Answer: mashup.
14.6.1 Before You Run the App
You’ll build this app using the Lite (free) tiers of several IBM Watson services. Before executing the app, make sure that you’ve registered for an IBM Cloud account, as we discussed earlier in the chapter, so you can get credentials for each of the three services the app uses. Once you have your credentials (described below), you’ll insert them in our keys.py file (located in the ch14 examples folder) that we import into the example. Never share your credentials.
As you configure the services below, each service’s credentials page also shows you the service’s URL. These are the default URLs used by the Watson Developer Cloud Python SDK, so you do not need to copy them. In Section 14.6.3, we present the SimpleLanguageTranslator.py script and a detailed walkthrough of the code.
Registering for the Speech to Text Service
This app uses the Watson Speech to Text service to transcribe English and Spanish audio files to English and Spanish text, respectively. To interact with the service, you must get a username and password. To do so:
Create a Service Instance: Go to
https:console.bluemix.net/catalog/services/speech-to-textand click theCreatebutton on the bottom of the page. This auto-generates an API key for you and takes you to a tutorial for working with the Speech to Text service.Get Your Service Credentials: To see your API key, click
Manageat the top-left of the page. To the right ofCredentials, clickShow credentials, then copy theAPI Key, and paste it into the variablespeech_to_text_key’s string in thekeys.pyfile provided in this chapter’sch14examples folder.
Registering for the Text to Speech Service
In this app, you’ll use the Watson Text to Speech service to synthesize speech from text. This service also requires you to get a username and password. To do so:
Create a Service Instance: Go to
https:console.bluemix.net/catalog/services/text-to-speechand click theCreatebutton on the bottom of the page. This auto-generates an API key for you and takes you to a tutorial for working with the Text to Speech service.Get Your Service Credentials: To see your API key, click
Manageat the top-left of the page. To the right ofCredentials, clickShow credentials, then copy theAPI Keyand paste it into the variabletext_to_speech_key’s string in thekeys.pyfile provided in this chapter’sch14examples folder.
Registering for the Language Translator Service
In this app, you’ll use the Watson Language Translator service to pass text to Watson and receive back the text translated into another language. This service requires you to get an API key. To do so:
Create a Service Instance: Go to
https:console.bluemix.net/catalog/services/language-translatorand click theCreatebutton on the bottom of the page. This auto-generates an API key for you and takes you to a page to manage your instance of the service.Get Your Service Credentials: To the right of
Credentials, clickShow credentials, then copy theAPI Keyand paste it into the variabletranslate_key’s string in thekeys.pyfile provided in this chapter’sch14examples folder.
Retrieving Your Credentials
To view your credentials at any time, click the appropriate service instance at:
https:/ Self Check
(Fill-In) Once you have an IBM Cloud account, you can get your ____________ for interacting with Watson services.
Answer: credentials.
14.6.2 Test-Driving the App
Once you’ve added your credentials to the script, open an Anaconda Prompt (Windows), a Terminal (macOS/Linux) or a shell (Linux). Run the script30 by executing the following command from the ch14 examples folder:
ipython SimpleLanguageTranslator.pyProcessing the Question
The app performs 10 steps, which we point out via comments in the code. When the app begins executing:
Step 1 prompts for and records a question. First, the app displays:
Press Enter then ask your question in Englishand waits for you to press Enter. When you do, the app displays:
Recording 5 seconds of audioSpeak your question. We said, “Where is the closest bathroom?” After five seconds, the app displays:
Recording completeStep 2 interacts with Watson’s Speech to Text service to transcribe your audio to text and displays the result:
English: where is the closest bathroomStep 3 then uses Watson’s Language Translator service to translate the English text to Spanish and displays the translated text returned by Watson:
Spanish: ¿Dónde está el baño más cercano?Step 4 passes this Spanish text to Watson’s Text to Speech service to convert the text to an audio file.
Step 5 plays the resulting Spanish audio file.
Processing the Response
At this point, we’re ready to process the Spanish speaker’s response.
Step 6 displays:
Press Enter then speak the Spanish answerand waits for you to press Enter. When you do, the app displays:
Recording 5 seconds of audioand the Spanish speaker records a response. We do not speak Spanish, so we used Watson’s Text to Speech service to prerecord Watson saying the Spanish response “El baño más cercano está en el restaurante,” then played that audio loud enough for our computer’s microphone to record it. We provided this prerecorded audio for you as SpokenResponse.wav in the ch14 folder. If you use this file, play it quickly after pressing Enter above as the app records for only 5 seconds.31 To ensure that the audio loads and plays quickly, you might want to play it once before you press Enter to begin recording. After five seconds, the app displays:
Recording completeStep 7 interacts with Watson’s Speech to Text service to transcribe the Spanish audio to text and displays the result:
Spanish response: el baño más cercano está en el restauranteStep 8 then uses Watson’s Language Translator service to translate the Spanish text to English and displays the result:
English response: The nearest bathroom is in the restaurantStep 9 passes the English text to Watson’s Text to Speech service to convert the text to an audio file.
Step 10 then plays the resulting English audio.
Self Check
(Fill-In) Watson’s Text to Speech service converts text to ____________.
Answer: audio.
14.6.3 SimpleLanguageTranslator.py Script Walkthrough
In this section, we present the SimpleLanguageTranslator.py script’s source code, which we’ve divided into small consecutively numbered pieces. Let’s use a top-down approach as we did in the “Control Statements and Program Development” chapter. Here’s the top:
Create a translator app that enables English and Spanish speakers to communicate.
The first refinement is:
Translate a question spoken in English into Spanish speech.
Translate the answer spoken in Spanish into English speech.
We can break the first line of the second refinement into five steps:
Step 1: Prompt for then record English speech into an audio file.
Step 2: Transcribe the English speech to English text.
Step 3: Translate the English text into Spanish text.
Step 4: Synthesize the Spanish text into Spanish speech and save it into an audio file.
Step 5: Play the Spanish audio file.
We can break the second line of the second refinement into five steps:
Step 6: Prompt for then record Spanish speech into an audio file.
Step 7: Transcribe the Spanish speech to Spanish text.
Step 8: Translate the Spanish text into English text.
Step 9: Synthesize the English text into English speech and save it into an audio file.
Step 10: Play the English audio.
This top-down development makes the benefits of the divide-and-conquer approach clear, focusing our attention on small pieces of a more significant problem.
In this section’s script, we implement the 10 steps specified in the second refinement. Steps 2 and 7 use the Watson Speech to Text service, Steps 3 and 8 use the Watson Language Translator service, and Steps 4 and 9 use the Watson Text to Speech service.
Importing Watson SDK Classes
Lines 4–6 import classes from the watson_developer_cloud module that was installed with the Watson Developer Cloud Python SDK. Each of these classes uses the Watson credentials you obtained earlier to interact with a corresponding Watson service:
Class
SpeechToTextV132 enables you to pass an audio file to the Watson Speech to Text service and receive a JSON33 document containing the text transcription.Class
LanguageTranslatorV3enables you to pass text to the Watson Language Translator service and receive a JSON document containing the translated text.Class
TextToSpeechV1enables you to pass text to the Watson Text to Speech service and receive audio of the text spoken in a specified language.1 # SimpleLanguageTranslator.py2 """Use IBM Watson Speech to Text, Language Translator and Text to Speech3 APIs to enable English and Spanish speakers to communicate."""4 from watson_developer_cloud import SpeechToTextV15 from watson_developer_cloud import LanguageTranslatorV36 from watson_developer_cloud import TextToSpeechV1
Other Imported Modules
Line 7 imports the keys.py file containing your Watson credentials. Lines 8–11 import modules that support this app’s audio-processing capabilities:
The
pyaudiomodule enables us to record audio from the microphone.pydubandpydub.playbackmodules enable us to load and play audio files.The Python Standard Library’s
wavemodule enables us to save WAV (Waveform Audio File Format) files. WAV is a popular audio format originally developed by Microsoft and IBM. This app uses thewavemodule to save the recorded audio to a.wavfile that we send to Watson’s Speech to Text service for transcription.7 import keys # contains your API keys for accessing Watson services8 import pyaudio # used to record from mic9 import pydub # used to load a WAV file10 import pydub.playback # used to play a WAV file11 import wave # used to save a WAV file12
Main Program: Function run_translator
Let’s look at the main part of the program defined in function run_translator (lines 13–54), which calls the functions defined later in the script. For discussion purposes, we broke run_translator into the 10 steps it performs. In Step 1 (lines 15–17), we prompt in English for the user to press Enter, then speak a question. Function record_audio then records audio for five seconds and stores it in the file english.wav:
13 def run_translator():14 """Calls the functions that interact with Watson services."""15 # Step 1: Prompt for then record English speech into an audio file16 input('Press Enter then ask your question in English')17 record_audio('english.wav')18
In Step 2, we call function speech_to_text, passing the file english.wav for transcription and telling the Speech to Text service to transcribe the text using its predefined model 'en-US_BroadbandModel'.34 We then display the transcribed text:
19 # Step 2: Transcribe the English speech to English text20 english = speech_to_text(21 file_name='english.wav', model_id='en-US_BroadbandModel')22 print('English:', english)23
In Step 3, we call function translate, passing the transcribed text from Step 2 as the text to translate. Here we tell the Language Translator service to translate the text using its predefined model 'en-es' to translate from English (en) to Spanish (es). We then display the Spanish translation:
24 # Step 3: Translate the English text into Spanish text25 spanish = translate(text_to_translate=english, model='en-es')26 print('Spanish:', spanish)27
In Step 4, we call function text_to_speech, passing the Spanish text from Step 3 for the Text to Speech service to speak using its voice 'es-US_SofiaVoice'. We also specify the file in which the audio should be saved:
28 # Step 4: Synthesize the Spanish text into Spanish speech29 text_to_speech(text_to_speak=spanish, voice_to_use='es-US_SofiaVoice',30 file_name='spanish.wav')31
In Step 5, we call function play_audio to play the file 'spanish.wav', which contains the Spanish audio for the text we translated in Step 3.
32 # Step 5: Play the Spanish audio file33 play_audio(file_name='spanish.wav')34
Finally, Steps 6–10 repeat what we did in Steps 1–5, but for Spanish speech to English speech:
Step 6 records the Spanish audio.
Step 7 transcribes the Spanish audio to Spanish text using the Speech to Text service’s predefined model
'es-ES_BroadbandModel'.Step 8 translates the Spanish text to English text using the Language Translator Service’s
'es-en'(Spanish-to-English) model.Step 9 creates the English audio using the Text to Speech Service’s voice 'en-US_AllisonVoice'.
Step 10 plays the English audio.
35 # Step 6: Prompt for then record Spanish speech into an audio file36 input('Press Enter then speak the Spanish answer')37 record_audio('spanishresponse.wav')3839 # Step 7: Transcribe the Spanish speech to Spanish text40 spanish = speech_to_text(41 file_name='spanishresponse.wav', model_id='es-ES_BroadbandModel')42 print('Spanish response:', spanish)4344 # Step 8: Translate the Spanish text into English text45 english = translate(text_to_translate=spanish, model='es-en')46 print('English response:', english)4748 # Step 9: Synthesize the English text into English speech49 text_to_speech(text_to_speak=english,50 voice_to_use='en-US_AllisonVoice',51 file_name='englishresponse.wav')5253 # Step 10: Play the English audio54 play_audio(file_name='englishresponse.wav')55
Now let’s implement the functions we call from Steps 1 through 10.
Function speech_to_text
To access Watson’s Speech to Text service, function speech_to_text (lines 56–87) creates a SpeechToTextV1 object named stt (short for speech-to-text), passing as the argument the API key you set up earlier. The with statement (lines 62–65) opens the audio file specified by the file_name parameter and assigns the resulting file object to audio_file. The open mode 'rb' indicates that we’ll read (r) binary data (b)—audio files are stored as bytes in binary format. Next, lines 64–65 use the SpeechToTextV1 object’s recognize method to invoke the Speech to Text service. The method receives three keyword arguments:
audiois the file (audio_file) to pass to the Speech to Text service.content_typeis the media type of the file’s contents—'audio/wav'indicates that this is an audio file stored in WAV format.35modelindicates which spoken language model the service will use to recognize the speech and transcribe it to text. This app uses predefined models—either 'en-US_BroadbandModel' (for English) or 'es-ES_BroadbandModel' (for Spanish).56 def speech_to_text(file_name, model_id):57 """Use Watson Speech to Text to convert audio file to text."""58 # create Watson Speech to Text client59 stt = SpeechToTextV1(iam_apikey=keys.speech_to_text_key)6061 # open the audio file62 with open(file_name, 'rb') as audio_file:63 # pass the file to Watson for transcription64 result = stt.recognize(audio=audio_file,65 content_type='audio/wav', model=model_id).get_result()6667 # Get the 'results' list. This may contain intermediate and final68 # results, depending on method recognize's arguments. We asked69 # for only final results, so this list contains one element.70 results_list = result['results']7172 # Get the final speech recognition result--the list's only element.73 speech_recognition_result = results_list[0]7475 # Get the 'alternatives' list. This may contain multiple alternative76 # transcriptions, depending on method recognize's arguments. We did77 # not ask for alternatives, so this list contains one element.78 alternatives_list = speech_recognition_result['alternatives']7980 # Get the only alternative transcription from alternatives_list.81 first_alternative = alternatives_list[0]8283 # Get the 'transcript' key's value, which contains the audio's84 # text transcription.85 transcript = first_alternative['transcript']8687 return transcript # return the audio's text transcription88
The recognize method returns a DetailedResponse object. Its getResult method returns a JSON document containing the transcribed text, which we store in result. The JSON will look similar to the following but depends on the question you ask:
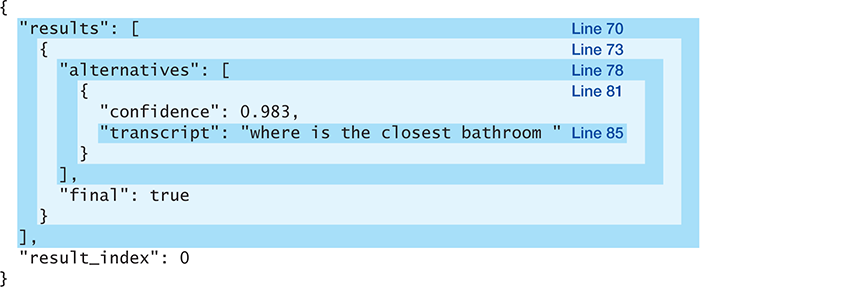
The JSON contains nested dictionaries and lists. To simplify navigating this data structure, lines 70–85 use separate small statements to “pick off” one piece at a time until we get the transcribed text—"where is the closest bathroom ", which we then return. The boxes around portions of the JSON and the line numbers in each box correspond to the statements in lines 70–85. The statements operate as follows:
Line 70 assigns to
results_listthe list associated with the key'results':results_list = result['results']Depending on the arguments you pass to method
recognize, this list may contain intermediate and final results. Intermediate results might be useful, for example, if you were transcribing live audio, such as a newscast. We asked for only final results, so this list contains one element.36Line 73 assigns to
speech_recognition_resultthe final speech-recognition result—the only element inresults_list:speech_recognition_result = results_list[0]Line 78
alternatives_list = speech_recognition_result['alternatives']assigns to
alternatives_listthe list associated with the key'alternatives'. This list may contain multiple alternative transcriptions, depending on methodrecognize’s arguments. The arguments we passed result in a one-element list.Line 81 assigns to
first_alternativethe only element inalternatives_list:first_alternative = alternatives_list[0]Line 85 assigns to
transcriptthe'transcript'key’s value, which contains the audio’s text transcription:transcript = first_alternative['transcript']Finally, line 87 returns the audio’s text transcription.
Lines 70–85 could be replaced with the denser statement
return result['results'][0]['alternatives'][0]['transcript']but we prefer the separate simpler statements.
Function translate
To access the Watson Language Translator service, function translate (lines 89–111) first creates a LanguageTranslatorV3 object named language_translator, passing as arguments the service version ('2018-05-31'37), the API Key you set up earlier and the service’s URL. Lines 93–94 use the LanguageTranslatorV3 object’s translate method to invoke the Language Translator service, passing two keyword arguments:
textis the string to translate to another language.model_idis the predefined model that the Language Translator service will use to understand the original text and translate it into the appropriate language. In this app,modelwill be one of IBM’s predefined translation models—'en-es' (for English to Spanish) or 'es-en' (for Spanish to English).89 def translate(text_to_translate, model):90 """Use Watson Language Translator to translate English to Spanish91 (en-es) or Spanish to English (es-en) as specified by model."""92 # create Watson Translator client93 language_translator = LanguageTranslatorV3(version='2018-05-31',94 iam_apikey=keys.translate_key)9596 # perform the translation97 translated_text = language_translator.translate(98 text=text_to_translate, model_id=model).get_result()99100 # Get 'translations' list. If method translate's text argument has101 # multiple strings, the list will have multiple entries. We passed102 # one string, so the list contains only one element.103 translations_list = translated_text['translations']104105 # get translations_list's only element106 first_translation = translations_list[0]107108 # get 'translation' key's value, which is the translated text109 translation = first_translation['translation']110111 return translation # return the translated string112
The method returns a DetailedResponse. That object’s getResult method returns a JSON document, like:
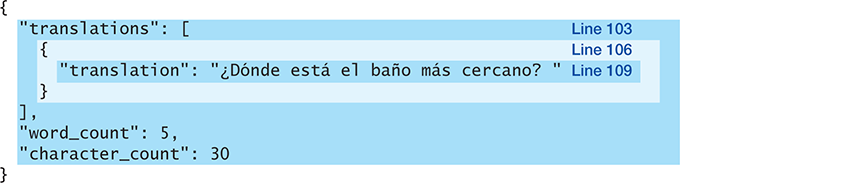
The JSON you get as a response depends on the question you asked and, again, contains nested dictionaries and lists. Lines 103–109 use small statements to pick off the translated text "¿Dónde está el baño más cercano? ". The boxes around portions of the JSON and the line numbers in each box correspond to the statements in lines 103–109. The statements operate as follows:
Line 103 gets the
'translations'list:translations_list = translated_text['translations']If method
translate’stextargument has multiple strings, the list will have multiple entries. We passed only one string, so the list contains only one element.Line 106 gets
translations_list’s only element:first_translation = translations_list[0]Line 109 gets the
'translation'key’s value, which is the translated text:translation = first_translation['translation']Line 111 returns the translated string.
Lines 103–109 could be replaced with the more concise statement
return translated_text['translations'][0]['translation']but again, we prefer the separate simpler statements.
Function text_to_speech
To access the Watson Text to Speech service, function text_to_speech (lines 113–122) creates a TextToSpeechV1 object named tts (short for text-to-speech), passing as the argument the API key you set up earlier. The with statement opens the file specified by file_name and associates the file with the name audio_file. The mode 'wb' opens the file for writing (w) in binary (b) format. We’ll write into that file the contents of the audio returned by the Speech to Text service.
113 def text_to_speech(text_to_speak, voice_to_use, file_name):114 """Use Watson Text to Speech to convert text to specified voice115 and save to a WAV file."""116 # create Text to Speech client117 tts = TextToSpeechV1(iam_apikey=keys.text_to_speech_key)118119 # open file and write the synthesized audio content into the file120 with open(file_name, 'wb') as audio_file:121 audio_file.write(tts.synthesize(text_to_speak,122 accept='audio/wav', voice=voice_to_use).get_result().content)123
Lines 121–122 call two methods. First, we invoke the Speech to Text service by calling the TextToSpeechV1 object’s synthesize method, passing three arguments:
text_to_speakis the string to speak.the keyword argument
acceptis the media type indicating the audio format the Speech to Text service should return—again,'audio/wav'indicates an audio file in WAV format.the keyword argument
voiceis one of the Speech to Text service’s predefined voices. In this app, we’ll use'en-US_AllisonVoice'to speak English text and'es-US_SofiaVoice'to speak Spanish text. Watson provides many male and female voices across various languages.38
Watson’s DetailedResponse contains the spoken text audio file, accessible via get_result. We access the returned file’s content attribute to get the bytes of the audio and pass them to the audio_file object’s write method to output the bytes to a .wav file.
Function record_audio
The pyaudio module enables you to record audio from the microphone. The function record_audio (lines 124–154) defines several constants (lines 126–130) used to configure the stream of audio information coming from your computer’s microphone. We used the settings from the pyaudio module’s online documentation:
FRAME_RATE—44100frames-per-second represents 44.1 kHz, which is common for CD-quality audio.CHUNK—1024is the number of frames streamed into the program at a time.FORMAT—pyaudio.paInt16is the size of each frame (in this case, 16-bit or 2-byte integers).CHANNELS—2is the number of samples per frame.SECONDS—5is the number of seconds for which we’ll record audio in this app.124 def record_audio(file_name):125 """Use pyaudio to record 5 seconds of audio to a WAV file."""126 FRAME_RATE = 44100 # number of frames per second127 CHUNK = 1024 # number of frames read at a time128 FORMAT = pyaudio.paInt16 # each frame is a 16-bit (2-byte) integer129 CHANNELS = 2 # 2 samples per frame130 SECONDS = 5 # total recording time131132 recorder = pyaudio.PyAudio() # opens/closes audio streams133134 # configure and open audio stream for recording (input=True)135 audio_stream = recorder.open(format=FORMAT, channels=CHANNELS,136 rate=FRAME_RATE, input=True, frames_per_buffer=CHUNK)137 audio_frames = [] # stores raw bytes of mic input138 print('Recording 5 seconds of audio')139140 # read 5 seconds of audio in CHUNK-sized pieces141 for i in range(0, int(FRAME_RATE * SECONDS / CHUNK)):142 audio_frames.append(audio_stream.read(CHUNK))143144 print('Recording complete')145 audio_stream.stop_stream() # stop recording146 audio_stream.close()147 recorder.terminate() # release underlying resources used by PyAudio148149 # save audio_frames to a WAV file150 with wave.open(file_name, 'wb') as output_file:151 output_file.setnchannels(CHANNELS)152 output_file.setsampwidth(recorder.get_sample_size(FORMAT))153 output_file.setframerate(FRAME_RATE)154 output_file.writeframes(b''.join(audio_frames))155
Line 132 creates the PyAudio object from which we’ll obtain the input stream to record audio from the microphone. Lines 135–136 use the PyAudio object’s open method to open the input stream, using the constants FORMAT, CHANNELS, FRAME_RATE and CHUNK to configure the stream. Setting the input keyword argument to True indicates that the stream will be used to receive audio input. The open method returns a pyaudio Stream object for interacting with the stream.
Lines 141–142 use the Stream object’s read method to get 1024 (that is, CHUNK) frames at a time from the input stream, which we then append to the audio_frames list. To determine the total number of loop iterations required to produce 5 seconds of audio using CHUNK frames at a time, we multiply the FRAME_RATE by SECONDS, then divide the result by CHUNK. Once reading is complete, line 145 calls the Stream object’s stop_stream method to terminate recording, line 146 calls the Stream object’s close method to close the Stream, and line 147 calls the PyAudio object’s terminate method to release the underlying audio resources that were being used to manage the audio stream.
The with statement in lines 150–154 uses the wave module’s open function to open the WAV file specified by file_name for writing in binary format ('wb’). Lines 151–153 configure the WAV file’s number of channels, sample width (obtained from the PyAudio object’s get_sample_size method) and frame rate. Then line 154 writes the audio content to the file. The expression b''.join(audio_frames) concatenates all the frames’ bytes into a byte string. Prepending a string with b indicates that it’s a string of bytes rather than a string of characters.
Function play_audio
To play the audio files returned by Watson’s Text to Speech service, we use features of the pydub and pydub.playback modules. First, from the pydub module, line 158 uses the AudioSegment class’s from_wav method to load a WAV file. The method returns a new AudioSegment object representing the audio file. To play the AudioSegment, line 159 calls the pydub.playback module’s play function, passing the AudioSegment as an argument.
156 def play_audio(file_name):157 """Use the pydub module (pip install pydub) to play a WAV file."""158 sound = pydub.AudioSegment.from_wav(file_name)159 pydub.playback.play(sound)160
Executing the run_translator Function
We call the run_translator function when you execute SimpleLanguageTranslator.py as a script:
161 if __name__ == '__main__':162 run_translator()
Hopefully, the fact that we took a divide-and-conquer approach on this substantial case study script made it manageable. Many of the steps matched up nicely with some key Watson services, enabling us to quickly create a powerful mashup application.
Self Check
(True/False) Class
SpeechToTextV1enables you to pass an audio file to the Watson Speech to Text service and receive an XML document containing the text transcription.
Answer: False. Watson returns a JSON document, not an XML document.(Fill-In) The Language Translator service’s ____________ model translates from English to Spanish.
Answer:'en-es'.(Fill-In) The ____________ type
'audio/wav'indicates that data is audio in WAV format.
Answer: media.(True/False) 44100 frames-per-second is common for BluRay quality audio.
Answer: False. This is a common frame rate for CD quality sound.(Code Explanation) In lines 121–122 of the script, what’s the
contentattribute?
Answer: Thecontentattribute represents the bytes of the audio file received from the Text to Speech service. We write those bytes to an audio file.(Code Explanation) In lines 97–98 of the script, what’s the purpose of the keyword argument
model_id?
Answer: Themodel_idspecifies the model that the Language Translator service uses to understand the original text and translate it into the appropriate language.