In this section, you will learn the foundations of networking in Linux. Everything about networking is within the classic domain of Unix and Linux, and, in fact, the old Unix folks do say that Unix has been created for network communication. Linux is considered one of the best systems to use, learn, test, play, diagnose, and troubleshoot computer networks because a lot of great tools are available in Linux for free and come right out of the box, or just need a single command to install. There's a lot to learn about the subject of computer networks, and here we can only teach you the fundamentals of it using the CentOS 7 Linux operating system.
Now, let's learn about computer networks from 10,000 up. The two most fundamental concepts in networking are the network, or subnetwork, and the IP address. The three most important facts every Linux user needs to know are the network, or sometimes called the subnetwork, the IP address, and the rules of the network:
- Rule 1: The network
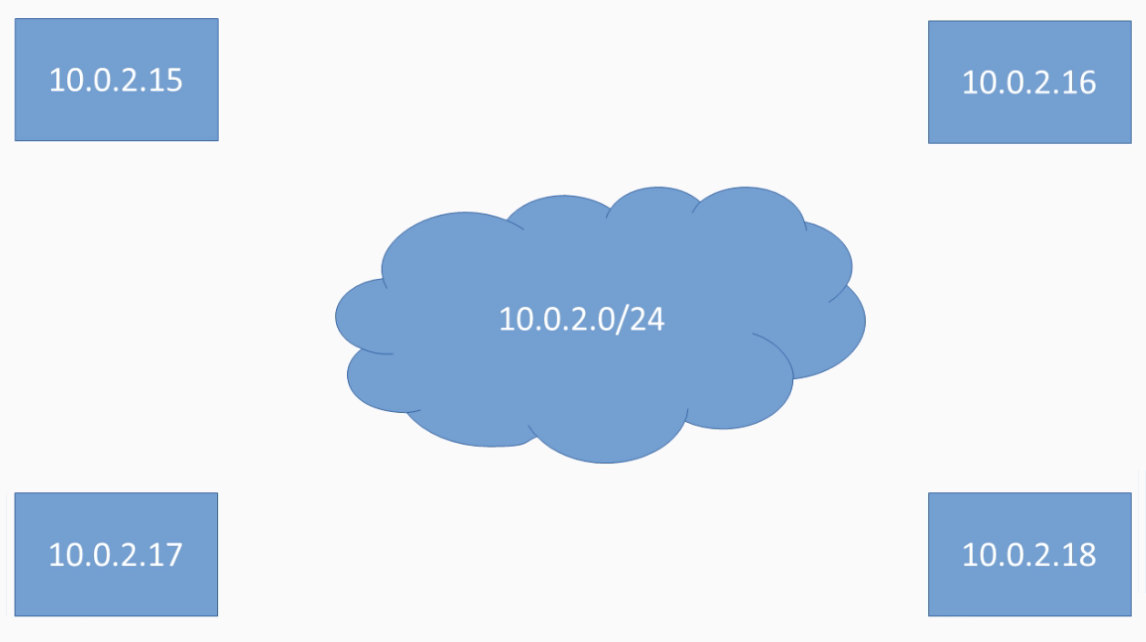
Every network, or sometimes called subnetwork, has a so-called network address consisting of only numbers, which looks like this:

- Rule 2: The IP address
Every computer needs an IP address for communication, which is part of a subnetwork's address. In our example, the first three numbers divided by dots are the same between the IP addresses and the network address:
- Rule 3: The same network
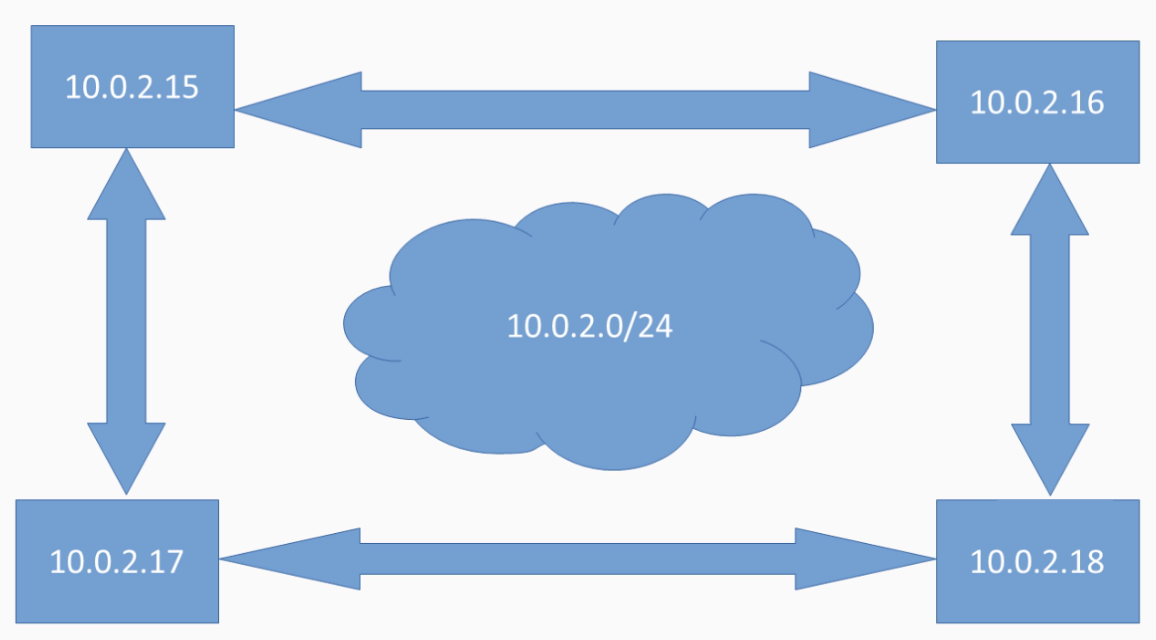
The easiest way for network communication between two or multiple computers is to connect them physically (for example, by using network cables and a single switch), and then put them in the same network, which means choosing all of the computers' IP addresses from the same range as our subnetwork's network address. In our example, choose 10.0.2 as the first three digits for all our IP addresses. As you can see, only the last digit is variable. Every computer that wants to talk to another computer in the same network then only needs the correct IP address of the recipient. This is also the basic setup of almost all private networks you may have at home:
As we have just learned, for normal network communication, all participants need to be in the same network. If this was all there was to networking, we would have to stop here and modern communication and the World Wide Web would not exist. The reality is that there are millions of networks connected together around the globe, such as our own private one, which are all connected through routers. If you want to communicate with another machine in your network or any other network, your computer needs to have a so-called IP routing table that defines static routes or the next hop towards a particular destination. This IP routing table is part of every Linux operating system. For example, if we have a private network consisting of three subnetworks with the following IP network addresses, if you want to get into contact with another computer in your subnetwork, your routing table could work the following way. If there is an entry in the table that defines what to do if someone wants to access the IP address of the 10.0.2.0 subnetwork, for example, with the IP 10.0.2.15, there is a route entry in the table that defines that you should hop to the 10.0.2.0 network:

The same happens if you want to access the machine with the IP address 192.168.122. Because there is an entry in the table, the routing table will hop to the 192.168.1.0 network that this computer is part of:
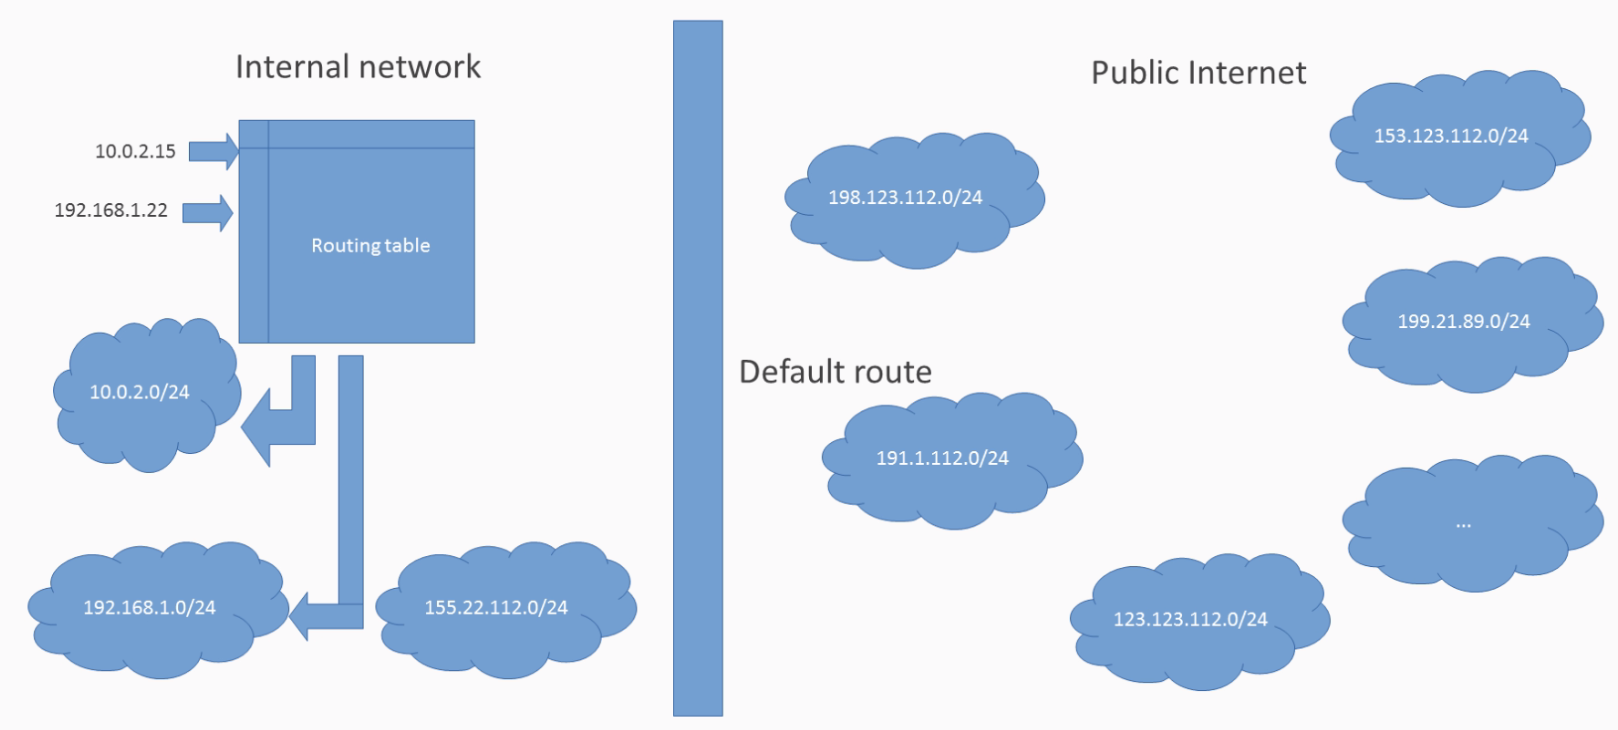
For all the other IP addresses where there is no explicit rule, the so-called default route will be used. In most private networks, the default rule is the IP address of a real hardware router, which basically is the same as an IP routing table, but which can do more, as it is connected to other routers around the globe where it will find its way to the correct destination address:

This is also called dynamic routing, as the router or path between the source and the destination can vary depending on which routers it will use. Normally, each private network that most internet service providers offer has only one public IP address that connects to the public internet:

All machines from our private network need to go via this router, with its single public IP address, if they want to communicate with other computers in the public internet.
On the other hand, if an outside public machine from the internet wants to access the private computers from our subnetwork, the router needs to handle the correct delivery of messages to the correct recipient, which has an internal IP address only visible within our private network.
But how can you define an IP address for a computer? The IP address needs to be set on an OS level in the correct configuration location associated with a certain network interface:

But, as mentioned before, the IP addresses need to be unique in the same subnetwork; otherwise, the correct recipient for a network message cannot be found.
So, how can you take care of that? The first approach is to manually manage a list of computers and all free and reserved IP addresses available in this network. Here, we need to assign static IP addresses, which means every computer gets an IP address hardcoded into the system, which will not change and remain stable:
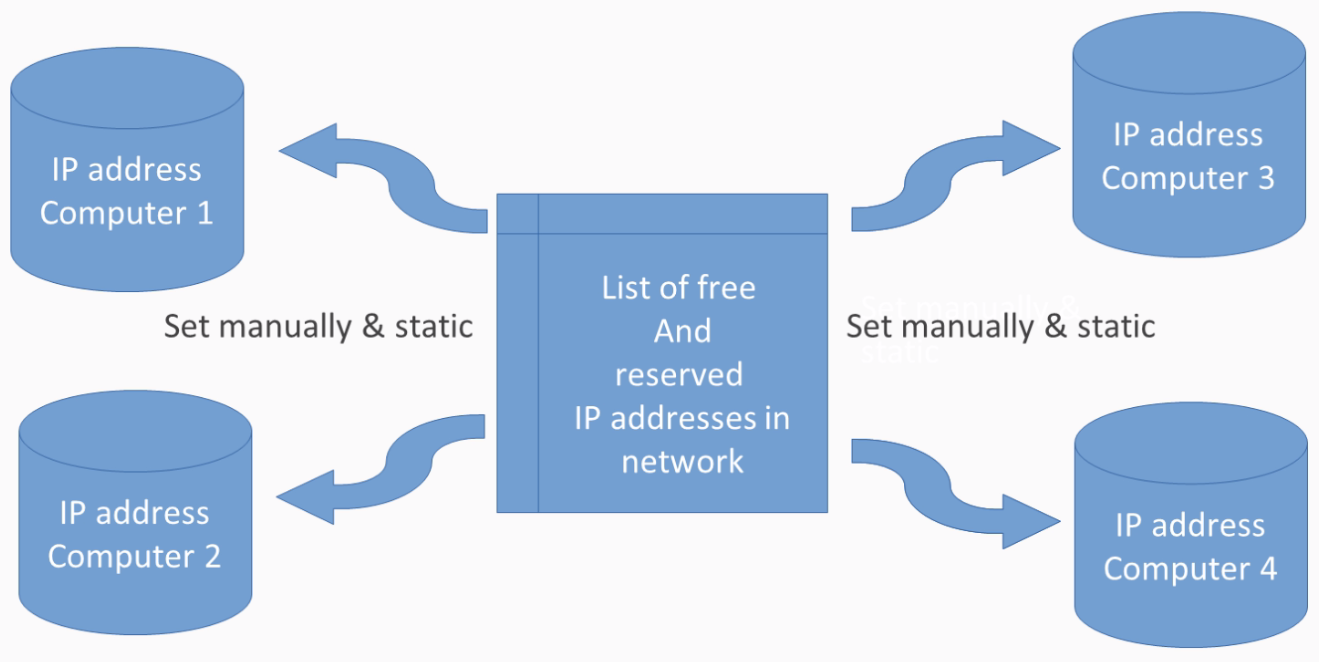
Often, important services in networks, such as a mail or web server, have a static IP because they must be reachable under the same address all the time from multiple other computers or services. But, as you can imagine, this system is very inflexible and needs manual intervention all the time. Just think about a public wireless hotspot and all the people who are connecting to this network all the time with multiple devices, such as smartphones, laptops, and tablets. A much better solution is to use a so-called DHCP server. This is a service running in your network that listens to new devices and keeps a database of all devices currently connected to the network. It automatically assigns or revokes, and manages, in a very reliable manner, IP addresses to all the machines connected:
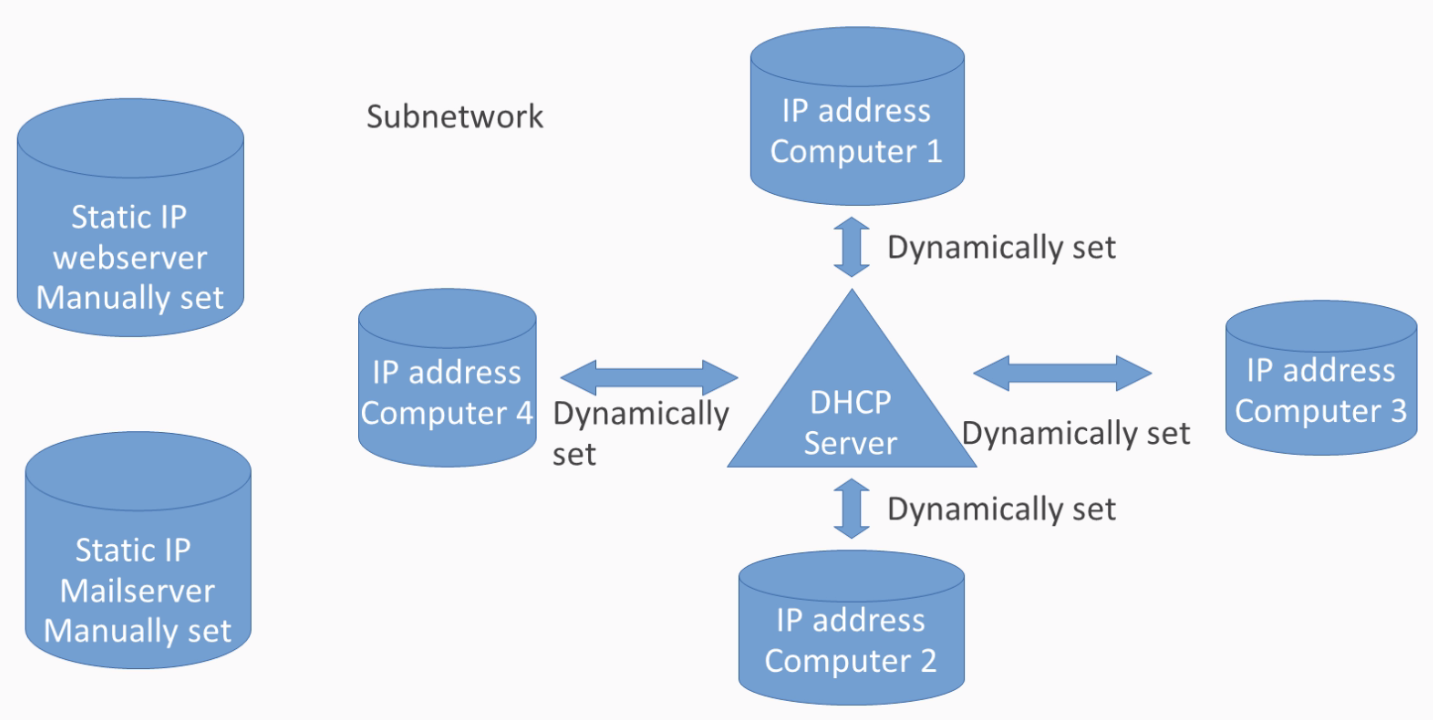
The IP addresses assigned to the computers are dynamic, which means tomorrow, your computer can have an IP address other than the one used today. The great thing about this system is that it can also send additional information about your network to the computers connected, for example, the IP address of a private DNS or mail server in your network, as can be seen in the following diagram:

A DNS server is another very important networking feature that we need to know about. As we have just learned, computers communicate with each other using IP addresses only, which are just numbers. As we humans are not so good at memorizing or recalling long sequences of numbers, but are much better working with names for objects or things, a system has been developed to assign names or aliases to these IP addresses so that we can address computers by names instead.
A DNS server has a database that stores these relationships. As computers can only work with numbers and not names on the network, every time we want to connect the computer using a name, a corresponding DNS server gets asked internally to translate the name to its corresponding IP address so that we can make the right connection with the IP address instead. Now, for resolving names of the normal internet, such as google.com, we will use some public DNS servers normally provided by your ISP or from another source:

But how can we give names to our internal private computers' IP addresses in our subnetwork when the public DNS servers don't have this information? One solution would be to install and set up our own private DNS server and add new names to IP address relationships.
As this needs a lot of work to install and configure. An easier, and quicker, solution is to put the name to an IP address relationship locally in a special file called the /etc/hosts file:

The biggest disadvantage of using the hosts file is that you have to put this file on every single computer in your network that wants to resolve network names, and also you have to keep this file up to date at all times so that each time a new computer is added to the network, every computer in the network needs to update their hosts file.
Until now, we have only spoken of names to IP address relationships when it comes to DNS servers and the hosts file. But here we need to discuss the anatomy of such a name in greater detail. For example, you could give all the computers in your network hostnames of the persons working with them:
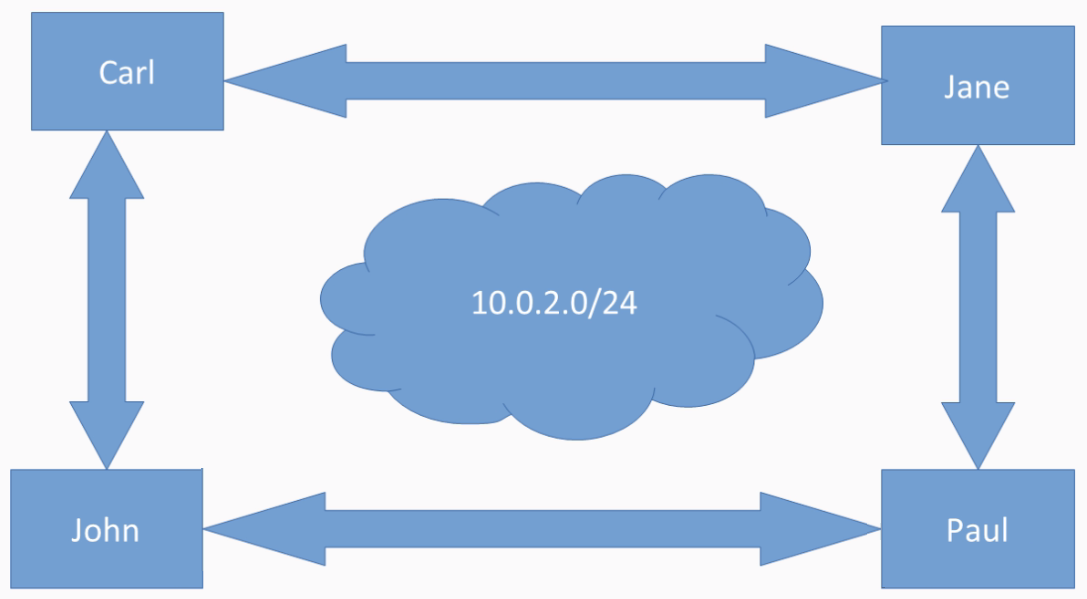
You can also use any name schema you like, but, as you can imagine, these hostnames are not unique enough to fully qualify a computer in a network so that we can address it directly. Bear in mind that our private network can consist of several different subnetworks, for example, one for the IT department, and one for the human resources department:
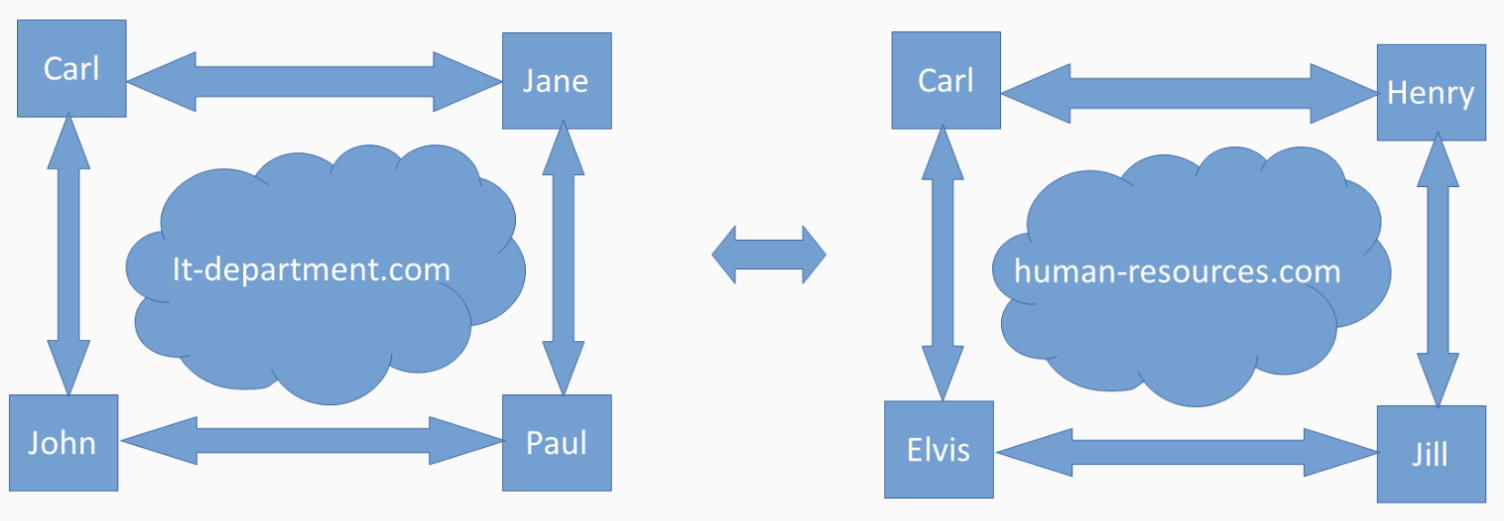
Here, two people can easily exist with the same name in different subnetworks, so this would not work because the computer hostname, Carl, exists in both networks and we just cannot use the hostname alone to differentiate between unique computer names. Therefore, we can also give names to subnetworks or network addresses. This kind of name is also called the DNS name, or domain name. The hostname or name of the computer plus the DNS name, combined together and separated by a dot, is called the fully-qualified domain name (FQDN), and really is needed each time we need to access computers in different networks outside our own local subnetwork:
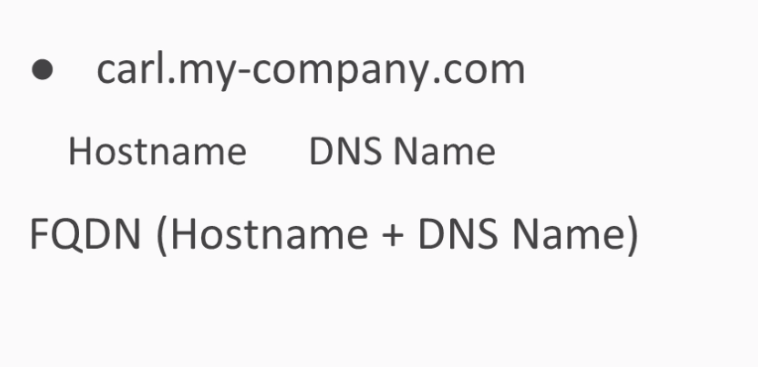
So here, using the fully-qualified name to address Carl at it-department.com will not clash with the Carl in the human-resources.com subnetwork.
Let's recap! The hostname is a computer name (for example, Carl), the DNS name is the name of a network or subnetwork, such as my-company.com or google.com, and the fully-qualified domain name is the hostname plus the DNS name separated by a dot (for example, Carl.my-company.com or mail.google.com).
In Chapter 1, Introduction to Linux, of this book, we set up three VMs called Master, client1, and client2. We configured the network of our three machines to have one network interface per VM, always with the same isolated IP 10.0.2.15, which means no internal connections between the three VMs can be made because they all have the same IP:
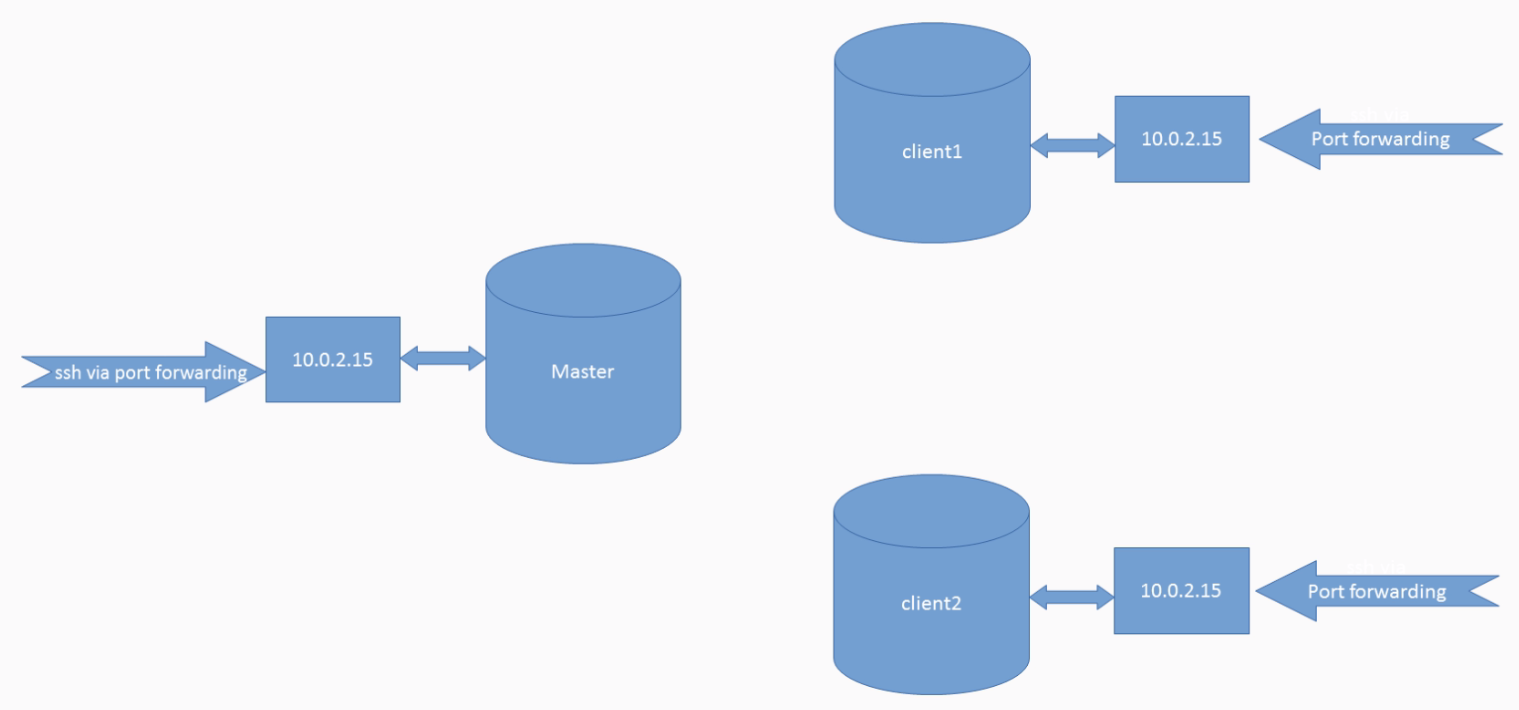
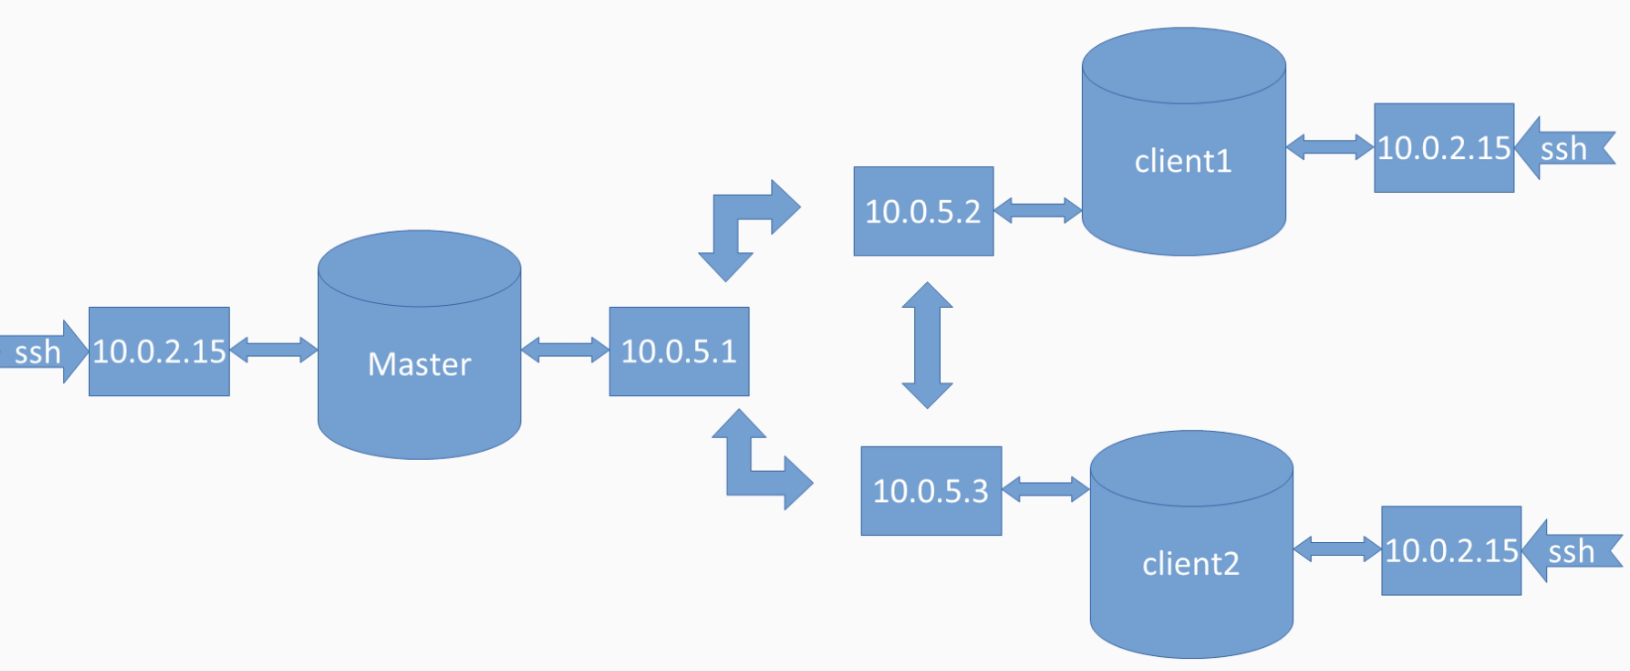
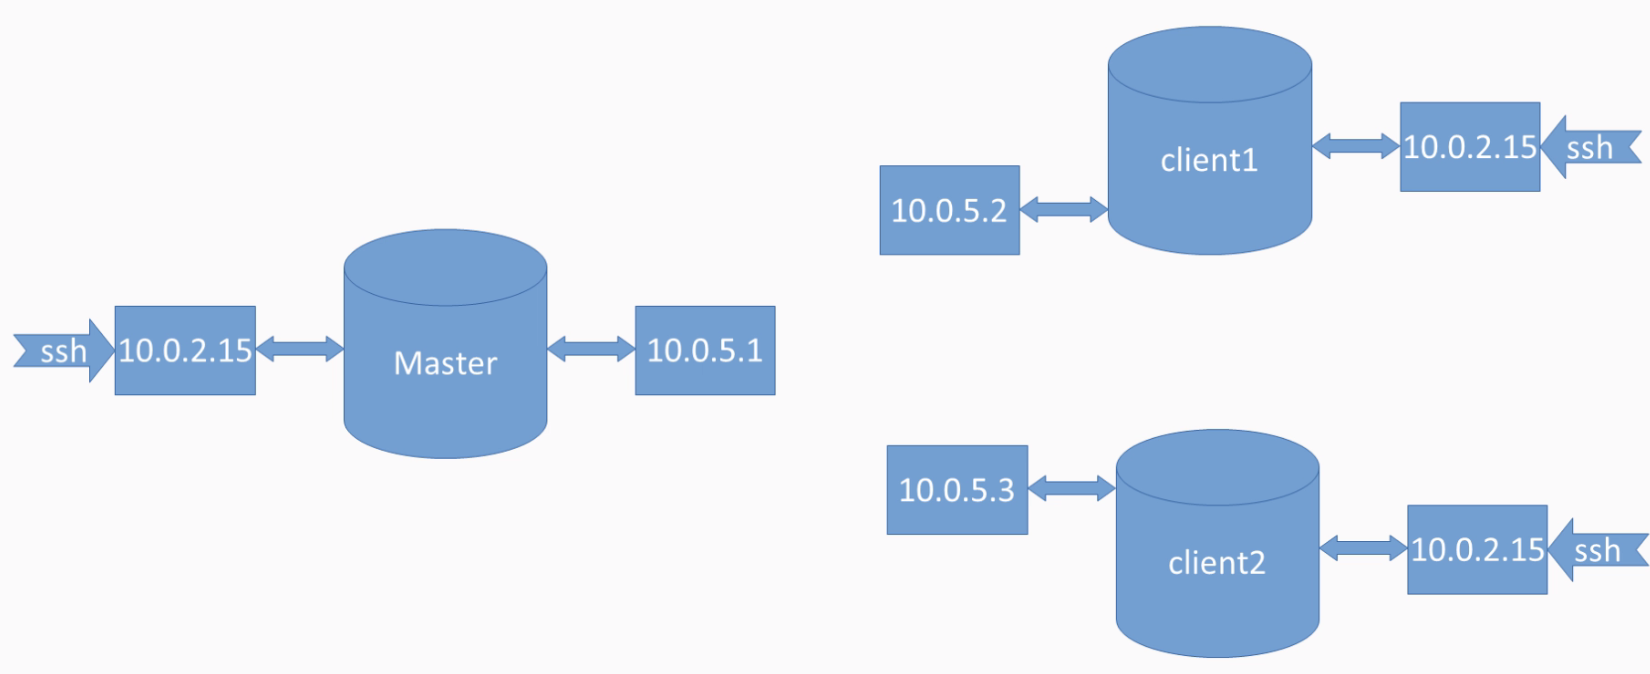
We use VirtualBox port forwarding to access our machines from outside through SSH using the host ports 2222, 2223, and 2224, which all map to port 22, the internal SSH port of the machines. Now, we want to make the machines able to communicate with each other using an internal private network. As each network interface can only have one IP address, we will accomplish this by adding a second virtual network adapter with a new IP address from another subnetwork to each machine, so that every VM has one network adapter for public access via SSH, and one for internal subnetwork communication:

As you can see, we use a second subnetwork called 10.0.5 instead of our 10.0.2 for our internal network:
If you type in the ip addr list, you will get a list of all the network interfaces currently attached to your computer:
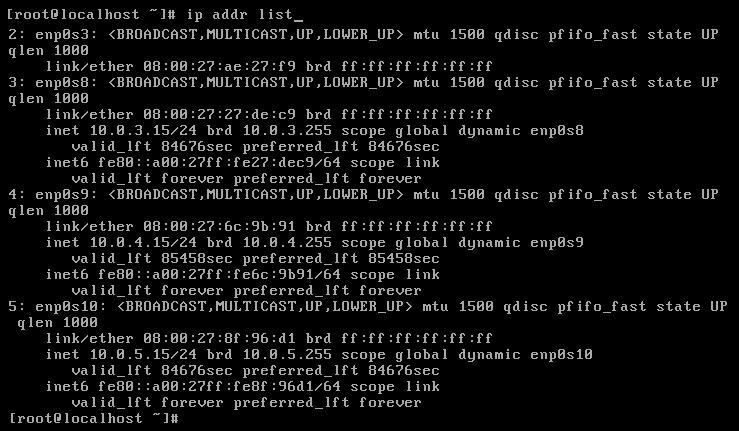
The first device is the loopback device, which is a non-physical device so that we can make a network connection to our own computer. It always has the IP address 127.0.0.1. The second network interface is enp0s3, which is a virtual network interface provided by the VirtualBox configuration. This reflects to adapt the one in the following setup:
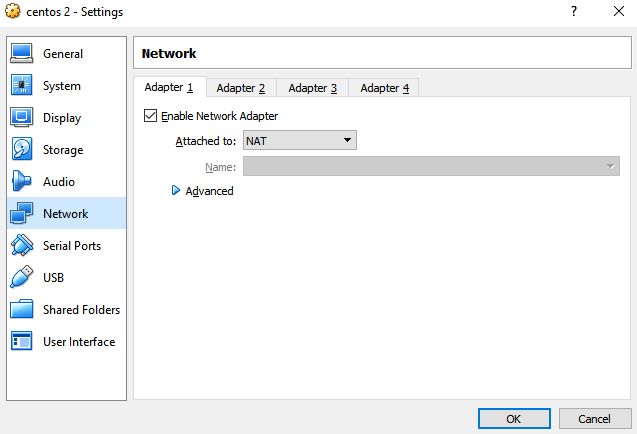
This virtual network interface has the IP address 10.0.2.15 and is mainly used so we can SSH to the machine.
Now, let's add another network interface to our virtual machine:
- In order to do that, first shut down the machine:

- Now, to add a new network interface for internal communication between your virtual machines, add a second network interface to each machine in the following way. First, open your VM Settings, go to Network, open the tab Adapter 2, enable it, and attach it to the internal network. As you can see, the name of the internal network is called internet. We will put all our other VMs in the same network:

- Now, press OK to proceed.
- Do the same for every VM you want to have as part of your internal network for communication between the machines.
- Now let's start one of your VMs to test the network settings.
- Now, if you again run the IP address list, you will see that our newly added network interface appears at interface number 3 with the name enp0s8. Also, you will see that currently, no IP address has been associated to this device automatically:
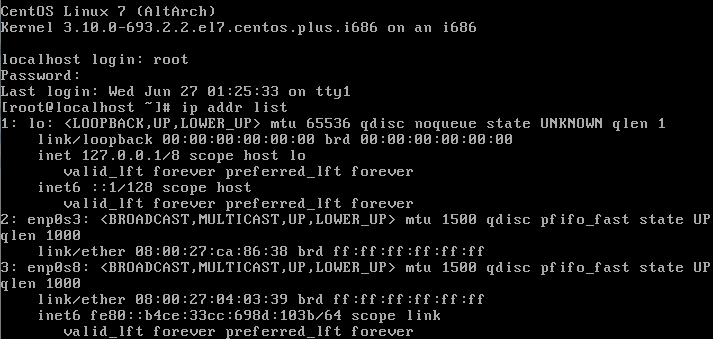
- Let's get some information about our current network. Let's show the IP routing table for our network devices:
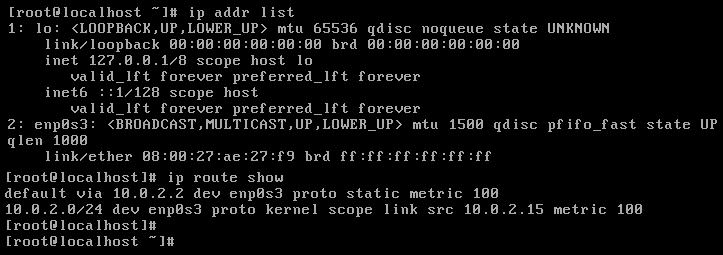
As you can see, the enp0s3 network adapter with the IP address 10.0.2.15, which is the interface we used to connect via SSH from the host machine using port forwarding, currently has two routes in the IP routing table. The first route is the route for the subnetwork we are currently a member of, 10.0.2.0. This means that this route will be taken if we try to contact another computer in our subnetwork. For example, 10.0.2.16. All the other IP addresses we want to reach are using the default route, which points to the IP address 10.0.2.2. This is the IP address of our router. So, for example, if you want to go to www.google.com, first the domain name will be translated to an IP address using a DNS server, and then it will be matched against our routes there. We can use the nslookup command to resolve any domain name into an IP address using the system's default DNS server. As you can see, the google.com domain name has the following IP address:
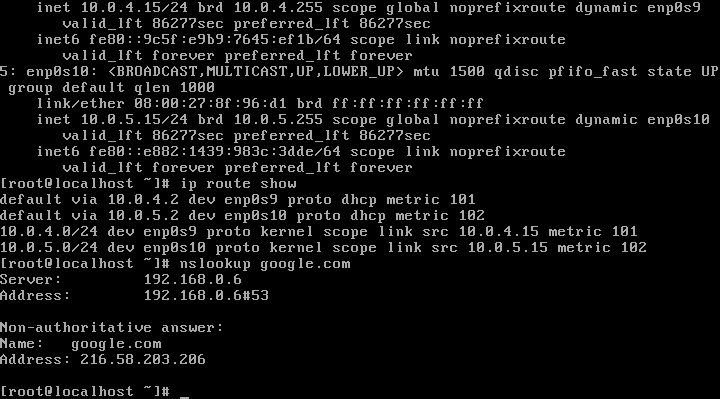
Since the IP addresses starting with 172 are not part of our subnetwork, the default route will be used. Behind the 10.0.2.2 IP address sits a real hardware router; it will take care of the proper routing between the virtual machine and the google.com website.
Before we create a new network connection between our three virtual machines using the enp0s8 network interface, let's set three unique FQDNs. We will do this using the root account.
To print out the FQDN, use the hostnamectl status command:
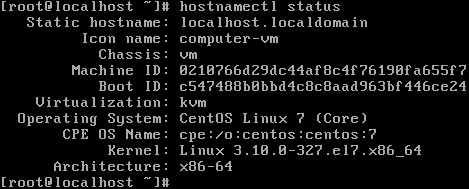
As you can see, currently we have the FQDN of localhost.localdomain. Now, to change the FQDN, use the set-hostname option of the hostnamectl command. In our example, we used the hostname or computer name master and the DNS name, centos7vt.com. The fully-qualified domain name is master.centos7vt.com.
Let's recheck using the status option. On our two other VMs, we will later set the hostnames, client1 and client2, and the same DNS name, centos7vt.com. You can also set the FQDN by editing the /etc/hostname file.
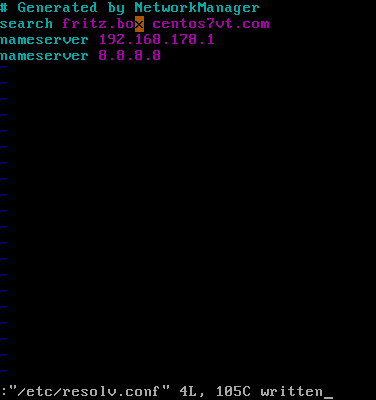
To change your system's default DNS server IP address, open the file called /etc/resolv.conf. Under the keyword name server, you can change or add new name servers. For example, to add a new name server, introduce a new name server line and change the IP address. In this example, we will use Google's official DNS server address, or you can just use 1:
Next, let's set up a new static network configuration for our new network adapter, enp0s8. On CentOS 7, all the network configuration files can be found at /etc/sysconfig/network-scripts:
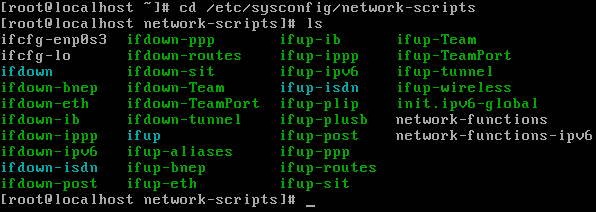
As you can see, for the enp0s3 network interface, a corresponding network interface configuration file called ifcfg-enp0s3. Let's view its content by typing cat ifcfg-eno0s3 exists:
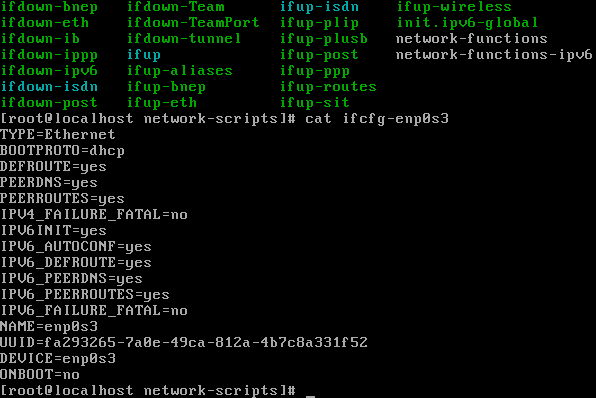
The most important things to know about this Ethernet network device are that it's getting its IP address from a DHCP server, the device is activated on boot up, and has the device ID enp0s3. The other items you see in this configuration file can also become very important when configuring different network devices in different environments. Since there is no visual manual page for the if configuration file format, please refer to the excellent documentation at /usr/share/doc/initscripts-* sysconfig.txt:

If you open the file and search for ifcfg, you will come to the section where all the different items of the ifcfg file format are being explained. For example, the BOOTPROTO item can have the values none, bootp, and dhcp. Since both bootp and dhcp refer to a DHCP client for our new network device, enp0s8, that we want to configure as a static device, we will use the BOOTPROTO none, but what items do we need for setting up our simple static network connection? Since we are setting up an internal network only, we don't need any routing set up and only need very little information in our interface config (ifcfg) file.
So we will need the following items: the name, the device, the IP address, because we will hardcode a static IP address, and the BOOTPROTO, which we will set to none. So let's review our plan network configuration from the introduction.
As you will remember, the master node we are currently logged in should have a second network interface with the static IP address 10.0.5.1. Client1 should have a second network adapter with the static IP address 10.0.5.2, and client2 should have 10.0.5.3, all for internal network communication between the nodes:
So let's configure our new device:
- As you can see, we are currently in the network scripts folder, where all our network interface's configuration files can be found. So let's first create a new configuration file for our new network interface:

- We will make our life easy by copying the existing configuration file for the enp0s3 network device to the new enp0s8 configuration file. Now let's open this new configuration file:

- Let's change the boot protocol to none for the static IP configuration. Most of the items are not needed, so just delete the lines. Change the name of the device to s8; UUID is not needed here. Also, change the device ID, leave the ONBOOT as yes, so the interface will come up on server restart, and finally, add a new line that defines the hardcoded IP address of our static internet network configuration. Use the IP address 10.0.5.1 for our master server:
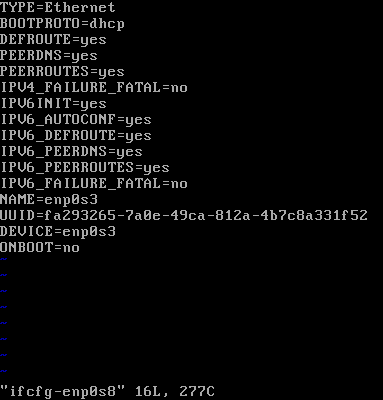
- Now save the file and exit.
- We then need to hard reset our enp0s8 network interface so that the changes we made to the configuration file can be applied to the device and the static IP address can get active. In order to do so, first shut down the enp0s8 device using the ifdown command.
- Then bring it back online using the ifup command.
- Finally, let's review the ip addr list command.
If you compare the output of enp0s8 before we restarted the device and afterwards, you will see that the changes we made to the configuration file were valid, and now we have a static IP of 10.0.5.1 for our enp0s8 network device.
Now, after we set up the static network configuration for the enp0s8 network adapter, let's recheck our IP routing table with the ip route show command. If you compare the routing table before and after we have set up the new network interface, enp0s8, you will see that a new route has been created for routing network communications in our new 10.0.0.0 subnetwork.
The last thing still left on the master node, as we don't have a private DNS server, is to set up our network's computer names to IP relationships in the /etc/hosts file. Always start adding new entries at the end of the file by using the fully-qualified domain names first, and then you can add further short hostnames. You can always add multiple names for the same IP address:
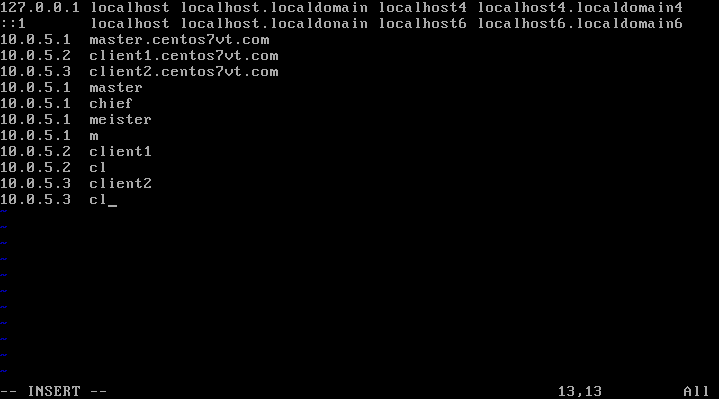
The first entry will be our own machine we just set up. The other entries are for our clients we are about to set up shortly. Save and exit the file. Now start the two client VMs. After booting up the VMs is complete, open two new tabs in your Terminal emulator of your choosing. The first tab on the left holds the connection to the master node. On the next tab to the right, please log in to the client2 VM using the SSH port forwarding on port 2223. In the third tab, log into the client2 VM on port 2224. Now go to the middle tab where our client1 VM is open.
Here let's repeat the steps to configure our enp0s8 network interface so we can make the connection between our servers:
- First, log in as root.
- Next, set a fully-qualified domain name to client1.centos7vt.com.
- Next, create a configuration file for our new enp0s8 static network connection. Here, enter the same information as on the master; only change the IP address to the 10.0.5.2. Save and exit the file.
- Next, restart the network interface:

As you can see, we have successfully assigned the 10.0.5.2 IP address to our enp0s8 network interface. Finally, add entries to the /etc/hosts file so that we can resolve other domain names in our subnetwork. Add the same information as on the master:
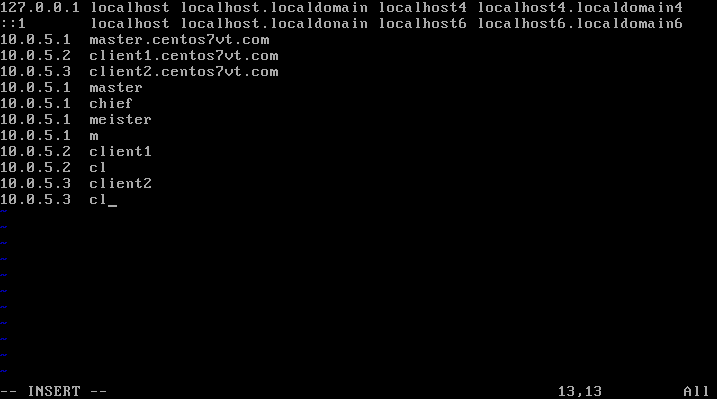
Save and exit the file. Next, do the same steps for the client2 VM in the third tab. First log, in as root, use client2 for the hostname, use the 10.0.5.3 for the IP address, restart your network interface, and finally, add entries to the /etc/hosts file.
Now that we have set up our private network for communication, the easiest way to test whether it is working properly is to use the ping command. This command can be used to see whether another host is alive and reachable. If it is not reachable, the following error message will be printed:

Now let's start our connection tests from the master in the first tab. First, let's test if we can reach client1 with the IP address 10.0.5.2:

As you can see, it works. Also, test if we can reach client2 with the IP address 10.0.5.3:
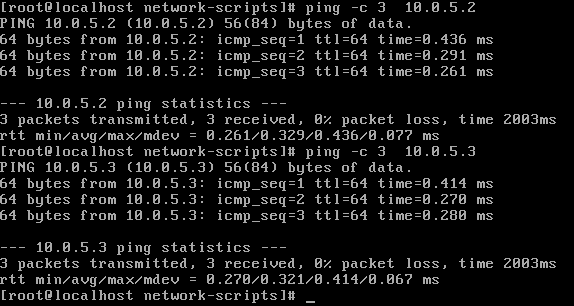
As you can see, this also works.
As a next step, test if our /etc/hosts configuration is also working. In order to do so, let's ping the various hostnames we set up in this file. The fully-qualified domain name of client1 is working. Also, the hostname client1 is working. C2 is also working as a short name for client2. The fully-qualified domain name of client2 is also working. The short name client2 is working and the very short name c2 is also working for client2:

Now let's move to client1. Here, let's test if we can reach the master server:

Yes, it's working. Also, you can test the master server under a different name. Let's also test the client2 connection. Test the master under a different name, and also test client1. In summary, we can say that the network configuration between our three VM machines is now working properly.