In this section, we will learn how to create and remove users and groups, and how to add groups to users. Also, we will see how Linux internally stores user information and passwords, and how to retrieve user information programmatically. Finally, we will learn how to substitute user accounts while staying logged in. Linux is a multiuser system, which means more than one user can work with the system simultaneously. Therefore, a system is needed, which guarantees common access to Linux objects such as files using measurements of excess protection. For example, all files which have been created by one user should not be allowed to be erased by another user. Every Linux user is defined and identified by a unique user ID, as humans more easily can work with names than numbers. There also exists a literal username connected to each user ID, but Linux internally works with the user ID (UID) number when managing control on Linux objects such as files. There are two types of users accounts, login users which need a password to authenticate, and nonlogin users, which are useful for attaching user IDs to running programs or processes, as we will see later. Also there's one special account on every Linux system, the root user account, or administrator account, which we set up a password for during installation. This account on every system has access and is the owner to all objects, such as files presented in the Linux system, and this account can do anything to the system. If in Linux we have the username to control access files, it will be very limiting and time-consuming to grant or revoke permissions. Therefore, Linux also has the concept of groups to access control. Using groups can drastically simplify permission management by assigning permissions on a shared resource to a group, rather than to individual users. Assigning permissions to a group assigns the same access to the resource to all members of that group. Linux groups are also represented by a group ID, which is a number, but can also be referenced by its name, the group name. Every user in Linux has exactly one UID, but can belong to multiple groups or group IDs. One group is the primary group, which will be used when new files are created by that user.
Let's start by creating some new user accounts for our tests. Only root can do this. So first, let's log in as root. The useradd command adds a new user with the username given as an argument. This command creates a new user in the system and also creates the corresponding home directories. To make our new login accounts functional, we need to set passwords as well; we can do this with the passwd command. You can also use this command to change your own password. To set or change a password for other users, we type passwd username-this can only be done using the root user account. To delete a user, use the userdel command. By default, the userdel command will not delete the user's home directory, so you have to do it yourself. To delete a user, it's better to use the userdel -r flag, which not only deletes the user but also deletes the associated home directory and mailbox. Let's recreate the user. Let's log out the root user. You can use the su command, or substitute user command, to switch the user while you are logged in. When you call the su command without any argument, the root user is assumed to be switched. To switch a substitute to a different user, you use the username as the first argument. You can recheck who is logged in using the whoami command. Using the su command, will preserve the original environment of the user who has executed the su command, and will not switch to the home user of the substituted user account.
Now, let's exit the substituted user and switch to another user. Using the su command with a dash symbol as an argument, we create a more login shell-like environment, which means it behaves more like a user who would login to the shell for real. By executing pwd, you can see that the home directory has been changed to the substituted user's home directory. Now, exit the substituted user again. You can also directly execute a single command with another user account using su -c flag; su username -c. This is useful if you want to quickly start a script or a command using a different user account without completely switching the user.
The useradd and passwd commands are making changes to the etc/passwd and etc/shadow files, which are the most important files to store authentication and user information in the entire Linux system. The passwd file stores a list of all the user accounts known to the system, all the login users and all the system users. Login users are typical physical persons who can log into a shell such as the Bash shell using a password for authentication. System users typically cannot log into a shell and are often associated to system services and processes.
For example, to get a list of all the usernames available in the Linux system use:
awk -F: '{print $1}' /etc/passwd
The passwd file stores a lot of useful information such as the user's home directory, the default shell, or the user ID number. Refer to the manual page of the passwd command to find out more. The /etc/shadow file contains all the password information for all the users in an encrypted format. You need the root user account in order to view this file. To create a new group, use the groupadd command and to delete a group, use the groupdel command. The groupadd and groupdel commands internally work with the /etc/group file. This file shows you all groups available in the system as well as all the user IDs associated to these groups. Instead of reading the /etc/group or /etc/passwd file for getting information about a user, you can also use the id command. This will tell you the user ID, the group ID, and all the associated groups a user has. To add existing groups to a user, you can use the usermod -G command. -G overrides all the secondary groups a user has, leaving the primary group as it is. You can also define a comma-separated list of group names to be added to a username. It's important to remember that the -G always overrides the existing group names a user has.
Now, let's examine the permission string, which specifies what the file owner, group owner, or any other user is allowed to do or not, based on who he is:

-l outputs the file owner in the third column. Here, it is root, and for this file it is olip. In the fourth column, the ls -l outputs the group owner of the file. Also, here it is root and here it is olip. You already know that the first character in the ls -l output is the file type. Now, the nine bits afterward l and d define the file's permission string. The first three characters of the permission string define the permissions for the file owner. The second three bits of the permission string define the permissions for the group owner. The last three bits in the permission string define the permissions for all the other users. In this example, folderABC has the file owner olip, the group owner olip. Furthermore, the file owner olip has full permissions on the directory, the group owner olip has full permissions on the directory, and all the other users have read and execute permissions on this directory.
Perform the following steps:
- First, let's create a directory. We'll put in some files to work with and then change to the directory:

- Now, let's create some files to play around.
- Let's look at the file permissions of the files we have just created.
- As you can see in the preceding screenshot, the root user has created all these files. Hence, the file ownership and the group ownership are both root for all the files.
- Now, to change the file ownership and group ownership information you can use the chown or chgrp commands.
- Instead of using the chgrp command, you can also use the chown command using a different notation.
- For example, to change a file's group, you can modify both the file owner and group ownership.
- Let's also create some subfolders as well for testing directory permissions.
- Put some files into these folders as well.
- Next, let us use some very dangerous test directories so that everyone is able to work with the files properly during our tests. This is not meant to be for production.
- Next, create some common permissions for our files.
- Create some unusual permissions, also create some permissions for directory tests.
- Change some file ownership permissions on files and group ownership permissions on a directory.
Now, let's work with our new files and change permissions. Let's first review the output of the ls -l command:
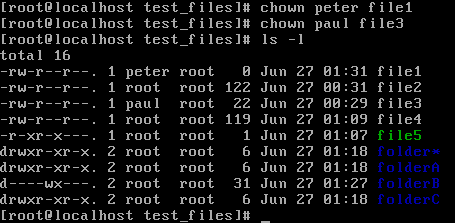
File one is a file which has full read, write, and execute permissions for anyone. For example, any user known to the system can modify this file. The next file has the standard permission every file gets upon creation on a CentOS 7 machine. File owners have read and write access, whereas the group and all the other users only have read access. Let's find out what this means if different users want to modify the file:
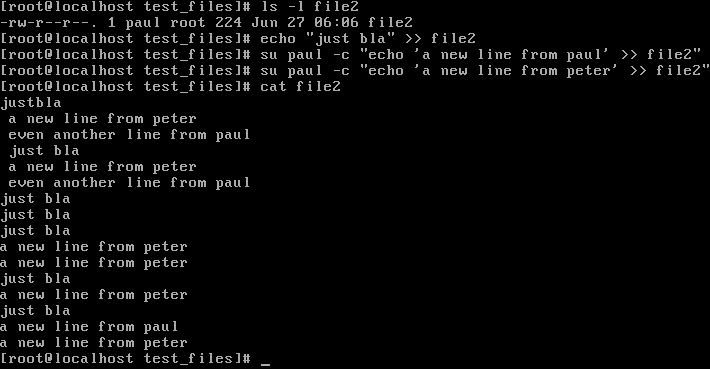
Here we can see some interesting things. The root user has read, write, and execute permissions to any file despite what has been set in the permission string for the root user. Peter is the file owner, so he can write to this file. Paul is neither the file owner nor the group owner, so he has no write permissions at all. The next file has a permission often used for confidential files such as password files. Often this is done for services running a filesystem user account to protect others from reading credentials:
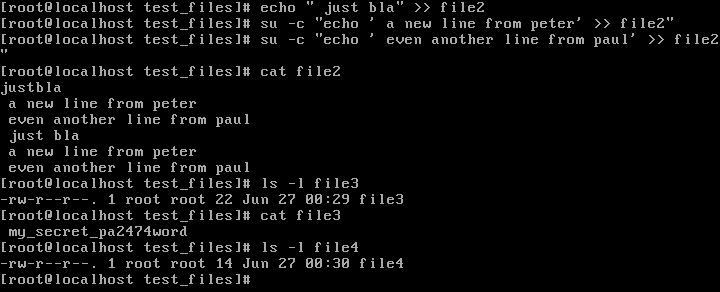
In this example, only the root user has the ability to read the file, nobody else. The next file has a common permission set used if not only the file owner but also members of the group that owns the file's owning group should have full control over the file. As you see, Peter and Paul don't have access to write to this file because they are neither the file owner nor the group owner. To change this, let us add Peter to the group that owns this file, and then test again:

Now, file5 has some unusual permissions, which are valid. file5 is a script file, which prints something out. As you can see, only the root user can execute the file. To let Peter execute the script, add one of the groups that is associated with it to the file. This still does not work because now Peter can execute this file, but cannot read it. To change this, add read permissions for the group ownership of the file as well. Now, Peter is finally able to run the script:

Finally, a common misconception is to delete a file you need to set the file's write permission flag correctly for the user, but this is not true, as we can see. Why can't Peter delete this file even though we've assigned full permissions to everyone here? This is because file deletion is completely dependent on the write permission of the directory the file you want to delete is in, and not on any file permission. The following screenshot is where the user Peter is denied permission to delete the file:

Finally, let's discuss directory permissions. The following screenshot is an example:
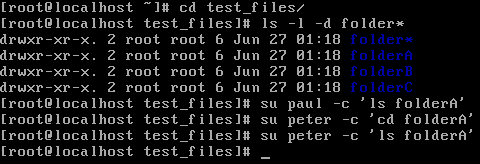
folderA has read permissions for the file owner, so he's the only one who is able to see what's in the folder but cannot change into the directory. folderB has only read permissions for the group owner, which means only members of the projectAa group can change into this directory, but Peter cannot do anything in this folder other than entering it using the cd command:

In order to list files in this directory, let's order the read permissions to the group owner:
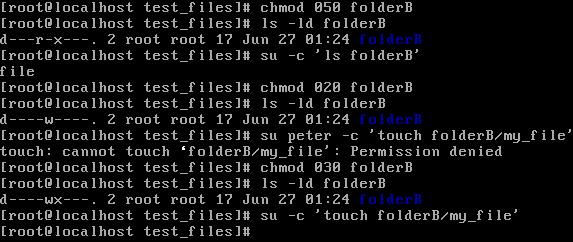
As we have learned before, we need to enable the write flag on a directory in order to create or delete new files in it. But why is this not working here? It's because we also need to enable execute permissions on a directory, which makes sense because in order to create or delete a file in the directory, we need to have access to this directory. What can we do if we want to change permissions on a lot of files, for example, a whole subdirectory tree? Using the ls -lR flag, we can list all the subdirectories and files included. Now, to change the permission string for all the files in a subdirectory, you can use the chmod -R flag:
ls -lRchmod 775 -R ../test_files
As always, be careful with the recursive flag as you easily can change the file permissions for your whole filesystem to an unsecure permission irreversible.