
Freezer Favorites: Meat & Seafood

 Freezer-to-Instant-Pot Chicken and Dumpling Soup
 Freezer Chicken Black Bean Burritos
 Freezer-to-Instant-Pot Cream of Chicken and Wild Rice Soup
 Freezer-to-Instant-Pot Thai Chicken Stew with Butternut Squash
Instant Pot Cajun Red Beans and Rice
Instant Pot Chicken and Shrimp Gumbo
Slow Cooker White Bean Chicken Chili
Italian Stuffed Jalapeño Peppers
Sicilian Rice Ball (Arancini) Casserole
Indian-Inspired Shepherd’s Pie
Winter Brisket and Barley Soup

 Frozen Fish Sticks with Dill Tartar Sauce
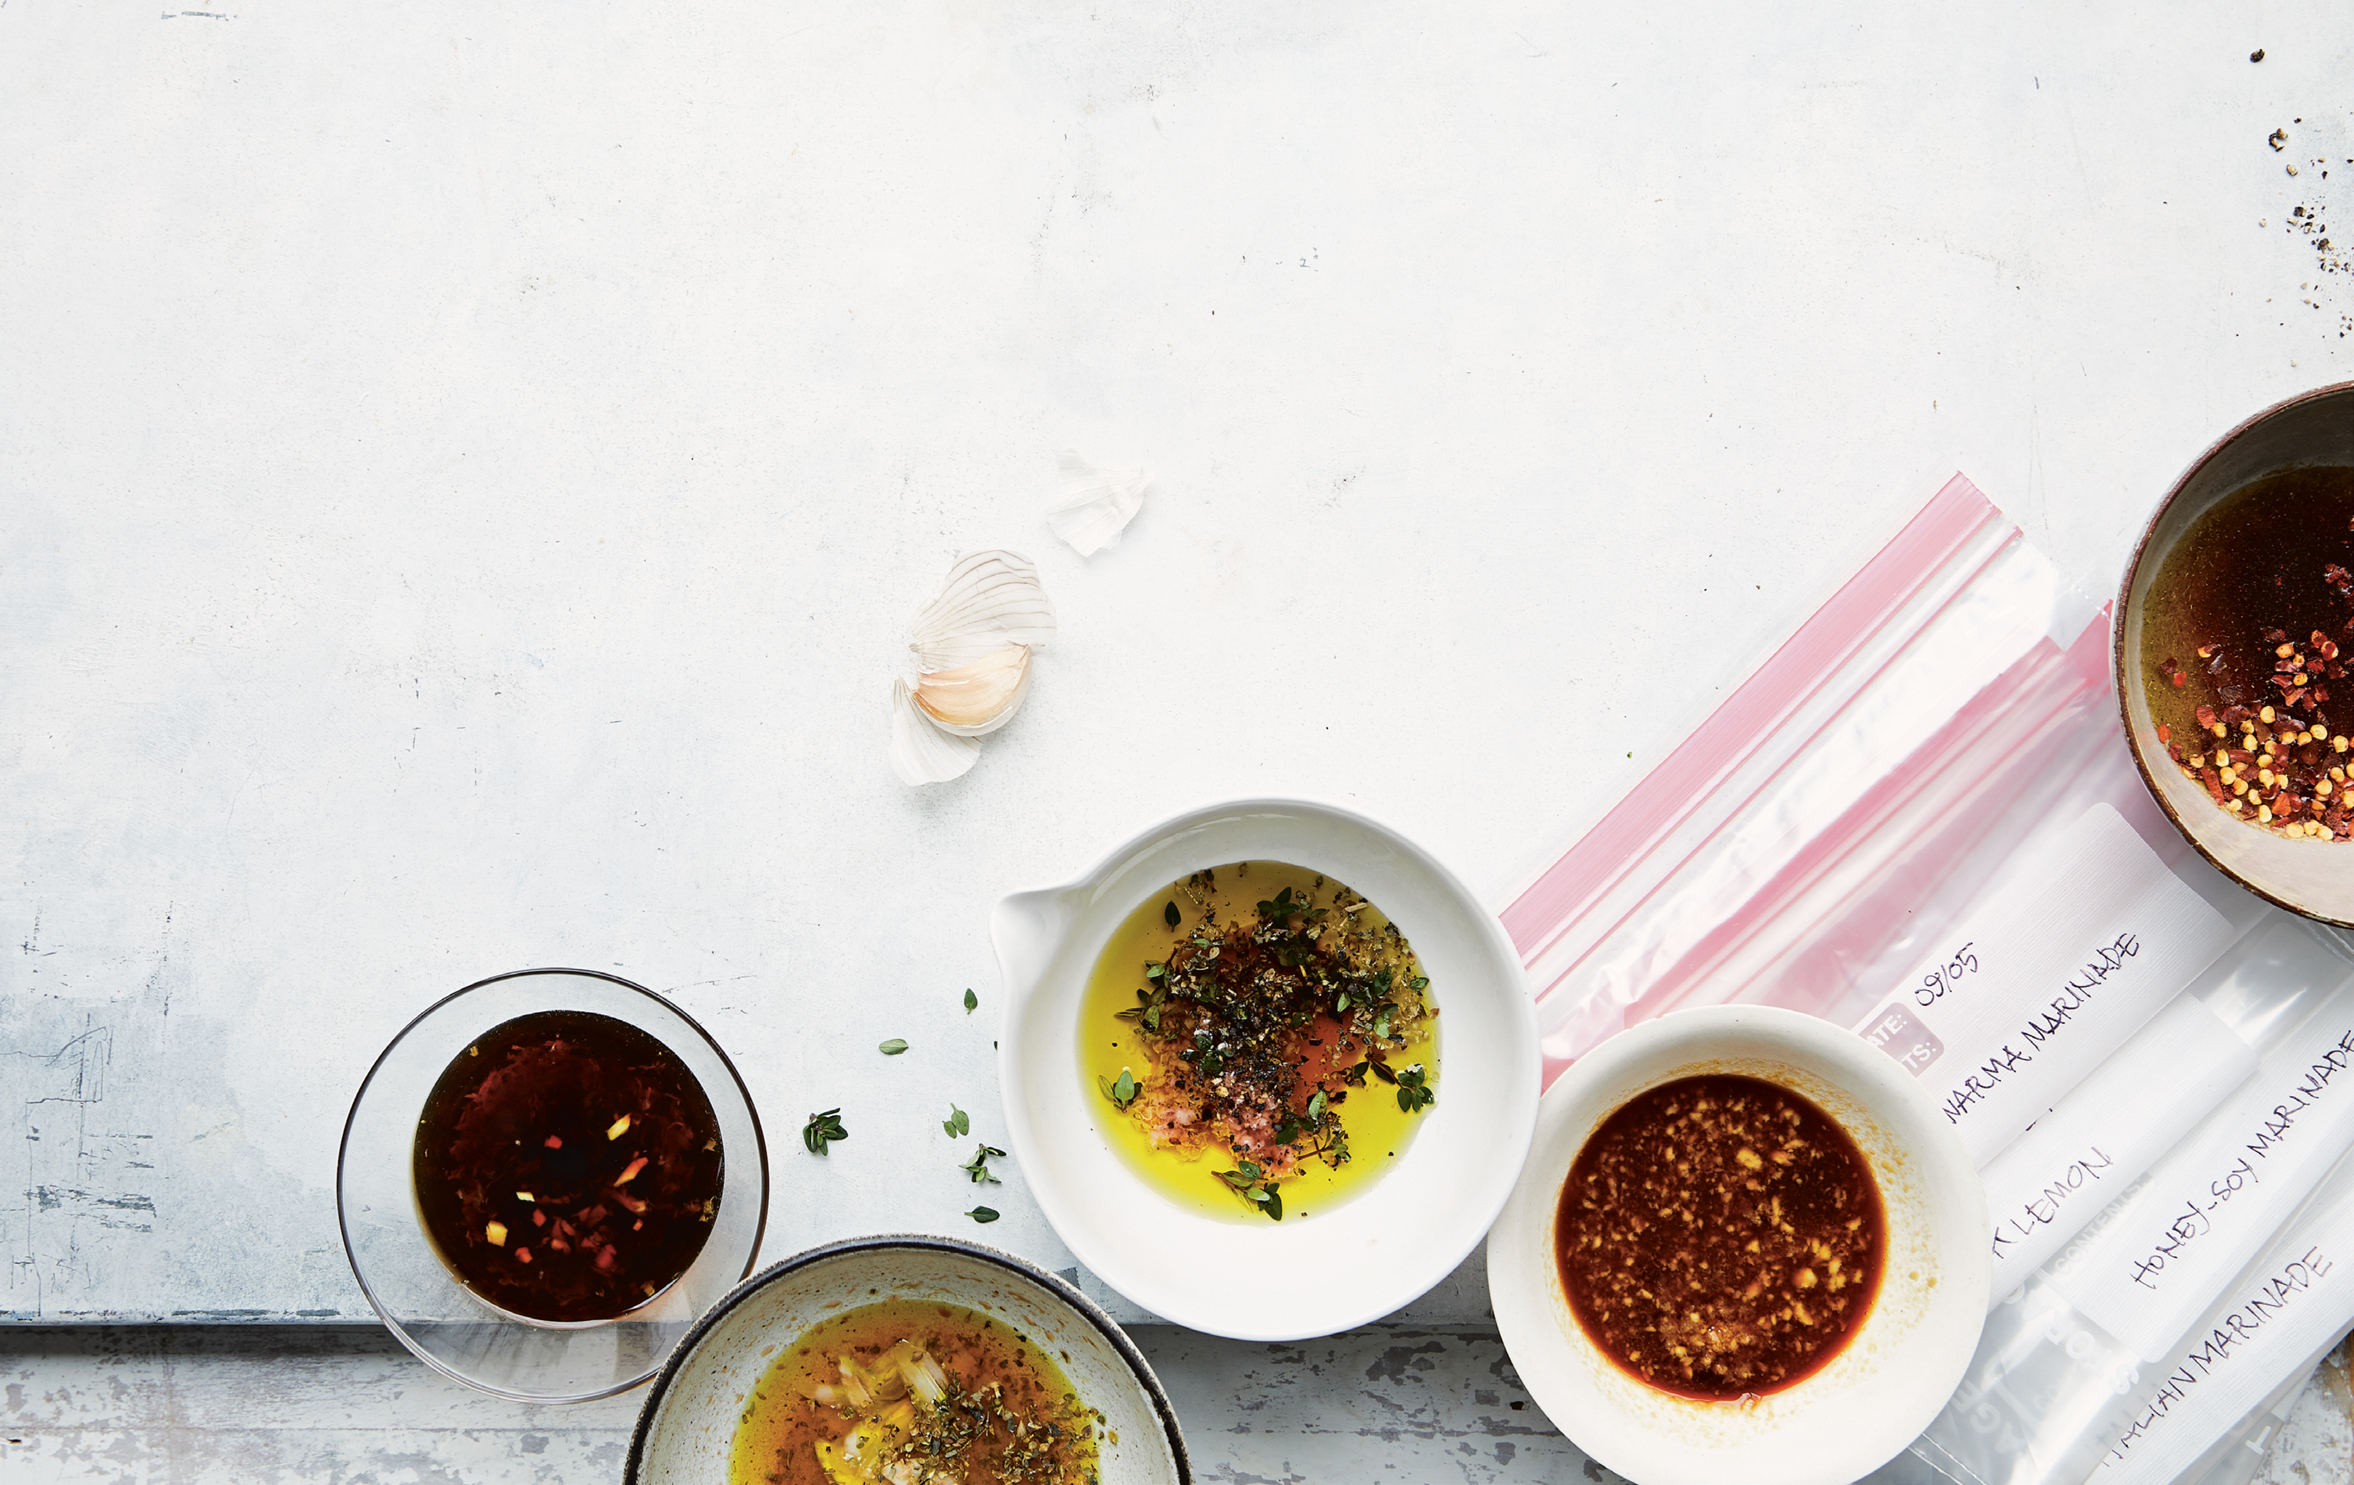
5 Freezer Chicken Marinades
Is there anything easier than grabbing marinated and ready-to-cook chicken from the freezer for busy weeknights? Just thaw the individually wrapped portions overnight in the fridge, then prepare them on the grill or grill pan or in an air fryer. Each of these marinades is good for about 1½ pounds of chicken—you can use boneless chicken breasts, chicken tenders, and/or boneless chicken thighs. Use gallon-size heavy-duty freezer bags, or if you’re cooking for one or two, portion the servings out into smaller bags. Be sure to write the name of the recipe in permanent marker along with the date before filling the bags.
SERVES 6
1½ pounds chicken (boneless, skinless chicken breasts, chicken tenders, and/or boneless, skinless chicken thighs)
Marinade of your choice (recipes follow)
FRIDGE: UP TO OVERNIGHT (UNCOOKED)
FREEZER: UP TO 6 MONTHS (UNCOOKED)
Trim the fat off the chicken. If using chicken breasts, place them on a work surface and cut each horizontally into two cutlets. Transfer to a labeled gallon-size, heavy-duty freezer bag.
In a medium bowl, combine the marinade ingredients of your choice and transfer to the bag with the chicken.
SERVE NOW: If serving now, let marinate for at least 4 hours or overnight in the refrigerator.
To grill, preheat a grill pan over medium-high heat (or preheat a grill to medium-high). Discard the marinade in the bag and grill the chicken on the oiled pan or grate for about 5 minutes per side, or until cooked through.
To air-fry, preheat the air fryer to 400°F and cook the breasts as directed for about 10 minutes, turning halfway through. For thighs, cook at 400°F for 16 to 18 minutes, turning halfway through.
FREEZE AND SERVE LATER: Squeeze the air out of the bag with the chicken and marinade and freeze. To thaw, transfer to the refrigerator the day before serving and grill or air-fry as directed.
SKINNY SCOOP For best results, always start with organic chicken that has not been previously frozen.
Italian Marinade
Perfect served over some pasta, salad, or rice.
3 tablespoons olive oil
3 tablespoons red wine vinegar
2 garlic cloves, minced
1½ teaspoons kosher salt
½ teaspoon onion powder
½ teaspoon dried oregano
½ teaspoon dried basil
¼ teaspoon dried thyme
½ teaspoon sugar
⅛ teaspoon freshly ground black pepper
Per Serving (½ cooked breast) • Calories 141 • Fat 4 g Saturated Fat 1 g Cholesterol 73 mg • Carbohydrate 0 g • Fiber 0 g Protein 24 g • Sugars 0 g Sodium 179 mg
Maple-Dijon Soy Marinade
Simple and delicious; slice this chicken up and serve over a salad for a protein and veggie feast.
¼ cup reduced-sodium soy sauce or gluten-free tamari
3 tablespoons pure maple syrup
3 tablespoons Dijon mustard
3 garlic cloves, crushed
Per Serving (½ cooked breast) • Calories 140 • Fat 3 g Saturated Fat 3 g Cholesterol 73 mg • Carbohydrate 2 g • Fiber 0 g Protein 24 g • Sugars 1 g Sodium 241 mg
Honey-Soy Marinade
Sweet and savory, this marinade is inspired by Japanese yakitori and is delicious with steamed rice and sliced cucumbers.
⅓ cup reduced-sodium soy sauce or gluten-free tamari
3 tablespoons honey
3 tablespoons mirin
3 garlic cloves, crushed
½ teaspoon grated fresh ginger
Per Serving (½ cooked breast) • Calories 149 • Fat 3 g Saturated Fat 0.5 g Cholesterol 73 mg • Carbohydrate 5 g • Fiber 0 g Protein 24 g • Sugars 4 g Sodium 303 mg
Greek Lemon Marinade
Try pairing this with orzo, roasted lemon potatoes, or Greek salad.
3 tablespoons fresh lemon juice
2 tablespoons extra-virgin olive oil
1 tablespoon red wine vinegar
6 garlic cloves, minced
2 teaspoons dried oregano
½ teaspoon ground turmeric
2 teaspoons kosher salt
⅛ teaspoon freshly ground black pepper
Per Serving (½ cooked breast) • Calories 134 • Fat 3.5 g Saturated Fat 0.5 g Cholesterol 73 mg • Carbohydrate 0 g • Fiber 0 g Protein 24 g • Sugars 0 g Sodium 162 mg
Shawarma Marinade
This Middle Eastern–inspired chicken is delicious served over salad with feta and tzatziki or stuffed into gyro bread with red onions and tomatoes.
2 tablespoons extra-virgin olive oil
Juice of 2 medium lemons
6 garlic cloves, minced
2 teaspoons ground cumin
2 teaspoons smoked paprika
½ teaspoon ground turmeric
½ teaspoon curry powder
¼ teaspoon ground cinnamon
Pinch of red pepper flakes
2 teaspoons kosher salt
⅛ teaspoon freshly ground black pepper
Per Serving (½ cooked breast) • Calories 136 • Fat 3.5 g Saturated Fat 0.5 g Cholesterol 73 mg • Carbohydrate 0.5 g • Fiber 0 g Protein 24 g • Sugars 0 g Sodium 179 mg
Freezer-to-Instant-Pot Chicken and Dumpling Soup

When the weather turns cool, I crave comfort foods—the kind of dishes that stick to your bones and warm you up like a big hug or a cozy sweater. Most comfort foods, however, are loaded with calories and fat…so my solution is always a big pot of soup! This chicken and dumpling soup is perfect to prep ahead and freeze, so you can whip it up anytime you’re craving comfort in a bowl. To streamline the recipe, I used frozen ricotta cavatelli rather than making the dumplings from scratch. (Note: If you want to make this with fresh ingredients rather than frozen, the same cook times will apply.)
SERVES 7
PREP AHEAD AND FREEZE
½ cup diced onion
1 cup chopped celery
1 cup chopped carrots
1 garlic clove, minced
1¼ pounds boneless, skinless chicken breasts
2 fresh sage leaves, chopped
2 bay leaves
8 ounces frozen ricotta cavatelli
ADD LATER
1 tablespoon unsalted butter
2 tablespoons all-purpose flour
6 cups water
2 tablespoons organic chicken bouillon (I like Better Than Bouillon)
¼ teaspoon kosher salt
Chopped fresh parsley, for garnish
FRIDGE: UP TO 4 DAYS. THE PASTA WILL SOAK UP A LOT OF THE LIQUID. ADD MORE WATER AS NEEDED WHEN REHEATING.
FREEZER: UP TO 6 MONTHS
Add the onion, celery, carrots, and garlic to a gallon-size zip-top plastic bag or freezer-safe container. Wrap the chicken, sage, and bay leaves separately in plastic, then place in the same bag or container with the vegetables.
When ready to cook, remove from the freezer.
Press the sauté button on the Instant Pot (or any electric pressure cooker). Add the butter. Once melted, add the onion, celery, carrots, and garlic. Cook, stirring occasionally, until the vegetables are soft, about 5 minutes. Add the flour and cook, stirring constantly, for about 1 minute to cook out the raw taste of the flour. Press cancel. Add the water and stir with a wooden spoon to deglaze, scraping any browned bits stuck to the bottom of the pot. Add the frozen chicken, the bouillon, and the frozen herbs. Cover and cook on high pressure for 20 minutes. Natural release. Remove the chicken and discard the bay leaves. Shred the chicken with two forks, then return to the pot.
Add the frozen cavatelli, cover, and cook on high pressure for 2 minutes. Quick release. Stir in the salt.
SERVE NOW: Divide among 7 serving bowls, and garnish with parsley.
FREEZE AND SERVE LATER: If you want to freeze the cooked soup, cook as directed above without adding the cavatelli, then freeze. Reheat on the stove until heated through, then add the cavatelli and cook until tender and thawed.
No Instant Pot, No Problem! If you don’t have an electric pressure cooker, no problem. Add an additional ½ cup water and simmer this soup in a covered large pot or Dutch oven on low for about 1 hour before adding the cavatelli. Cook according to the package directions until the cavatelli is tender.
SKINNY SCOOP Cavatelli is an Italian pasta, sometimes made with ricotta, sometimes without. The ones I use here are made with ricotta and are sold frozen in some supermarkets or Italian specialty stores. Frozen gnocchi could also be used in their place.
Per Serving (scant 1½ cups) • Calories 203 • Fat 4 g • Saturated Fat 1.5 g • Cholesterol 58 mg • Carbohydrate 17 g • Fiber 1.5 g • Protein 21 g Sugars 2 g • Sodium 742 mg
Freezer Chicken Black Bean Burritos
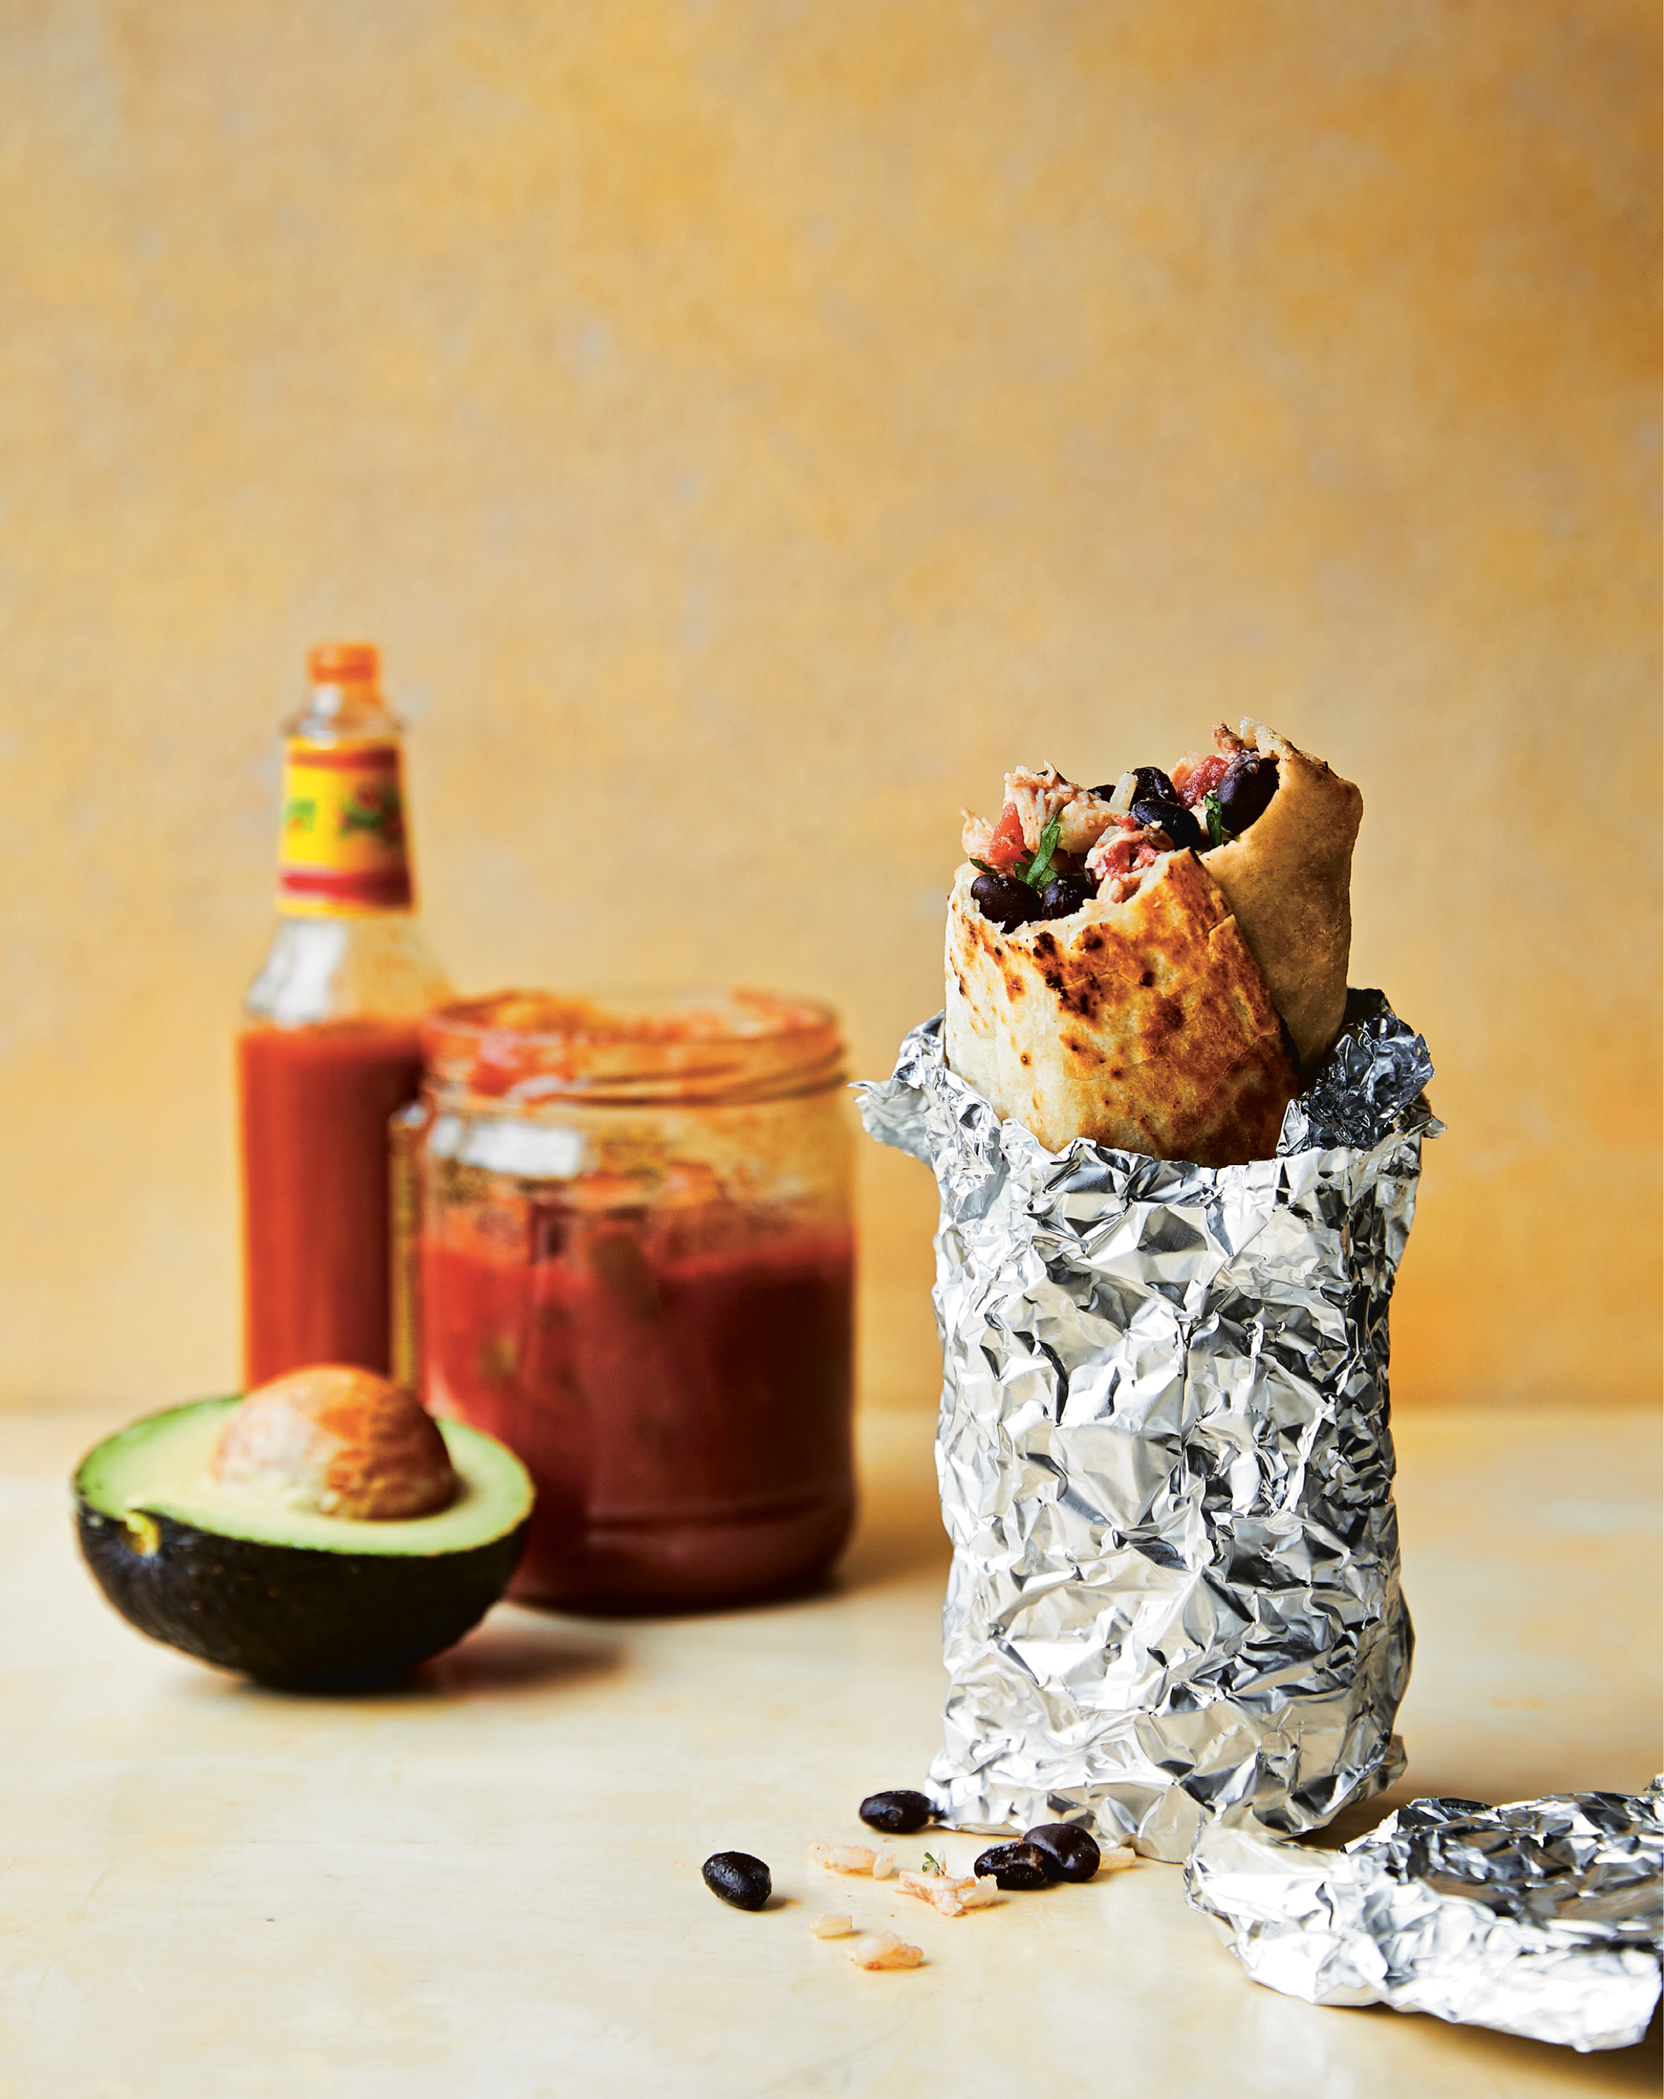
On those crazy-busy weeknights when there’s zero time to cook, you’ll be happy to have these burritos tucked away in your freezer! Using the slow cooker to make the chicken and bean filling, and buying frozen brown rice (I’m obsessed with Trader Joe’s brand!), makes the prep super simple. Since this recipe makes ten burritos, you can serve some for dinner when you make them, then freeze the rest for another night. To make it a more substantial meal, serve them with refried beans, guacamole, and pico de gallo on the side.
MAKES 10
CHICKEN
1 cup canned reduced-sodium black beans, rinsed and drained
1 (10-ounce) can diced tomatoes with mild green chilies
1 pound boneless, skinless chicken breast
½ teaspoon kosher salt
¾ teaspoon ground cumin
½ teaspoon garlic powder
¼ teaspoon cayenne pepper
1¼ cups jarred mild or spicy chunky salsa
1¼ cups cooked brown rice
¼ cup chopped fresh cilantro
BURRITOS
10 (8-inch) low-carb flour tortillas (I like Olé Xtreme Wellness)
1¼ cups shredded cheddar or pepper Jack cheese
Cooking spray
Hot sauce, salsa, guacamole, and/or sour cream, for serving (optional)
FRIDGE: UP TO 4 DAYS
FREEZER: UP TO 3 MONTHS
Make the chicken: In a slow cooker, combine the beans and tomatoes with chilies. In a medium bowl, season the chicken with the salt, cumin, garlic powder, and cayenne. Place the chicken over the beans in the slow cooker and top with the salsa. Cover and cook on low for about 4 hours, or until the chicken is tender. In the slow cooker, shred the chicken with two forks and mix well with the sauce to let the flavors combine. Pour the chicken mixture into a large colander to drain (you don’t want any liquid) and return to the slow cooker. Mix in the rice and cilantro.
Assemble the burritos: On a hot griddle or over an open flame, lightly char both sides of the tortillas. (Keep them warm under a towel covering if eating right away.)
On a clean work surface, spread out the tortillas and scoop ½ cup of the chicken and bean mixture onto the center of each. Top each with 2 tablespoons cheese. To assemble, roll a tortilla from the bottom up and fold the left and right edges in toward the center. Continue rolling into a tight cylinder. Repeat with the remaining tortillas and filling.
SERVE NOW: Heat a skillet over medium heat. When hot, spray the skillet with oil and add the burritos, seam side down. Cook, covered, until the bottom of the burritos are golden brown, about 3 minutes on each side. Serve with hot sauce, salsa, and other optional toppings.
FREEZE AND SERVE LATER: After assembling the burritos, place a piece of foil on a work surface vertically, then place a burrito at the bottom center. Fold the sides of the foil over the burrito and roll it up. Transfer to a labeled freezer-safe bag to prevent freezer burn.
How to Reheat
Thawing overnight in the refrigerator (best results): Transfer the burritos to the refrigerator the night before you plan to eat them.
Preheat the oven to 425° F. Place the burritos, still in their foil, on a baking sheet. Bake for about 20 minutes, turning them over halfway through. Carefully remove the foil and bake uncovered for about 5 minutes more, until browned. Let cool for 2 minutes before serving.
Reheating directly from freezer to oven (best results): Preheat the oven to 425°F. Bake the wrapped burritos for about 45 minutes, turning over halfway through. Carefully remove the foil and bake uncovered for about 5 minutes, until browned. Let cool for 2 minutes before serving.
Reheating from freezer to microwave (least favorite results): Remove a burrito from the foil, place on a microwave-safe dish, cover with a paper towel, and microwave for 1 minute. Flip the burrito, then cook for an additional 1 to 1½ minutes. Let cool for 2 minutes before serving.
Per Serving (1 burrito) • Calories 225 • Fat 8 g • Saturated Fat 3.5 g • Cholesterol 44 mg • Carbohydrate 29 g • Fiber 13.5 g • Protein 20 g Sugars 2 g • Sodium 785 mg
Freezer-to-Instant-Pot Cream of Chicken and Wild Rice Soup
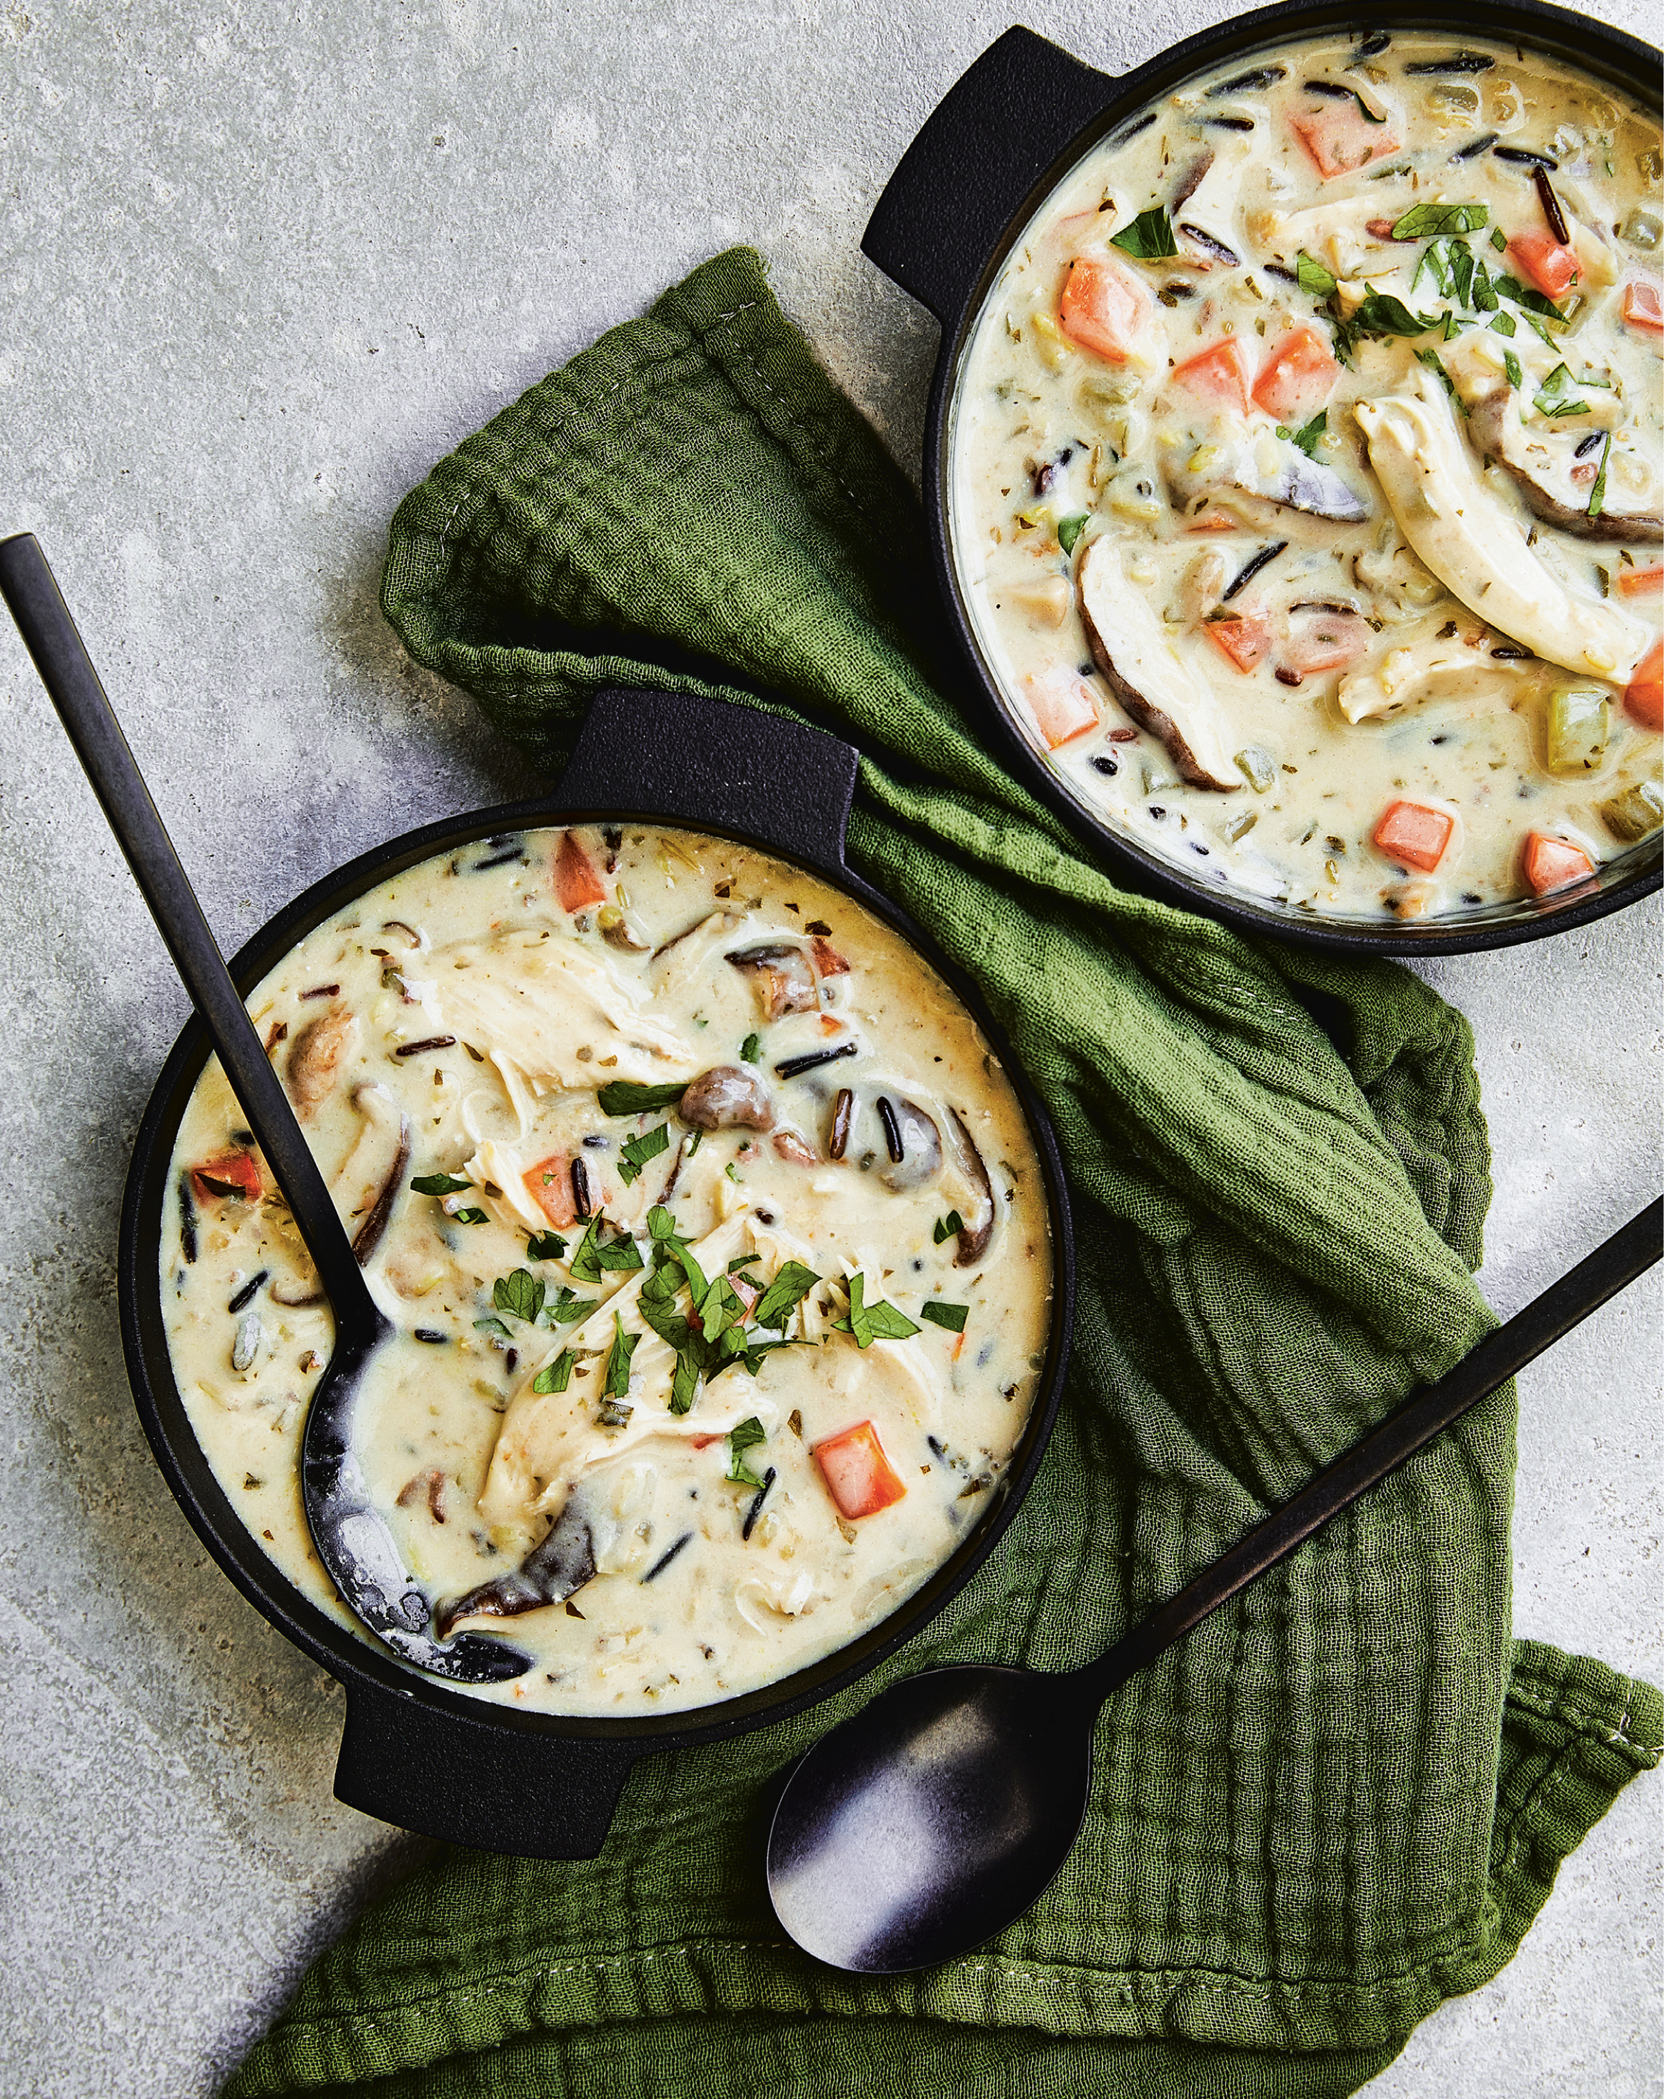
I literally crave this hearty soup when the weather begins to chill. It’s thick, creamy, and so warming on a cold day. This soup also works great as a freezer-to-Instant-Pot meal—just prep all your veggies and herbs and freeze them with the chicken and rice. When a soup craving strikes, simply pop it in the Instant Pot, adding the flour and sour cream after. It makes enough for dinner, with leftovers for lunch the next day. I find that chicken thighs are more tender and flavorful here, but I used chicken breasts for this recipe.
SERVES 6
PREP AHEAD AND FREEZE
2 cups sliced shiitake mushrooms (about 4 ounces)
1 cup chopped celery
1 cup chopped carrots
¼ cup chopped shallots
2 tablespoons chopped fresh parsley
1 pound boneless, skinless chicken breasts
6 ounces uncooked wild rice
1½ teaspoons fresh thyme leaves
2 bay leaves
ADD LATER
¼ cup all-purpose flour
2 tablespoons chicken bouillon* (I like Better Than Bouillon)
½ cup reduced-fat sour cream
¼ teaspoon kosher salt
*Read the label to be sure this product is gluten-free.
FRIDGE: UP TO 4 DAYS. ADD BROTH OR WATER TO LOOSEN WHEN REHEATING IF THE SOUP IS TOO THICK.
FREEZER: FREEZE UNCOOKED PREPPED INGREDIENTS UP TO 6 MONTHS.
Add the mushrooms, celery, carrots, shallots, and parsley to a gallon-size zip-top plastic bag or freezer-safe container (make sure the container fits in your Instant Pot (or any electric pressure cooker) so you don’t have to thaw it before cooking) along with the chicken, rice, thyme, and bay leaves. Label with the remaining ingredients you will need for later.
When ready to cook, remove from the freezer.
Add the frozen ingredients to the Instant Pot with 5 cups water. In a small bowl, add the flour to an additional 1 cup water and whisk well. Add to the pot along with the bouillon. Cover and cook on high pressure for 25 minutes. Natural release. Remove the chicken and discard the bay leaves. Shred the chicken with two forks and return the chicken to the pot. Stir in the sour cream and salt.
SERVE NOW: Divide the soup among 6 bowls (1½ cups each) and eat right away.
No Instant Pot, No Problem! You can prepare this soup in a Dutch oven, adding an additional ¼ cup water. Simmer on low heat for 45 to 55 minutes, until the wild rice is tender.
Per Serving (1½ cups) • Calories 282 • Fat 5.5 g • Saturated Fat 2.5 g • Cholesterol 56 mg • Carbohydrate 32 g • Fiber 3.5 g • Protein 24 g Sugars 4 g • Sodium 862 mg
Freezer-to-Instant-Pot Thai Chicken Stew with Butternut Squash
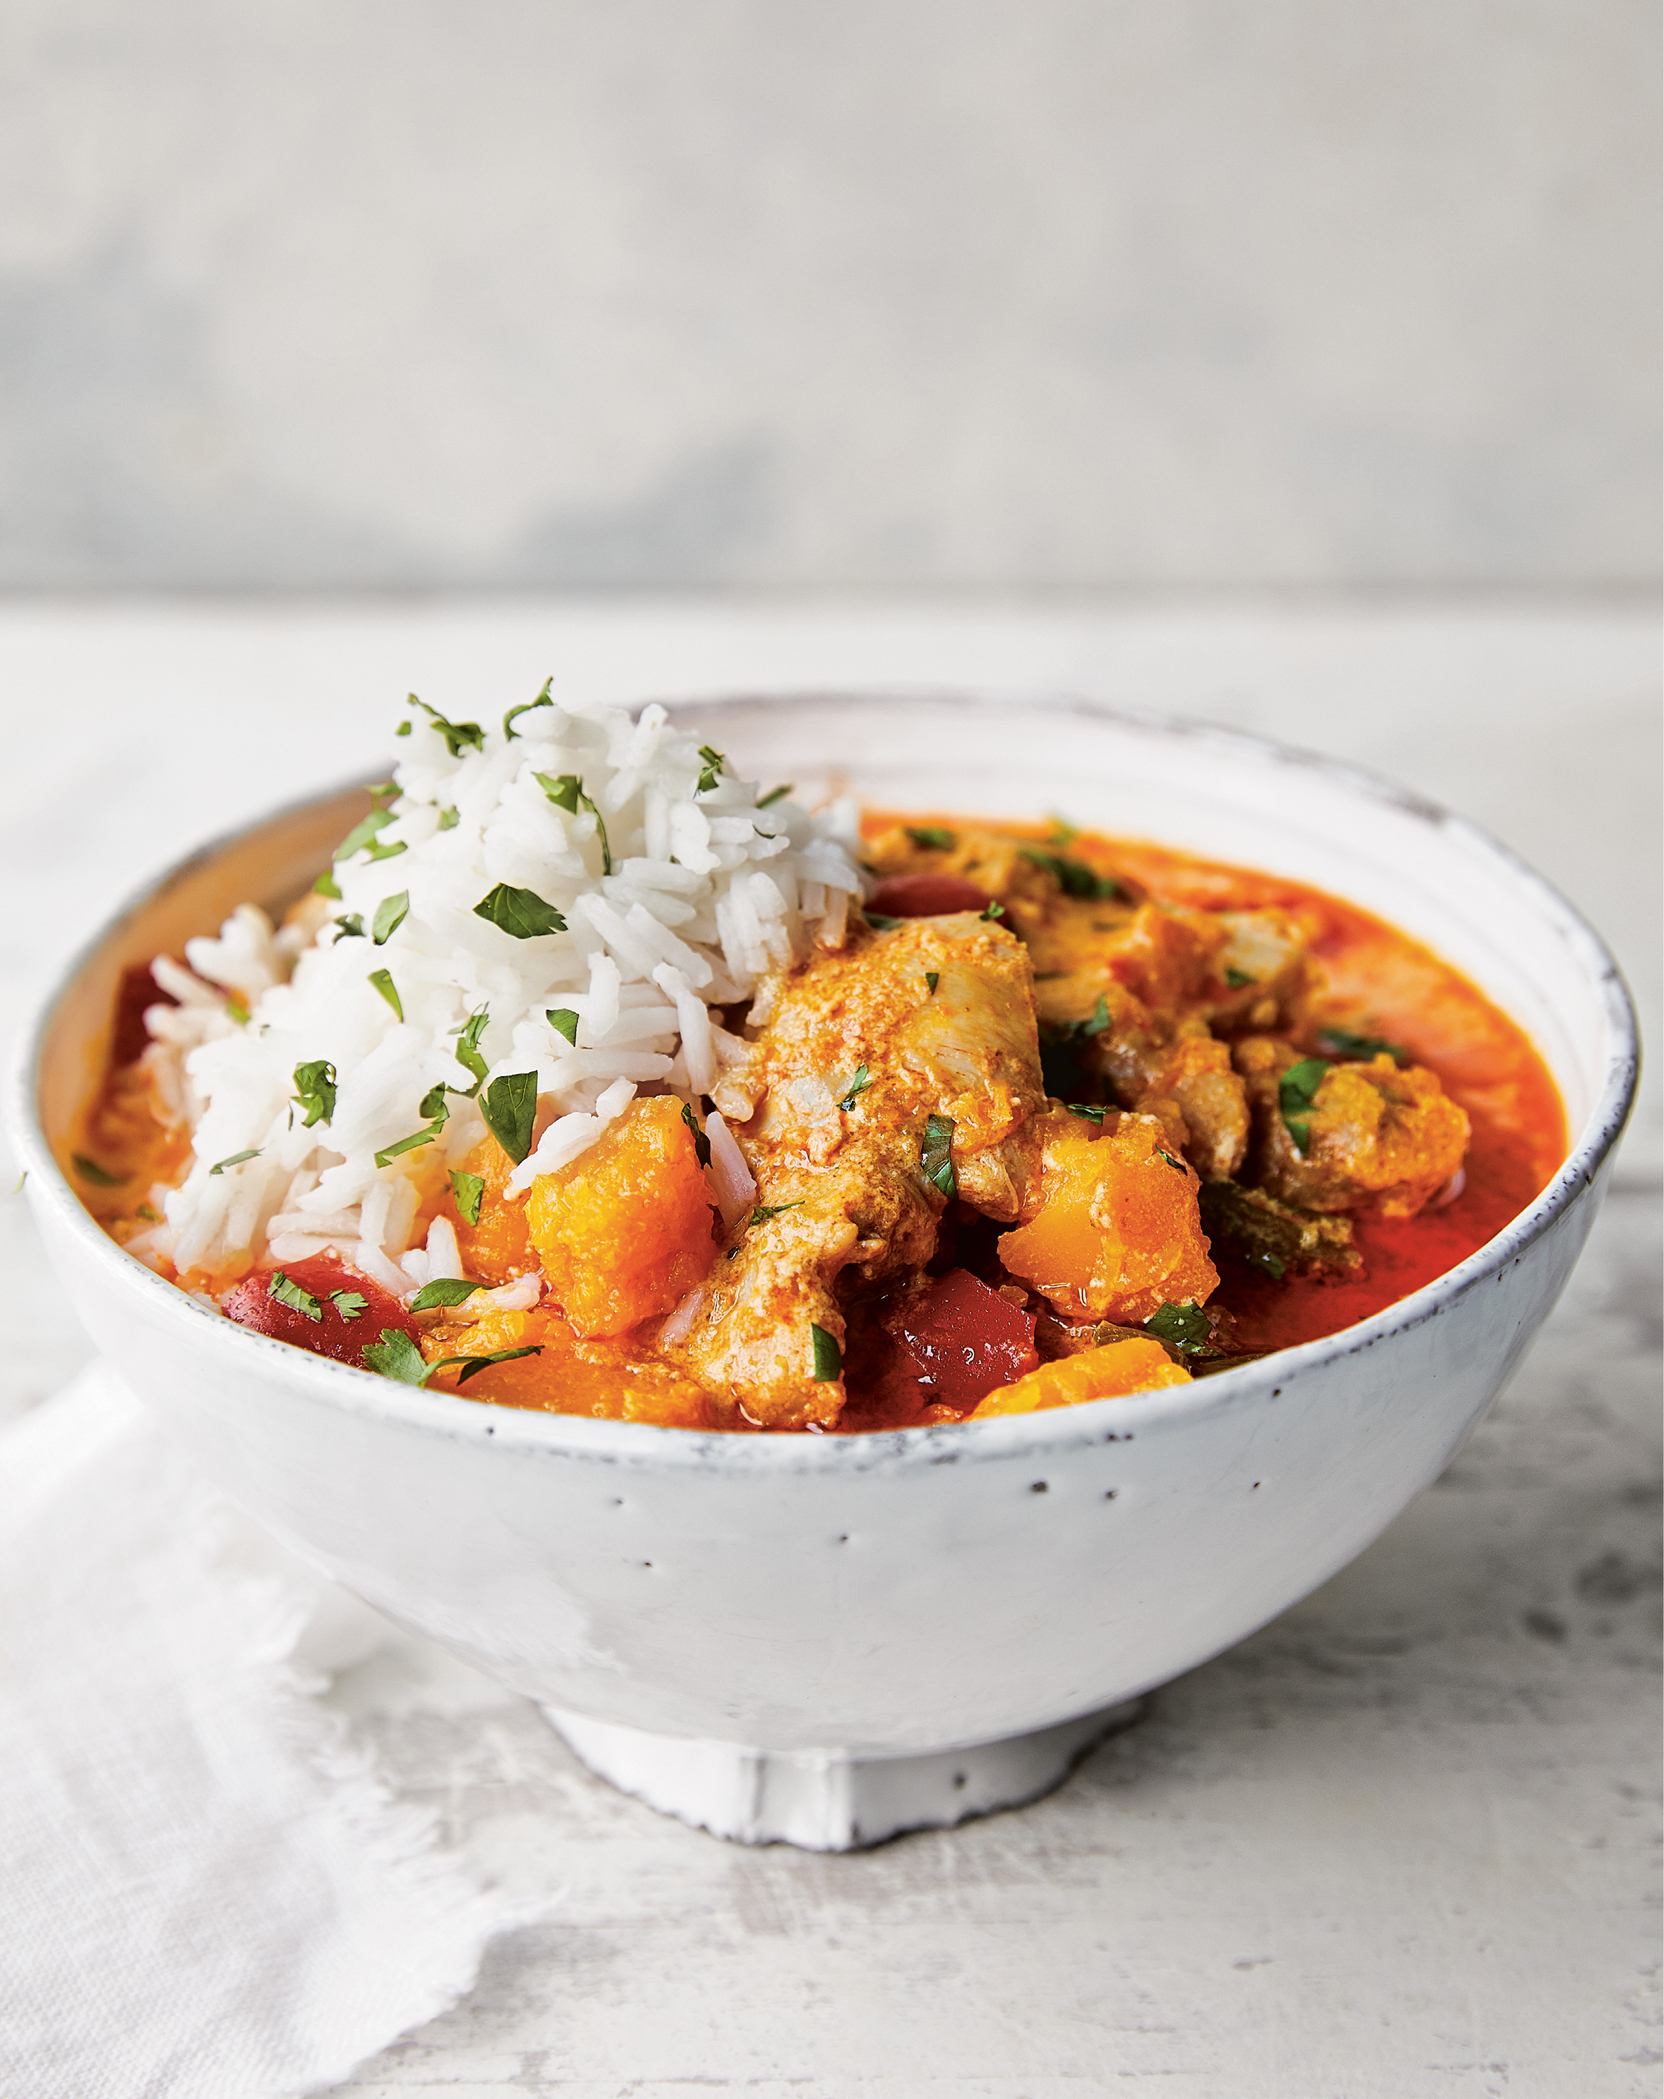
This Thai-inspired stew is a great contender for prepping and freezing the ingredients ahead of time. This way, you can cook the ingredients from frozen right in an Instant Pot (or any electric pressure cooker) whenever the mood strikes. Just be sure to freeze the stew ingredients in a freezer-safe container that fits in the Instant Pot. With curry paste, a hint of coconut milk, Sriracha, and lime, this flavorful stew is perfect over basmati rice.
SERVES 5
STEW
2¼ pounds boneless, skinless chicken thighs (about 10), fat trimmed
1½ pounds peeled butternut squash, 1-inch cubes
3 medium scallions, cut into 1-inch pieces
1 medium red bell pepper, diced
4 medium garlic cloves, thinly sliced
1 tablespoon grated fresh ginger
2 teaspoons toasted sesame oil
1 tablespoon red curry paste
1½ teaspoons kosher salt
1 tablespoon Sriracha sauce
⅓ cup reduced-sodium soy sauce*
¼ cup fresh lime juice (from about 2 limes)
2 tablespoons chopped fresh cilantro, plus 1 tablespoon for garnish
½ cup canned unsweetened full-fat coconut milk
SERVING
2½ cups cooked basmati rice
*Read the label to be sure this product is gluten-free.
FRIDGE: UP TO 4 DAYS
FREEZER: UP TO 9 MONTHS (UNCOOKED) OR 3 MONTHS (COOKED)
In a large bowl, combine all of the stew ingredients except for the coconut milk and mix well (I like to wear gloves to mix with my hands). Transfer to a large freezer-safe container (use one that will fit in your Instant Pot, or any electric pressure cooker, so it fits when frozen) or a gallon-size freezer bag, pressing out all the air out. Seal and freeze. (If using a freezer bag, I place the bag in a container that will fit in my Instant Pot rather than laying it flat, so it fits frozen.)
When ready to cook, remove from the freezer and run under warm water to make it easy to take out.
Place all of the stew ingredients plus the coconut milk and ½ cup water in an electric pressure cooker. Seal and cook on high pressure for 15 minutes. Let the pressure release for 10 minutes before quick releasing.
Transfer to 5 bowls and scoop ½ cup rice over each bowl. Garnish with cilantro.
No Instant Pot, No Problem! Make this on the stove by adding an additional ¼ cup water and cooking on low for about 40 minutes, or until the chicken is tender and cooked through.
Per Serving (2 cups stew + ½ cup rice) • Calories 501 • Fat 15.5 g • Saturated Fat 6.5 g • Cholesterol 194 mg • Carbohydrate 46 g Fiber 4 g • Protein 45 g • Sugars 6 g • Sodium 1,209 mg
Instant Pot Cajun Red Beans and Rice

In New Orleans, it’s a Monday tradition to simmer a big pot of red beans and rice in the kitchen all day long—but using an Instant Pot makes this classic Cajun dish cook up a whole lot faster! The beans are seasoned with onions, bell peppers, and celery (the “holy trinity” of Cajun cooking), along with garlic, herbs, spices, and smoky andouille sausage. If you can’t find chicken or turkey andouille sausage, any smoked sausage, or even a smoked turkey leg, would also work. Puréeing some of the beans at the end in a blender is the key as it creates a creamy consistency.
SERVES 8
1 pound dried kidney beans
1 tablespoon kosher salt
½ tablespoon extra-virgin olive oil
1 large onion, diced
1 green bell pepper, diced
2 celery stalks, diced
6 garlic cloves, minced or pressed through a garlic press
1 teaspoon Cajun or Creole seasoning (I like Tony Chachere’s Creole Seasoning)
¼ teaspoon cayenne pepper
12 ounces cooked chicken andouille sausage,* sliced (I like Aidells or Al Fresco)
1½ teaspoons chopped fresh sage
4 sprigs of fresh thyme
2 bay leaves
SERVING
4 cups cooked white rice
Sliced scallions or chopped fresh parsley, for garnish
Hot sauce (optional)
*Read the label to be sure this product is gluten-free.
FRIDGE: UP TO 4 DAYS
FREEZER: UP TO 3 MONTHS
Rinse the beans and place them into the Instant Pot (or any electric pressure cooker) with 8 cups water and 1 teaspoon salt. Seal and cook on high pressure for 4 minutes. Let natural release for 10 minutes, then quick release. Drain and rinse the beans.
Press the sauté button on the Instant Pot. Add the oil, onion, bell pepper, celery, garlic, 1 teaspoon salt, Cajun seasoning, and cayenne. Cook, stirring occasionally, until the vegetables are soft, 5 to 7 minutes. Stir in 3½ cups water, the parcooked beans, sausage, sage, thyme, bay leaves, and remaining 1 teaspoon salt.
Seal and cook on high pressure for 15 minutes. Natural release.
Discard the thyme sprigs and bay leaves. Pour 1½ cups of the beans and liquid (without the sausage) into a regular blender, process until smooth, then pour back into the pot to thicken the mixture.
Press the sauté button. Bring the entire mixture to a boil and cook, stirring occasionally, until thickened, 4 to 5 minutes.
SERVE NOW: Divide the beans and sausage among 8 bowls and top each with ½ cup rice. Garnish with scallions or parsley and serve with hot sauce on the side.
FREEZE AND SERVE LATER: Divide among 8 airtight containers and refrigerate or freeze. To reheat, thaw overnight in the refrigerator and reheat on the stove or in the microwave.
No Instant Pot, No Problem! To make this in a Dutch oven, soak the beans overnight and discard the water. Cook covered with 6 cups water over medium-low heat for 1 hour 45 minutes, stirring occasionally. Discard the herbs and purée 1½ cups of the beans and liquid (not sausage) in a blender. Cook 10 to 15 minutes more, until thickened.
Per Serving (generous 1 cup beans and sausage + ½ cup rice) • Calories 402 Fat 5.5 g • Saturated Fat 1.5 g • Cholesterol 33 mg • Carbohydrate 66 g Fiber 10 g • Protein 23 g • Sugars 3 g • Sodium 707 mg
Instant Pot Chicken and Shrimp Gumbo
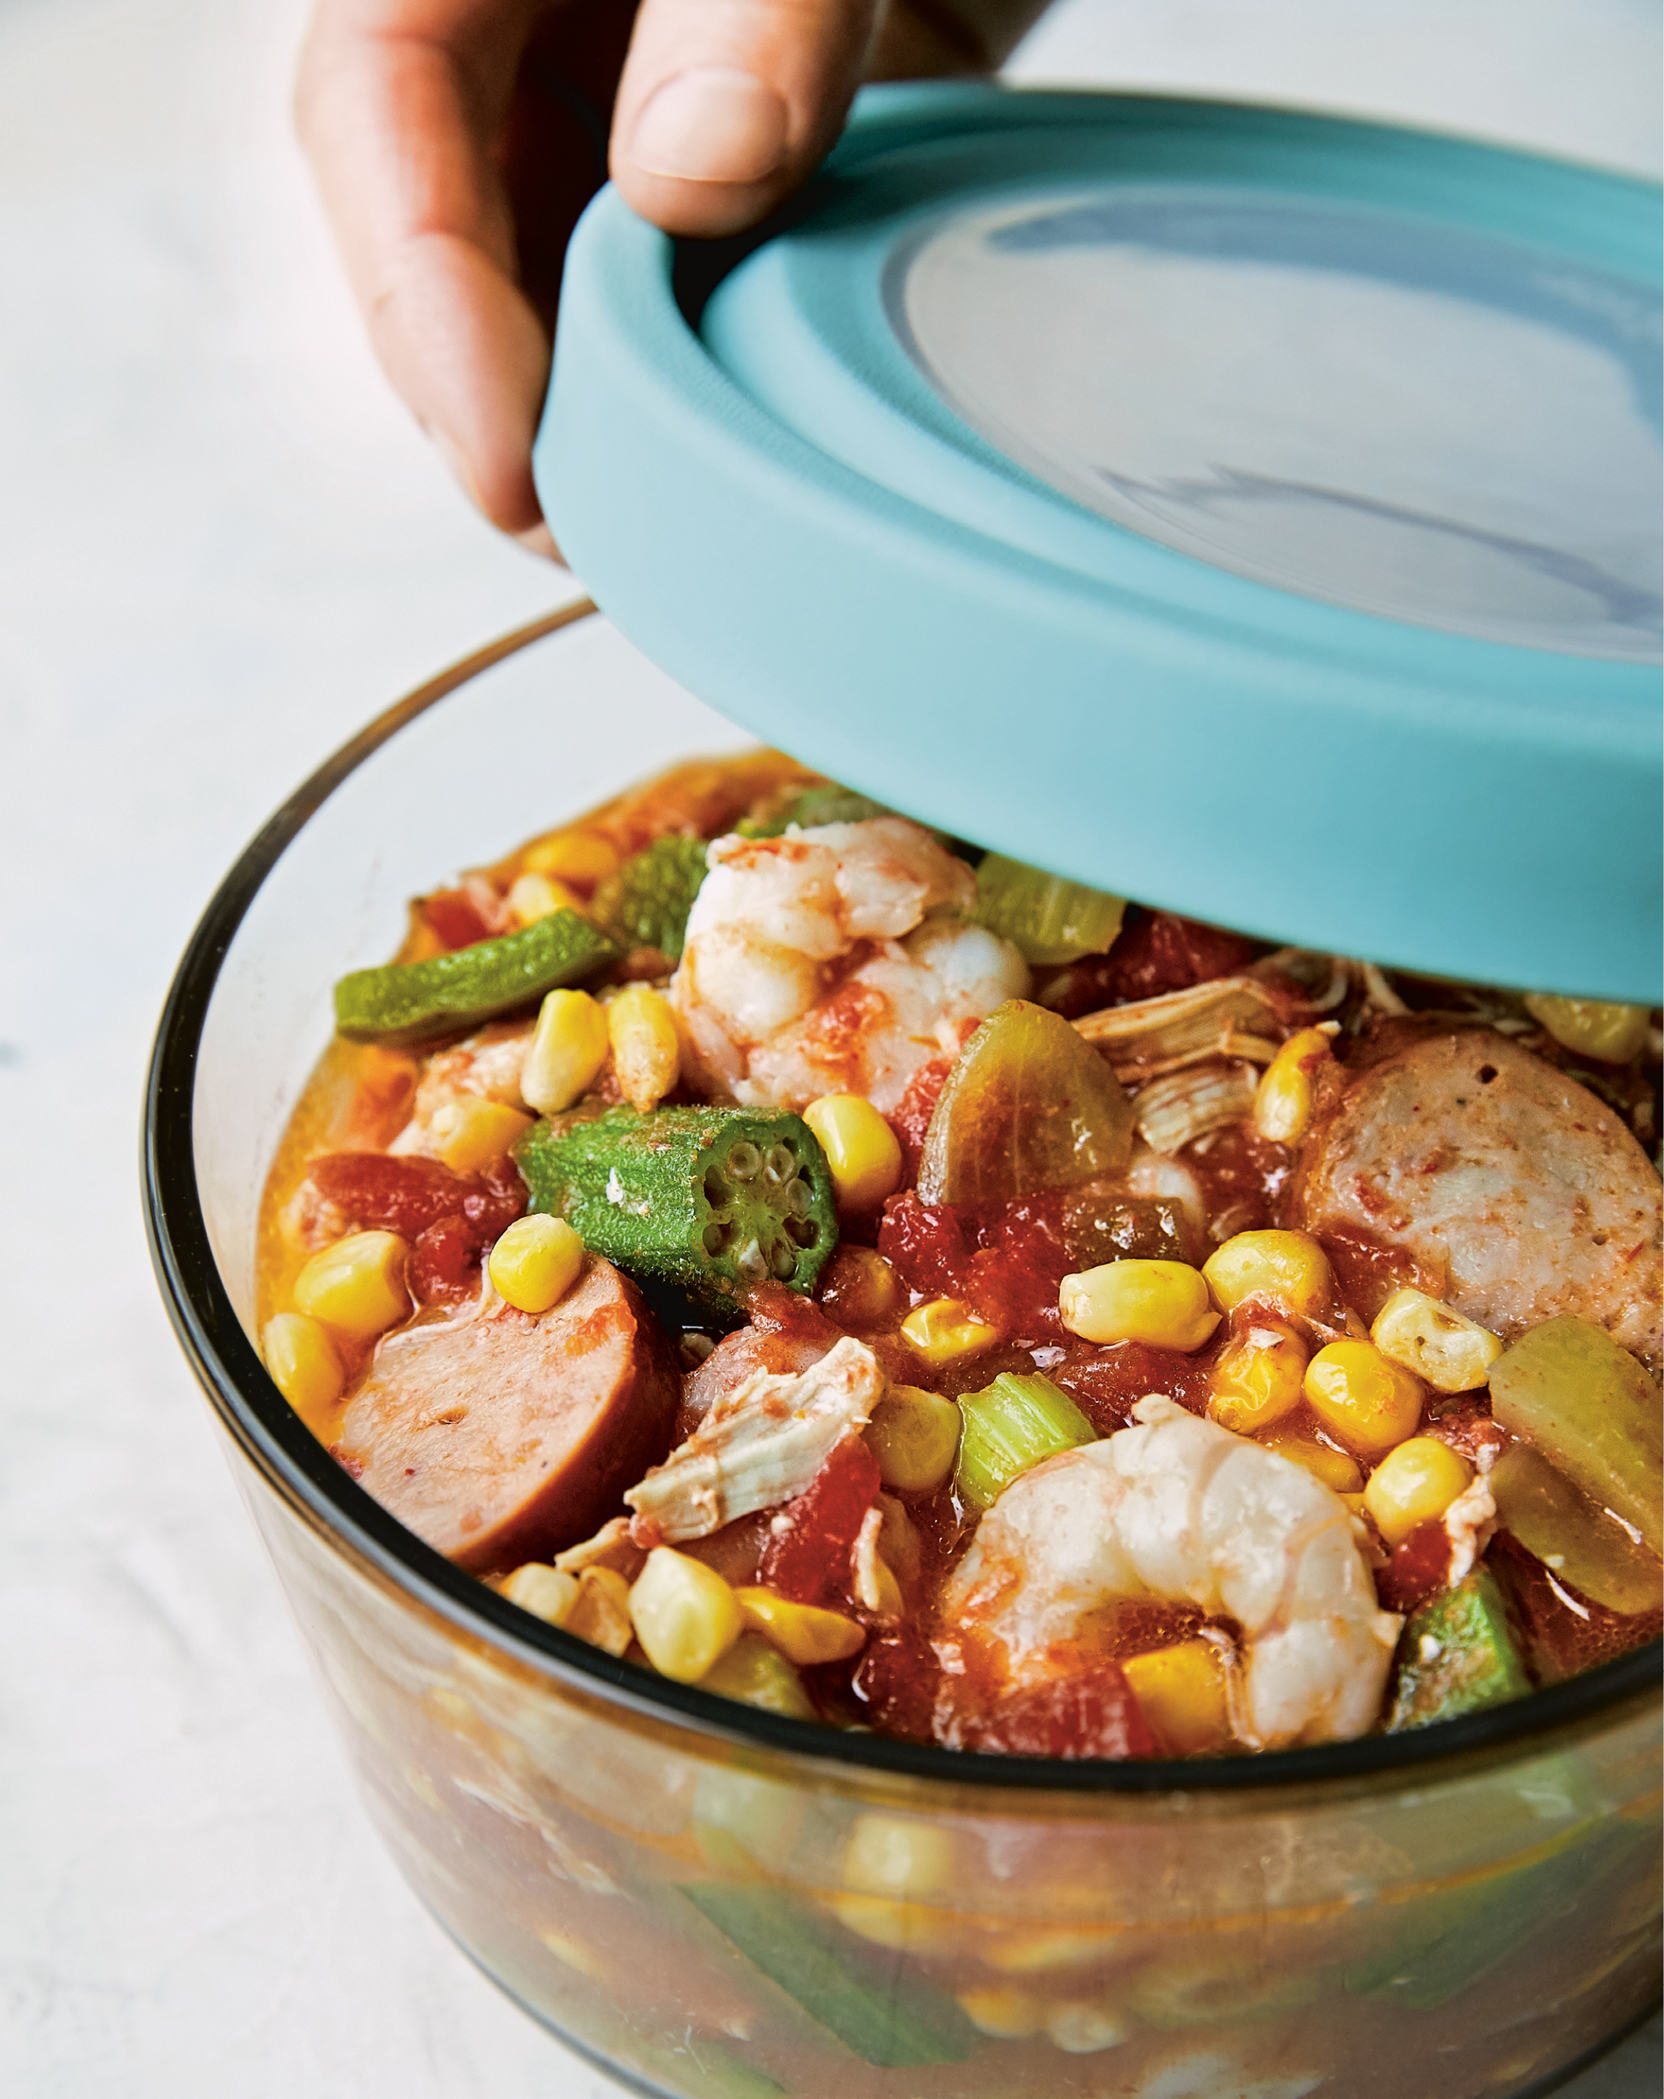
This lightened-up gumbo is loaded with so many delicious ingredients: chicken thighs, shrimp, sausage, okra, and lots of veggies. While many Louisiana recipes start with a roux (a mixture of flour and fat used to thicken sauces, stews, and gravies), this gumbo is actually roux-free. The result is a quicker dish that is lighter in calories, but certainly not in flavor! The base of this stew is made with onions, bell pepper, and celery, plus garlic and filé powder (made with ground sassafras leaves, it’s available online). I like to serve this over brown rice, but you can skip the rice if you prefer to keep it low-carb.
SERVES 6
1 tablespoon unsalted butter
1 large onion, chopped
1 green bell pepper, chopped
2 celery stalks, chopped
3 garlic cloves, minced
1½ cups chicken broth*
1 (14.5-ounce) can petite diced tomatoes, undrained
½ (10-ounce) can diced tomatoes with green chilies, undrained
24 ounces boneless, skinless chicken thighs (about 6 total), fat trimmed
9 ounces chicken andouille sausage, sliced
2 cups sliced fresh or frozen okra (fresh is best)
¾ cup fresh or frozen corn kernels
¼ teaspoon cayenne pepper
½ teaspoon kosher salt
Freshly ground black pepper
¾ pound peeled and deveined raw medium shrimp, tails removed
2 teaspoons ground gumbo filé powder (I like Zatarain’s)
2 cups cooked brown rice
Chopped scallions, for garnish
*Read the label to be sure this product is gluten-free.
FRIDGE: UP TO 3 DAYS
FREEZER: UP TO 3 MONTHS
Press the sauté button on the Instant Pot. Add the butter. Once melted, add the onion, bell pepper, and celery. Cook, stirring occasionally, until the vegetables are tender, about 5 minutes. Stir in the garlic and cook until fragrant, about 1 minute. Press cancel. Add the broth and stir with a wooden spoon to deglaze, scraping up any browned bits stuck to the bottom of the pot. Add the diced tomatoes, tomatoes with green chilies, chicken, sausage, okra, corn, cayenne, salt, and pepper to taste. Cook on high pressure until the chicken easily shreds, about 25 minutes. Natural release.
Shred the chicken coarsely with two forks, then return to the pot and add the shrimp. Press the sauté button and bring the mixture to a boil. Simmer until the shrimp is opaque and cooked through, 4 to 5 minutes. Press cancel, and when it stops boiling, stir in the filé powder.
SERVE NOW: Divide among 6 bowls and serve topped with the rice and scallions.
FREEZE AND SERVE LATER: Let the gumbo cool to room temperature, then transfer to freezer-safe containers. Thaw overnight in the refrigerator before reheating on the stove or in the microwave.
No Instant Pot, No Problem! Make this on the stove by increasing the broth to 1¾ cups and cook, covered, over low heat for about 50 minutes, until the chicken is tender, then add the shrimp and cook for about 3 minutes more, until the shrimp is opaque and cooked through.
Per Serving (1⅔ cups gumbo + ⅓ cup rice) • Calories 419 • Fat 11.5 g • Saturated Fat 3.5 g • Cholesterol 213 mg • Carbohydrate 34 g Fiber 5 g • Protein 43 g • Sugars 6 g • Sodium 1,188 mg
Chicken and Chickpea Stew

Some days call for a rustic and cozy meal that fills your belly and warms your soul. That’s where this simple chicken stew comes in—it’s the kind of dish you can eat with a fork and a spoon. This unfussy one-pot recipe is made with bone-in thighs, white wine, canned chickpeas, and collard greens, and my family actually prefers it over beef stew. I often double the recipe and freeze the other half for another night; the cook time remains the same and it gives me a night off later in the month.
SERVES 4
4 large bone-in, skinless chicken thighs, fat trimmed (1½ pounds)
1½ teaspoons kosher salt
½ teaspoon garlic powder
1 teaspoon olive oil
1 large onion, chopped
¼ cup chopped fresh parsley
3 garlic cloves, minced
2 tablespoons tomato paste
½ cup white wine
2 (15-ounce) cans chickpeas,* rinsed and drained
2 cups chopped collard greens or Swiss chard
1 teaspoon sweet paprika
Freshly ground black pepper
1 bay leaf
*Read the label to be sure this product is gluten-free.
FRIDGE: UP TO 4 DAYS
FREEZER: UP TO 3 MONTHS
Season the chicken with ½ teaspoon salt and garlic powder. Set aside.
Heat a large pot or Dutch oven over medium heat. Add the oil, onion, parsley, and garlic and sauté until soft, about 2 minutes. Stir in the tomato paste and cook until slightly darkened, about 1 minute. Add the wine and let reduce for about 2 minutes. Add the chicken, chickpeas, greens, and 2½ cups water (enough to just cover the chicken), the remaining 1 teaspoon salt, paprika, pepper to taste, and bay leaf. Mix to combine. Cover and cook until the chicken is tender, 45 to 50 minutes. Discard the bay leaf and serve.
FREEZE AND SERVE LATER: Let the stew cool to room temperature. Divide into freezer-safe containers and freeze. To reheat, transfer to the refrigerator to thaw completely or reheat from frozen in 30-second intervals in the microwave until heated through.
For an Instant Pot: Reduce the water to 2 cups and cook for 20 minutes on high pressure, then quick release.
For a Slow Cooker: Reduce the water to 2 cups and cook on low for 8 hours.
Per Serving (1 thigh + 1 cup chickpeas + greens) • Calories 510 Fat 12 g • Saturated Fat 2 g • Cholesterol 119 mg • Carbohydrate 57 g Fiber 12 g • Protein 41 g • Sugars 3 g • Sodium 1,000 mg
Chicken Orzo Soup with Dill
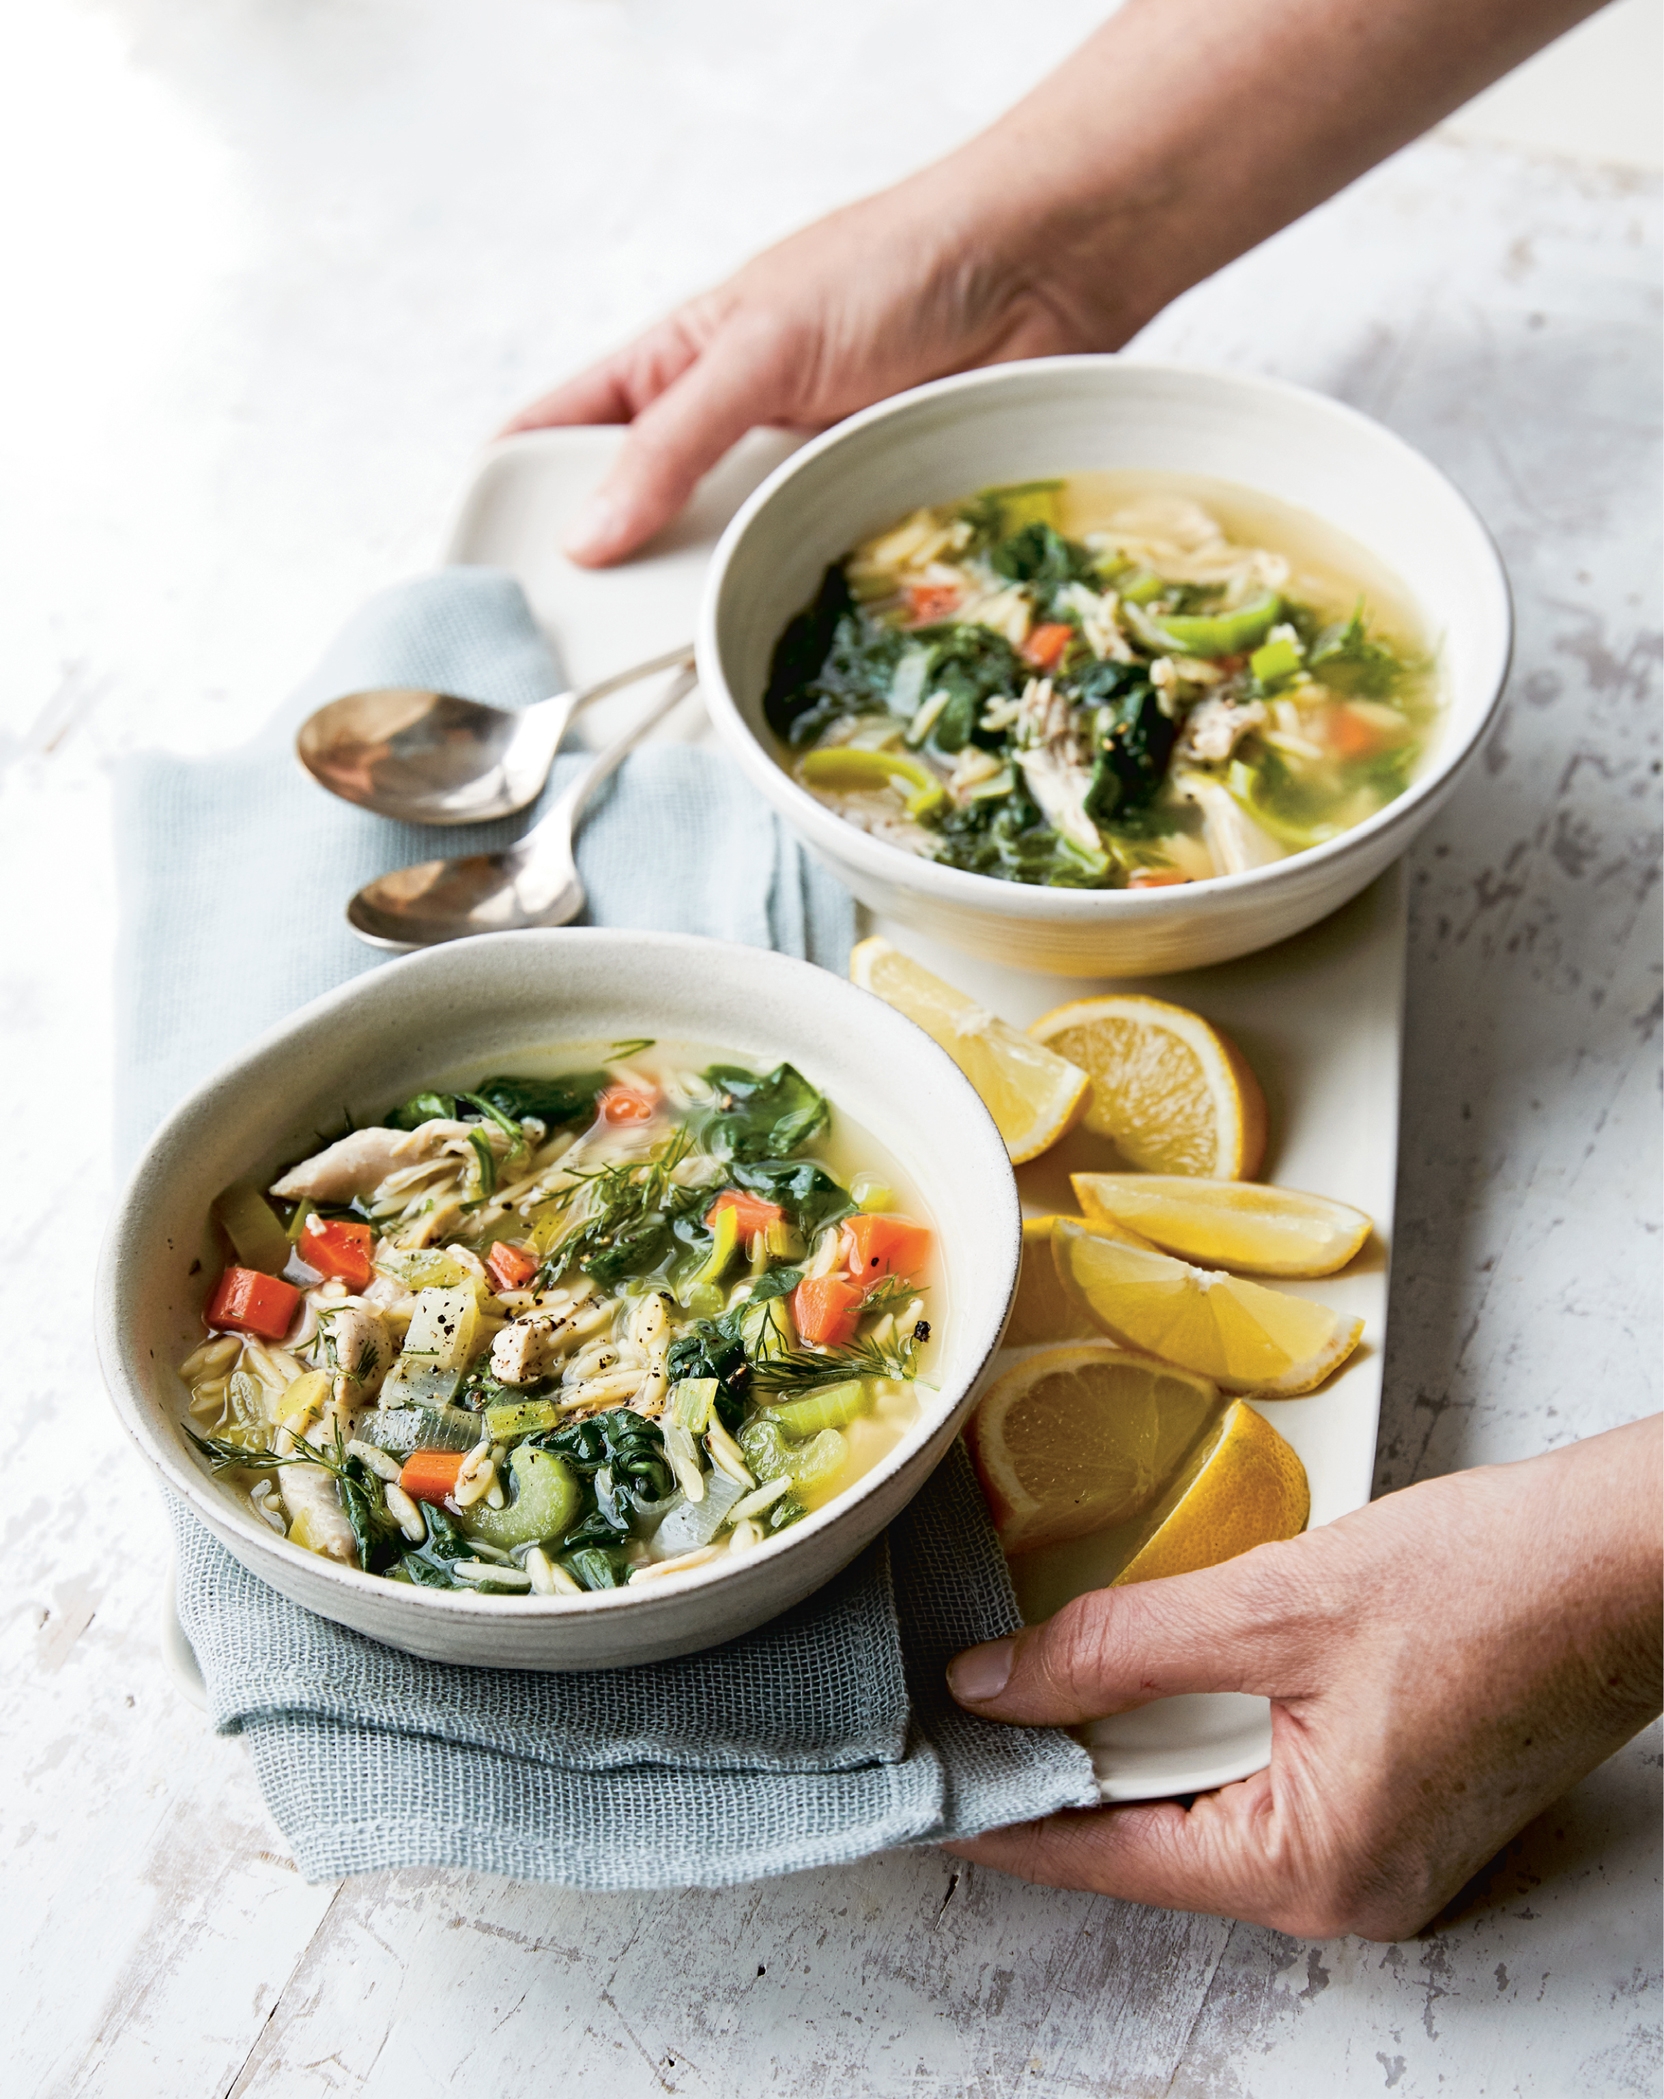
This weeknight chicken soup is Greek-inspired—I use orzo in place of noodles, flavor it with a handful of fresh dill, and finish it off with a squeeze of lemon juice. It’s hearty enough to stand on its own as a meal, but you can also serve a small salad or piece of crusty bread on the side if you’d like. It’s easy, inexpensive, and great for lunch or dinner. Or better yet, enjoy half for dinner and freeze the rest for another night alongside an entrée.
SERVES 8
1½ pounds boneless, skinless chicken thighs, fat trimmed
½ teaspoon kosher salt, plus more if needed
2 teaspoons extra-virgin olive oil
1 cup diced leeks, white and pale green parts only, rinsed well
1 cup diced celery
1 cup diced carrot
5 garlic cloves, minced
11 cups reduced-sodium chicken broth (canned or homemade)*
2 bay leaves
⅛ teaspoon freshly ground black pepper
1 cup orzo pasta, wheat or gluten-free
4 cups baby spinach
½ cup chopped fresh dill
Lemon wedges, for serving (optional)
*Read the label to be sure this product is gluten-free.
FRIDGE: UP TO 4 DAYS
FREEZER: UP TO 3 MONTHS
Season the chicken with the salt. Set aside.
In a large pot or Dutch oven, heat the oil over medium heat. Add the leeks, celery, carrot, and garlic and sauté until soft, about 5 minutes. Add the chicken, broth, bay leaves, and pepper and bring to a boil. Cover, reduce the heat to medium-low, and cook until the chicken is tender and cooked through, 25 to 30 minutes. Discard the bay leaves.
Transfer the chicken to a plate and shred with two forks. Set aside.
Bring the soup to a boil over high heat. Add the pasta and cook according to package directions. Add the baby spinach during the last minute of cooking to wilt. Return the chicken to the pot along with the dill and adjust the salt to taste. Serve with lemon wedges for squeezing over (if using).
FREEZE AND SERVE LATER: Let the soup cool, then transfer to airtight, freezer-safe containers. To reheat from frozen, let thaw in the refrigerator the night before, then reheat on the stove or in the microwave.
For an Instant Pot: Prepare the soup in an Instant Pot (or any electric pressure cooker). Seal and cook on high pressure for 20 minutes. Natural release, then add the orzo and cook on high pressure for 2 minutes (or press sauté and cook uncovered according to package directions). Quick release and serve.
SKINNY SCOOP Leeks are mild and delicious in this soup, but chopped onions would also work well.
Per Serving (1¾ cups) • Calories 238 • Fat 6.5 g • Saturated Fat 1.5 g • Cholesterol 81 mg • Carbohydrate 20 g • Fiber 2 g • Protein 23 g Sugars 3 g • Sodium 1,062 mg
Slow Cooker White Bean Chicken Chili
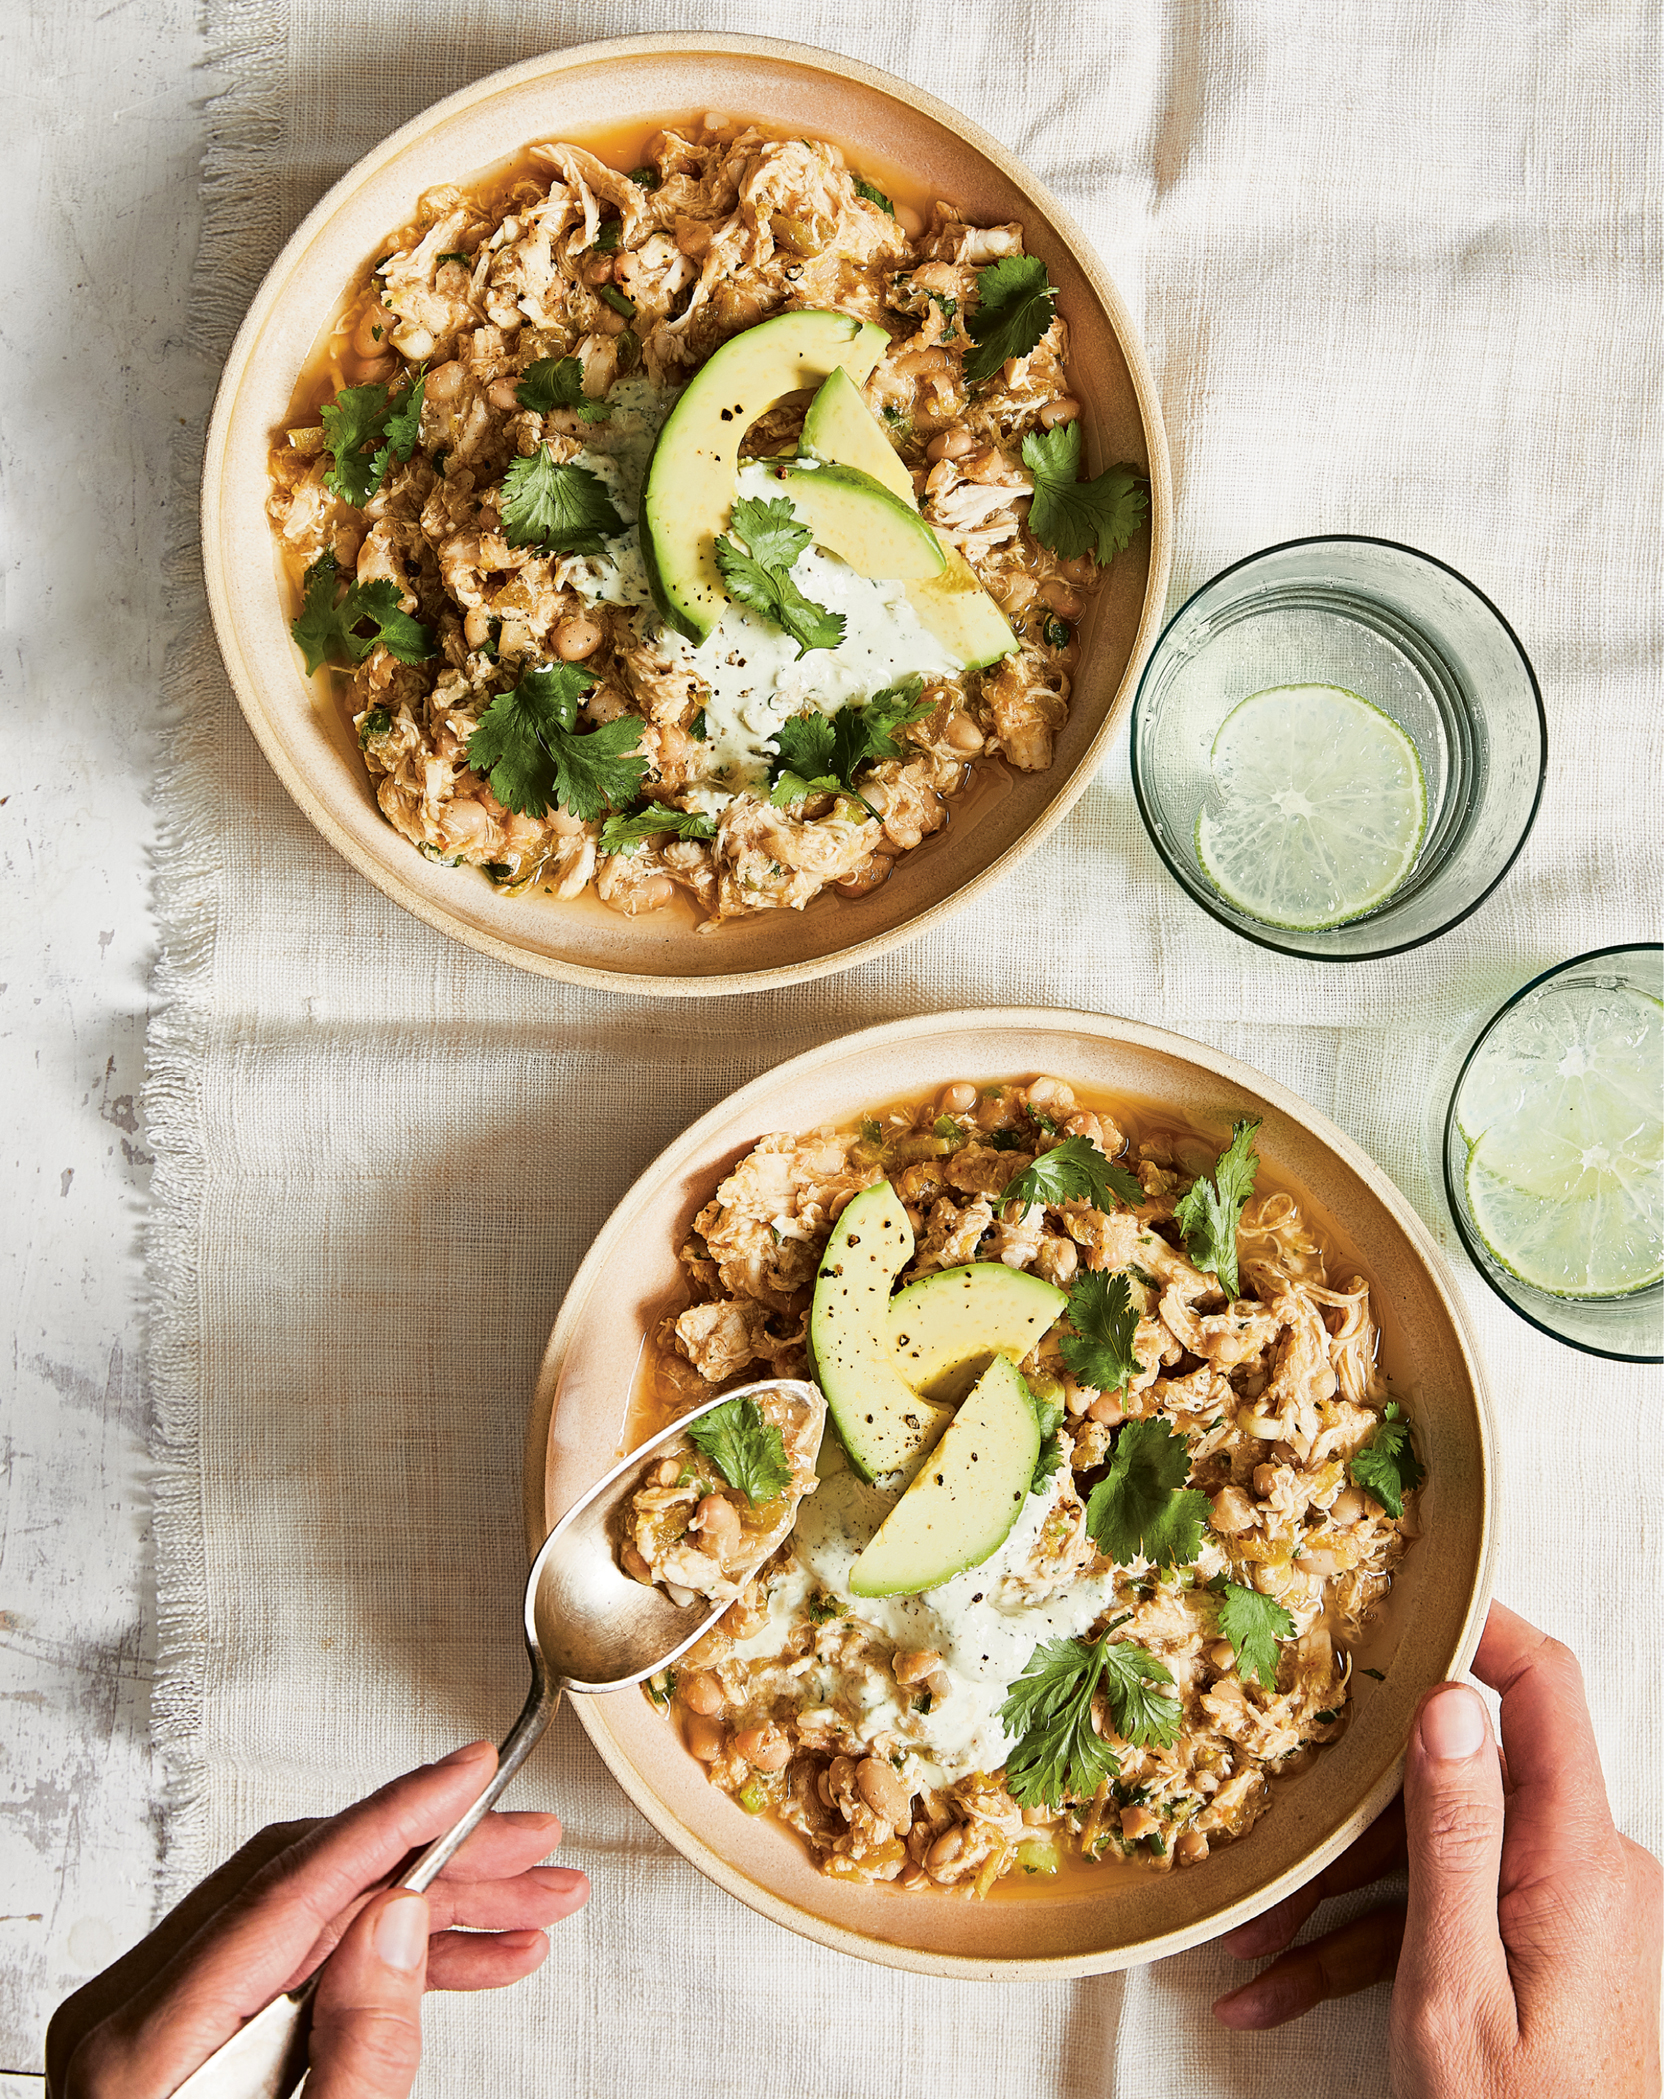
I always prefer white beans over red, pink, or black beans—especially in chili! This white bean chicken chili is light but also substantial, and the prep couldn’t be easier since nothing has to precook. Just dump all of the ingredients into the slow cooker and then set it and forget it—my favorite type of slow cooker recipe! This chili is also tasty with boneless chicken thighs if you prefer dark meat.
SERVES 8
2 (15.5-ounce) cans small Great Northern or navy beans,* undrained
2 (4-ounce) cans chopped green chile peppers, undrained
4 medium scallions, chopped
⅓ cup chopped fresh cilantro, plus more for topping
3 tablespoons reduced-sodium taco seasoning* (from 1 packet)
1½ pounds boneless, skinless chicken breasts (3 breasts)
OPTIONAL TOPPINGS
Sour cream, sliced avocado, pepper Jack cheese, poblano cream (this page)
*Read the label to be sure this product is gluten-free.
FRIDGE: UP TO 4 DAYS
FREEZER: UP TO 3 MONTHS
Combine the beans and their liquid, ¾ cup water, green chiles and their liquid, scallions, cilantro, and taco seasoning in the slow cooker and mix well. Add the chicken and cook on high for 5 to 6 hours or on low for 8 to 10 hours. (To make in an Instant Pot, or any electric pressure cooker, cook for 20 minutes on high pressure with quick release.)
Shred the chicken with two forks and mix to combine.
SERVE NOW: Top with fresh cilantro and serve with your favorite chili toppings.
FREEZE AND SERVE LATER: Transfer the cooked chili to freezer-safe containers. To reheat, thaw overnight in the refrigerator and reheat on the stove or in the microwave.
Per serving (about 1 cup) • Calories 194 • Fat 3 g • Saturated Fat 0.5 g • Cholesterol 54 mg • Carbohydrate 20 g • Fiber 8.5 g • Protein 24 g Sugars 0 g • Sodium 682 mg
Make It a Freezer Meal Kit! Combine all of the ingredients except the beans and water in a freezer-safe bag. Label, date, and freeze the bag. When ready to prepare, transfer to the refrigerator to thaw overnight, then empty the contents of the bag into the slow cooker. Add the beans and water and cook as directed.
Pollo Guisado

If you’ve ever lived in or visited Colombia, you probably know that stews are the most common type of food eaten there, especially at lunchtime, when they’re served with a slice of avocado and a side of white rice to soak up the sauce. If I eat this with rice and avocado, a single piece of chicken is usually enough. It’s also great served over cauliflower rice, which is not very Colombian but still a great way to add more vegetables to the meal and cut your carbs, to boot. Any part of the chicken works—you can even use a whole cut-up chicken (just be sure to remove the skin). I also prefer to use bone-in chicken because the bones add more flavor and collagen that thickens the soup.
SERVES 4
4 chicken drumsticks, on the bone, skin removed (14 ounces total)
4 bone-in chicken thighs, skin removed and fat trimmed (1¼ pounds total)
½ teaspoon kosher salt
½ teaspoon garlic powder
1 teaspoon olive oil
4 medium scallions, chopped
1 plum tomato, diced
2 garlic cloves, minced
¼ cup chopped fresh cilantro, plus 2 tablespoons for garnish
1 (8-ounce) can tomato sauce
1 tablespoon chicken bouillon* (I like Better Than Bouillon)
½ teaspoon ground cumin
2 bay leaves
*Read the label to be sure this product is gluten-free.
FRIDGE: UP TO 4 DAYS
FREEZER: UP TO 3 MONTHS
Season the chicken with the salt and garlic powder. Set aside.
In a large pot or Dutch oven, heat the olive oil over medium heat. Add the scallions and sauté until soft, 2 to 3 minutes. Add the tomato and garlic and cook until soft, 2 to 3 minutes. Stir in the cilantro and cook for about 1 minute more. Add the tomato sauce, 1 cup water, bouillon, and cumin. Stir well to combine.
Add the chicken and bay leaves to the sauce. Bring to a boil, then reduce the heat to medium-low. Cover and cook until the chicken is tender, about 50 minutes. Uncover the pot and increase the heat to high. Cook until the sauce is thickened, 5 to 10 minutes. Discard the bay leaves, top with the remaining 2 tablespoons cilantro, and serve.
FREEZE AND SERVE LATER: Let the soup cool to room temperature, then transfer to freezer-safe containers. To reheat, thaw in the fridge the night before and reheat on the stove or in the microwave until heated through.
For an Instant Pot: Prepare the ingredients in an Instant Pot (or any electric pressure cooker). Seal and cook on high pressure for 20 minutes. Natural release, then open when the pressure subsides. Serve as directed.
SKINNY SCOOP If you want to make this a one-pot meal, add peeled, diced yellow potatoes or yucca along with the chicken. You can also add a few corncobs cut in half in the last 5 minutes of cooking.
Per Serving (2 pieces chicken + ⅓ cup sauce) • Calories 290 • Fat 9.5 g • Saturated Fat 2 g • Cholesterol 90 mg • Carbohydrate 6 g • Fiber 1.5 g • Protein 41 g • Sugars 4 g • Sodium 1,158 mg
DIY Chicken Taco Kits
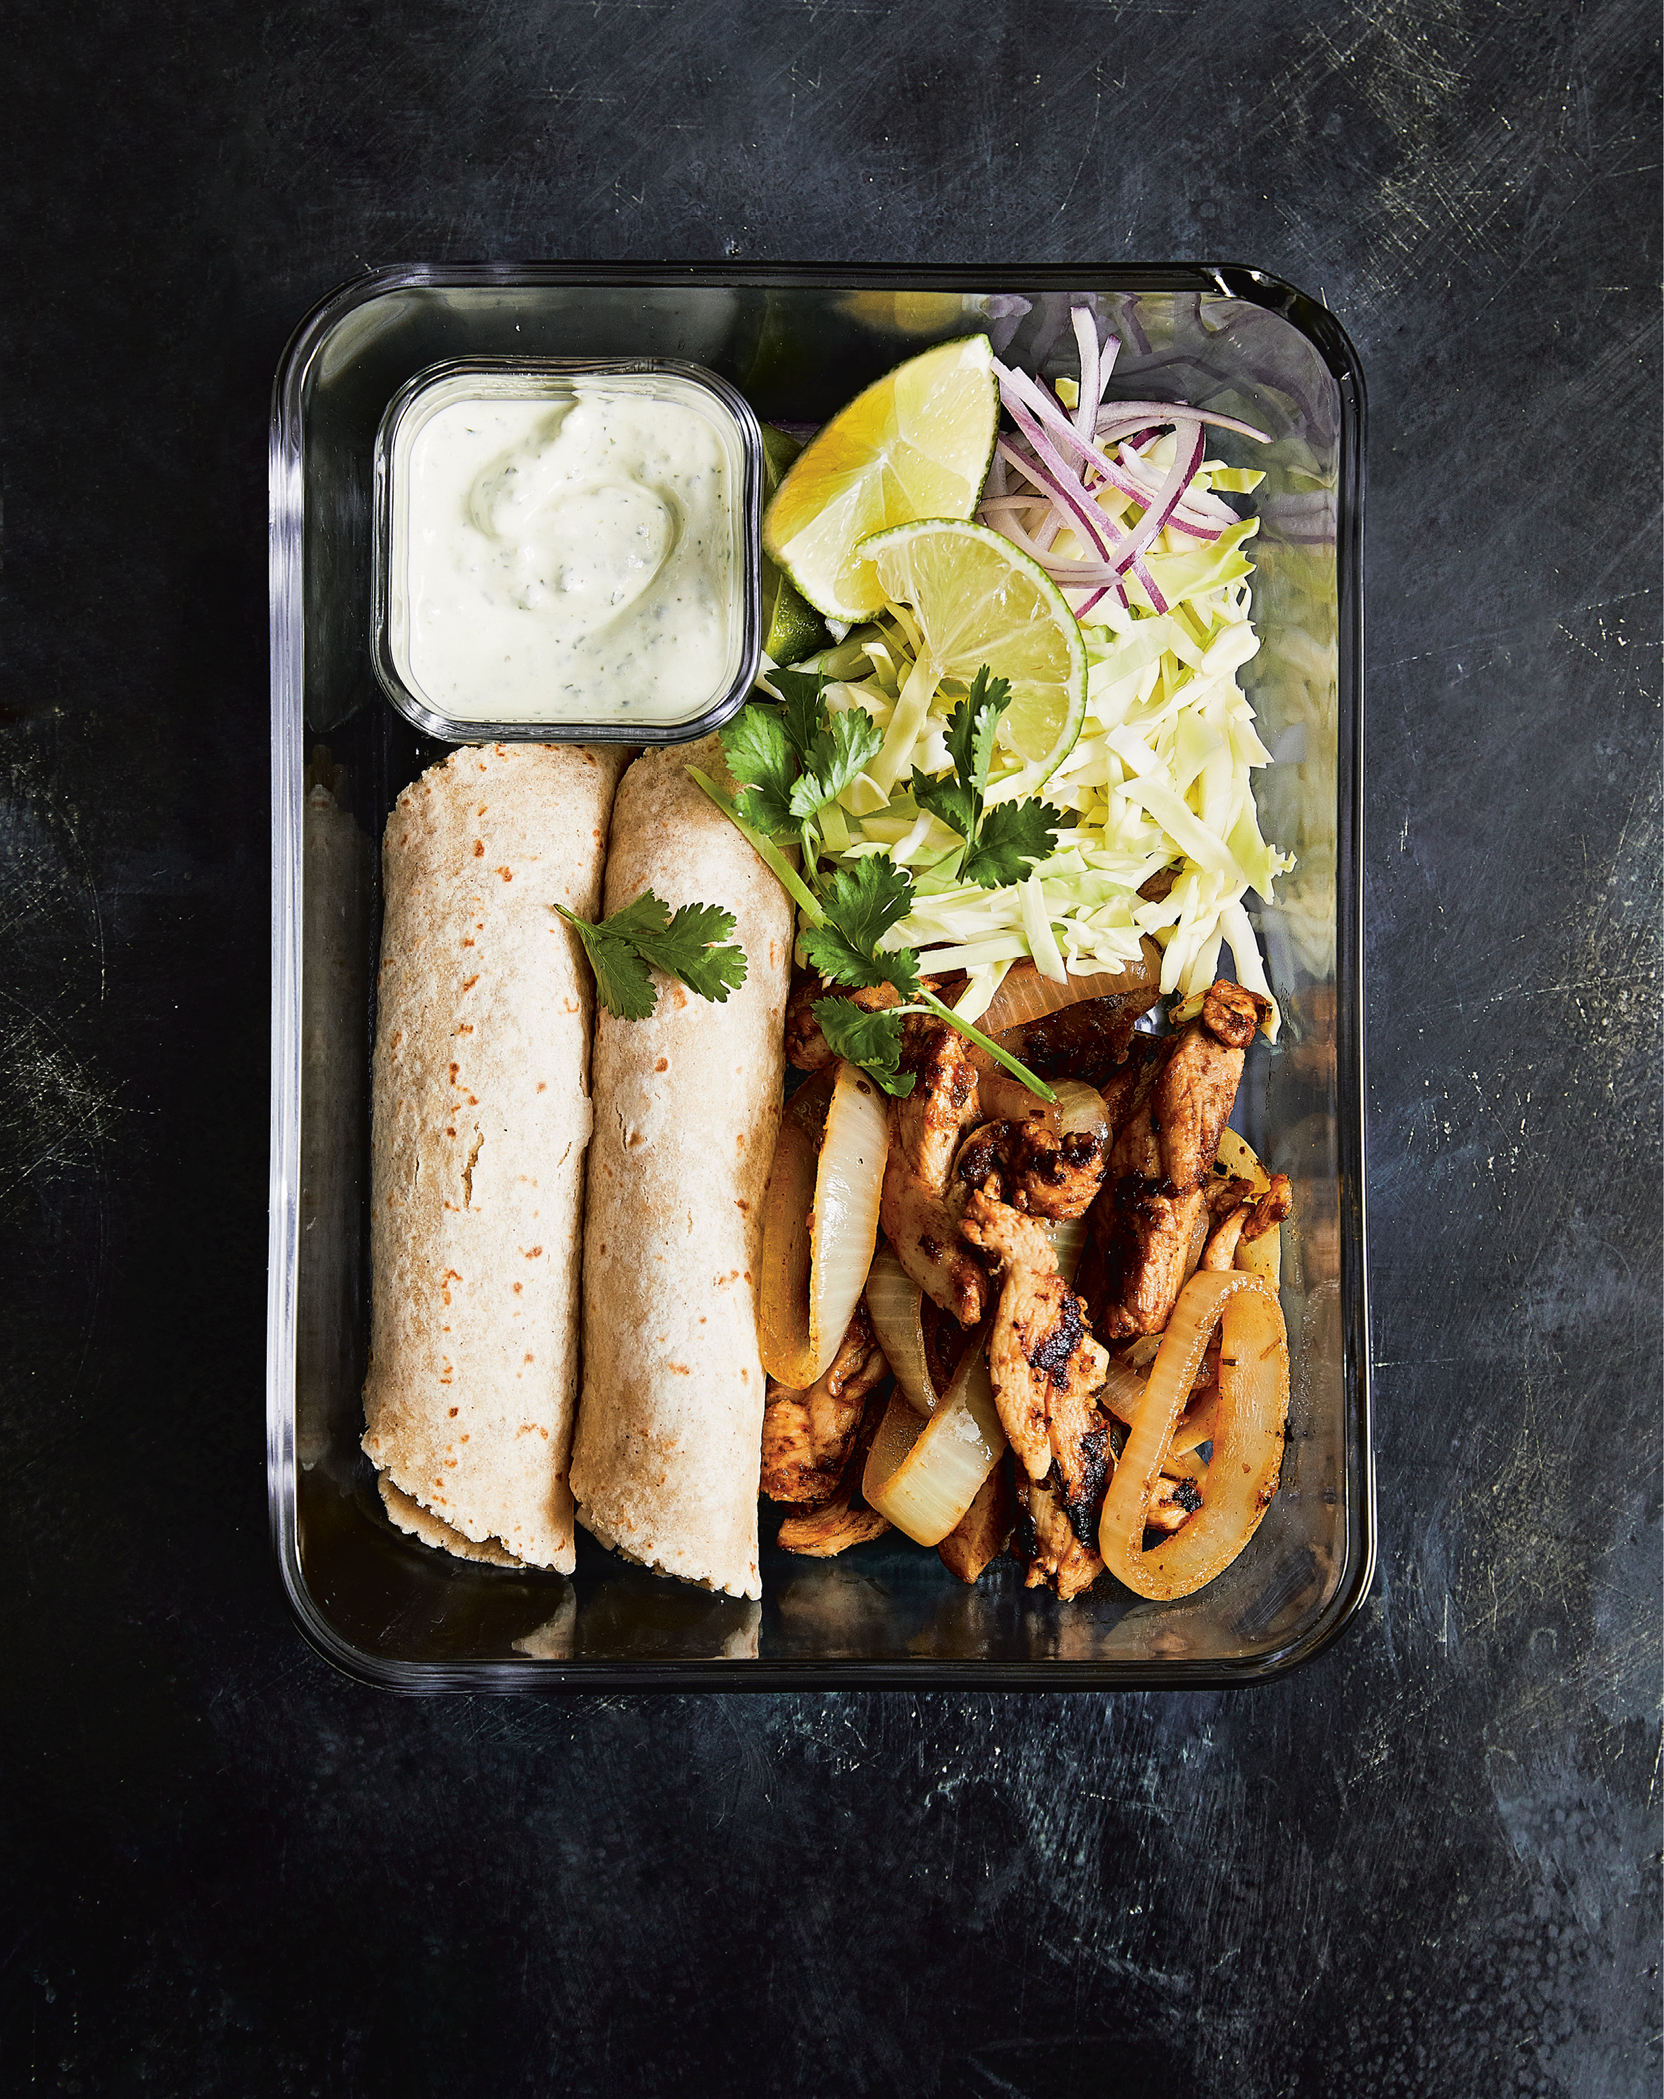
Inspired by Costco’s Street Taco Dinner kits, which are pretty genius, I set out to make my own homemade chicken tacos to pack for lunch or make ahead for dinner. Easy-peasy—the chicken and caramelized onions cook at the same time all in one skillet and I use boneless chicken thighs because they have more flavor and are juicer than chicken breasts. The whole thing takes just about 30 minutes—make the sauce and prep the rest while the chicken cooks. This recipe makes extra poblano sauce; you can use the rest drizzled over chili or frozen taquitos (see this page).
SERVES 4
CHICKEN
1¼ pounds boneless, skinless chicken thighs, fat trimmed, cut into ½-inch-thick strips
1 large yellow onion, cut into ¼-inch-thick slices
1 tablespoon extra-virgin olive oil
3 tablespoons fresh lime juice
1 tablespoon ground cumin
1 tablespoon dried oregano
1 teaspoon chili powder*
2 garlic cloves, crushed
Kosher salt
Freshly ground black pepper
Olive oil spray
ROASTED POBLANO CREAM
¼ poblano pepper, with seeds
Olive oil spray
1 cup light sour cream
2 tablespoons fresh lime juice
2 tablespoons chopped fresh cilantro
½ teaspoon kosher salt
Freshly ground black pepper
SERVING
8 (6-inch) corn tortillas
2 cups shredded green cabbage
¼ cup chopped red onion
1 lime, cut into 8 wedges
Chopped fresh cilantro, for garnish
*Read the label to be sure this product is gluten-free.
FRIDGE: UP TO 4 DAYS (CHICKEN AND SAUCE)
FREEZER: UP TO 3 MONTHS (MARINATED RAW CHICKEN)
Preheat the oven to 350°F.
Make the chicken: In a medium bowl, toss the chicken and onion with the olive oil, lime juice, cumin, oregano, chili powder, and garlic. Season with 1¼ teaspoons salt and black pepper to taste. (If making the chicken ahead, you can freeze at this point. Thaw overnight in the refrigerator before cooking.)
Heat a large, deep nonstick skillet over high heat until very hot. When hot, spray with oil and add the chicken and onion along with any marinade and cook, stirring occasionally, until the liquid evaporates and the chicken and onion are tender and browned on the edges, 20 to 25 minutes. Set aside.
Make the poblano cream: Place the poblano on a small baking sheet and spritz with oil. Roast until slightly charred, flipping halfway through, about 12 minutes. Transfer to a food processor with the sour cream, lime juice, cilantro, salt, and black pepper to taste and process until smooth.
SERVE NOW: Heat the tortillas on an open flame for 30 seconds. Divide the chicken among the charred tortillas and top with the cabbage, red onion, 1 teaspoon cream, a squeeze of lime juice, and cilantro. (You’ll have about 1 cup cream left over; store up to 4 days in an airtight container.)
MEAL PREP: Roll up each tortilla and place in an airtight container with ¾ cup chicken and onion, ½ cup cabbage, 1 tablespoon red onion, 2 lime wedges, cilantro, and 1 teaspoon cream. When ready to serve, warm the tortillas on an open flame for about 30 seconds, and reheat the chicken in a skillet over medium heat for about 3 minutes or in the microwave. Top as directed.
Per Serving (2 tacos) • Calories 366 • Fat 12.5 g • Saturated Fat 3 g Cholesterol 139 mg • Carbohydrate 33 g • Fiber 6 g • Protein 32 g Sugars 4 g • Sodium 558 mg
Italian Stuffed Jalapeño Peppers
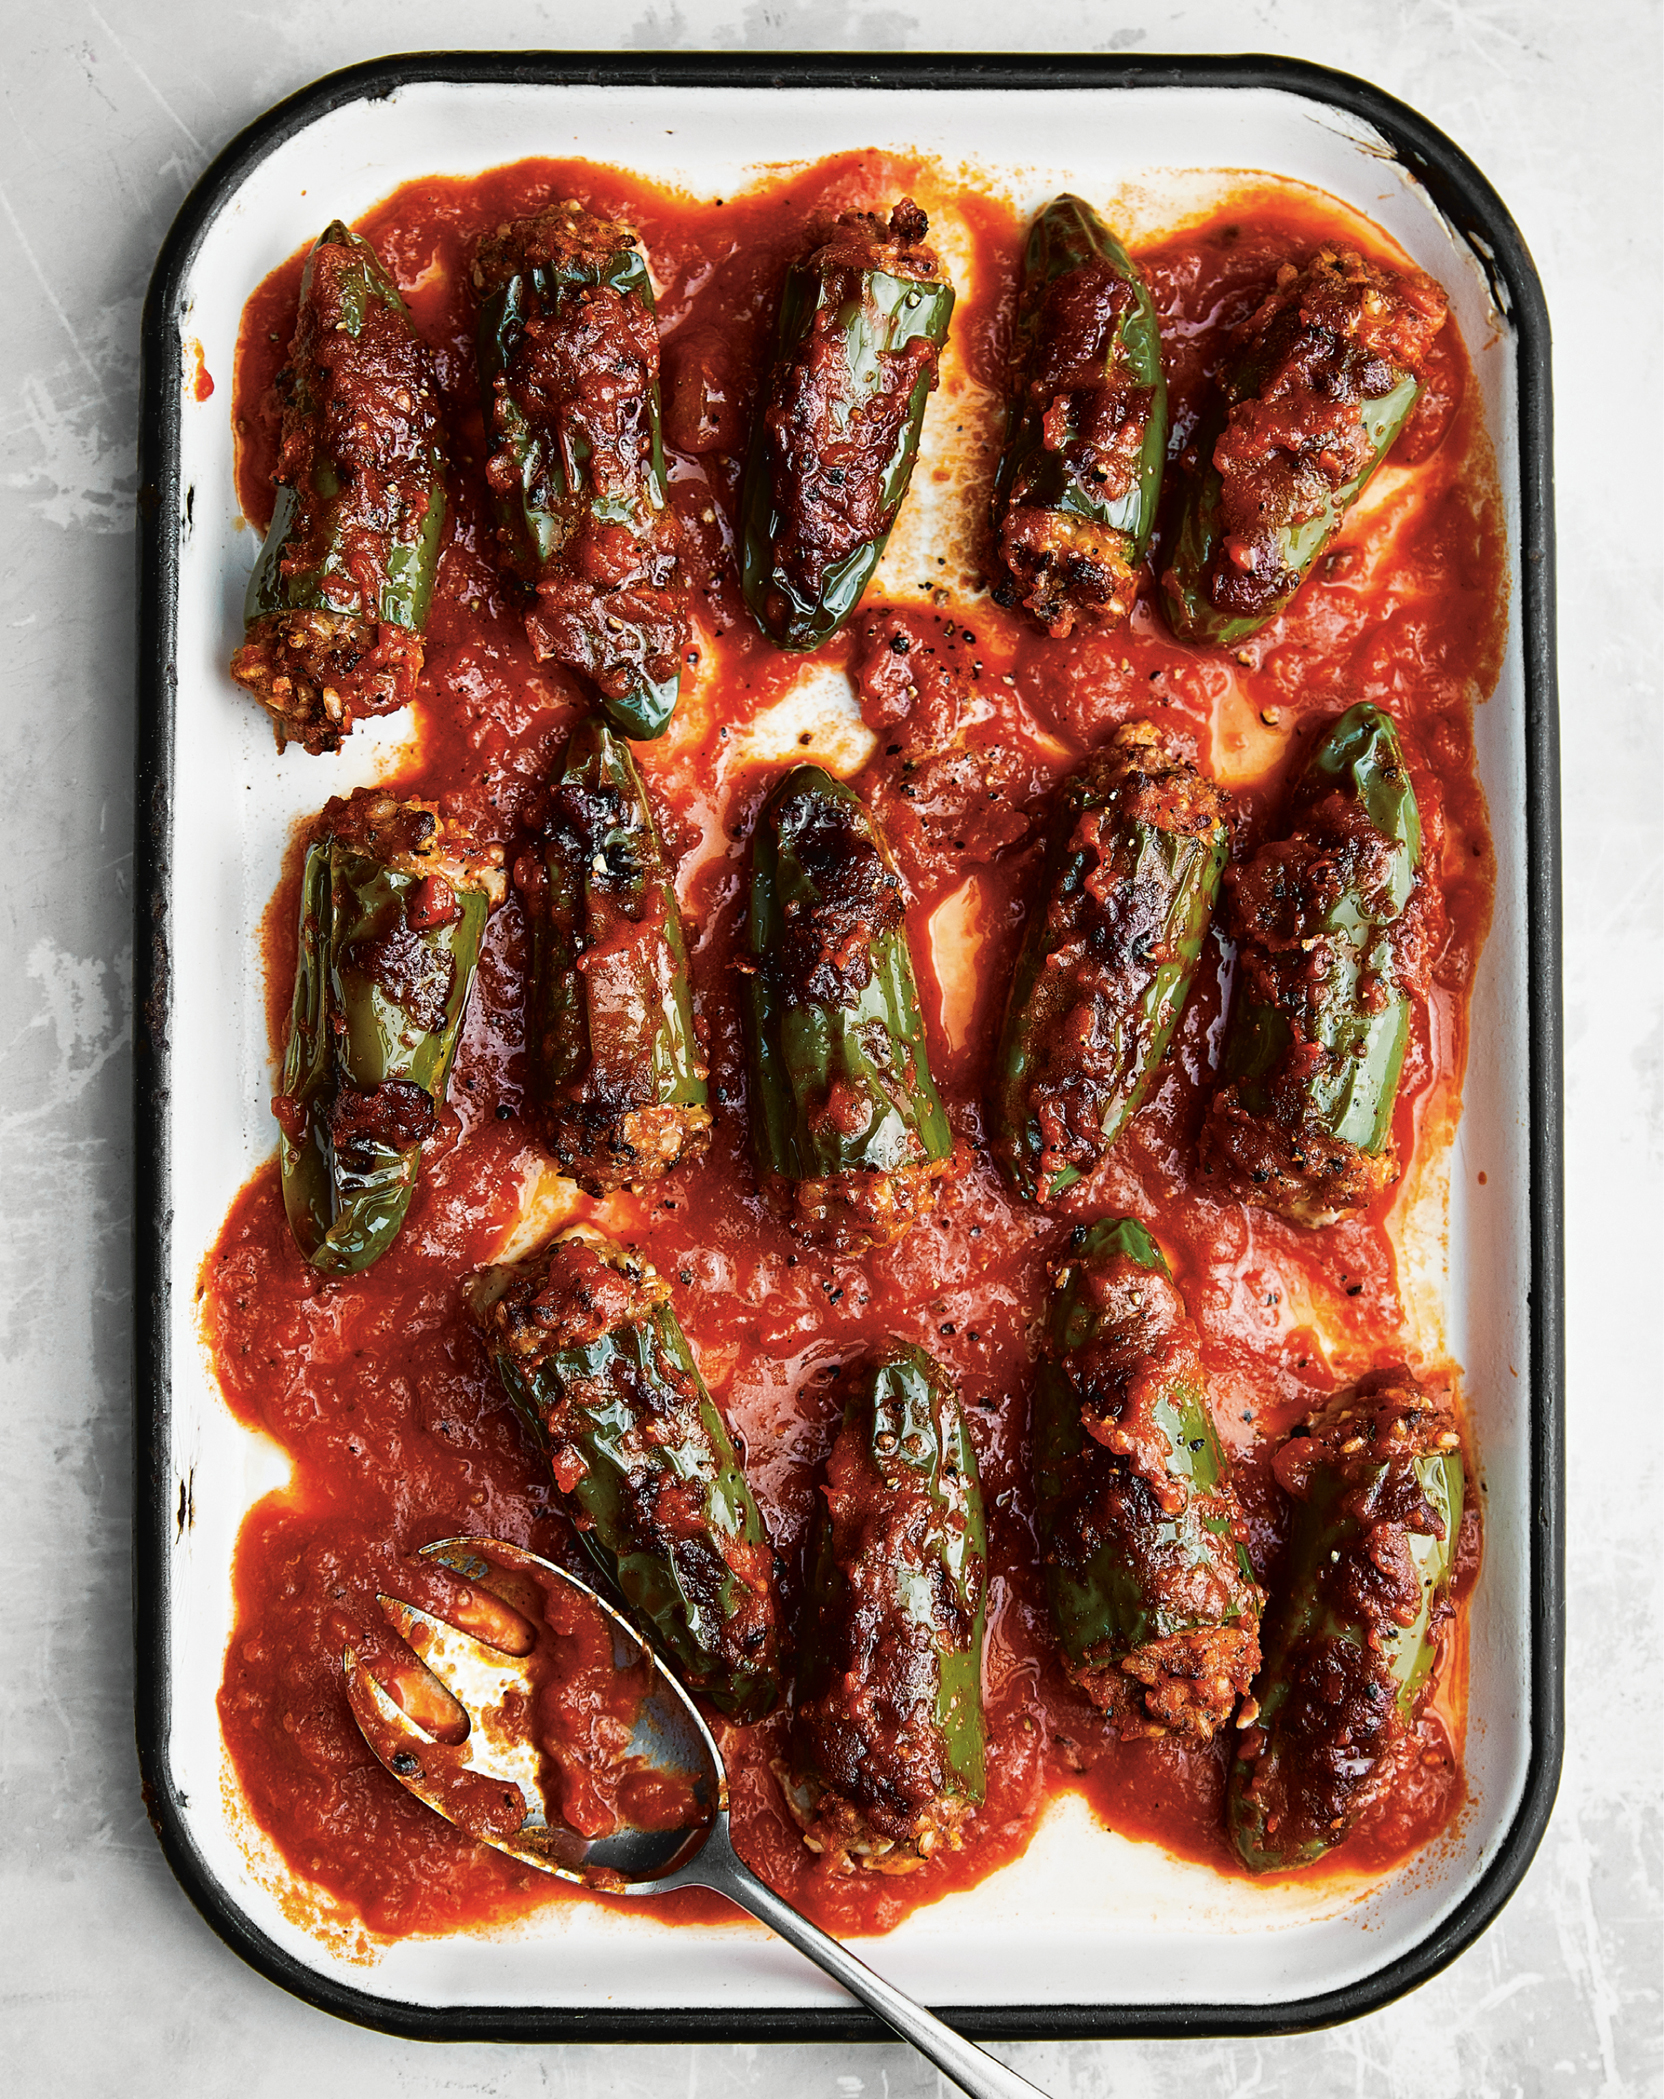
Eating these stuffed jalapeños filled with ground turkey and rice is a little bit like playing Russian roulette—some are mild, some are spicy, and you just don’t know what you’re going to get! No matter what you end up with, you’re sure to enjoy it because they are incredibly delicious. Most of the heat comes from the seeds and the membrane of the peppers, so make sure to clean them well before stuffing.
SERVES 4
16 large fresh jalapeño peppers
1 pound 93% lean ground turkey
¾ cup cooked brown rice (I like Trader Joe’s frozen brown rice)
⅓ cup seasoned bread crumbs, whole wheat or gluten-free
3 cups Basil Pomodoro Sauce (this page) or store-bought marinara sauce
¼ cup minced onion
3 tablespoons chopped fresh parsley
1 large egg, beaten
1 garlic clove, minced
¼ cup freshly grated Pecorino Romano or Parmesan cheese
2 teaspoons tomato paste
¾ teaspoon kosher salt
Freshly ground black pepper
FRIDGE: UP TO 5 DAYS
FREEZER: UP TO 3 MONTHS
Preheat the oven to 375°F.
Using gloves, slice off the top of the jalapeño peppers, cut out the membranes, and remove the seeds. Cut a slit along one edge to make them easier to stuff.
In a large bowl, combine the turkey, rice, bread crumbs, ¼ cup marinara sauce, onion, parsley, egg, garlic, Pecorino, tomato paste, salt, and pepper to taste. Mix thoroughly.
Stuff the ground turkey mixture (about ¼ cup) into each pepper.
Pour ½ cup marinara sauce into the bottom of a 9 × 13-inch baking dish. Place the peppers on top and cover with the remaining sauce. Cover tightly with foil.
SERVE NOW: Bake until the peppers are tender, 1 to 1½ hours.
REFRIGERATE AND SERVE LATER: Before baking, the dish can be prepared up to 24 hours ahead and refrigerated. Bake for 1 to 1½ hours.
FREEZE AND SERVE LATER: Before baking, the dish can be prepared in a freezer-to-ovenproof baking dish, covered tightly, and frozen. Bake from frozen (no need to thaw) in a preheated 350°F oven for about 2 hours, until heated through and tender.
Per Serving (4 peppers + sauce) • Calories 375 • Fat 15 g • Saturated Fat 4.5 g • Cholesterol 136 mg • Carbohydrate 33 g • Fiber 6.5 g • Protein 31 g Sugars 10 g • Sodium 971 mg
Autumn Stuffed Acorn Squash

Acorn squash, the star of this dish with its deep orange color, makes the perfect edible bowl. I pack it with a wild rice stuffing featuring chicken sausage, sage, apples, and thyme. You can serve it for dinner, then pack the extras for lunch, or make it ahead to freeze for the month. And don’t toss those squash seeds! Just like pumpkin seeds, you can toast the seeds of an acorn squash with a few spritzes of olive oil and a little salt for easy snacking.
SERVES 6
3 small acorn squashes (22 ounces each), washed, halved lengthwise, and seeds removed
Olive oil spray
½ teaspoon kosher salt
Freshly ground black pepper
½ cup (3 ounces) uncooked wild rice
1 tablespoon olive oil
1 small yellow onion, chopped
1 medium carrot, chopped
1 medium celery stalk, chopped
2 garlic cloves, minced
4 links (11 ounces total) sweet Italian chicken sausage, casings removed
1 Granny Smith apple, chopped into ¼-inch pieces
1½ tablespoons chopped fresh sage
½ tablespoon chopped fresh thyme
½ cup chicken broth*
¼ cup dry white wine
2 cups chopped kale
*Read the label to be sure this product is gluten-free.
FRIDGE: UP TO 5 DAYS
FREEZER: UP TO 3 MONTHS
Preheat the oven to 375°F.
Spritz both sides of the squash with olive oil spray. Season the insides with the salt and black pepper to taste.
Place the squash on a large baking sheet, skin side up, and bake until soft and tender, 45 to 50 minutes.
Meanwhile, cook the wild rice according to the package directions and set aside.
In a large skillet, heat the olive oil over medium heat. Add the onion and carrot and cook until beginning to soften, about 3 minutes. Add the celery and cook until softened, about 2 minutes more. Add the garlic and cook until fragrant, about 1 minute.
Add the chicken sausage, breaking it up as it cooks, until cooked through, about 6 minutes. Add the apple, sage, thyme, broth, wine, and kale. Mix well and cook until the liquid evaporates, 10 to 15 minutes. Mix in the wild rice and remove from the heat.
Fill the acorn squash cavities with the rice and sausage mixture, about a generous ¾ cup each. Transfer to a large casserole dish, cover with foil, and bake until heated through, about 15 minutes. Serve hot.
FREEZE AND SERVE LATER: After stuffing the cavities, transfer to airtight containers or a large covered baking dish and transfer to the refrigerator or freezer. If reheating from frozen, let thaw in the refrigerator for 1 to 2 days. Reheat in the microwave for 3 to 4 minutes or in a 375°F oven for 20 to 30 minutes, until heated through.
SKINNY SCOOP To make your “bowl” sit flat, simply slice the squash in half lengthwise and slice off a tiny piece of the skin at the bottom of each half.
Per Serving (1 stuffed half) • Calories 295 • Fat 7 g • Saturated Fat 1.5 g • Cholesterol 39 mg • Carbohydrate 47 g • Fiber 7 g • Protein 15 g Sugars 12 g • Sodium 553 mg
Sofrito-Stuffed Cabbage Rolls
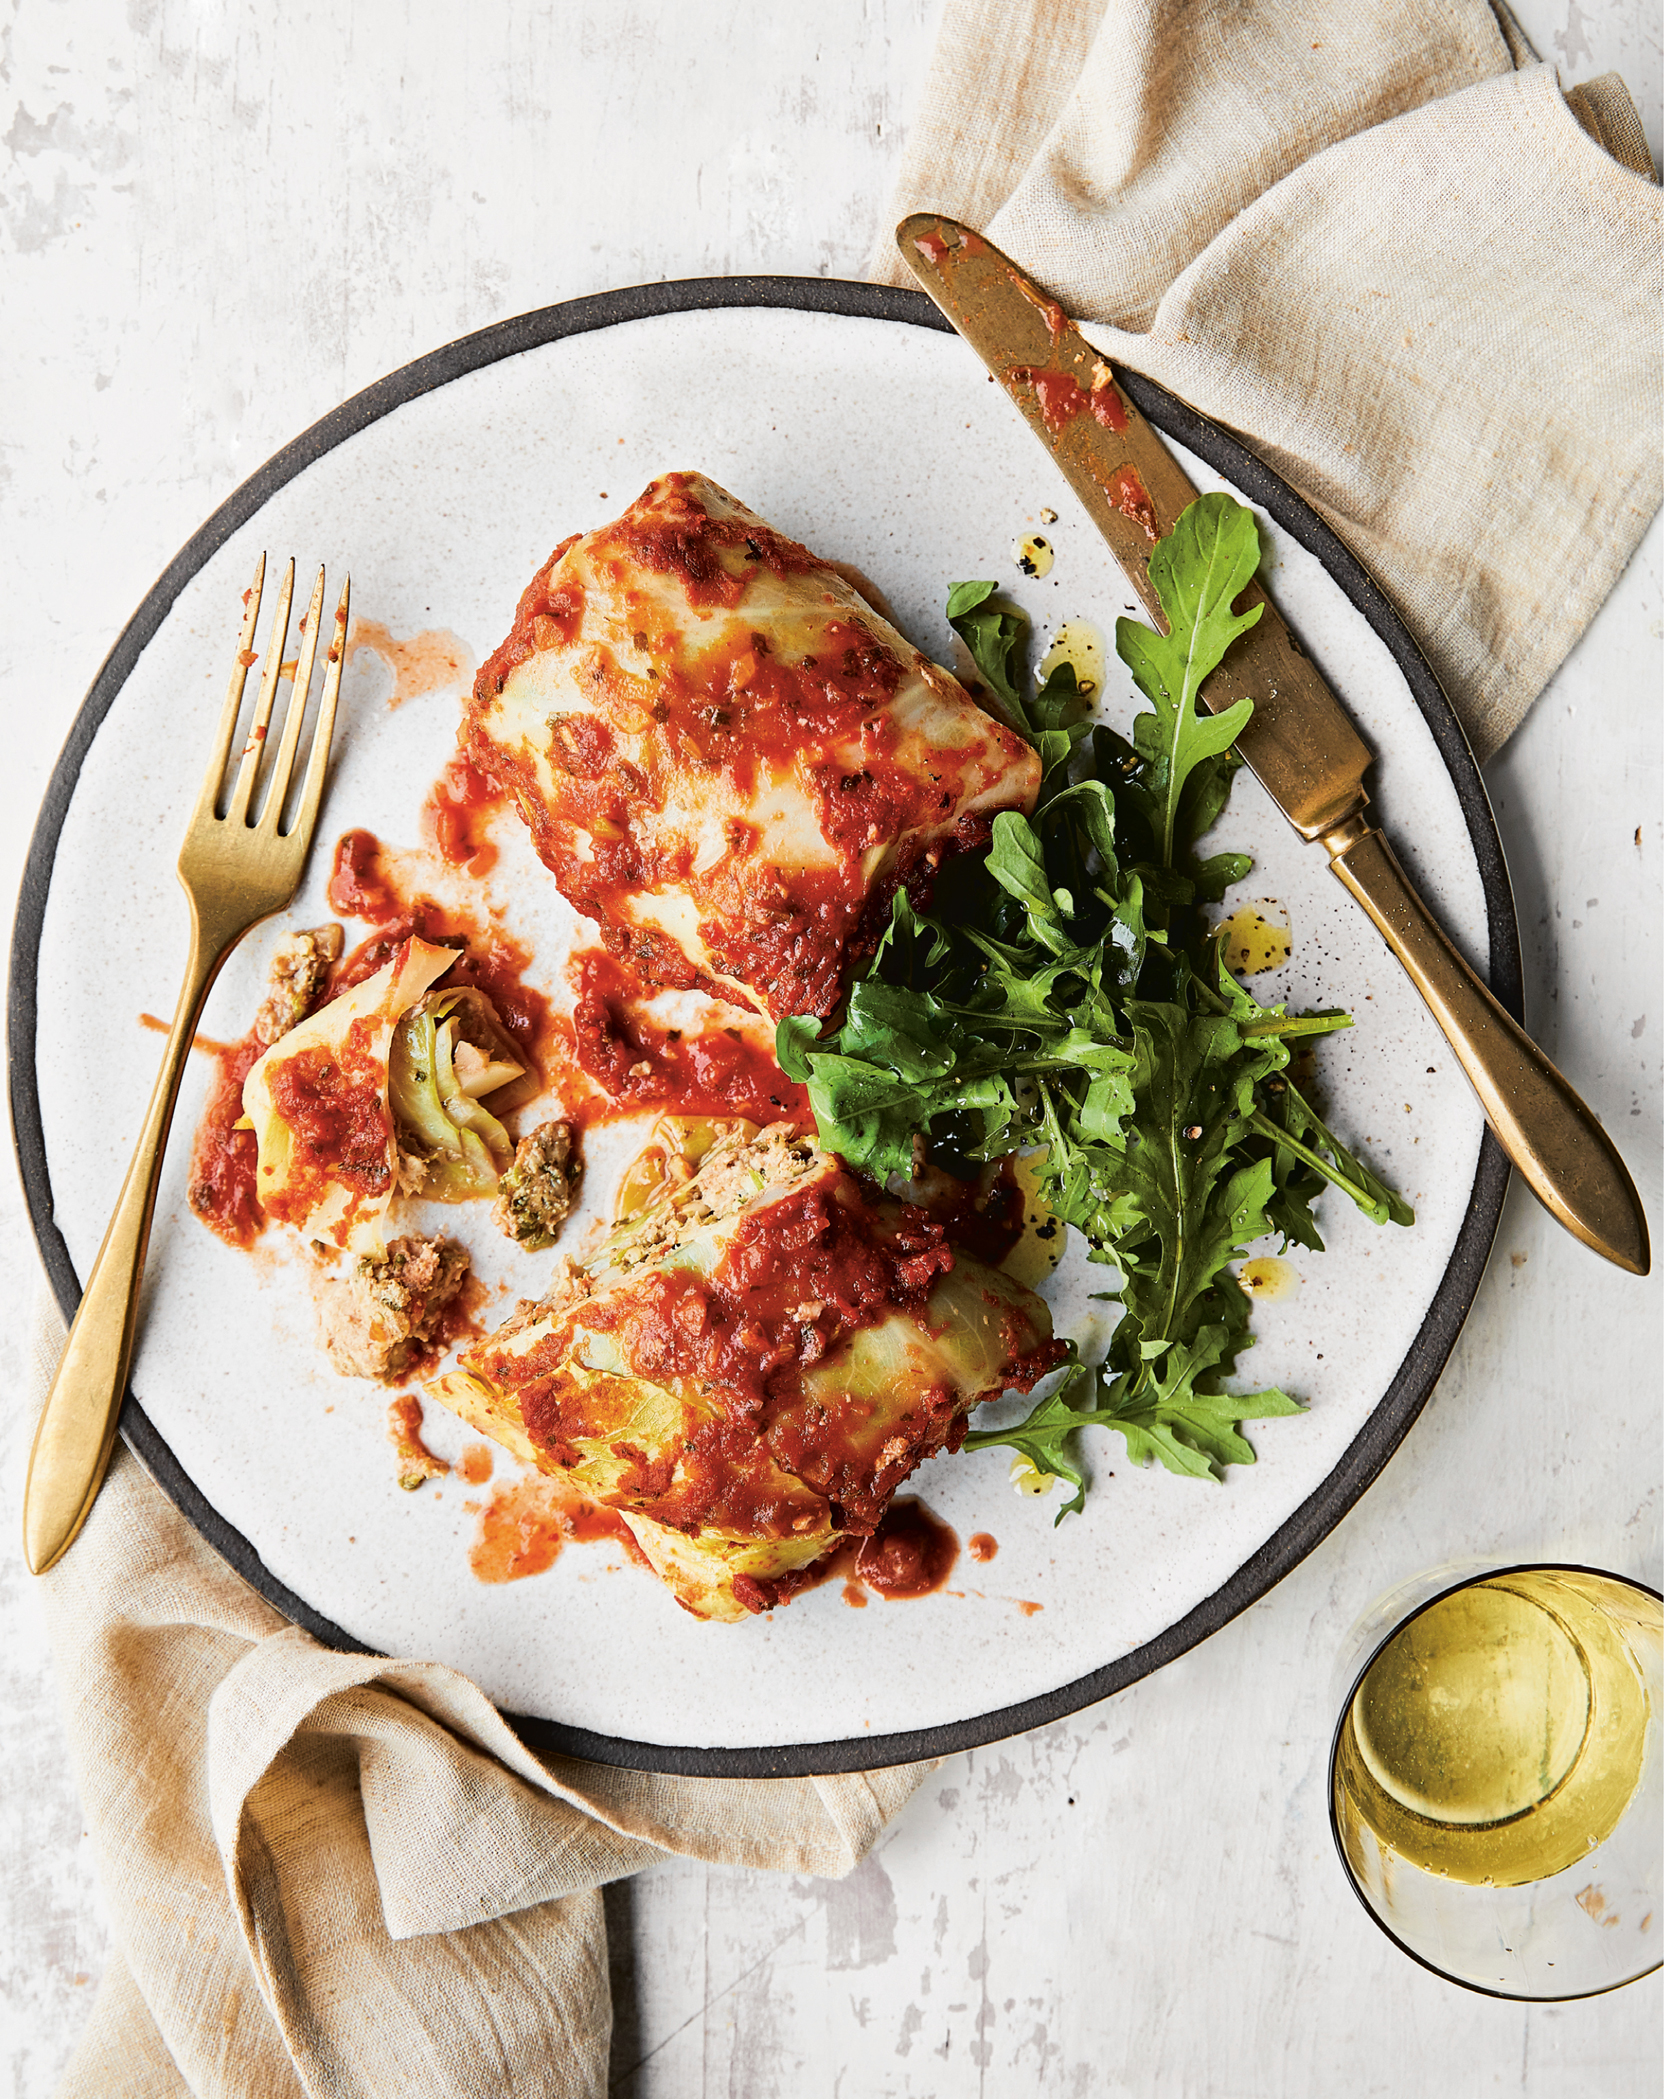
I grew up eating my dad’s Czech-style stuffed cabbage, but since I’m also half-Colombian, I can’t help but put a Latin spin on them here by adding lots of sofrito and green olives. Although they’re a labor of love, once they’re made, you can easily get two meals out of them for a family of four or freeze them in portioned servings for meals for the month. They can be prepped a day ahead and refrigerated until they’re ready to bake. Freeze them cooked, then thaw overnight in the refrigerator and reheat in the oven or microwave.
SERVES 8
SOFRITO
1 small onion, roughly chopped
2 Cubanelle peppers, seeded and roughly chopped
1 large bunch fresh cilantro, ends trimmed, roughly chopped
8 garlic cloves, roughly chopped
½ tablespoon olive oil
ROLLS
1 large head cabbage
1 pound 93% lean ground beef
1 pound 93% lean ground turkey
2 cups cooked brown rice
⅔ cup chopped pitted green olives, plus 2 tablespoons of the brine
1 teaspoon dried oregano
1 large egg, beaten
1¾ teaspoons kosher salt
Freshly ground black pepper
SAUCE
1 teaspoon olive oil
¼ teaspoon kosher salt
3 (8-ounce) cans tomato sauce
1 cup reduced-sodium beef broth*
*Read the label to be sure this product is gluten-free.
FRIDGE: UP TO 4 DAYS
FREEZER: UP TO 3 MONTHS
Preheat the oven to 350°F.
Make the sofrito: Working in 3 to 4 batches, add the onion, peppers, cilantro, garlic, and olive oil to a blender and pulse a few times until chopped, but not puréed. You should have about 1¾ cups.
Bring a large pot of water to a boil over high heat. Remove the entire core of the cabbage with a paring knife. Immerse the whole head of cabbage in the boiling water for a few minutes, peeling off each leaf with tongs as soon as it becomes flexible, about 3 minutes. Set the leaves aside to dry and cool. You will need 16 outer leaves.
When cool, shave or cut out the thick rib of the cabbage leaves with a knife to make them easy to roll.
Make the sauce: Heat a medium pot over medium heat. Add the oil, ½ cup sofrito, and salt and cook until soft, about 5 minutes. Add the tomato sauce and broth and simmer until the flavors meld, about 5 minutes.
In a large bowl, combine the ground beef, ground turkey, remaining sofrito, brown rice, olives and brine, oregano, egg, salt, and pepper to taste. Add ⅓ cup sauce and mix well.
Scoop about ½ cup ground meat mixture onto the center of each cabbage leaf. Roll up the leaves, tucking in the ends.
Ladle 1 cup tomato sauce on the bottom of a 9 × 13-inch casserole dish in an even layer. Transfer the cabbage rolls, seam side down, to the dish, tightly packing them into 2 rows of 8 each. Top with the remaining sauce. Tightly cover with foil and bake until the cabbage is tender enough to cut with a spoon, 1½ to 2 hours.
FREEZE AND SERVE LATER: Let the rolls cool completely before transferring a few at a time into separate freezer bags with the sauce, squeezing out any air, and freeze. To reheat, remove from the bag and transfer to a baking dish. Thaw in the refrigerator overnight. Bake in a 350°F oven until heated through, 40 to 50 minutes.
Per Serving (2 rolls + sauce) • Calories 341 • Fat 13.5 g • Saturated Fat 3.5 g • Cholesterol 100 mg • Carbohydrate 30 g • Fiber 7.5 g • Protein 29 g Sugars 10 g • Sodium 1,070 mg
Turkey Taquitos

Whether you want a quick snack for the kids when they’re hanging out with their friends or a main dish they won’t complain about, you’ll be happy to have a batch of these easy, crispy taquitos stashed in your freezer. The protein-packed filling made with ground turkey and Mexican cheese is so flavorful, and the taquitos reheat great in the oven or air fryer. As an appetizer, I usually just serve them with salsa for dipping, but to make it a meal, serve them over a bed of lettuce with guacamole and a drizzle of sour cream.
SERVES 8
TAQUITOS
Cooking spray
1 teaspoon garlic powder
1½ teaspoons ground cumin
1¼ teaspoons kosher salt
1 teaspoon chili powder*
½ teaspoon dried oregano
1 pound 93% lean ground turkey
½ small yellow onion, diced
½ cup tomato sauce
16 (6-inch) corn tortillas
1 cup (4 ounces) shredded reduced-fat Mexican cheese blend*
SERVING
2 medium (8 ounces total) Hass avocados
Juice of 1 small lime
¼ teaspoon kosher salt
½ cup light sour cream
8 cups shredded iceberg lettuce
*Read the label to be sure this product is gluten-free.
FREEZER: UP TO 3 MONTHS
Preheat the oven to 400°F. Line a sheet pan with foil and spray with cooking spray.
In a small bowl, combine the garlic powder, cumin, salt, chili powder, and oregano.
Heat a large skillet over medium heat. Spray with oil. Brown the ground turkey, using a wooden spoon to break it into smaller pieces as it cooks, until no longer pink, 5 to 6 minutes. Stir in the spice mixture and mix well. Add the onion, tomato sauce, and ¼ cup water. Reduce the heat to low and simmer until the flavors meld and the sauce thickens, about 20 minutes. Let cool slightly.
Working in batches, place 3 tortillas between two paper towels and microwave until they are warm and pliable, about 30 seconds. Place a tortilla on a work surface and spread 2 tablespoons filling onto the bottom third of the tortilla and top with 1 tablespoon cheese. Roll the tortilla up from the bottom to surround the filling and place on the prepared baking sheet, seam side down. Repeat with the remaining filling and tortillas, arranging them in the pan about ½ inch apart. Spray the tops with oil, then bake until the tortillas are golden and crispy, about 15 minutes.
SERVE NOW: In a small bowl, mash the avocados. Stir in the lime juice and salt. Place the sour cream in a small bowl and stir in a small amount of water to achieve a drizzling consistency. Divide the shredded lettuce on serving plates and top with the taquitos, mashed avocado, and sour cream drizzle.
FREEZE AND SERVE LATER: Allow the taquitos to cool completely, then place in an airtight container or zip-top plastic bag and freeze. To reheat in an oven: Preheat the oven to 400°F. Place the frozen taquitos on a sheet pan and bake for 15 to 18 minutes, until heated through. To reheat in an air fryer: Preheat the air fryer to 380°F for 3 minutes. Cook the frozen taquitos for about 8 minutes, flipping halfway through, until heated through.
Per Serving (2 taquitos + ¼ cup guacamole + 1 tablespoon sour cream) • Calories 317 • Fat 15 g • Saturated Fat 5 g • Cholesterol 55 mg • Carbohydrate 30 g Fiber 6.5 g • Protein 20 g • Sugars 3 g • Sodium 467 mg
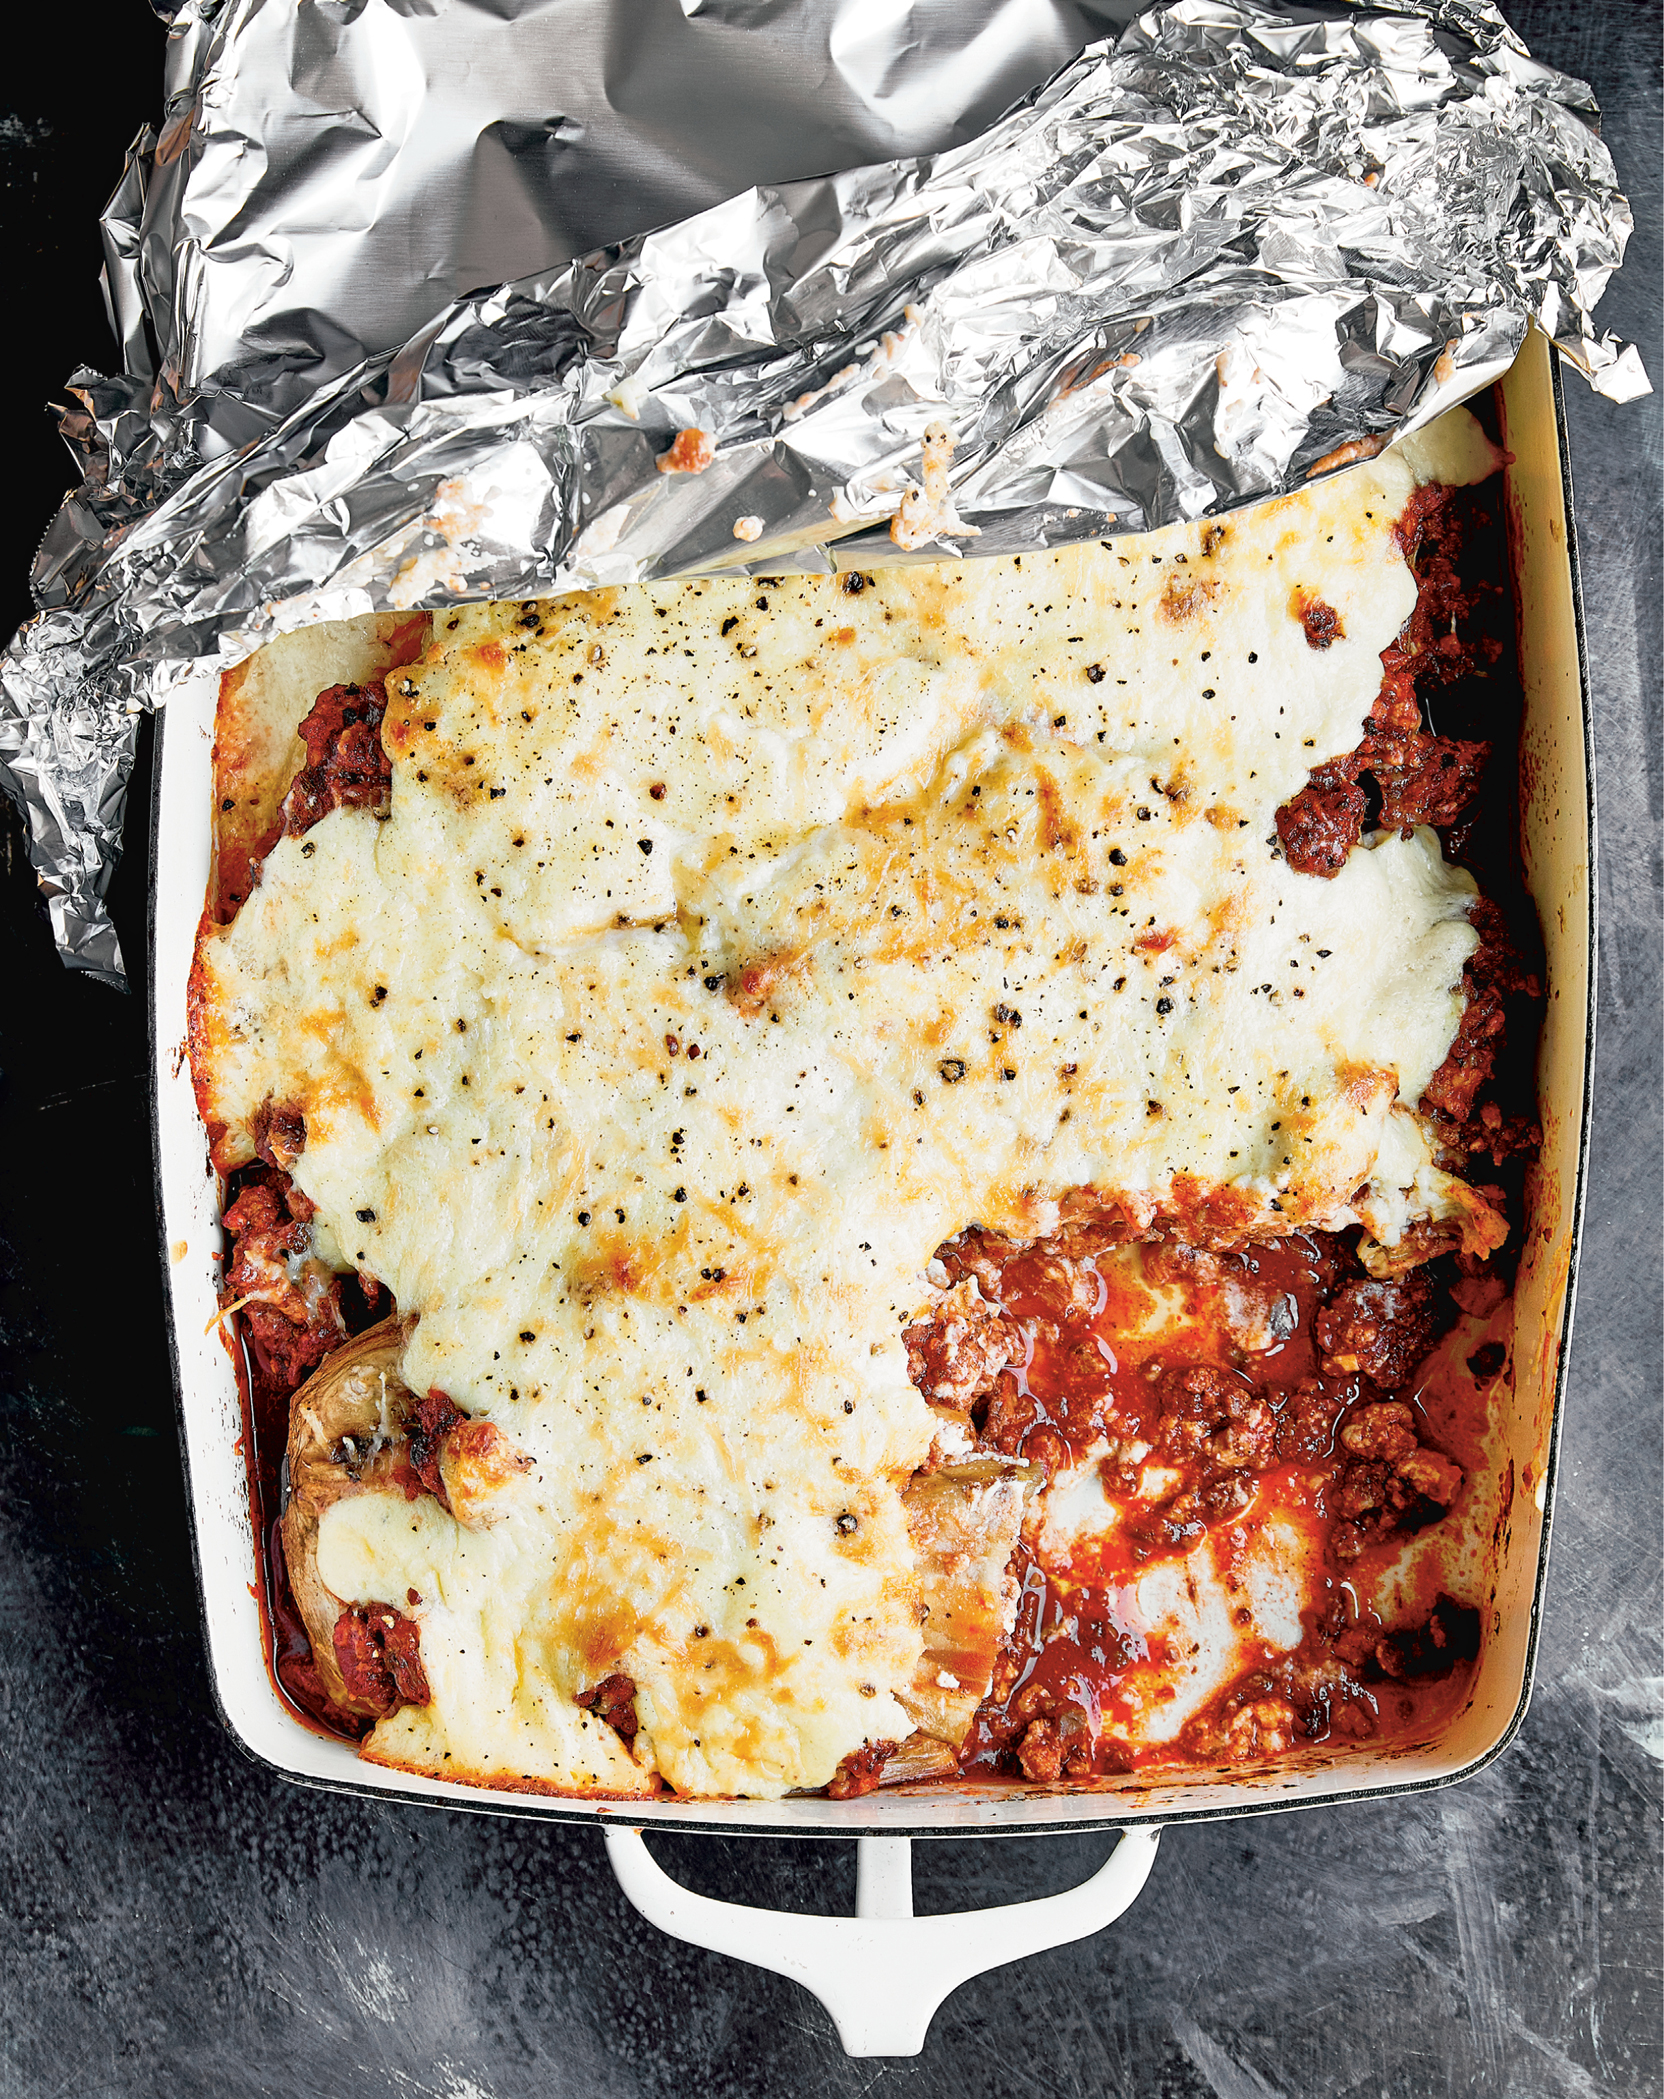
Sicilian Rice Ball (Arancini) Casserole
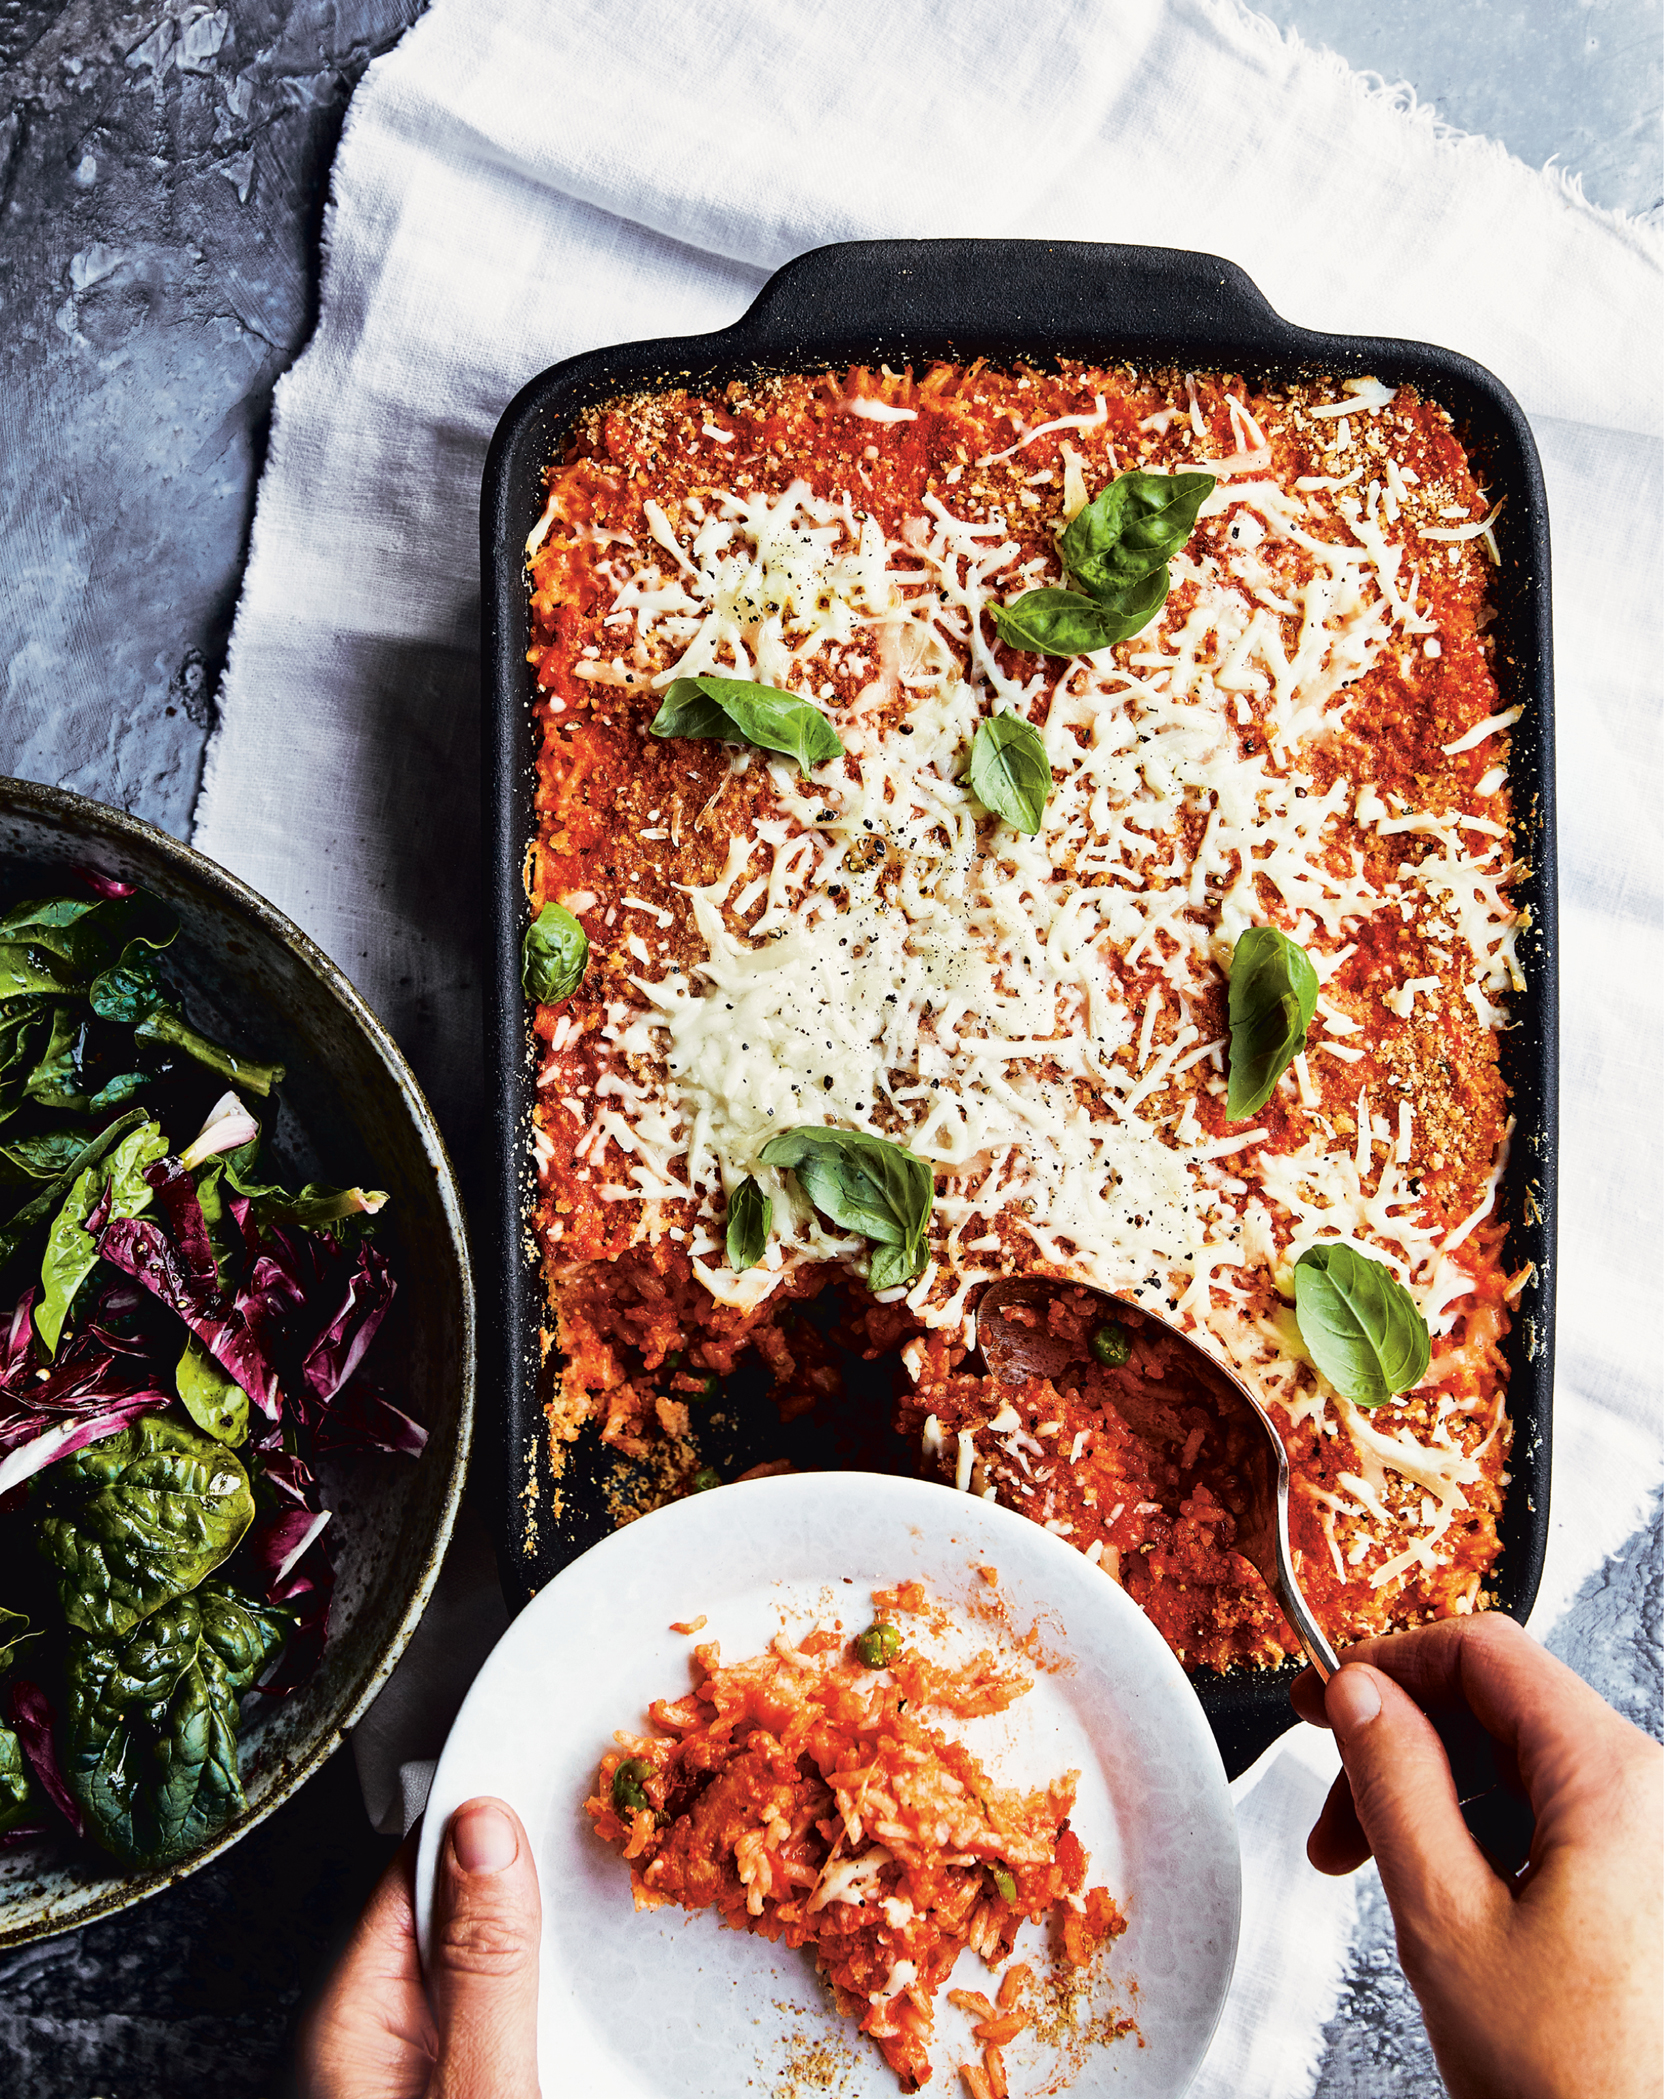
This comforting casserole takes one of my favorite Italian appetizers (arancini) and turns it into a weeknight meal. It’s an idea from my Italian friend Julia that is pure genius—I originally shared the recipe on my blog a few years ago and it’s been a huge hit! A simple green salad on the side completes the meal. Julia usually makes two casseroles—one for dinner and one for the freezer to save for another night. It’s basically the same amount of work to make two, so why not?
SERVES 8
2 cups uncooked long-grain white rice
1 teaspoon kosher salt
14 ounces sweet Italian chicken sausage, casings removed
¼ cup minced onion
5 ounces frozen peas
2 cups Basil Pomodoro Sauce (this page) or store-bought marinara sauce, plus more for serving (optional)
½ cup freshly grated Pecorino Romano cheese
2 large eggs, lightly beaten
Olive oil spray
¼ cup seasoned bread crumbs, regular or gluten-free
1¼ cups shredded part-skim mozzarella cheese*
Chopped fresh parsley or basil, for garnish (optional)
*Read the label to be sure this product is gluten-free.
FRIDGE: UP TO 4 DAYS
FREEZER: UP TO 3 MONTHS
Cook the rice with the salt according to the package directions. Set aside to cool.
Heat a large nonstick skillet over medium-high heat. Add the sausage and cook, breaking it up into small pieces with a wooden spoon, until browned, about 5 minutes. Stir in the onion and cook until browned, 4 to 5 minutes more. Add the peas and 1 cup marinara sauce. Reduce the heat to low and cover. Cook until the flavors meld, about 20 minutes.
Preheat the oven to 400°F.
In a large bowl, combine the cooked rice, Pecorino, eggs, and ½ cup marinara sauce and mix well. (The mixture should be a bit sticky.)
Spray the bottom and sides of a 9 × 13-inch baking dish with oil. Add 2 tablespoons bread crumbs to the dish and roll around to coat the bottom and sides.
Take half the rice mixture (or a little more if needed) and cover the bottom and sides of the dish, pressing the rice down to form an even bottom layer. Add the meat-pea mixture and spread into an even layer. Top with ¾ cup mozzarella. Cover with the remaining rice mixture, pressing until even. Top with the remaining ½ cup marinara, 2 tablespoons bread crumbs, and ½ cup mozzarella.
SERVE NOW: Cover with foil and bake until hot, about 30 minutes. Garnish with parsley or basil (if using). Cut into 8 pieces and serve with more marinara (if using).
FREEZE AND SERVE LATER: Before baking, cover the uncooked dish tightly with plastic wrap, then foil, and freeze. Let completely thaw in the refrigerator 24 hours before cooking. Preheat the oven to 350°F. Remove the plastic wrap and cover tightly with foil. Bake until heated through in the center, 40 to 50 minutes.
Per Serving (1 piece) • Calories 391 • Fat 11.5 g • Saturated Fat 5 g Cholesterol 98 mg • Carbohydrate 49 g • Fiber 3 g • Protein 22 g Sugars 4 g • Sodium 913 mg
Turkey Cheeseburger Egg Rolls
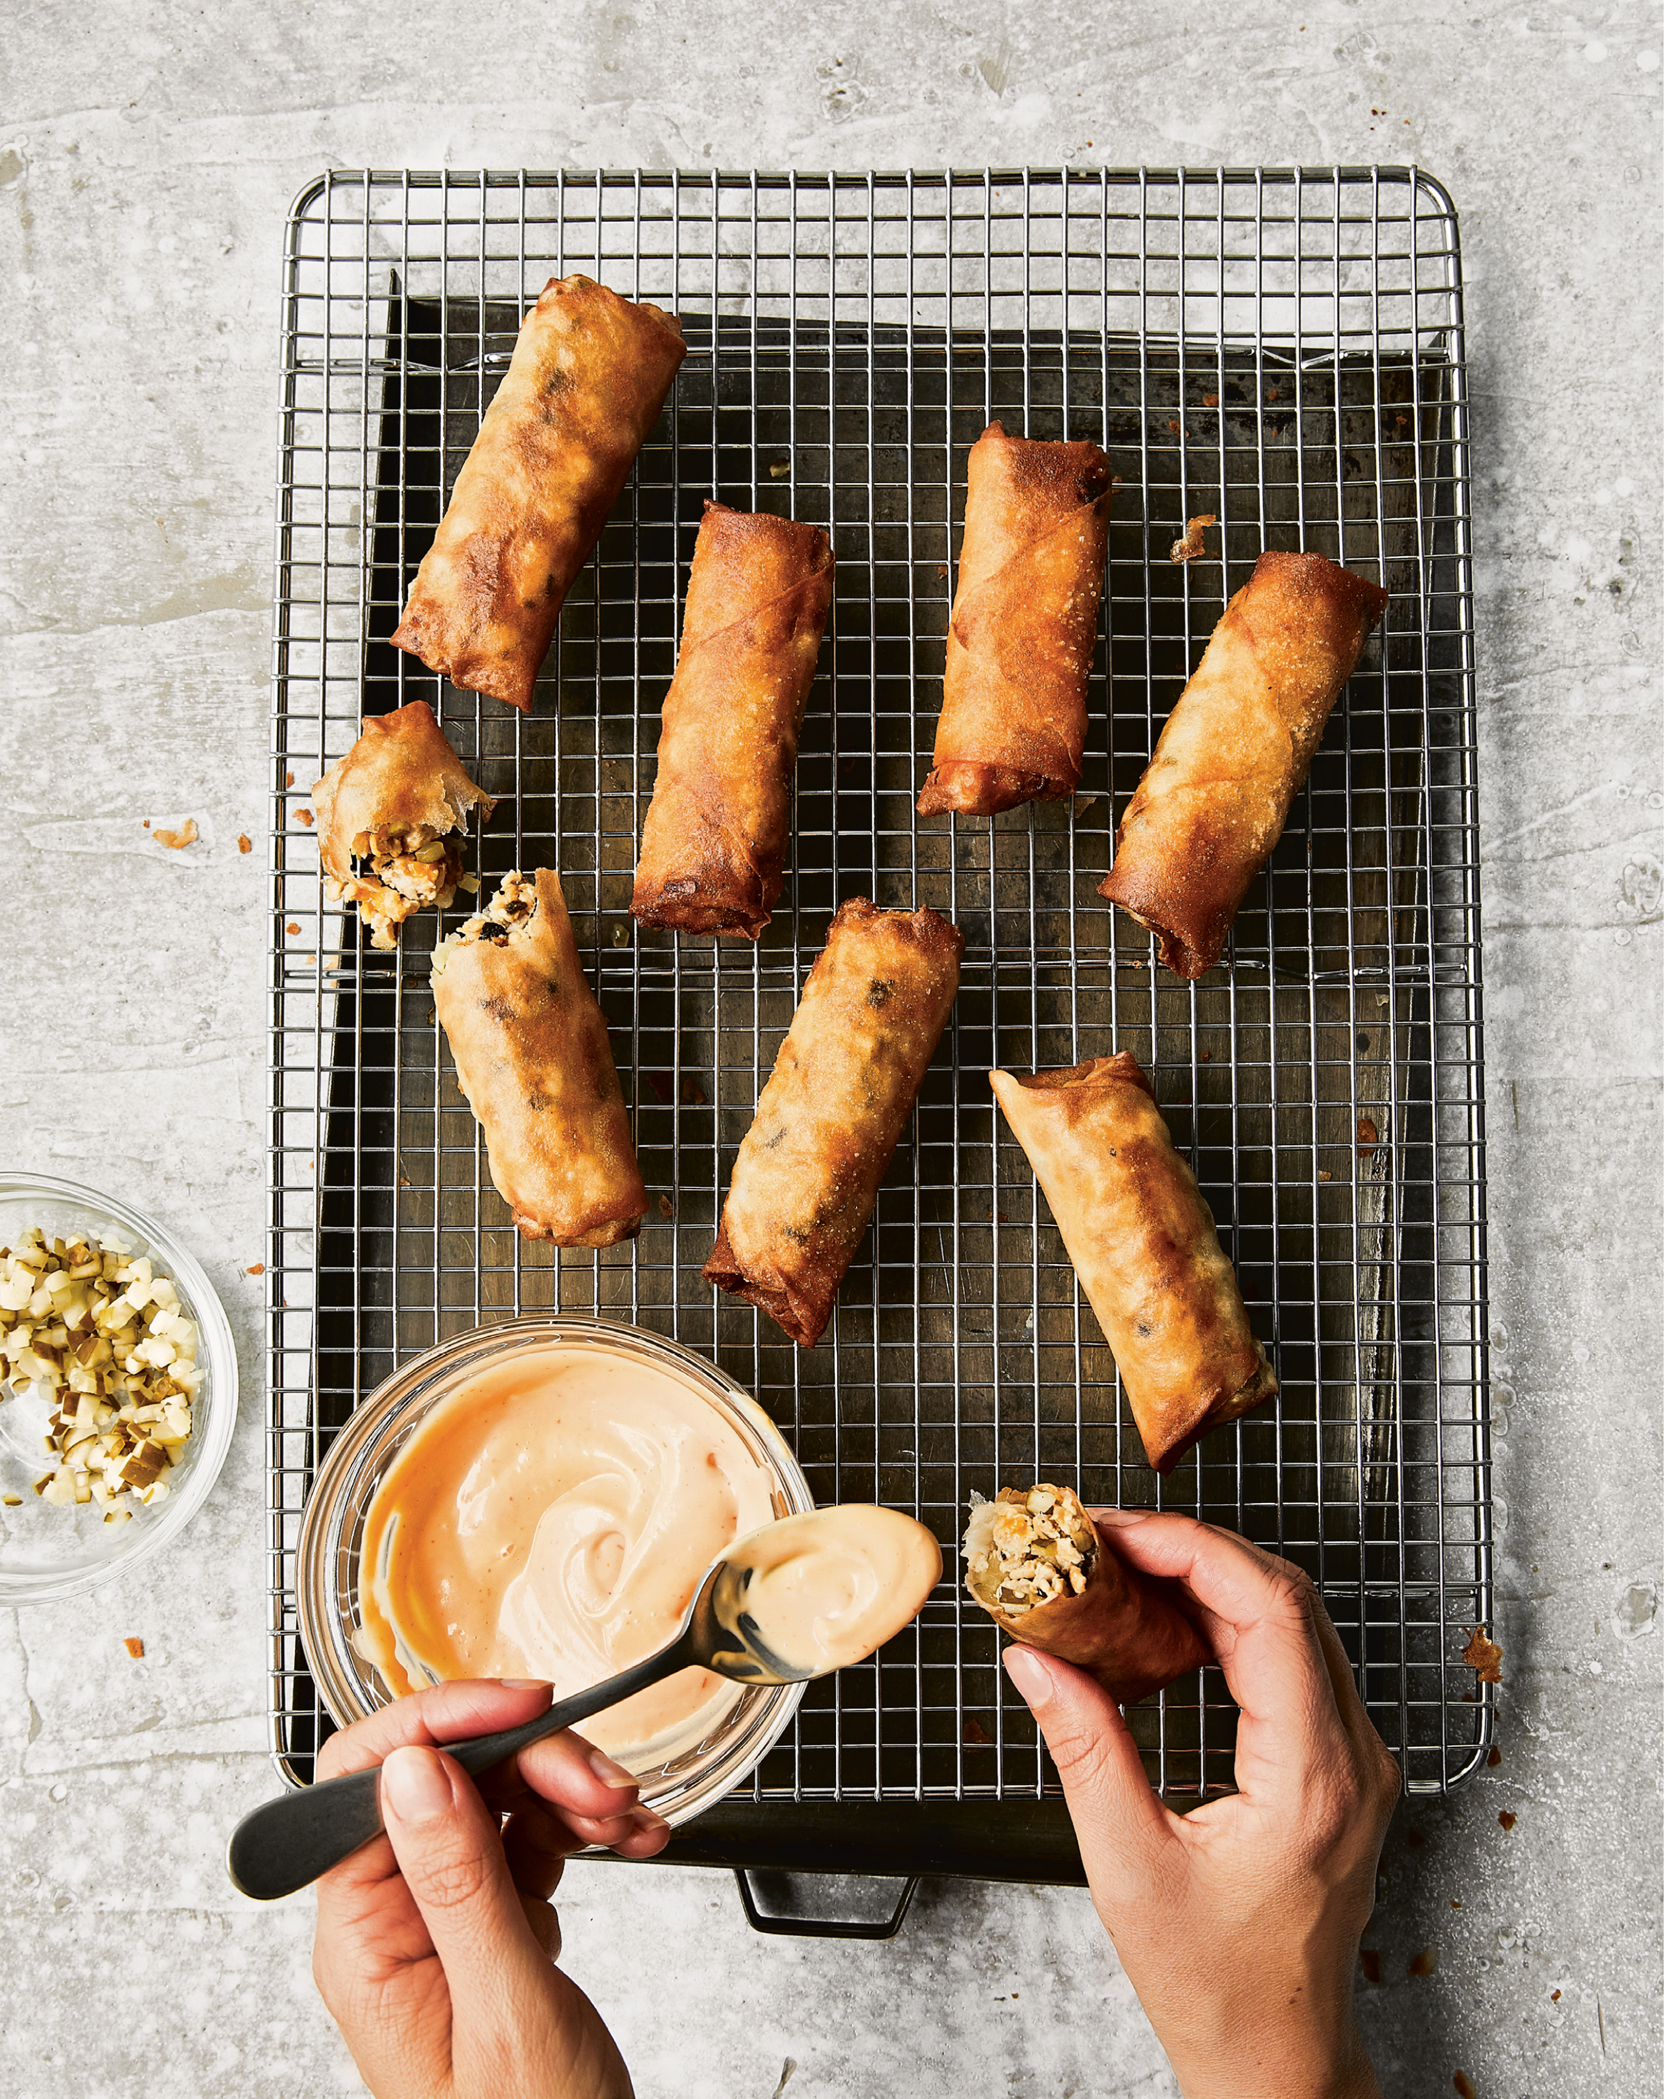
These egg rolls are filled with everything you love about your favorite burger—pickles, mushrooms, and cheddar. They’re perfect for snacking while watching a game, but if you’re not a sports fan, like me, they’re great for lunch or dinner, served with lettuce and tomatoes on the side. You can also swap your favorite burger mix-ins such as chopped bacon or jalapeño! My best advice for making egg rolls is to be sure there is no extra moisture in the filling. You can cook them all at one time if you’re entertaining, or you can freeze the ones you don’t cook—they bake from frozen beautifully.
SERVES 7
1 teaspoon olive oil
1 cup white mushrooms, chopped
1¼ pounds 93% lean ground turkey
1 teaspoon kosher salt
1 small onion, chopped
3 garlic cloves, chopped
1 teaspoon yellow mustard
1 cup shredded cheddar cheese
14 egg roll wrappers (I like Nasoya)
5 tablespoons finely chopped pickles, drained on paper towels
Olive oil spray
Ketchup, mustard, or special sauce, for dipping (optional)
FRIDGE: YOU CAN MAKE THE FILLING AHEAD AND REFRIGERATE FOR UP TO 3 DAYS BEFORE ASSEMBLING. EGG ROLLS ARE BEST WHEN EATEN RIGHT AWAY BUT CAN BE REFRIGERATED OVERNIGHT.
FREEZER: UP TO 6 MONTHS
Heat the oil in a large skillet over medium-high heat and add the mushrooms. Cook for 2 to 3 minutes, stirring occasionally, until soft. Add the turkey and salt. Brown the meat, using a wooden spoon to break it into small pieces, until just cooked through, 4 to 5 minutes. Add the onion, garlic, and mustard, and cook for 2 to 3 minutes, stirring occasionally, until soft.
Drain the meat in a colander, then transfer to a mixing bowl and mix in the cheese.
One at a time, place an egg roll wrapper on a clean surface, positioning it in a diamond shape in front of you. Spoon ¼ cup turkey mixture onto the bottom third of the wrapper. Top with about 1 teaspoon pickles. Dip your finger in a small bowl of water and run it along the edges of the wrapper. Carefully lift the bottom point nearest to you and wrap it around the filling. Fold the left and right corners in toward the center and continue to roll into a tight cylinder. Repeat with the remaining wrappers and filling.
SERVE NOW: Spray all sides of the egg rolls with oil and rub with your fingers to evenly coat. Preheat an air fryer to 370°F. Cook the egg rolls in batches for about 7 minutes, turning halfway through, until golden brown. Serve immediately, with dipping sauce on the side (if using).
FREEZE AND SERVE LATER: Before cooking the egg rolls, transfer to freezer bags, squeeze out as much air as possible, and seal. To cook from frozen, preheat an air fryer to 320°F and cook for 12 to 14 minutes, turning halfway through, until golden brown and crisp. Serve immediately, with dipping sauce on the side (if using).
No Air Fryer, No Problem! Bake for 12 to 16 minutes in a 400°F oven, flipping halfway through. From frozen, cook for 18 to 20 minutes at 375°F, flipping halfway through.
SKINNY SCOOP To make a special sauce for dipping, in a small bowl combine ¼ cup light mayonnaise, 1½ tablespoons ketchup, 1 teaspoon yellow mustard, and 1 teaspoon dill pickle juice.
Per Serving (2 egg rolls) • Calories 322 • Fat 13 g • Saturated Fat 5.5 g • Cholesterol 77 mg • Carbohydrate 26 g • Fiber 0.5 g • Protein 24 g Sugars 1 g • Sodium 621 mg
Indian-Inspired Shepherd’s Pie
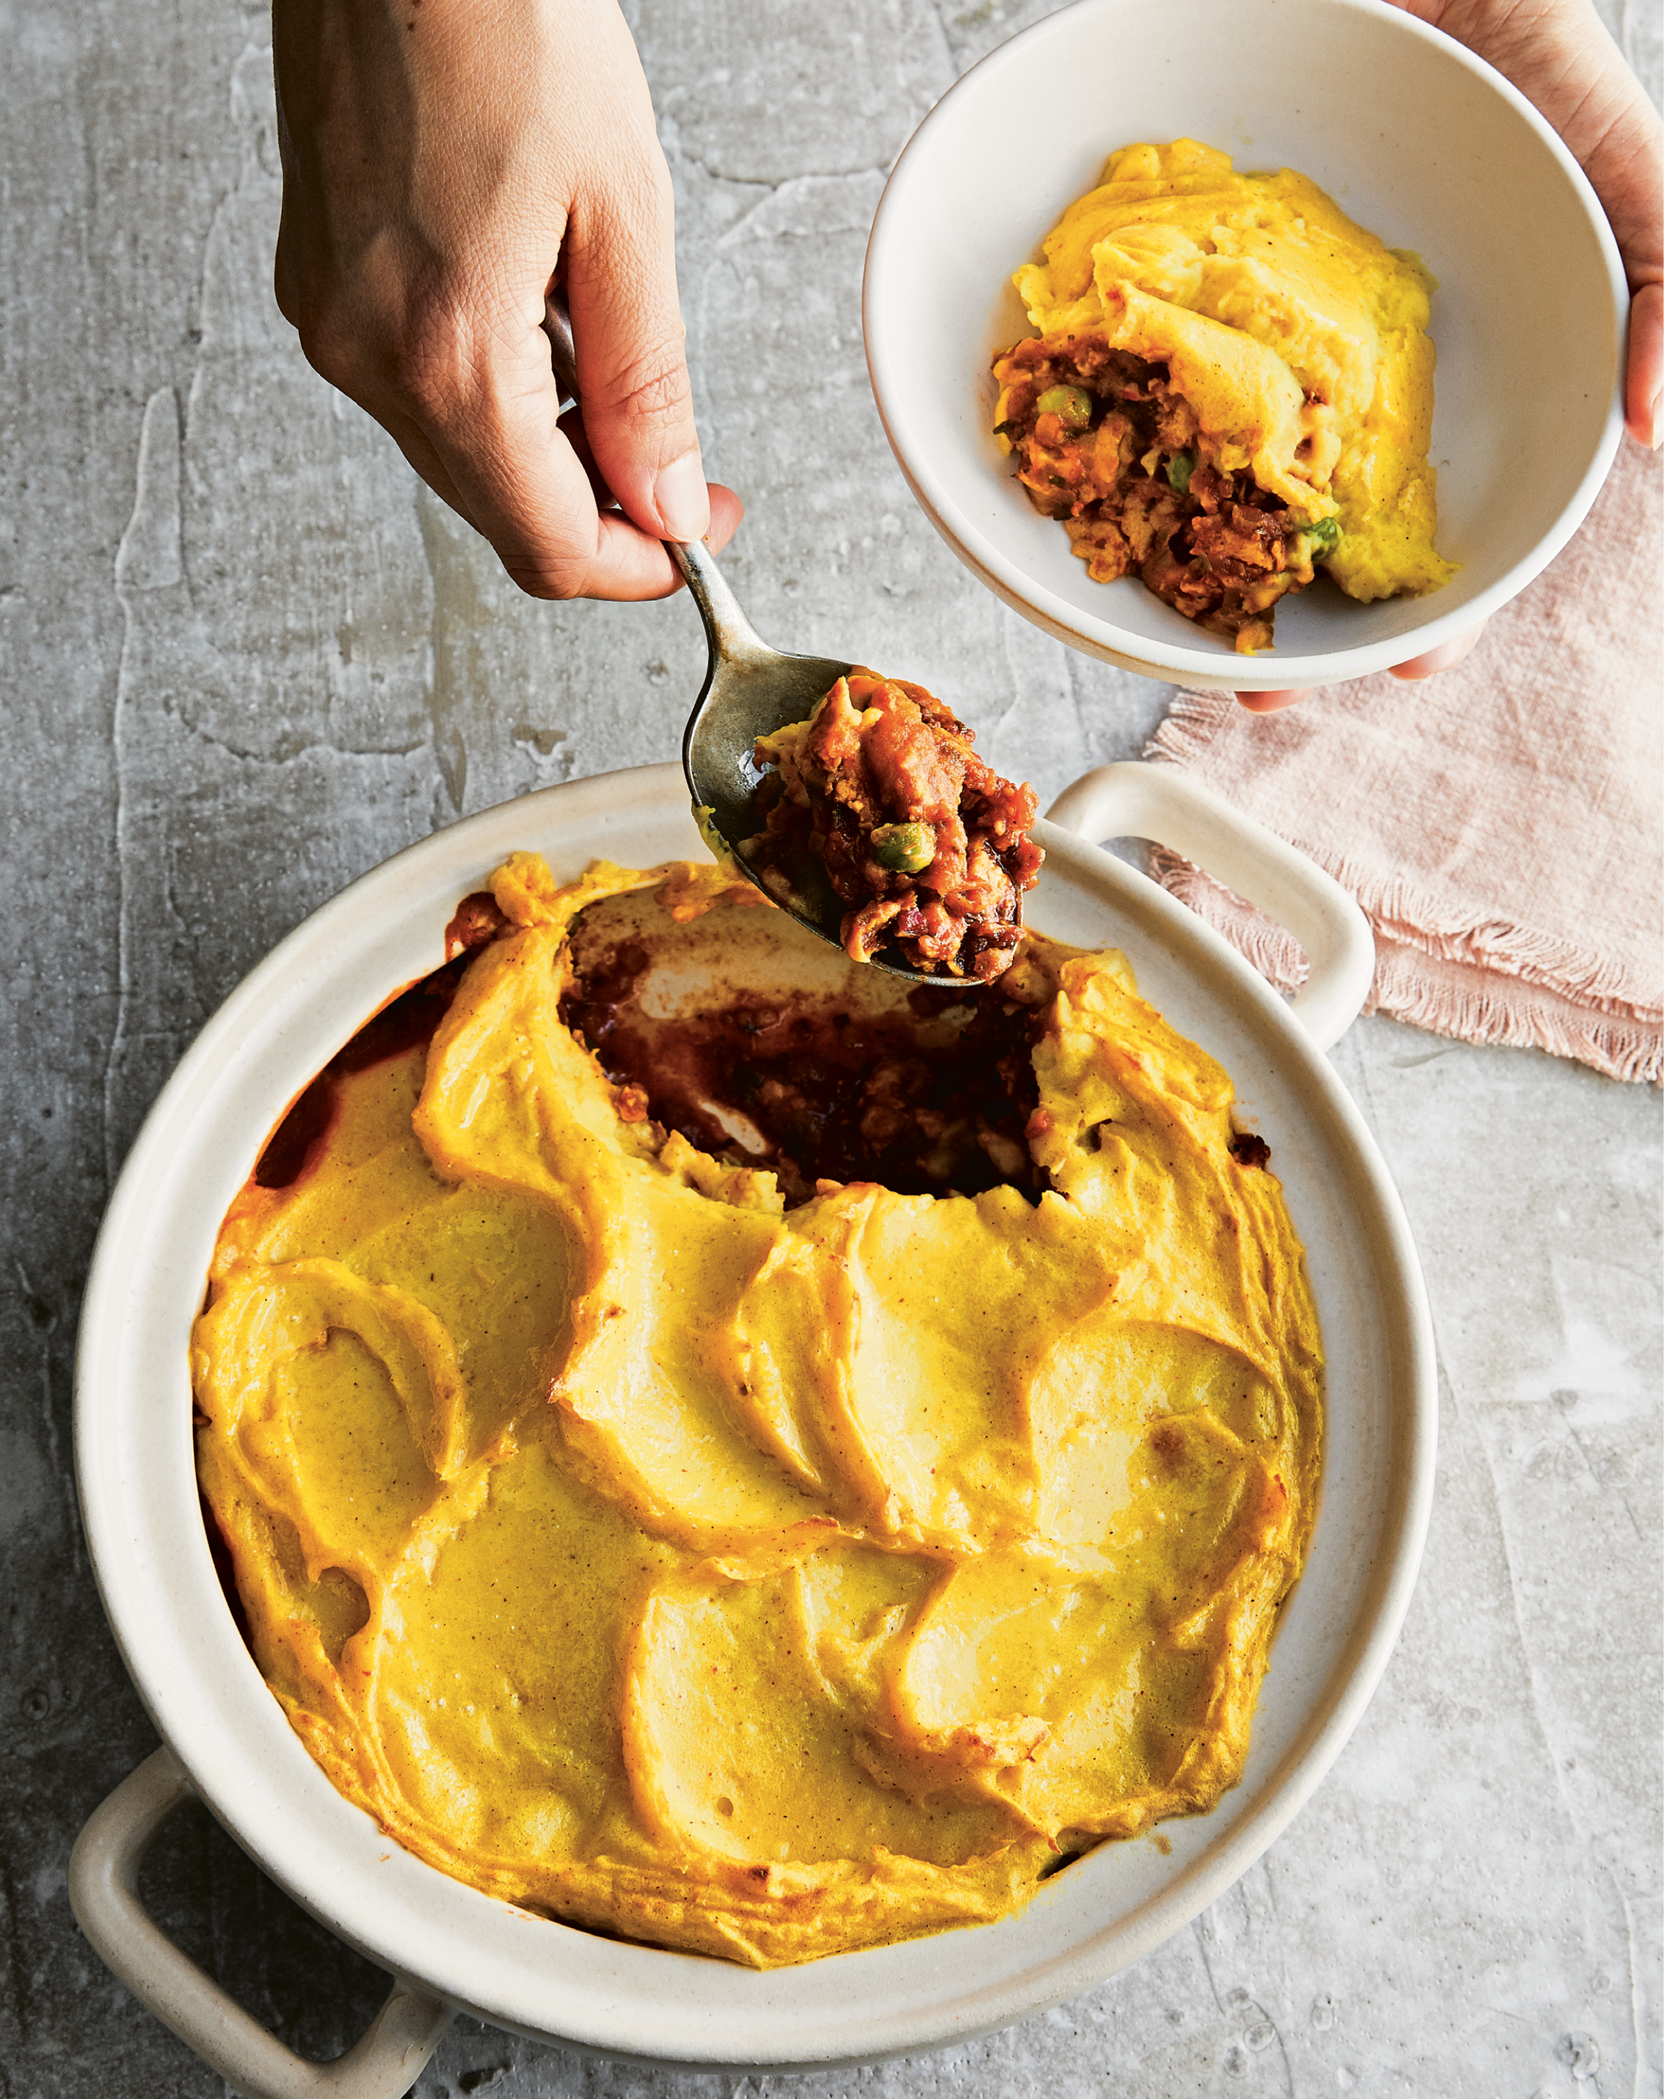
This samosa-inspired savory pie is hearty and flavor-packed, and comes together pretty quickly thanks to the lean ground turkey that is used in place of lamb. It takes nearly the same amount of time to make two pies, so if you want to double the recipe, you can eat one now and freeze one for later. Baking from frozen does require some additional time (at least 2½ hours), so if you want something quick for dinner, it’s best to thaw it in the refrigerator the night before.
SERVES 6
1½ pounds Yukon Gold potatoes, peeled and diced into 1-inch pieces
Kosher salt
¼ cup sour cream or full-fat yogurt
1 teaspoon ground turmeric
1 teaspoon garam masala*
¾ teaspoon ground cumin
¾ teaspoon chili powder,* plus more for dusting
2 teaspoons ghee or unsalted butter
1 large yellow onion, minced
3 garlic cloves, minced
1 teaspoon grated fresh ginger
1 pound ground 93% lean turkey
¾ cup tomato sauce
2 tablespoons chopped fresh cilantro, plus more for garnish (optional)
1 red chile pepper, seeded and minced
¾ cup frozen peas
*Read the label to be sure this product is gluten-free.
FRIDGE: UP TO 4 DAYS
FREEZER: UP TO 6 MONTHS
Place the potatoes and 1 tablespoon salt in a medium saucepan. Cover with water, bring to a boil, and cook for 16 to 18 minutes, until tender. Drain and return to the saucepan. Add ½ teaspoon salt, the sour cream, ½ teaspoon turmeric, ¼ teaspoon garam masala, ¼ teaspoon cumin, and ¼ teaspoon chili powder, and mash with a potato masher. Set aside.
Heat a large, deep nonstick skillet over medium heat and melt the ghee. Add the onion and cook until golden, 6 to 8 minutes. Add the garlic and ginger and cook until fragrant, about 2 minutes.
Add the ground turkey and 1 teaspoon salt to the skillet. Brown the meat, using a wooden spoon to break it until small pieces, until cooked through, 4 to 5 minutes. Add the tomato sauce, ¼ cup water, cilantro, chile pepper, remaining ¾ teaspoon garam masala, remaining ½ teaspoon cumin, remaining ½ teaspoon chili powder, and remaining ½ teaspoon turmeric, and stir well. Cover and cook on low heat for 20 to 25 minutes, then stir in the frozen peas and cook for about 3 minutes more, until the peas are warmed through.
Transfer the meat mixture to an 8- or 9-inch baking dish or deep pie plate, spreading it across in an even layer. Dollop the potatoes across the top and gently push them around until they cover the entire top of the casserole, then run the tines of a fork across the top for texture. Dust with the chili powder for color.
SERVE NOW: Position an oven rack in the center of the oven and preheat to 375°F. Place the pie on a sheet pan and bake for 25 to 30 minutes, until heated through. Adjust an oven rack 4 to 6 inches from the heating element and turn the broiler to high. Finish under the broiler for 2 to 3 minutes. Serve as is or sprinkled with cilantro, if using.
FREEZE AND SERVE LATER: Assemble the unbaked pie in a foil or freezer-to-ovenproof baking dish or pie plate. Cover the pie with foil and freeze. When ready to bake, transfer the baking dish to a sheet pan and bake, covered, in a 350°F oven until heated through in the center, about 2½ hours. (If you thawed it the night before, bake for 30 to 35 minutes.) Adjust an oven rack 4 to 6 inches from the heating element and turn the broiler to high. Finish under the broiler for 2 to 3 minutes.
Per Serving (1 cup) • Calories 271 • Fat 10 g • Saturated Fat 3.5 g • Cholesterol 65 mg • Carbohydrate 28 g • Fiber 4.5 g • Protein 19 g Sugars 5 g • Sodium 534 mg
Moussaka Makeover
Moussaka is a rich Mediterranean casserole similar to an Italian lasagna, except it’s layered with eggplant, cinnamon-spiced ground meat, and béchamel sauce. Like any good lasagna, it takes time to prepare, but it’s worth the work! It’s ideal to make ahead—just refrigerate or freeze until ready to bake. I lightened up the classic by roasting the eggplant instead of frying it, mixing chopped mushrooms and ground turkey in with the ground beef, and reducing the amount of béchamel sauce on top. It’s still every bit as delish as the original.
SERVES 8
Olive oil spray
1 pound 90% lean ground beef
1 pound 93% lean ground turkey
Kosher salt
1 large yellow onion, chopped
6 garlic cloves, minced
8 ounces white mushrooms, finely chopped
2 (8-ounce) cans tomato sauce
1 teaspoon ground cinnamon
1 tablespoon dried oregano
1 teaspoon dried basil
3 bay leaves
4 large eggplants (1¼ pounds each), peeled and sliced lengthwise, ¼ inch thick
BÉCHAMEL SAUCE
¼ cup unsalted butter
¼ cup all-purpose flour, wheat or gluten-free
2½ cups 2% milk, warmed (don’t use fat-free)
½ teaspoon kosher salt, plus more to taste
5 tablespoons freshly grated kefalotyri or Pecorino Romano cheese
Pinch of ground nutmeg
2 large eggs, beaten
FRIDGE: UP TO 4 DAYS
FREEZER: UP TO 3 MONTHS
Preheat the oven to 450°F. Spray four large sheet pans with oil.
Heat a large, deep skillet over high heat. Add the beef, turkey, and 1½ teaspoons salt. Brown the meat, using a wooden spoon to break it into small pieces, until cooked through, about 5 minutes. Add the onion and garlic and cook until soft, 4 to 5 minutes. Reduce the heat to low and stir in the mushrooms, tomato sauce, ½ cup water, cinnamon, oregano, basil, and bay leaves. Simmer, stirring occasionally, until thickened, about 20 minutes. Remove the bay leaves.
While the sauce simmers, transfer the eggplant slices to the prepared sheet pans (it’s OK if they overlap slightly). Spray both sides with olive oil and season with 1 teaspoon salt. Bake until the eggplant is golden, flipping halfway through, 15 to 16 minutes.
Make the béchamel sauce: In a medium pot, melt the butter over medium heat. Add the flour, stirring quickly with a wooden spoon to prevent lumps from forming. Cook, stirring constantly, until the mixture turns golden, about 2 minutes. While constantly stirring, pour in the milk, then add the salt. When the mixture thickens, turn off the heat and stir in 3 tablespoons kefalotyri and the nutmeg. Slowly pour in the eggs and continue stirring until combined.
To assemble: In a 9 × 13-inch baking dish, spread 1 cup meat mixture on the bottom of the dish. Top with half the eggplant, then half the meat mixture. Add the second layer of eggplant and the remaining meat mixture. Pour the béchamel sauce on top and sprinkle the remaining 2 tablespoons cheese over the top. (At this point, you can refrigerate for up to 1 day before baking.)
Bake until the top is golden brown, 30 to 35 minutes. Let cool for 10 minutes before cutting into 8 pieces and serving.
FREEZE AND SERVE LATER: Let cool completely, then cover tightly with foil and freeze. To reheat from frozen, bake, still covered with foil, in a 350°F oven until heated through, 50 to 60 minutes.
SKINNY SCOOP Kefalotyri is a hard, salty, white cheese made from sheep’s and/or goat’s milk in Greece and Cyprus. If it’s not easy to find near you, Pecorino Romano works fine in its place.
Per Serving (1 piece) • Calories 420 • Fat 20.5 g • Saturated Fat 9 g Cholesterol 149 mg • Carbohydrate 30 g • Fiber 11.5 g • Protein 33 g Sugars 14 g • Sodium 954 mg
Low-Country Boil Foil Packets

You can bake just about anything in a foil packet! Filled with everything you’d find in a classic shrimp boil—Old Bay seasoning, shrimp, potatoes, corn, and sausage—these delicious packets make it so much easier to serve this dish any night of the week.
SERVES 4
32 peeled and deveined jumbo shrimp, tails on (18 ounces total)
2 garlic cloves, minced
4 teaspoons Old Bay seasoning
12 ounces baby red potatoes, washed and sliced ¼ inch thick
2 medium ears corn, husked and kernels removed from cob (about 2 cups)
6 ounces turkey kielbasa, sliced
¼ cup beer
4 teaspoons olive oil
8 thin lemon slices
¼ cup chopped parsley
FRIDGE: UP TO 1 DAY (UNCOOKED)
FREEZER: UP TO 2 MONTHS (UNCOOKED)
In a medium bowl, toss the shrimp with the garlic and 1 teaspoon of the Old Bay seasoning. In a separate medium bowl, toss the potatoes with 2 teaspoons of the Old Bay.
Place four large (12 x 18-inch) pieces of heavy-duty aluminum foil on a flat surface.
Place one-fourth of the potatoes in a single layer in the center of each foil piece, then top with the corn, kielbasa, and shrimp. Drizzle each with 1 tablespoon of the beer and 1 teaspoon of the oil, followed by the remaining teaspoon Old Bay and the lemon slices. Sprinkle each with 1 tablespoon of the parsley.
Fold each piece of the foil to form a packet, sealing tightly and leaving a little room inside for air to circulate in the packet.
SERVE NOW: Preheat the oven to 425°F. Arrange the packets on a baking sheet and cook until the shrimp are cooked through and the potatoes are tender, about 25 minutes. Open the packets slowly, being careful of the hot steam. Transfer to plates and eat hot.
FREEZE AND SERVE LATER: Place the assembled, uncooked foil packets into sealable gallon plastic bags (2 should fit in each one). Keep upright and freeze for up to 2 months. Cook from frozen on a baking sheet in a cold oven set to 425°F. Once the oven comes to temperature, continue to cook until the potatoes are tender and the shrimp is opaque, 40 minutes.
SKINNY SCOOP: If you prefer spicier packets, just use a little (or a lot!) more Old Bay. Andouille chicken sausage can also be used in place of kielbasa.
Per Serving (1 foil packet) • Calories 333 • Fat 9 g • Saturated Fat 2 g Cholesterol 183 mg • Carbohydrate 27 g • Fiber 3 g • Protein 33 g Sugars 4 g • Sodium 1,369 mg
Slow Cooker BBQ Brisket
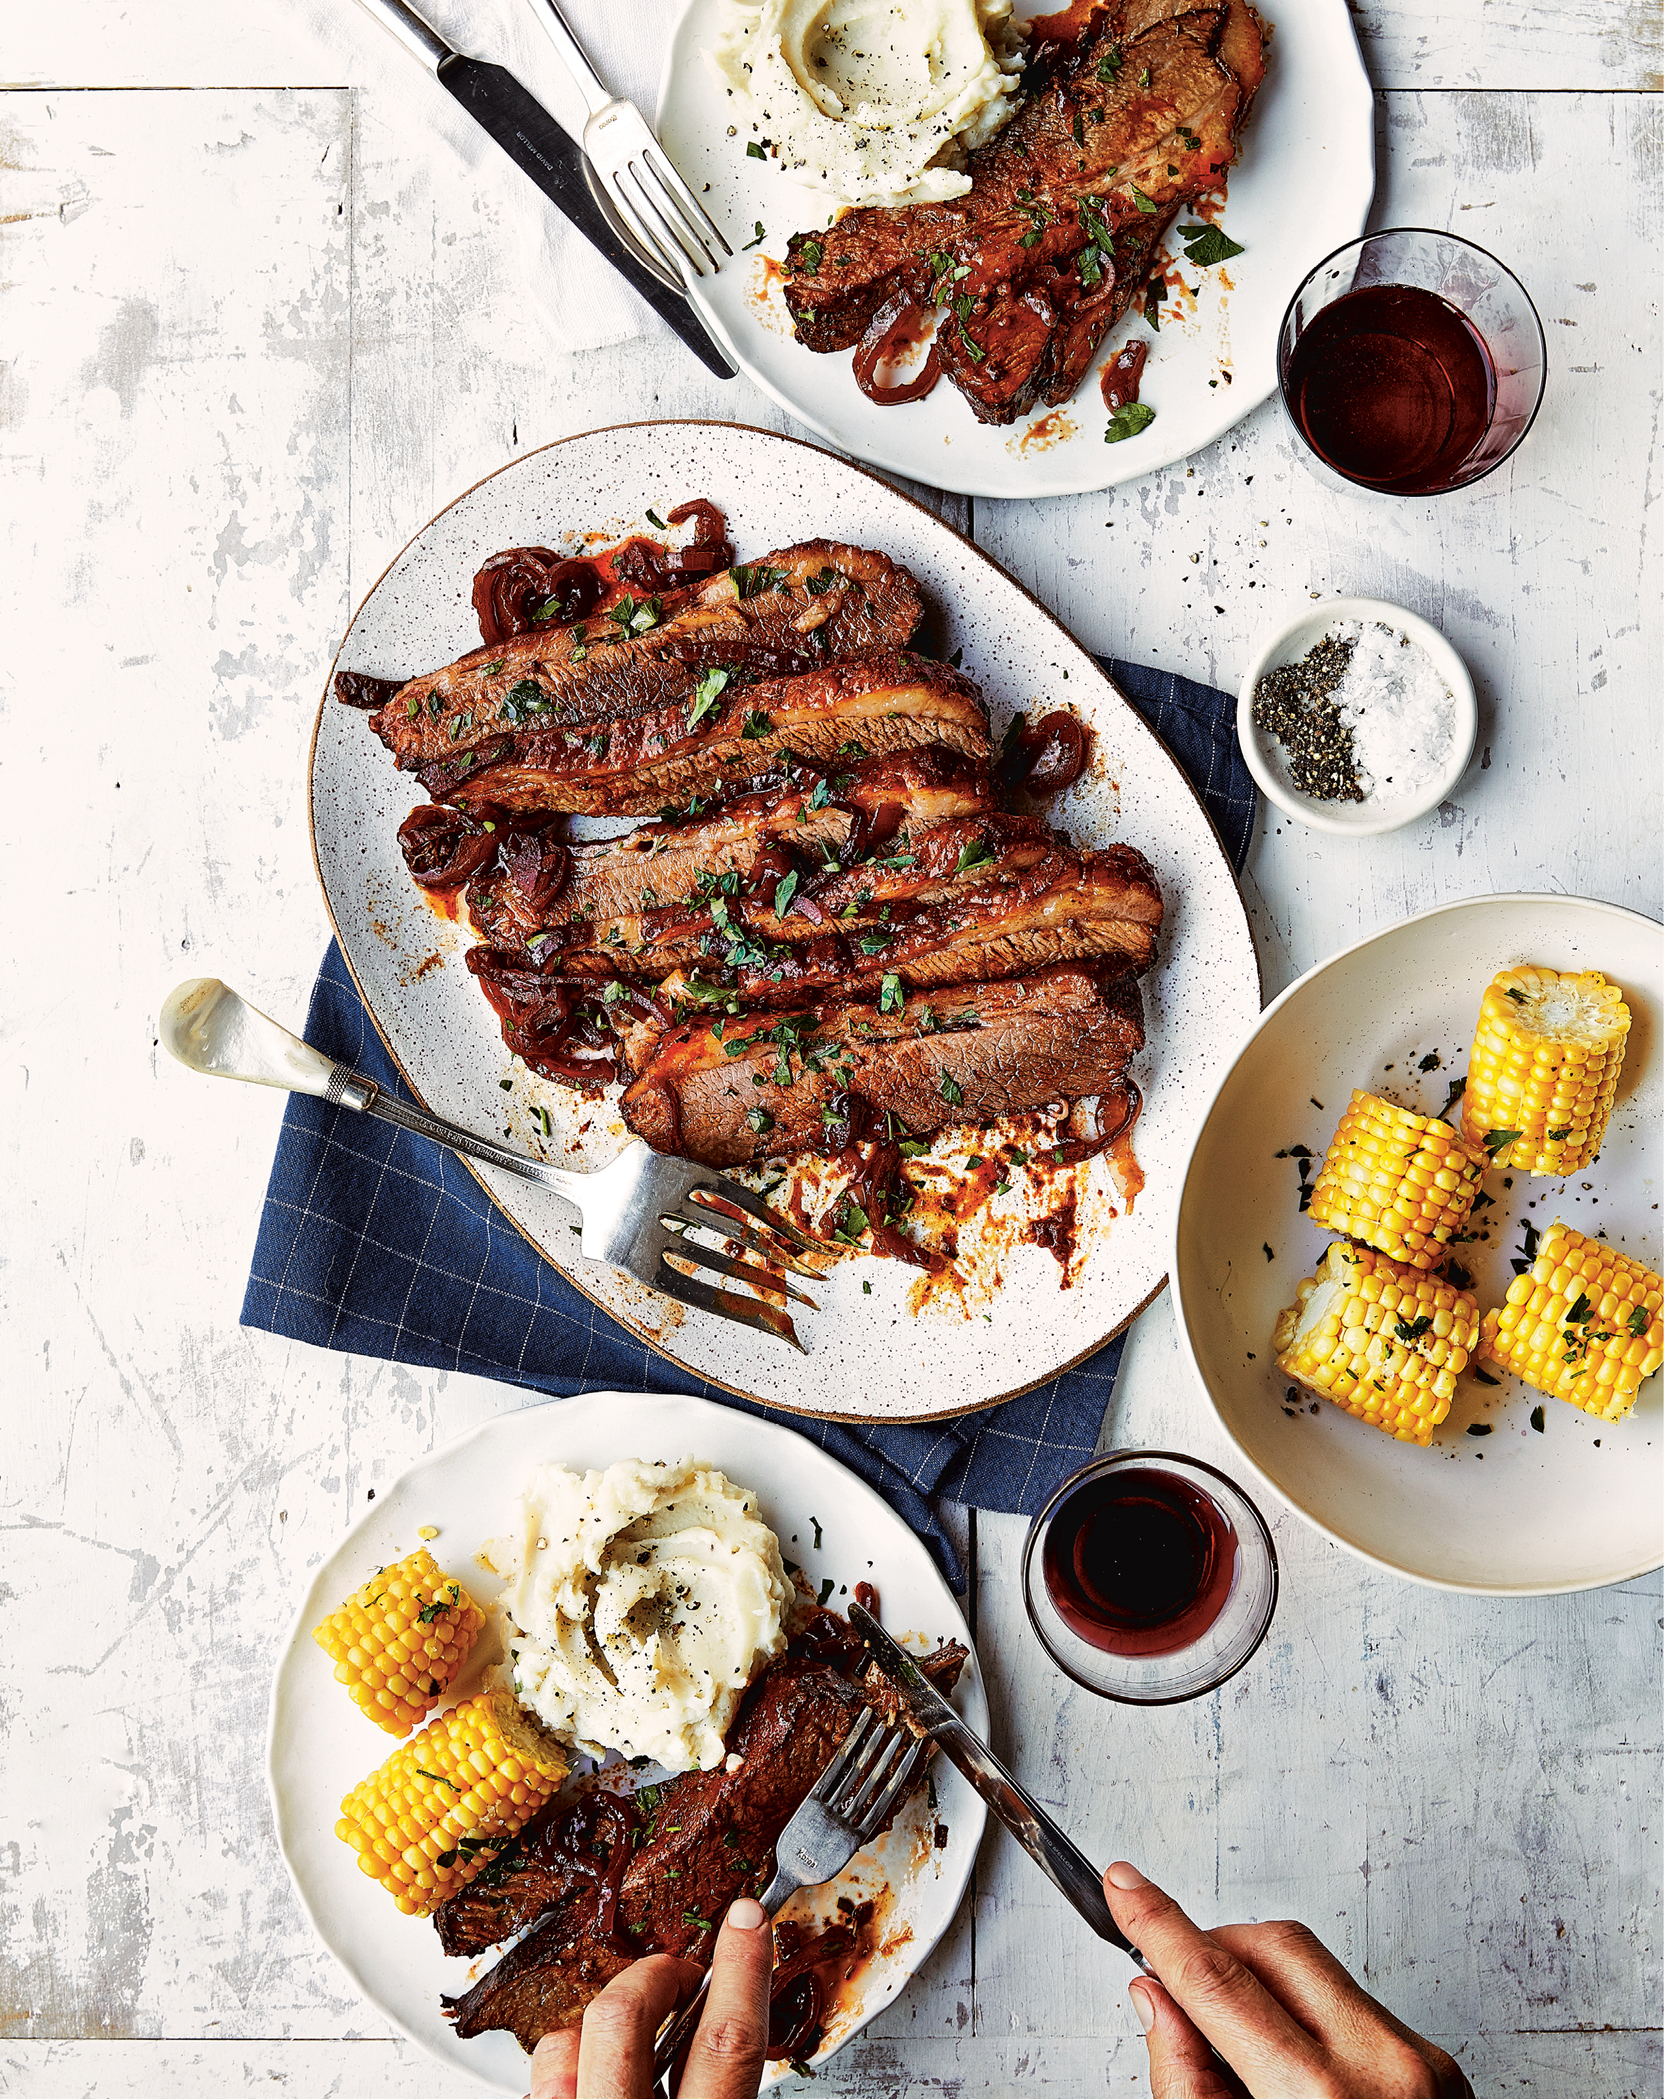
I just love the smoky taste of BBQ brisket, and with this easy slow cooker recipe, you can have it any time of the year—no smoker or charcoal grill required! The slow cooker transforms one of the toughest cuts of beef (brisket) into something so tender and delicious, you can cut it with a fork. Just rub the brisket with smoked paprika and liquid smoke, add caramelized onions and BBQ sauce, then let the slow-cooking magic begin. Slicing the beef before it’s completely cooked, then arranging the slices like a fallen stack of dominoes inside the slow cooker to finish cooking, is a pro trick. This not only keeps the slices from falling to shreds, it allows all of the delicious smoky flavor to seep into every slice as it finishes cooking. Serve this with mashed potatoes or cauliflower mash and corn on the cob. Any leftovers are great on a roll with coleslaw.
SERVES 8
2½ pounds lean beef brisket, trimmed of all fat
1¾ teaspoons kosher salt
1 teaspoon smoked paprika
1 teaspoon garlic powder
Freshly ground black pepper
3 teaspoons olive oil
1 tablespoon mesquite liquid smoke
2 medium onions, sliced lengthwise
¾ cup BBQ sauce of choice, plus more for serving (optional)
1 tablespoon chopped fresh parsley, for garnish
FRIDGE: UP TO 4 DAYS
FREEZER: UP TO 3 MONTHS
Season the brisket with 1½ teaspoons salt, paprika, garlic powder, and pepper to taste.
Heat 2 teaspoons oil in a large cast iron or heavy skillet over medium-high heat. Add the brisket and cook until browned on both sides, about 5 minutes per side. Transfer to a 5- to 6-quart slow cooker (an oval cooker is ideal). Pour the liquid smoke over the brisket.
Heat the skillet over medium-low heat. Add the remaining 1 teaspoon oil and the onions and cook, stirring constantly, until soft and golden, about 15 minutes. Place the onions on top of the brisket in the slow cooker and sprinkle with ¼ teaspoon salt and more pepper to taste. Pour the BBQ sauce on top. Cover and cook on low for about 8 hours, until tender.
Remove the brisket and transfer to a cutting board. Using a sharp knife, slice the meat across the grain into approximately ¼-inch-thick slices. Place the sliced meat back into the slow cooker, arranging the meat like fallen dominoes and submerging it in the liquid and onions. Cook for about 1 hour more, until very tender. Keep warm until ready to serve.
SERVE NOW: Top with the fresh parsley just before serving. Serve with more BBQ sauce (if using). (To freeze, store cooked brisket and sauce in an airtight container.)
REFRIGERATE AND SERVE LATER: To prep the night ahead, follow all the steps up to turning on the slow cooker. Refrigerate, covered, until ready to cook. In the morning, remove from the refrigerator. Cook on low for about 8 hours 30 minutes before continuing with the recipe (the extra 30 minutes accounts for starting with cold ceramic). Note: Never place your stoneware (whether it has been refrigerated or is at room temperature) in a preheated slow cooker.
Per serving (3.25 ounces [generous ½ cup] beef + sauce) • Calories 275 Fat 10 g • Saturated Fat 3 g • Cholesterol 95 mg • Carbohydrate 17 g • Fiber 0.5 g • Protein 31 g • Sugars 13 g • Sodium 584 mg
Winter Brisket and Barley Soup
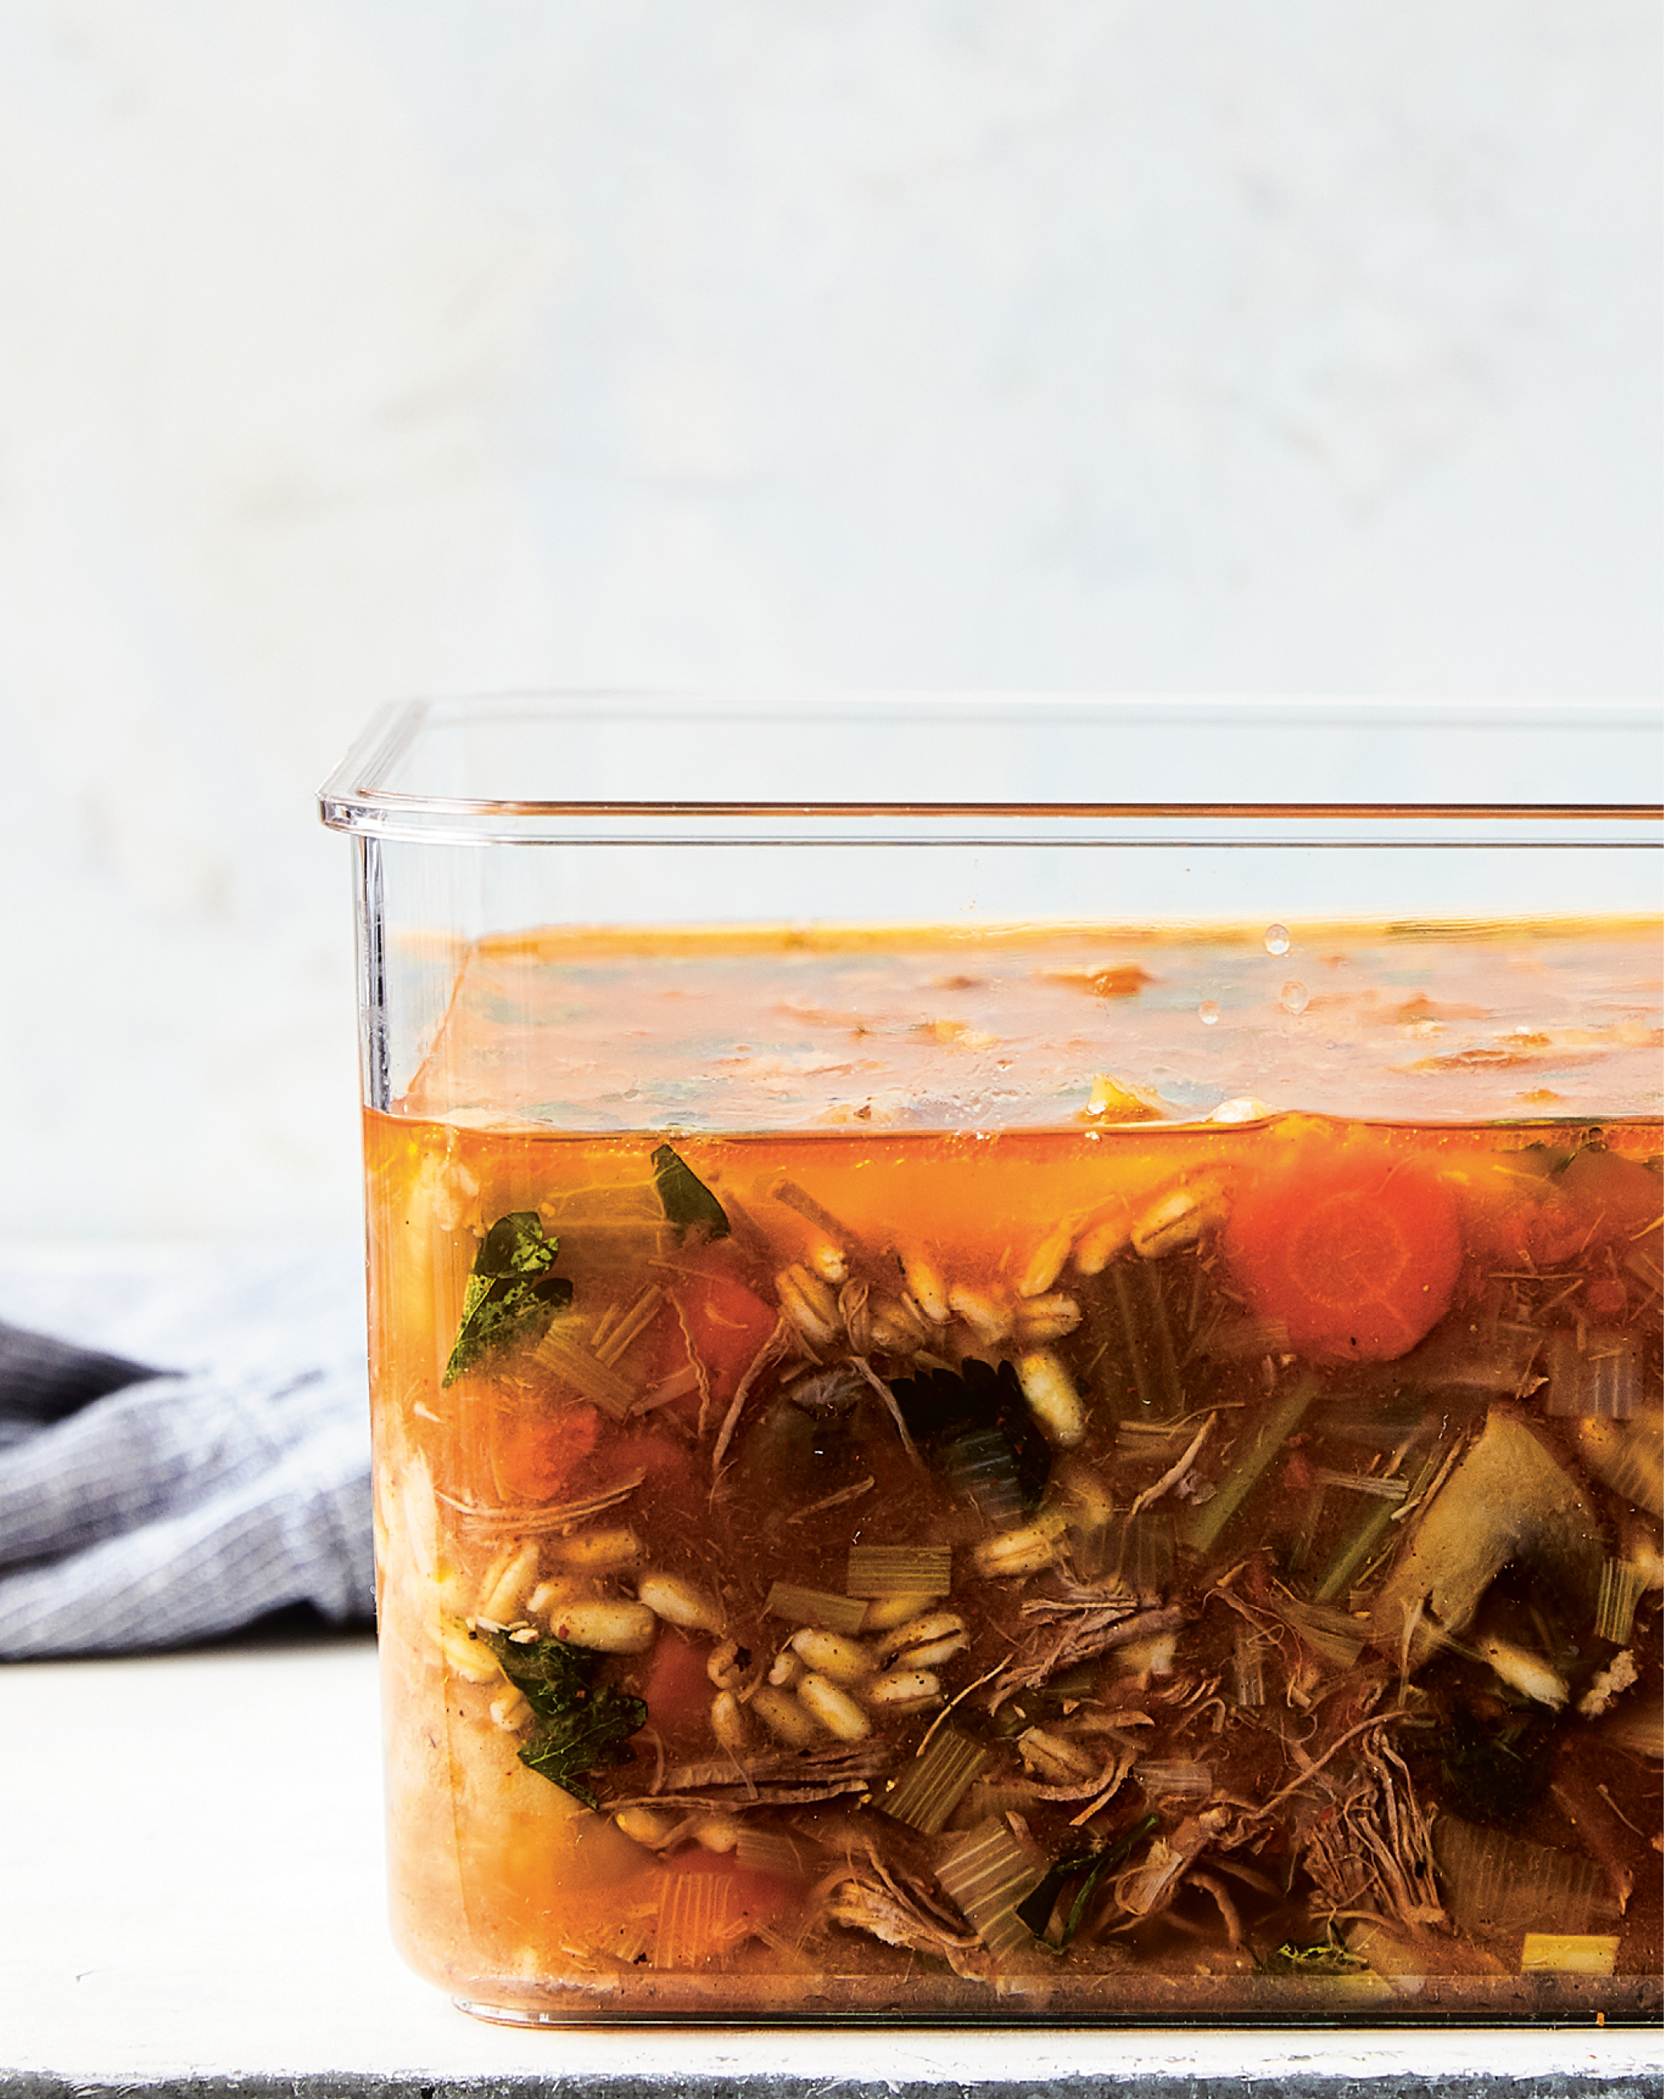
When I was growing up, my parents made soup almost every day (beef and barley was always one of my favorites—it’s the perfect cold-weather comfort soup). We either started our meal with a light soup or enjoyed a more substantial soup, like this, as our main course. Soup was one of my mom’s go-to recipes because it allowed her to stretch her dollar and feed a crowd. Anyone who knows us knows there was always someone staying for dinner. Even today, if you were to show up at my mom’s house hungry, she’d have food ready and waiting for you. And, of course, soup makes the best leftovers for lunch or dinner a second night—it’s always better the next day.
SERVES 6
1 tablespoon olive oil
1¼ pounds beef brisket, trimmed and cut into 4 pieces
1 large onion, chopped
2 medium carrots, chopped
2 leeks, rinsed well, white part only, chopped
1 celery stalk, diced
2 tablespoons tomato paste
6 cups beef broth
8 ounces sliced white mushrooms
1 bay leaf
¼ cup chopped fresh parsley, plus more for garnish
2 ounces uncooked pearled barley
½ teaspoon kosher salt
Freshly ground black pepper
FRIDGE: UP TO 5 DAYS
FREEZER: UP TO 3 MONTHS
Heat a heavy pot or Dutch oven over high heat. When hot, add ½ tablespoon oil, then add the brisket and brown on both sides, 3 to 4 minutes on each side. Remove from the pot.
Add the remaining oil, onion, carrots, leeks, and celery. Reduce the heat and cook until the vegetables soften, 4 to 5 minutes. Add the tomato paste and cook, stirring often, until tender, about 2 minutes.
Return the beef to the pot. Add the broth, mushrooms, bay leaf, parsley, and barley and bring to a boil. Reduce the heat to low, cover, and simmer until the beef is very tender, 2 to 2½ hours. Discard the bay leaf. Remove the beef from the pot and shred it with two forks. Return the beef to the pot, season with the salt and pepper to taste, garnish with parsley, and serve.
FREEZE AND SERVE LATER: Let the soup cool, then divide among airtight freezer-safe containers. To reheat from frozen, transfer to the refrigerator the night before to thaw, then reheat on the stovetop or in the microwave.
For an Instant Pot: Reduce the broth amount to 5¾ cups and cook on high pressure for 1 hour. Natural release, then open when the pressure subsides.
Per Serving (1½ cups) • Calories 249 • Fat 8 g • Saturated Fat 2.5 g • Cholesterol 63 mg • Carbohydrate 20 g • Fiber 4 g • Protein 26 g Sugars 5 g • Sodium 1,037 mg
Lentil Soup with Bacon
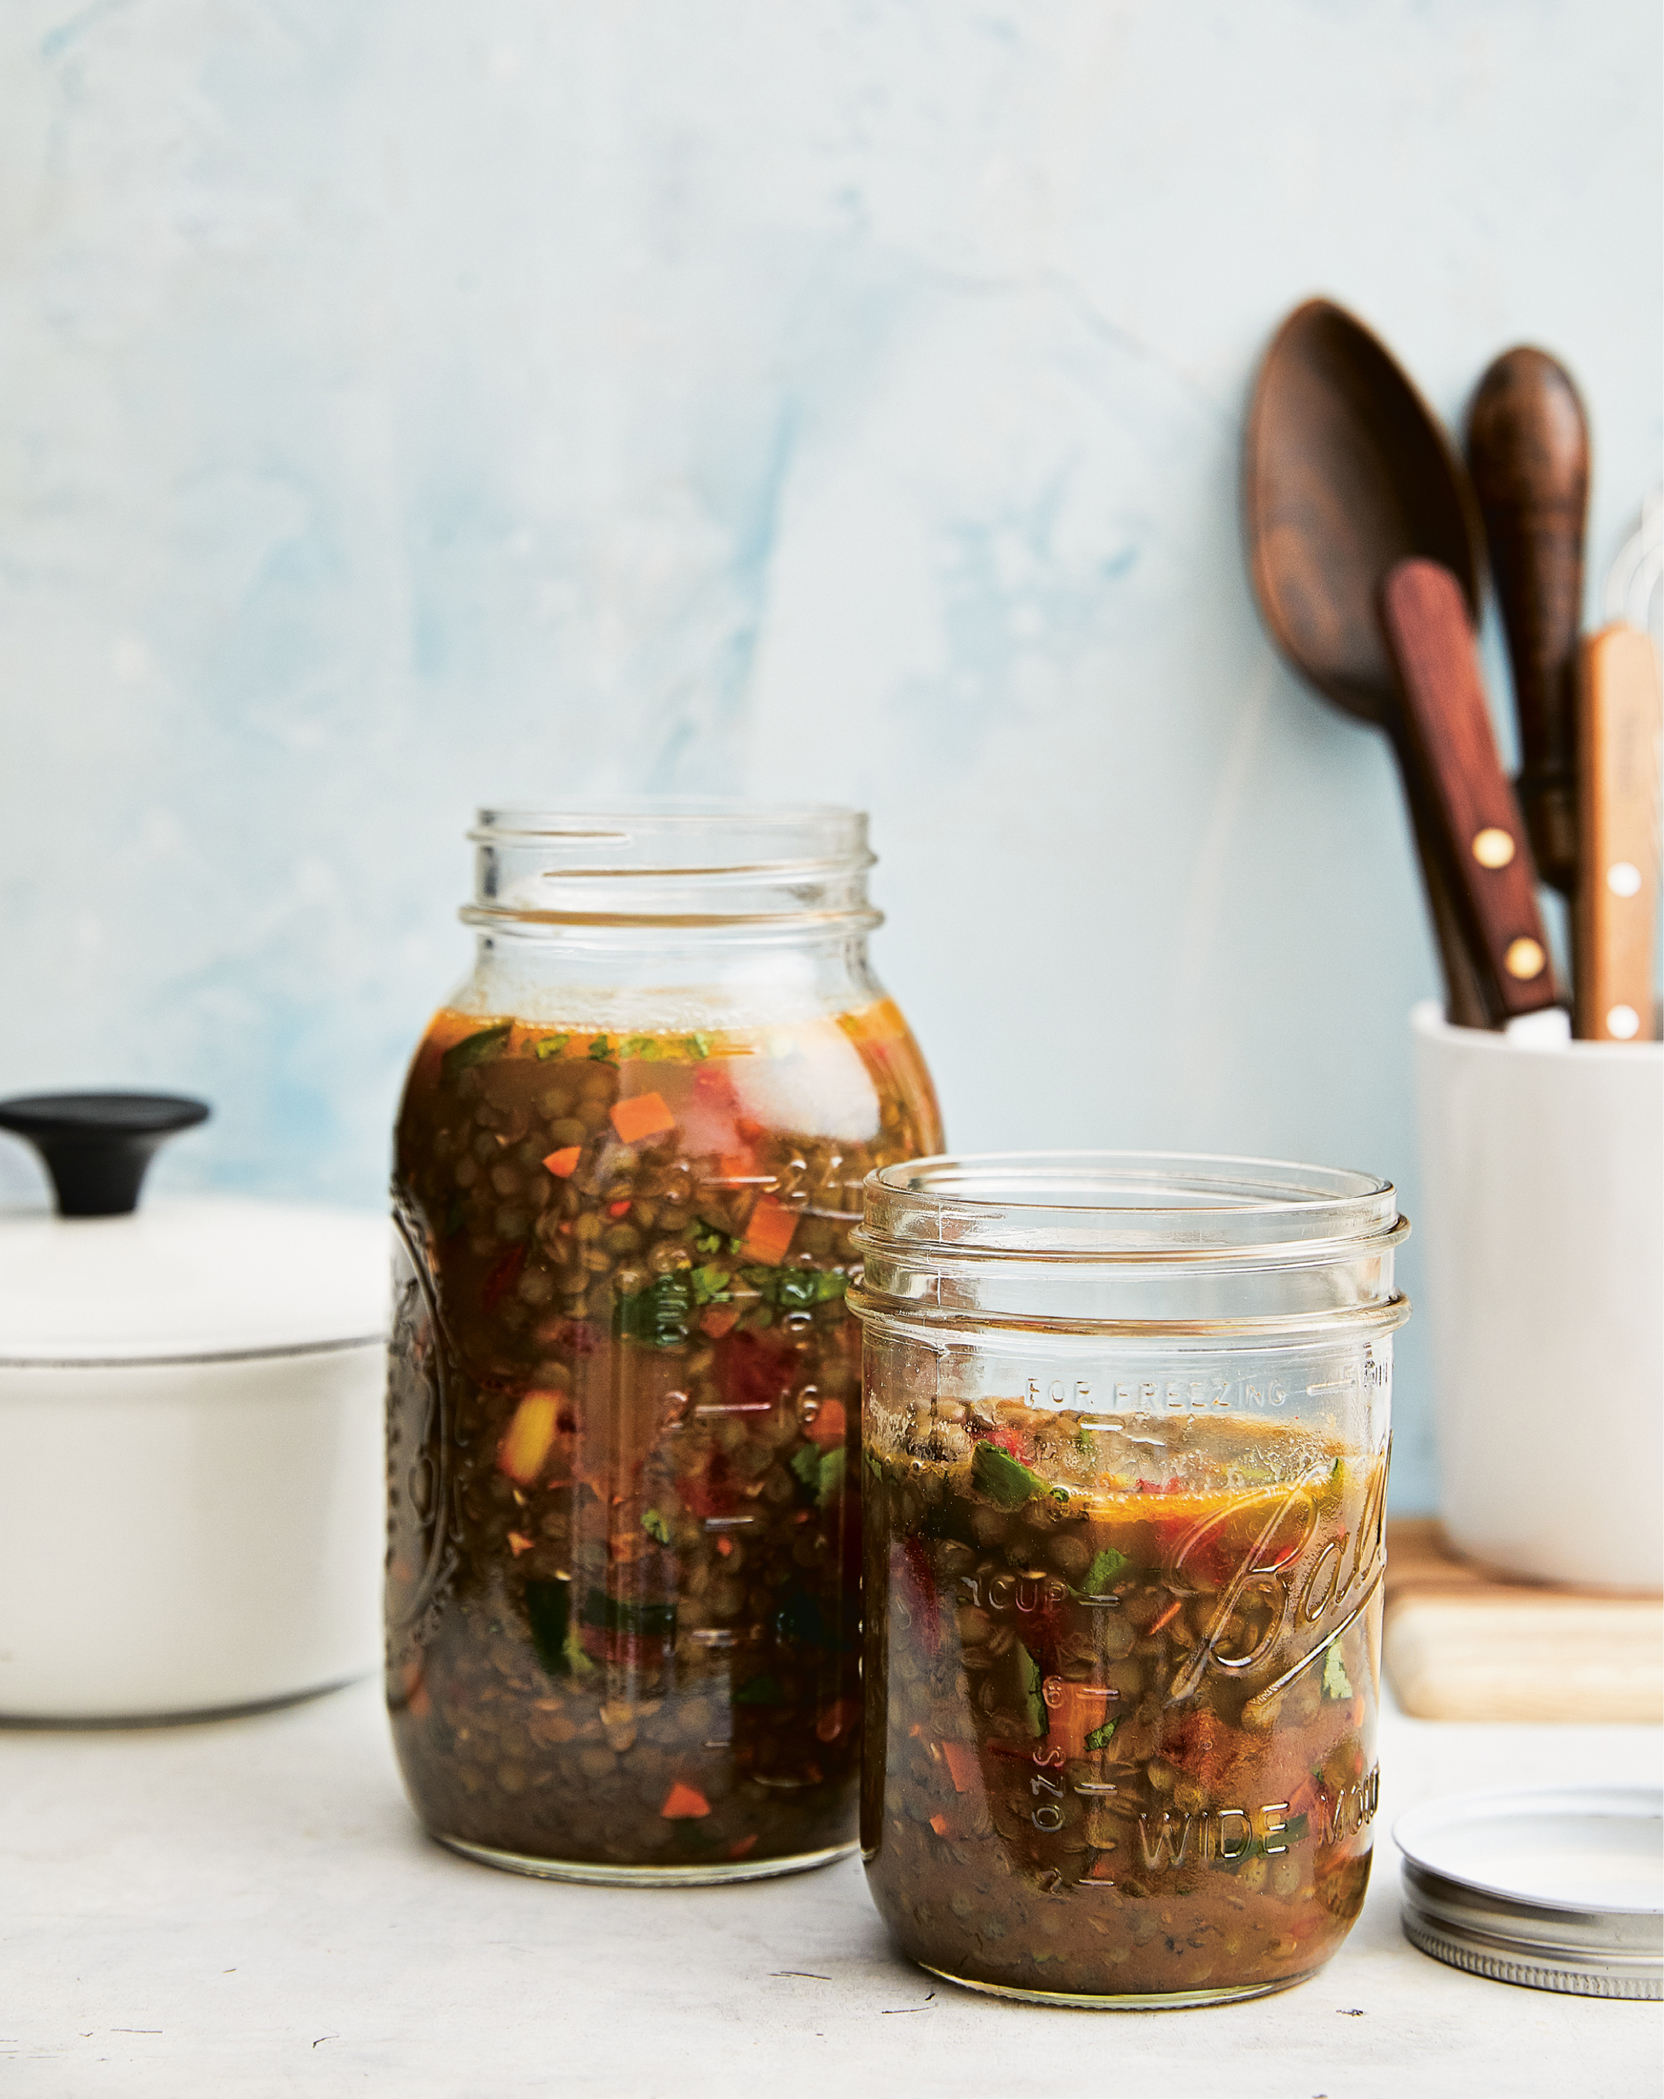
Every time I make lentil soup, I always wonder why I don’t make it more often. It’s healthy, filling, and super budget-friendly; it freezes perfectly; and it’s seriously delish. I make mine over-the-top flavorful by adding bacon, scallions, cilantro, and sazón seasoning, which infuses so much flavor into the soup that everyone will be begging for seconds. Plus, you’ll feel good about serving it because it’s packed with vegetables and nutrients. Add a big salad and warm crusty bread and dinner is done!
SERVES 10
1½ cups chopped carrots
1 pound uncooked small green lentils, rinsed well
1 (48-ounce) carton reduced-sodium chicken broth*
2 bay leaves
3 slices center-cut bacon, chopped
¾ cup chopped scallions (from 5 to 6)
4 garlic cloves, minced
1½ cups diced tomatoes (from 2 medium)
1 tablespoon sazón seasoning (I like Badia)
½ cup chopped fresh cilantro
*Read the label to be sure this product is gluten-free.
FRIDGE: UP TO 4 DAYS
FREEZER: UP TO 3 MONTHS
Combine the carrots, lentils, broth, bay leaves, and 2 cups water in a large pot or Dutch oven. Bring to a boil, cover, and reduce the heat to low. Cook until the lentils are tender, about 30 minutes.
Meanwhile, heat a large skillet over medium heat and add the bacon. Cook, stirring occasionally, until browned, 4 to 5 minutes, then remove with a slotted spoon to a paper towel to drain. Add the scallions and garlic to the skillet and cook until they begin to soften, 2 to 3 minutes. Add the tomatoes and sazón seasoning, and cook, stirring frequently, until the tomatoes are soft, 2 to 3 minutes.
Once the lentils are cooked, stir the tomato mixture into the pot along with the cilantro. Cover and cook until the flavors meld, 8 to 10 minutes. Discard the bay leaves, stir the bacon into the soup, and serve.
FREEZE AND SERVE LATER: Let cool and then transfer to one large or individual containers and freeze. Thaw overnight in the refrigerator, then reheat on the stove or in the microwave.
Per Serving (1¼ cups) • Calories 206 • Fat 1.5 g • Saturated Fat 0.5 g • Cholesterol 1 mg • Carbohydrate 32 g • Fiber 15 g • Protein 16 g Sugars 4 g • Sodium 939 mg
Frozen Fish Sticks with Dill Tartar Sauce

Forget the frozen aisle! Make your own healthy fish sticks from scratch with cleaner, fresh ingredients that taste so much better than packaged. Guys, these are so easy to make and so delicious, you’ll be very happy you tried them. The dill tartar sauce is a must-make when you’re ready to serve them, but a squeeze of fresh lemon would also be great in a pinch. Everyone in my home thought they actually taste even better cooked from frozen (the texture is firmer). But if you don’t have time to freeze them and want them for dinner tonight, they will still be tasty. Another option is to double the batch: one for dinner tonight and one for the freezer.
SERVES 4
DILL TARTAR SAUCE
1 tablespoon chopped fresh dill
2 tablespoons drained capers, minced
¼ cup fat-free Greek yogurt
¼ cup light mayonnaise
Juice of ½ lemon
FISH
28 ounces skinless wild cod or haddock fillets (thawed, if frozen)
1 teaspoon kosher salt
2 teaspoons finely chopped fresh dill
1 teaspoon lemon zest
2 large egg whites, lightly beaten
1 cup plus 2 tablespoons plain or gluten-free panko bread crumbs
Olive oil spray
FREEZER: UP TO 3 MONTHS (UNBAKED)
Prepare the sauce: Combine the ingredients for the dipping sauce in a small bowl and refrigerate until ready to eat.
Prepare the fish: Cut the fish into 16 sticks, about 4 x 1 inches. Season with ½ teaspoon salt, the 2 teaspoons dill, and the lemon zest.
Place the egg whites in a shallow bowl. In a second shallow bowl, combine the panko with the remaining ½ teaspoon salt. Dip the fish into the egg whites, then the panko. Set aside.
SERVE NOW: Preheat the oven to 450°F. Line a sheet pan with foil and spray with oil. Lay the fish sticks on the sheet pan, making sure they don’t touch. Spray the tops of the fish sticks with oil and bake in the center of the oven for 14 to 16 minutes, turning halfway, until golden and crisp. Serve hot with tartar sauce.
FREEZE AND SERVE LATER: Place the sheet pan with the uncooked breaded fish sticks in the freezer for about 2 hours to flash freeze them. Once frozen, transfer them carefully into a freezer bag or container, squeezing out all the air. To serve, preheat the oven to 475°F. Place the frozen fish sticks on a sheet pan lined with foil and spray with oil. Bake from frozen for 12 to 14 minutes, turning halfway or until they flake easily and are cooked in the center and golden and crisp.
Per Serving (4 sticks + scant 2 tablespoons sauce) • Calories 298 • Fat 6.5 g • Saturated Fat 1 g • Cholesterol 91 mg • Carbohydrate 17 g • Fiber 1 g Protein 41 g • Sugars 2 g • Sodium 685 mg
Southwest Salmon Burgers
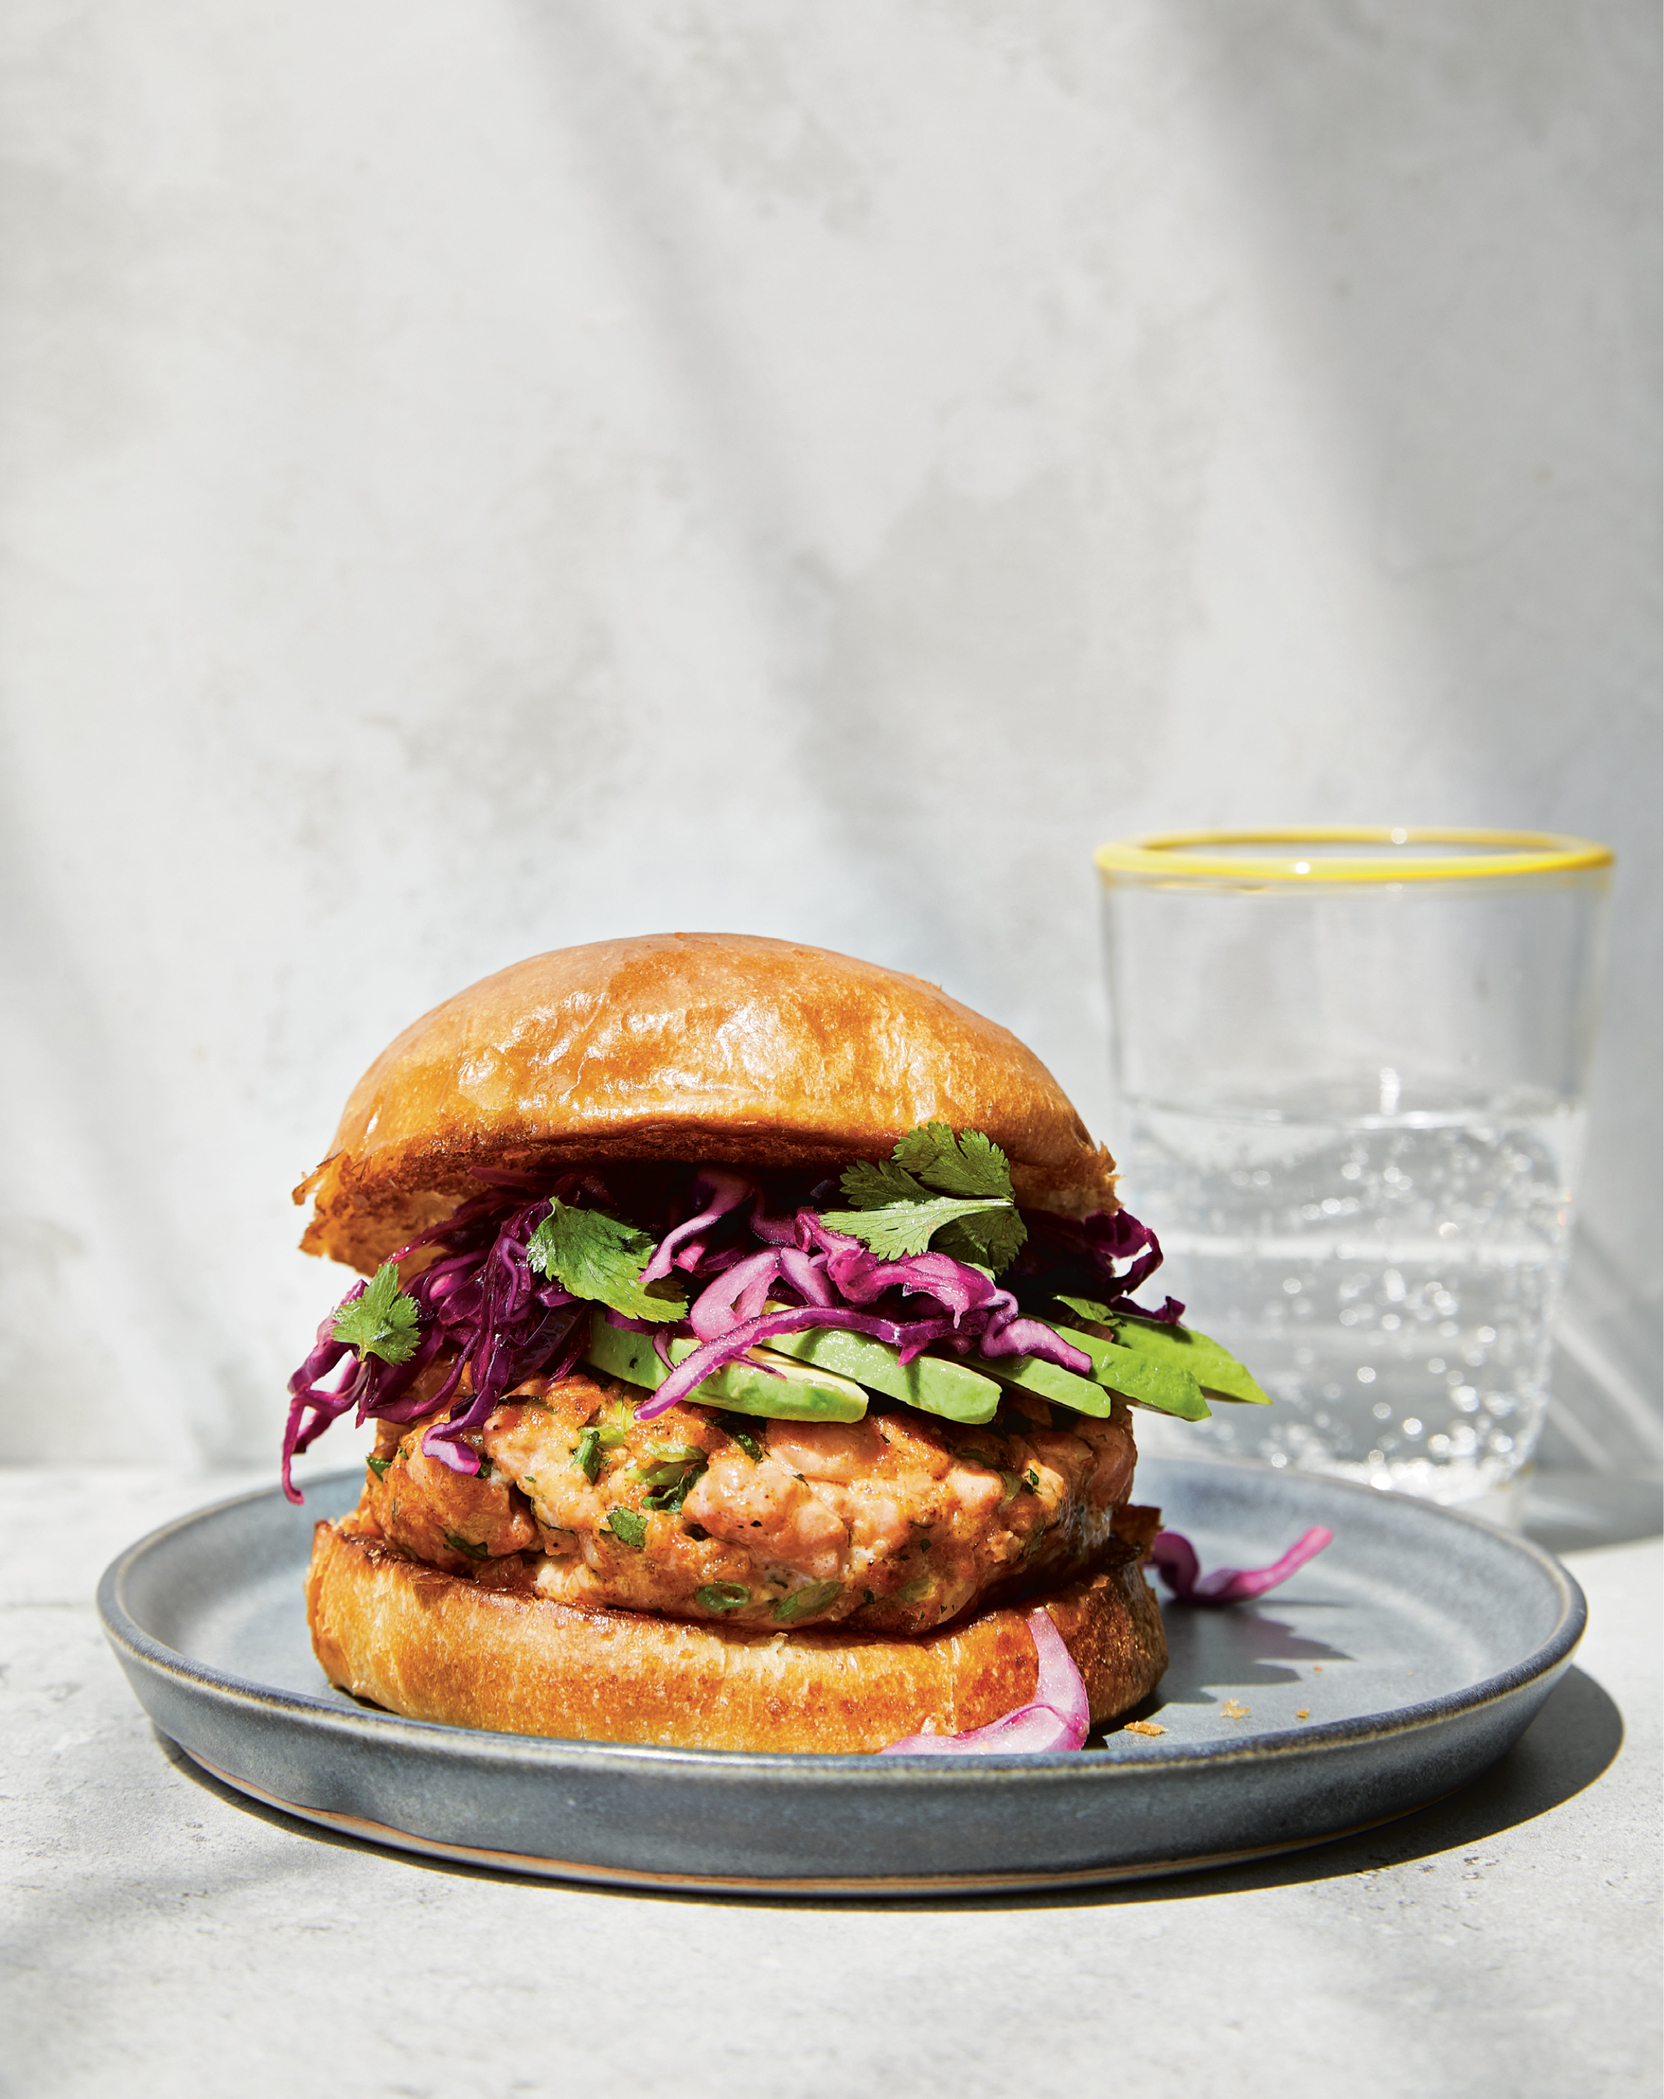
Salmon burgers are my new favorite way to eat salmon! The simple base for my burgers is usually wild salmon fillet and some type of binder such as bread crumbs or panko and egg. Then I just mix in different spice blends, herbs, and aromatics. These Southwest-style burgers are smoky with a little kick, and I pair them with a limey, crunchy cabbage slaw with cilantro and some creamy avocado in place of mayo. The burgers retain the salmon flavor and texture but don’t have an overpowering fishy taste, making it a great recipe for introducing salmon to kids or the non-fish eater in your life. You can also make the patties ahead of time and keep them frozen until you’re ready to cook.
SERVES 5
SLAW
2 cups shredded red cabbage
¼ cup thinly sliced red onion
¼ cup fresh cilantro leaves
1 tablespoon fresh lime juice
1 tablespoon extra-virgin olive oil
1 teaspoon apple cider vinegar
½ teaspoon kosher salt
SALMON PATTIES
1 pound wild salmon fillet, skin and bones removed
6 tablespoons panko bread crumbs, wheat or gluten-free
4 scallions, green parts finely chopped, white parts thinly sliced
1 garlic clove, minced
1 large egg, lightly beaten
1 tablespoon light mayonnaise
1 tablespoon fresh lime juice
1 tablespoon chopped fresh cilantro
½ teaspoon ground cumin
½ teaspoon chili powder
1 teaspoon smoked paprika
¼ teaspoon chipotle chile powder
⅛ teaspoon cayenne pepper
1 teaspoon kosher salt
Olive oil spray
5 whole wheat potato buns
5 ounces (from 1 medium) Hass avocado, sliced, for serving
FRIDGE: COOKED PATTIES UP TO 3 DAYS
FREEZER: COOKED PATTIES UP TO 6 MONTHS; UNCOOKED PATTIES UP TO 3 MONTHS
Prepare the slaw: Combine the cabbage with the onion, cilantro, lime juice, olive oil, apple cider vinegar, and salt. Refrigerate until ready to eat the burgers.
Prepare the salmon patties: Cut off a 4-ounce piece of salmon and transfer it to a food processor. Pulse until it becomes pasty. This consistency will help hold the burgers together. With a knife, chop the remaining salmon into a small dice.
In a medium bowl, combine the salmon with the panko, scallions, garlic, egg, mayo, lime juice, cilantro, cumin, chili powder, paprika, chipotle chile powder, cayenne, and salt. Toss gently to combine. Form the mixture into 5 patties. Refrigerate for at least 30 minutes before cooking.
To cook the patties in a skillet, heat a large skillet over medium-low heat and spray with oil. When hot, cook for 5 to 6 minutes on each side, until browned and cooked through.
To air-fry, preheat an air fryer to 400°F and cook the burgers in batches for 5 to 6 minutes on each side, until golden and cooked through.
SERVE NOW: Transfer each patty to a bun and serve with ⅓ cup cabbage slaw and 1 ounce avocado.
FREEZE AND SERVE LATER: Store uncooked patties in an airtight freezer bag or container in single layers, separated by parchment paper, and freeze. Thaw the patties for 24 hours in the refrigerator before cooking and serving according to the recipe instructions.
Per Serving (1 burger) • Calories 360 • Fat 16.5 g • Saturated Fat 2.5 g • Cholesterol 88 mg • Carbohydrate 27 g • Fiber 5.5 g • Protein 27 g Sugars 6 g • Sodium 567 mg