
Few culinary skills are involved when it comes to making sausage. There’s no spinning a swan from molten sugar or folding layers of puff pastry. It takes some basic equipment, most of which you likely have and some of which you can improvise. It takes some ingredients—fresh ones you’ll need to buy and dried herbs and spices you probably have in the pantry. And making sausage takes some time. Read this chapter through in its entirety to introduce yourself to the simple process of sausage making.
You don’t need much, and most items will already be on hand.
Kitchen scale. Absolutely necessary to make sure you have the correct amounts of meats and fat per recipe; sausage is not a food that should be “eye-balled” to determine your amount. The scale should be capable of weighing food up to five pounds.
Measuring cups and measuring spoons. An extra set of spoons means that one set can be used for liquid ingredients, the other for dry seasonings.
Good knives. These are essential for all cooking, including making sausage. Keep them sharp.
Kitchen twine. This used to be found in all kitchens, but a recent survey of my friends revealed that it no longer was, so buy some at a hardware or housewares store.
Instant-read thermometer. Along with good knives, this is essential. If you don’t have one, here’s a good excuse to buy one. Instant-read thermometers are how you determine if the sausages are cooked to a safe internal temperature.
Candy thermometer. Sometimes called a frying thermometer, it clips to the side of a pot. You’ll use this to check the temperature of the water when poaching sausages. If you don’t want to invest in one, keep popping your instant-read into the pot to keep the water at the correct temperature.
Kitchen funnel. You’ll need this to flush out the casings. The nozzle should be narrow so as to not break the fragile casings.
Lots of kitchen towels or a roll of paper towels. Making sausage is messy, and you’ll constantly be washing your hands during preparation.
Even if you’re planning on using pre-ground meat, a meat grinder is a good idea because it can also be used to stuff sausage casings. The food processor is a great grinding alterative. My food processor is so important in my kitchen that it has a reserved corner of the dishwasher; it’s in there every time the dishwasher is run.
Sausage can be made in a food processor using the on-and-off pulse button, but it takes much longer than using a meat grinder because the ingredients are ground in small batches. A food processor is necessary for making seafood sausages. If you end up a serious sausage maker, chances are good you’ll end up with a grinder. Make sure whatever grinder you buy has both a fine and coarse grinding plate; you’ll need both for the recipes in this book.
Hand grinders. These are what Grandma used before there was such as thing as pre-ground beef in the market, and they can be purchased for very little money. They clamp on to a table or the edge of the counter, and your biceps get a good workout using them. Make sure the grinder is made from steel, not plastic; plastic is just not strong enough.
Mixer grinding attachments. If you have a sturdy stand mixer, such as those made by KitchenAid, a meat grinder attachment can be purchased. The cost is the same as a good hand grinder. I use one and recommend it without hesitation.
Electric grinders. Here’s where you can spend some big bucks, so be sure you’re going to make a lot of sausage before buying one.
As I wrote in the introduction, there’s no need to stuff casings to enjoy most of the recipes in this book. Unless the sausages are poached or baked slowly in the oven, the meat mixture can be formed into patties. But when a set form is desired, you need some device with which to stuff the sausage and some sort of casing into which it can be stuffed. As with meat grinders, there’s a wide range of appliances that are united by the use of a long funnel, the stuffing horn.
Hand-held funnels. These are about 6 inches long, come in various widths, and correspond to the size of sausage casings. Most funnels are made from plastic, and they’re very inexpensive. They’re fine for a small amount of sausage of two pounds or less, and if you place one through the opening at the end of a pastry bag it works very well.
Mixer stuffing attachments. If you have the meat grinding attachment for a stand mixer, for about ten dollars you can get the sausage stuffing attachment, and the problem is solved.
Hand stuffing machines. These come as both push machines with a lever that pushes the mixture into the casings and crank models that push the meat in with a plunger as the crank is turned.
Historically, sausages were the first “fast food.” They were hand-holdable, and the packaging was edible too. Keeping that in mind, it’s not surprising that the intestines of pigs, cows, and sheep became part of the equation and are still the best casings.
My first choice is medium-size hog casings, followed by thin sheep casings. If you’re only going to buy one, make it hog casings; if you fill them with less meat mixture you can make sausages as thin as those formed in a sheep casing. One pound of sausage mixture fills about two feet of hog casings and about four feet of sheep casings. While my local supermarket carries hog casings, I realize that’s not the case everywhere. Look at the Resources to order casings. Collagen casings are also available. They’re natural because they’re made from the connective tissue of animals. Collagen is the tissue that turns meltingly tender when meat is braised and it turns into gelatin. Collagen casings don’t stretch like natural casings, making them difficult to work with.
So you open up your package of casings, and what do you find? A bunch of yucky-looking strands about the width of linguine. They’re gritty because they’re packed in coarse salt. Sausage casings can be kept refrigerated in that state up to six months; the salt acts as a preservative.
Here’s how to prepare casings so they’re ready for stuffing:
1. Gently pull strands off the hank. Depending on the brand you buy, they may either be tied together in the center with a plastic twist tie or just a mass of strands in a plastic bag.
2. Rinse the exteriors well under cold running water. This is the first step to riding them of excess salt and making them pliable.
3. Put the casings in a bowl, cover with lukewarm water, and soak for 20 minutes. The meat for almost all sausage recipes chills for 30 minutes prior to grinding it, so this soaking doesn’t slow down the process.
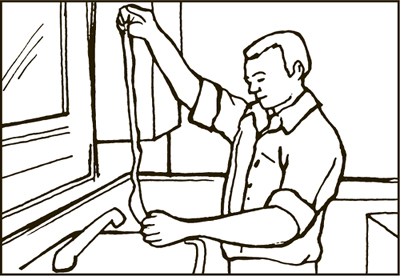
4. Rinse them inside with cold water. If you think that those plastic bags in the produce section of the supermarket are hard to get open, they’re a snap compared with a length of sausage casing! Start by cutting off a snip from one of the ends, and have a kitchen funnel handy. Pull apart the newly cut top of the casing, and insert the tip of the funnel. Pull about 3 inches of casing onto the funnel. Make sure your sink is empty, because this next part is similar to filling up water balloons; you want to slowly run cold water through the funnel to rinse the salt out of the interior of the casing, straighten the casing, and make it wider. While doing this, the casing will be flying all over the sink. You’ll soon get the hang of it. Then remove the casing from the funnel.
5. Put the casings in a bowl, cover with lukewarm water and 1 tablespoon distilled white vinegar, and soak until you need them. The vinegar both softens the casings, and makes them more transparent so they look nicer on the finished sausages. You can soak them this way for up to 30 minutes.
Each chapter in Part I of this book suggests the appropriate cuts of meat to use for each category of sausages. Once your shopping is done, you’re ready to begin making sausages.
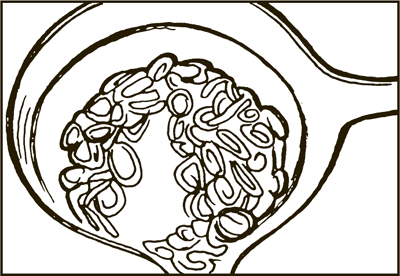
1. Cut the meat. Cut the meat with a sharp knife into 1-inch cubes; that size works for all meat grinders and a food processor.

Meat should be cut into 1-inch cubes to make grinding easier.
2. Season: when and how. There are two schools of thought on when the best time is to season meat, and I use both of them. Once the meat is cut, either transfer it to a mixing bowl and add dry seasonings, salt, and pepper, or add those seasonings after the meat is ground and you’re blending it. I pre-season meat if the recipe specifies a large number of herbs and spices, and after for only a few. The reason is that seasoning prior to chilling is an additional step. You toss everything together in a mixing bowl, and then transfer the seasoned cubes to a baking sheet.
Meat can be seasoned before chilling.
3. Chill the meat. Arrange the meat cubes on a sheet of plastic wrap on a baking sheet, and place the cubes in the freezer for 30 minutes. Do not eliminate this step. Whether using a meat grinder or a food processor, cold meat is easier to grind.
4. Chill the mixing bowl. While the meat cubes chill, put the mixing bowl that will hold the ground meat into the freezer. A cold bowl keeps the meat cold while blending and stuffing.
5. Keep going. For many of these recipes vegetables are sautéed in oil or butter while the meat is chilling. Read the recipe from beginning to end, and see if there’s something you should be doing rather than watching the clock.
While the meat chills is the time to sauté any additional ingredients.
6. Grind the meat. If using a meat grinder, read the recipe carefully to see if it specifies a coarse or a fine blade. Then grind the meat, pressing the meat down into the grinder mechanism with the plunger given for that purpose. NEVER PUT YOUR HANDS INTO A MEAT GRINDER. If using a food processor, add only 1/2 to 3/4 cup of meat cubes at a time, and chop them using the on-and-off pulse button. In either case, the ground meat will go into the chilled bowl.
7. Mix it together. Add all other ingredients to the meat, and knead the mixture with your hands until everything is well distributed. I keep a bowl of hot water with a tablespoon or two of white vinegar next to me along with a kitchen towel so that if I need to rinse my hands to fetch an ingredient or answer the phone it’s handy.
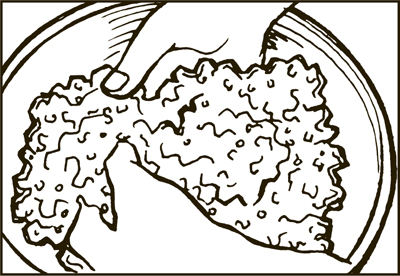
The sausage mixture should be kneaded with your hands to blend it totally.
8. Taste for seasoning. Here is one rule of sausage making that should NEVER be broken: You don’t taste raw sausage mixture. For all meat mixtures, fry one tablespoon portion in a small frying pan; for seafood mixtures I cook the test sample in a microwave because all of those formulations are poached. Once you’ve cooked a bit, taste it. Then adjust the seasoning as needed. My recipes are written for a minimum of salt; if you want more, then add it. If you’re turning your sausage into patties, skip to Step 12.
9. Arrange the casing. The first step is to bunch up the casing on the funnel of whatever device you’re using to stuff the sausages. Pull one strand out of the water, and rinse it again under cold water, and pat it dry with a towel. If necessary, cut another bit off one end to be able to open it fully. The trick to easing the casing over the sausage horn is to do it slowly and carefully. Use one hand to keep the casing straight and feed it to the other hand that eases it over the stuffing horn.

The casing must be eased gently onto the stuffing horn.
10. Stuff the sausage. With the casing on the stuffing horn, pull the end of the casing about 3 inches down. Feed enough forcemeat into the horn so that it starts to enter the casing. Then tie a knot in the casing. You have to regulate the flow of forcemeat as it enters the casing to determine how tightly packed the sausage is. Hold the casing on the stuffing horn with your thumb and forefinger. Increasing or decreasing finger pressure on the casing will determine how tightly and consistently the sausage is packed. Keep filling the casing, holding on to the horn so that the casing fills evenly; you want it full but not bursting. Once all the forcemeat is inserted into the casing, take a minute to even out the width of the sausage. Then tie a knot in the casing at the other end leaving about 3 inches of casing unstuffed.
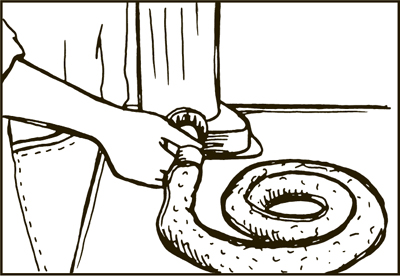
Hold onto the casing so that the sausage fills evenly.
11. Link the sausage. At this point you have one long link of sausage. Each recipe gives a specific length for the links; they vary from 4 to 6 inches with the majority linked at 5 inches. Until you become accustomed to judging lengths, put a ruler on the counter in front of you. Measure off the length of your link, and then twist the link three or four times. Continue in the same manner down the whole coil. The extra casing at the end of your coil is to compensate for the amount of casing used in twisting. Chances are there will be almost no empty casing by the time you finish. If the links are going to be poached, use some kitchen twine and tie off each link with a knot. If not, cut apart the links.
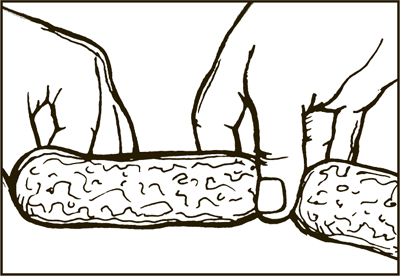
Sausage is linked by twisting lengths with your fingers.
12. Let the sausage “rest.” Just as roasted meats need time to allow their juices to be reabsorbed, sausages benefit from time to allow the flavors to blend. For bulk sausage, if you can wait even 30 minutes before cooking, they’ll taste even better. For links, refrigerate them overnight to allow the casings to dry; this will result in crisper casings when the sausages cook. Arrange the links on a wire cooling rack placed over a baking sheet, and refrigerate the sausages. This resting period is not as important for sausages that are poached or oven-baked as it is for links cooked with high-heat methods like grilling and broiling.
Here are some problems frequently encountered during this process, and what to do if . . .
The meat grinder stops working. If using the fine blade of a meat grinder, it can get clogged from time to time. Unscrew the cap holding the blade in place, use a metal skewer or toothpick to clean out the clogs, wash the plate well with hot water, and replace it onto the meat grinder.
The casing breaks. And this will happen. Sometimes it’s because there was a small tear in the actual casing, and many times you’ll find this out when flushing the casings with water. If that’s the case, just cut it at that point. If it happens when you’re midway through making a coil, stop stuffing immediately, and empty about 3 inches of filled coil. Tie off the coil, and begin again with the portion of casing remaining on the sausage horn. Casing is very inexpensive, so if I’m near the end of one when a rip occurs, I’m just as likely to throw out what’s left and begin with a new casing.
There are air bubbles in links. A common problem, especially at the beginning of a coil. Just take a straight pin or a metal skewer, and bust the bubble.
The casing isn’t filling evenly. It’s difficult to fill evenly at the beginning, before enough casing is filled so that the sausage coils onto the counter. Build a platform with an overturned pot with a plate on top of it to hold the sausage and place it right under the stuffing horn to make filling easier.
Most sausages are raw once filled in casings or shaped in patties, and they need thorough cooking before you can enjoy them. Each recipe is annotated with the temperature the sausage should be; most are cooked to 160°F, while poultry sausages, like poultry itself, must be cooked to 165°F.
Cooking in the bulk sausage category is a no-brainer, because it’s either crumbled and browned in a pan or shaped into patties and cooked. I treat patties like burgers. Shape into about 1-inch thick, and make an indentation with your thumb on one side; this keeps them from creating a dome when cooking them.
Broil, grill, or pan-fry the patties over medium-high heat, beginning with the side with the indentation facing up, until the desired temperature is reached. When cooking patties of beef or lamb sausage, I cook them medium-rare (about 130°F) rather than well done. If there’s egg in the sausage mixture it should be cooked to 160°F.
There are many ways to cook raw sausage links, and each has its fans. If cooking them over high heat, prick them first with a toothpick or skewer, like a baking potato, to avoid explosions. Here’s a summary of ways to reach your goal of a wonderful sausage:
Fry over low heat. Place the sausages in a heavy skillet over low heat, and allow them to cook up to 20 minutes, uncovered, turning them gently with tongs only after one section has crisped.
Fry in two steps. Place the sausages and 1/2 cup water in a cold skillet. Cover the pan, bring the water to a boil over medium-high heat, then reduce the heat to low and simmer the sausages for 10 minutes, turning them occasionally. Then drain the liquid from the pan, and cook over medium-high heat, uncovered, for 5 minutes, or until browned, turning them gently with tongs.
Simmer and roast. Prick the sausages evenly all over, and simmer them covered with water for 5 to 10 minutes, depending on the diameter; the simmering begins the cooking process and also removes some of the fat. Then roast them in a 475°F oven for 5 to 10 minutes, or until browned and crisp. If using this method, the two operations should happen in rapid succession. Don’t refrigerate partially cooked sausages.
Bake in a hot oven. Preheat the oven to 425°F, and prick the sausages. Bake them for 12 to 18 minutes, depending on thickness, turning them with tongs midway as the sides brown.
Broil in the oven broiler. Prick the sausages evenly on all sides, and broil them 4 to 6 inches from the broiler element for 5 to 7 minutes, or until cooked through and no longer pink, turning them with tongs to brown on all sides.
Grill on a charcoal or gas grill. I’ve seen recipes that suggest splitting the sausages open to grill them flat, and I’d love to press charges about sausage homicide! Do prick them, but then cook them whole, uncovered if using a charcoal grill, on a medium-hot grill for 10 to 15 minutes, or until cooked. Turn them gently with tongs and not with a meat fork or fat will drip into the fire causing flare-ups.
Hot smoke on a covered grill. Prepare a grill for indirect cooking, which means there’s part of the grate not over either lit charcoal or a live gas flame. If using a charcoal grill, soak 2 cups of wood chips in water to cover for 20 minutes; if using a gas grill, create a tin-foil packet for the dry chips to enclose them, and poke holes in the packet. Place the chips or chip packet on the hot side of the grill, and then place the sausages on the cold side of the grill. Cook them for 20 to 30 minutes, turning them halfway through and rearranging them so those closest to the fire are on the periphery, or to the correct internal temperature.
Poach in simmering water. To poach sausages, bring a large pot of salted water to a boil over high heat. Add sausages, and maintain water at a bare simmer. Cook sausages for 20 to 25 minutes, or until firm. Remove one sausage to a plate with tongs and insert an instant-read thermometer. If the temperature is 160°F, sausages are done. If not, return to the pot and continue cooking. Remove sausages from the pan with tongs, and serve immediately or cool to room temperature, lightly covered with plastic wrap, and refrigerate.
Many sausages, like Boudin Blanc and Andouille are completely cooked by poaching or slow oven-baking during the production process. These sausages are all in casings because it’s impossible to poach or bake a sausage in bulk form.
Although you can eat them right from the pan or reheat them, I brown them gently as a way to reheat them and give them some texture—a crisp casing and a soft filling.
Heat a few tablespoons of olive oil, butter, or a combination of the two in a skillet over medium heat. Then add the sausage links, and cook them, uncovered, turning them gently with tongs. By the time they’re evenly brown, they’ll be heated through to the center.
One of the best reasons to make your own sausages is to keep them free from additives and preservatives. Because that’s important to me, none of the recipes in this book are made with curing salts, nitrites, or nitrates. While the FDA and the USDA have judged sodium nitrite to be a “safe ingredient,” I don’t agree. That’s why, rather than cold-smoking sausages, they’re cooked for many hours in the oven at a low temperature.
The first—and most important—requirement for good cooking is knowing the basic rules of food safety, whether cooking sausage, roasting meat, or using eggs. Food safety begins with trips to the supermarket and ends once leftovers are refrigerated or frozen at the end of a meal.
While the following tips may seem like common sense, this food writer has heard horror stories about people who have been come very sick from food-borne illnesses.
Shop safely. Most supermarkets are designed to funnel you into the produce section first. But that’s not the best place to start. Begin your shopping with the shelf-stable items from the center, then go to produce, and end with the other refrigerated and frozen sections. Never buy meat or poultry in a package that is torn and leaking. Place all meats and poultry in the disposable plastic bags available in meat and produce departments. Check the “sell-by” and “use-by” dates, and never purchase food that exceeds them. The case is always stocked with the least fresh on top, so dig down a few layers to find packages with more days of life in them. For the trip home, keep an insulated cooler in the back of your car if it’s hot outside or if the perishable items will be out of refrigeration for more than an hour. In hot weather, ask someone in the seafood departments to put the wrapped fish or shellfish in a separate bag with crushed ice.
Banish bacteria. While fruits and vegetables can contain some bacteria, it’s far more likely that the culprits will grow on meat, poultry, and seafood. Store these foods on the bottom shelves of your refrigerator so their juices don’t accidentally drip on other foods. And keep these foods refrigerated until just before you cook them. Bacteria multiply at room temperature. The so-called “danger zone” is between 40°F and 140°F. As food cooks, it’s important for it to pass through this zone as quickly as possible.
Avoid cross-contamination. Cleanliness is not only next to godliness, it’s also the key to food safety. Wash your hands frequently with soap and water while cooking. Never touch cooked food if you haven’t washed your hands after handling raw food. This rule is especially important when making sausage because you’re handling raw food a lot. The cooked-food-and-raw-food-shall-never-meet precept extends beyond the cook’s hands. Clean cutting boards, knives, and kitchen counters often. Don’t place cooked foods or raw foods that will remain uncooked (such as salad) on cutting boards that have been used to cut raw meat, poultry, or fish. Bacteria from raw animal proteins can contaminate the other foods.
All of my recipes include the number of servings, which is usually given as a range. If the dish is part of a multi-course meal—or if your table will be occupied by eaters with small appetites—the yield can be “stretched” to feed more people. The recipes for sauces and stocks are given as yields of cups or quarts.
“Active time,” the second annotation, is the amount of hands-on prep time needed in the kitchen when you’re slicing and dicing. Use these times as general guidelines; some people are faster in the kitchen than others.
The third annotation is “Start to finish,” the amount of time needed from the moment you start collecting the ingredients to placing the sausages on the table. The actual cooking time, as well as any time for chilling, is included in this figure. The unattended time is when you can be reading a book or readying other components of the meal.