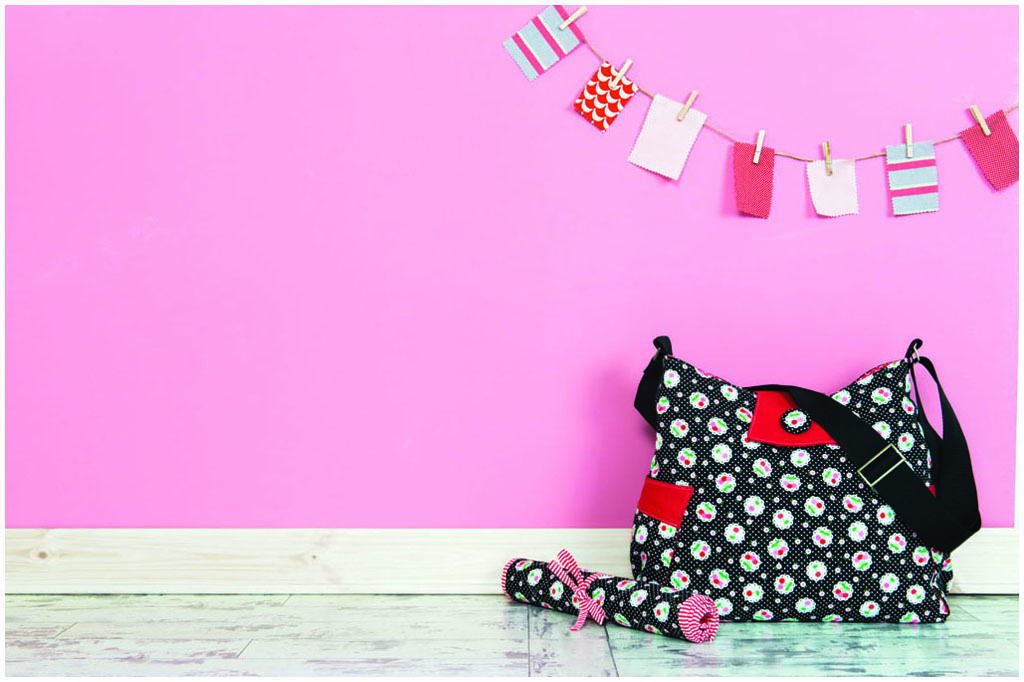
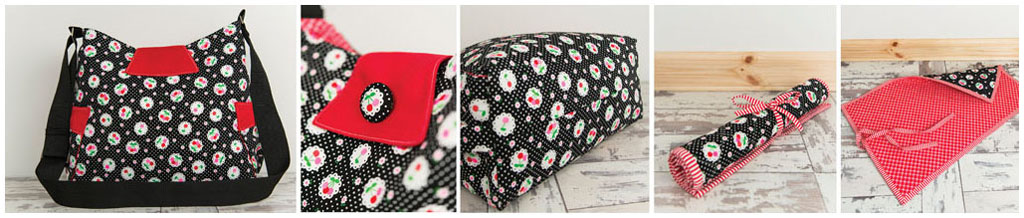
MOBILE MUMMY CHANGING BAG
When there are little ones in your life, it seems as if you need to carry everything! This smart changing bag with its cute cherry print detail is ideal for fitting in all those baby necessities. There are internal and external pockets for all the little essentials, such as soothers, rattles and snacks, plus a matching machine-washable changing mat to make change times a breeze. The generous strap can be adjusted to fit either over your shoulder or the pram.
SKILL RATING: 
You will need
- 91.5cm (36in) home décor weight non-directional print fabric for main bag and mat (for a directional print, you will need approximately 38cm (15in) more)
- 91.5cm (36in) red non-directional print lining fabric (any weight)
- 55cm (22in) solid red linen/cotton blend fabric for internal pockets and trims
- 1.4m (11⁄2yd) lightweight fusible fleece
- 53.5 × 33cm (21 × 13in) thin wadding (batting) for changing mat
- 1.65m (17⁄8yd) of 5cm (2in) wide black webbing for strap
- Two 5cm (2in) oblong rings
- 5cm (2in) oblong slide adjuster
- Large decorative button (I used a self-cover button)
- 2m (21⁄4yd) of 2.5cm (1in) wide bias tape, or enough fabric to make this for the changing mat
- 10cm (4in) hook and loop tape
Finished size: Changing Bag: 36 × 43cm (141⁄4 × 17in) including handle Changing Mat: 53.5 × 33cm (21 × 13in)
Cutting
- Trace all of the Mobile Mummy Changing Bag templates (see Pattern Pullout Sheet) onto tracing paper or template plastic, transferring all the markings and cutting them out around the traced lines.
- From the home décor weight print fabric, cut two 16.5 × 23cm (61⁄2 × 9in) pieces for the external pockets. Trace the main bag template twice onto the remaining fabric and cut out along the traced lines. Cut one panel measuring 52.5 × 32.5cm (21 × 13in) for the changing mat.
- From the red non-directional print lining fabric, cut one panel measuring 53.5 × 33cm (21 × 13in) for the changing mat. Trace the main bag template twice onto the remaining fabric and cut out along the traced lines.
- From the solid red linen/cotton blend fabric, cut two strips measuring 23 × 7.5cm (9 × 3in). Next cut four panels measuring 34.5 × 25cm (131⁄2 × 10in) for the internal pockets. Trace the pocket template and the closure flap template twice and cut out along the traced lines.
- From the lightweight fusible fleece, trace the main bag template four times and cut out along the traced lines. Now cut two panels measuring 34.5 × 25cm (131⁄2 × 10in) for the internal pockets. Trace the closure flap template once and the pocket template twice and cut out along the traced lines.
Preparation
- Interface the main bag pieces, main bag lining pieces, two internal pocket pieces and one closure flap piece with matching lightweight fusible fleece pieces.
- If you are using a self-ßcover button, interface a decorative cut scrap of the main bag fabric with fusible fleece and use to cover the button, following the manufacturer’s instructions.
When tracing the main bag template twice onto fabric you will need to position the template sideways in order to fit two within the width.
Construction
5mm (1⁄4in) seam allowance included.
CHANGING BAG
- Place one of the 16.5 × 23.5cm (61⁄2 × 9in) external pocket pieces on top of one of the 23.5 × 7.5cm (9 × 3in) red fabric strips, with right sides together. Sew together along one 23.5cm (9in) edge and press. Trace the pocket template (see Pattern Pullout Sheet) onto this, so that the marked line meets the seam in the fabric. Cut out along the traced line then interface with one of the matching pieces of fusible fleece. Topstitch the seam along the red fabric seam of the pocket. Repeat to create the second pocket front.
- Place one of the pocket pieces created in Step 1 on top of one of the red pocket lining pieces, with right sides together. Sew the pocket together by stitching along the side and top edges only. Snip the corners, turn and press, then topstitch the pocket along the top curved edge. Repeat to create the second pocket.
- Take one of your pockets and following the markings on the pocket template piece (see Pattern Pullout Sheet), fold both layers of fabric from the centre markings out to meet the outer markings. This will create two pleats, as shown in the photograph. Tack (baste) the pleats in place along the raw edge (see Useful Stitches). Repeat for the second pocket.
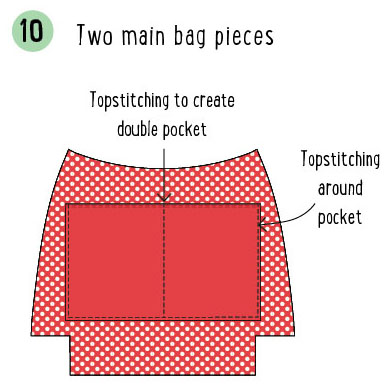
- Centre the ‘loop’ half of the hook and loop tape length onto one of the main bag pieces, 6cm (21⁄2in) down from the top raw edge. Topstitch into place (see Useful Stitches), as shown, to create the bag front.
- Place the two main bag pieces on top of each other, right sides together. Sew them together along one side edge only and press. Place this on your work surface, right side up, and then centre one of your pockets over the seam, as shown. Ensuring that the bottom raw edge of the pocket meets the raw edge of the bag, topstitch the pocket along the side edges onto the main bag.
- Place the main bag pieces right sides together again, then sew the remaining side edges of the bag together. Position the remaining pocket onto this side seam and sew onto the bag as in Step 5.
- Position the bag front and back on top of each other evenly again, then sew the bottom edge only together. You will have a remaining unsewn angled section between the bag sides and bottom.
- Sew the bottom box corners together (see Box Corners), capturing the bottom edge of the pockets in the process.
- Take one of the interfaced and one of the non-interfaced internal pocket pieces and place them on top of each other, right sides together. Sew together along all four edges, leaving a 10cm (4in) gap in the centre bottom for turning. Snip the corners, turn and press. Topstitch the top 33cm (13in) edge with a double row of topstitching. Repeat to create the second pocket piece.
- Take one of the bag lining pieces, right sides up, and place the pocket centrally on top of this, also right side up. Position the pocket approximately 7.5cm (3in) from the top lining edge and topstitch in place along the side and bottom edges only to create a large internal pocket. Repeat with the second bag lining piece and internal pocket, this time adding another row of topstitching from the centre top to the centre bottom to create a double pocket, as shown.
Feel free to add extra rows of topstitching to one or both of your pockets to create custom-sized sections for those smaller often-used items.
- Place the two bag lining pieces on top of each other, right sides together. Sew the lining front and lining back together along the side and bottom edges, this time leaving a 20cm (8in) gap in the centre of the bottom edge for turning. Now sew in the box corners as you did for the main bag in Step 8.
- Thread a 7.5cm (3in) length of black webbing through one of the oblong handle rings. Fold the webbing onto itself and tack (baste) the raw edges together, securing the ring. Position the ring holder on top of one of the main bag side seams, so that the raw tacked (basted) edge of the webbing meets the top raw edge of the bag side. Tack (baste) into place. Repeat to create the ring holder on the other side of the bag.
- Keeping the main bag right side out and the lining bag right side in, place the main bag inside the lining bag. Sew the main bag and lining together all the way along the top edges. Turn right side out and ladder stitch the opening in the lining closed (see Useful Stitches).
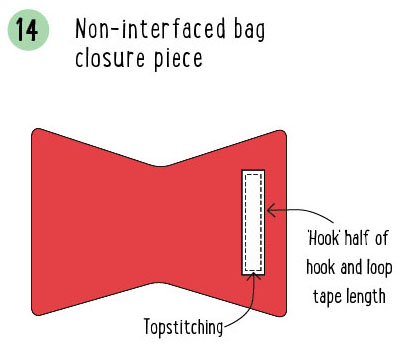
- Centre the ‘hook’ section of the hook and loop tape on top of the non-interfaced bag closure piece, 2.5cm (1in) from one straight edge Topstitch in place, as shown.
When sewing the back section of the closure flap in place, make sure that the lining is sitting flatly and neatly underneath to avoid messy or puckered lining.
- Place the two bag closure pieces on top of each other, right sides together. Sew together along all edges, leaving a 5cm (2in) gap along one edge for turning. Snip the corners, turn and press, then topstitch along all edges. Attach the closure flap edges to the bag front with the hook and loop tape. Fold the other side over to the bag back and pin in place where desired. Topstitch the back section of the closure flap to the bag back.
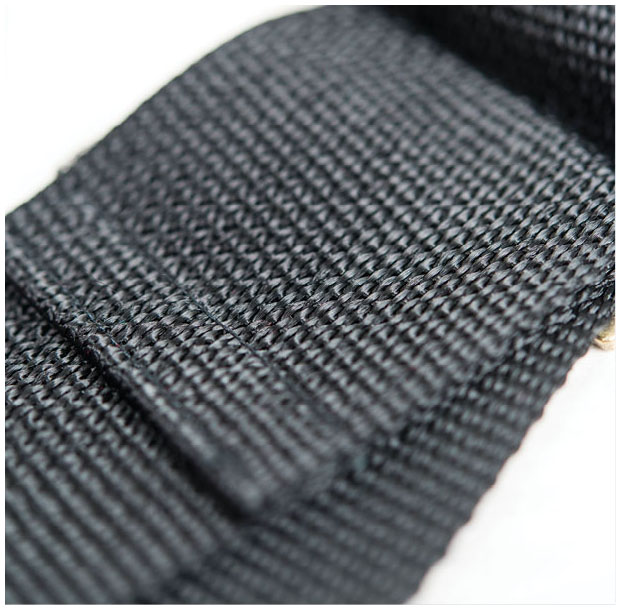
- Take a 1.5m (11⁄2yd) length of black webbing, attach one end of the strap to the slide adjuster (see Adjustable Straps) then attach to the two oblong rings. To finish the raw ends of the webbing, simply fold under the raw edge and topstitch in place, as shown in the photograph.
- Sew the covered button to the front of the closure flap as desired. This is purely decorative.
CHANGING MAT
- Take the two pieces of remaining fabric for the changing mat. Make a sandwich with the outer fabric, wadding (batting) and internal fabric, so that both pieces of fabric are rights sides out. Pin well, then quilt the three layers together as desired. I quilted mine with a 5cm (2in) diagonal grid.
- Take two 33cm (13in) lengths of bias tape, open up one end and fold the raw edge in. Refold the bias tape, fold the strip in half along the entire length, right sides out, and press well. Topstitch the bias tape in this folded position to create one tie and repeat to create a second tie. Place the two ties on top of each other so that the raw ends meet and tack (baste) the raw ends together. Place the ties onto the outer side of the changing mat so that the raw edges meet the centre top raw edge of the quilted mat and tack (baste) in place.
- Take the remaining length of bias tape, fold along the entire length, right sides out, and press. Use this length of bias tape to bind the changing mat (see Topstitch Binding), mitring the corners as you go (see Mitring Corners).
- To finish, roll up the changing mat and secure in place with a bow using the two ties.