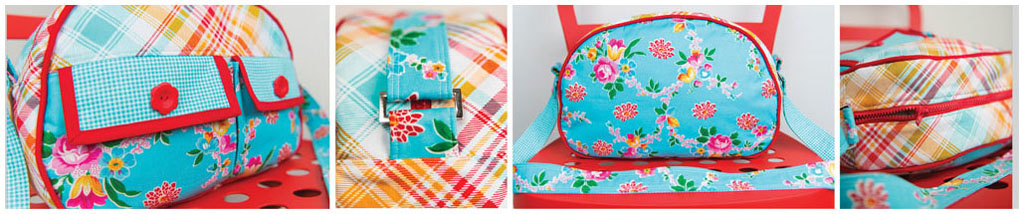
SUGAR SWEET SHOULDER BAG
This adorable shoulder bag has to be one of my favourite designs. With its pretty fabrics, floral button details and cute pastel colour scheme it has a real vintage feel, while doubling up as the perfect practical handbag for everyday use. The secure zipped-up main bag offers so much space and the easy access pockets on the front are handy for those small, often-used items. A bag that makes a bold statement!
SKILL RATING: 

You will need
- 30cm (12in) diagonal check patchwork fabric for main bag and handle
- 40cm (153⁄4in) blue floral patchwork fabric for bag back, pockets and handle
- 45cm (173⁄4in) blue micro gingham patchwork fabric for lining and pocket flaps
- 1 fat quarter (18 × 22in) plain red patchwork fabric (or 21⁄2m (23⁄4yd) premade red bias tape) for pocket flap binding
- 1m (40in) lightweight fusible fleece
- 2m (21⁄4yd) white cord to make piping
- Two magnetic closures
- Two medium red buttons
- Two 4cm (11⁄2in) oblong rings
- One 46cm (18in) minimum red zip
Finished size: 22.5 × 31.5 × 11.5cm (9 × 121⁄2 × 41⁄2in) excluding handles
Cutting
- Trace all of the Sugar Sweet Shoulder Bag templates (see Pattern Pullout Sheet) onto tracing paper or template plastic, transferring all the markings and cutting them out around the traced lines.
- From the diagonal check patchwork fabric, trace the bag top and bottom templates once and cut out along the traced lines. Cut one 54.5 × 12.5cm (211⁄2 × 5in) strip and two 39.5 × 6.5cm (151⁄2 × 21⁄2in) strips.
- From the blue floral patchwork fabric, trace the main bag template once and cut out along the traced line for the bag back. Cut two 40.5 × 16.5cm (16 × 61⁄2in) pieces for the front pockets, one 1m × 5cm (40 × 2in) strip for the handle and two 15 × 5cm (6 × 2in) strips for the ring holders.
- From the blue micro gingham patchwork fabric, trace the main bag template twice and cut out along the traced lines for the lining. Cut four 14 × 6.5cm (51⁄2 × 21⁄2in) pieces for the pocket flaps and one 1m × 5cm (40 × 2in) strip for the handle lining. Now cut one 54 × 12.5cm (21 × 5in) and two 39.5 × 6.5cm (151⁄2 × 21⁄2in) strips.
- From the plain red patchwork fabric, cut two 30 × 4.5cm (12 × 13⁄4in) strips for the pocket flap binding and four 3cm (11⁄4in) strips on the bias, each measuring 56cm (22in) in length.
- From the lightweight fusible fleece, trace the main bag template twice onto the folded fleece and cut out along the traced lines to make four pieces. Cut four 14 × 6.5cm (51⁄2 × 21⁄2in) pieces for the pocket flaps, one 15 × 5cm (6 × 2in) strip for the ring holders and one 1m × 5cm (40 × 2in) strip for the strap lining. Now cut two 54.5 × 12.5cm (211⁄2 × 5in) strips, four 39.5 × 6cm (151⁄2 × 21⁄2in) strips and a 40.5 × 16.5cm (16 × 61⁄2in) piece for the front pockets.
Preparation
- Take the main bag piece, lining pieces, 12.5cm (5in) strips, 6.5cm (21⁄2in) strips, pocket flap pieces, one of the front pocket pieces, one of the ring holder pieces and the main strap strip. Interface each piece with the matching lightweight fusible fleece pieces.
- Create two 1m (40in) lengths of piping with the red fabric bias strips and white cord (see Creating Piping).
Construction
5mm (1⁄4in) seam allowance included.
- Place two of the pocket flap pieces on top of each other, right sides out. Tack (baste) the side and bottom edges together (see Useful Stitches), leaving the top straight edge open.
If you have a bias tape maker you could alternatively use this to make your pocket flap binding.
- Fold a 30 × 4.5cm (12 × 13⁄4in) red patchwork binding strip in half along the length, right side out, and press. Fold the long raw edges into the fold and press again. Use this strip to bind the three tacked edges of the pocket flap (see Topstitch Binding). Mitre the corners as you go (see Mitre Topstitch Binding).
- Now insert the male side of one of the magnetic closures into the lining side of the pocket flap (see Inserting Magnetic Closures). The closure should be centred within the width and approximately 2–2.5cm (3⁄4–1in) up from the flap edge. Now sew a red button onto the front side of the flap in the same location as the closure, as shown in the photograph.
- Repeat Steps 1–3 to create the second pocket flap.
- Place the bag bottom piece right side up on the work surface. Position the two pocket flaps on top of this, also right side up. You should have a 1.5cm (1⁄2in) gap in-between the two pocket flaps, and the raw edges of the pocket flaps should meet the top raw edge of the bag bottom. Tack (baste)the pocket flaps into position, as shown.
- Place the bag top piece on top of the bag bottom piece, right sides together, so that the straight edges meet. Sew the bag top and bag bottom pieces together, capturing the pocket flaps in the stitching. Press the seams towards the bag top, interface with the remaining main bag fleece piece and then topstitch the seam at the bag top with a double row of stitches.
- Place the two blue floral front pocket pieces on top of each other, right sides together. Sew them together along one 40.5cm (16in) edge. Turn the pocket piece right side out, press, then topstitch the sewn edge with a double row of stitches. Mark a line down the centre of the pocket panel, from the topstitched edge down to the bottom raw edge. Now mark a line approximately 2–2.25cm (3⁄4–7⁄8in) away from the centre line on each side.
- Place the pocket panel on top of the bag front, both right sides up. Position the pocket panel so that it is approximately 3mm (1⁄8in) below the bag top seam (under the pocket flaps) and the marked centre line is centred between the two pocket flaps. Topstitch the pocket panel in place along the centre marked line, as shown.
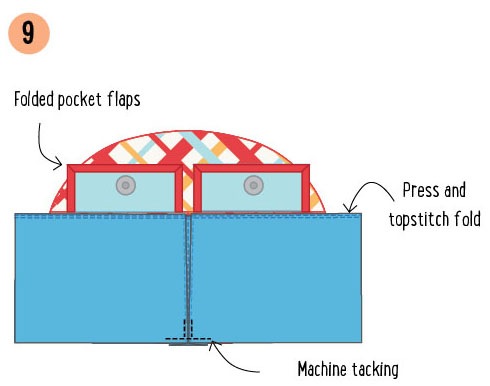
- Fold the pocket flaps up out of the way and then fold the front pocket panel, right sides out, along one of the previously marked lines. Press and then topstitch this fold close to the folded edge. Repeat with the remaining marked line. Now fold the two topstitched folds in to meet at the centre stitched line. Machine tack the bottom edge of the pockets into place, as shown. Secure them in place by sewing the bottom 2.5cm (1in) into place over the previous fold topstitching.
- Mark where the female ends of the magnetic closures should be placed, then insert them into the front side of the pocket panel (see Inserting Magnetic Closures). Trim the pocket panel to match the edges of the bag front and tack all loose edges together.
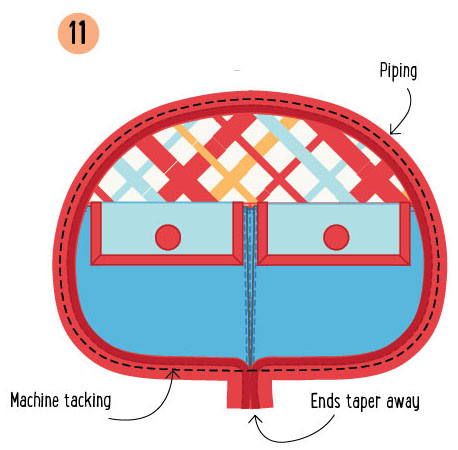
- Place one of the piping lengths, right sides together, around the entire edge of the bag front. The raw edge of the piping should lie against the raw edge of the bag front and the piping ends should taper away where they meet at the centre bottom, as shown. Machine tack the piping into place and trim the ends. Repeat with the bag back piece.
- Centre the zip on top of one of the 39.5 × 6.5cm (151⁄2 × 21⁄2in) check fabric lengths, right sides together, so that one long edge meets. Sew together using the zipper foot. Open the seam, right side out, and press, then topstitch the seam. Repeat with the remaining 39.5 × 6.5cm (151⁄2 × 21⁄2in) strip on the other side of the zip, ensuring that they are aligned. Shorten the zip to meet the ends of the fabric (see Shortening Zips).
- Place the two ring holder pieces on top of each other, right sides together. Sew together along both of the 15cm (6in) edges, then turn and press. Topstitch along both sewn edges then cut into two 7.5cm (3in) lengths.
- Thread one of the 7.5cm (3in) ring holder pieces through one of the oblong handle rings. Fold the fabric onto itself, enclosing the ring then tack the raw edges together. Place the ring and holder on top of one end of the zip panel, right sides together and tack in place, as shown. Repeat this step with the remaining ring and tack to the other side of the zip panel.
- Place the zip panel and the remaining 54.5 × 12.5cm (211⁄2 × 5in) check fabric panel on top of each other, right sides together. Sew together along both 12.5cm (5in) edges to create a gusset ring – this stitching will also secure the ring holders in position. Topstitch this seam.
Be very careful not to break your needle on the teeth of the zip!
- Take the bag front and ease one raw side of the gusset ring into place, right sides together, all along the bag front edges. Ensure that the centre top of the bag front is meeting the centre of the zip. Once you are happy with the fit, tack and then sew the gusset neatly and evenly in place. Go over the stitching twice if you need to get closer to the piping. Ensuring first that the zip is partly open for turning, repeat this with the bag back and the remaining edge of the gusset.
- Take one of the 39.5 × 6.5cm (151⁄2 × 21⁄2in) blue gingham fabric strips and fold under one long edge by approximately 1.5cm (1⁄2in). Press well. Repeat with the remaining strip of the same size.
- Place the 54.5 × 12.5cm (211⁄2 × 5in) gingham fabric strip right sides together with the two folded under strips created in Step 17. There will be approximately a 2cm (3⁄4in) gap in-between the two thinner strips. Sew the ends together to create a gusset ring without the zip, as shown. Topstitch the seams to the 12.5cm (5in) wide panel side.
- Sew the lining gusset into place with the lining front and back, as you did for the main bag in Step 16. Keeping the main bag right side out and the lining bag right side in, place the lining bag inside the main bag. Neatly and evenly pin the folded under edge of the lining opening around the zip. Ladder stitch the lining in place all the way around the zip (see Useful Stitches).
- Place the strap and strap lining strips on top of each other, right sides together. Sew together along all four edges, leaving a 5–7.5cm (2–3in) gap in one long edge for turning. Snip the corners and turn right side out (see Turning Handles). Press well then topstitch the strap along all four edges.
- Insert one end of the strap strips into an oblong ring at one side of the bag. Fold the end under to enclose the rings by approximately 2.5cm (1in), then topstitch the end in place. Repeat on the other side.