CHAPTER ELEVEN
MODERN SCENIC PRODUCTS AND TECHNIQUES
Never has it been easier to make great-looking scenery.
Making scenery has never been so enjoyable. There is a huge array of products from which to create great-looking scenics. Ranging from laser-cut plants through to trees that actually look like trees, our scenery can be made to look very realistic.
WHAT MODERN PRODUCTS ARE AVAILABLE?
Following is a summary of the products that are now available for scenic modellers.
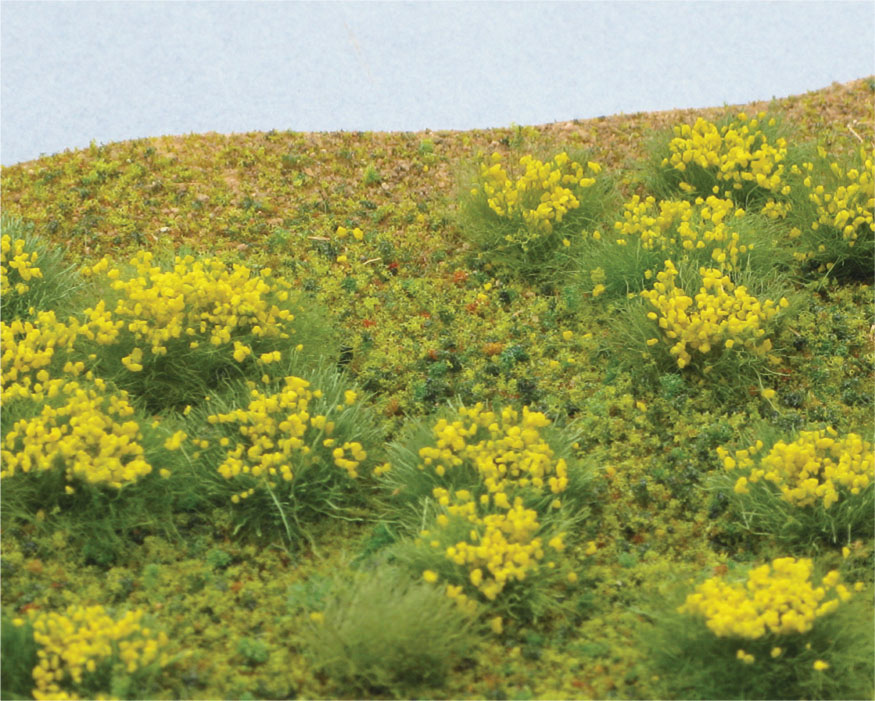
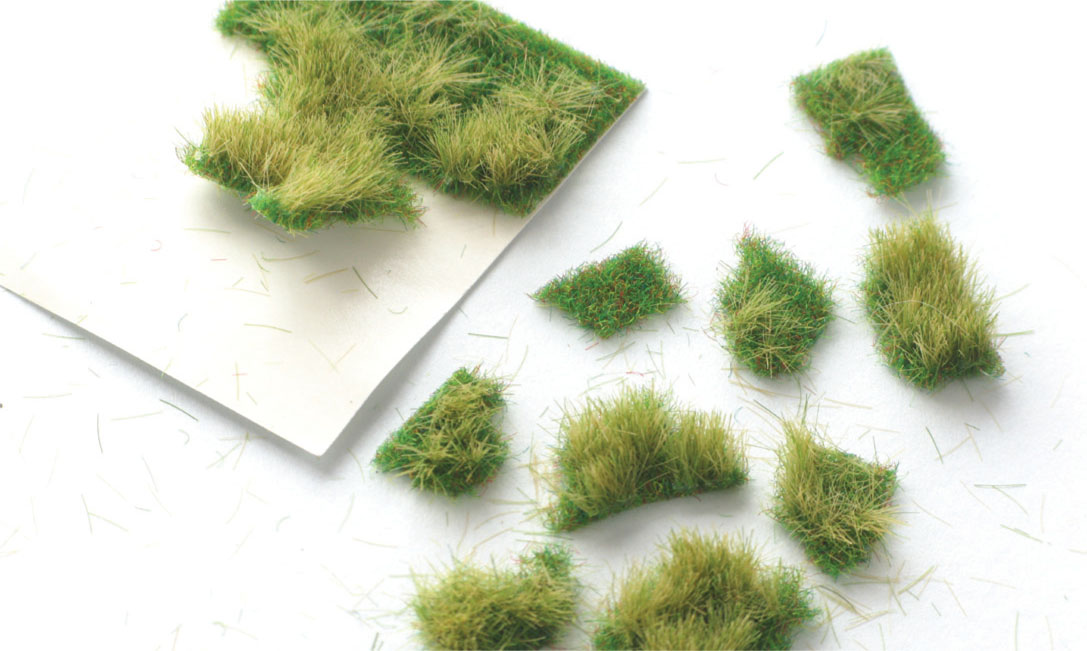
Tufts of grass Clumps, tufts and strips of grass in a number of colours are available from various manufacturers. Some are plain grass, others include various coloured foam pieces to represent flowers. These can easily be fixed to the layout with a dab of PVA adhesive.
Good-quality grass mats Many of us remember those bright green grass mats from European scenic manufacturers. Things have certainly come a long way since then, because grass mats are now available with vari-levelled fibres, multicoloured grasses and earth effects. Some of the major scenic manufacturers, including Heki and Noch, even retail mats of static grass fibres planted in an invisible mesh ready to be added to layouts.
Static grass During the last few years, static grass fibres have become increasingly popular, offering a carpet-tuft appearance to the landscape rather than the flatter appearance that comes from using traditional scatter materials. Recently, new tools have come on the market, plus new grass fibres for both the small (N and Z scales) and larger (O and above) scales. The cost of the more sophisticated applicators can be an issue, but while the inexpensive puffer bottle might not be good for planting lots of grass, it does make static grass a scenic possibility for all. There are also electrostatic grass applicators available at less than £30.
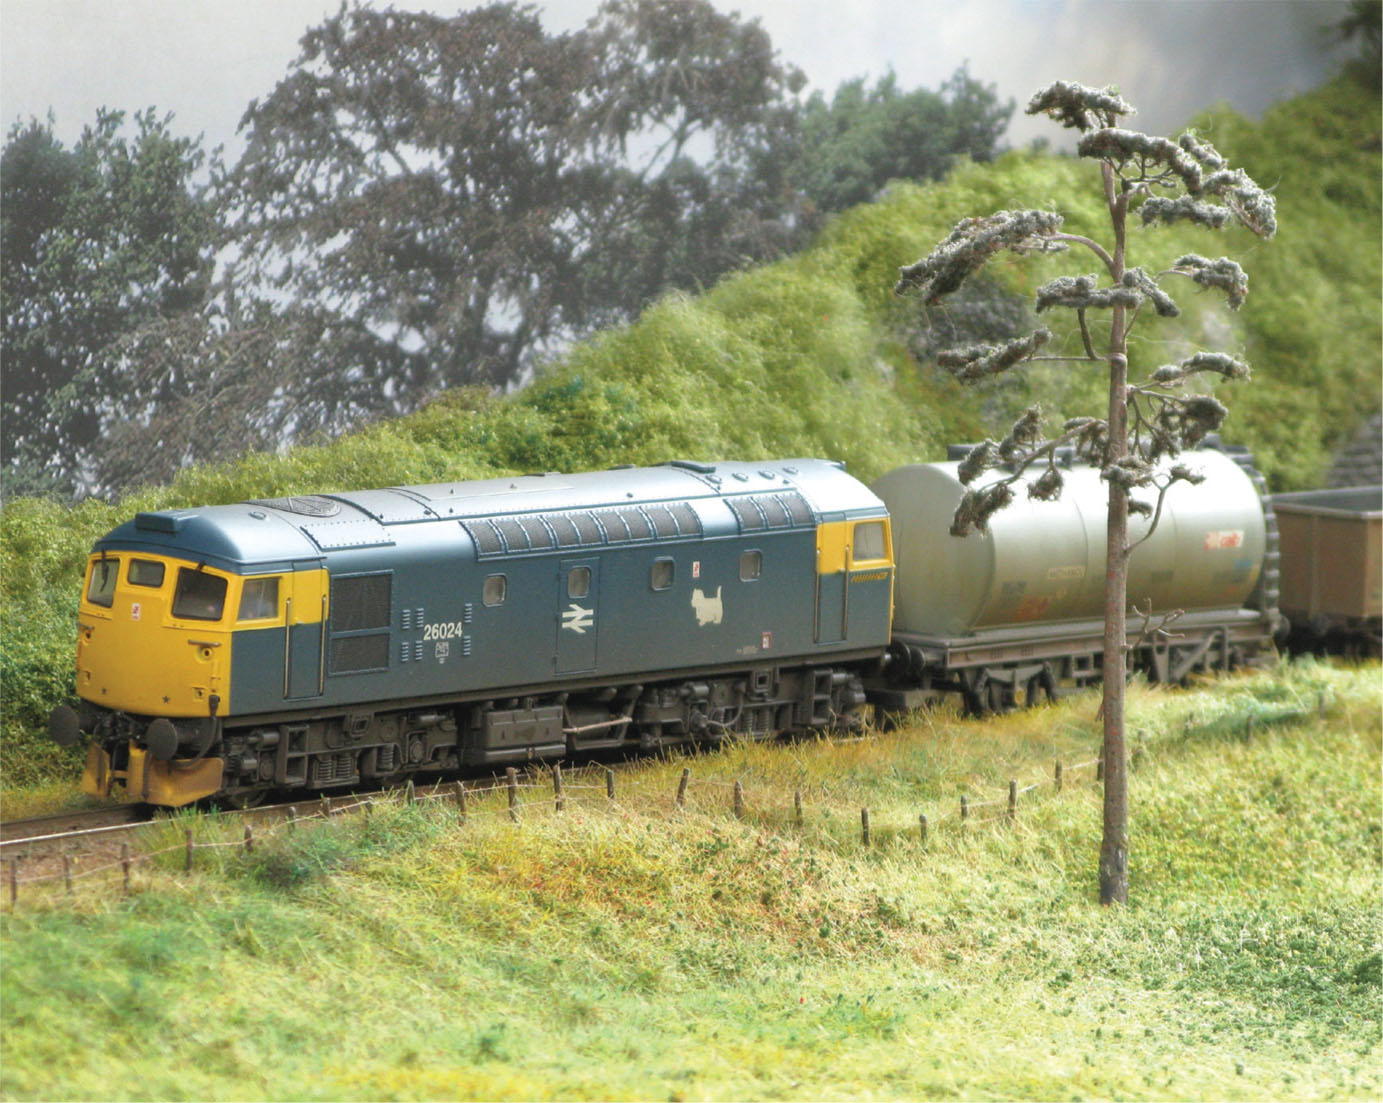
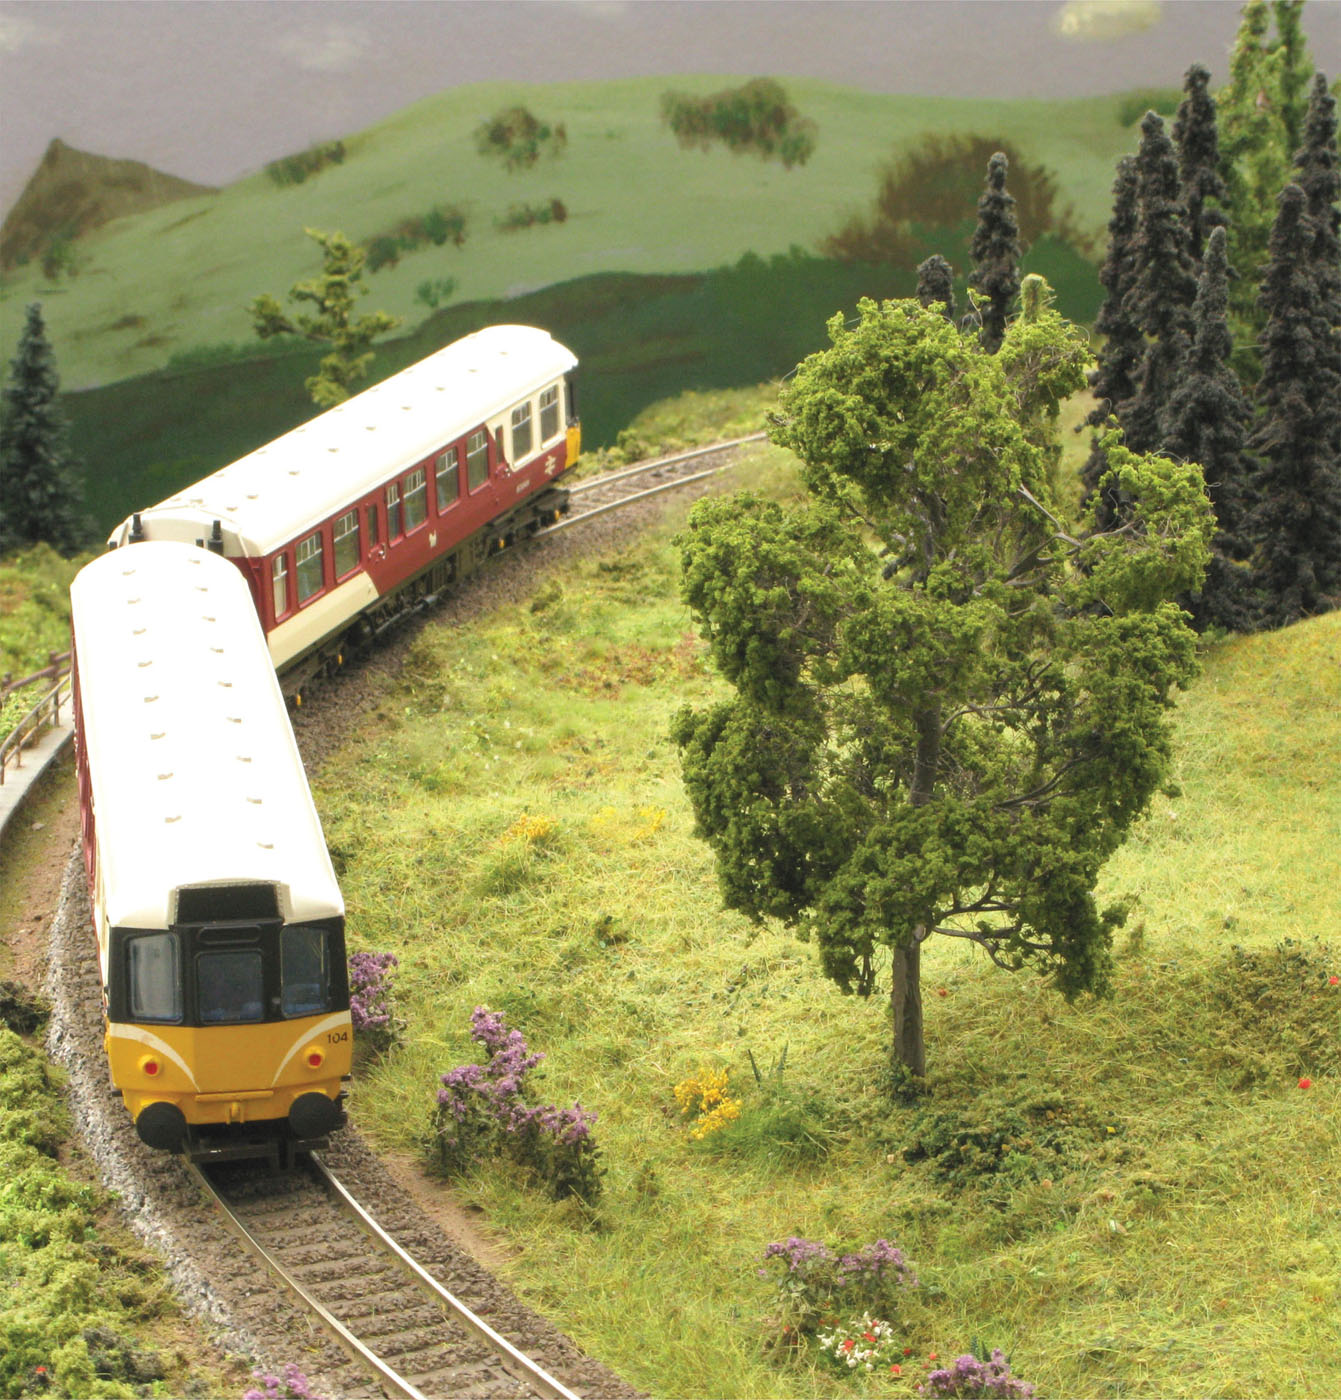
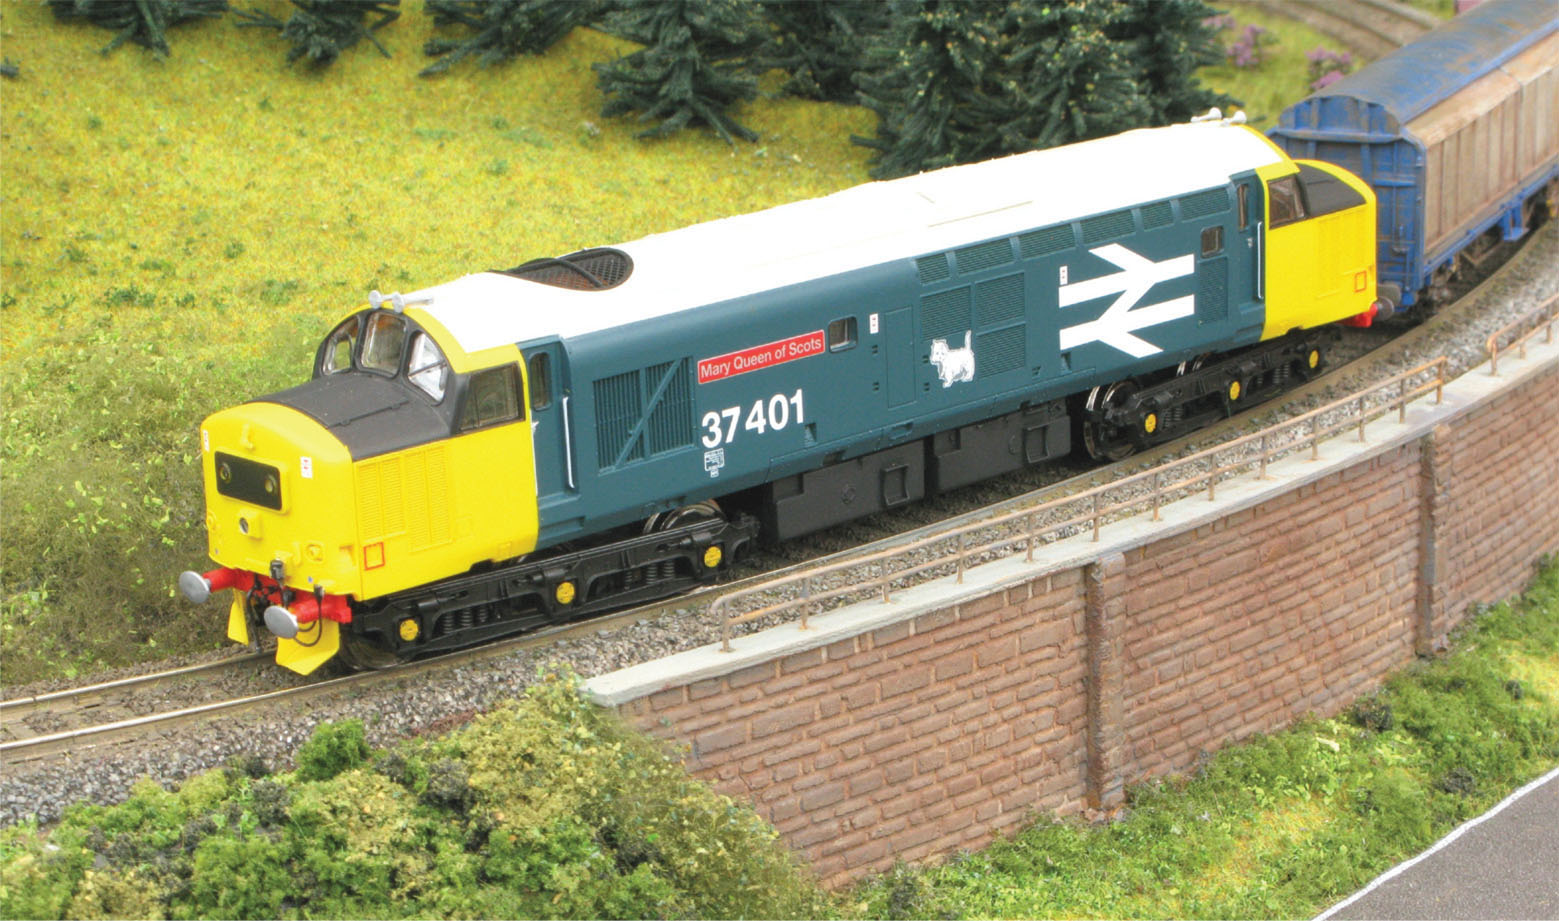
A weathered Heljan Class 26 locomotive passes through scenery intended to represent Scotland. Various layers of static grass fibres have been planted. The fence was made from florist’s wire and elastic thread, the back is a photo scene and the Scots pine tree is by 4D Model Shop.
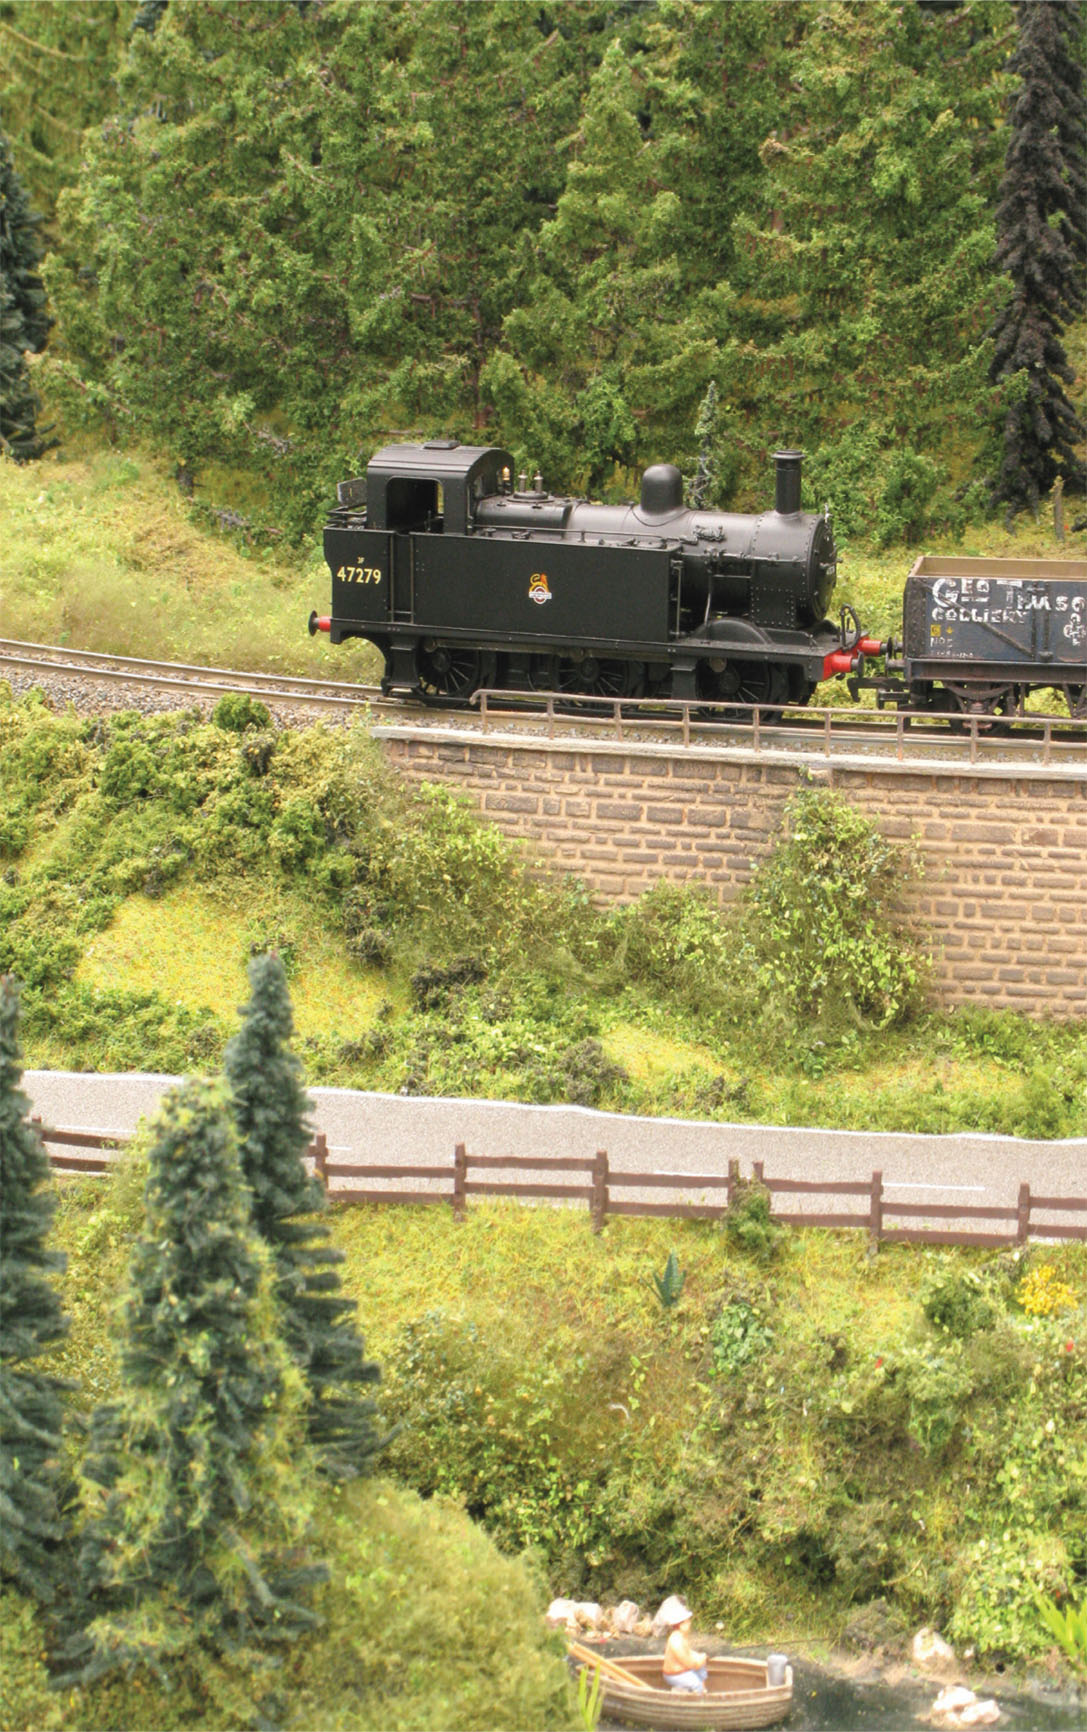
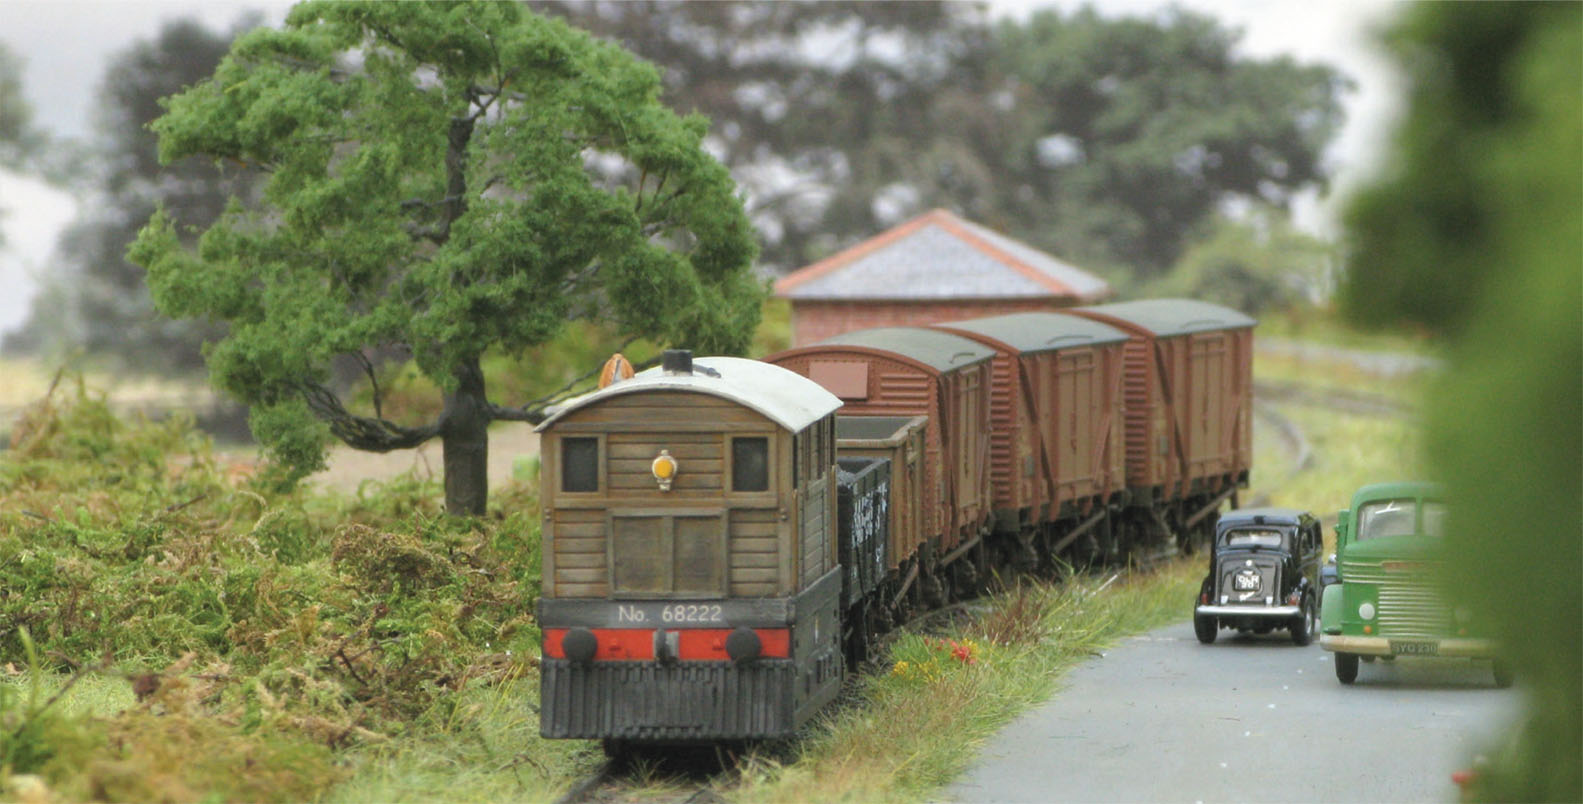
Looking across this valley, the trees make a good backdrop to the Jinty tank. Most of the trees in this scene were made from kits and the readymade ones were improved by adding additional texture and colour variations.

One of the more recent scenic products available is packs of laser-cut card plants.
Trees and hedges Bottle-brush trees and plastic trunks with blobs of lichen on the top are far removed from the quality models of trees that are available today. The latest trees are either ready to plant or basic trees that can easily be improved. In addition, there are many good tree kits.
Plants In both plastic and laser-cut thin card there are now lots of tiny plants available in scales ranging from Z through to O. Careful use of these plants, plus some toning down of the colours, is a good way to feature detailed plants in the foreground scenes on layouts.
Water One-step ready-mixed fluids make the task of adding a water feature to a layout easy and fun. Just remember to follow the instructions carefully and allow the recommended drying time and depth of water for successful results.
In the following sections, we will look at the various ways of adding grass and trees to your layout.
Wallpaper rollers have several uses when making scenery, including positioning a back scene on the plywood (or other) timber support for the back scene and working with brick papers and pavement papers.
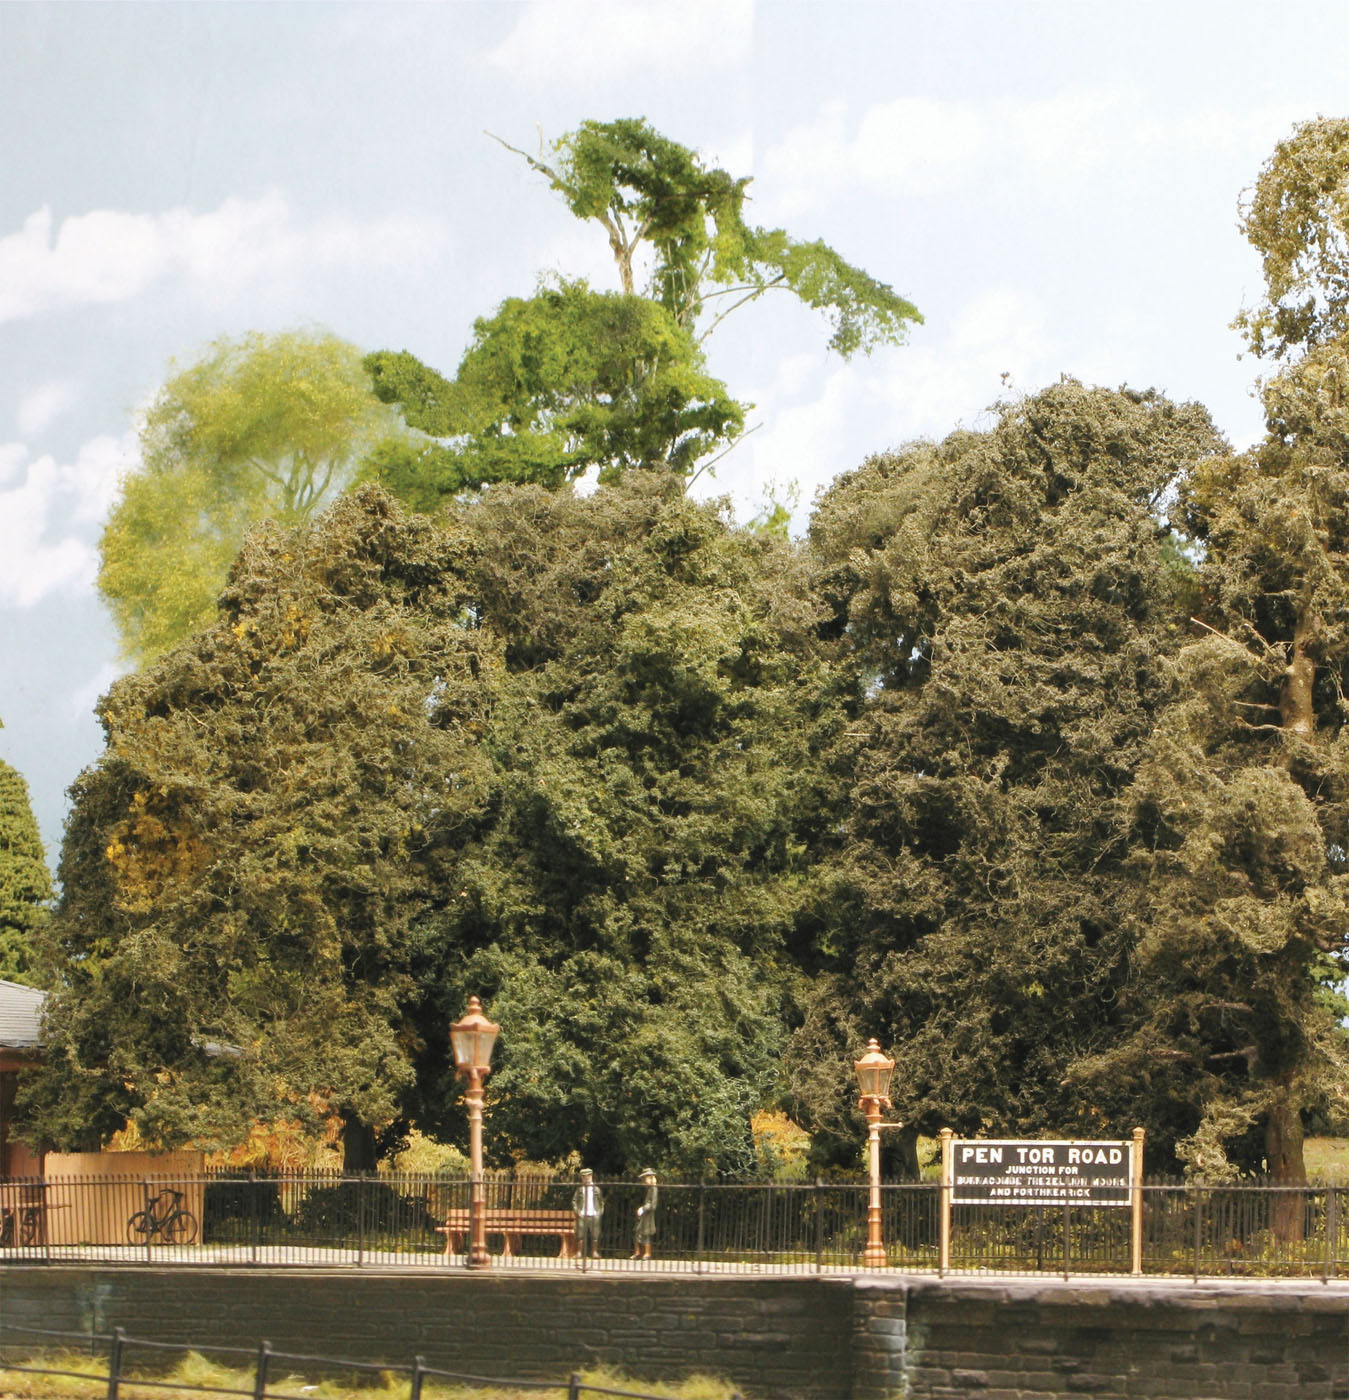
Hedgerow Scenics retails superb hedges such as these. The use of real wood pieces, good colour and fine foliage and leaves makes them irresistible to add to a suitable layout.
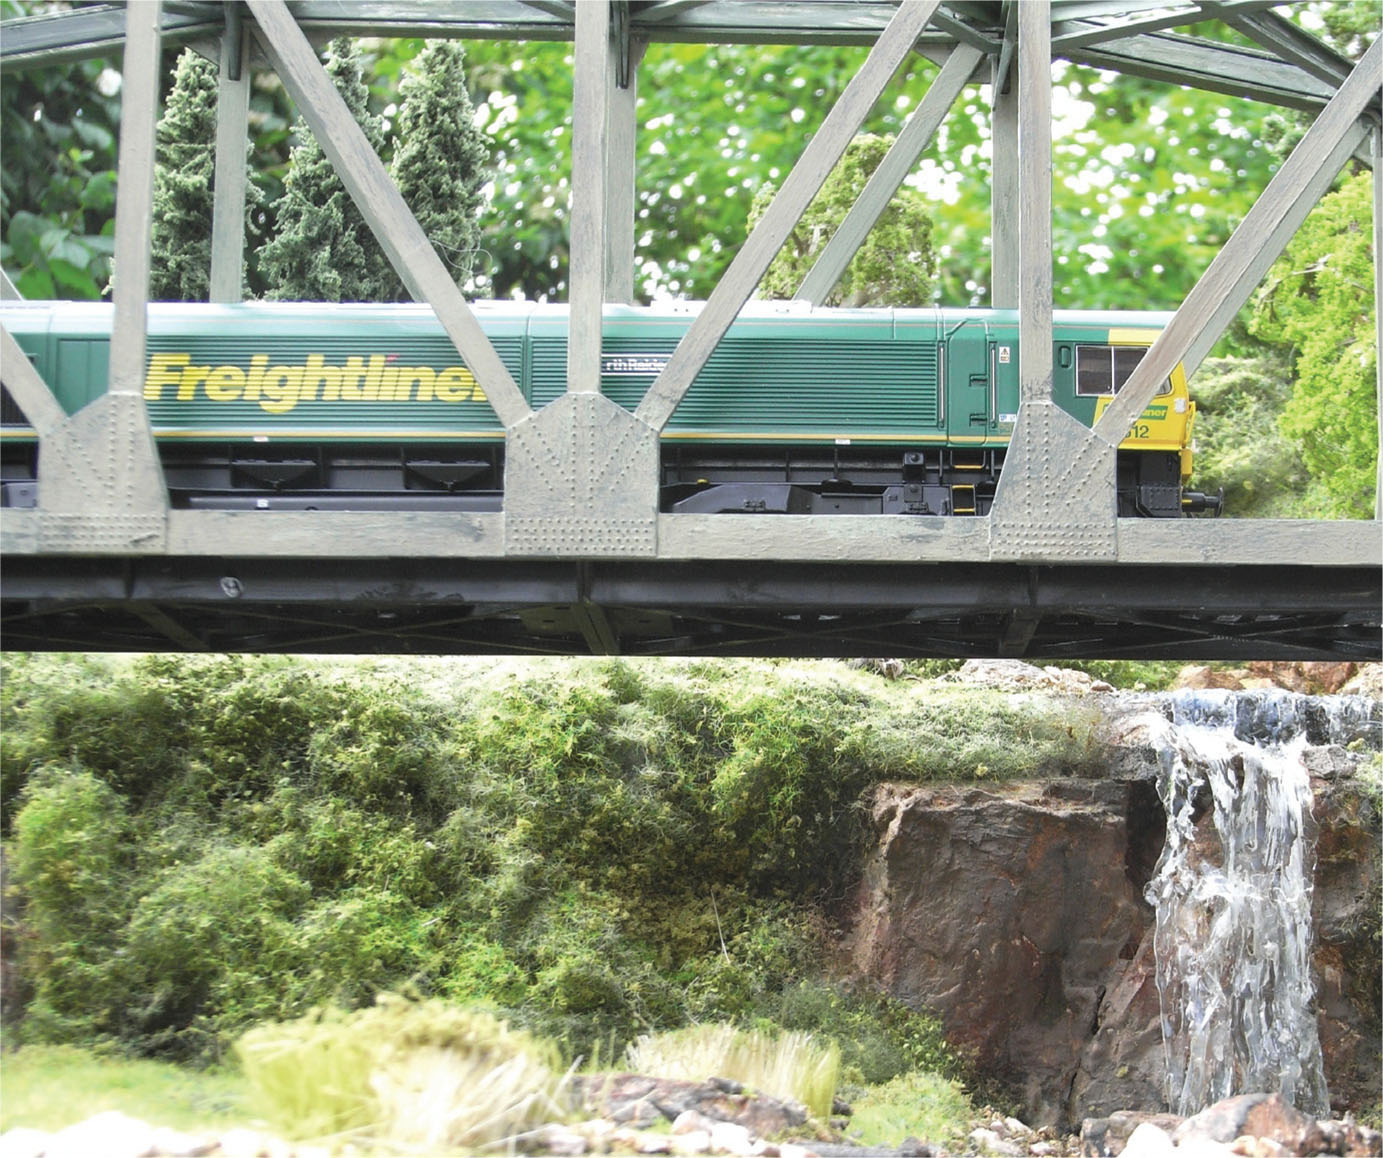
Water adds life to a layout. This waterfall was made by ‘hanging’ strips of dried Woodland Scenics Water Effects over a cliff.
WHAT IS AVAILABLE TO MAKE GRASS?
Does real grass all look the same? The quick answer is no. Grass is not always just found in back gardens – it is everywhere. Grass is not always short and it is not always green. The texture of grass varies enormously. Some grass is plain, some has flowers, some has seeds, some is rough. The texture of grass is generally uneven, other than on newly mown gardens and sports fields.
The colour of grass changes with the seasons. In winter it might look a trampled-down brown/green colour, whilst in spring it takes on a vivid green appearance. The height of wild grass changes with the seasons. It may look very flat in winter compared to when it is at its tallest in late summer.
There is plenty of choice of scenic materials on the market today to represent the great variety of grass and ground cover.
Sawdust-based scatter material This longestablished method is probably the cheapest way of covering the ground, although it has the disadvantage of looking flat on the landscape. The material can be obtained in numerous colours.
Clumps, tufts and strips of grasses These can be obtained in a numerous colours. Some are plain grass in seasonal colours, whilen others represent flowers.
Grass mats Good-quality grass mats are available these days, as well as ‘static grass on a roll’.
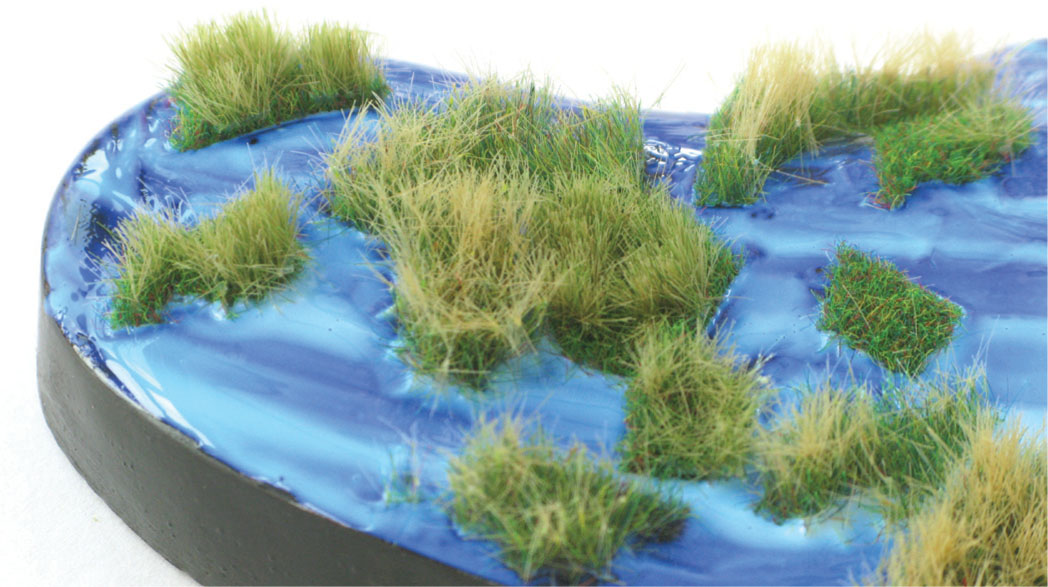
Static grass When fixed to the landscape using specific tools, static grass fibres give a 3D effect that is becoming increasingly popular among modellers.
Finely chopped pieces of foam These are available in very fine, fine, medium and coarse. The range of colours is large, as is the number of firms making these products. Mixed scatter materials for specific seasons and locations such as a heather mixture, spring flower mixture, moorland mixture and forest floor are also available.
Other materials Teddy bear fur can be teased out to represent tall grass. Hanging basket liner is a good way to reproduce tall, random grasses. Rubberized horsehair is suitable for ragged patches of tall weeds and grasses.
Below, we will look in detail at how to work with grass tufts, strips and mats and how to apply static grass.
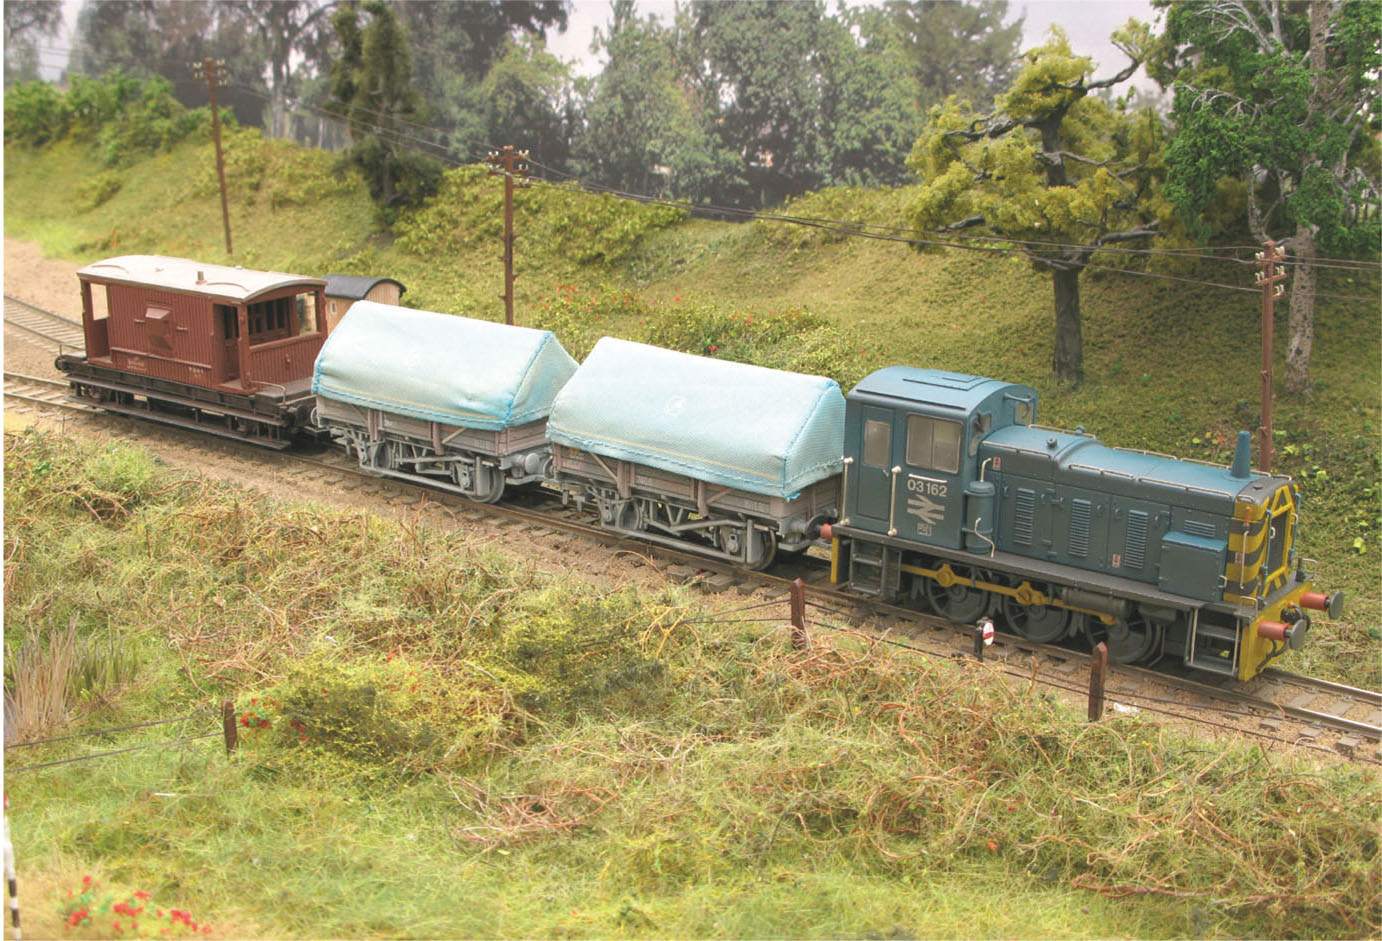
In BR Blue days, a Class 03 locomotive by Bachmann hauls a short china clay train. The vegetation was made mainly from rubberized horsehair. The track is Code 75 ballasted with very fine sand.
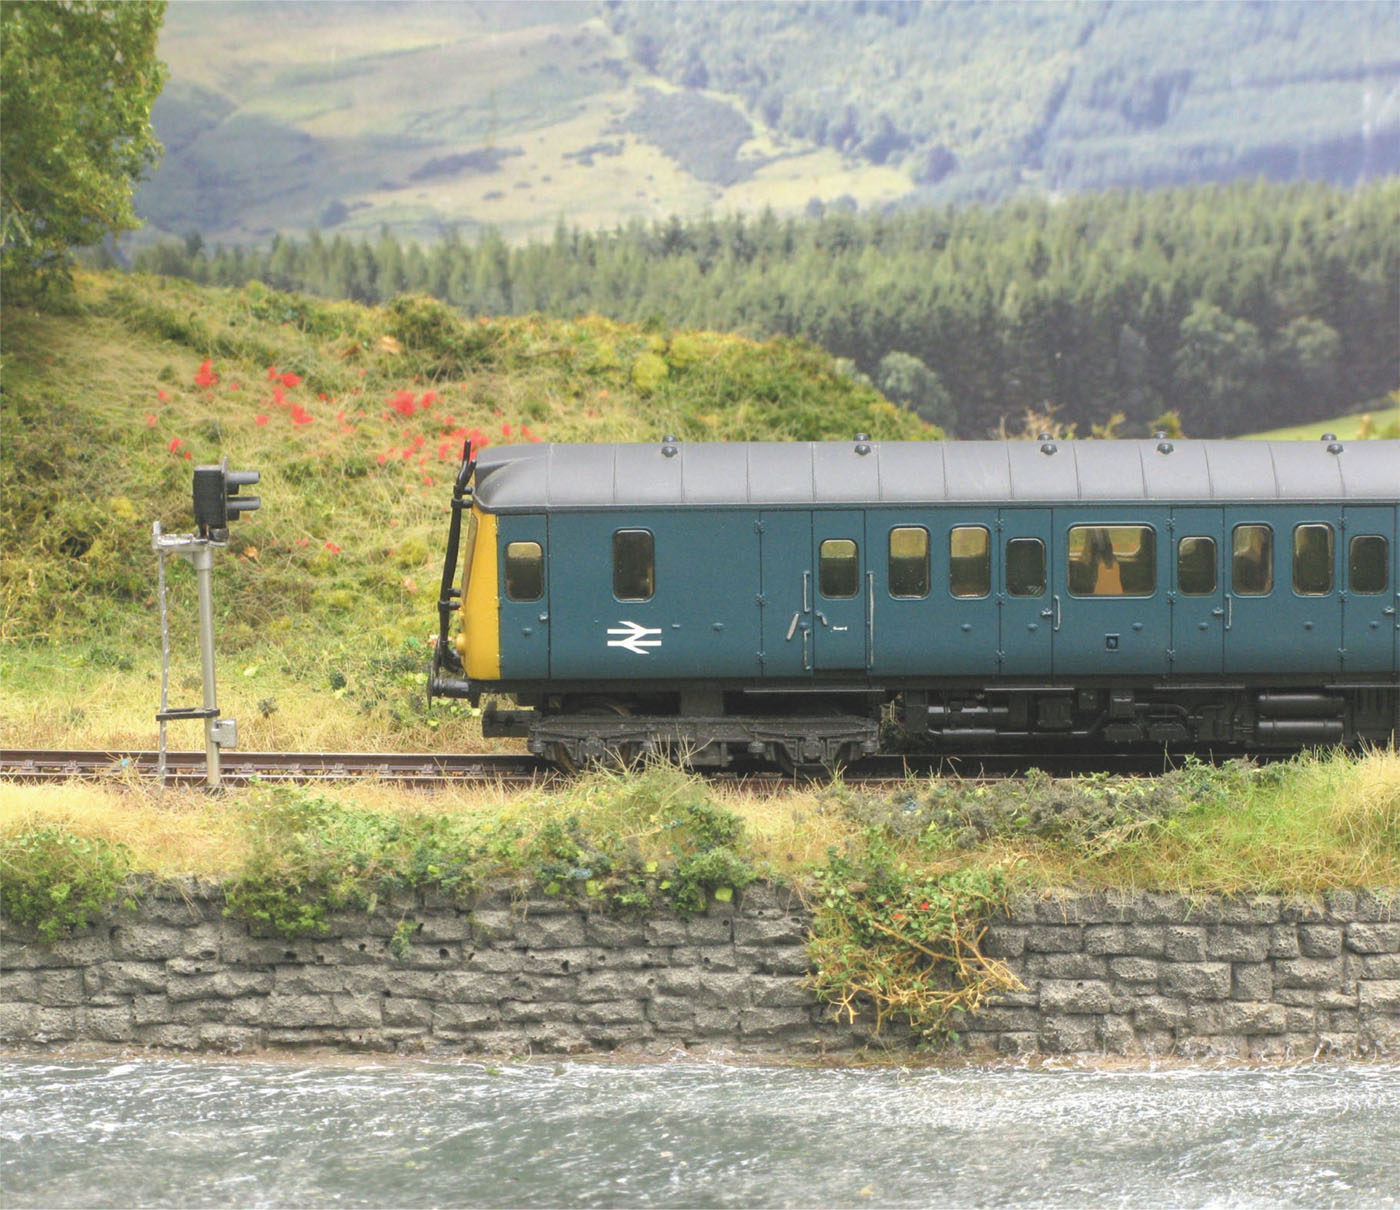
Three layers of static grass fibres were planted on this O-scale lineside scene layout built by John Emerson. Extra-hold hairspray was then ‘wafted’ over the grass fibres and bits of red foam were sprinkled on to represent red poppies.
WORKING WITH GRASS TUFTS AND STRIPS
Most railway depots, stations and lineside areas are strewn with tall grasses and weeds. Road sides and industrial areas are often full of grasses and weeds too. The colours will vary with the seasons; for example, the grasses in early summer will be deeper green than in late summer, when they will be tinged with yellow and brown.
Grass tufts and strips are available from Gaugemaster, Heki, miniNatur, Model Tree Shop, Noch, Train Terrain and Treemendus. The grass tufts can be removed from their backing sheet and used singly or in multiples. They are sold in seasonal colours and suitablility for smaller or larger scales. Some feature tiny leaf effects. Cutting the tufts and strips with scissors gives you smaller dots of grass tufts, which can be especially useful in the smaller scales.
Grass tufts and clumps are simply dots of tall grass. Tufts can be removed from their packaging with tweezers and then a spot of adhesive dabbed on to their base to fix them to the landscape. Some come with adhesive on the base, but it is always worth setting them in a small blob of PVA adhesive or contact adhesive. These can be positioned on the layout singly or along with several others. Mix some of the coloured clumps together in a garden setting to provide a summer border.
Grass strips are sold in various thicknesses and colours. They are useful for along the edge of a ploughed field, or as the central grass strip in a farm track. Again, they can be stuck to the baseboard with PVA or contact adhesive.
If you want to add further variety to your grass, this is easy to do by running a brush that has been dipped in PVA along the top of the grass. Then sprinkle on different-coloured best-quality fine foam scatter material. The glue will dry clear.
CHOOSING AND USING GRASS MATS
Many grass mats are ready planted with static grass and some of today’s better mats are very realistic. These mats enable a time-starved modeller to cover areas of ground quickly and realistically. The latest mats contain grasses of different heights and colours, though it must be added that the best mats are quite expensive to buy. The most realistic high-quality grass mats around at the moment are by Busch, Faller, Hedgerow Scenics, Heki, Langmesser Modellwelt, miniNatur, Model Scene of the Czech Republic and Noch. The miniNatur range of mats offers especially good grass mats for the larger scales in addition to those for OO/HO.
Grass mats cover large areas quickly and ‘solidly’. Nowhere does the colour of the base material show through. The more expensive grass mats can be laid on their own and do not generally require additional layers of scenic detailing.
It is best not to lay these mats as they come. Pull them apart gently, make random pieces and push them into brushed-on adhesive. By teasing the mats apart, they will cover a larger area. Pull off the backing sheet before you pull apart the mat. Push the torn-off sections of grass mat into wet glue.
Grass mats are now available with fibres of different colours, textures and heights. Some include sand, pieces of timber and other details. These mats are not intended just to be positioned whole on the layout, but should be used in smaller pieces like a jigsaw puzzle.
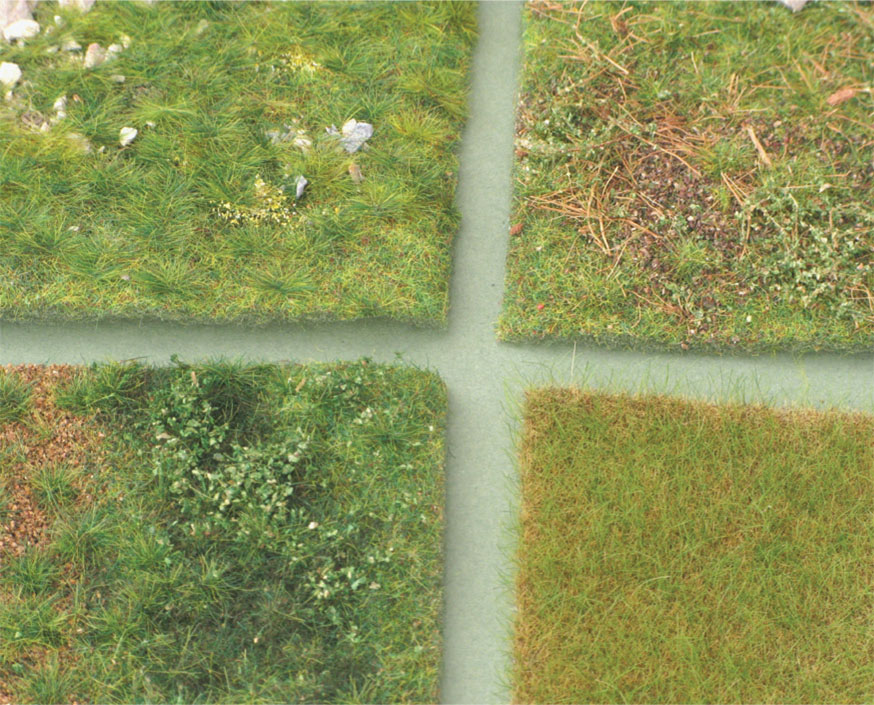
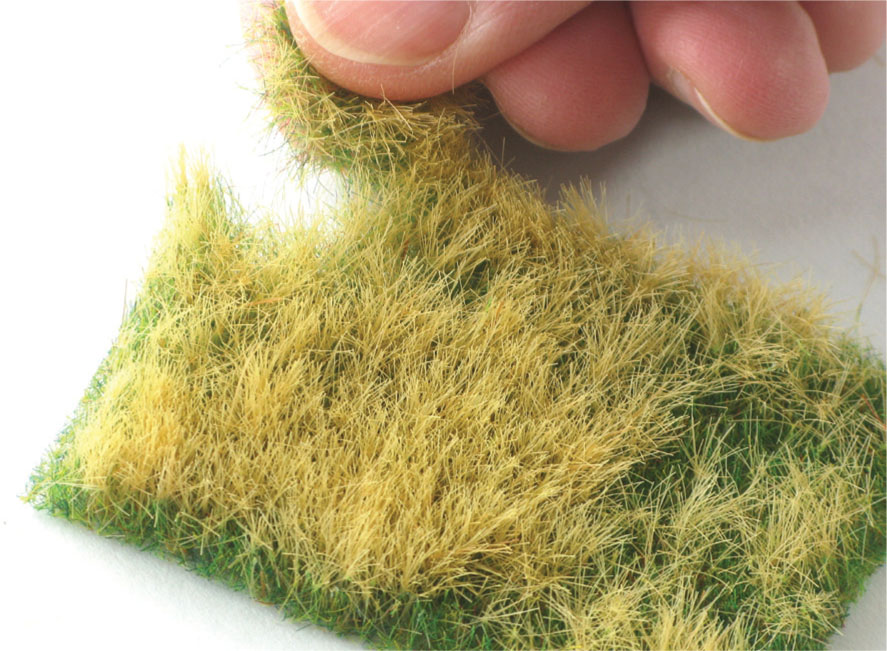
One corner of a good-quality grass mat showing coloured plants embedded in the mat. These plants could be carefully torn or cut from the mat one by one and used to represent daffodils on a layout.
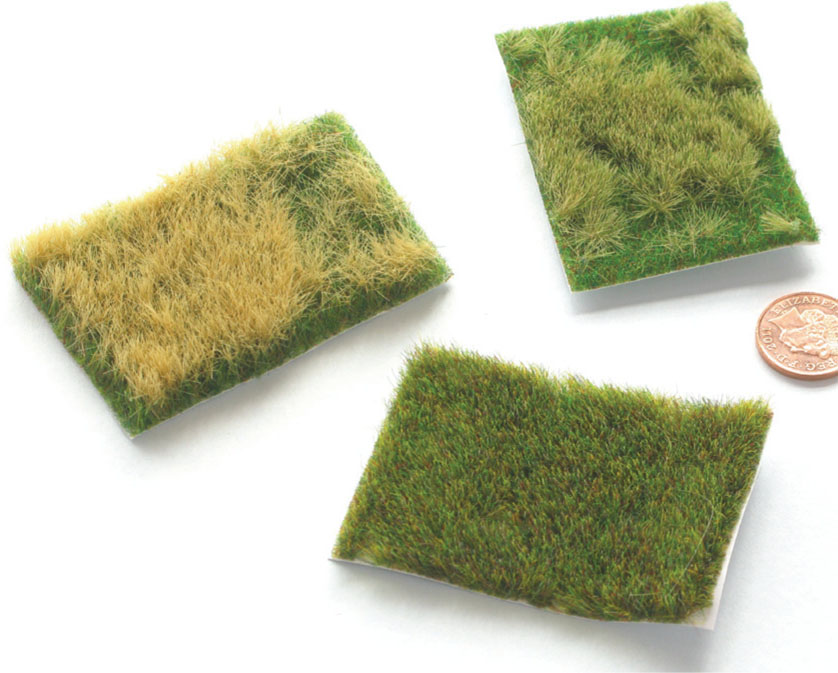
The Busch range of good-quality grass mats is large and here we show just three pieces, with a 1p coin for size-comparison purposes.
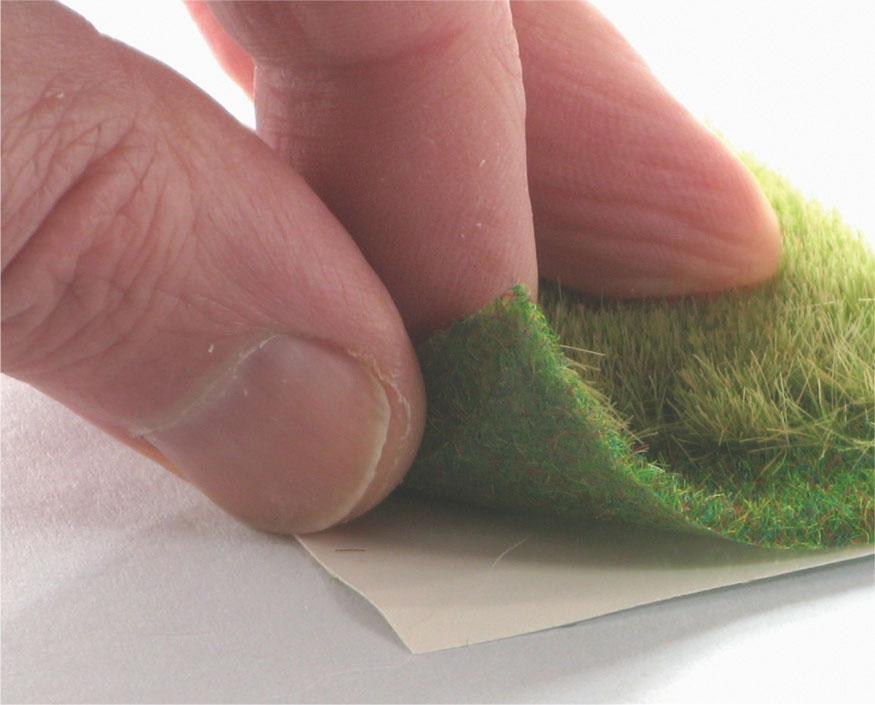
Teasing the grass mat from its backing sheet is easy between your fingers. Whilst some grass mats are self-adhesive, I always use PVA adhesive or similar to fix them to the landscape to be doubly sure that they stay in place.
Never be tempted to use the grass mat sheets as they come. Tear them off in random-sized pieces and then use them on the layout in a jigsaw manner. The result will be more realistic.
A selection of random pieces of grass mat ready to be placed in adhesive on the landscape. These pieces are only 10 or 12mm (½in) across.
Rather than cover all the adhesive, this shows some pieces of grass mat already positioned in adhesive. The gaps between the pieces of grass mat will be covered in real sand, fine foam scatter material and various plants.
Close up of a finished part of a diorama showing the grass mat pieces, sand and plastic flowers by Busch.
Another view of the completed diorama intended to be sandy dunes in a coastal location. Alternatively, it could be a sandy forest floor.
HOW TO USE THE CHEAPER GRASS MATS
A grass mat can simply be laid on top of brushed PVA adhesive but they can look rather crumpled if they are not cut into smaller pieces which are much easier to work with one at a time. Once the PVA has dried under a cheaper grass mat detailing can be done by brushing on PVA adhesive then sprinkling on some fine and coarse scatter material in various places. Later brush on more PVA adhesive then plant static grasses from various suppliers applied with a Noch Gras Master or puffer bottle. Tease out pieces of foliage from Heki (Heki Flor) and Woodlands Scenics (Foliage mats) and others then push the sections into spread PVA to represent low ground cover and weeds. Grass tufts, clumps of foam and taller grasses can then be ‘planted’ into blobs of PVA.
HOW TO USE STATIC GRASS ON A ROLL
Prolific German scenery manufacturers Heki and Noch retail what is effectively ‘static grass on a roll’:
Heki Realistic Wildgras This is sold in four colours with 6mm (¼in) tall grass fibres on an almost invisible mesh net. Each piece is around 450 x 170mm (I7¼ × 6¾in), but because it is best ‘teased out’ it can cover an area almost twice that size.
Heki Kreative Wildgras This is retailed in four shades of green. It comes in the same size as Realistic Wildgras, but is more suitable for cutting with scissors and randomly positioning on the landscape.
Gaugemaster and Noch Natur + Meadow Mats These are a good way to add 12mm (½in) tall static grass if you do not have a an electrostatic grass tool. The mats can be torn or cut and then glued on to the landscape. Various colours are available.
These mats can be planted whole or in pieces. It is very easy to break off pieces of the mat between your fingers, or alternatively scissors or a craft knife can be used to cut off pieces of the mat. Push and slide them together on top of spread PVA or scenic glue. Butt up the pieces closely to give a seamless effect. The mats easily follow the contours of any landscape. It is not always necessary to paint the landscape before laying the mats because of the density of the grass fibres.
STATIC GRASS
The use of static grass on model railway layouts in the UK is becoming increasingly popular. Modellers love the 3D effect that is possible by using static grass. The results are generally much more realistic than a flat landscape texture created by using traditional scatter materials. It is easy to plant goodlooking static grass and in the past couple of years many more tools and grass fibres have come on to the market that are now suitable for Z through to O scales and above. There has never been a better time to enter the world of static grass.
WHAT IS STATIC GRASS?
Static grass is made from very fine polyfibre lengths and is retailed in various lengths and colours. When fixed to the landscape using specific tools the fibres give a carpet-tuft effect, with the fibres standing upright in the ground. Static grass is also known as electrostatic grass because of the process involved in planting it.
Static grass is dependent upon a tiny electrical charge that the grass fibres pick up in the dispensing tool. They retain this charge as they fly through the air and stick to the adhesive that has been brushed on to the landscape. When the glue is dry, the tiny strands of imitation grass are left standing in a vertical position in the landscape.
With electrostatic devices, a connection is made between the tool (by way of a wire and an alligator clip) and the land just before the grass is to be planted. The alligator clip needs to be attached to the nearest section of rail, or a nail or a pin inserted into the baseboard near to the area to be treated. This creates the electrical circuit to ensure that the grass particles land in an upright position in the glue on the landscape. With the plastic puffer bottles, the electrostatic charge comes from the shaking of the fibres in the bottle.
Some modellers use static grass extensively, whilst others keep it for specific areas on their layouts. There is no right or wrong way to use static grass, though once a modeller has experimented with it there is an almost 100 per cent guarantee that he will want to use it a lot more in the future.
STATIC GRASS FIBRES
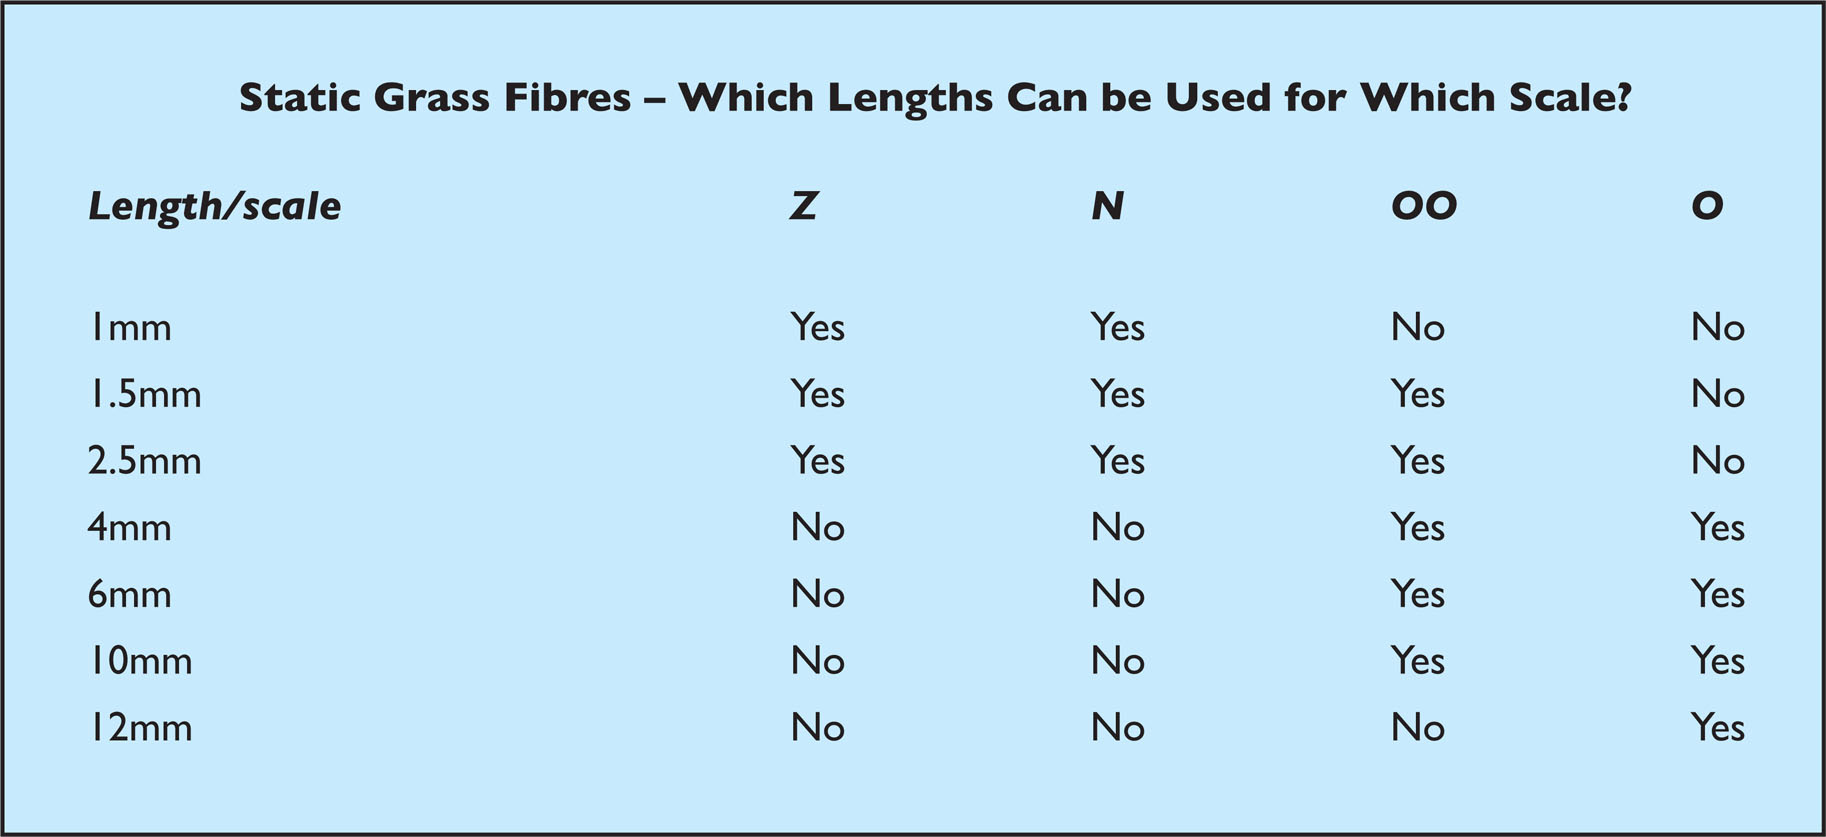
Static grass fibres are made by an increasing number of companies, including Anita Decor, Busch, DCC Train Automation, DoubleO Scenics, Faller, Green Scene, Heki, Javis, miniNatur, Noch, Woodland Scenics and WW Scenics.
Grass fibres vary in both length and colour, ranging from 1mm through to 12mm, and come in a large selection of colour shades. Because of this variety, multiple levels of grass can be modelled and every season can be represented realistically. The grasses can be used to suit different locations, for example shorter grasses in a garden setting, longer at the trackside. Short grass might only need one application, but longer grasses may require several layers of static grass to build up the height of grass.
Multiple layers of static grass make the lineside appearance of this riverside diorama look more visually appealing compared to using simply green scatter material.

One of the more recent electrostatic grassfibre tools is by WW Scenics. It comes with three different-sized mesh screw-on tops so that it can successfully plant grass fibres from 1–12mm. Such tools retail at around £100.
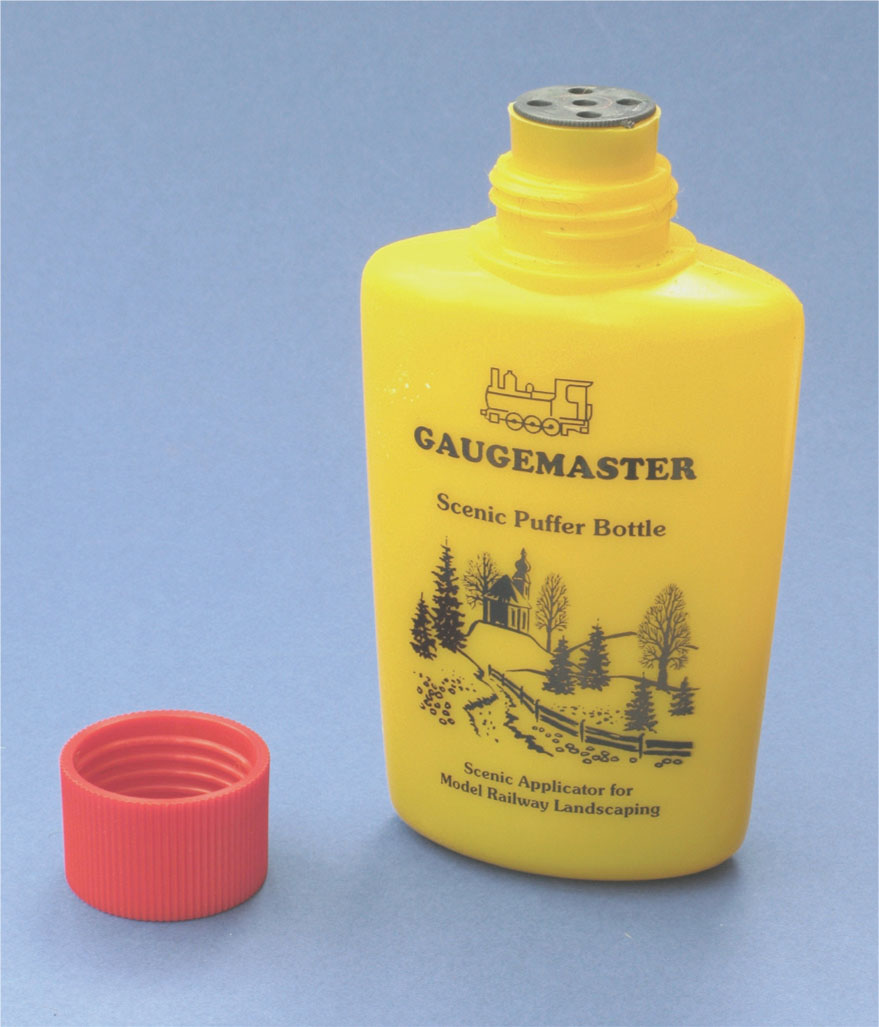
For less than £5, a plastic puffer bottle is a good way to plant small areas of static grass fibres. These are available from Gaugemaster, Noch, WW Scenics and others.
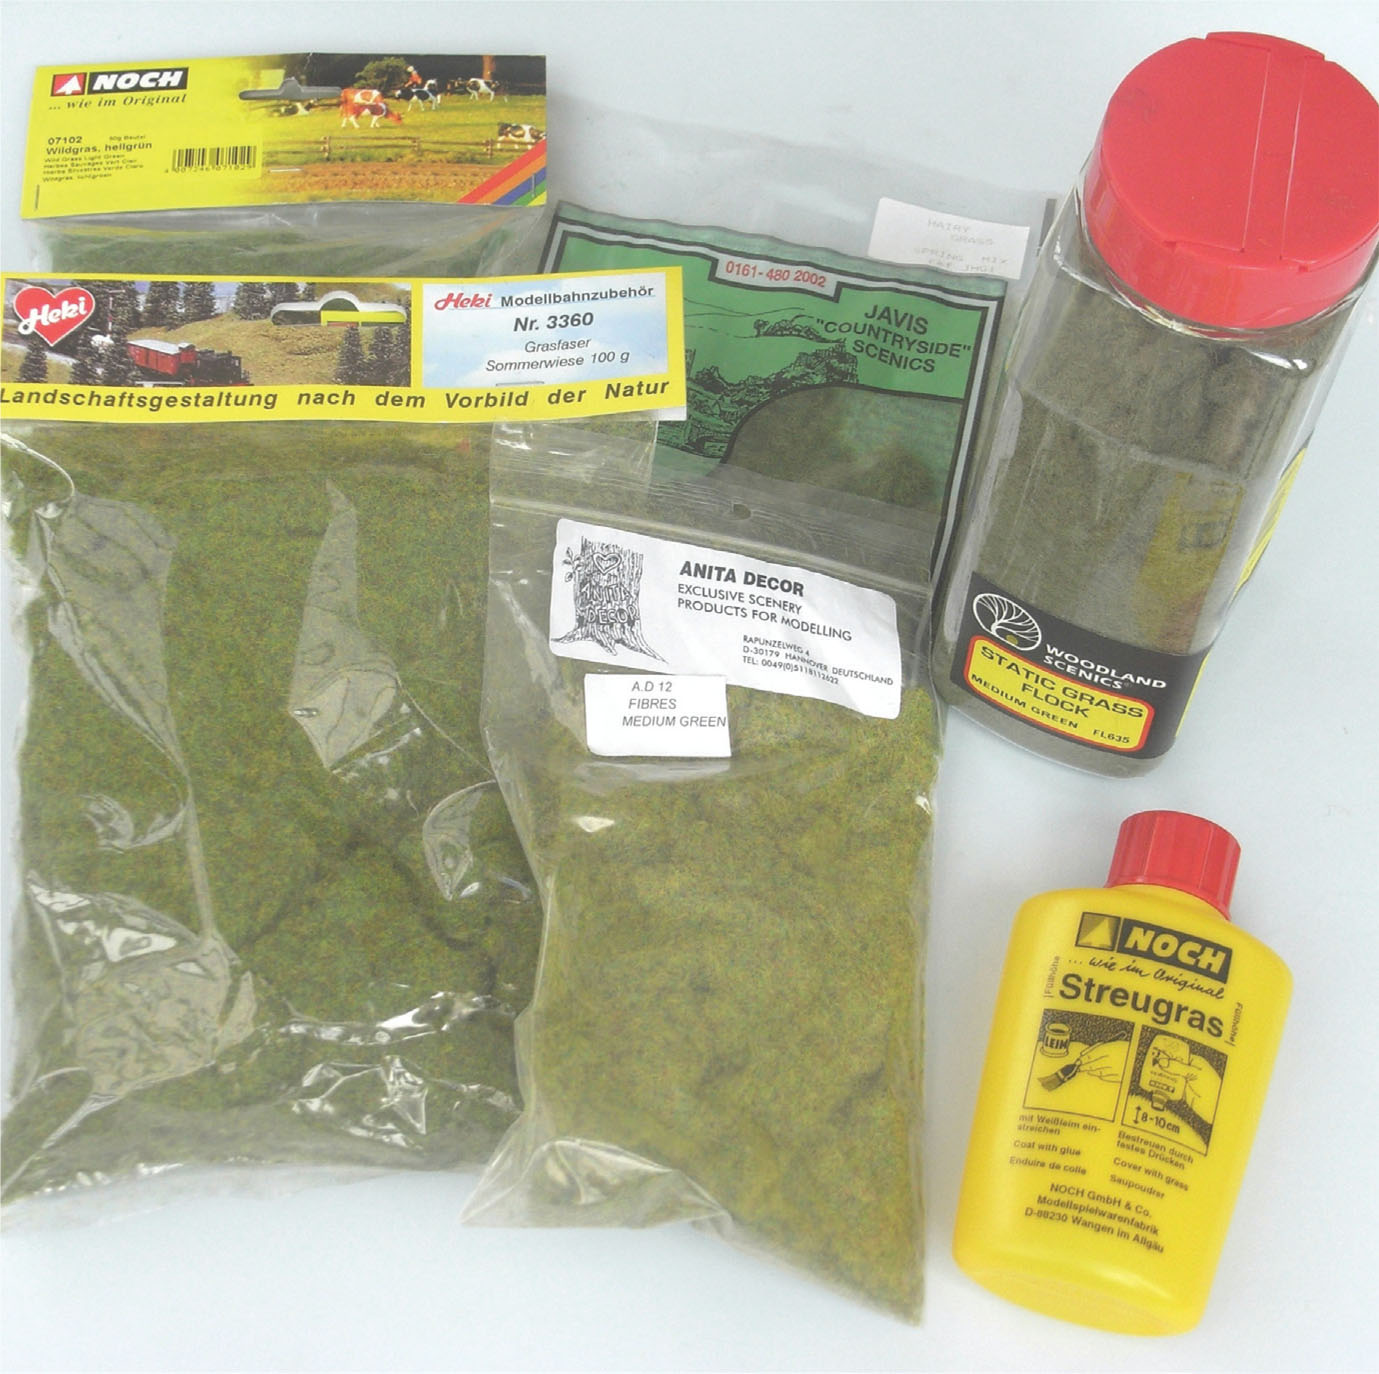
There are lots of manufacturers now retailing static grass fibres. The colour range is now vast, with some packs available in ready-mixed seasonal tints.
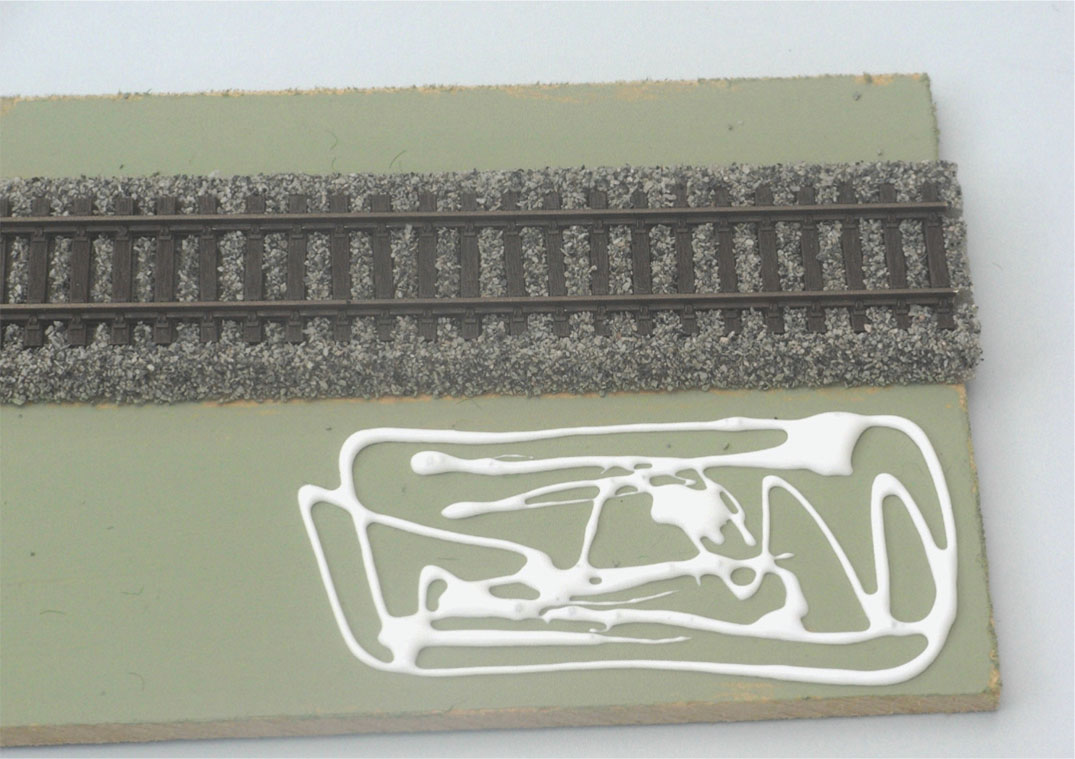
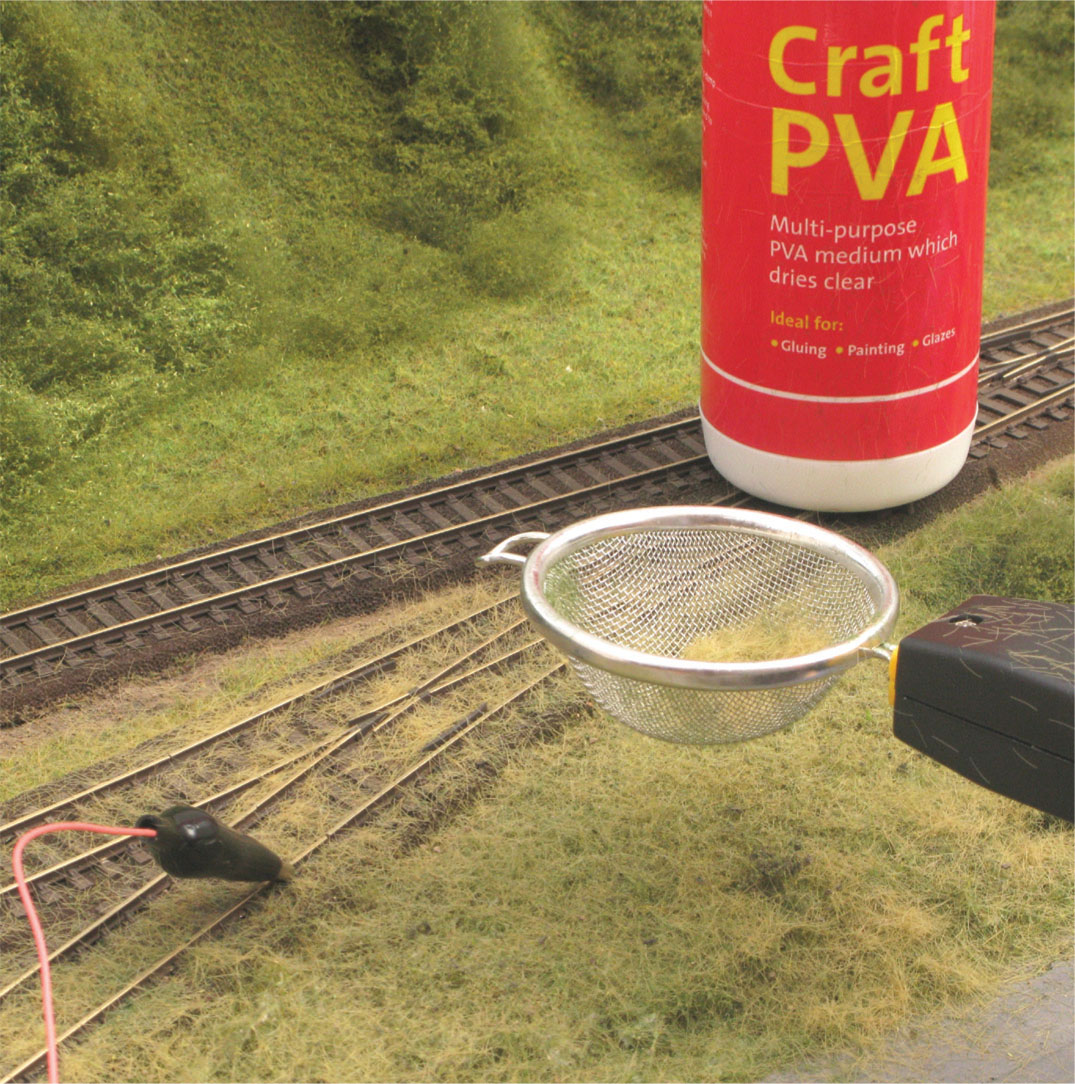
The first step to planting static grass fibres is to pour some adhesive on to the landscape. PVA is suitable for this, or one of the specialist scenic glues.
Spread the adhesive evenly with a wide paintbrush so that the entire area is covered. Limit yourself to working with 100sq cm at a time to ensure that the adhesive will still be wet when you plant the grass fibres.
The alligator clip on the electrostatic tool needs to be attached to the landscape in some way. This can be to the rail of track adjacent to the area to be planted, or to a pin knocked into the surface of the landscape.
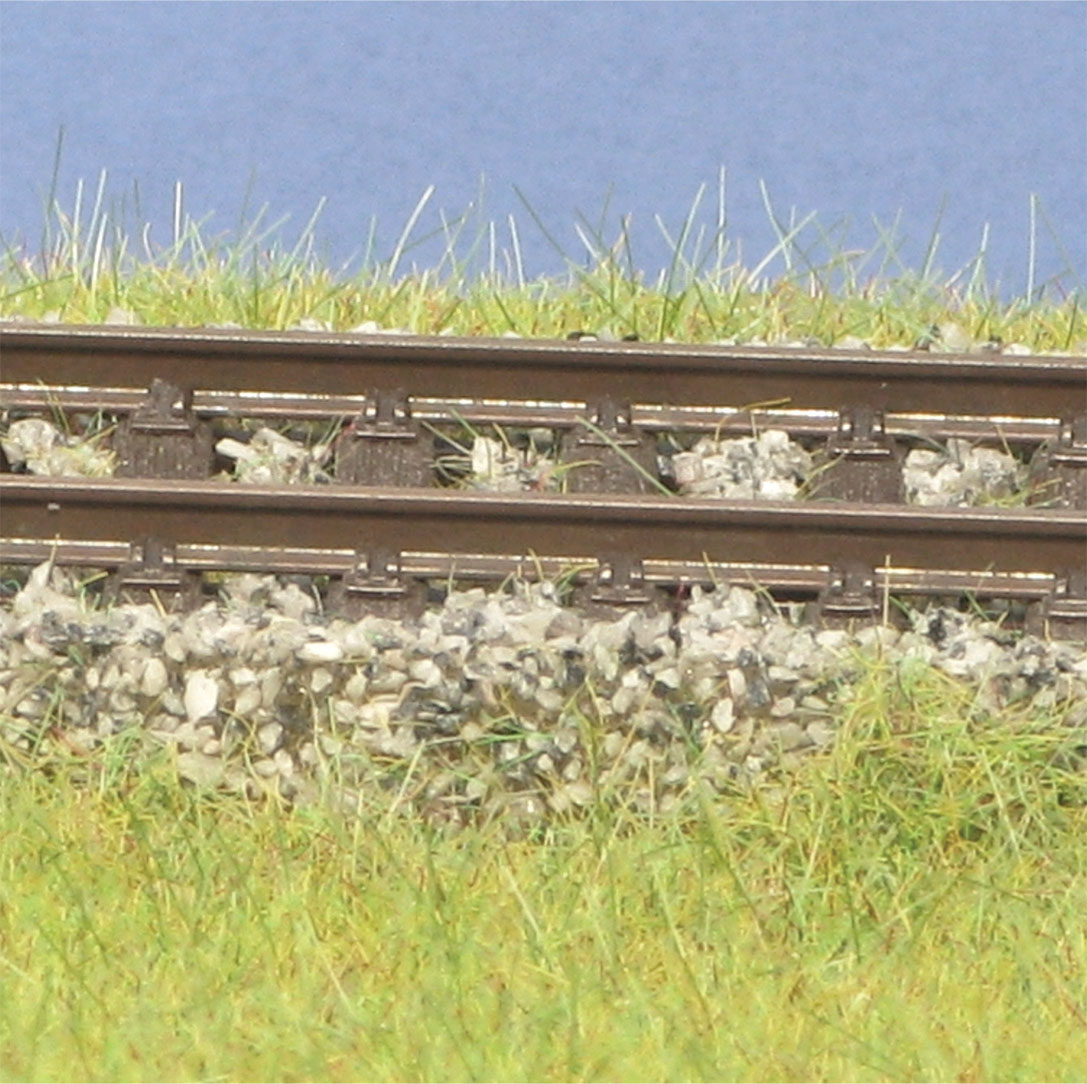
Close-up of the effect that static grass fibres can give. This looks a lot more realistic than just scatter material.
IS STATIC GRASS JUST AN EXPENSIVE TECHNIQUE?
Definitely not. Whilst some of the electrostatic tools cost more than £100, there are many cheaper alternatives. Just some of the ways to keep the costs down include: Gaugemaster has a Static Grass Starter Set, which includes a puffer bottle, a bag of 2.5mm light green static grass plus a small plastic bottle of adhesive, and costs less than £10 and is a good way to experiment with static grass; Finescale Model World and DoubleO Scenics retail electrostatic grass tools at around £30 (www.finescalemodelworld.co.uk and www.doubleOscenics.co.uk); bags of static grass fibres cost from around £1.50 upwards and special glue is not required, as PVA glue works very well with all the popular grass fibres.
STATIC GRASS TOOLS AND MATERIALS
There are two main types of static grass tools: electrostatic devices that require battery or mains power and which retail between £28 and £180; and plastic puffer bottles that are available from less that £5. In addition, industrial static grass applicator tools are available at around £900. If the price of some of these electronic tools seems expensive, a model railway club could buy one and hire it out to members in the same way it does with reference books. Or a couple of friends with scenic layouts might decide to buy one jointly.
There are many homemade alternatives to these tools, including balloons, vacuum cleaners and other contraptions. These work with varying degrees of success and if you search the various model railway forums, you will find information on how to make these. A word of warning – be careful when using mains electricity with any of these devices.
Following is an overview of the tools and materials:
- Acrylic or emulsion paint to cover the landscape before applying the static grass. An aerosol of acrylic paint is a quick way to do this.
- An electrostatic grass tool or puffer bottle.
- PVA or any of the more specialized scenic adhesives. Extra-hold unscented hairspray is an alternative to PVA for the second and third layers of grass.
- A selection of static grass fibres. Fine foam scatter materials of different colours and textures from Busch, DoubleO, Noch, Treemendus, Woodland Scenics, WW Scenics and so on add variety of texture to finished static grass.
- Wide flat paintbrushes for painting the landscape with paint and then the glue once the paint has dried.
- When working with the longest grass fibres, a vacuum cleaner can be used to raise up the fibres as the glue sets. A vacuum should also be used suck up any excess fibres before you begin running trains again.
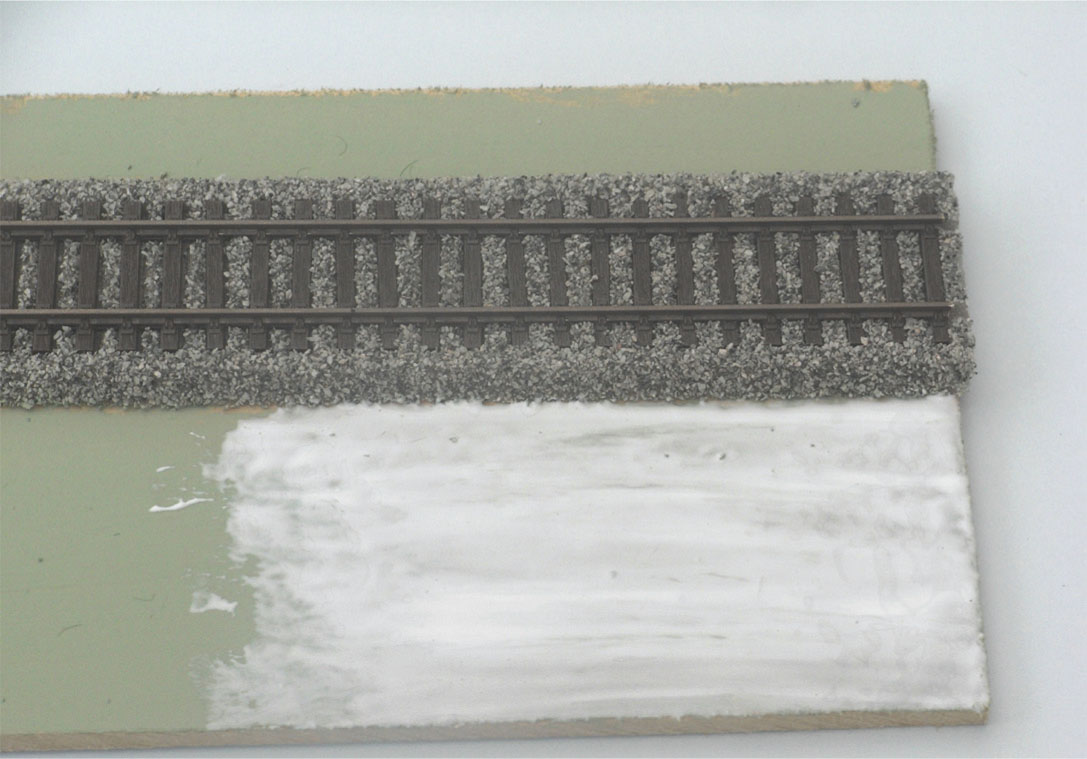
PREPARING THE GROUND
As when using scatter material, it is necessary to paint the landscape fully in a subdued colour such as brown or green (acrylic or emulsion paint are ideal) before treating it with static grass. This is because the static grass fibres will stand upright and the base colour of the scenery might be visible when looking from above through the upright fibres.
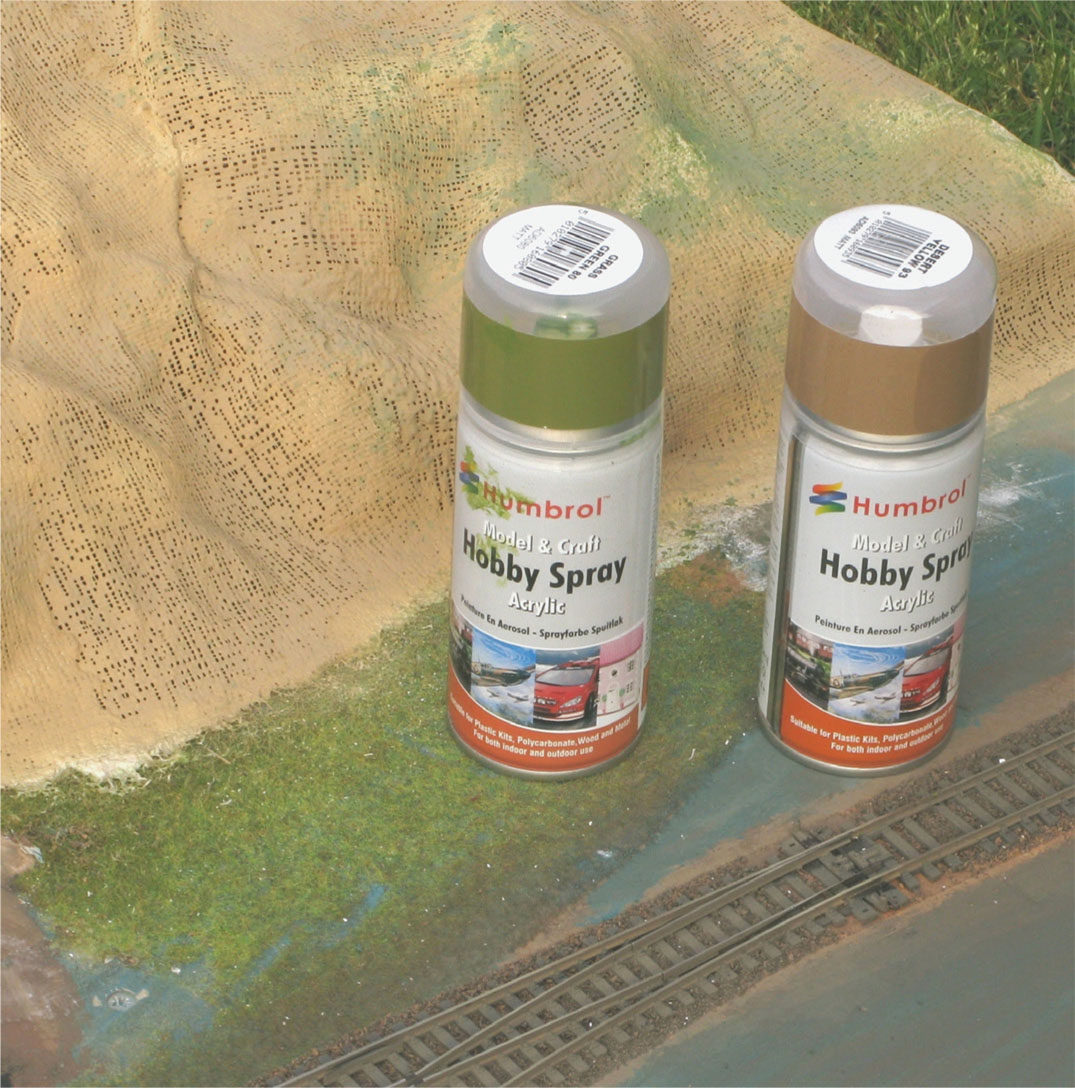
A really quick way of painting white plaster cloth once it has dried is to use acrylic aerosols. Primer aerosols from car shops are another good source of suitable paint.
A shortcut is to use glue that is already coloured, then apply the scenic materials directly into the glue. Faller, Heki and WW Scenics retail a selection of coloured glues, but what is to stop us adding brown or green paint to PVA adhesive? Just experiment with a small amount of your chosen paint to ensure that it mixes well.
PLANTING STATIC GRASS WITH AN ELECTROSTATIC TOOL
It is very easy to plant static grass. Many of the techniques are common to the more usual scenic processes and once you have learned the basic principles you will be able to experiment with the multiple uses of electrostatic grass on dioramas and layouts.
For tools with screw-on meshes, the fine mesh sieve is best suited to the short grass fibres, whilst the larger mesh sieves are best for the longer grass fibres. Half fill up the grass applicator device with your chosen static grasses. It is advisable to do this before you paint on the glue because you need to work quite quickly after the glue is painted on to the landscape. To fix the static grass fibres to the landscape you can use PVA adhesive, though some scenic manufacturers do retail their own products for this purpose. Use a wide paintbrush to spread the PVA on to the landscape and ensure that all of the area to be treated is covered in glue, because fibres will only stick where there is glue. I find that to get the best results it is advisable to limit work on applying static grass to areas of about 100sq cm (15.5sq in) at a time.
Attach the metal alligator clip of the electronic device to a rail of a section of track near to the area that you want to work on. If the area is remote from the track, knock a pin or nail into the landscape and attach the alligator clip to the pin. I find that Woodland Scenics Foam Nails (also known a T-pins) are ideal for this purpose. This connection with the layout is necessary to provide the electrostatic link between the charge in the grass tool and the ground.
Switch on the electronic grass tool, invert it and gently shake it from side to side about 7mm (¼in) over the surface of the glue and watch the grasses fall into the glue in an upright position. Once you have treated the area covered with the glue with the static grass, switch off the tool and leave the area to dry.
Not all static grass fibres will stick to the glue the first time. If your layout is portable after the glue has dried, shake off the excess grass fibres and save them for use again. If the layout is not portable, use a soft 2in (50mm) paintbrush to sweep the excess grass fibres into piles to collect them for reuse later.
PLANTING FIBRES WITH A PUFFER BOTTLE
The Gaugemaster, Noch and WW Scenics Puffer Bottles of course have no ‘electronic link’– it is the action of ‘puffing up’ the grass fibres in the plastic bottle that provides the necessary electrostatic charge to the fibres.
Using a puffer bottle is easy: first paint the baseboard a solid colour using acrylics or similar. Leave to dry. Choose the colours and lengths of static grass that you wish to use on the landscape and unscrew the top of the bottle and take out the plug with the holes in. Pour in the chosen mixture of static grass fibres to about half way and push home the plug.
Brush glue on to the ready-painted surface of the landscape and while the glue is still tacky pump up the plastic bottle in your hands several times. Tip the bottle upside down so that the plug end of the bottle is about 60–80mm (2.4–3.2in) above the area to be treated, then squeeze the sides of the puffer bottle as quickly as you can a few times so that the grasses ‘shoot’ out of the bottle on to the sticky adhesive. Move the bottle along to cover the area that has been spread with glue and leave the treated section to dry.
If your layout calls for tall grass or weeds, repeat the process a second or third time over the whole or parts of the area to be treated.
TAKING IT TO THE NEXT LEVEL
When the basics of planting static grass have been mastered, there are various advanced techniques that can be used. These include creating:
- Very tall grass.
- Natural-looking colour variations.
- Multiple levels of grasses and colours.
CREATING TALL GRASS
You may be content with the first layer of static grass, or you may wish that all or some of the treated areas could be taller grass. Wait until the adhesive has fully dried on the first layer of grass, then thinly brush on a second layer of PVA with a wide paintbrush over some or all of the surface of the already planted static grass. Then pass the electronic tool over the surface again, but with slightly different colour variations of grasses to the first application. Again, leave to dry.
Another alternative to using PVA glue where you want a lighter covering of secondary static grass is to spray some extra-hold unscented hairspray over the area to be treated. Whilst hairspray cannot be applied in such a controlled manner as brushedon PVA, it is useful for a light spread of adhesive to ‘catch’ random fibres.
CREATING NATURAL-LOOKING COLOUR VARIATIONS
Use acrylic spray paints or an airbrush to add further colours very sparingly to your landscapes. Or you could try lightly brush-painting the fibres. For example, where you would like tall summer bleached grass along the roadside or trackside, use a little straw-coloured acrylic paint on a brush to pass lightly through the grass fibres. You will be surprised at how quickly this method changes the appearance of your scenery.
MULTIPLE-LEVEL GRASSES AND COLOURS
Go outside and observe some tall grasses. The lower strands will usually be greener than the top strands of grass. To replicate this effect, lay a first layer of shortest grass (say, 1.5mm or 4mm on an OO-scale layout), then leave to dry. Later, use a brush or pipette to add drops or areas of white glue. Then add a layer of lighter-colour 6mm grass fibres. Once the excess grass fibres have been blown off you will see the multiple-level effect of the grass fibres.
To make small tufts of grass add drops of adhesive to the landscape, then plant grass with an electrostatic tool or puffer bottle. The second tier of fibres will only stick to the wet adhesive, so you can build up clumps of patchy grass and weeds.
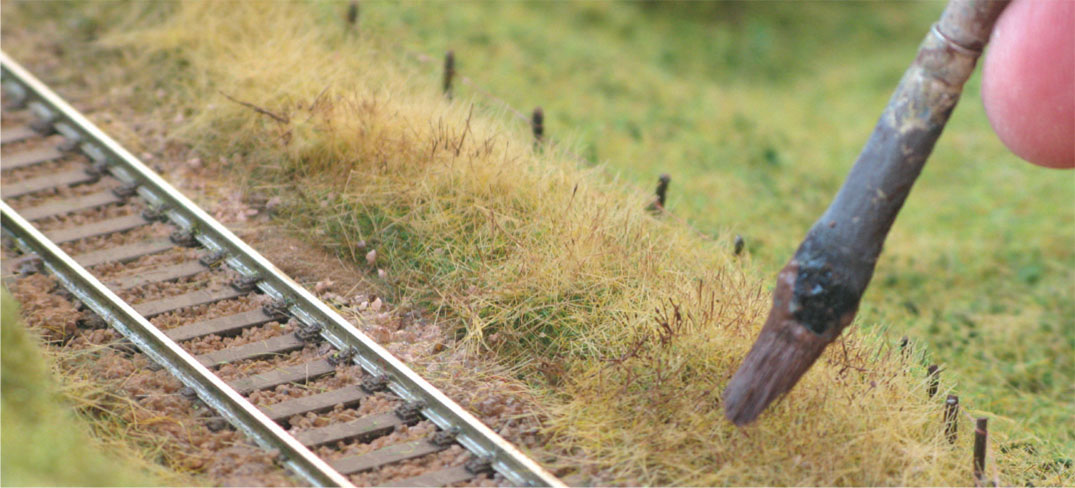
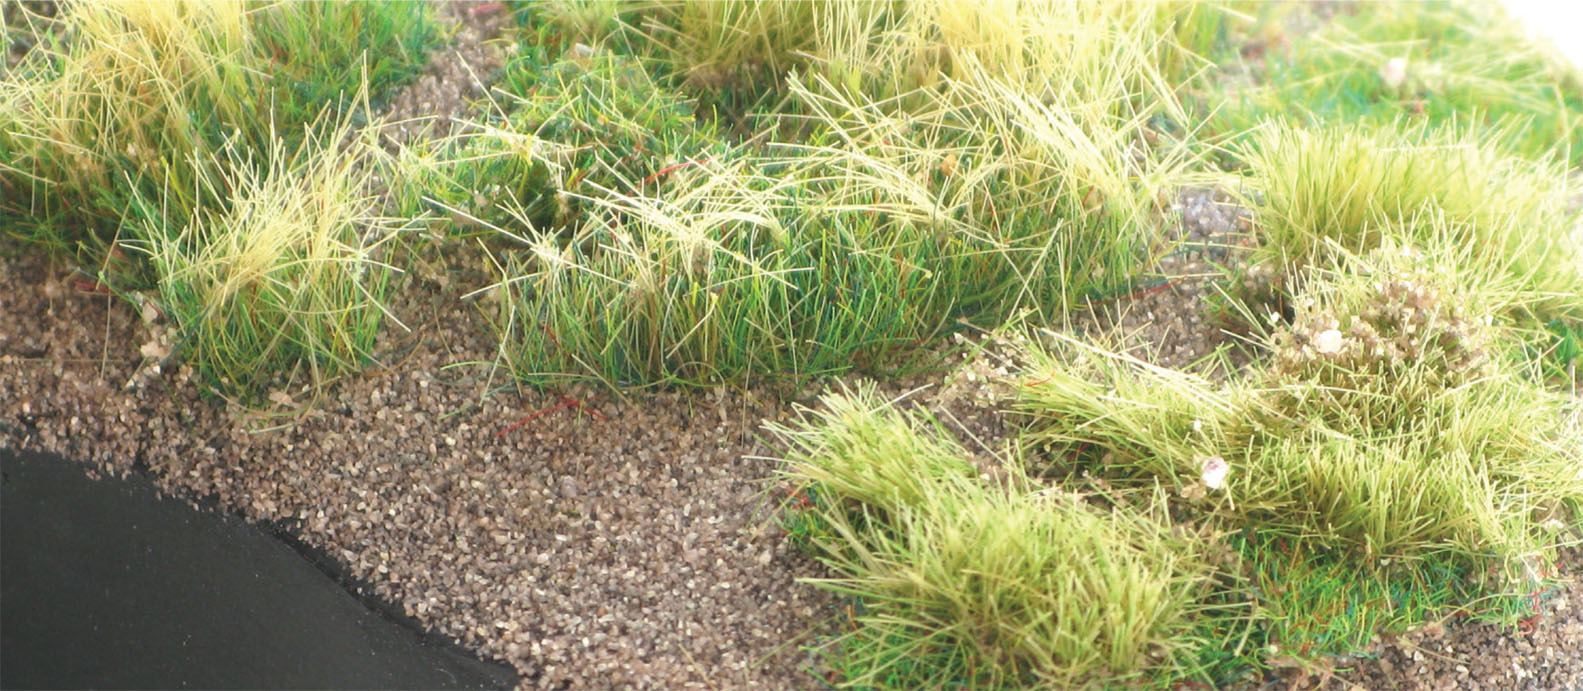
Dry-brushing planted grass fibres is a good way of adding colour variation. Just drag a paintbrush across the tops of the fibres.

This section of landscape uses multiple layers of static grass fibres of different colours and lengths. It is fun to add the extra layers of grass fibres and visually they make the scene much more interesting.
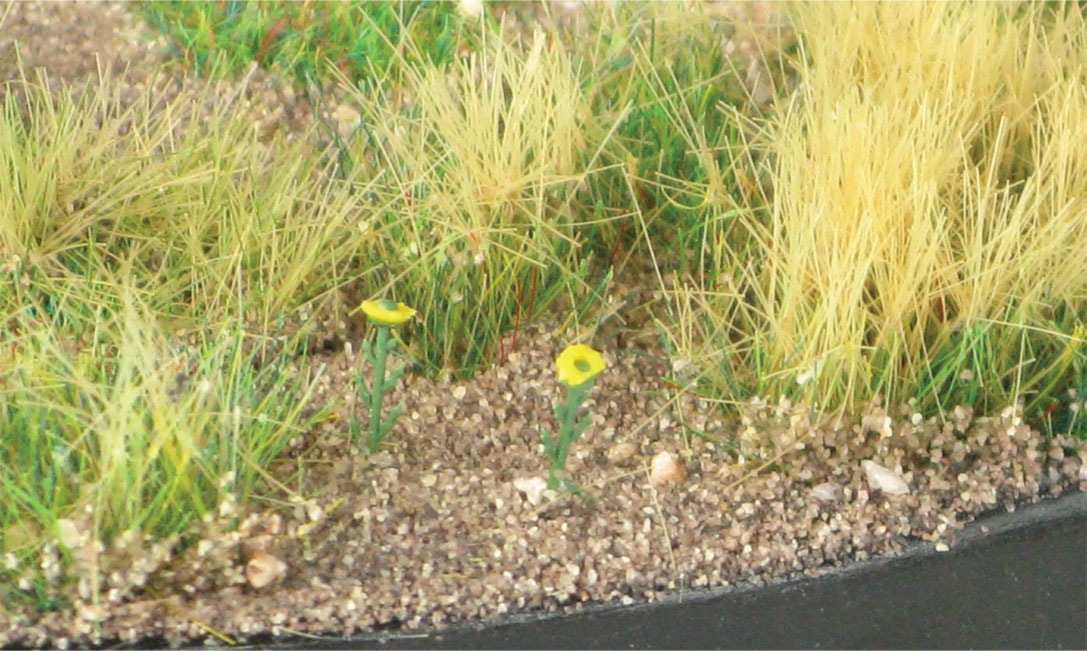
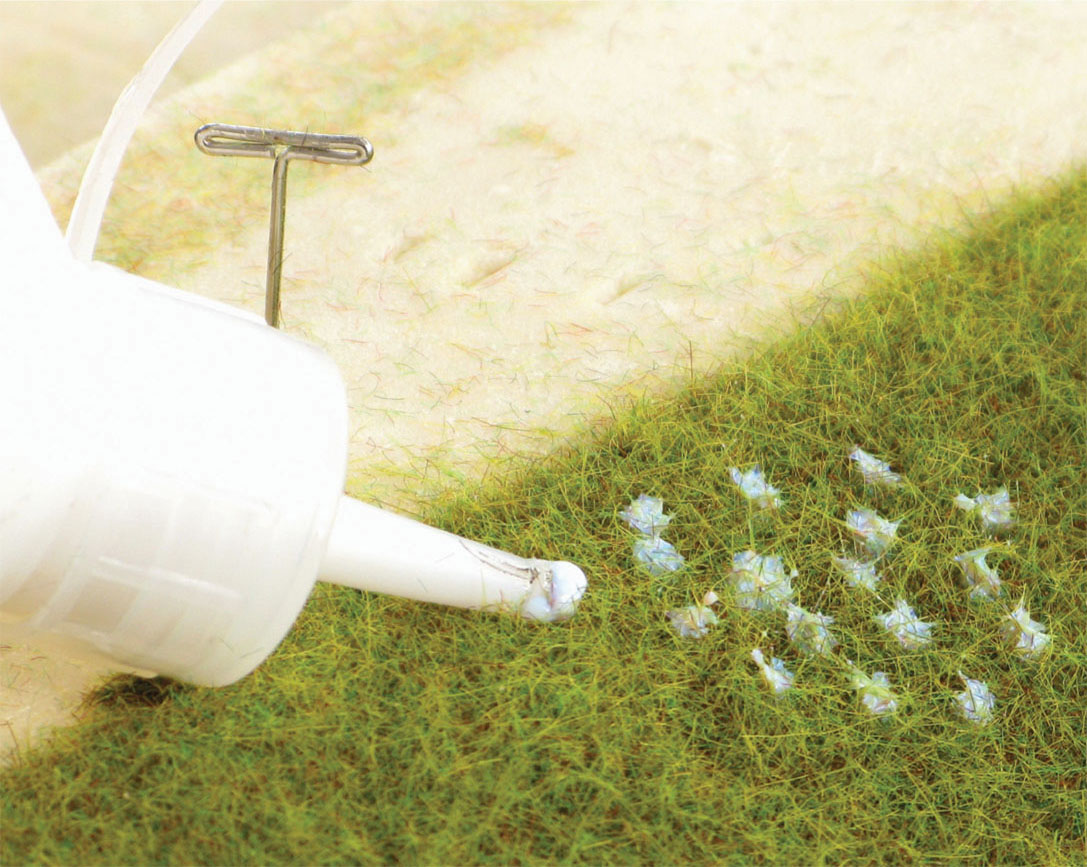
MAKING A FIELD OF POPPIES
To add variations in colour and texture to the planted static grasses, spray a little hairspray over some areas, then sprinkle on some fine foam and/or coarse scatters. This is an easy way of adding a ‘dash of colour’ to the landscape. For example, to create a poppy field or a patch of poppies sprinkle some tiny pieces of red foam scatter through your fingers on top of justapplied hairspray. Then seal the poppy flowers to the landscape with another light coating of the hairspray. If some have planted themselves where you did not want them, it is simple to remove the flower heads by using a small pair of tweezers to pluck them off the grass.
By combining traditional materials such as rubberized horsehair with the more modern materials such as static grass fibres, the scenic modeller can achieve the ‘best of both worlds’.
Tips for Planting Static Grass
- First, paint the baseboard a solid colour using acrylic, latex, emulsion paints or similar. This is necessary to prevent the colour of the baseboard showing between the static grass fibres as one looks down through the planted grass fibres. Leave the paint to dry before adding the adhesive and the grass fibres.
- Choose the colours and lengths of static grass that you wish to use on the landscape. The longest fibres will be necessary for the larger scales.
- Do not be tempted to use the brightest grass fibres. The more subdued the colour, the more realistic it will look. Be careful not to mix seasonal colours.
- Spread the adhesive on the landscape with a wide, flat paintbrush in areas of about 100sq cm (15.5sq in) at a time. If the area is any larger, the adhesive will start to dry out before the fibres have been planted. With the adhesive still wet, use the tool to apply static grass fibres.
- Leave the planted section to dry. The length of drying time of the adhesive will depend upon the time of year and the location in which you are doing the work. The warmer the room, the quicker it will dry.
- Only after you are convinced that the static grass fibres are firmly fixed down on the baseboard should you shake or vacuum off any excess static grasses that have not stuck to the adhesive. Reuse the unused static grass fibres if possible.
- If your layout calls for tall grass or weeds repeat the process a second or third time over the whole or parts of the area to be treated. Just keep on painting adhesive on to planted grass fibres, then add more fibres to build up the height of the grass.
- If you want to just plant a few areas of taller grass try spraying extra-hold hairspray in the area of already planted grass. It acts as a good adhesive for static grass fibres.
- To add additional texture variations run a paintbrush partly loaded with adhesive over the top of planted grass fibres, then sprinkle on various fine foam scatter materials of the appropriate size and colours. This creates the illusion of flower and weed heads.
- When using the 10 and 12mm grass lengths it is necessary to run a vacuum cleaner over the surface of the newly planted grasses a few minutes after they have been planted into the glue. In this way they will stand upright and not simply fall back down into the adhesive.
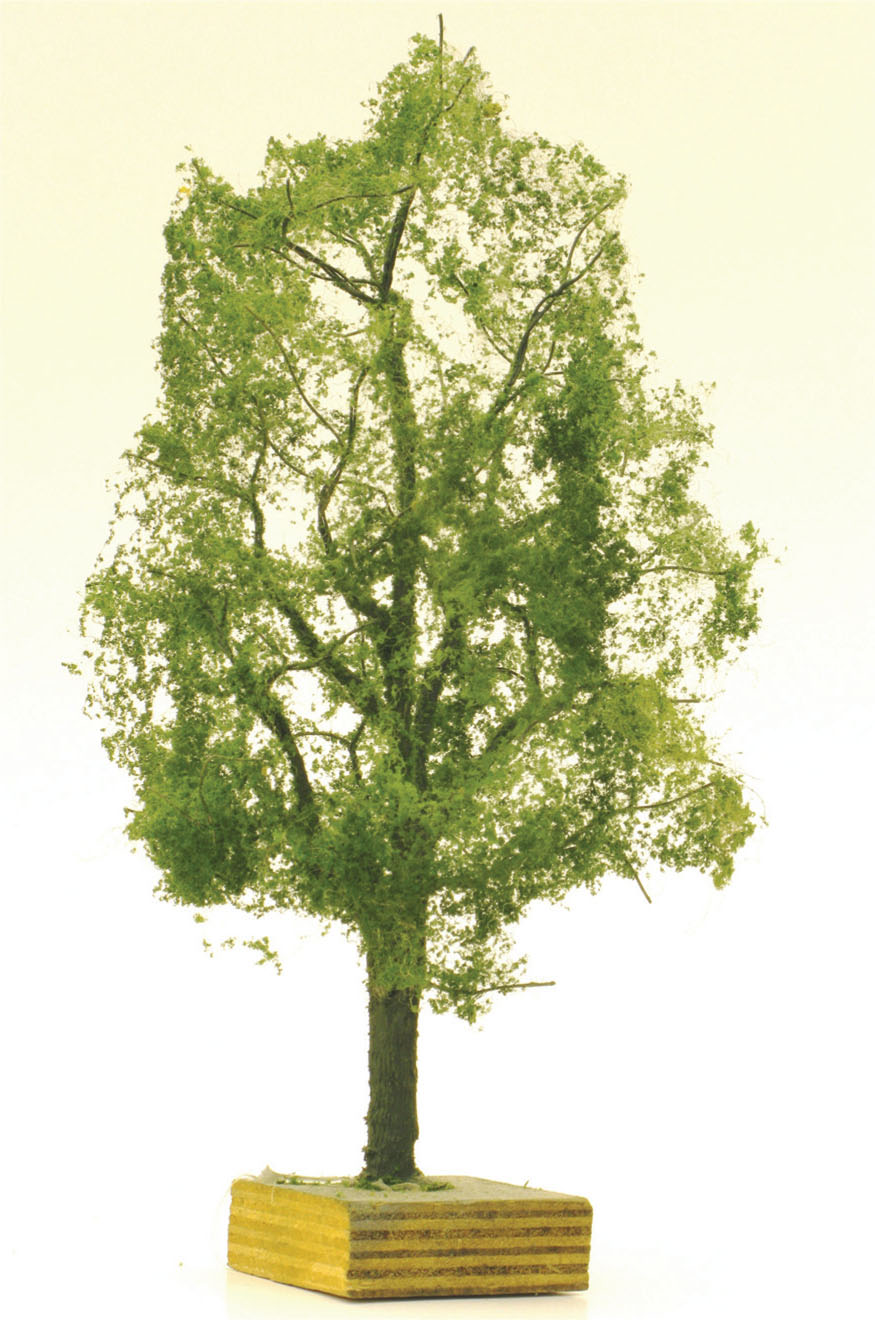
TREES
Today’s scenic modellers are blessed with a good selection of models of trees in various scales. The trees come in highly detailed form or as basic trees either as deciduous or coniferous trees.
WHAT MODERN PRODUCTS ARE AVAILABLE?
Ready-made models of trees have come a very long way in the last decade. Today, the scenic modeller is spoilt for choice. Many ready-assembled trees look good straight out of the packaging. Others require a little work to improve their appearance, but definitely have the potential of becoming a realistic-looking tree compared to some models of trees that require a substantial amount of work to make them acceptable to the modeller’s eye. In addition, there are many tree components available right down to miniature leaves and a number of tree kits that feature a variety of materials, such as wire, tree armatures, plastic trunks, white metal trunks – the list goes on. There are a number of companies that offer a bespoke treemaking service.
REAPY-TO-PLANT TREES
A few years ago, companies just offered models of either coniferous or deciduous trees. Things are very different now. Today, modellers want model trees that look like trees – of the correct species, for the correct season and of the correct height. There are an increasing number of model tree manufacturers. Some are big-name manufacturers, whilst others are scenic specialists. Some of the larger manufacturers tend to offer ranges of trees, including economy packs of a number of basic trees, standard-quality trees and premium-quality trees. Usually, the higher the price tag on a tree, the better the model.
Many of the trees made by mainstream model railway companies are now of good quality. These manufacturers include Anita Decor, Bachmann Scenescapes, Busch, Faller, Gaugemaster, Heki, Hornby Skale Scenics, K & M, Noch, The Model Tree Shop, Viessmann and Woodland Scenics. Some firms such as Faller, Gaugemaster, Heki, Hornby Skale Scenics, Noch and Woodland Scenics retail bumper bags of trees that usually represent good value. The tree shapes are typical rather than detailed and as such these are useful trees for the background scenes on layouts.
Anita Decor manufactures trees that are beautifully crafted using natural components. Being handmade, they are suitable as specimen trees at the front of layouts. The company retail trees that suit various scales, for example oak trees in heights of 25, 35 and 45cm.
Some companies specialize in architectural model trees (for example, 4D Model Shop and Treemendus) and these are generally of a very good standard. Manufacturers of architectural tree models also offer a bespoke tree-building service if a specific size, shape and kind of tree is required. These are ideal for single standing specimen trees and those near to the viewing edge of a layout, where the budget permits it.
Many of the European manufacturers retail fruit trees complete with miniature fruit. Whilst some of these are realistic, others feature fruit that may be intended to look like apples, but in scale terms look more the size of pumpkins!
One useful source of trees is The Model Tree Shop (www.themodeltreeshop.co.uk), which sells tree ranges made in three methods: string and wire; etched brass; and twisted wire. Take a look at their website – the number of model trees that this company retails is amazing.
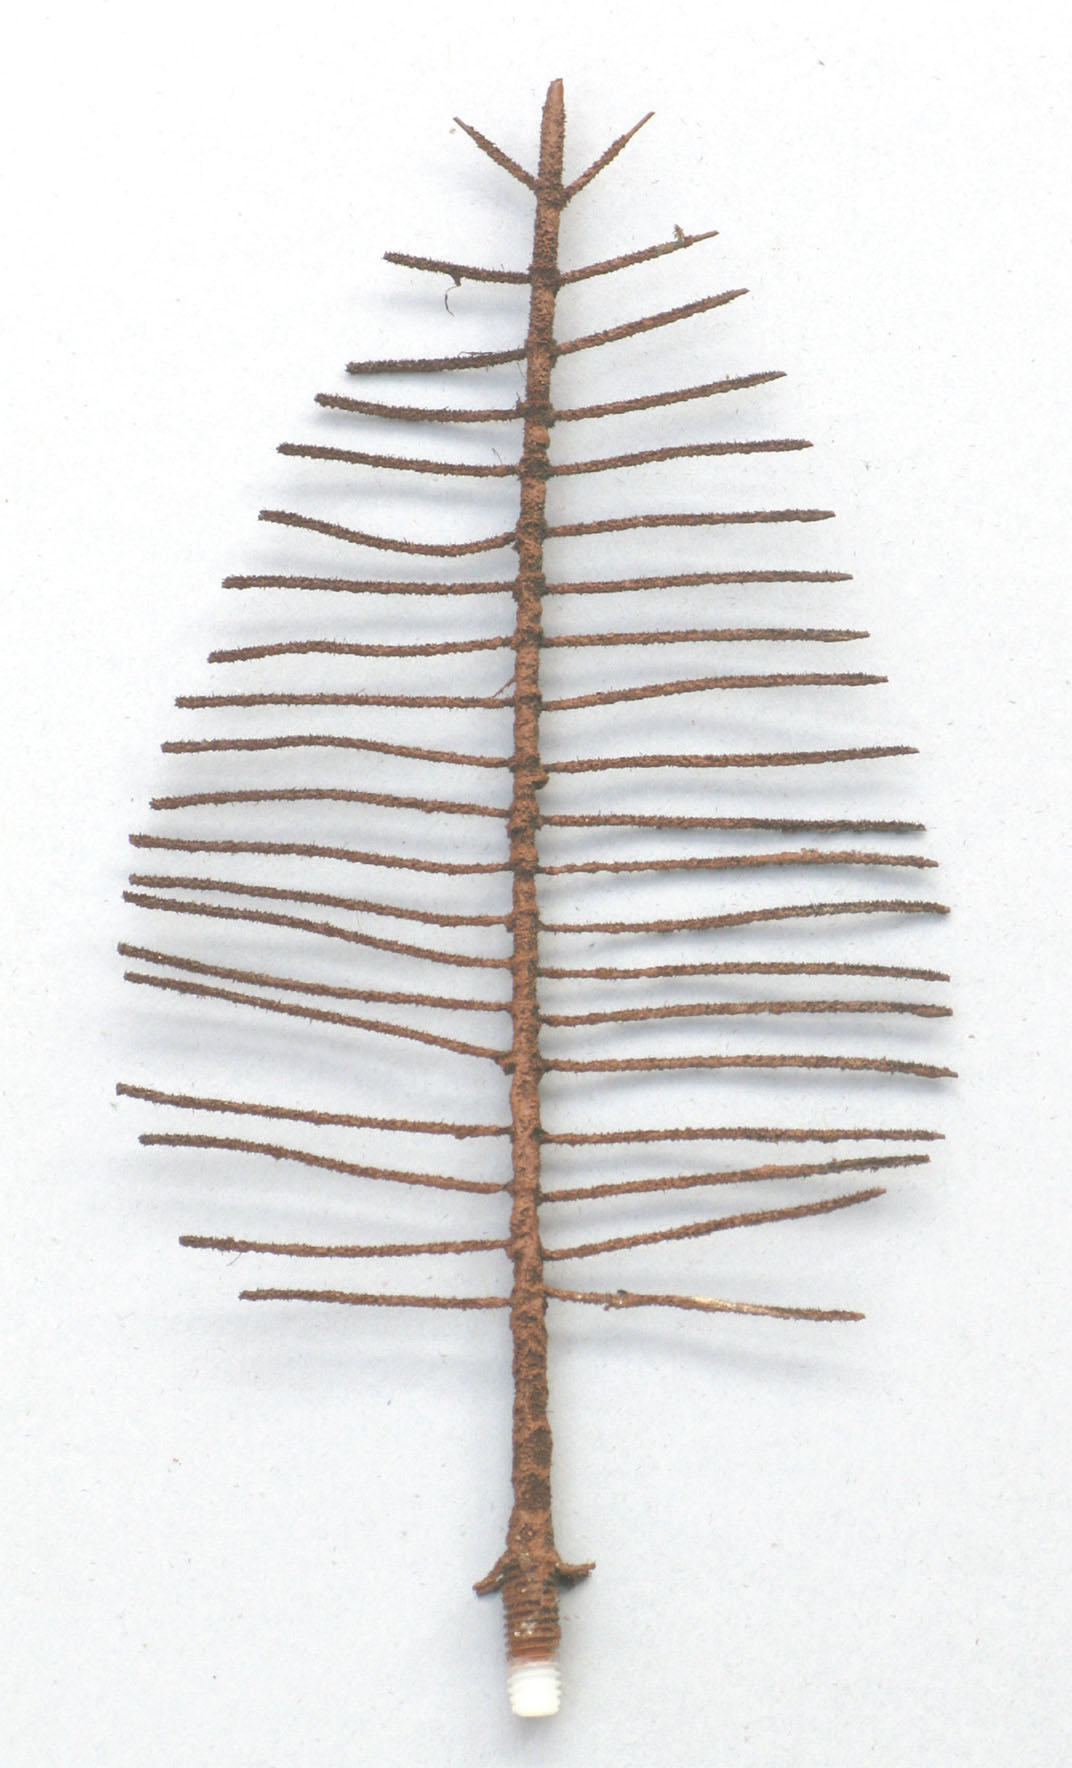
MAKING TREES FROM WIRE
Wire suitable for trees can be purchased from florist shops or specialist model suppliers. It is either sold on a reel or in lengths. Firstly, decide what height the tree will be, which will determine the longest length of wire that will be needed to form the basis of the trunk for the tree. The lengths of wire can be cut as necessary with wire cutters that are obtainable from any DIY stores.
Secondly, study the shape of the real tree that you intend to model. The correct tree profile can be found in one of the many books about trees that are available. Keep the book close by as you make the tree and refer to it from time to time to ensure that your model looks authentic. How many main branches does a typical tree have? Does it have a close-knit branch structure, or are the branches few in number? Is the trunk very thick or slender? The answers to these questions will determine the number of lengths of wire that will be needed for each particular tree. Basically, the more branches and the thicker the trunk, the more lengths of wire that will need to be wound.
One lone well-made tree makes a real contribution to any layout. This tree is made from wire by 4D Model Shop.
This stand of mixed trees at Pendon is mainly made from wound wire and foliage material. Pendon Museum has so many trees on its layouts that it sets up a production line to make them.
To start making a tree, take the longest lengths of wire and twist them around each other one by one. For the length of the main trunk, all the wires will need to be wound around each other tightly for the lower section of the tree to form the trunk, leaving the top two-thirds of the wires generally untwisted. Twisting wire is not a task that you can do for hours on end. It is rather wearisome on the fingers and you may find that it is best to limit the time spent on the task. Once you are happy with the shape of the main trunk, you can begin to twist the wires to form the main branches. When you have twisted the number of main branches, stand back and look at the shape of the tree. Does it compare well with the tree profile that you are aiming to achieve? Use finer-diameter wire to add further branches.
There are several ways of adding the bark. Some modellers wrap the main trunk and the main branches with florist’s tape, to be followed by adding tree bark material. Others simply add tree bark material to the trunk and branches. Tree bark can be one of three different materials:
- Flexible sealant obtainable from DIY stores; ideally this should be dark grey or brown in colour, but if not mix in a little paint to colour it.
- Tree bark powder that needs to be mixed with PVA adhesive – this is obtainable from Treemendus and other suppliers.
- Ready-mixed tree bark obtainable from Green Scene and International Models.
Whichever method you use, the tree bark material can be brushed on to the trunk and main branches using an old flat paintbrush. It is not necessary to get a perfectly smooth finish – tree bark is never that! Leave the tree bark to dry for at least twenty-four hours. Go back to your book of trees and see what the colour of the bark is on the actual tree. Acrylic paints can be used to colour the trunk and main branches using a paintbrush or acrylic aerosol spray paints, or by using an airbrush.
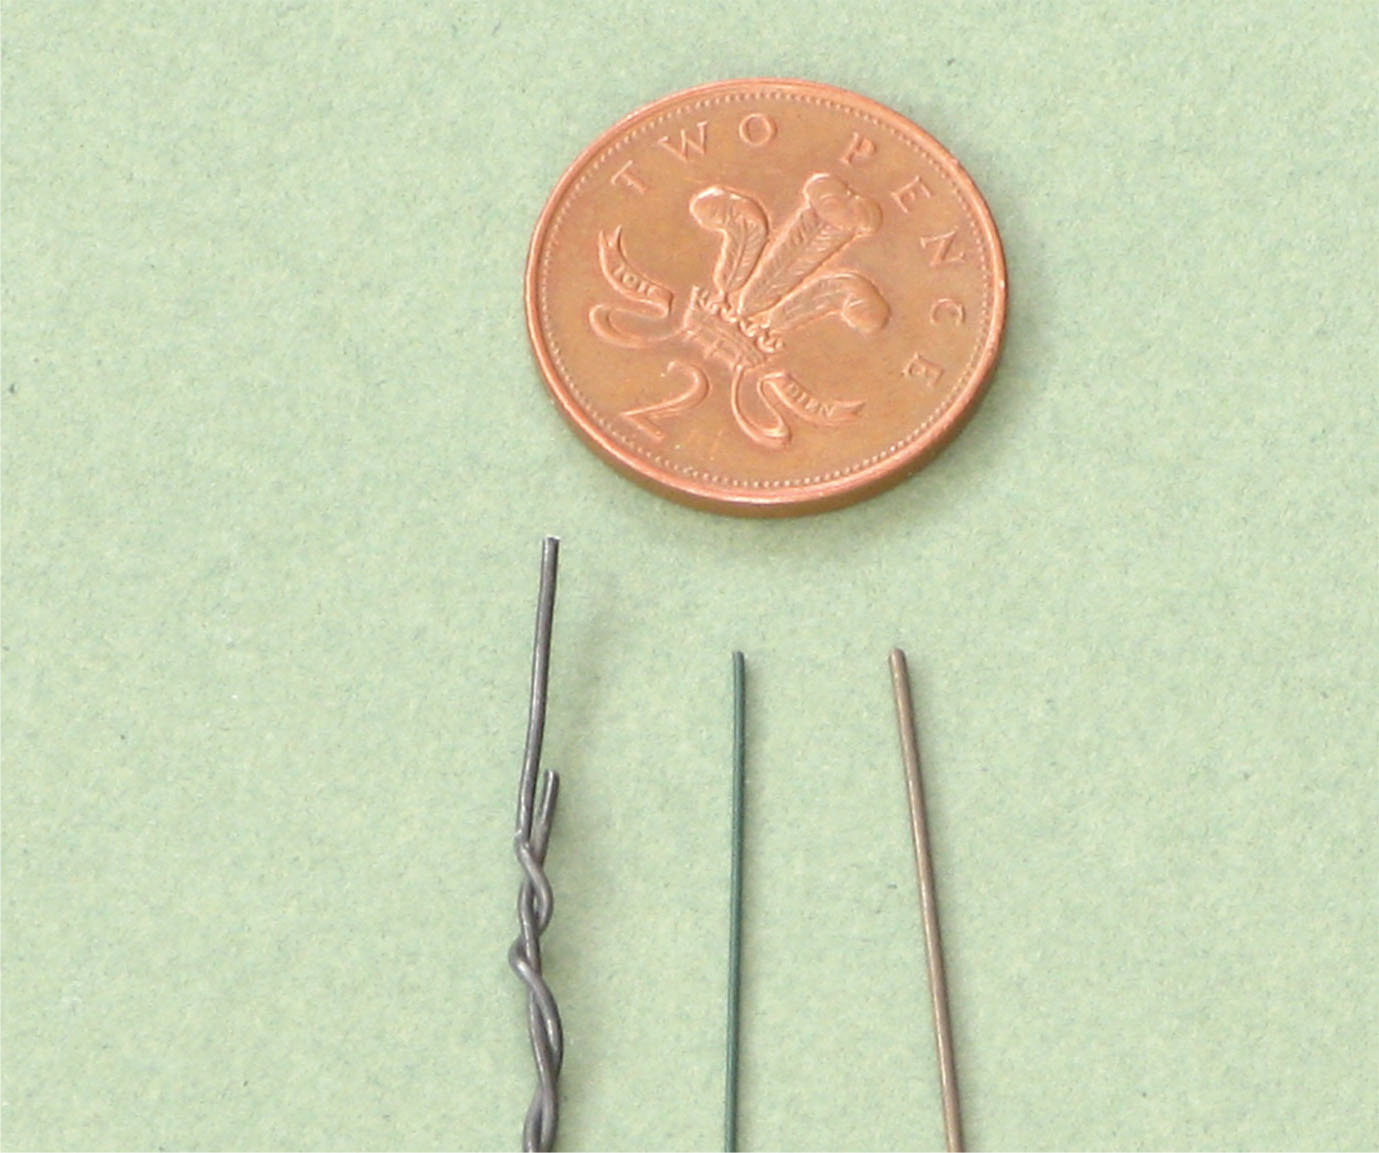
This selection of wire was bought from a florist’s shop and specialist suppliers at model railway shows.
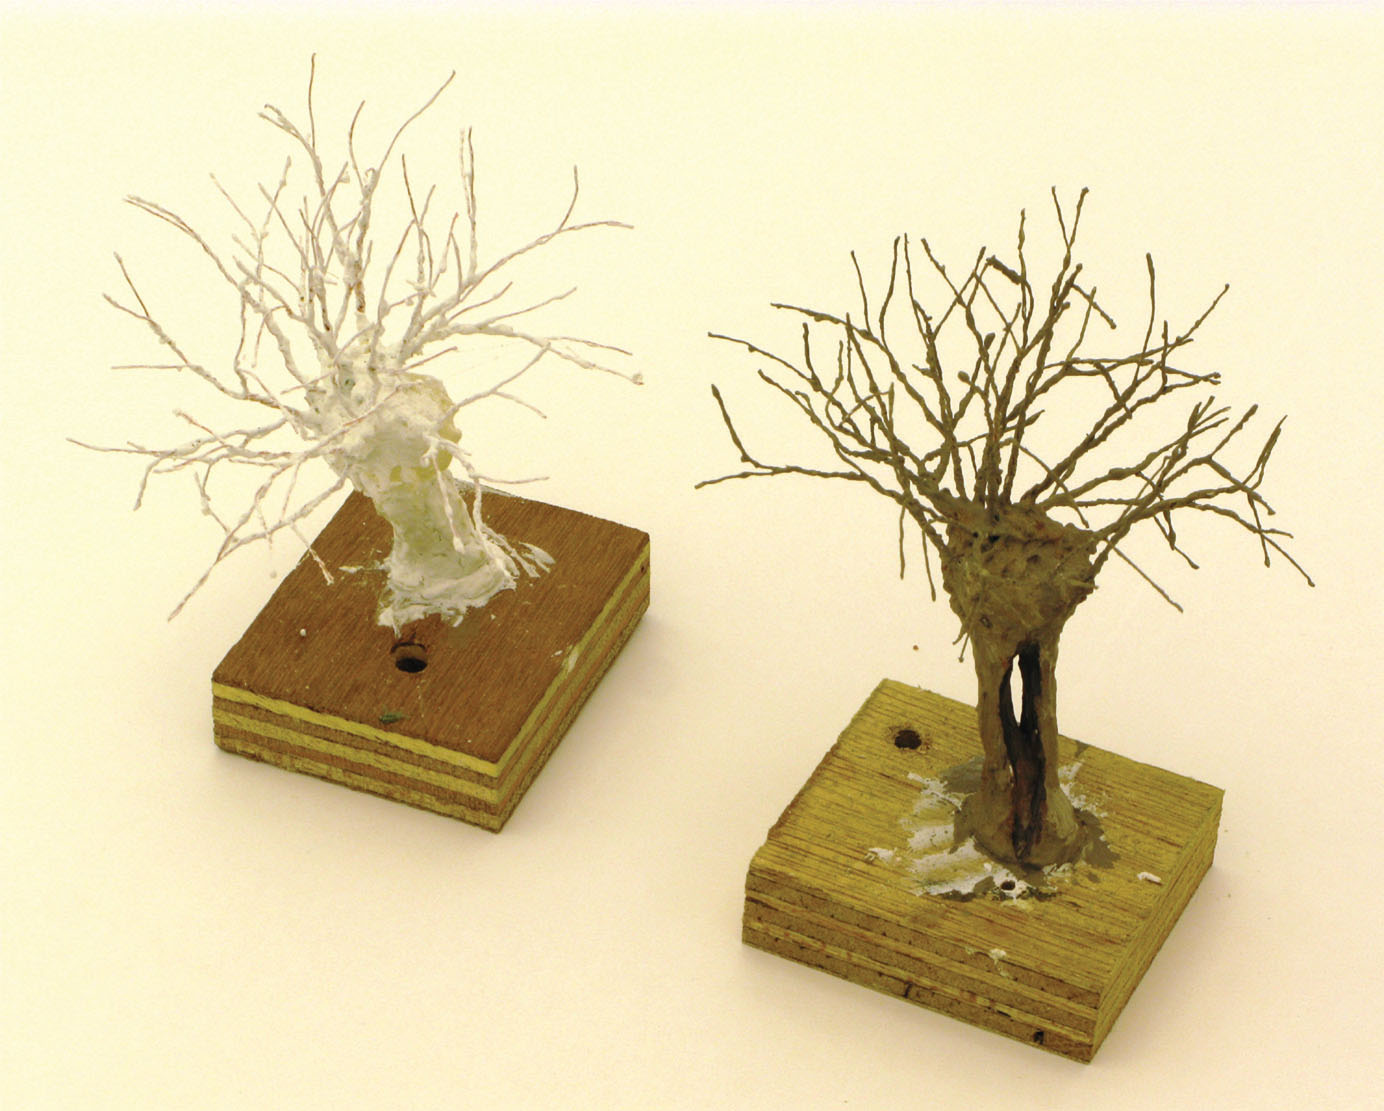
Two Pendon wire willow trees under construction. Note the bark effect; one is already painted. The trees stand in a wooden block during the construction process.
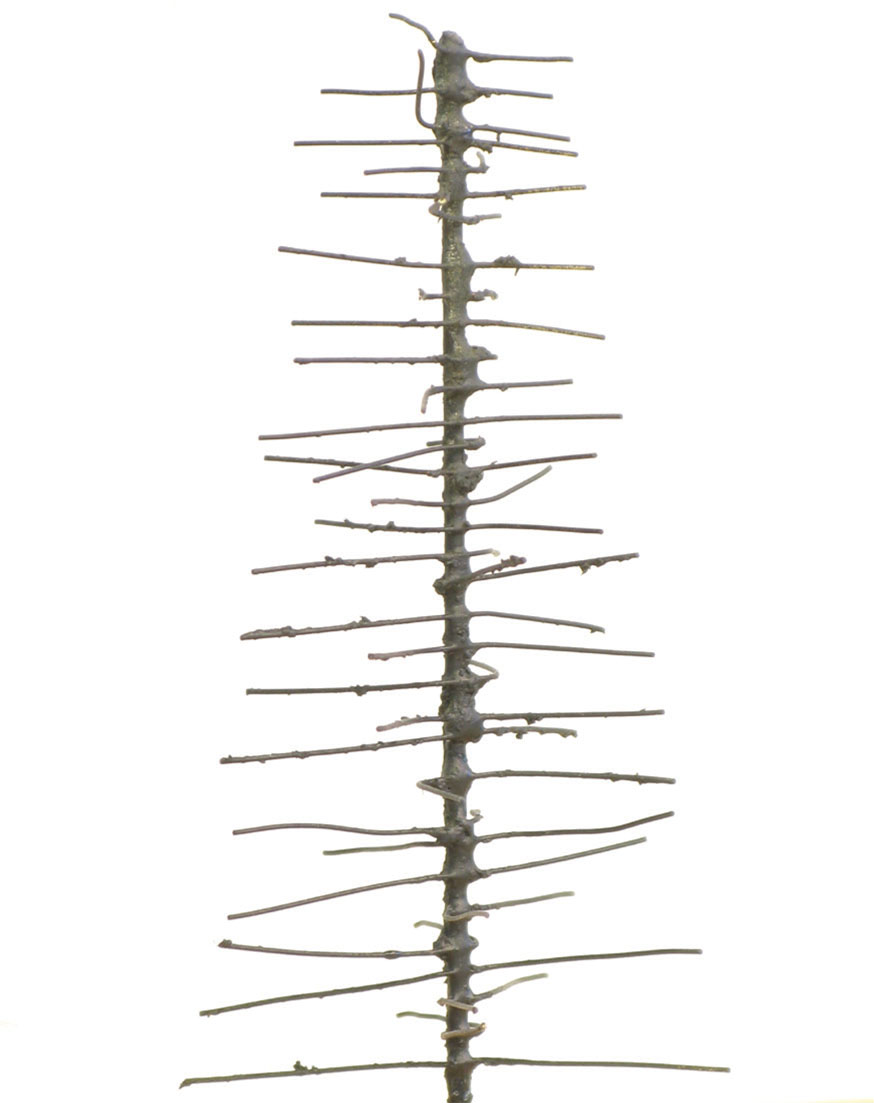
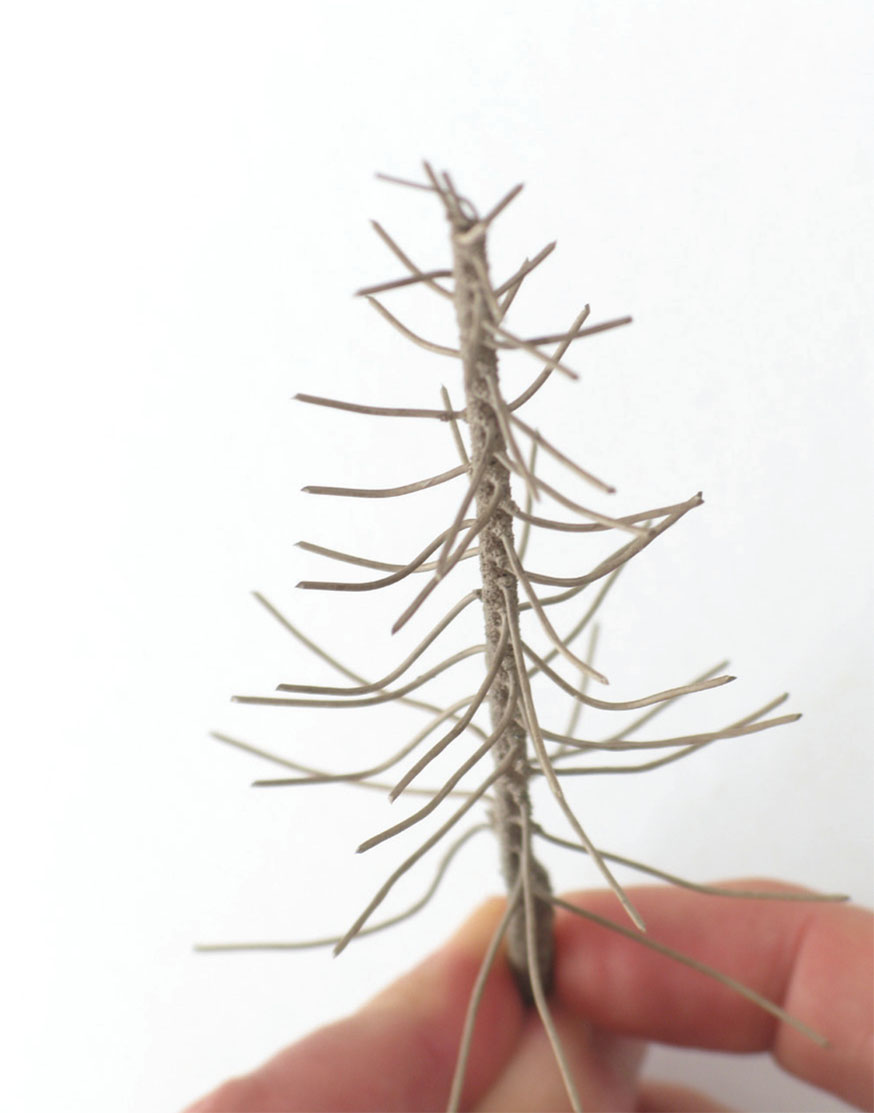
A handmade conifer tree armature made by winding wire and then gluing the wires together with a hot glue gun.
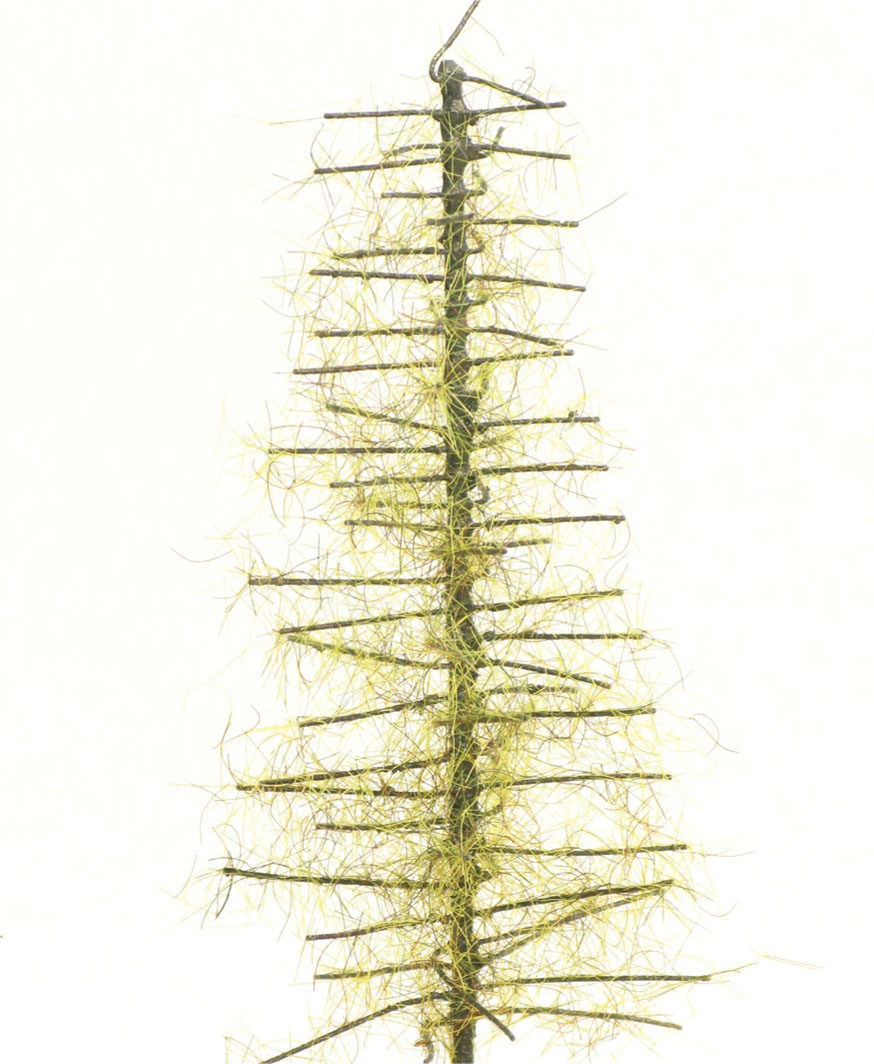
The same tree armature now has added grass fibres to build up the foliage in layers. The more layers of fibres that are added, the denser the foliage will become.
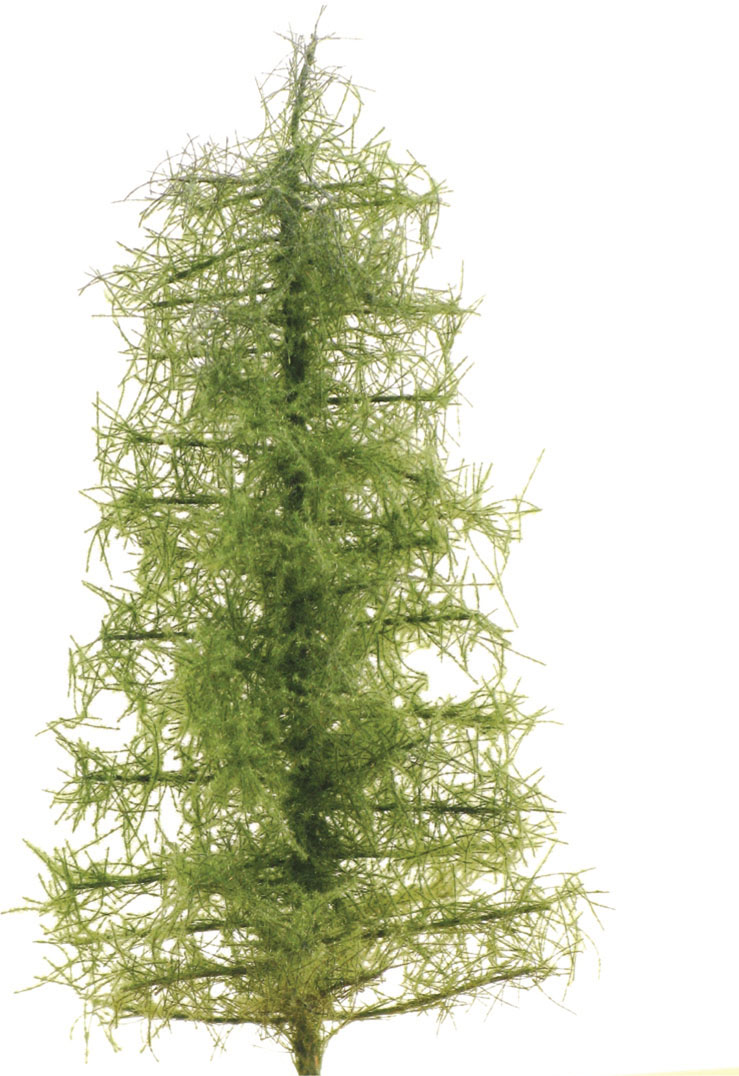
By using static grass fibres and miniNatur foliage, this wire tree armature has been transformed into a realistic-looking tree as made by Stephan Kraus.
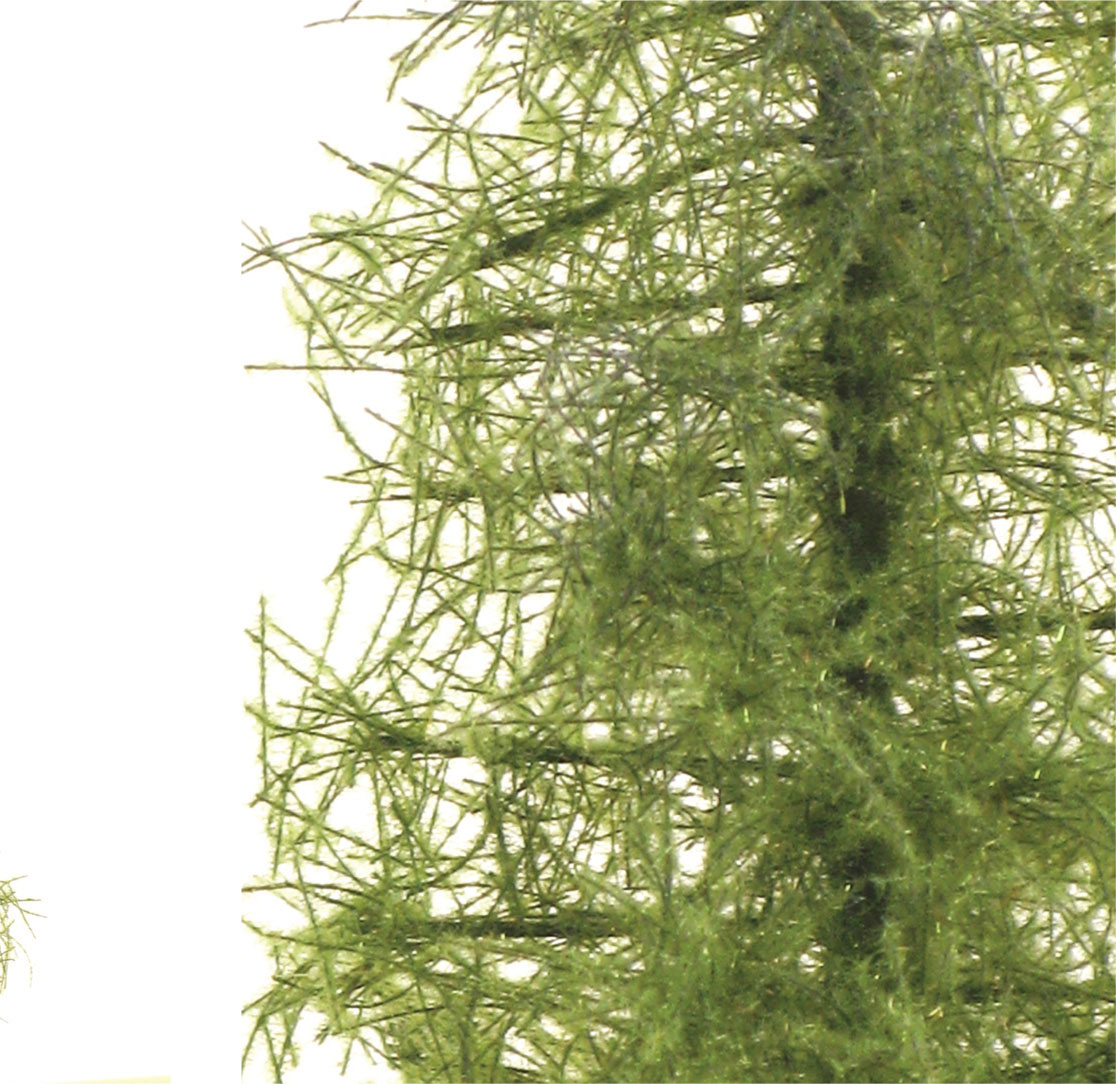
Close-up of the foliage on the completed tree.
A deciduous tree using wire for its trunk and branches with light foliage at Pendon Museum.
Tree trunks are rarely one colour, so it will be worth highlighting various parts of the trunk with different-colour paints by dry brushing. Once the paint is dry on the trunk and the branches, it is time to add the foliage. Again, study the reference book to see if the foliage is dense or light and airy. This may depend upon the season that you are modelling.
There are various materials available for tree foliage from Heki, miniNatur or Woodland Scenics, for example foliage mats and sections that can be cut and teased out from the main piece to form ‘clumps’ of foliage. Woodland Scenics Poly Fibre is a light and airy material that can be teased out from the main ball. Treemendus canopy is fine twisted pastiche material that can easily be teased out from its twine. Rubberized horsehair can be sprayed green and teased out to form foliage and finally sea moss pieces create a light and airy foliage effect.
These materials can be prepared appropriately according to the size of tree. Do not attempt to cover a tree with one piece of teased-out foliage – it is generally much better to use more, smaller pieces. The foliage pieces can be fixed to the branches using dabs of PVA adhesive or contact adhesive, which then needs to be left to dry.
Add some individual leaves to the tree. There are various excellent products for this process, including Noch Laub (leaves) and any of the fine scatters now available. Use a couple of quick bursts of supermarket extra-hold unscented hairspray across the foliage, then by hand sprinkle on the leaf material. Do not apply so much leaf material as to cover the foliage. The intention is to add texture and variety to the foliage. When you are content that the tree is as good as it can be, spray it either with more hairspray or with Woodland Scenics Scenic Cement, or any other designated scenic glue from Treemendus or Deluxe Materials.
If making a tree in winter it is not necessary to add leaves and foliage. A tree outline could be sprayed grey. Adding sea moss to the branches they spraying the entire tree grey can create a convincing deciduous tree in winter. Plant the tree in the landscape and fix with a blob of PVA adhesive.
This tree armature was purchased from miniNatur and comes complete with coloured bark effect.
Between my fingers I manipulated the ‘wire branches’ so that they pointed in all directions.
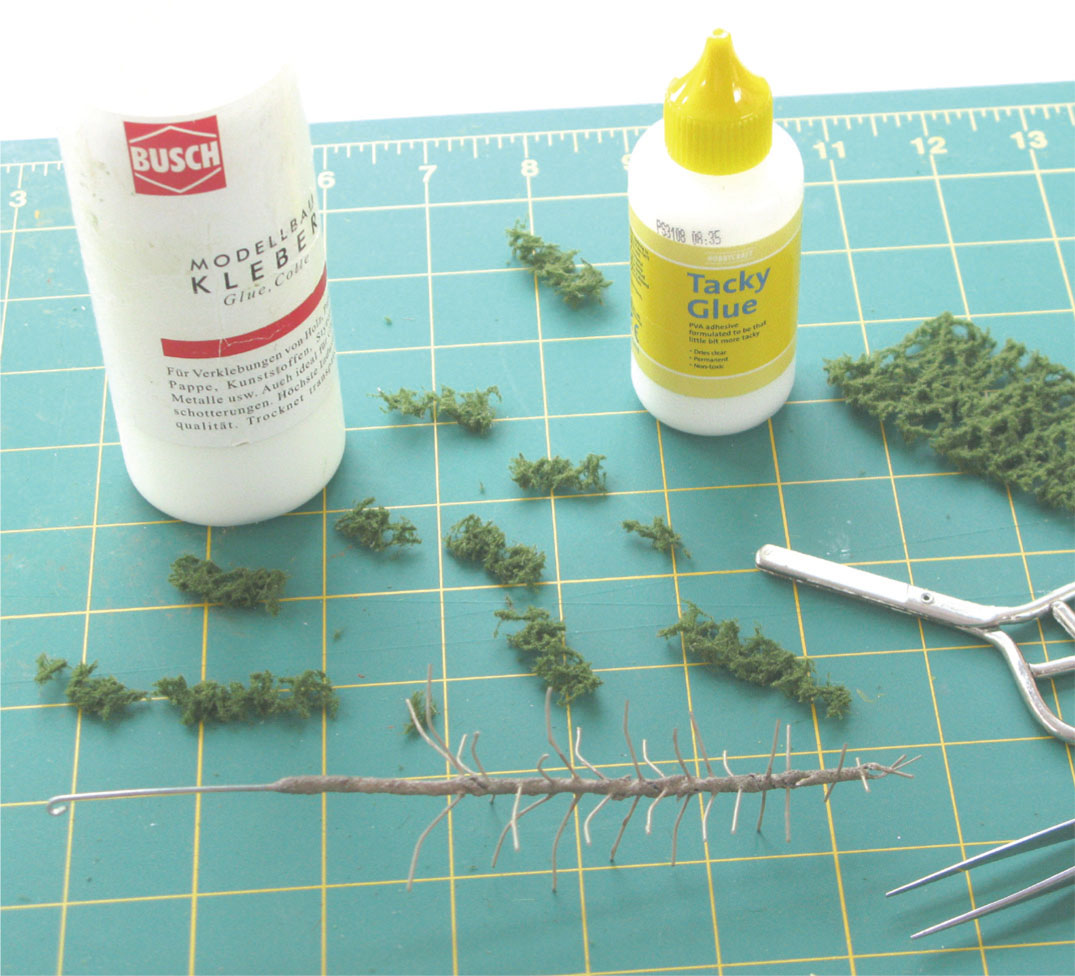
Next step was to cut up pieces of miniNatur foliage with scissors to be added to the armature. The foliage can be teased out too.

Close-up of the drooping foliage on a branch. The foliage was fixed using Busch scenic glue.

This is the completed tree after about two hours’ work.

A conifer tree made from balsa wood, shaped with a sharp craft knife. Florist’s wire was pushed through holes in the trunk and bent over, then foliage added from a foliage mat.
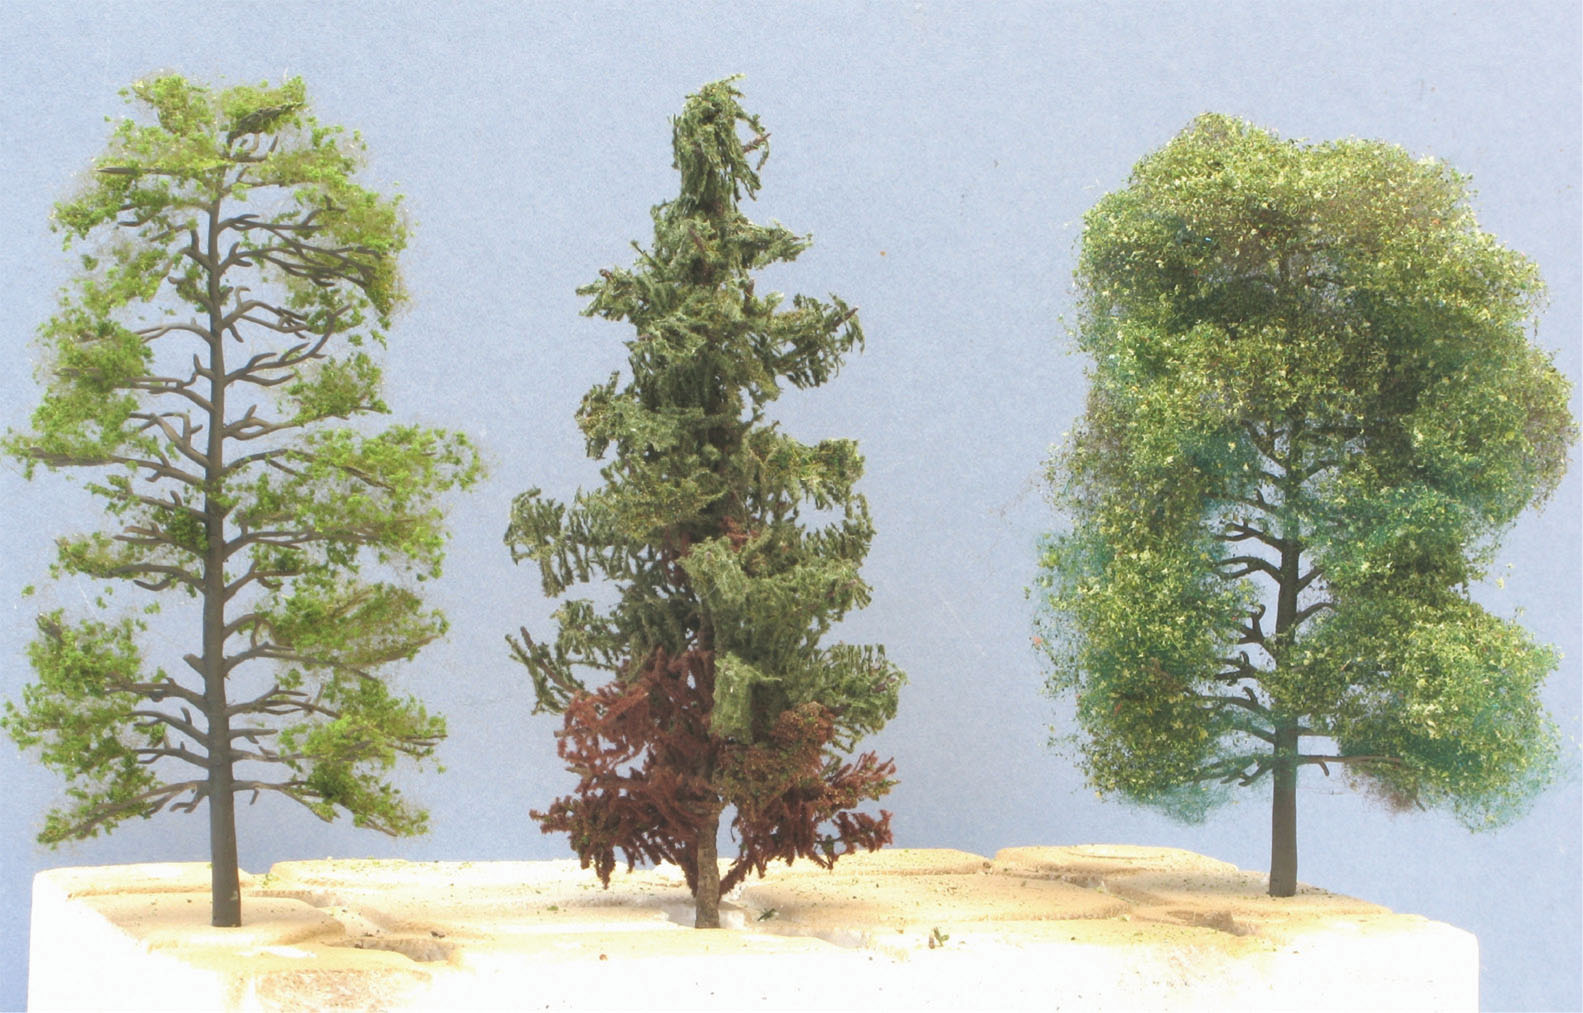
To the left and the right are trees made from Heki plastic tree armatures. To the left the tree is lightly covered in foliage mat, but the tree to the right uses lots of teased-out poly-fibre to give a denser foliage. The tree in the middle was made from a weathered spruce kit by miniNatur.
This rural scene is partially completed. The retaining wall is by Heki. It has just one coat of paint and the first layer of scenic materials.

The same scene, but now the wall has been dry-brushed a darker colour to make the stonework more obvious and various creeping plants, made from Woodland Scenics Poly Fibre treated with scatter materials, now grow up the wall. The scene looks much more complete than the previous picture.
Tree armatures form the trunk and branches of a tree. We are very familiar with armatures moulded in plastic from companies such as Woodland Scenics but these are also available made from wire with the trunk and main parts of the branches coated in a flexible material which comes ready painted. The range by Langmesser Modellwelt includes both deciduous and conifers and is suitable for scales N upwards. A tree armature such as these would probably taken up to 2 to 3 hours to make to this standard. The branches on the armatures need to be twisted around through the fingers but this is just a five minute job.
INTERLUDE ON THE WISBECH AND UPWELL
Even a small layout can endeavour to capture the flavour of a well-known line. Here we have a glimpse of the Wisbech and Upwell Tramway using all ‘off the peg’ equipment. The line running alongside a road was one of the memorable features of the now-closed line. This layout was built for British Railway Modelling (BRM) magazine.
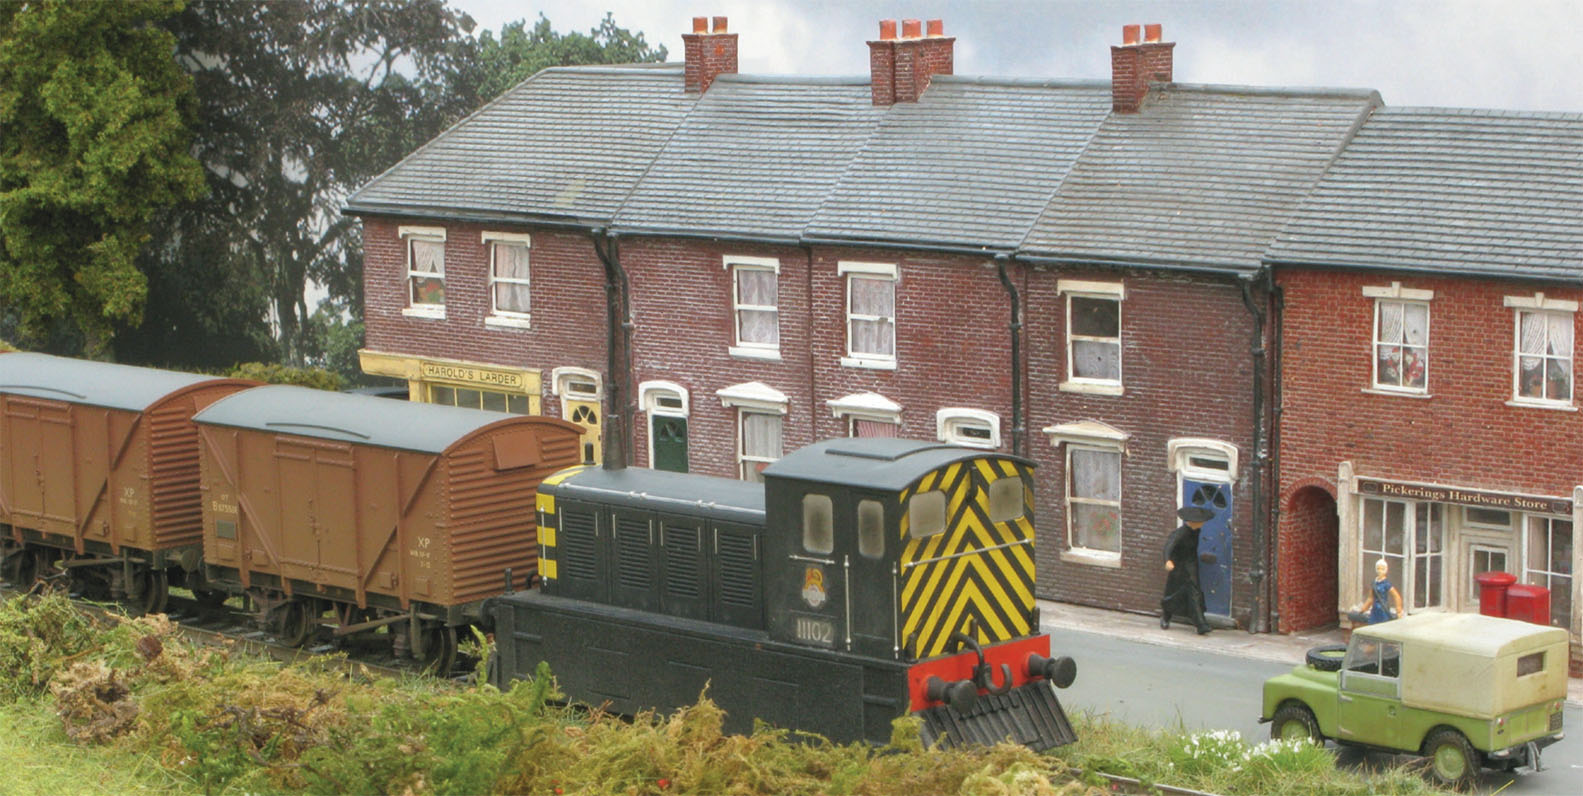
The row of cottages on the Wisbech layout were Hornby Skaledale models with repainted front doors, curtains, different stages of weathering, a pavement using Metcalfe paving slabs and various figures and road vehicles.
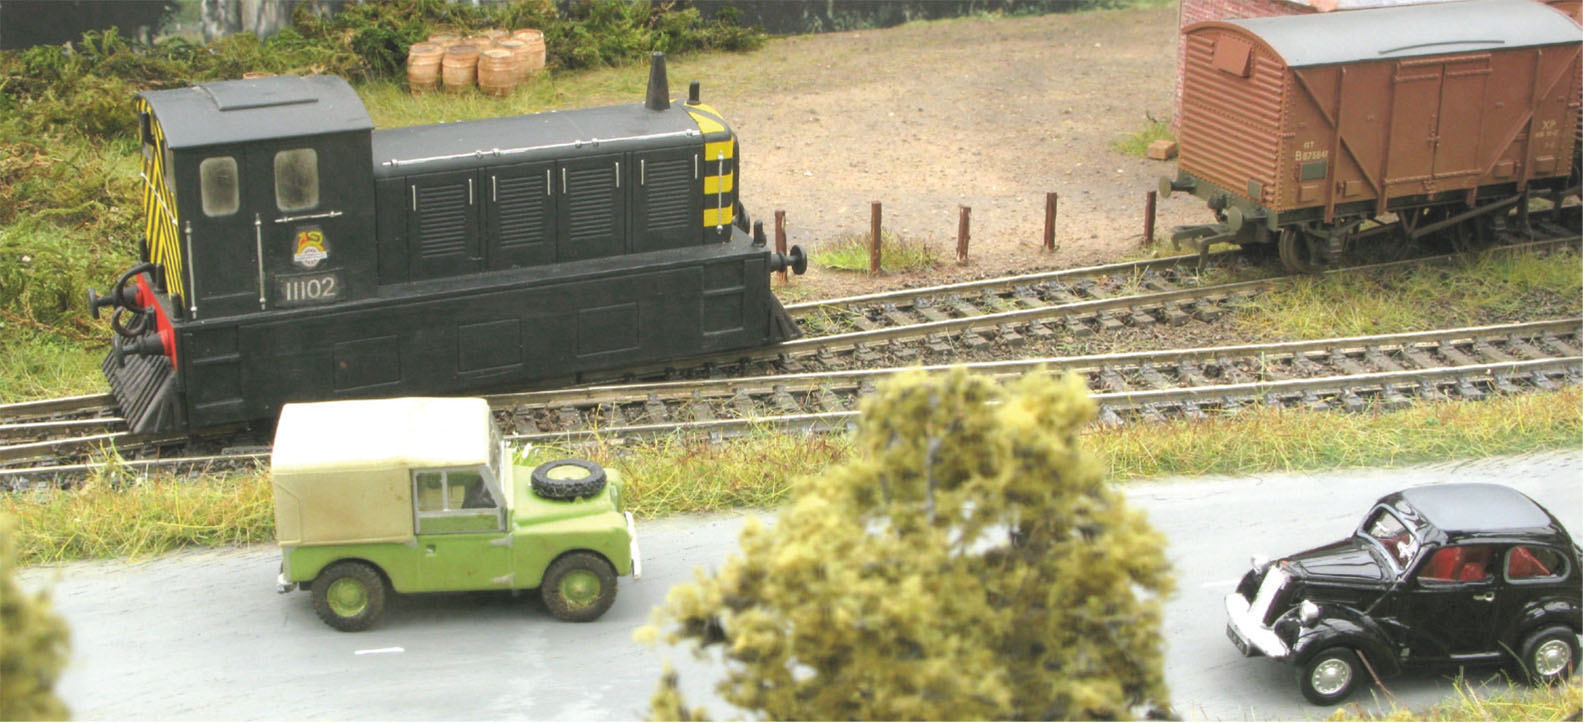
Class 04 11102 is shunting in the yard. The basis for this locomotive used a Bachmann Trains USA locomotive that I imported into the UK. There is more road traffic to be seen on the layout than there would have been in real life at the time.
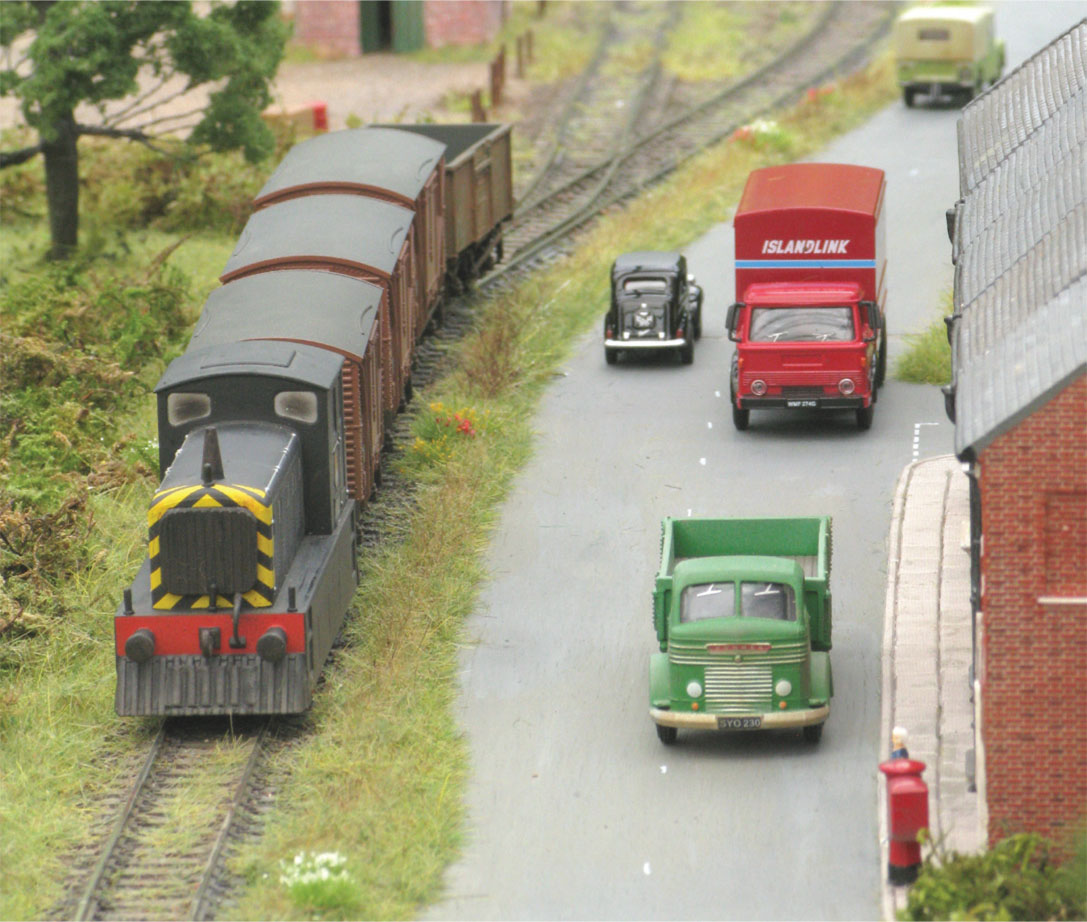
In reality, lorries caused the demise of this line, so here we have two of the line’s opposition racing the train towards the cottages.
The tram locomotive used a Bachmann Trains USA ‘Toby’ locomotive as its basis. I added various details to give an overall impression of the famous tram locomotive.
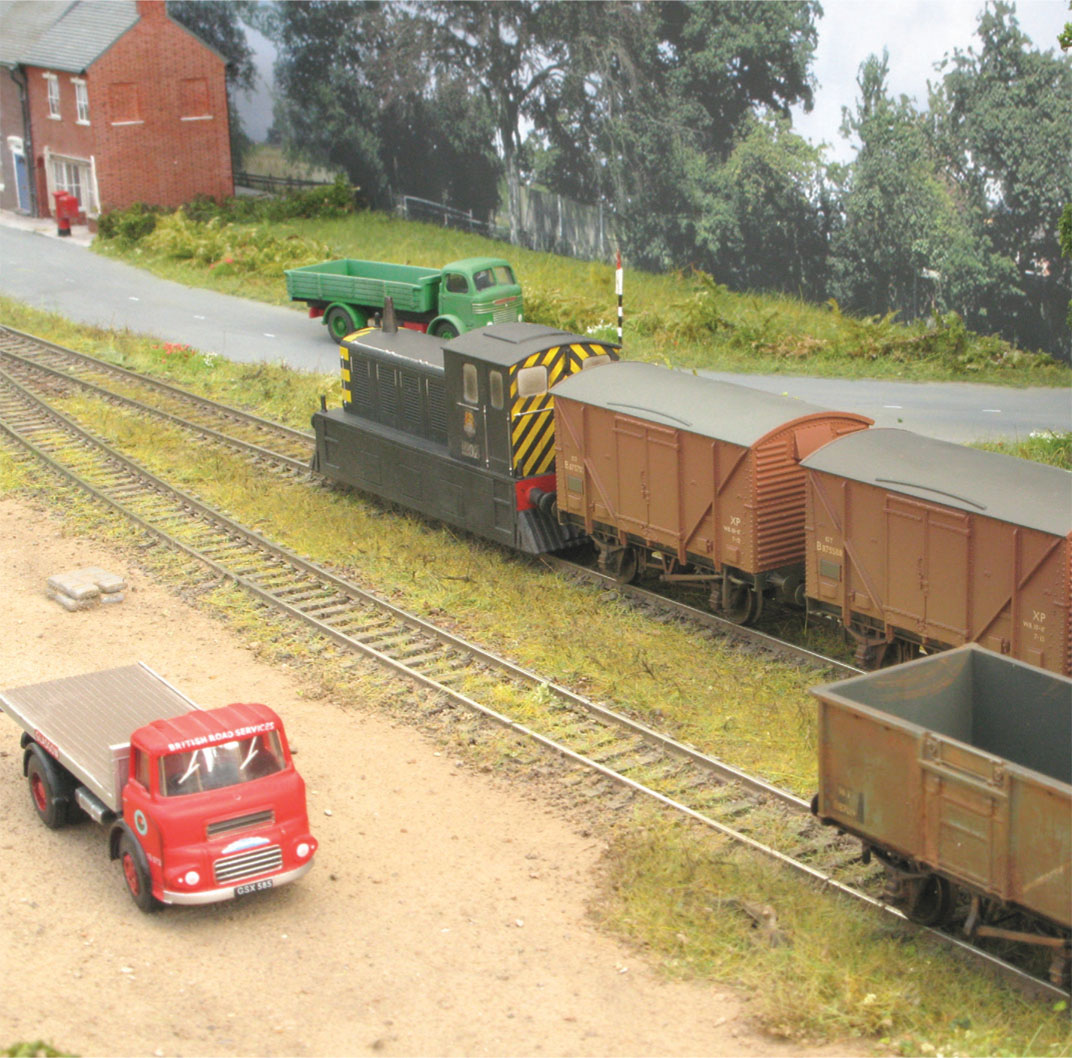
Well-used fruit vans and a coal wagon would have been seen frequently on the real Wisbech railway line.

At some places along the line I planted static grass fibres between the rails to create the illusion that the line was infrequently used.