Whether you are out on a day hike, a weeklong family camping trip, or bugging out of the city after a major disaster, surviving and thriving in a wilderness setting involves finding adequate shelter, having plenty of food and drinkable water, and knowing what to do in an emergency. Without the comforts of home, it is critical that you know your surroundings, especially if you’ve never camped or hiked in that area before. Don’t just count on trail markers and fellow hikers to direct you back to base camp or to the safest source of water.
CAMPING AND HIKING
Before you even leave the house, check with the National Weather Service to see what the chance of rain or snow will be in the area you plan to camp or hike in. Rain could even lead to flash flooding if you will be on a hillside or near a creek or river. The last thing you want is to be trapped in a slot canyon during a sudden flash flood. Even if the weather is great when you leave, continue to listen for updates and possible changes that might affect your choice of where to set up camp.
Unless you have serious wilderness survival training, stick to designated campsites and hiking trails, and be sure to check in at base camps or with park rangers to let them know where you will be and how many are in your party.
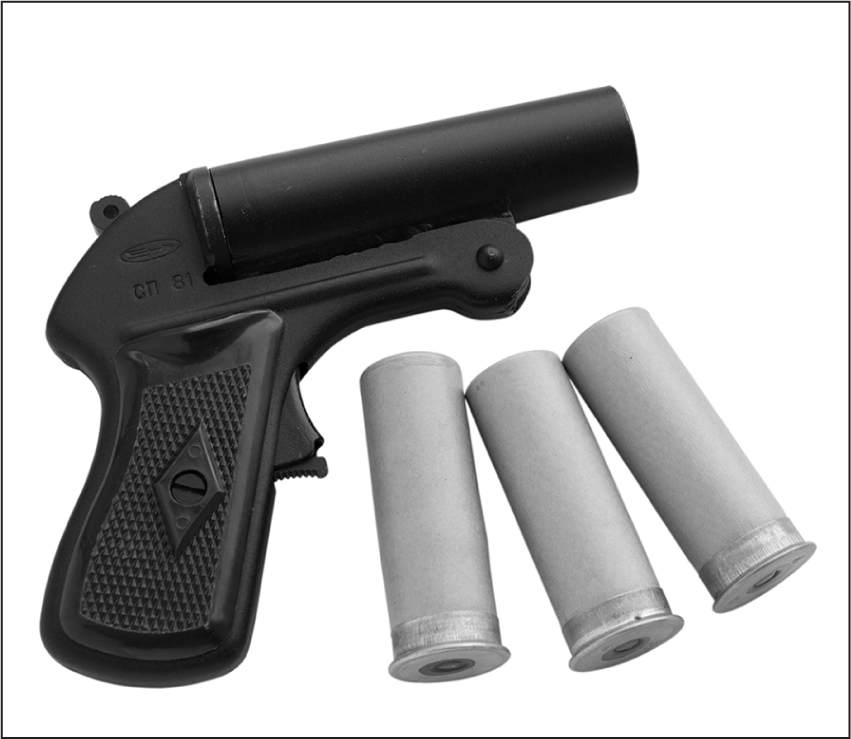
Map out your route both on your cell phone and on paper, because out in the woods you may not have any cell phone coverage to rely upon. Beware of venturing off into unknown territory. If you get lost, no one will know where to look, and you won’t have a method of contacting anyone. Consider having a flare gun on you when hiking in case you do venture off the maintained and marked trails.
If it is legal in your area, invest in a few canisters of bear spray, which is a form of pepper spray that you can use in a chance bear encounter.
Whether camping or hiking, have extra food, water, and a good first aid kid stocked with the basics. Include warm clothing and a blanket and a waterproof raincoat or plastic poncho. If you are going on a long hike or rappelling, go in a group. Be careful on trails with steep cliffs, and observe all posted warnings. If you are hiking with children, consider taking a longer, less steep route. Keep the weather in mind at all times to avoid having to deal with hyperthermia or heat exhaustion.
Snakes and poison plants are rampant in the wilderness. Consider wearing long pants, or socks that pull up to your knees, and sturdy closed-toed shoes. Some hikers like to bring along a ski pole or stick, which can be used to assist walking as well as clearing brush immediately ahead and possibly uncover a snake in the waiting.
Speaking of shoes, if you are an avid hiker or want to become one, make sure to invest in a good pair of comfortable hiking boots. Visit a specialty sporting goods store to get the best advice. The last thing you want or need is to be stuck in the middle of nowhere with feet too sore to stand on.
Similarly, do some research and choose the best hiking and camping gear you can afford. Buy a tent that is both easy to assemble and strong enough to withstand some rain. Don’t forget about a sanitation system. Yes, you can “relieve yourself” in the woods, but if there is a danger of running into wild animals or snakes, bring a large bucket and some hefty trash bags and ties and some toilet paper.
In case your phone GPS isn’t working, consider buying a compass to help you keep your directions straight. You may also want to mark your trail as you go so you can easily get back to camp. This can help when you are hiking with children, and you might become incapacitated and need to send them back for help. Invest in a light pair of binoculars as well for searching from hilltops and high points.
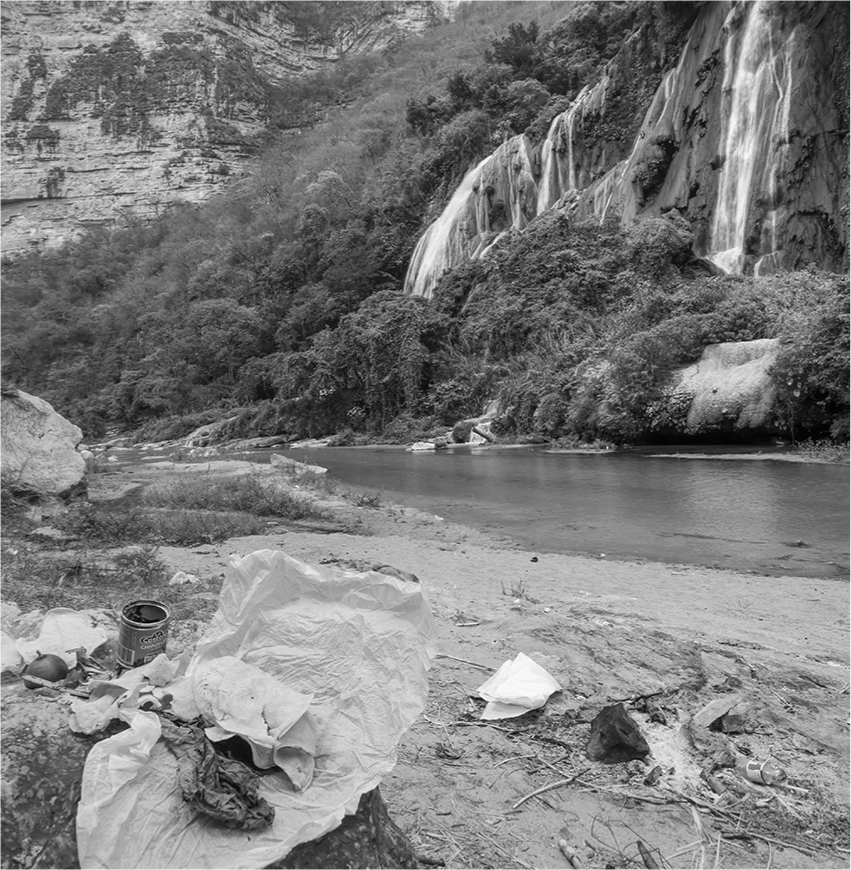
Honor the code of the trail when hiking. Don’t leave behind litter. Do not damage trail markers and map stations. Serious hikers live by this code because they know and respect nature and understand how easy it can be to get lost and become disoriented. There is a trail saying: Take nothing but pictures, leave nothing but footprints.
According to the U.S. Forest Service and the Centers for Disease Control and Prevention, recreation activities should be planned just as for a trip abroad. Some of the tips they suggest are:
Think about any vaccinations you might need before you head out, such as tetanus, pertussis, meningitis, or hepatitis A. Ask your doctor if you are concerned.
Travel with someone, and leave your itinerary with a responsible third party.
Here, the beauty of the La Conchuda waterfall in Chiapas, Mexico, stands out. Unfortunately, not all hikers honor the trail and nature’s beauty.
Before you take on a long hike, make sure you are in good physical shape! If it is a group hike, plan it around the weakest member of the group and what they are capable of. If you are traveling with a disabled person, take into account what they are able to do, and perhaps let faster hikers form a separate group.
Watch the weather and plan accordingly.
Avoid cliffs! This especially applies if you and others have been drinking, it is dark out or wet from rain. You are not a surefooted mountain goat!
Know the basics of first aid, and have someone carry a first aid kit. Know your ABCs too.
Make camp before dark, or you run the risk of falls, accidents, and getting lost in the woods.
Don’t assume a clear brook offers clean, drinkable water. Boil it, or use your water purification tablets to avoid water-borne parasites. If you have diarrhea, stay out of any water areas others may be swimming in. Do not swallow any water that you are fishing, bathing, or swimming in.
Pack a lot of energy bars, which are a great and compact source of carbs, proteins, and fats, and carry plenty of water.
If you are bringing your dogs, keep them leashed, and be sure to have food, snacks, heat protection, and water for them too. Clean up after them if they poop in the middle of the trail!
Protect yourself against the sun with a hat, sunglasses, and sunscreen. Use a broad-spectrum sunscreen that will protect from UVA and UVB rays, and don’t forget a sunscreen lip balm or stick!
Assign tasks, if in a group, so everyone can be in charge of something specific and one person is not expected to remember everything.
Take breaks if needed, but give yourself a two-hour window to set up camp during daylight.
Never leave a fire unattended. Drown it with plenty of water, and look for any burning embers.
Never use fuel-burning equipment such as stoves, heat devices, lanterns, or grills inside a closed tent or shelter because of the risk of carbon monoxide poisoning. Keep them outside.
Out in the Storm
If you are out in the middle of the woods or hiking up a mountain, and a storm approaches, obviously the ideal situation would be to get back to camp. If you are on a lake fishing or boating, or out playing golf on a Sunday afternoon, a storm can mean flash flooding and lightning.
While you want to avoid being near waterways or areas where flash flooding can send water downhill towards you, you also want to descend from exposed, high places to avoid getting struck by lightning. This applies to locating your camp too. Don’t pitch tents right next to the tallest trees around or isolated trees in a clearing. They act as lightning rods!
If you are on a mountain bike or horse or in a golf cart, get off immediately and drop anything metal you may be carrying, such as an umbrella, ski pole, or golf club. If you are out in the open, find a low spot and crouch with your head low or covered. Don’t sit or lie down, because the more of your body that is in contact with the ground, the more chance you have of being injured if a lightning bolt hits nearby. If you are with a group of people, spread out 15 feet (4.6 meters) apart to avoid all of you getting struck. If you are in the woods, stay put until the storm is over.
If someone is hit by lightning, tend to them immediately for the ABCs. Unlike in the movies, a person hit by lightning will not carry and transfer a charge to you. Help them!
Once the storm appears to have passed, wait a bit before going out into any clearings to avoid lightning that may still be lingering. Make sure that the area you are in is not in the path of a potential flash flood!
Beware of wildlife, and keep foodstuffs put away in containers to avoid visits from bears. This includes garbage, cooking grease, coolers, and even utensils that haven’t been washed yet.
If you need to relieve yourself outside at night, go with a buddy and bring a flashlight. Animals feed at night, and the noise and light may drive them away.
Know the difference ahead of time between regular and poisonous plants!
Wear long-sleeved clothing, long pants, and sturdy shoes.
Stay away from alcohol, as it can dehydrate you and add to clumsiness on steep trails.
Apply some type of bug repellant to skin that will be exposed.
Wear light-colored clothing if you are concerned about ticks, as they will be easier to spot.
Do not eat wild berries, mushrooms, or any other plant!
Do not approach or pet wild animals such as raccoons, possums, mountain cats, and coyotes. They may be small and look harmless, but they are not, especially if they feel threatened.
One of the biggest problems is campers and hikers who go out into the woods thinking they will remember the trail they took and then find themselves lost as darkness falls. Always have a map and a compass at the very least. A cell phone with GPS and trail markers is great, but there may not be any service in the middle of the woods or up on a mountain. Don’t take that risk. Mark the trail as you go, and do not use bits of popcorn or food, because they won’t be there when you go back. Use strips of cloth or trash bag ties on branches, or something in bright colors that you can easily see. Avoid using green and brown, as they will blend in too much with your surroundings. If you are injured, you may be better off finding a somewhat sheltered area with brush and trees and waiting until morning, or sending the person you are with for help. As a very last resort, if there is a nearby stream, creek, river, or even a drainage waterway, follow it downhill. Again, make camp before dark, getting back at least two hours before it starts to get dark. Better safe than sorry.
If you want to take a night hike, there are guided hikes in groups that you can sign up for.
Survival in the wild can come down to protecting your body temperature and staying warm when it’s cold, and cool when it’s burning hot. Any shelter you find must block the elements and insulate you for warmth and away from the cold.
ANIMAL AND PLANT HAZARDS
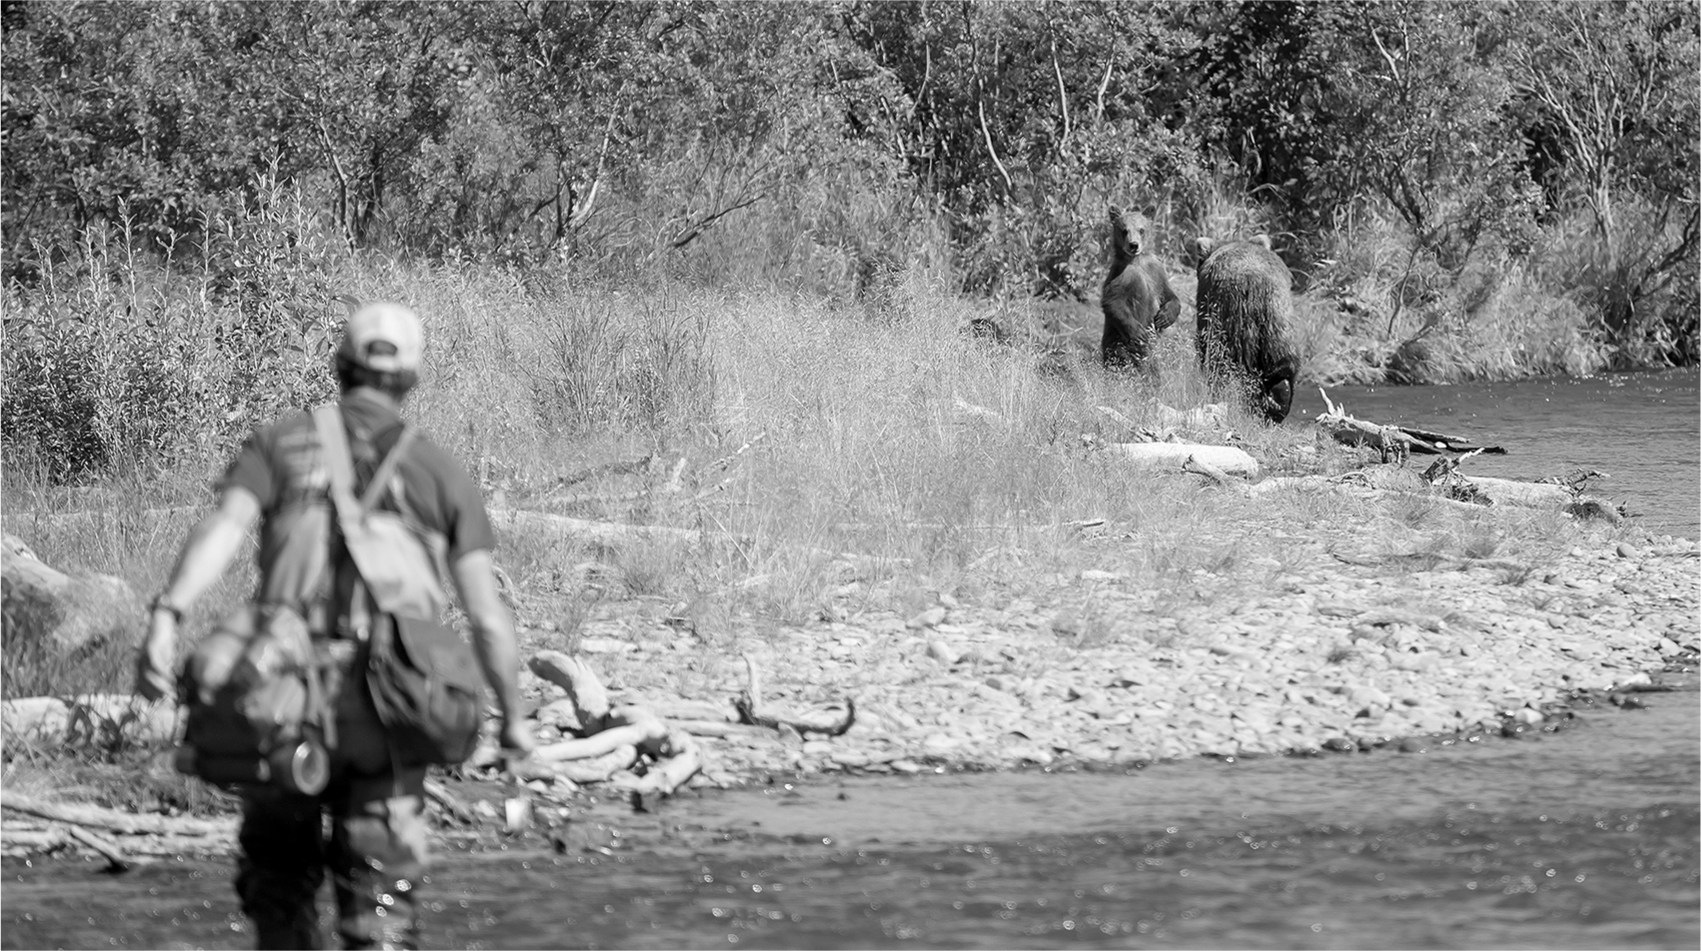
A walk in nature can turn into a nightmare if you are not prepared for a potential problem. Let’s start with bears. Do you know what to do if you encounter a bear, mountain lion, or other large predatory animal out in the wild? Many national parks and camping areas do not allow you to carry bear spray, which is a type of pepper spray. You have to remember that, when you enter the woods and mountains, you are on their territory and need to act with respect.
If you spot a bear or other large animal at a distance, avoid it. The same applies if you come upon babies or cubs. Stay away. The parent animals can be nearby and look at human interaction with their babies as an act of aggression. Leave the area and try to report the location to a park ranger. The closer you get, the more you are actually allowing bears and wild animals to become less fearful of people. In designated sites, park rangers will be on the lookout and have their own methods for dealing with animal intruders.
At a campsite or on the hiking trail, the key is to present yourself as being “big” and making a lot of noise. If a bear is nearby or coming toward you, do not run from it. Stand tall, arms linked with others, and scream, yell, bang on things. Never surround the bear, as this will make it feel threatened and launch an attack. Scare it away. Clap, stomp, wave your arms high to intimidate the bear with your size, and make all the ruckus you can until the bear backs off. If any of you are holding food, drop it or toss it out of the way of the campsite. Do not stop to take cell phone pictures, because the bear may change its mind and attack.
If you encounter a bear or bears while hiking, camping, or fishing, do not approach them; move away from them as quickly as possible. If you are hiking in an area where bears are known to roam, make noise by clapping, singing, or talking loudly and the bears will avoid you.
Beware of areas where there are a lot of dead animal and bird carcasses around, as you may be entering a bear’s or other wild animal’s feeding ground and will be seen as a competing predator. Also, look for aggressive behavior from the start. Bears will snort, paw the ground, and pop their jaws as signs they feel threatened or ready to lunge at you. These behaviors may be to get you to back off and leave the area. Do not turn your back and run screaming. Just quietly back up and away until you feel you are at a safe distance.
However, if you do get attacked, the best thing you can do is fight with all your might, protecting your face and neck. Punch, kick, slam your hands into the bear’s ears, jab at the eyes. Do whatever you can to break the bear’s hold on you. If there are several bears, try to climb a tree. Use legal bear spray if you have it, pointing the nozzle just above the bear’s head level so that the spray actually falls in its face, which will sting the eyes, nose, and ears and send the bear off in the opposite direction. If not, do your best to fight it off while screaming for help.
Bears attack for two reasons: defensively, to protect themselves and their cubs; and offensively, to get your food or to get you as food. Black bears tend to be more predatory and will attack humans more than brown bears. Grizzlies are more predatory than black bears. Female bears will be more concerned with protecting their cubs. Know what kinds of animals are common in the area where you are hiking or camping. Both black bears and grizzlies can outrun a human, so don’t run away. Often bears do what is called “bluff charging,” which is to charge without actual contact to allow the enemy a chance to back down and leave. Slowly back away if a bear bluff-charges you.
Bear Spray
Bear spray or bear Mace is not the same as regular pepper spray. Bear spray is much stronger and is highly effective. You might not be able to fight off a bear with regular pepper spray. Nor will you deter a bear by spraying it on your cooler, tent, or backpack. It works well because bears have a sense of smell about 2,000 times stronger than that of humans. Just getting the spray in their noses works wonders, but it also causes extreme distress if you get it in the bear’s eyes or mouth.
It is not lethal, but it will work long enough for you to get away. You take the can out of the holster and remove the safety clip, then point and spray. You may want to aim the spray just above the bear’s head, as it will arc down to the face. Spray in short bursts for about two seconds each. If it is freezing or raining, the spray may not work as well reaching its target, as the pressure in the canister will decrease, so try to keep the canister in a warm place when you are outside.
Bear spray or Mace is easy to get, but you may want to go to a camping or survival store and ask for a recommended brand, or check online reviews. There is no rating system for quality control, so see what others have said about using it.
You can also try playing dead to deflect a defensive bear or animal attack. If you must do this as a last resort, get into a fetal position with your body tightly curled, and cover your head with your backpack if you have it with you, or bury your head between your legs and stay still and quiet. If a bear sees you as a threat only, this may cause them to take off, feeling safe. This is a last-minute choice, though. Until you feel you cannot out-dodge the bear any longer, stay standing and moving.
Even wolves and coyotes, which may not seem big enough to worry about, can attack you if provoked. Often they travel in packs, and you may not see the pack right away. Back away from the animal slowly, and if you must fight, go for the head area. You can try to block the animal’s mouth with your non-dominant arm, then use your other hand to smash the heel against the animal’s nose, ears, or head and stun it enough to get away. Don’t treat your bite wounds until you know you are safe and the animal can’t find you.
Avoid issues with bears or any other wild animals that may be predatory, aggressive, or even rabid as much as you can by staying away from areas they are sighted in, avoiding coming into contact with cubs, and not leaving food and garbage out in the open or uncovered in tents. You can also avoid a potential attack by respecting a bear or other animal’s space and not trying to get close to get a photo for social networking. Leave them alone and you have a better chance of being left alone in return.
PLANTS
Know what poison plants are indigenous to your area, whether at home or out camping in the woods. The best way to deal with poisonous plants is to avoid exposure by wearing long pants and sleeves while out in the woods.
The big three are poison oak, poison ivy, and poison sumac. Poison oak is found primarily in the western United States, but there is an Atlantic poison oak found in the southern states. Poison ivy is found throughout the country, with western poison ivy in the West and eastern poison ivy in the eastern United States. Poison sumac is found in swampy regions of the eastern United States, but also in Texas and the southern states.
Poison ivy and oak share the “leaves of three, let them be” status of having leaf clusters in threes. Leaves may be notched or smooth, and the plant itself will have a reddish tinge in spring, green in summer, and more of an orange/yellow tone in fall. They may also have greenish-white berries and green/yellow flowers. Poison sumac grows as both a vine and a shrub, with seven to thirteen leaflets per stem. Leaves are smooth with pointed tips.
They all produce urushiol, a very potent oily resin that is highly irritating to exposed skin. Symptoms of contact to all three include redness, rash, itching, blistering, and systemic infections if left untreated. Initial reactions may be mild, with symptoms worsening over time, so treat the problem once you realize there has been exposure. If you can identify the type of plant, that helps. Even if you were wearing long sleeves and pants, the oil will be on your clothes, so if your skin is fine, be careful when removing clothing! Touching someone else that has been exposed, even a pet, can get the oil on you too.

Both poison ivy and poison oak have a distinctive, three-leaf configuration that makes them easy to spot and avoid if you are vigilant.
Immediately wash the exposed area with cold water and soap. There are commercial products you can use, but rarely do we have them on hand. Call your doctor or ask your pharmacist if you want more protection than water and soap. Launder your clothing right away, including sleeping bags if you were out camping. Scrub under fingernails to remove any oil deposited there.
Cold packs can help relieve pain. Benadryl or an antihistamine will help with some of the itching, as will cold compresses, calamine lotion, or hydrocortisone cream. Do not apply anything on open or blistered skin.
Severe symptoms may require a steroid shot, so seek your doctor’s help.
HOW TO START A FIRE
Ideally, you should have dry matches or a lighter and fuel source in your gear. But if you are without these items or they don’t work (matches wet from unexpected rain), you need to know how to start a fire to keep warm and to cook food and boil water. Fires require oxygen, fuel, and a spark. Look for dry twigs, branches, and dry leaves, and put them in a pile. Now you have your fuel. Oxygen is in the air. So how do you make the spark light it all up?
Can you find a flintstone and something with steel? Strike the flint against the steel until a spark or two ignites the fuel source. You can even buy a flint/steel kit to bring with you if matches and lighters aren’t your thing. You can also try rubbing two dry sticks together or striking a rock against another rock to make a spark, but that may take a lot longer.
If you have a small magnifying glass, you can use the sun’s rays to start a fire, but if you don’t, try putting some water in a clear plastic bag. Tie the bag off, and make it as round as possible, like a round balloon. Hold it up to the sun. See how the rays spread on the ground? Focus the light about one or two inches over the kindling to light the fire.
Use pine needles to make a fire if they are around, as they contain a highly flammable material called “pitch” and will even keep a fire going in light rain. Split larger pieces of wood into smaller pieces, which burn better. If the only wood around looks wet, try peeling off the bark to get to the dry wood underneath.
To start and feed a fire, you need the right amount of food. Start with tinder and kindling. Tinder is anything that gets the fire started, which burns the kindling, which in turn lights the fuel or the wood.
Tinder can be anything that is highly combustible and only needs a spark to get it going. Think things like dry leaves that are crushed, bark and bark shavings, fallen pine needles, paper, strips of newspaper, strips of rubber, cotton wool, charred fabric, dried grasses, and wood shavings. Once the spark gets the tinder going, then it will ignite the kindling.
Kindling can be dry, crisp leaves, pine cones, dry bark chunks, twigs and branches and is usually some type of wood. Softer woods flare up faster, and if the wood has resin it will burn even faster. The kindling must be more substantial than the tinder, so that it creates high flames, but not as big as your main wood logs. Kindling must be dry when collected or it won’t take the flame. If all you see around you is damp kindling, then shave off the outer layer to get to the dry interior.
Wood is the largest part of the fire and is usually large branches, logs, and chunks of wood. Softwoods will burn out more quickly, so they may not be good for cooking over a fire. Hardwoods burn hot for a long time, so they are great for cooking and roasting. All wood used must be dead, dry, and not from something man-made like a telephone pole or fence post, because those will contain paint and other chemicals that will be released upon burning. It helps to know the trees in the area you will be camping or hiking in, so you can identify hard and soft woods. If you plan to camp and hike often, consider investing in a good field guide to trees and plants for your region.
Have any hand sanitizer in your first aid kit? They usually contain alcohol, which is flammable. You can rub some on leaves or a cloth and place on the tinder to assist the kindling in catching fire off a spark.
If you wear thick coke-bottle eyeglasses, you are in luck. You can use the thick lenses like a magnifying glass to make a fire. Spit on the lens, and then angle the lens at the pile of kindling you have. Hold steady awhile and blow on the fire to get it going. You can also do this with a glass water bottle. The idea is to focus the rays through the water to create a single point of intense heat on the dry kindling.
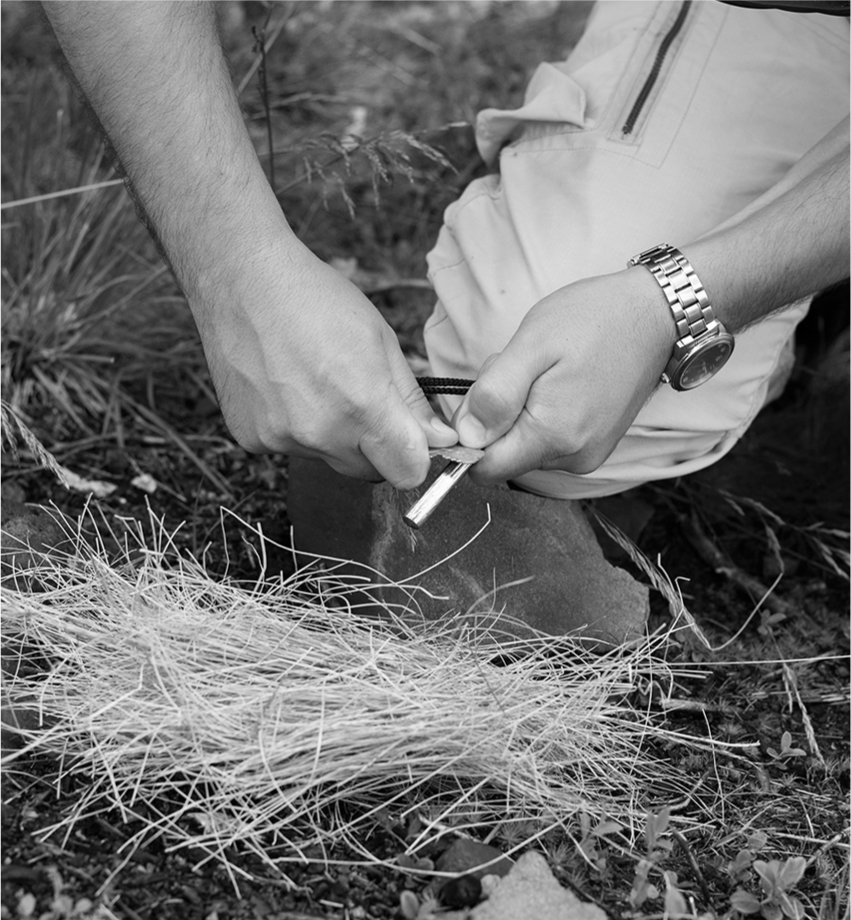
A man starts a fire using a fire striker (carbon steel to start a spark) over dried grass. If you don’t have this tool, or a match, or a cigarette lighter, you might try a piece of glass or even a polished aluminum soda can bottom.
You may want to use a larger log of wood for your base, and then, when the tinder on top of it is lit, stack your kindling against the larger log, almost like a lean-to, which will allow oxygen to pass through and feed the larger log’s flames. Keep adding larger kindling until the fire grows really hot, then add larger logs of wood.
You can also use your fire, once it’s roaring, to make smoke signals for other campers or hikers to see if you need help and don’t have a flare gun. Burn something that creates thick smoke, then use a blanket or board to wave over it to create puffs of smoke. Pine and spruce leaves make thick smoke. Obviously, this works best if you make the fire on a high spot that isn’t hidden by tall trees.
Alert! SOS!
You can use fire and smoke to alert other campers and hikers, or even a helicopter flying by, that you are in distress. Do this out in the open so it can be seen, preferably at the top of a hill or in a clearing where high winds won’t disperse the smoke before it can be spotted. Make a platform with twigs and branches that will raise the actual fire up higher. This can look like a teepee made of wood planks and branches. Using your most easily combustible materials, get the fire going at the base, and pile on greener branches to keep the smoke thick and visible.
If you think you will need to make a fire again the next day, here is a wonderful way to make it a lot easier. You can make a “char cloth.” This is done by taking a small piece of cloth and putting it inside some kind of metal box or container. Then you seal the container and put it in the fire for a few minutes. Carefully remove the container from the fire, let it cool, and keep closed until the next time you need a fire. When you open the case, you will have a piece of black cloth that is not burned but can be used to create a much easier spark from. Also, if you have petroleum jelly and cotton balls, you can soak the cotton balls in the jelly and use them for fast and long-burning fuel.
But if you don’t have the ability to make a fire, find something that can reflect sunlight into the sky, such as a mirror, eyeglasses, a magnifying glass, or a glass or plastic bottle. You can even use your cell phone screen. Hold it up to the sun, and move it back and forth to reflect light in “flashes.” If there is a boat or plane you are trying to target, try making a peace sign with one hand. Line up the boat or plane between your two raised fingers, and aim the flashes back and forth between those fingers.
SHELTER, FOOD, AND WATER
The weather can be enemy number one in the wilderness. Finding shelter might be as easy as popping a tent, but if you are stuck without cover, you can succumb to heat, cold, and even predators. You can, with the right materials, build your own shelter. Rules of thumb, though: do not ever build on wet ground; do not build on top of hills or high areas, where strong and cold winds can become a hazard and blow your shelter away; do not build in low and narrow valleys, where wind also blows hard. A shelter can be a quick pile or mound of leaves and twigs you can crawl under or put your sleeping bag under, or something more elaborate built with sticks and brush that mimics a tent. To do this, you would need long sticks that can be put into an A-frame and covered with leaves and twigs. No matter how fancy your shelter is on the outside, make sure to have a dry bed of leaves to sleep on to avoid the cold ground.
In the woods or mountains, the idea is to keep warm and dry. If you are stuck out in the middle of the desert, the goal will be to keep cool and avoid the punishing sun’s rays. Heat stroke is the second most common cause of death in the desert. Dehydration is first. If you are stuck with no shelter, not even a broken-down car to get out of the sun in, you may have to walk to find something to hide in or under. A tip, if water is scarce, is to use your own urine to soak a cloth, bandana, or anything you might have on you that you can then wrap around your head.
Finding water in the woods is easy, as long as you follow steps to boil or disinfect it. In the desert, where the average annual rainfall may be less than ten inches, you may have to get creative. You can keep an eye on any wildlife or birds to see what direction they are moving in, which will often be towards a water source. Fly and mosquito swarms are an especially good indicator of nearby water. Even bees fly towards and away from water. There may be some water deposited from previous rains under rocks or near dry riverbeds and streams. Green plants in the desert imply rain has fallen. The key is to not use up all your own water supply walking long distances to find water.
When it cools down a bit, you can dig for water under areas where greenery is growing or in low valleys and rock crevices. Water might be found about twelve inches from the surface. It may take a while for the water to collect into the hole, but once it does, be sure to disinfect before drinking if you can. Also look for water in the form of dew on plants and in the hollow trunks of dead trees. You can also eat cactus fruit to get water, and you can eat the pads of prickly pear cactus by cooking them over a fire.
In North American deserts, we also have barrel cactus, which has water inside, but this is only a last resort if no other water source can be found. The liquid inside can cause severe reactions such as vomiting, nausea, and even paralysis. The only really safe barrel cactus is the fishhook barrel cactus, found in the southwestern part of the United States and into Mexico. It may have little red or yellow flowers on top and can be cut at the top to reveal the white interior “meat.” Mash the meat up until you can squeeze a liquid from it to drink, and only drink a very small amount.
Out in the woods, if you cannot find a creek or other water source and have run out of water, you can get water from the trees around you by collecting it from leaves. You need to work with leaves that are directly exposed to sunlight. Early in the morning, rap a plastic bag around a chunk of these leaves and the sun will force water inside the leaves to evaporate, trapping the residue inside the bag. All you need to do is poke a hole in the bag and use the water. Make sure the plastic bags are clear and also clean when you use them.
You might also camp near a snowy mountain that will have run-off, but be careful not to be right up against the base in case of flash flooding. Most designated campsites and hiking trails have access to water sources, but when you choose to go out on your own, it might be helpful to check a map of the area beforehand to spot any creeks, lakes, ponds, rivers, or brooks.
Although we can get some of that much-needed water from food sources, drinking it or liquids containing it, such as juice and milk, is much better.
How Long Can You Go without Food and Water?
Yes, you can survive without food far longer than you can without water, possibly even a few months! According to “Who, What, Why: How Long Can Someone Survive without Food?” a February 20, 2012, article for BBC.com, there have been instances of people subsisting on next to nothing but snow or water for two months. Water is far more critical to our survival. Many of us tend to have enough body fat on us for our brains and metabolic system to use as fuel.
Surviving two months on next to nothing is of course the extreme, but according to Dr. Mike Stroud of the Department of Medicine and Nutrition at Southampton University, the body’s metabolism can slow down to conserve energy. He feels that body fat is not that great an indicator of how long you can survive, but it would be about sixty days before organs would begin to shut down in an extreme case. Two months is a lot of time, and no doubt we could find food during that period, even if it came in the form of bugs and plants.

The human body can go without food for a few weeks, depending on body fat, but surviving without water for more than four days is unlikely.
The body will use glucose, which is stored in the muscles and the liver, as glycogen, the primary fuel source. But once that is used up, the body will convert fat into ketone bodies, which can fuel the brain as well as the muscles and organs. But once the body fat is gone, then you have the wasting of important tissue reserves, and worse.
So while the body does slow down to accommodate the lack of food, you can still only go so long without finding some source of nourishment.
When it comes to water, things don’t look as good. We can last up to a week without water, but even that limit is more oriented to studies of people who are on their deathbeds, when food and water needs slow to a crawl. Three to four days is much more reasonable. Because over 60 percent of the body is made up of water, and every cell we have needs water to function properly, as do our organs, joints, muscles, and skin, we need to find it more quickly than food. If we lose too much water, our blood volume may drop dangerously low and cause blood pressure levels that are fatal. If the weather is hot, we need to find it even quicker because of the amount of water we lose in the form of sweat.
What about food? If you have enough with you to last the duration of your stay, good for you. But if you end up being caught out of doors for longer than you hoped for, do you know how to fish? Hunt? Trap animals? Do you know how to clean them, skin them, and cook them?
If you are lucky enough to be near a body of water with fish in it, and you don’t have a fishing rod and gear, find a long stick and poke at the fish you can see to try to catch one. When you get a fish back to your campsite, you will need to clean it and take out the bones, using a sharp knife, and dispose of anything not to be eaten in a sealed trash bag. You can make a makeshift grill to put the fish on over the fire, using interwoven greener twigs that are flexible, or you can poke a stick through the fish and cook it over the open flame.
You can also make a type of “dam trap” to put in the water and catch fish in. This can be a metal box with a fishhook and bait inside, or a stretch of fabric that can act as a net. If you don’t have bait hooks, make one with a sharp piece of wood or metal, and stick a worm on the end. Safety pins make great hooks, as do paper clips. Rough them into a hook, find anything you can use as bait, and if you have string or rope, you can use that as a makeshift fishing pole. If you don’t plan to hold the rope or line, attach it to a stick, and place it in the ground with a small bell or noisemaker to alert you when a fish bites.
If you have a hunting rifle or a crossbow or some other type of hunting gear, you won’t have to worry about catching food by hand. But you do have to clean the carcass and remove all inner organs and body parts that won’t be eaten, dispose of them in a sealed trash bag, and cook over the fire long enough not to get sick from undercooked meat. The truth is, if you are out of food and starving, you will do what it takes to trap and catch food, even if it is something you wouldn’t have otherwise considered eating, such as squirrel or raccoon, even insects, which can provide protein and keep you alive in a pinch.
You can make a spear out of a tree branch or stick and use it to kill small animals. Traps work too, but you have to place them in high animal traffic areas. They can consist of a box rigged with a rope that will pull the cover down when something gets inside, or a net attached to twine or rope on either side that can be lifted up when an animal steps into it. Get creative. A pit trap is an option too, if you have the ability to dig a hole and then cover it with twigs and brush, but you have to get the animal to walk over it for it to work. In any trap, put some kind of bait inside, like water, to attract the animal inside in the first place.
Never eat an animal carcass you find on the ground, no matter how fresh the kill may look. It may already be infested with maggots and fly eggs. Or it may be the meal of a nearby predator that won’t take too kindly to having its dinner stolen.
One way to find potential animals to hunt is to follow heavily used trails and look for tracks and droppings. Water sources are great because birds and other animals will use them as watering holes. Also look for visible signs of dens, nests, and holes where animals could be hiding.
You can sun-dry meat you catch by cutting it into long, thin strips, like bacon. Stick two large sticks or branches into the ground about a foot apart, and then tie a cord, rope, or twine at each end to form a line between the tops of the sticks. Hang the meat over the string or twine and keep each strip from touching other strips of meat or from folding over on itself. Do this in a place with plenty of sunlight, and protect the meat from bugs and predators as best you can. This works great if you are in the desert camping or hiking, as there is ample sunshine.
When it comes to foraging for food, if you are not familiar with the types of plants, grasses, mushrooms, and berries that grow in the area, you run the risk of eating something not meant for human consumption. But foraging doesn’t require the effort of hunting and fishing, so if you find edible goods like nuts, berries, and greenery that you can survive on, more power to you.
According to the U.S. Air Force guidelines, listed in the Special Forces Survival Guide by Chris McNab, which were created by downed pilots who needed to identify what they could and couldn’t eat, the following rules apply:
•Avoid plants with umbrella-shaped flowers (but vegetables like carrots, celery, and parsley are fine).
•Avoid bulbs.
•Avoid white and yellow berries.
•Avoid plants with milky white sap.
•Avoid legumes, as they may lead to stomach issues.
•Avoid plants that irritate the skin.
•Avoid plants that smell like almonds on their leaves or woody areas, as this can indicate the presence of cyanide.
But …
•Eat plants growing in water or moist soil.
•Eat aggregated fruits and berries.
•Eat single fruits on stems.
Also look for acorns from oak trees. The nut is edible, and they are small and easy to carry back to camp. Pine trees have nuts too, and their inner bark can also be eaten. Other edible nuts include walnuts, almonds, chestnuts, and beechnuts. Tall grasses and ferns can be eaten. Go for the base, where the starchy carbohydrates are focused. You can also eat cattail, the stalk of which is similar to celery, clover, and daisies. You can eat fungi, but not all are edible, so it helps to know which is which. In general, you can eat tree fungi and many varieties of puffy mushrooms found growing in the ground. However, if a mushroom stains yellow when cut open, it is poisonous.
Try testing the plant first. You can do this by separating the parts of the plant into a pile. Leaves, stem, flowers, etc. This way you can test one part at a time. First, smell the plant parts for an acidic odor that may mean they are not safe to eat. Try not to eat anything else for eight hours before you test the plants. Touch each part of the plant to see if there is a skin reaction. If not, you can try a part of the plant along with a mouthful of purified water. If you feel any burning sensation at all when you touch the plant part to your lip, don’t eat it. Hold a bit of the plant on your tongue for up to fifteen minutes. If there is no reaction, you can try eating that plant.
Spruce and pine needles can make a great tea. They contain a lot of vitamins C and A. Bruise the needles first with a rock, then put them into a pot of boiling water. Remove from the fire, and let steep for ten minutes before drinking.
Look for dandelions, which grow wild, and eat the leaves.
Look for the youngest plants when you are picking them. They will be easier to digest.
When it comes to berries found in the wild, here is a general rule: “White and yellow, kill a fellow. Purple and blue, good for you. Red, could be good, could be dead!” With blackberries and cranberries, not only can you eat the berries, but the leaves are also edible.
Quite a few plants that are common to see are edible, including cattails, clover, chickweed, and dandelions. Dandelions are best when boiled; you can eat every part of this “weed,” and you can even make dandelion wine!
Even wild plants that are edible may have parts that shouldn’t be eaten, such as stalks and leaves. You can try the poison taste test if uncertain. You obviously want to avoid plants that are afflicted with pests or mold/ fungi, and plants in contaminated or filthy water, unless you plan to boil the plant.
You can eat a variety of insects, but avoid eating bugs like spiders, bees, and millipedes. Ants and crickets are fine to eat. Crickets can be roasted over the fire if the thought of eating them live doesn’t appeal to you. You may want to cook ants too, to remove any toxins from the ground they were found in (especially if the soil was damp).
Other edible insects and bugs include worms, grasshoppers, termites, slugs, and snails. You can skewer them with a stick and cook them over a fire. If it has a stinger or is brightly colored, leave it alone.
When it comes to finding insects, they are often most abundant beneath rocks and on the ground in shaded brush areas. Older trees can be havens for termites too. Look for a termite nest, and use a stick to poke the nest and retrieve insects. Scrape them into a jar or container, and cook them over the fire back at camp.
Some pointers when foraging for bugs:
Be careful when searching for insects that you don’t accidentally get bitten by something hiding beneath the rocks or brush, such as a snake! Wear work gloves if you can. Never jostle or disturb a wasp’s or hornet’s nest or you will be sorry.
Brightly colored insects tend to be poisonous, even if they are easy to spot. Go for the dull in color and appearance.
Grubs found on the underside of leaves are not good to eat, as they can excrete a venomous fluid.
Cricket and locust wings, heads, and legs should be removed before eating, even if you plan to cook them.
When it comes to finding food, look down and around, but also look up. Most birds can be eaten, if you can catch them. You can also eat the eggs in their nests. Be careful not to eat dead birds, as they may be infested with maggots or carrying diseases.
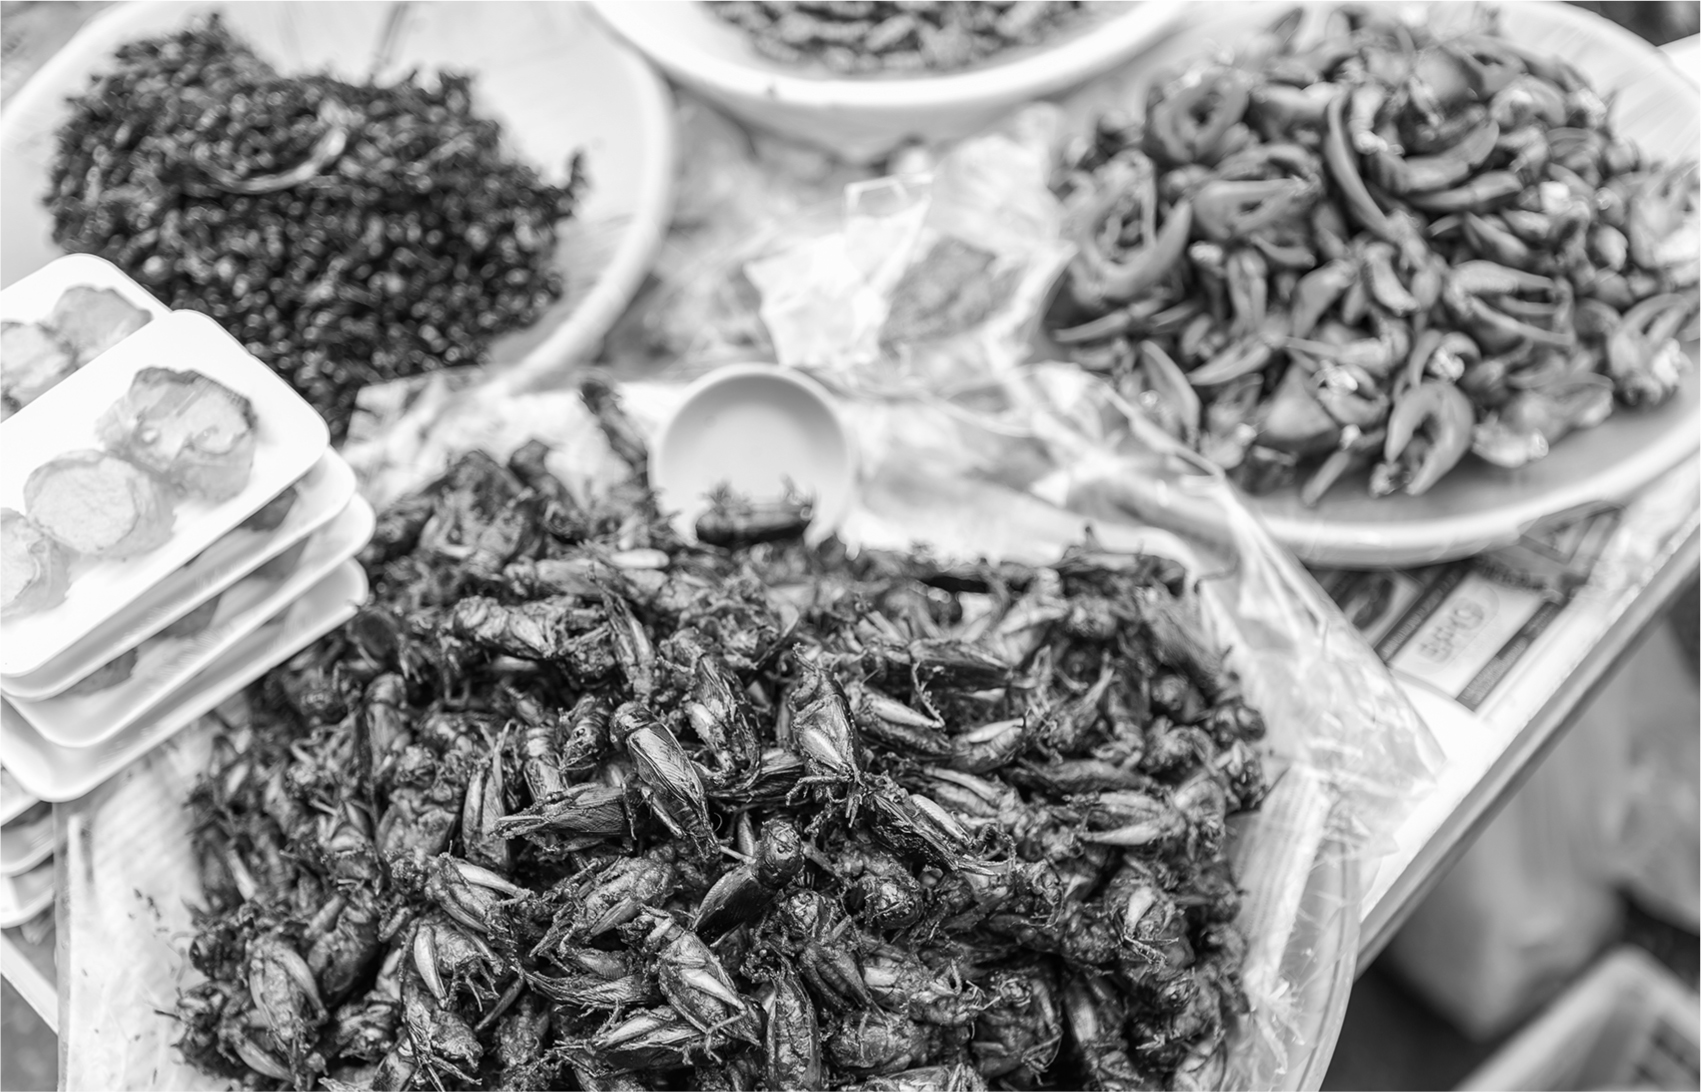
A Thai vendor offers a spread of various insects to eat. Insects are a great source of protein that you can take advantage of yourself if necessary.
Nonvenomous snakes are also something you can fall back on—again, if you can catch them. You can make simple ground traps or, if you have seen them around, hunt them down with a sharp stick or butterfly net. Skin them and throw them over a fire roasted. Frogs can be cooked and eaten, but not toads, which may carry toxins in their skin.
When creating your shelter, keep in mind that a big problem is setting up shelter in a danger zone and finding out too late. Watch out for potential overhead “widowmakers,” old tree branches that can fall on you in high winds. Also try to stay away from dried out and dead trees that, if they catch fire, will go up fast and furiously around you. If you are in the mountains, avoid being right at the base or in foothill areas because of possible flash flooding from snow runoff.
Oh, and take some time to survey the area you may camp in for at least twenty yards in every direction before you begin to set up tents and start a fire. Look for bee and wasp hives, ant colonies, claw marks on trees that indicate large predators may be around, and signs of animal nesting places that can cause you trouble later if mama or papa returns.
WILDERNESS HACKS
Toothpaste can be used on bug bites to help relieve itching and stop minor pain and swelling.
Tampons can be used to absorb blood from wounds.
Even a dead lighter can be taken apart for the cotton inside, which is dry and can assist in catching a spark to make a fire.
Have a roll of aluminum foil? You can make bowls out of it and also lay a sheet down on damp ground to start a fire on.
Keep a line of big rocks around the campfire to trap in some heat long after the fire has died out. Smaller rocks hot from the fire can be put inside aluminum cans filled with water to purify it.
Large aluminum sheets can be draped outside your tent to reflect sunlight away and keep you cooler inside.
Those crazy glow sticks kids get at Halloween make great makeshift lights if the flashlight runs out of batteries.
There are many unusual and creative ways to make being stuck out in the wild more survivable and comfortable.
Animal organs such as bladders and snake skins make great makeshift water carriers. Be sure to rinse them out first.
You can make a torch out of a stick with a rag tied around the top end. Soak the rag in a fuel source, and light it on fire. It may not last long, but it can help when you need extra light.
Lost in the Woods?
If you are without a compass or phone with GPS, you can still find your way back if you pay attention to nature’s signals. The easiest is to watch for sunrise and sunset to tell east from west and then north and south. Some other tips include:
•Look at tree trunks for moss growth. Moss usually grows away from sunlight and is often found on the northern side of trees. The same goes for moss-covered rocks.
•The thickest part of the moss will be on the north side.
•Make your own sundial by sticking a twig in the ground and watching the direction of the shadow on the ground to indicate east-west movement.
•In the northern hemisphere, your shadow will point northward at noon. In the southern hemisphere, it will point southward.
•Spiders will build their webs on the southern side of trees.
•In the desert, look for barrel cactus. They lean south.
•On mountain slopes that face the sun, look for trees. There will be more snowmelt on the side of the trunk facing south.
•Ideally, you will have a general guess as to what direction you were moving in when you left your campsite, so you can then redirect yourself back.
•Don’t forget your watch if you wear one! Often watches, especially men’s sportier watches, have compasses in them.
If you hunt and cook your own food, be sure to prepare the dead animal away from the campsite and put all uneaten parts in a sealed bag or container. Remember: bears.
If you plan to stay outdoors awhile and fish and hunt your own food, know how to make some basic snares and traps if you are not using a gun or bow and arrow. For smaller animals, you can use funnel traps that direct them into the hidden trap. This works well for rabbit, squirrel, and smaller mammals.
Buying a new sleeping bag? Look for a U.S. military Gore-Tex modular sleeping bag system. It comes with a sleeping bag liner inside that will keep you warm. If you are going camping in colder weather, look for a sleeping bag with goose down that is in a layer of Gore-Tex liner to protect against moisture. Synthetic bags also keep you warm, but tend to be a few pounds heavier than goose down.
Invest in a sturdy tent that won’t tear or leave you with a broken zipper in the cold and rain. Look for a tent that is rated for use in places such as Mount Everest if you want to be extra sure of protection.
Invest in a good compass, and learn how to use it. Don’t opt for cheap plastic compasses that may have polarity issues and be less than accurate.
A headlamp makes a great flashlight that allows you to stay hands free for cooking or cleaning.
A signal flare gun like this is an optimal tool to signal for help when you are lost in the wilderness or even at sea.
Ladies’ lipstick can be used to mark trees on the hiking trail in case you get lost.
Get both a signal flare gun with extra flares and roadside safety flares. You can use the signal flares if you are lost or trying to signal to others in your group. The safety flares can be used if you need something to start a fire in a pinch. Handheld flares will burn for a good half hour and can be stuck into the ground to light campsites.
Consider bringing an air horn. Not only can it work wonders warding off bears, but it can also act as a noise signal to others if you are lost in the woods.
If you are stuck outdoors for a long time, you need to pay attention to your hygiene. Dental plaque can build up fast and become painful, leading to infections. If you didn’t bring toothpaste or floss, you can even wipe your teeth with a clean cloth or pick at the plaque with a piece of twig. Remember that if you go without bathing for a while, you run the risk of bacteria and fungal growth in the more dark, moist places on the body, including armpits, under breasts, groin areas, in between fingers and toes, and in the folds of skin. Bathe when you can, and air-dry, and wash clothing in a creek or river, even if the water isn’t sparkling clean.
Potty tip! When there is no toilet paper around, you can use leaves, or you can squat instead of sitting low. By spreading your, um, “cheeks,” you have less of an area that needs cleaning.
Being out in the wilderness requires some creativity when you don’t have the items you are used to at home. You may find yourself wishing you had packed with more common sense, but don’t fret. There are hacks and tips you can use to make the outdoors less intimidating.
Whether you are outdoors for a day, for several days, or bugging out for good after a disaster sends you running from your home, knowing the basics of where to set up shelter, where to find water and food, first aid, and survival hacks is a must. Not only will you be contending with other people and wild animals as well as bugs and plants and the weather, you will be away from the comforts and conveniences of home that we all have become so used to. Everything from cooking to sleeping to going to the bathroom will suddenly become something that requires thought and planning. It’s always best to do that sooner rather than later.
Using Tools
One of the best investments you can make for your home emergency kit and your bug-out or camping kit is a multipurpose tool. This one item alone will allow you to do so many things and is compact enough not to take up much space. A multipurpose tool doesn’t weigh a lot either, so it can be kept in a backpack for a hiking expedition. There are a variety of these tools on the market, and you can choose which one fits your needs best.
The basic tools include a corkscrew, tweezers, pliers, Allen key, wire cutters, a tiny saw, a bottle opener, and a straight blade. More complex tools may include a small magnifying glass, a whistle, a flashlight, and even a tiny noise alarm. Aim for practicality, but consider buying one tool for your home kit and a different one for outdoor use, as needs may be different.
There are larger tools with a compass, dry container, and even a starting flint inside the container to help with fires. These would be ideal for camping and outdoor kits.
If you are stuck without a can or bottle opener, you can improvise with a small knife. For a can, take the knife and poke holes all around the top lid until you can slip the knife point under and pry up the lid.
For a bottle, use the knife tip carefully to get under the cap and apply pressure, lifting the cap upward while pushing the knife downward.
If you don’t have a knife, you can use a rock to poke holes in the lid of a can or do enough damage to the can by repeatedly smashing the rock against it that you can get to what’s inside. Don’t try this on a glass bottle, though, for obvious reasons.
If you have a metal spoon, you can position the edge of the spoon under the bottle cap and push the cap up while pushing down on the spoon handle. A spoon can also open a can if you place the tip of the spoon against the inner edge of the top lid where there is a small, raised lip from the crimping process that seals the can shut. Hold the spoon with the inside bowl facing the can’s lid, and continue to rub the tip of the spoon back and forth over the lip area. The friction should eventually thin the area enough for the spoon to break the lid. Then pry it open with the spoon.