In this last chapter of the book, we are going to use the Arduino Yún in a completely different field: robotics. You will learn how to interface DC motors, as well as how to build your own mobile robot with the Arduino Yún as the brain of the robot, a distance sensor for the robot, and wireless control using Wi-Fi and a simple web interface. You will also be able to get a live display of the measurements done by the robot, for example, the distance that is measured in front of the robot by the ultrasonic sensor.
Arduino boards are widely used in mobile robots because they are easy to interface with the different parts of a robot, such as sensors, actuators such as DC motors, and other components such as LCD screens. Arduino even released their own robot recently so people can experiment on a common robotic platform. These robots are usually programmed once and then left alone to perform certain tasks, such as moving around without hitting obstacles or picking up objects.
In this project, we are going to make things differently. What we want is to build a mobile robot that has the Arduino Yún as its "brain" and control it entirely via Wi-Fi from a computer or mobile device, such as a smartphone or a tablet. To do so, we will program an Arduino sketch for the robot that will receive commands and send data back, and program a graphical interface on your computer. This way, if you want to build more complex applications in the future, you simply need to change the software running on your computer and leave the robot untouched.
We are first going to build the robot using some basic mechanical and electrical parts. We will not only show you how to build the robot using a specific kit, but also give you a lot of advice on building your own robot using other equivalent components. To give you an idea about what we are going to build, the following is an image of the assembled robot:
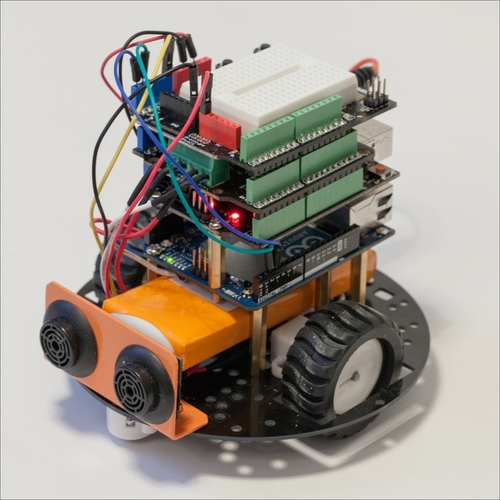
At the bottom of the robot, you have most of the mechanical parts, such as the chassis, the wheels, the DC motors, and the ultrasonic sensor. You also have the battery at the center of the base of the robot. Then, you can see the different Arduino boards on top. Starting from the bottom, you have the Arduino Yún board, an Arduino Uno board, a motor shield, and a prototyping shield.
Assembling components in this project will be slightly different than before because we will actually have two Arduino boards in the project: the Yún, which will receive commands directly from the outside world, and an Arduino Uno board, which will be connected to the motor shield.
We will then perform the usual test on the individual parts of the robot, such as testing the two DC motors of the robot and the ultrasonic distance sensor that is located at the front of the robot. To test the motor, we are simply going to make them accelerate gradually to see whether or not the command circuit is working correctly. The measurements being received from the ultrasonic distance sensor will simply be displayed on the serial monitor.
The next step is to build the Arduino software that will receive commands from the computer and transmit them to the motors that move the robot around. At this point, we are also going to code the part that will transmit the distance information back to the computer. Because we want to standardize our code and make it usable by other projects, we will build this part with inspiration from the REST API of the Arduino Yún board that we already used in Chapter 2, Creating a Remote Energy Monitoring and Control Device.
Finally, we are going to build the server-side graphical interface on your computer, so you can easily control the robot from your computer or a mobile device and receive some data about the robot, such as the readings from the ultrasonic sensor. This server-side software will again use HTML to display the interface, JavaScript to handle the users' actions, and PHP to talk directly to your Arduino Yún board via the cURL function.