A lot of applications implement modally presented view controllers. A modally presented view controller is typically a view controller that is presented on top of the current screen. By default, they animate up from the bottom of the screen and are often used to present forms or other temporary content to the user. In this section, we'll take a look at the default transition and how to customize it to suit your own needs.
The first thing you need to do is create a view controller to be presented modally. Start by creating a new file; pick Cocoa Touch Class and name it CustomPresentedViewController. Make sure that it subclasses UIViewController. Open Main.storyboard and drag out a new UIViewController from the Object Library and set its class to CustomPresentedViewController in the identity inspector panel. Next, drag out a bar button item to the left side of the navigation bar on the contacts overview page. Set the bar button's label text to Show Modal and press Ctrl, and drag from the bar button item to the new view controller. Select the Present Modally segue (refer to the next screenshot). Finally, give the new view controller's view a bright blue background color, so it will be easier to see the transition later. If you run your app now, you can click on the Show Modal button and you'll see an empty view controller pop up from the bottom. You can't dismiss this view controller right now. That's okay, we'll get to that later. Let's work on a custom transition to display this view controller first:

Now that we have a view controller to play with, it's time to explore how to actually implement a custom modal transition. The first object we will look at is the transitioningDelegate for UIViewController. The transitioningDelegate method is responsible for creating an animation controller for the custom transition. Under the hood, the created animation controller makes use of a transitioning context that contains information about the view controllers involved in the transition.
The transitioning flow can be described in the following steps:
- A transition begins; the target view controller is asked for its transitioningDelegate.
- The transitioningDelegate is asked for an animation controller.
- The animation controller is asked for the animation duration.
- The animation controller is told to perform the animation.
- When the animation is complete, the animation controller calls completeTransition(_:) on the transitioning context to inform it about the successful transition.
If step 1 or step 2 returns nil, or isn't implemented at all, the default animation for the transition is used. The objects involved in a custom transition are displayed in the following figure:
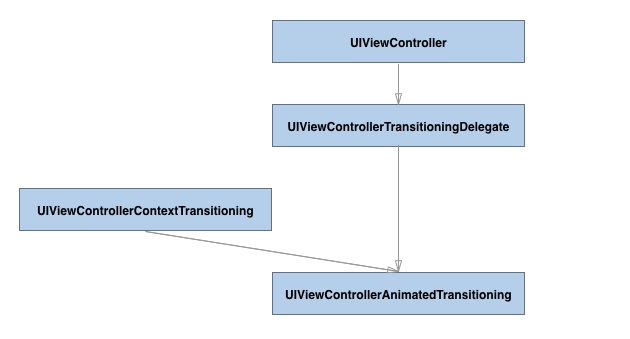
The view controller we're going to present will be its own transitioningDelegate. The animation controller will be a separate object that conforms to UIViewControllerAnimatedTransitioning, and it will take care of animating the presented view onto the screen. Before we implement this, we'll create the animation controller that's responsible for performing our animation.
Create a new Cocoa Touch class and name it CustomModalShowAnimator. Pick NSObject as its superclass. This class will act as both the transitioning delegate and the animation controller. After creating the new file, open it and change the class declaration as follows:
class CustomModalShowAnimator: NSObject, UIViewControllerAnimatedTransitioning {
}
This makes our new class conform to the protocol that's required to be an animation controller. Xcode will show a build error because we haven't implemented all the required methods yet. Let's go over the methods one by one so we end up with a full implementation for our animation controller.
The first method we need to implement for the animation controller is transitionDuration(using:). The implementation for this method is shown below:
func transitionDuration(using transitionContext: UIViewControllerContextTransitioning?) -> TimeInterval {
    return 0.6
}
This method returns a TimeInterval. This is the time (in seconds) we want the transition to last.
The second method that needs to be implemented is animateTransition(using:). Its purpose is to take care of the actual animation for the custom transition. Our implementation will take the target view controller and its view will be animated from the top down to its final position. It will also do a little bit of scaling, and the opacity for the view will also be animated; to do this, we'll use UIViewPropertyAnimator. Add the following implementation to the animator:
func animateTransition(using transitionContext: UIViewControllerContextTransitioning) {
    guard let toViewController = transitionContext.viewController(forKey: UITransitionContextViewControllerKey.to)
        else { return }

    let transitionContainer = transitionContext.containerView

    var transform = CGAffineTransform.identity
    transform = transform.concatenating(CGAffineTransform(scaleX: 0.6,
    y: 0.6))
    transform = transform.concatenating(CGAffineTransform(translationX:
    0, y: -200))

    toViewController.view.transform = transform
    toViewController.view.alpha = 0

    transitionContainer.addSubview(toViewController.view)

    let animationTiming = UISpringTimingParameters(
            dampingRatio: 0.8,
            initialVelocity: CGVector(dx: 1, dy: 0))

    let animator = UIViewPropertyAnimator(
            duration: transitionDuration(using: transitionContext),
            timingParameters: animationTiming)

    animator.addAnimations {
        toViewController.view.transform = CGAffineTransform.identity
        toViewController.view.alpha = 1
    }

    animator.addCompletion { finished in
        transitionContext.completeTransition(!transitionContext.transitionWasCancelled)
    }

    animator.startAnimation()
}
The implementation above first obtains a reference to the target view controller from the context. Then, the view that will contain the transition is fetched and the final frame for the target view controller is read.
The next step is to set up the initial frame for the target view controller. This is the position at which the animation will start. For this transition, the target view's alpha is set to 0, and a combined transition is used to create an offset on the Y-axis and to scale the target view down.
Then, the target view is added to the transitionContainer and the actual animation is implemented. Once the animation completes, the completeTransition(_:) method is called on the context to inform it that the transition is finished.
Now that the animation controller is complete, we should implement the UIViewControllerTransitioningDelegate protocol on CustomPresentedViewController and make it its own transitioningDelegate. Open the file and add the following implementation code:
class CustomPresentedViewController: UIViewController {

    override func viewDidLoad() {
        super.viewDidLoad()
        transitioningDelegate = self
    }
}

extension CustomPresentedViewController: UIViewControllerTransitioningDelegate {

    func animationController(forPresentedController presented: UIViewController, presenting: UIViewController, sourceController source: UIViewController) -> UIViewControllerAnimatedTransitioning? {
        return CustomModalShowAnimator()
    }

    func animationController(forDismissedController dismissed: UIViewController) -> UIViewControllerAnimatedTransitioning? {
        return nil
    }
}
This code adds conformance to the UIViewControllerTransitioningDelegate protocol and assigns the view controller as its own transitioning delegate. The animationController(forPresentedController:presenting:source) method returns the animation controller you created before. The animationController(forDismissedController:) method returns nil for now. Go ahead and test your custom transition! This is all the code required to create a custom display transition. Now that we can display our view controller with a custom transition, let's add an interactive dismissal transition.