Chapter 5
Arranging Visual Elements in a Frame According to the “Rules”

In This Chapter
Understanding the different areas of an image
Aiming for a more pleasing composition with the rule of thirds
Making the most out of the space in your frame
Deciding between simple and chaotic compositions
Creating balance in a composition to keep a viewer’s attention longer
Rookie photographers often instinctually place a subject dead center in a frame, but doing so rarely produces a great-looking photograph. So, as a photographer, one of the first things you need to recognize is that keeping your subject out of the center creates better compositions. In the world of visual arts, thousands of years of practice show that artists rarely obtain the ideal image of a subject by placing it in the center of a frame.
Think about it this way: If you placed a person’s face directly in the center of your frame, you have just as much space above the head (referred to as headroom) as you do below the head. The person has an entire body below her head and nothing above it. So why waste the space above the person’s head by showing nothing but the sky or your backdrop when you could eliminate that space and show more of the person’s body?
As a photographer, you choose what to shoot and how to position that subject in your frame. The “rules” — okay, they’re more like guidelines — I pose in this chapter get you started in the right direction; understanding them is the first step toward improving the way you take pictures.
Looking at Foreground, Background, and the Space Between
A typical scene is made up of these three different areas:
The foreground: This area contains elements that are the closest to the camera.
The background: This area is made up of anything that’s the farthest from the camera or that’s behind the subject itself.
The midground: This is the space between the foreground and background.
 You can compose an image that contains just a foreground and a background, but including a foreground, midground, and background in your compositions can maximize the illusion of depth. The separate areas work together to give the sense of space.
In most cases, your subject can exist in the foreground or the midground. Exceptional situations enable you to photograph your subject in the background (such as mountains or a storm on the horizon as your subject), but these cases are rare.
Because the foreground is the most prevalent to the viewer, placing your subject there is an easy way to make it stand out in your image. This position, which is closest to your camera, maximizes the size of your subject in relation to the other elements in your scene, causing it to seem important to a viewer. In this situation, the subject makes up the foreground and everything else is considered the background. However, to create a composition that’s more dynamic and contains more depth, photographers often place the subject in the midground with supporting elements in the foreground and background.
When your subject occupies the midground, you can use foreground elements to lead a viewer into the scene. Supporting foreground elements often are blurry when compared to the subject because they’re outside the range of your plane of focus, which determines what’s sharp and what’s blurred. (For information on focus, check out Chapter 7.)
Figure 5-1 shows an image composed to have a foreground, midground, and background. The tree on the left side of the frame and the brush on the ground make up the foreground in this scene. They give you a sense of what the environment is like and lead your eyes to the subject in the midground, which is the house with the two dummies. The subject is the main focus of the image and is supported by the foreground and the background. The mountains and the sky make up the background in this image. They work with the foreground to create the illusion of depth, which causes your eyes to wander around the image, exploring the different areas and gathering information about the subject. The combination of the foreground, midground, and background tells a lot about where this shack is located and how sparse the human population is there.
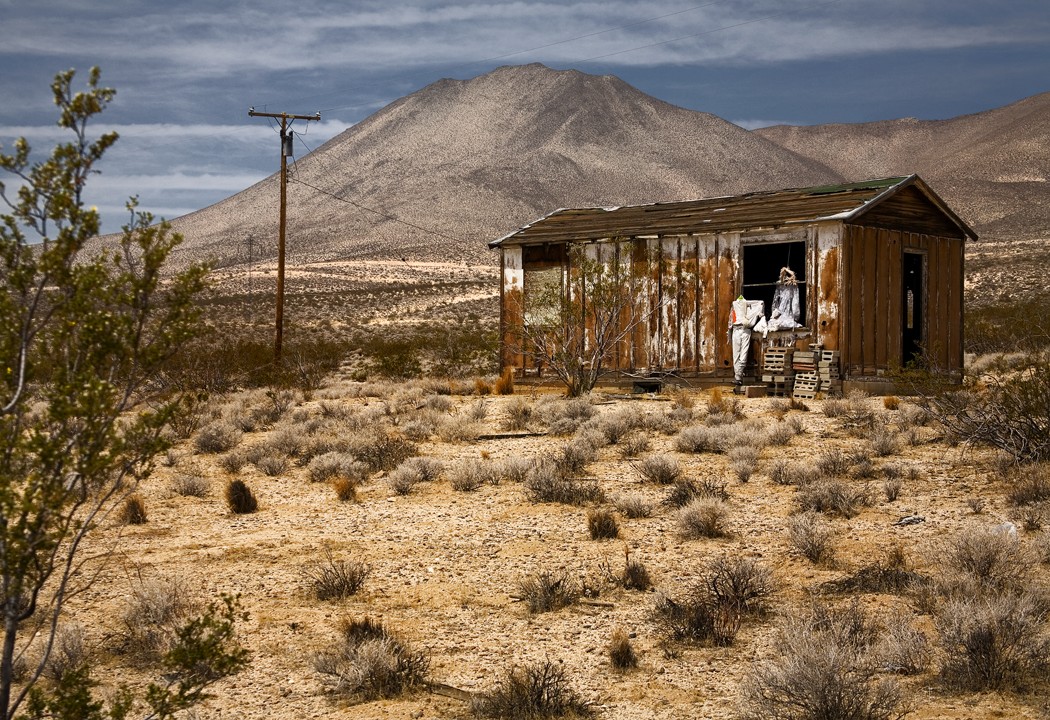
Figure 5-1: The foreground, midground, and background in this image give a sense of depth.
Enlivening Your Images with the Rule of Thirds
The most common composition guideline is the rule of thirds, which refers to the photographic technique of dividing your frame into thirds horizontally and vertically to determine which areas have the most aesthetic quality. By placing key elements on a frame’s thirds, you can create compositions that are easy to look at and can break the habit of placing your subject in the center. Getting your subject out of the frame’s center produces more interesting, dynamic results. In the following sections, I show you how to take advantage of the rule of thirds to take the best photos possible.
Your subject consists of whatever seems most important to you in any scene. If you’re having a difficult time identifying your subject, ask yourself why you’re taking the picture in the first place. Are you creating a landscape that highlights the river curving off into the distance? If so, the river is your subject. If you’re taking a person’s portrait, the person is clearly the subject. You may have multiple subjects in one scene. In that case, you can use the rule of thirds to prioritize each subject.
Dividing your frame to conquer composition
To use the rule of thirds, imagine four lines (two vertical and two horizontal — picture a tic-tac-toe board) dividing your frame into nine equal boxes, as in Figure 5-2. These lines determine the sweet spots for positioning your scene’s key elements, such as your subject.
View the image in Figure 5-2 to get an idea of how photographers typically use a frame’s thirds. Notice how the woman’s eyes are lined up along the top third of the frame and the horizon in the background is lined up along the bottom third. Plus, the woman’s eyes are lined up with the left third of the frame rather than being centered.

Figure 5-2: The rule of thirds in action.
The areas where the horizontal and vertical lines of thirds intersect — called golden points — are known to have the highest visual impact. (You can read more about golden points in Chapter 4.) Placing a key element in one of these areas makes it one of the strongest visual elements in the frame. As you can see in Figure 5-2, the woman’s eyes are placed near the intersection in the upper left-hand corner.
Don’t get too obsessed with the positioning of your elements on the thirds. Placement doesn’t have to be exact to be effective. Cutting your frame into thirds gives you an idea of where the most visually pleasing areas are, but it doesn’t create a definite rule of where to place your elements. If your subject is a little to the left or right of one of the thirds, it’s still going to get the attention it deserves. Think of the rule of thirds as a guide rather than a rule.
As you gain experience, the rule of thirds becomes so embedded in your brain that you stop noticing it’s there. At this point, you automatically place the key elements on the thirds of your frame.
Using the thirds to their fullest
When taking a photo, you’ll most likely want to place your subject in the area of most importance. You do so by placing it at a point where two of the thirds intersect in the frame. (See the earlier section “Dividing your frame to conquer composition” for more information on these golden points.)
 For those who speak English, the left side of the frame has more visual impact than the right side because English reads from left to right. So placing your subject on the left third gives it the most compositional importance for English-speaking viewers. In cultures where text reads from right to left, the inverse is true.
Because a frame includes four points of intersection among the thirds, you have options when considering where to place particular elements in your frame.
Certain elements in composition (including your subject) almost always are placed on one of the thirds because of their naturally striking visual impact. Here are some common elements that are positioned on the thirds:
The horizon line: The horizon line usually stands out in an image because it cuts straight through your frame from one side to the other. Placing it along the top third emphasizes what’s in the foreground; placing it along the bottom third emphasizes the sky.
Notice, for example, the difference in the two images in Figure 5-3. In the image on the left, the horizon lies on the upper third, drawing attention to the chair in the foreground and the expansiveness of the sea. The image on the right, on the other hand, emphasizes the sky and the power of the kite because the horizon is on the bottom third.
The tops of buildings, trees, and mountains: These elements often appear along the top or bottom third in an image. You sometimes can align the horizon with the bottom third and place the top of the buildings, trees, or mountains in the top third to create a comfortable composition that accommodates both naturally strong visual elements.
Supporting elements: Your supporting elements are the things in a scene that help to tell the story of the subject. When photographing a musician, for example, including his instrument in the composition clues a viewer in to who he is. Place supporting elements on or near the thirds in order to take advantage of their descriptive qualities, but don’t let them compete with your subject as the main attraction.

Figure 5-3: Draw attention to your foreground by placing the horizon on the top third and to your sky by placing it on the bottom third.
The size of your subject determines where you position that subject in your frame and what you focus on when positioning it. If the subject is large in your frame, you have to determine what detail is most important and most deserving of priority placement. For example, when you photograph a person so he’s large in your frame, consider placing his eyes on a third so viewers are drawn to make eye contact when looking at the image. If the person is smaller in your frame, you can simply position his entire body on one of the thirds.
Leaving some of your golden points empty (containing no points of interest) gives more impact to the ones you do use. In Figure 5-4, for instance, the right side of the frame has more visual impact on a viewer because the left third contains no points of interest. The left side of the frame contains leading lines that walk your eyes through the frame, but they ultimately lead you back to the subject.

Figure 5-4: Keeping some of your golden points free of compositional elements helps to draw more attention to the others.
Interpreting the rule of thirds to make it work for your scene
The rule of thirds is a wonderful guide for helping you get more creative with your compositions. It causes you to consider placing your subject, supporting elements, and horizon lines somewhere other than the center of your frame. However, don’t think that you have to follow the rule of thirds to a T every time. If you compose images in such a formulaic way with every scenario, your photography will become predictable and possibly even boring.
Treat every scene according to its own unique circumstances. After all, certain elements change the way you compose a scene. Sometimes you can use the rule of thirds as a guide and then shift your subject (or another key element) a little to one side or the other in order to convey your message more appropriately.
The size and shape of your subject along with your intended message determine where you position the subject. Placing it closer to the center creates a more traditional and comfortable feeling. Placing it nearer the edge of your frame creates tension and suggests that you did so for a reason. Perhaps you intended to lessen the importance of the subject in comparison to the rest of the scene. You may use this composition if you were photographing a firefighter putting out a house fire. Having the firefighter toward the edge of the frame enables you to reveal the blazing house as a major part of the story.
After you find the appropriate position for your subject, also make sure that everything else in the scene has a place and fits comfortably in that place. Doing so is important to creating clear messages and images with high aesthetic quality.
Figure 5-5 shows you a composition that successfully manages many separate elements. I didn’t follow the rule of thirds precisely in this figure, but I did apply the general theory.
Here’s a breakdown of how I composed Figure 5-5 and why:
I positioned the subject between the center and the right thirds. I placed him on the right side because of the room’s setup and the lighting. The bed takes up much of the space on the left side of my frame, and the light comes from the right, casting a shadow to the left. If I had positioned my subject nearer the left third, the shadow (which creates an interesting leading line in the composition) would be lost, and he would be uncomfortably close to the bed. I moved him slightly toward the center to keep him from merging with the edge of the door on the right side of the frame.
To avoid merging lines (see Chapter 9), I had to choose between placing my subject in front of the painting or in front of the door. I chose to block the painting with my subject so it wasn’t recognizable. After all, this photo is my work of art, not the painter’s.
I positioned the bed in the foreground to help lead viewers’ eyes into the image. This supporting element signals that the subject is in a bedroom and gives a sense of environment. The bed’s coverings also have a similar texture to the curtains in the background, and repeating (or similar) elements add interest to a composition. (Chapter 4 tells you more about using patterns and repetition.)
I placed the horizon (where the floor meets the back wall) along the bottom third. This placement helps create a comfortable space to work within. If a horizon line is too close to the center, it divides an image in half in a somewhat uncomfortable manner. And having the horizon too close to the bottom edge creates an unbalanced relationship between the floor space and the wall space.
I arranged the chair in the background to balance the bed in the foreground. Because of these strategic placements, this scene is naturally symmetrical; having something on the left requires something on the right to maintain balance.
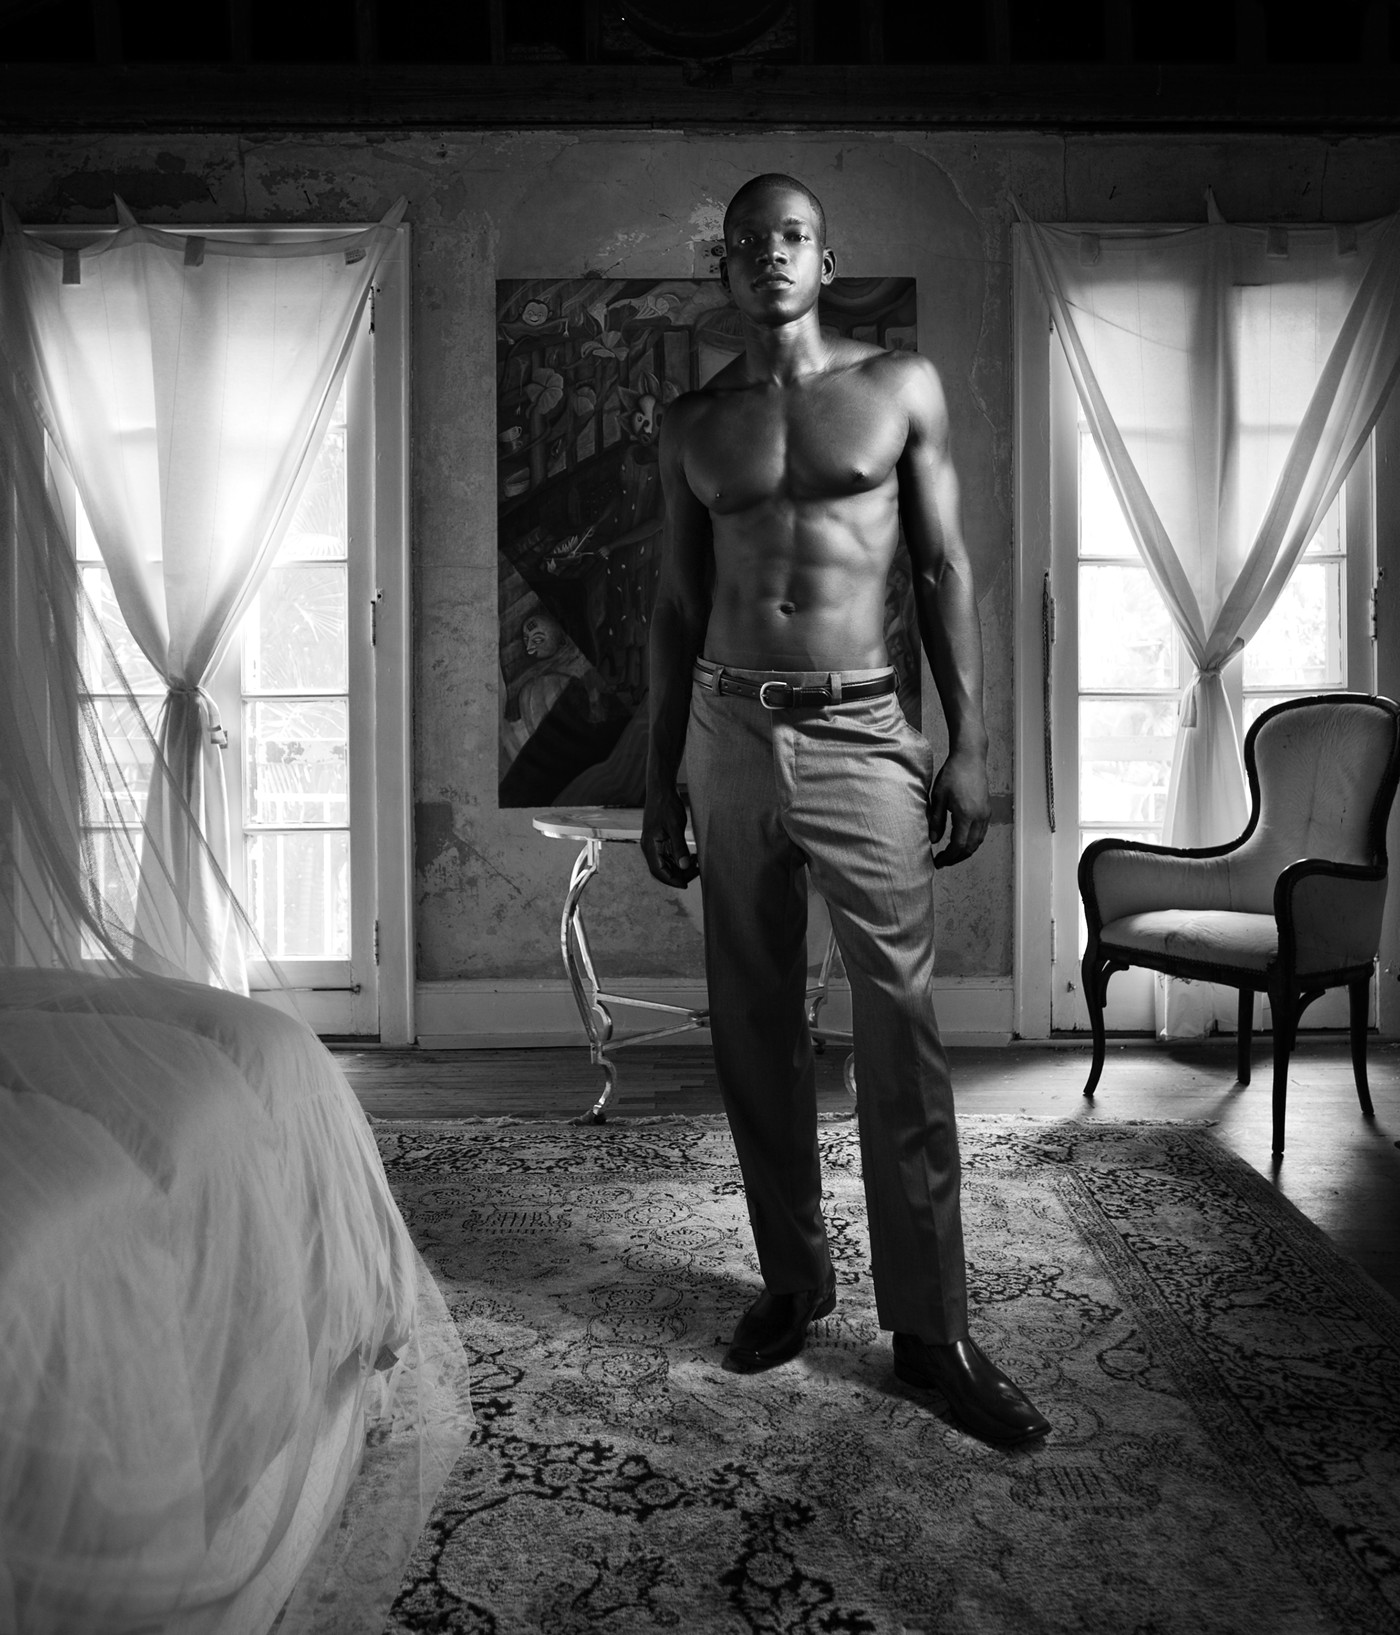
Figure 5-5: Every element has its place in a successful composition.
I ensured that the back doors appeared at the edges of the frame in order to bring closure to the composition. The outer edges of the doors are darker than the center areas of the doors, creating an edge that keeps viewers’ eyes in the frame. In other words, including more wall space beyond the doors would have invited viewers’ eyes to go out of the frame.
I left space in the foreground to bring viewers’ eyes into the frame, and I included the dark section above the back wall to close out the top of the frame. Both of these techniques help keep a viewer in the frame longer and provide descriptive details about the subject’s environment. If this image was strictly about selling the pants or the model, I would crop in closer to show a clearer depiction of each. However, this particular image was created with the intentions of selling a photographic style that maximizes depth and narrative quality.
Your own judgment always trumps a general rule when choosing the best composition for an image. Keep the rules in mind but do what looks best in the end.
Taking Advantage of Space to Get Your Message Across
Your frame provides a rectangular space that’s basically a blank canvas until you take off your lens cap and begin to compose a scene. You need to fill the canvas with information that’s going to get your intended point across. The elements you include in your composition should fit appropriately according to their size in the frame and their relationship to the other elements.
Space refers to the two-dimensional frame you’re working with and the three-dimensional relationships a scene’s elements have with one another within the frame. The closer an element is to the camera, the more space it takes up in the frame. Various techniques enable you to take advantage of the space in your frame and use it to create visually compelling compositions. I explain what you need to know in the following sections.
Giving your subject more (or less) space
In order to reveal the details that are necessary for conveying your message, be sure to consider the amount of space that your subject takes up. When you want to reveal intimate details about your subject, for example, make it larger in your frame. You may use this technique to show the color of a person’s eyes, the texture of a piece of fruit, and so on. If, on the other hand, you feel that the environment surrounding the person can reveal more pertinent information to your intended message, you can back up from your subject and fit more of the scene into your frame.
Your ultimate goal is to find the best size to represent your subject while allowing adequate space to reveal any necessary supporting details in your scene. Sometimes you may want to fill your entire frame with your subject in order to show the maximum amount of detail, and other times you may reveal the subject as a tiny speck on top of a mountain.
Figure 5-6 shows two examples of the same subject in the same scene. In the image on the left, the subject is large in the frame and takes up a dominant amount of space. The image on the right shows the subject in a less-dominant position, which enables the environment to be more important and informative.

Figure 5-6: Your subject’s position in the frame changes what you reveal.
Allowing shapes room to breathe
When you compose an image, pay attention to how the shapes of your elements are being represented. When one element merges with another, which happens in the left-hand image of Figure 5-7, both shapes become less recognizable. By repositioning your camera or your subject, you can separate the elements in your frame to better illustrate them. See the image on the right, for example.
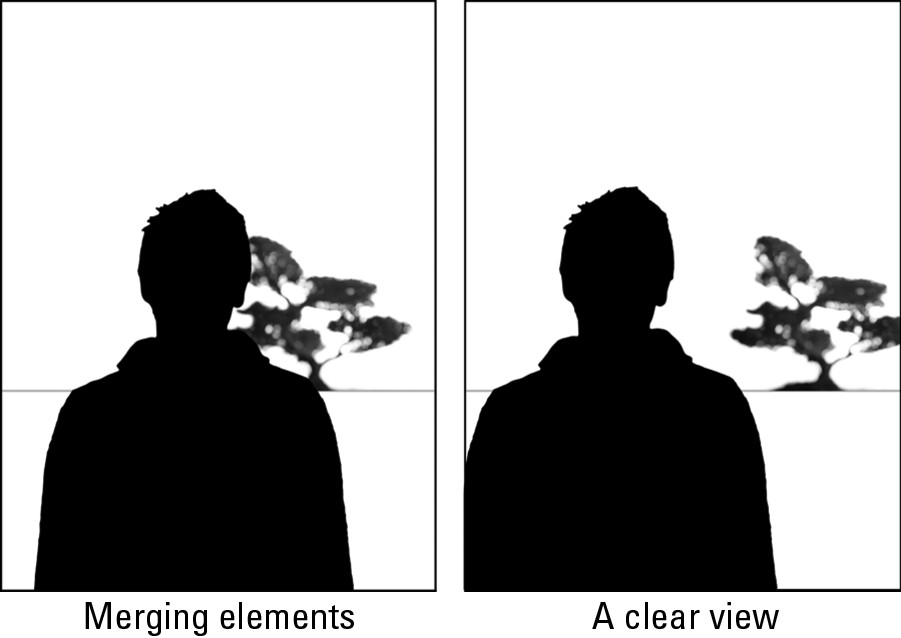
Figure 5-7: Show the shape of your subject and supporting elements in the best way possible.
 In some cases, you can allow elements to merge in order to create the illusion of depth, but do so with caution. Make sure the closer elements don’t block any important details in the further elements. Letting elements merge is appropriate only when it doesn’t compromise the viewer’s ability to see the elements as distinct objects.
For instance, in Figure 5-8, the image on the left shows two triangles side by side. This arrangement highlights their size relationship — because the gray triangle looks larger than the orange one and is on the same horizontal plane, you can assume it is in fact a larger triangle.
In the image on the right, I allowed the larger triangle to overlap the smaller one. I also positioned the smaller triangle higher in the frame than the larger one. This arrangement creates the illusion of distance. Because of the size difference and the overlapping effect, the gray triangle seems to be closer to the viewer than the orange triangle. In this version of the image, a viewer can’t assume that the gray triangle is larger than the orange one, and he knows only that it’s closer.
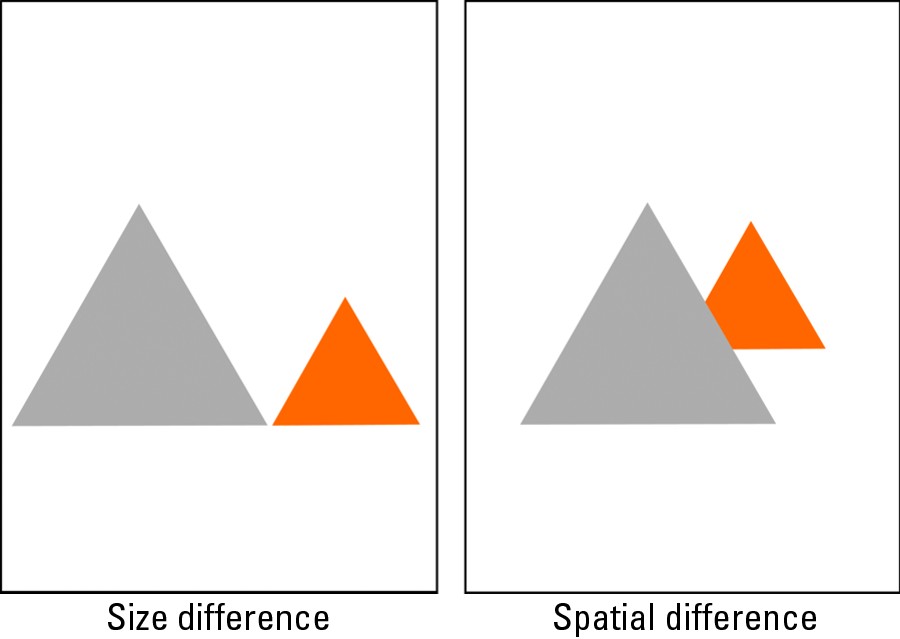
Figure 5-8: Composition reveals size and spatial relationship of objects.
Staggering objects within your frame
Lining up elements throughout your frame can cause images to feel stiff and boring. However, using your space to stagger the elements keeps viewers’ eyes moving from one to the other in an interesting way. Taking advantage of the space in your frame and giving viewers a reason to explore the whole scene is a good way to keep their attention for longer periods of time. Figure 5-9 shows you how staggering adds interest.
You can more easily create dynamic compositions with informal balance by using an odd number of key elements than with an even number. Perhaps this is because even numbers have a natural tendency to cause symmetry and formal balance. (Read more about the pros and cons of informal and formal balance in Chapter 12.) You call a person who’s boring a square, not a pentagon.
The left-hand image of Figure 5-9 shows a staggered composition of three elements. The lack of symmetry is natural when dealing with odd numbers. The right-hand image shows how to work with an even number of elements to throw off symmetry. Doing so adds interest in your composition and enhances the illusion of depth.
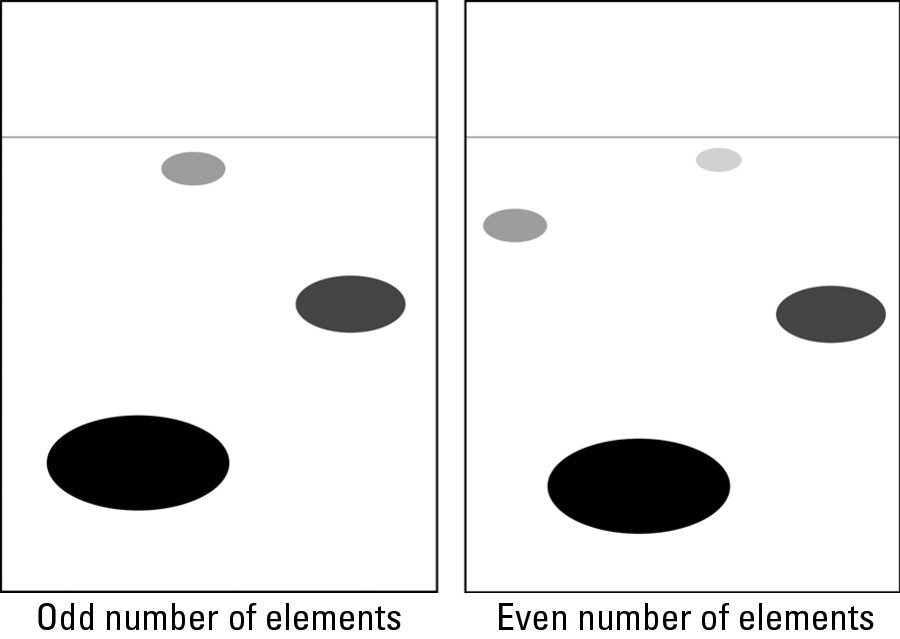
Figure 5-9: Staggering elements helps create interest in your compositions.
Containing lines inside your frame
When you allow a leading line (a compositional element that directs a viewer’s attention) to go off the edge of your frame at a corner, you take the viewer out of the frame and leave yourself no space to bring her back into it. Doing so is clearly a problem because the whole point of creating a photo is to grab a viewer’s attention and keep it for as long as possible.
In Figure 5-10, the image on the left uses the foreground to lead your eyes into the frame and then uses the horizon line to bring your eyes back into it where the blue curvy line goes off the edge. The space above the point where the line exits the frame enables me to use the space to keep your attention. A corner is at the edge of your frame both vertically and horizontally. As the image on the right-hand side of Figure 5-10 shows, a leading line in a corner leaves you no space to work with and no way to bring the viewer back into the image.
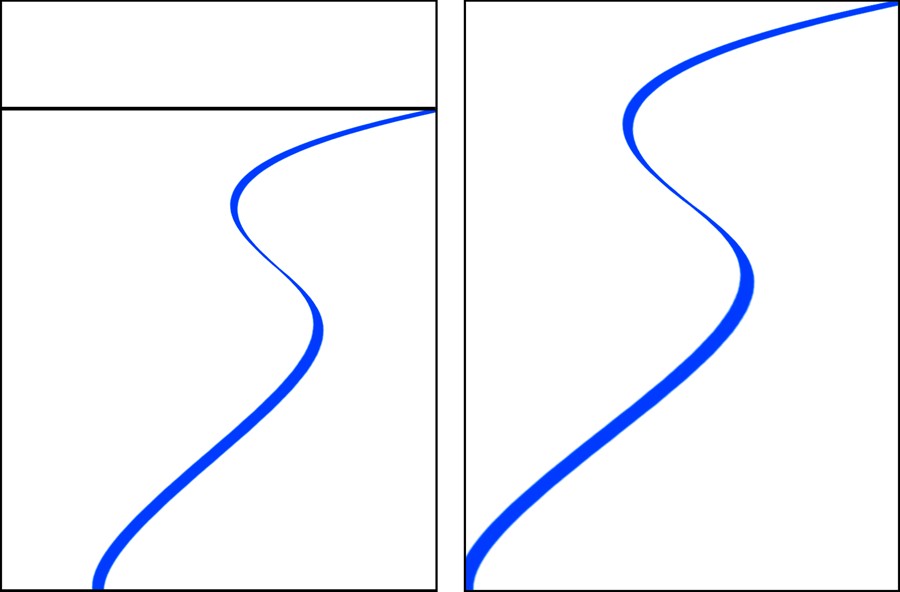
Figure 5-10: Stop lines from exiting the corners of your frame to keep a viewer’s eyes from permanently exiting the frame.
Keeping an Image Simple or Unleashing Controlled Chaos
Your message in a photograph consists of what you include in a frame and how you include it. Anything that doesn’t go with your message should be left out of your frame (check out Chapter 8 for tips on using perspective techniques to exclude certain elements). Everything that a viewer can see impacts what he takes away from an image. You can choose between the following two types of compositions (or find a happy medium), depending on your message:
A simple composition: This type of composition points out exactly what you want a viewer to notice with as few distractions as possible. It includes only the supporting elements that are absolutely necessary to your message. Simplicity is a good approach if you want to make sure a viewer gets your point.
A simple composition makes the most out of the few elements that exist in it. By having fewer distractions, you can say more about your subject (assuming the subject has some sort of descriptive qualities). Imagine, for example, that you’re photographing at a concert and the singer on stage is really getting into a song. You can capture that moment with a frame that simply includes the singer on stage in the spotlight with an expression that conveys the way he feels at that moment in time. The rest of your frame is filled with darkness, drawing the maximum amount of attention on the singer.
A chaotic composition: If you push the limits of how much you can fit into a single composition, you create chaos. Chaotic compositions include more elements for a viewer to look at and are most successful when everything works together to get a single point across. At first glance a scene of chaos may seem random and pointless, but further investigation shows that something specific is happening.
A chaotic composition uses everything possible to convey a message. Picture the same moment when the singer is on stage at a concert, except this time you want to capture a different side to the story. Turn your camera toward the crowd and fill the frame with screaming, jumping fans. Now you have a frame filled with descriptive elements all working together to say the same thing; something exciting is happening. No one element takes the spotlight in a chaotic composition, but many elements reinforce a similar message.
Although each type of composition takes a very different approach, you can use either concept to create photographs with clear messages. Figure 5-11 shows an example of a simple composition in which the subject is a wake boarder. He’s caught in a moment filled with adrenaline and energy. By combining that moment with a simple composition, I focused all the energy on him. The rest of the scene is fairly peaceful. The wake boarder is the star, and this is his moment.
In Figure 5-12, I made a fairly peaceful scene appear hectic by creating a chaotic composition. Leaves floated on top of this lake. From my point of view, I could see the reflection of a tree that was above my head. To add some interest, I dropped a stone into the water to cause some disturbance. My shutter speed was slow, so the reflections in the surface of the water were blurred but the leaves sitting on top weren’t. The combination of the leaves, the reflections, and the movement cause this image to appear chaotic.

Figure 5-11: An example of a simple composition.

Figure 5-12: An example of a chaotic composition.
Balancing Your Compositions
Balance refers to a distribution of visual elements throughout an image that lets a viewer’s eyes scan the entire frame without being drawn too much to one specific area. In theory, balance is most effective when your composition has perfect symmetry, which is when the left and right sides and top and bottom of your frame are the same and balanced by their opposites. You’re unlikely to shoot many symmetrical scenes, though, so you need to understand how to achieve balance without having symmetry.
Weight in a composition refers to the visual impact a specific area has. A balanced composition is comfortable to look at and keeps a viewer’s attention. You can draw specific attention to your subject by having it stand out more visually than the other elements in a scene. However, you still want to give viewers a reason to look throughout the entire frame. Finding the right combination of weight distribution between elements is key to achieving balance.
Balance allows viewers to look at an image with an appreciation of its use of space. You don’t want to place all your elements in one area; otherwise the rest of your frame will be empty and the weight of the image may appear to be lopsided. Distribute your elements throughout the space of your frame in order to create a sense of balance that’s more comfortable to look at.
In the left-hand image of Figure 5-13, the frame is practically divided in half by the diagonal line that runs from the top of the image to the bottom. The left side of the frame includes nothing that makes it worth looking at. Plus, this image is heavily weighted to the right, and the elements on that right side aren’t interesting enough to keep your attention for more than a few seconds. An element on the left side of the frame would cause you to move your eyes back and forth between the two sides, which would keep your interest longer.
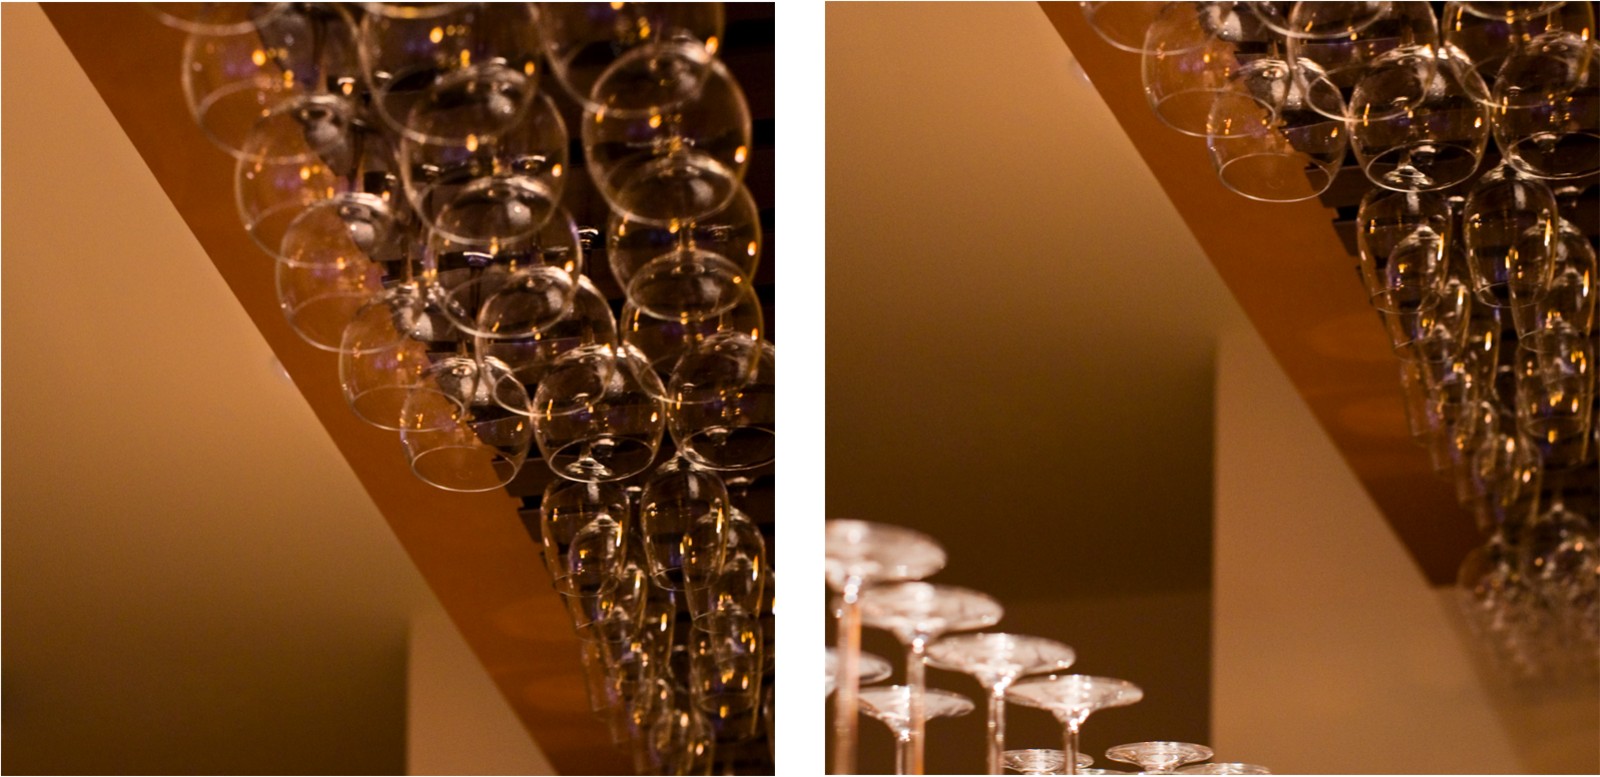
Figure 5-13: Including the glasses on the left side of the frame created balance in this composition.
Aiming my camera lower and including some wine glasses that were sitting upside down on the bar corrected the balance problem occurring in the left-hand image in Figure 5-13. The right-hand image of Figure 5-13 shows this new version of the same scene composed in a more balanced and dynamic way. The wine glasses on the left side don’t take up as much space in the frame as the glasses on the right, but they contain more tonal contrast, which gives them more weight in the composition. The two sides work together to create a sense of harmony that gives more purpose to the image and makes it easier to look at. For more information on achieving compositional balance see Chapter 12.