Chapter 8
Finding Your Perspective
In This Chapter
Understanding the meaning of perspective
Trying out techniques that help capture a solid photo of a scene
Breaking away from traditional composition
You can take the Ansel Adams tour of Yosemite National Park and set your tripod in the same exact spot that the great photographer once did while shooting one of his classic landscapes, and odds are that your perspective will still be slightly different than his was. This variation could be because of a minor difference in the vertical or horizontal placement of the camera or because of the change in elements in the scene through time. The possibility of two photographers accidentally creating images with the same exact perspective is very unlikely.
Each photographer has a unique perspective that he can alter and adjust. Discovering your own perspective and evaluating that of others helps you take photos that look like you want them to and sets you apart from other photographers. In this chapter, I explain techniques you can use to create depth in photos, draw attention to your intended subject, tell a story with a photo, and explore less common perspectives.
Looking at Things from a New Perspective
In photography, perspective is where and how you place your camera in relationship to your subject and the elements of a scene. When you determine your perspective, take into account where all the elements of a scene are in relation to each other at the time you take the picture. Every situation is different, so you must determine the level of significance to be given to your subject and the surrounding elements. Here are a few options and examples:
Placing your camera low and filling most of the frame with a particular subject usually helps to make the subject appear to be a hero of some sort. Look at iconic images of presidents of the United States or Che Guevara to see what I mean.
Shooting from a high angle and including many elements in the frame could dull the significance of your subject and draw more attention to the other elements. Consider the famous photograph of the man standing in front of the tanks in the protest on Tiananmen Square. In that image, the tanks are as important as the man is to telling the story.
The choices you make with regard to perspective play a major role in defining your photographic style. When a photographer develops a style, anyone familiar with that signature look can recognize the photographer’s images. Style develops over time and always has room to evolve. Although you may choose to do things a certain way to maintain your look, you need to understand all your options for manipulating perspective so you’re prepared for any situation you may come across.
 As a photographer, you have a job to do whether you’re shooting for fun, being paid to cover an event, creating an editorial fashion story, or making a fine-art masterpiece. Your job is to take photos you’re pleased with. Training yourself to automatically recognize the subjects and elements in a scene, to understand their relationship to you and to each other, and to know how your decisions affect those relationships frees your mind to concentrate on other techniques like focusing and adjusting your exposure.
Understanding how perspective impacts your message
A photograph tells you something about its subject. This message can be subtle or literal or somewhere in between, but the message is going to be there. The main subject in an image has relationships with whatever other elements exist in the frame, and your job is to present a clear message based on those relationships.
Take a look at Figure 8-1 and notice the differences between the two depictions of tuna tartar. In both photographs, the tuna tartar stands out as the subject because of its focus and position in the frame; however, the message is different in each case.
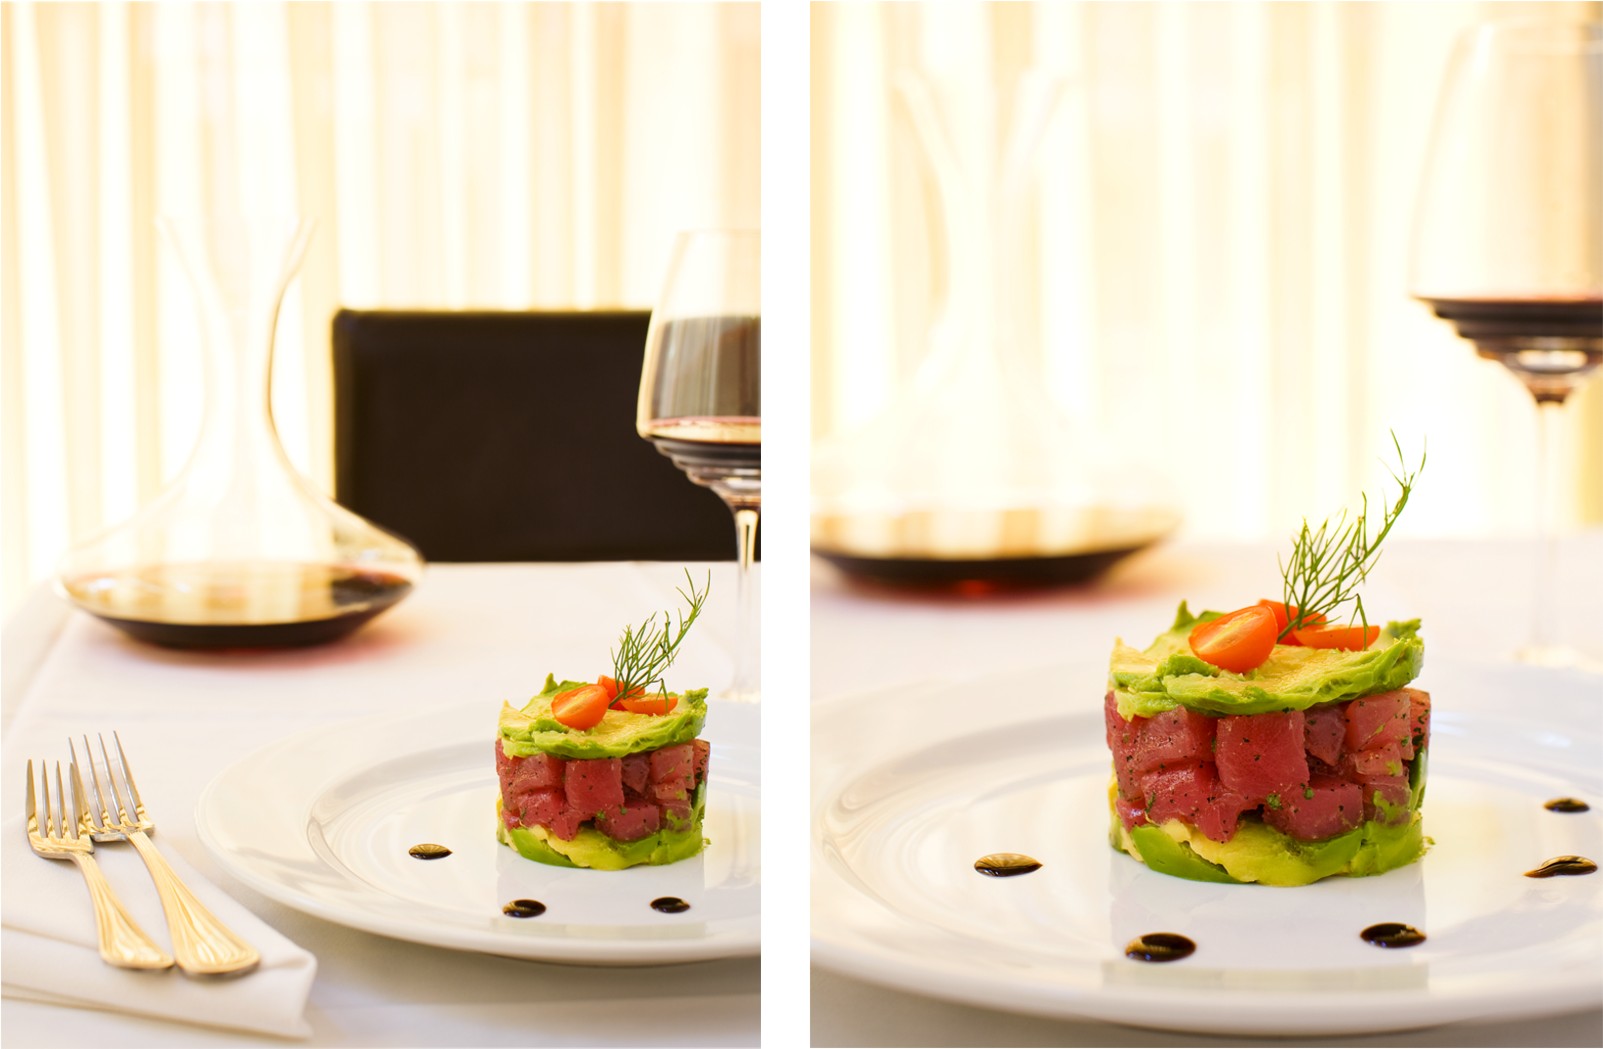
Figure 8-1: Changing the angle of view and distance from your subject can have a major effect on how people read an image.
The left-hand image in Figure 8-1 tells the story of the entire setting. It’s clear that the tuna dish is served in a restaurant environment and is good with red wine. The relationships it has with the other elements in the photo tell you these things. For instance, the red wine is in the background on the same table as the dish. The photo shows a setting for only one person, so the wine has to be for the person who’s having the tuna. The folded white napkin and white tablecloth tell you that the dish is in a restaurant.
The image on the right tells a much different story even though I took it with the same setting just moments after the shot on the left. Because you see the dish from a lower angle and because the camera is closer to the subject, the tuna tartar looks more like a product than part of a meal. The forks, napkin, and chair are no longer in the image; all were eliminated by the change of angle. You still see the wine glass and carafe, but they’re blurry because I changed the distance between the subject and camera. Because they’re so far out of focus, they don’t convey a strong message. Instead they provide an interestingly shaped frame around the subject along with the garnish on the plate. (The section “Moving the subject or yourself” tells you more about manipulating depth of field using distance.)
Making choices about perspective
Even though it may not always feel like it, you have an infinite number of choices regarding perspective when taking pictures. Consider the following:
You’re free to move around. The slightest movement in any direction affects your angle relative to the subject and the other elements in a scene. Even when your ability to move is restricted, you have some options for getting the best angle possible.
Your focal point and depth of field play a major role in conveying your message, and a slight change can have a huge impact. Tell your viewers what your subject is by making it the focal point, and determine how much of the scene should be in focus to support it. (See Chapter 7 for more on focal points.)
You choose the correct focal length to include an appropriate amount of surrounding elements. A 28mm–135mm lens provides a flexible range; it allows you to capture wide scenes, situations that require zooming in for more detail, and everything in between.
The later section “Considering Techniques to Get the Shot” tells you more about moving around, finding your focal point and depth of field, and choosing the correct focal length.
Making decisions based on perspective eventually becomes second nature. You begin to notice every detail in your frame as you develop an eye for composition and use perspective to incorporate or eliminate elements in order to create your version of the story.
If you see something in the background that you feel has some relevance to your message about the subject, you may want to find a perspective that allows you to include that element successfully. Search for the appropriate distance and angle to approach the subject so that no other element blocks what you’ve found. To see more of your background, usually you raise the height of your camera so you see the details of objects directly behind your subject or foreground. This also is a way to add depth to your photography.
 In landscape photography, photographers often shoot from a high angle in order to include as much detail as possible and to show how expansive a scene is. The high angle also is common in portraiture, which focuses on someone’s face. Conversely, fashion photography uses a low angle to highlight the wardrobe as the subject. Of course, these are all just common practices and are encouraged to be tweaked and personalized by each individual photographer.
I make decisions on the fly based on the situation at hand. Sometimes my portraits look like fashion images and vice versa. In the left photo of Figure 8-2, I had to have a high-enough angle to show the muddy foreground and the water on the horizon through the tall grass. In the right photo those details were lost; the low angle shows less of the environment and instead shows a subject with a background. It’s all about the girl or the coat she’s wearing.
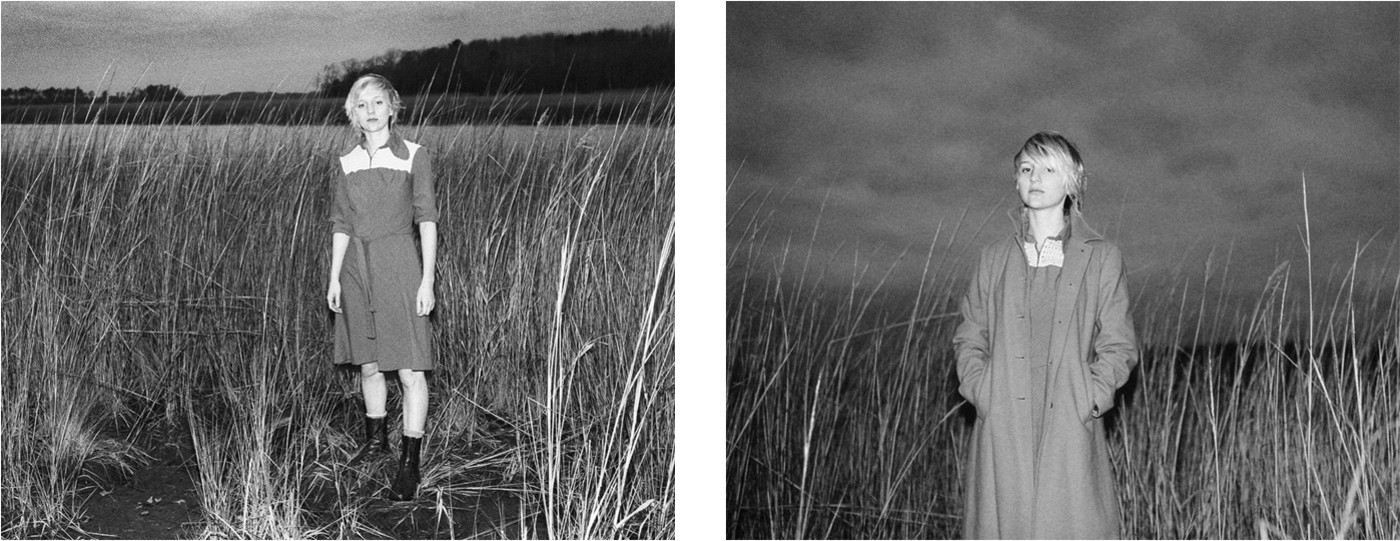
Figure 8-2: Choose a perspective that gets your message across.
Selecting perspective according to light
Photography in its most basic form is a record of light, so it’s no surprise that light is the most important element in any photographic scenario. Light causes you to see what you see. The ability to manipulate light in a scene is important but not always possible. When you can work only with available light, you may find that you choose your perspective based solely on what the light is doing.
People view photographs according to a lot of subconscious rules. Knowing these rules helps you decide which perspective would best capture a potential viewer’s attention. Most good compositions are designed to keep a viewer’s eyes within the frame for the longest time possible. Using contrast is one way to accomplish that task. (Refer to Chapter 10 for more on controlling contrast.) Typically, eyes go immediately to the spot on the image that has the most contrast. From there they move around the image following the lines and gradients that make up the image. (To see the lines and gradients in their basic form, squint while viewing an image; check out Chapter 3.)
Figure 8-3 presents a case in which light dictates perspective based on placing the subject in the area with the most contrast. A window just out of the frame on the right side lights the subject and the scene. The wall has a semigloss quality and reflects the light from the window, creating a highlight similar to a spotlight. With the perfect perspective, the reflected light ends up behind the subject — the female model. Because she’s fairly dark compared to her surroundings and was placed in front of the lightest spot in the room, she’s in the exact area your eyes go to when viewing the image (though, I’m sure the bright green mask helps draw your attention to her as well). The reflection also causes a natural vignette (a gradual loss in brightness toward the edges of an area that draw attention to the center), which helps keep your eyes from wandering outside of the frame.
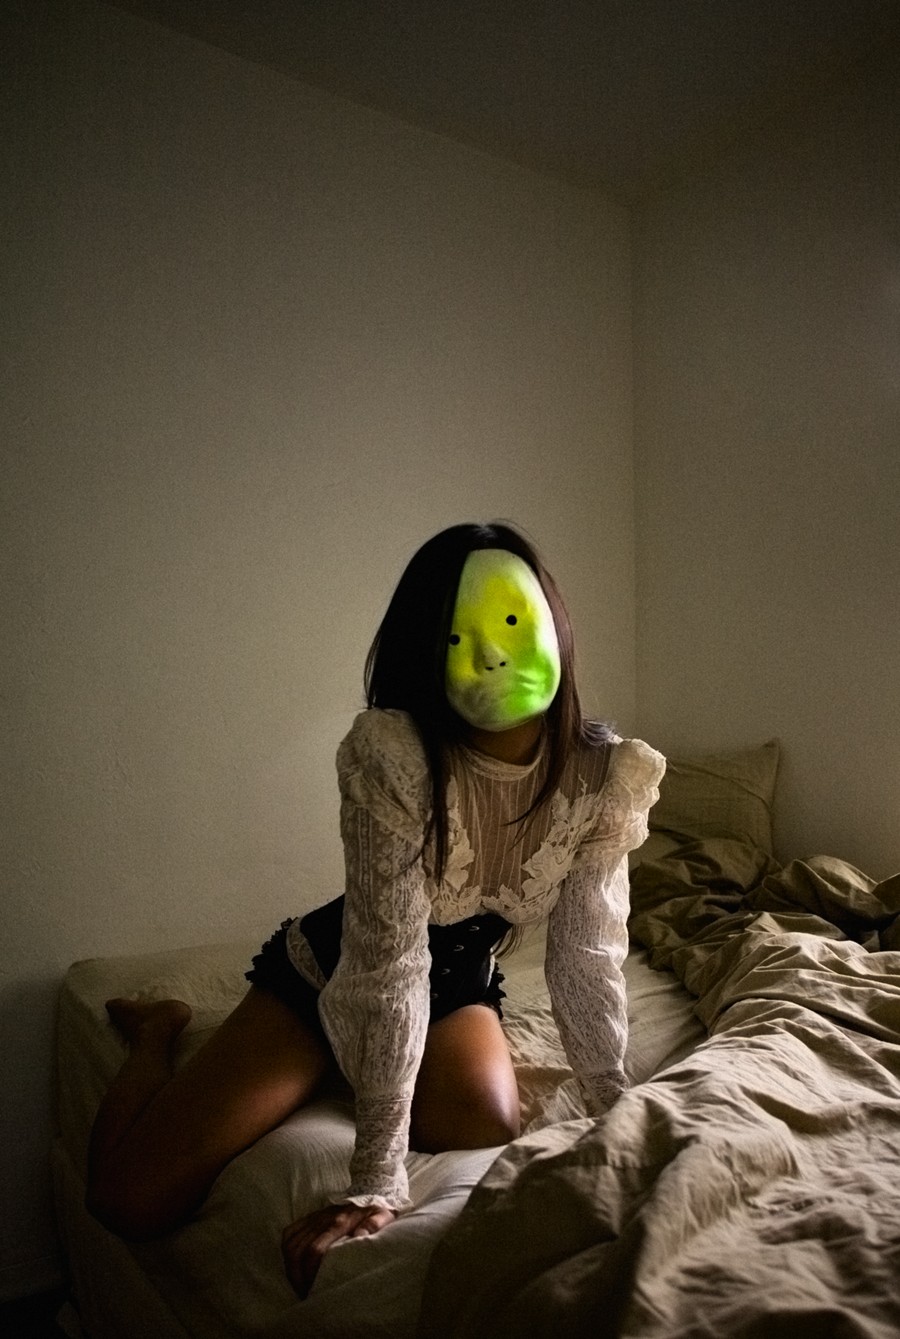
Figure 8-3: Creative use of available light can add interest to your compositions and draw attention to your subjects.
If you don’t have any interesting light falling into your background, you can always position the subject in a well-lit area in front of a background that’s covered in shadow.
Another way that light can dictate perspective is when a photographer includes the shadow of a subject as part of the background. If you’re using available light and can’t move your subject, you have to find the right perspective by moving your camera. If you want to take a picture of a tree lit by the sun, for example, you can wait for the sun to move and change your perspective, but the tree is staying right where it is. Of course, if the tree happens to be a bonsai, you have the option to change the relationship of the tree and wall.
Here are some more suggestions for using available light to create interesting compositions:
Approach your subject from an angle that places your key light source to the side of your subject for a more dramatic composition.
Be aware of how the light affects what’s behind you if you’re photographing a reflective surface like a shiny car or a person wearing sunglasses. Changing your angle could create a smoother highlight or a more appealing reflection, or it could reveal details about the environment. You control the effect of this light by moving around and viewing the changes that occur in the reflective surface.
When shooting a backlit scene (a scene that has a key light source behind your subject), find an angle where the subject or an element in the scene blocks the light in order to have a normal amount of contrast in your exposure.
Making the light source visible in your frame cuts down on contrast and provides a softer overall feel. In most cases, it also causes lens flare (halos and geometrical-shaped areas of color and haze that are created when a light source shines directly into a lens). Lens flare can be good or bad depending on what you’re shooting and what your message is supposed to be.
Considering Techniques to Get the Shot
Sometimes you have more time and control over getting a shot you’re happy with, but other times you have to get the shots on the fly. In those hurry-up situations, a well-trained photographer will have an idea of what to expect and will be prepared for the decisive moment. In order to prepare yourself for these types of situations, be sure to familiarize yourself with the techniques discussed in this section and get some hands-on experience using them. Before you snap a shot, look around and notice what options you have for getting a higher angle or for getting closer.
Keep in mind the basic rules of composition as discussed in Chapter 1. If you’re familiar with your camera, its settings, and how to focus it, you’ll have more time to concentrate on getting the best composition. I’m usually disappointed in myself when I capture a great moment and later discover I’m not satisfied with my composition.
You often can improve your composition by making quick adjustments to your perspective. Searching for something to stand on may provide you with the extra height needed to reveal more detail in the scene, or you can kneel and shoot from a low angle. I’ve been known to lie down on busy sidewalks to get a shot. (Don’t be too embarrassed to do these things; it’s the photographers with the million eye-level images who should be embarrassed.) If your subject moves and ruins your composition, move with it to regain your desired composition. Always be aware of the elements in your frame and their relationships with each other.
In a more controlled photo shoot, you can take time to perfect your composition and should consider everything. Here are some tips for getting the shot you want:
Move things around as necessary, if possible. If your subjects are smaller objects, they’re (usually) moveable. While you look through the viewfinder, have an assistant or friend move things around until you have the desired composition.
Move your camera if the subject isn’t movable. If you’re shooting buildings or mountains (or other large immovable structures), move the camera until you’re satisfied with the composition. Many architectural photographers bring a ladder to their shoots in order to achieve maximum depth and to have more control over their perspective.
Try holding the camera instead of using a tripod. For instance, when photographing people, I prefer to hold the camera in my hands. The tripod offers you a fixed perspective, but it also requires you to rely on directing the model in order to achieve the right composition. If you don’t need a fixed perspective, try holding the camera so you can move around to tweak the composition instead of asking the model to move over an inch.
Take several photos. When you have time, shoot from multiple perspectives to give yourself options and the chance to compare results. I often find that my second or third composition works much better than the original.
Moving the subject or yourself
A photographer’s distance from the subject is as important as the subject’s distance from the other elements in the frame. Keep the following tips in mind when you’re deciding whether you need to move your subject or your camera:
The closer the subject is to the background, the sharper the background appears in the photo.
The closer you are to the subject, the softer the background appears in the photo.
The closer a light source is to the subject, the darker the background appears (and vice versa).
As you back away from your subject, it becomes part of the background.
As you get closer to your subject, it becomes part of the foreground.
Experiment with factors like these in order to become familiar with the ways a shot can come together.
If you use an on-camera flash as your key light source when you photograph a person leaning against a wall, the person and the wall both will be fairly sharp and will receive the same intensity of light during the exposure. If you stay in the same spot and have the person step out half the distance between you and the wall and take another shot, the results will be different: The wall will become softer because your focus is now farther from it. The wall also will become darker. Light falls off at a certain rate as it travels through space, and in this case it would lose one stop of intensity by the time it traveled from the person to the wall. The person would be exposed properly and the wall would be one stop underexposed.
In some situations, you may prefer that your background be out of focus but exposed properly with the subject. In that case, bring the subject away from the background and rely on available light instead of an on-camera flash.
Zooming in to reveal details
A zoom lens can come in handy when you’re shooting on the fly or when you can’t move closer to your subject. When zooming in isn’t your only option, however, you have to decide whether to zoom in or physically move in.
 A major misconception in the world of photography is that the focal length of a lens can change perspective. This simply isn’t true. Only you can change your perspective.
Try following these steps to see what I mean:
1. Set up your camera with a subject in front of a background that includes various elements at various distances.
A city street is a good choice.
2. With a zoom lens at its widest focal length, take a photo of the subject.
3. Without moving the camera or any elements in the frame, zoom in to the lens’ longest focal length and take another photo of the subject.
If you look at the images from Steps 2 and 3 on your computer side by side, you may appear to have two different perspectives. In reality, though, you have two different crops. To prove this to yourself, crop into the photo taken with the wide focal length until the crop matches that of the photo taken with the long focal length. Compare the images, and you see that the compositions are the same. The relationships of the subject and the other elements have stayed the same, so the perspective hasn’t changed.
The reason photographers often believe focal length has something to do with perspective is because they typically use telephoto lenses from far away and wide angles from nearer perspectives. Focal length may cause a photographer to change perspective, but it doesn’t change perspective itself. So, if you feel that your perspective is perfect but you want more visible detail, you can zoom in. When you do so, you lose background information in two ways:
You magnify your subject, making your depth of field shallower.
You eliminate much of the surrounding background details.
If you want a clearer and more descriptive background, move in and use a wider angle. As you get closer to your subject, the background elements get smaller. By using a wider lens, you see more of the background and surrounding details, and your subject isn’t magnified in the lens. Therefore the depth of field is greater.
Macro photography is the art of magnifying the subject as much as possible while keeping sharp focus on that subject. With this technique, however, the background becomes much less focused. As you can see in Figure 8-4, the depth of field becomes extremely shallow with this much magnification.
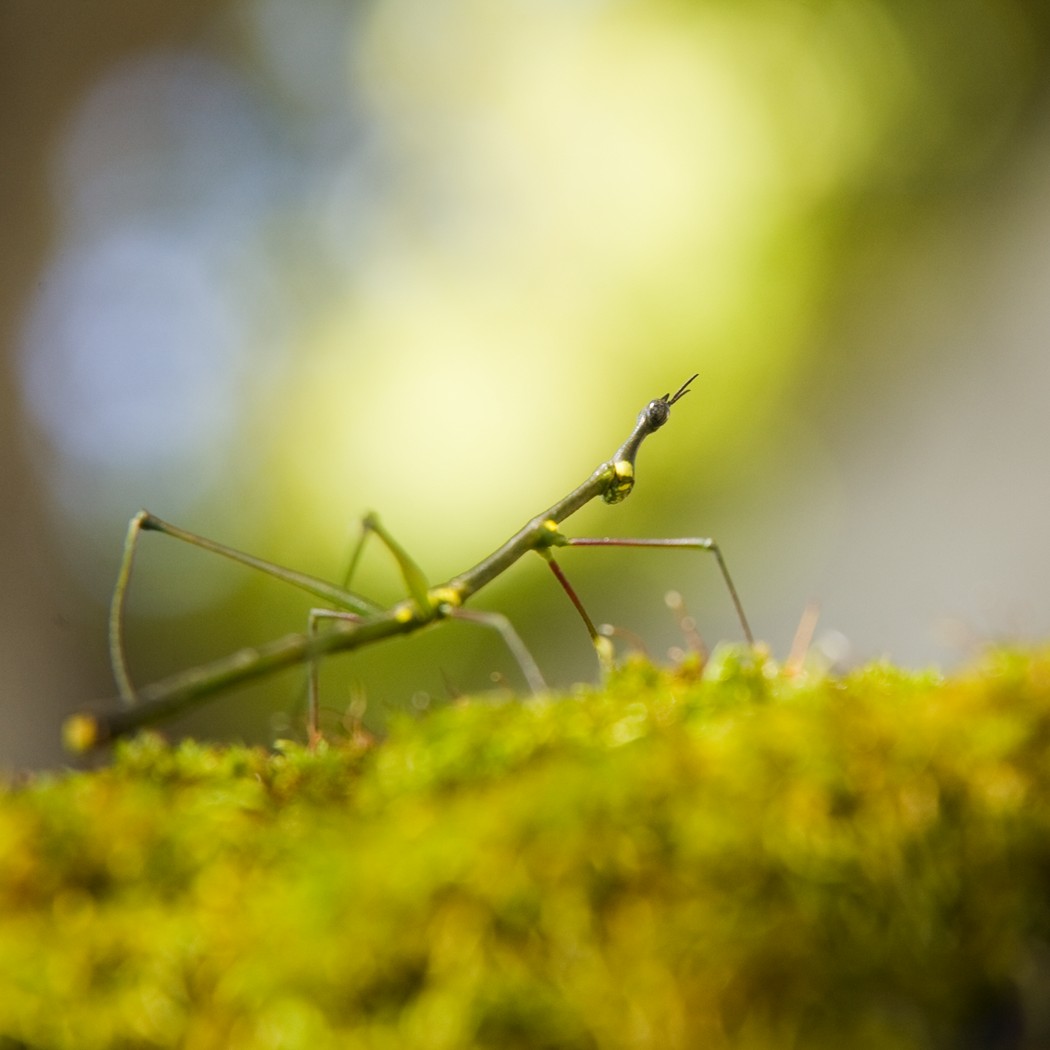
Figure 8-4: Place your focus where you want it when you use a lens or perspective that magnifies your subject.
Using focal length to achieve your goals
In addition to being a tool that helps you control depth of field, focal length is useful in finding the right perspective. Having depth (the illusion of three-dimensional space) in your photographs is a great way to draw viewers in. Remember: Don’t confuse depth with depth of field, which is the amount of sharp detail you have in an image. (See Chapter 7 for more details.)
Depth occurs when a viewer can sense the distance between different elements in a photograph. Wide-angle lenses enable you to incorporate more of a scene into your frame, which helps to maximize the illusion of depth. The wide angle enables you to include more physical space in the frame, so naturally it gives you the potential to create photographic depth when you combine it with a high angle. Figure 8-5 represents an example of depth in a scene created by using a wide-angle lens and a high perspective or angle.

Figure 8-5: Shooting down from a high angle with a wide-angle lens can create an image with depth.
Setting the camera high on a tripod and pointing it straight out and parallel to the ground gives you a frame with a centered horizon line and a lot of sky. The film plane (the plane that your digital sensor exists on; see Chapter 3) is perpendicular to the ground, limiting the focus you can achieve in the shot, regardless of your aperture. In most cases you can lower the angle of the camera to eliminate some of the sky and include more of the foreground. The foreground then contains a lot of detail because it’s closest to the lens. And if you choose it well, the foreground then provides purpose to your image.
When the film plane is closer to parallel with the ground, you can achieve focus on details in more of the frame. Shooting with a vertical crop instead of a horizontal crop can increase depth even more. You lose some of the surrounding details, but you then have the ability to include even more of the foreground in the frame. A horizontal crop works great for depicting expansive areas, and a vertical crop works for creating depth.
In many cases, depth isn’t the most important factor when composing an image. Consider, for example, when you take a portrait of a person’s face. If you get in close to someone’s face with a wide-angle lens and take a picture, your subject’s nose will appear much larger in the image than it does in reality. When taking a headshot or close-up portrait in the 35mm format, choose a focal length of 70mm or higher. Doing so proportions the features of the face evenly.
Rotating Your Camera to Create Unusual Angles
Imagine you’re in position with your camera, and your subject is in place. You’re satisfied with the perspective as far as the relationships of the elements within the frame, but suppose you want a more interesting composition. Maybe it seems that the situation needs something different to tell the whole story, or maybe you’re just bored with the traditional composition that you see through the viewfinder.
One way to take charge of this situation is to rotate your camera in order to depict the relationships of the elements in the scene in a different way. The difference can be obvious or subtle. Rather than changing the relationships of the elements to one another, you change their position in the frame, which ensures that viewers see them differently.
In the following sections, I show you different ways to rotate your camera so you can portray a scene differently without changing the relationships of the elements to one another.
Putting the subject off center
Sometimes I choose to put a subject in the center of my frame as an artistic statement or because the scene is symmetrical and I want to depict it that way. However, as a general rule, I try to center my subjects as little as possible. Centering your subject is sort of like making it the bull’s-eye on a target. It can be viewed as too obvious a place to put a subject, making it aesthetically unappealing; in fact, the viewer may think you were being lazy when you took the photo. Putting the subject off center can help liven up your photo’s composition.
When I suggest putting the subject off center, I’m not simply suggesting that you remove it from the center of the frame. I’m suggesting that you move the subject out of the typical place of importance or compositional strength.
When I’m shooting an event with a keynote speaker, for example, I find myself wondering how to show more of the story. Photographing a person talking to a microphone or showing a person’s back while she’s talking to a crowd can be boring; however, if you show a profile view of the speaker, you can include interesting details in the photos. Choose a lens wide enough to include the speaker and at least the first few rows of the audience, using a perspective where you can see facial expressions on both sides. In person, you can only view one thing at a time and would either catch the speaker’s delivery or the audience’s reaction, but a photograph enables you to record both of these by selecting the appropriate angle.
Many photographers would place the speaker in one of the frame’s thirds (see Chapter 5). Doing so ensures that the speaker is the main subject and provides the viewer with some idea of her importance. Plus, according to the rule of thirds, this placement of the subject makes for an aesthetically pleasing composition. However, keep in mind that although this placement can be a good idea, it isn’t always necessary or possible.
Assume, for example, you have the subject on the left third of a horizontal frame and a row or two of the audience on the right side of the frame. With this composition, you’re saying that the speaker is the main subject and the members in the audience are just details. Chances are the space on the far left of your frame (beyond the left third) isn’t filled with important details and is being wasted. Try angling your camera more to the right, placing the speaker on the far left edge. Now the audience has a stronger presence in the frame. The speaker has become less important and now has to compete with the audience for the viewer’s attention. This could cause tension, irony, or harmony, depending on the interplay between the audience and the speaker. You could go from having a fairly boring image to having an image that tells the whole story.
You also may try setting the focus on one of the unexpected heroes in the audience who’s having a strong reaction to the speaker’s presentation. Doing so would show a different side to the story and could be more interesting than the expected shot where the speaker is sharp. Changing focus gives the slight illusion of changing perspective, but it’s best known for directly telling a viewer exactly where to look in a photograph.
Another time when I often choose to place a subject on the edge of a frame is when the subject is in motion. If a surfer is riding the face of a wave in a photograph, I like to see what he’s coming up against rather than seeing the water he’s already covered. You could accomplish this by using the rule of thirds, but instead why not try placing the surfer on the edge of the frame? Doing so gives a moving subject space to move into the frame.
Keep two things in mind when you place a subject on the outer edges of the frame (especially when using a wide-angle lens):
Keep your subject in focus. If you’re using the camera’s auto focus, be sure to have a thorough understanding of how it’s controlled, because most cameras don’t allow you to simply focus on the far edges of the frame. (Chapter 3 tells you about your camera’s settings.)
Avoid (or be ready to correct) distortion. When you use a wide-angle lens and place subjects on the edge of your frame, you get barrel distortion, which is the illusion that something is bigger in the middle than it is at the edges.
For instance, a soda can photographed with a normal lens appears cylindrical. If you photograph the same can with a wide-angle lens, it would take the shape of a wooden barrel (having a fat center compared to the top and bottom). The closer the lens gets to the can, the more the can begins to appear that it has the shape of a barrel. Distortion becomes worse toward the edges of the frame. Tip: Some photo-editing programs provide filters that correct lens distortion. These programs are worth looking into if you haven’t already. However, sometimes distortion can add to the aesthetic quality in a composition, so you don’t need to fix it in postproduction. (See Chapter 18 for details on these programs.)
Placing the subject in the top or bottom of the frame
Having a foreground, subject, and background is a good way to create the illusion of depth in a photograph. This formula works great in doing its job, but it doesn’t always have to be configured in the traditional sense; in other words, you don’t always have to put the subject in the middle. In fact, the subject could become more interesting when it fills the space of the foreground or the background. Let some other elements fill the midground, and then set up your subject to be as subtle or obvious as you like.
When you take a high angle and place your subject in the foreground or background, you take a risk similar to placing the subject at the edge of the frame. The statement is bold and works for more tense messages, but could potentially throw off the balance of your composition. You have to make sure that you draw the viewer to the subject. The viewer’s eyes can wander farther from a subject at the bottom or top of the frame, so they may need extra instruction to come back. Lines that lead to the subject usually bring the viewer back to that area of interest.
Check out Figure 8-6; the lines created by the elements in the photo direct your eyes to the girl in the background. In Figure 8-7, on the other hand, the subject is in the foreground; this placement is blatant and provides an easy read.
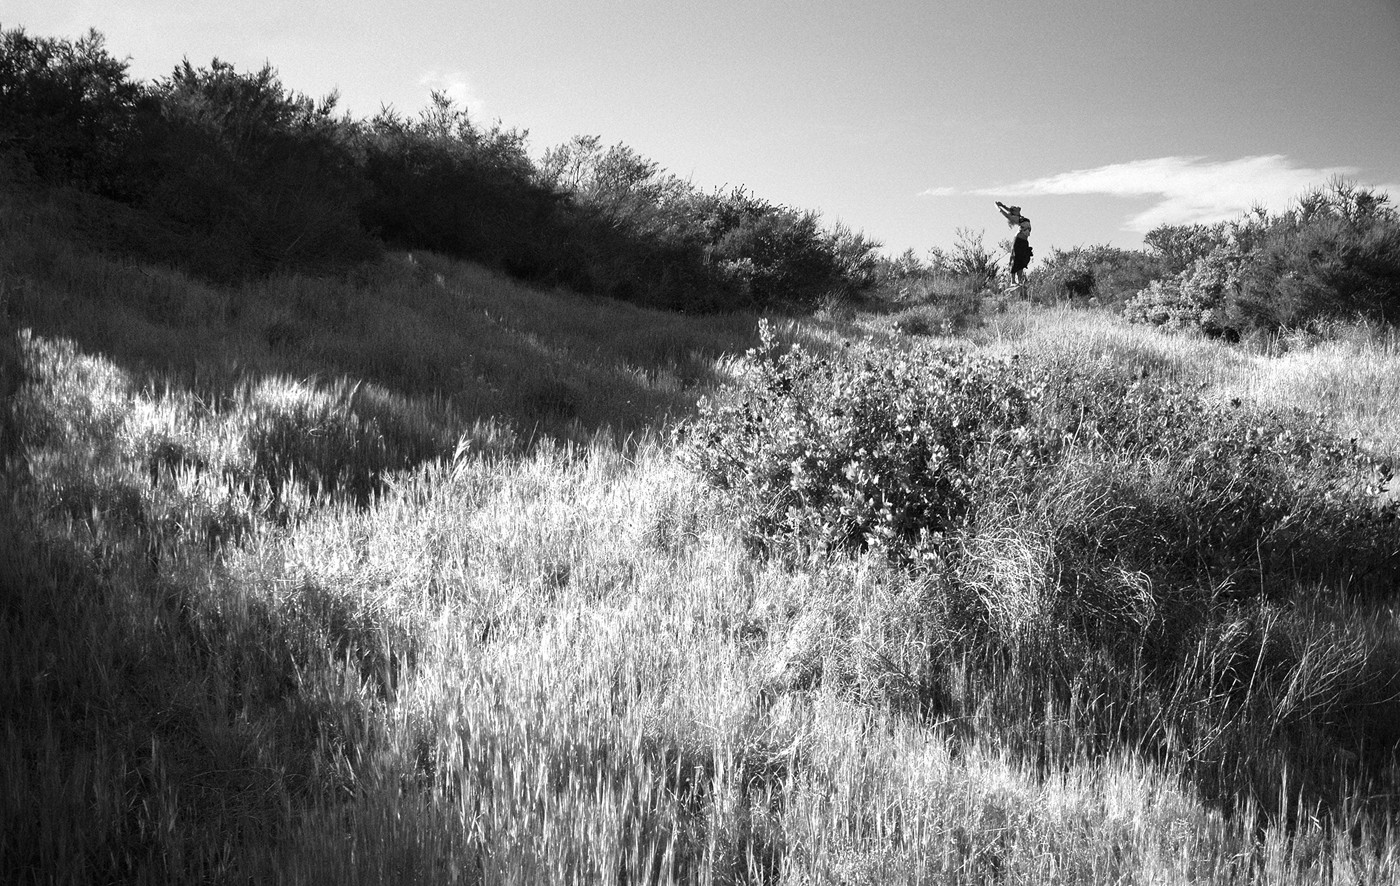
Figure 8-6: A subject placed in the background.
Sometimes you place a subject in the bottom or top of a frame simply because it makes sense. If you want to emphasize the greatness of the sky or the size of a tree, for example, putting the subject in the bottom of the frame may be wise. Cropping someone at the bottom of a frame tends to say as much or more about the environment as the subject. Or, if a flag is staked at the top of a tall mountain, you could place it at the top of the frame to show the size of the mountain compared to the flag itself and to represent the great feat of getting the flag there. Placing a subject at the top of a frame also could give it room to fall or roll down, or the arrangement may show that it has been thrown and has reached its peak.
Figure 8-7: A subject placed in the foreground.
You have the same concerns with focus and distortion when you photograph a subject on the top and bottom of a frame as you do when photographing a subject on the outside edges. You need to be familiar with your camera’s auto focus controls in order to use it on subjects that are placed outside of the sensors. And remember that if you use a wide-angle lens, any element that nears the edge of the frame will be distorted. Check out the earlier section “Putting the subject off center” for more details.
Changing your camera’s orientation
When you turn your camera sideways, the orientation of the frame goes from horizontal to vertical. Deciding on the orientation is important for choosing and creating the appropriate composition in any given scenario.
Both vertical and horizontal crops have their time and place, but sometimes neither is quite right for the message you want to depict. In these cases, you may want to take a photo with a crooked orientation. For me, a horizon looks best in photographs when it’s straight, but if you’re going to make it crooked you may as well go all the way with it. Instead of turning your camera the full 90 degrees, try somewhere around 45 degrees — what photo-graphers and cinema-tographers call the Dutch angle. If a clockwise rotation doesn’t look so hot, give counterclockwise a shot. Take a look at my example of a Dutch angle in Figure 8-8.
Figure 8-8: Using a Dutch angle for a crooked orientation.
The Dutch angle can add visual interest to an otherwise boring composition. It can add more drama to a subject in motion, throw off a viewer’s understanding of the photograph, or increase the depiction of an incline or decline. Try experimenting with this technique while using various camera angles as well. (Remember that the Dutch angle refers to your camera’s orientation, but your camera angle refers to your camera’s position in relation to the subject.) For instance, using a Dutch angle with a high angle and low angle will provide much different results.