Chapter 10
Using Light to Tell Your Story
In This Chapter
Running through the light sources you may use
Managing light quality and intensity
Finding out how light interacts with your subject
Putting natural light to work in your shots
Making use of light’s various colors
Light is the most important photographic element in any scene. After all, it’s what makes photography possible. Even if you take the existence of light for granted, you should be aware that it dictates the message in your images just as strongly as any other element. For instance, a statue doesn’t have the ability to change its expression or to move in any way, but you can use that statue to convey very different messages depending on the lighting style you use to photograph it.
This chapter shows you what light can say in an image and how to achieve the lighting you want based on what you want to say. For a more in-depth look at lighting, check out Digital Photography Lighting For Dummies by Dirk Fletcher (Wiley).
Recognizing Sources of Light
In just one scene, you may use many different forms of light from many different sources. An infinite number of recipes for light exist, and each controls the contrast throughout the composition of a scene. As photographer, you’re the chef.
 A light source is anything that provides light in your scene. Many different sources of light have unique value for photography. You can mix and match light sources to create limitless possibilities and create a photographic style of your own. Some common light sources include the following:

The sun: This is the most common light source. Because light reflects off of certain surfaces, the sun can create multiple sources of light at one time. In the upcoming section, “Modifying the quality and contrast of light,” I discuss how you can control sunlight (also commonly called natural light) in order to achieve the lighting you prefer at any time of day.
Natural light is a continuous light source, meaning the light is uninterrupted. The sun provides continuous light from just before it rises to just after it sets. A noncontinuous light source is one that provides light for a brief moment — like the flash on a point-and-shoot camera.
Available lights: These lights are part of the scene but aren’t typically used to generate light for photography. Examples include lamps, overhead lights, candles, streetlights, and so on. These lights can be used as your main source of light, but in some cases they’re dim, causing less-capable cameras to have difficulty exposing them properly.
Hot lights (designed for photography, video, or theater performances): These are continuous light sources that usually can be spotted (focused more directly on one spot) or flooded (spread more evenly). They also can be turned up or down with a dimmer. These light sources require electricity, and they drain portable power sources quicker than strobes.
Strobes: These are noncontinuous sources of light that produce light that lasts for just an instant at the time of exposure. Each flash or strobe of light is known as a pop. Strobes are professional lights that require electricity to work. When using strobes on location outdoors, you need a portable power source like a battery pack or a generator.
Battery-powered flashes: These are similar to strobes but are smaller, more compact, and can be used on the camera. They don’t provide as much light as strobes, and they have slower recycle times between pops.
Recycle times are determined by how long the flash takes to recharge after a pop. A flash can’t create another pop until it’s recharged. With full batteries, a common recycle time is about 2 to 3 seconds. As your batteries are drained, the recycle times increase.
A reflector: This is any surface or material that reflects light from another light source.
Window light: This type of light is an indoor source that provides direct or indirect sunlight.
Understanding Light Quality and Intensity
In any light recipe that you cook up for a particular scene, the primary two ingredients are
Quality: A light’s quality is determined by how hard or soft it is when it falls on the elements in the scene.
Intensity: The intensity of a light source depends on its relationship to the other lights in the scene. If one light is much more powerful than any other light, it stands out in the photograph and is considered high intensity.
In photography, the intensity of light is measured in stops because your exposure is measured in stops and can be determined by using your camera’s built-in light meter. (Chapter 3 tells you all about this light meter.)
On a clear day, for example, the sun (like most uninterrupted light sources) provides a direct light that produces hard shadows. A hard shadow is one that’s separated from the lit area with a sharp, well-defined line. The line between the shadowed and lit areas is very clear. You can think of this quality of light as hard light; some photographers refer to it as harsh light. The sun also provides an intense light producing dark shadows in areas that aren’t receiving the light directly.
On the other hand, on a cloudy day the sun still acts as a light source, but it comes in contact with clouds before reaching the elements in your scene. The molecules in the atmosphere cause the sun’s light to bounce around and scatter. Therefore, the light comes in at many different angles rather than just one, producing soft shadows. The line between the lit area and the shadowed area isn’t distinct. Because soft light spreads out more, it fills in the shadows somewhat, causing the light to appear less intense.
Having control of the quality and intensity of light — or at least knowing how to use the available light to your advantage — is the first step in achieving the balance that best reveals your intended message.
Considering hard light versus soft light
Because hard light provides drastic shadows, it’s best known for its ability to reveal texture and make shapes appear more rigid or to have an edge. As you can imagine, this effect is great for some things and not so great for others.
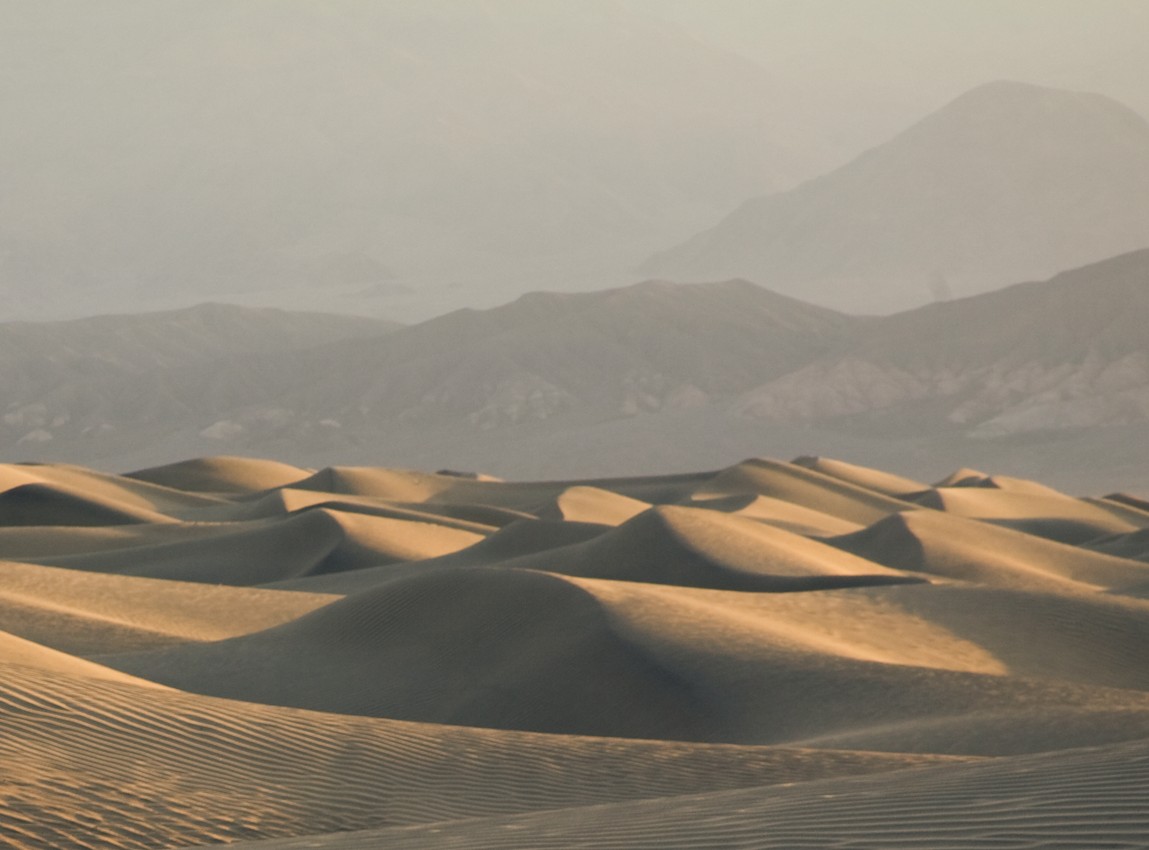
For example, when the sun is low in the sky and is shining directly toward sand dunes, you have a perfect opportunity to show the ripples, sandy textures, and shapes of the dunes in your photograph, as I did in Figure 10-1. However, when you’re shooting a portrait of a young woman’s face, hard, directional light isn’t the best choice because it reveals all the flaws and texture in her skin. Soft light is the better choice for representing beauty because it helps eliminate texture and blemishes by smoothing surfaces and softening shapes. See Figure 10-2 for an example of using soft light in a photograph.
Certain situations commonly call for hard or soft light. Here’s a rundown of when you’re likely to use each:
Hard light: You use hard light when you want to reveal details, show texture, and create distinct lines. Use it when shooting the following:
• Landscapes that are rigid, textured, or busy (meaning full of elements) or that contain fine details that soft light would minimize
• Fashion or portrait photography that’s meant to be edgy (meaning it has a sharp or biting edge and is associated with being bold or controversial)
• Products with texture or fine details
• Architecture that you want to appear sturdy and powerful
Soft light: You use soft light when you want to minimize details and texture, reveal smooth shapes, or produce dreamlike photographs. Use it when shooting these:
• Landscapes that are melancholy, smooth in texture, or sublime
• Fashion or portrait images that are meant to represent beauty, purity, or a pleasant image of a person
• Products with smooth shapes or reflective surfaces
• Architecture that’s rounded, graceful, or flowing in shape
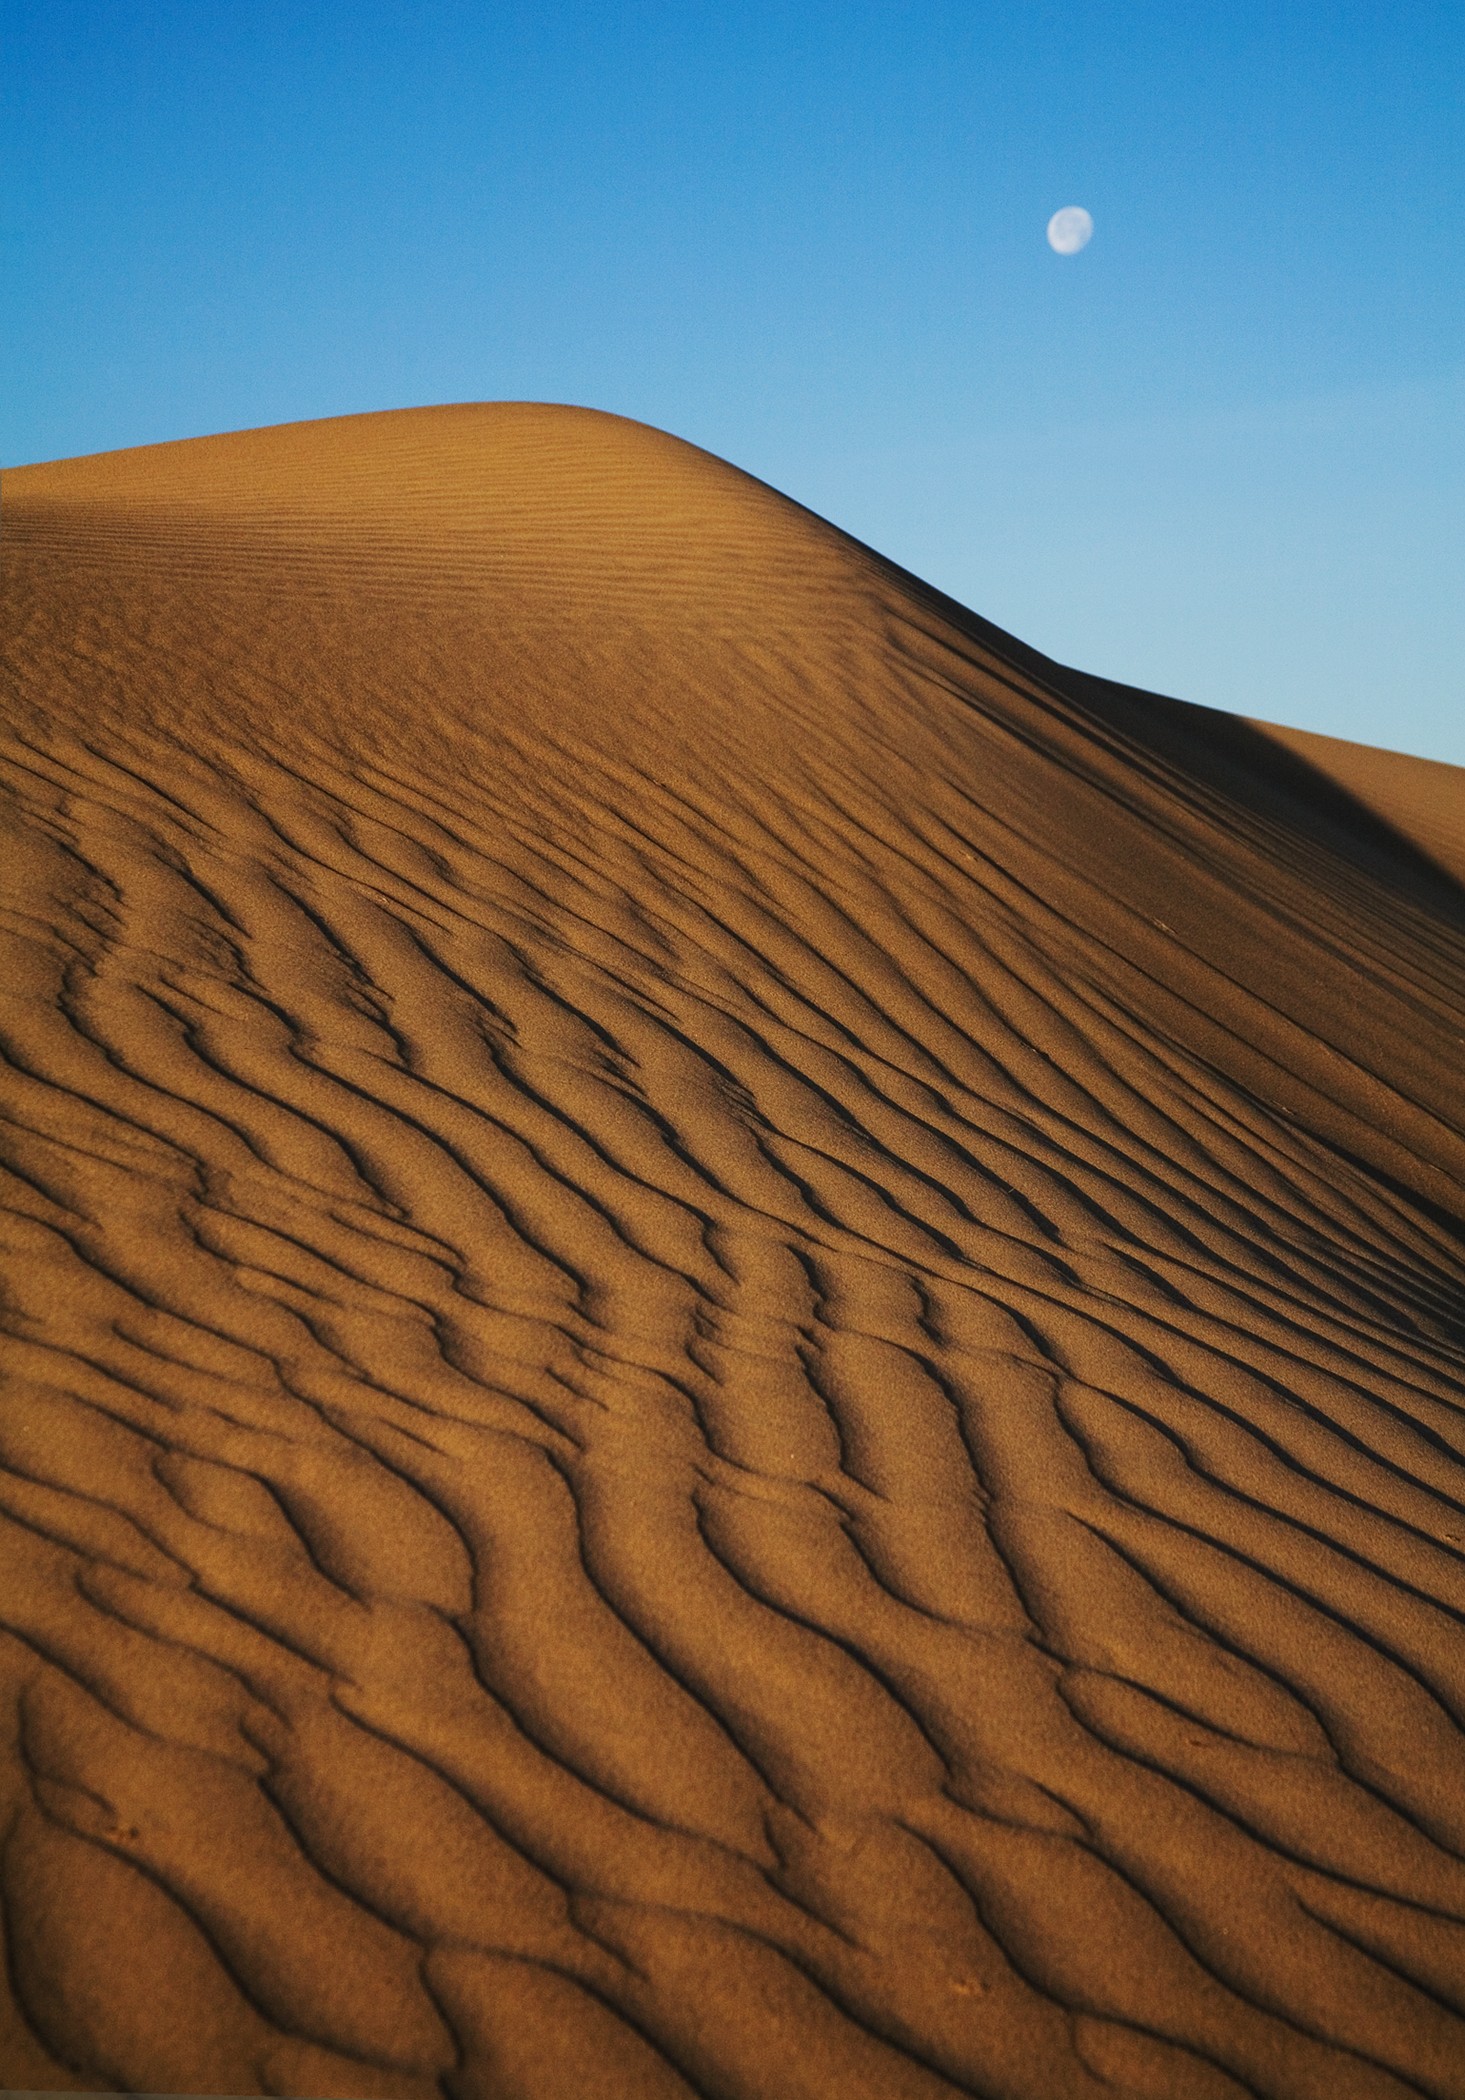
Figure 10-1: Hard light reveals texture, lines, and shape in the dunes.

Figure 10-2: Soft light often is used to portray images of beauty.
Keep in mind that sometimes images, especially landscapes, can have a mixture of hard and soft light. Using both helps to reveal different aspects of one scene.
Controlling your contrast
Contrast refers to how dramatic the difference is between your highlights and shadows in a photograph. If your highlights are white and your shadows are black, you have maximum contrast in the scene. If your highlights are white and your shadows are gray, you have less contrast.
You control contrast by changing the intensity of your key light in comparison to the intensity of your fill light. The key light is a directional light source that causes shadows to be cast in the scene. The fill light is an ambient light source (meaning it causes no shadows) or a light source that comes from the same direction as the camera, which minimizes the shadows it creates. The fill light gets its name by filling in the shadows created by the key light and controlling the level of contrast.
If your key light is 1 stop brighter (or more intense) than your fill light, you end up with low contrast. The shadows are only 1 stop darker than your highlights. When you shoot on a sunny day and use the sun as your key light, you most likely have a difference of 3 stops between your highlights and your shadows. This is a high-contrast situation and is about as far as you can go without losing details in your shadows. Your digital sensor has the ability to capture highlight and shadow information within a certain range. Anything outside of that range and you lose information in one of the areas, depending on your exposure settings.
Modifying the quality and contrast of light
Sometimes you may want to change the lighting on the scene you’re shooting so you have harder or softer light or more or less contrast. When that happens, experiment with different combinations of light qualities and contrasts to get a feel for how they look and how you could use them for different messages. Here are some example situations to get you started:
Hard light mixed with high contrast creates a bold and dramatic look. You can use high contrast to hide details and create a mysterious look.
Hard light mixed with low contrast is bold but lacks drama. It can be edgy and informative at the same time.
Soft light mixed with high contrast reveals shapes in a beautiful and dramatic way.
Soft light mixed with low contrast produces images of beauty that reveal shapes in a soft and dreamlike way.
In the following sections, I show you how to manipulate the quality and contrast of the light you’re working with and begin to create the preceding situations.
Bring a photo assistant to help you in situations when you want to manipulate light in a scene. Because of the equipment necessary to manipulate the light, an extra pair of hands makes life much easier.
Changing the quality
When photographing a scene, the natural light you have to work with may not be exactly what you want. So, you may need to either soften the light or harden it. I explain how to do both in this section.
You have the following two options for softening natural light:
Rely on the clouds. If a thin layer of clouds comes between your subject and the sun, your light naturally will be diffused and will spread more gradually around your subject’s features. If a thick layer of clouds rolls in, however, your light will become diffused to the point that it’s difficult to tell which direction it’s coming from. This severe diffusion causes what’s known as flat lighting. This type of lighting is considered to be boring in most situations. The exception is beauty photography. Flat light works well in this type of situation because it diminishes texture.
Use a diffusion material. Of course, you can’t always rely on the clouds to get the lighting you want. When you want to take matters into your own hands, use a diffusion material stretched out over a frame. Diffusion material typically is some sort of thin white cloth that causes light to scatter when it passes through. You place the material between your subject and the sun, usually by fixing it on a stand or enlisting an assistant to hold it. The density of the material determines how much the light is diffused: the thicker the material, the softer the light’s quality.
You can purchase Scrim Jims, diffusion products made specifically for photographers, at any photography retail store. The Scrim Jim has a lightweight metal frame with removable parts that make it easy to transport. When assembled, they make hollow 6-x-6-foot squares that you can cover with diffusion materials of different densities.
If you want to shoot with hard light but the sun is behind the clouds, you can use a strobe with a bare flash bulb to take the place of the sun. These strobes are a hard light source and provide a similar quality of light as the sun. They have an advantage over the sun because you can position them however you need to. (Try doing that with the sun.) Simply place the strobe on a light stand and place it where you want it.
You can modify the quality of light produced by a strobe in the same way that you can modify the quality of the sunlight. You can purchase accessories called light modifiers that attach to the strobe. Each accessory has a different effect on the light. Common strobe modifiers include the following:
Reflectors: These are dishes that surround the back end of the flash bulb. They direct light forward into the scene rather than letting some of it spill backward away from the scene. Reflectors are ideal for creating hard, directional light.
Beauty dishes: These modifiers are similar to reflectors but larger in size. They scatter light, making it less direct. They’re good for creating a slightly softer light than reflectors.
Soft boxes: You attach a soft box to the strobe so that a diffusion material is placed in front of the flash bulb and scatters the light. This modifier turns your hard light source into a soft light source. The soft box has a much larger surface area than the flash bulb. Soft boxes create a very soft light and vary in sizes. The larger the soft box, the softer the light.
Umbrellas: Lightweight and easy to transport, umbrellas create soft light by bouncing it from a larger surface back into the scene or acting like a soft box and allowing your light to pass through its material.
The two things that determine a modifier’s light quality are size and diffusion density. The larger a light source, the softer the light will be. Also, the thicker the diffusion material, the softer the light will be.
Altering the contrast
If you’re shooting outdoors on a sunny day and want to use the sun as your key light but want to reduce the amount of contrast, you have many options. Here are a few:
Use reflective material. This is the simplest way to reduce contrast on a sunny day. Many products are made specifically for photographers, but I use a piece of foam insulation with a shiny surface. You can buy it at any hardware store for less than $10. Have your assistant stand next to you and hold whatever reflective material you decide to use to bounce the sunlight at the subject. This technique increases the intensity of your fill light and reduces the contrast on your subject.
I used the preceding technique to take the photo in Figure 10-3. Notice the light that’s being created by the direct sun, which is causing the highlight on the right edge of the subject. And take a look at the light that’s being created by the reflected sunlight, which is filling in the face. Without the reflector, my subject’s face would have been much darker.
Combine reflective material and diffusion material. Photographers often use this combination to soften the sunlight on a subject (see the preceding section). The result is soft light with low contrast. You see this type of lighting in clothing catalogs like Victoria’s Secret.

Figure 10-3: Reducing contrast by increasing the intensity of your fill light.
Using strobes (instead of the sun) to light your scene puts you in total control and enables you to maintain consistent lighting throughout the shoot. In the most basic situation, you have a directional key light and a fill light. You can use light modifiers to control the quality of your light, and you can control the intensity of your fill light in comparison with that of the key light to manipulate your contrast in the scene. (I discuss strobes and light modifiers in the preceding section.) Your strobes have dials, slides, or switches that allow you to increase or decrease the amount of light they produce during each pop.
The Relationship between Light Source and Subject
Light quality and intensity (which I discuss earlier in the chapter) are important ingredients when creating appropriate lighting for your photo’s message. The third ingredient is the physical relationship of the light source to the subject. The position and distance of your lights in relation to your subject control many aspects of your achieved look and how you represent the subject.
In this section, I examine how the distance and position (or lighting pattern) of a light source can affect the quality of light it provides and change the way you see a subject. I also provide some information to help you add a third light source and experiment with breaking the traditional lighting patterns for creativity.
Seeing how distance makes a difference
A larger light source creates softer light. Luckily, if you can’t increase the size of your light source, you can simply move it closer to your subject. Doing so softens the light by increasing its surface area in relation to the subject.
On a similar note, the closer a light source is to a subject, the more intense the light becomes. So, if you want to keep the same level of contrast you had before moving the light, you may need to reduce the intensity of the light after moving it.
On the other hand, the farther a light source is from the subject, the harder the light will be. Consider the sun as a light source. If it were really close to you, it would be large enough to send light from many different angles and would cover you with a soft light quality (but, unfortunately, its nearness would cause all sorts of tragedy as well). But, because the sun is really far away, it’s small in comparison to you on earth and provides light only from a specific angle. Therefore, because of its distance, the sun provides hard light.
Imagine that you’re working with strobes and using a soft box to soften your key light. And say you want to soften the light more, but you’re already using the largest soft box you own. In this case, simply move your strobe closer to your subject. Doing so gives you a softer quality of light but also a more intense light. (See the earlier section “Understanding Light Quality and Intensity” for more about these photography tools and techniques.)
Positioning your light source to create lighting patterns
The position of your light source is an important factor in getting the lighting of your scene the way you want it. The angle at which a directional key light source hits your subject determines the lighting pattern that’s created. A lighting pattern is an effect created with highlights and shadows based on the angle of the light to the subject.
The lighting patterns I discuss in this section have been developed to optimize the way you photograph human subjects, but keep in mind that these styles of lighting can be applied to other subjects as well. You can read more about portraiture in Chapter 13.
A person’s face is made up of familiar shapes that are affected by light in certain ways when approached from different angles. Each face is unique and needs to be treated slightly different from the next, but certain lighting patterns show a face in its most appealing way. For example, you can use a lighting pattern to slim a wide face, widen a slim face, increase or decrease the appearance of a face’s features, or decrease the appearance of the skin’s texture.
Here are the four major lighting patterns, which I show you in Figure 10-4:
The paramount: This pattern provides a minimal amount of direction, which decreases the level of shadows and minimizes texture in the skin. The key light comes from the direction of the camera but at a higher angle, causing a small shadow under the nose and on the neck under the chin. You can see these shadows in the top left image of Figure 10-4. By putting the shadow under the chin, you help separate the face from the neck (which is especially good for photographing people with weak chins or neck fat that you don’t want to highlight). The paramount pattern highlights the entire width of the face, so it’s ideal for widening a slim face; however, as a result, it’s not ideal for someone who already has a wide face.
The loop: This pattern is achieved by rotating the key light away from the camera to the left or right of the subject until the shadow from the nose falls off to one side rather than down. This pattern’s light is more directional than the paramount’s, and it highlights one side of the face slightly more than the other. For instance, note the shadow on the right side of the woman’s face in the top right image. The loop pattern is good for slimming the face while also maintaining most of the benefits of the paramount. Notice that skin texture is revealed more in the loop pattern than in the paramount.
The Rembrandt: This pattern was named after the famous painter and was a pattern he commonly used. You achieve the pattern by rotating the key light even farther from the camera than you did for the Loop pattern. The shadow from the nose should connect with the shadow from the far side of the face. (Tip: You may have to tweak the height of the light source to get the shadows and highlights to appear where you want them.) This pattern leaves a highlighted area shaped like an upside-down triangle on the shadow side of the face. See what I mean in the bottom left image of Figure 10-4.
A Rembrandt, which has a more dramatic feel than the paramount or the loop, is great for slimming the face. Notice how the Rembrandt causes the face to appear much slimmer than the paramount and loop, even when the face is shot from the same angle as it was throughout Figure 10-4. Keep in mind that this pattern also tends to reveal the skin’s texture. You also can use it to draw attention to the eyes.
The Split: This lighting pattern is the most dramatic of the four. You achieve it by rotating the light farther away from the camera until it’s almost directly to one side of the subject’s face. This pattern is the most slimming of the four and puts one side of the face completely in shadow. Because it’s a sidelight, the texture of the skin is revealed more than any of the other patterns. See the bottom right image of the figure for an example of the split.
Except for the paramount, each of these lighting patterns has two different versions, assuming you’re not taking a mug shot and your subject’s face is posed at an angle to the camera. These different versions are referred to as broad and short lighting. A broad lighting pattern occurs when the key light highlights the side of the subject’s face that’s closest to the camera. A short lighting pattern highlights the side of the subject’s face that’s farthest from the camera. Broad lighting typically is used to reveal more of the face, and it works well on people with slim faces. Short lighting reveals less of the face, so it’s ideal for creating a slimming effect. In Figure 10-5, I show you a broad Rembrandt and a short Rembrandt.
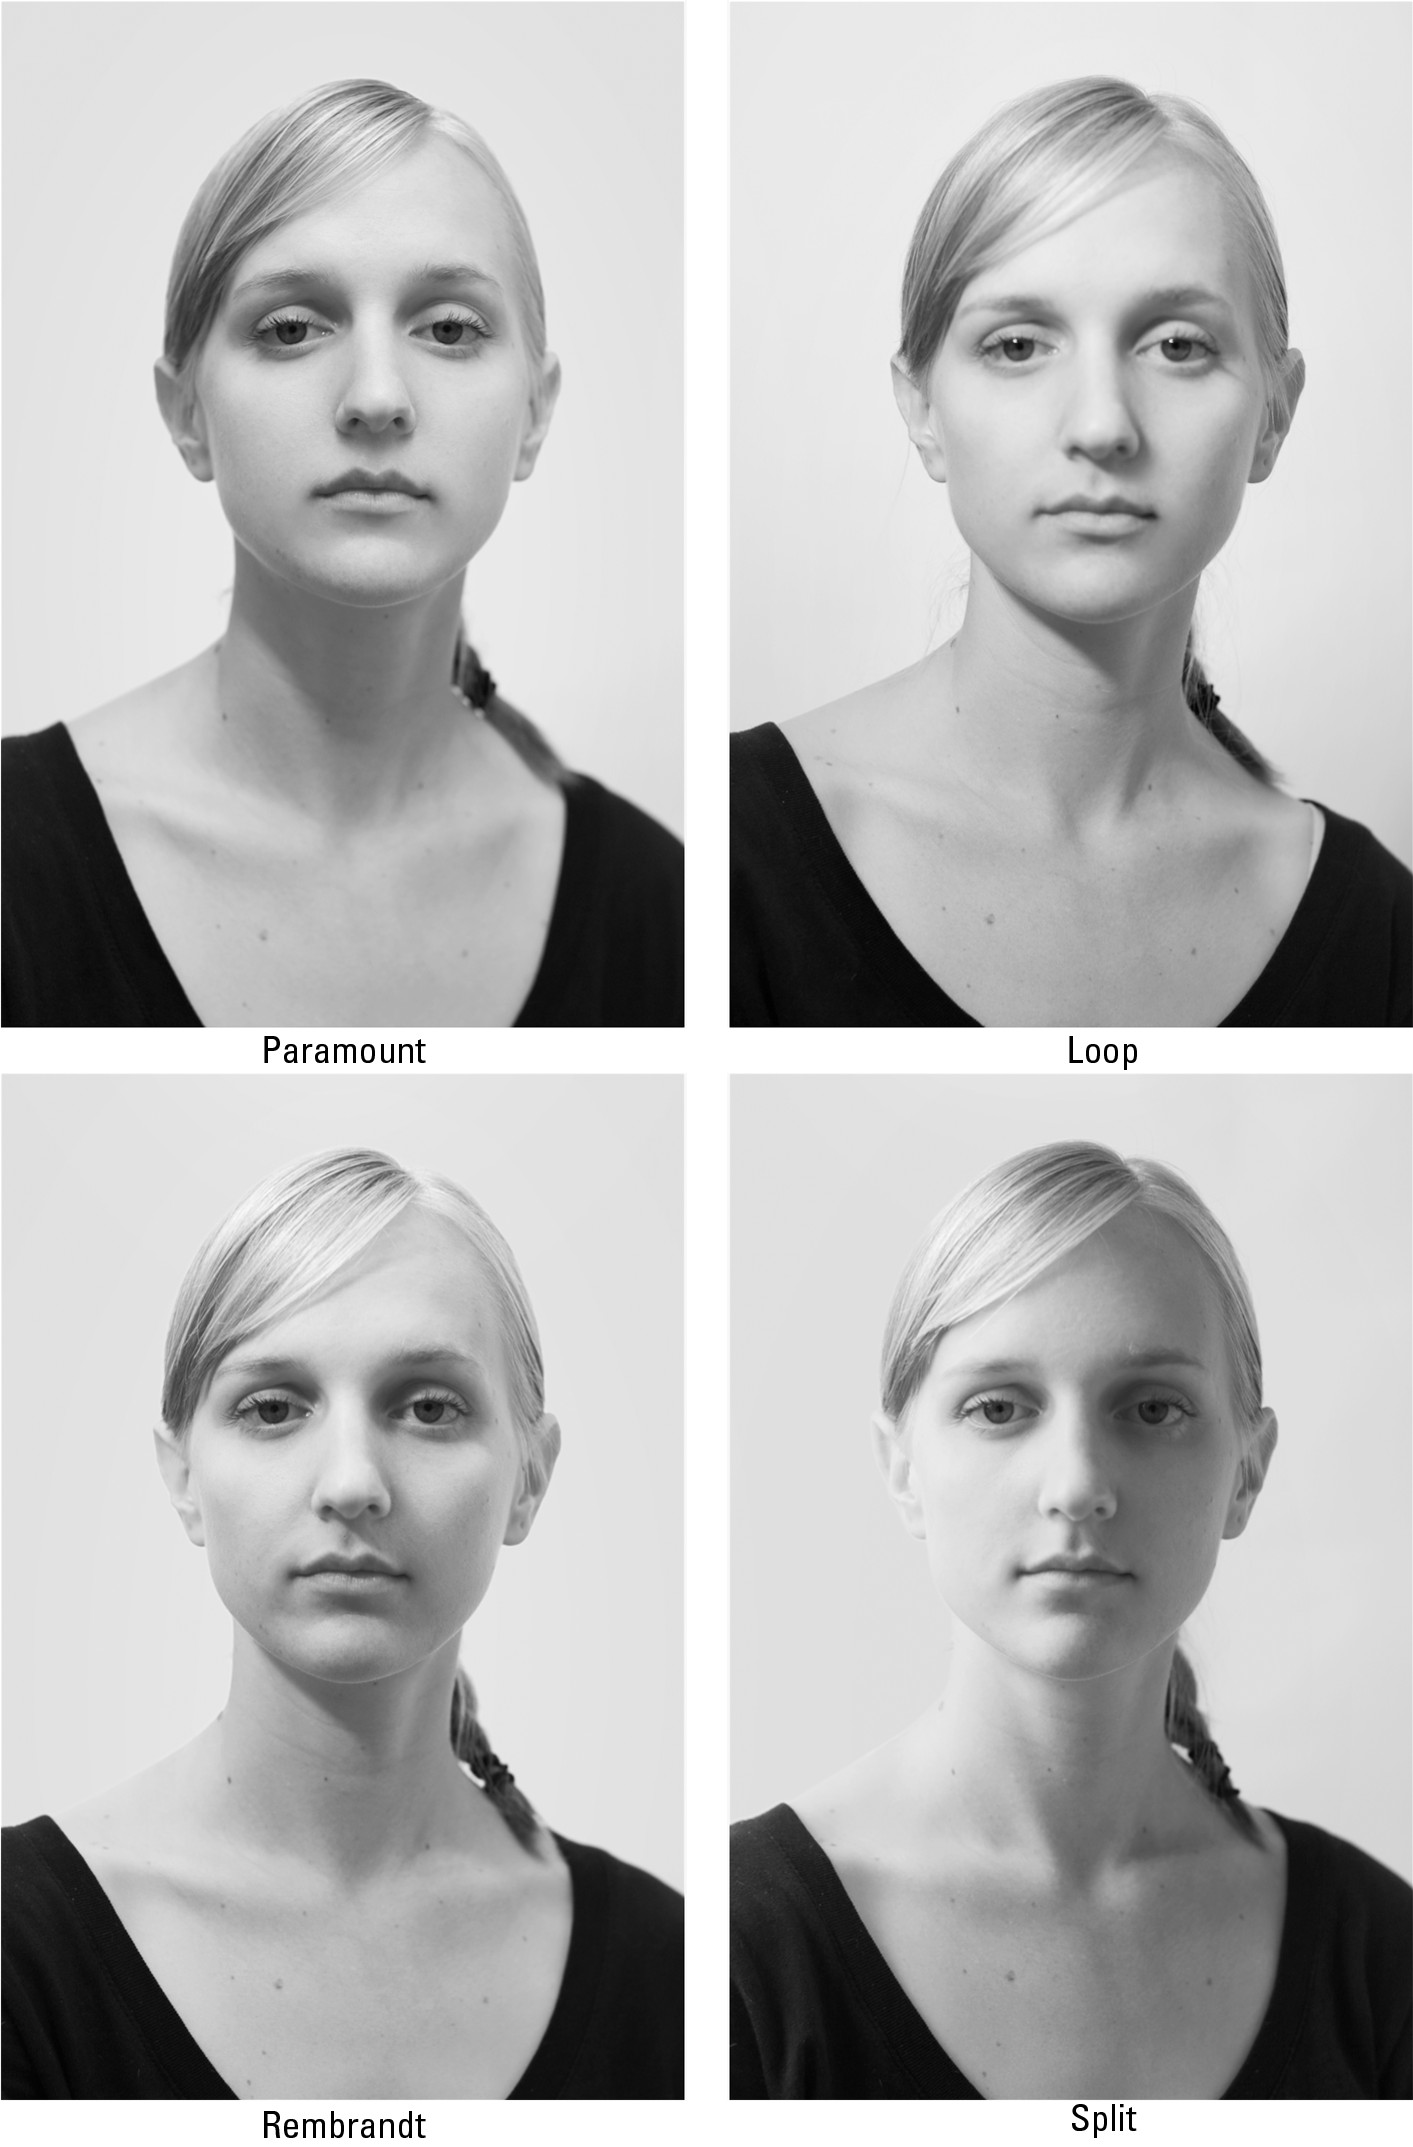
Figure 10-4: The four most common lighting patterns.
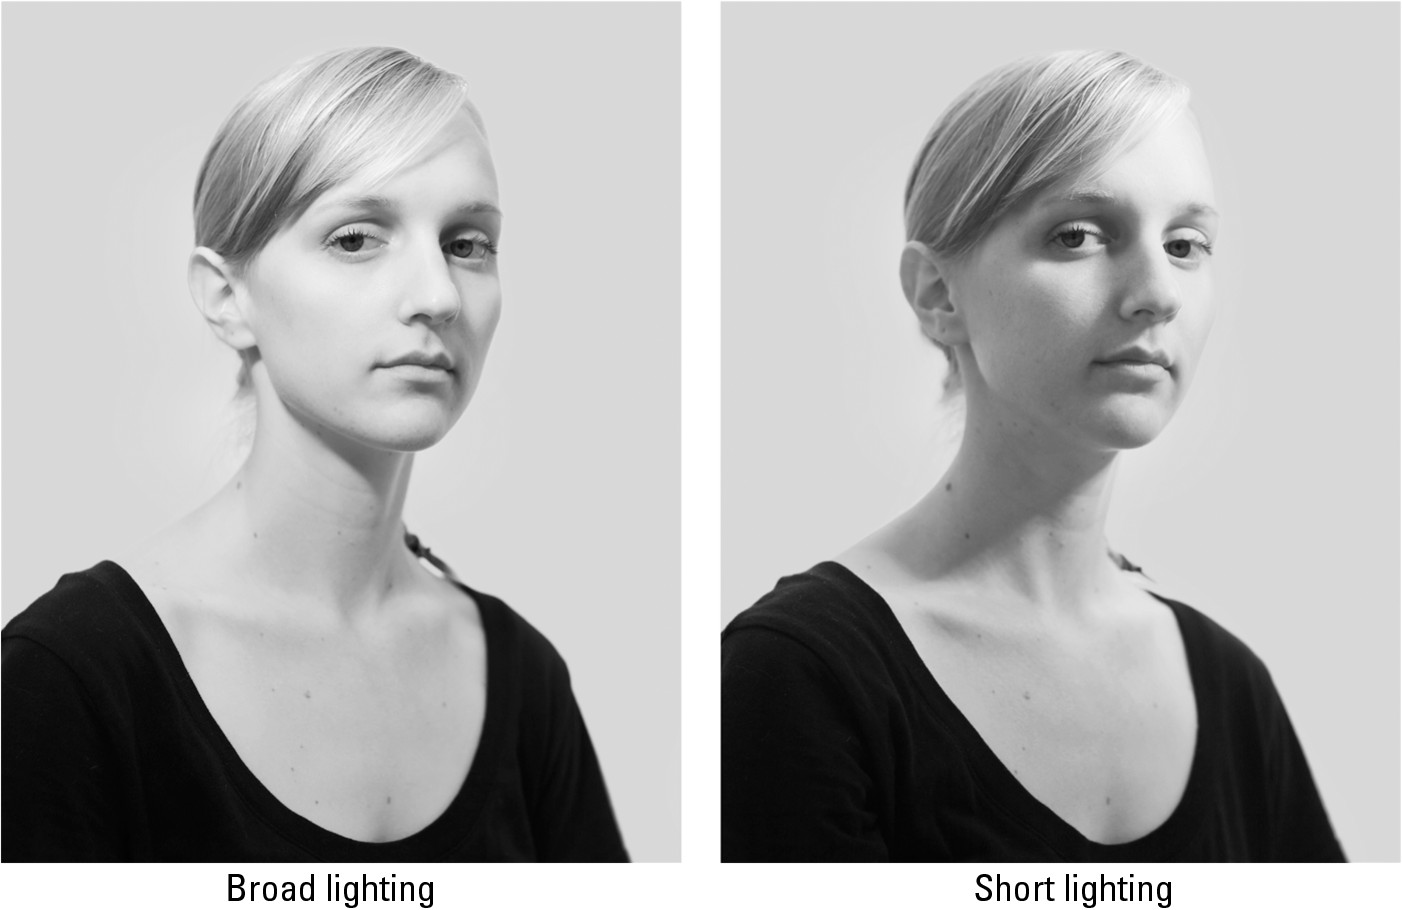
Figure 10-5: Broad versus short lighting using the Rembrandt pattern.
Adding a third light source
After you have a good grasp of the ways that key light and fill light work together to create light with a specific quality, level of contrast, and direction, you can consider including a third light source.
Here are some ways to use a third light:
To highlight the edge of a subject: Most photographers use a third source to create a rim light (also called a kicker), which is a light from behind that puts a thin highlight on the edge of the subject. The rim light was originally designed to separate the subject from the background, and it does just that when the background is darker than the subject or similar in tone to the subject. A rim light that’s used when the background is lighter than the subject will cause the subject to blend into the background a little. This use of light could have a slimming effect.
Figure 10-6 shows you a portrait shot using three lights: a key light, a fill light, and a rim light. Notice the highlight caused on the right edge of the subject’s hair and jacket. This helps to separate him from the background and to add more visual interest to the image. (See Chapter 13 for more on portraiture.)
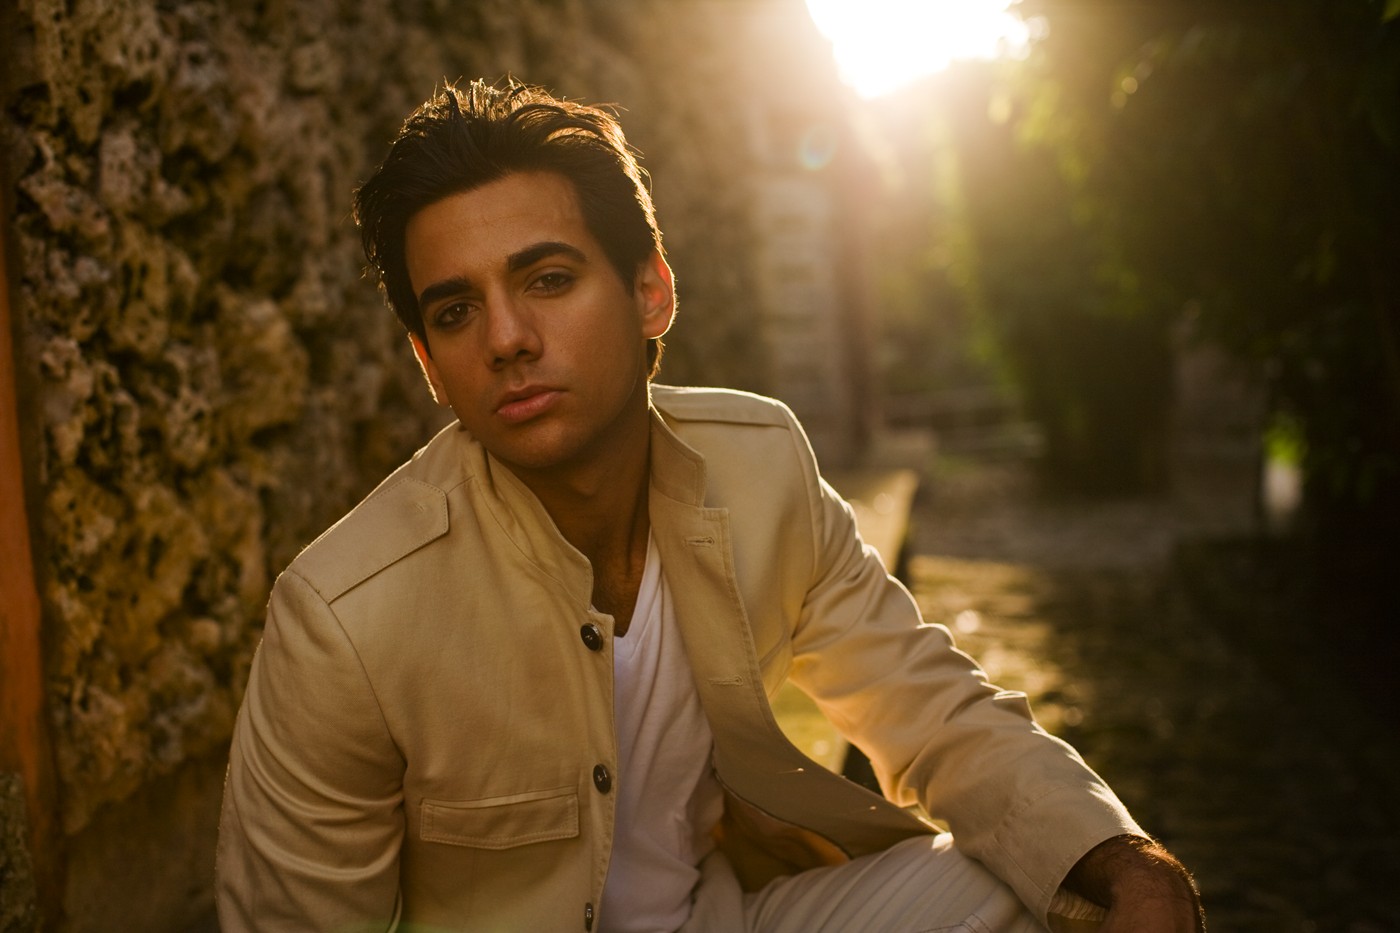
Figure 10-6: A rim light helps to separate the subject from the background.
To highlight the subject’s hair: This use of a third light is known as a hair light. It works well to reveal color and texture in the hair and also helps to separate the subject from the background.
To light a background: In addition to lighting your subject, you may sometimes want to use a third light to light your background, especially if you’re shooting in the studio. To do so, set up a separate light behind the subject and out of your frame. Direct it toward the background. Decide whether you want a background that’s evenly lit or one that has a gradation. The closer you place the light to the background, the more focused the light will be in the area that it’s pointing toward. The farther the light is from the background, the more even your light will be.
By placing the light fairly close to the background, you can create a spotlight behind your subject. This spotlight helps keep a viewer’s eyes in the frame by causing the composition’s edges to be darker than its center. You determine the intensity of your background light based on the tone of your background and how it relates to the tone of your subject. A subject that’s naturally darker, or is wearing dark clothing, stands out more from a lighter background, and a lighter subject stands out more from a darker background.
Breaking the patterns and creating your own look
The lighting patterns I discuss earlier in the chapter (see “Positioning your light source to create lighting patterns”) are great for making people look good in photos and often are used by professional photographers for formal portraits. This formal lighting works well when you’re taking headshots for business marketing, and you often see it in fashion photography as well.
Most people in the industry are familiar with these traditional lighting patterns. When I look at a photograph in which the shadow from the subject’s nose meets the shadow from the far side of his face, I say to myself, “Oh, so she went with the Rembrandt.” When a photographer creates an image that has a unique lighting style, I see it and ask myself, “How did she do that?”
Each situation is unique, and it should come across that way in a photograph. So it pays to find new ways to light people and objects. Try moving the lights around and adding or subtracting the number of light sources in the scene. Combine natural, available, and artificial lighting in one photograph. For example, if a lamp is on and a window provides light, take advantage of both of the sources. Whatever you do, never limit yourself to the four traditional lighting patterns.
Use your own judgment and experiment with lighting. Whenever you see a photograph with lighting that you find appealing, study it and try to figure out how the photographer achieved it. Then try to re-create it for yourself.
Figure 10-7 doesn’t use a specific lighting pattern on the subject’s face. The light simply reveals the shapes of his features, including his high cheekbones and strong jaw.
To achieve this lighting, I chose the sun (which was slightly diffused by a thin layer of clouds) as my key light. It acted as a mix between a key light and a kicker, or rim light (which I discuss in the earlier section “Adding a third light source”). The light was positioned behind the subject just enough to avoid causing a shadow on the far side of the subject’s nose. Because of the light’s soft quality, it smoothly wrapped around the side of his face.
My fill light was created by an assistant who was holding a reflector and standing just to the left of the camera. (Refer to the earlier section “Changing the quality” for more on reflectors.) This reflector put the highlight in the subject’s eyes and balanced the intensity of the key light so it wasn’t overbearing. By placing the fill light just slightly to the left of the camera, I created the illusion that the light was gradually wrapping around the subject’s face going from highlight to shadow with a smooth gradation.

Figure 10-7: Beautiful light doesn’t have to provide a traditional lighting pattern.
Manipulating the Direction of Natural Light
Whether you’re shooting on a bright sunny day with clear skies or one with heavy cloud coverage, the sun is your source of light in a naturally lit scene. Even at night, the sun provides light by reflecting off of the moon. It even provides natural light indoors by shining in through the windows and reflecting off of walls, ceiling, and floors.
Using natural light gives you less control over the sources of light and means that you have to work with what you’re given. In the earlier section “Understanding Light Quality and Intensity,” I explain the ways to control the quality and intensity of a naturally lit scene. In this section, however, I focus on how to achieve your desired direction of light when shooting with natural light so you can control your lighting patterns and the amount of texture that’s revealed in a subject or scene.
Any light source that you include in a scene but isn’t provided by the sun and isn’t placed there by you is known as an available light source. These sources could be lamps, streetlights, or any other manmade light. In this section, I concentrate only on natural lighting, but most of the rules that apply to natural light also apply to available light, assuming you don’t have the ability to reposition them or control their intensity.
Giving yourself the time of day
Time of day has everything to do with the direction of the sun in relation to a particular scene. So become familiar with the sun and its patterns. The sun is the main light source used in outdoor photography, and it doesn’t change its ways for anyone. The time of year and your location on the planet determine exactly how the sun will move through the sky throughout the day.
Dusk and dawn
The time just before the sun rises and just after the sun sets (known as dusk and dawn) often provides amazing light for photographing. The sky is colorful at dusk and dawn, and the light that occurs during these time periods is soft and has a directional quality that isn’t as intense as direct sunlight. The light, which has a soft quality with low contrast, makes for dreamy results.
Dusk and dawn are great times for capturing photographs of objects with specular surfaces (surfaces that reflect light like a mirror). It used to be popular to photograph cars during dusk or dawn so they would be evenly lit and wouldn’t have any hot spots from the sun’s reflections. I enjoy shooting landscapes and portraits during this time.
Sunrise and sunset
The day begins and ends with the sun in a low position, which is ideal for creating compositions with sidelight. Sidelight refers to light that comes across your scene from the side, creating highlights and shadows that reveal texture. The light at sunrise and sunset doesn’t last long, and as the sun makes its way up over the horizon, its effect on the scene changes drastically.
In portraits, sunrise and sunset are just right for using the split lighting pattern (check out the earlier section “Positioning your light source to create lighting patterns”). In landscape photography, these times are ideal for creating compositions with long shadows and for revealing texture in a scene. When I travel to a new location, I always wake up before sunrise at least once so I can explore the city, town, or scenery during this inspirational time of day.
Figure 10-8 shows a sidelit landscape that I shot in Death Valley at sunrise. Notice how the light causes the texture of the dunes to be revealed and how it only affects certain areas of the scene. The foreground area is on a slope that faces west. Because the sun is so low in the sky, only the parts of the dunes that are facing the east receive light. As the sun gets higher, everything gets filled in with light, eliminating the early morning intricacies.
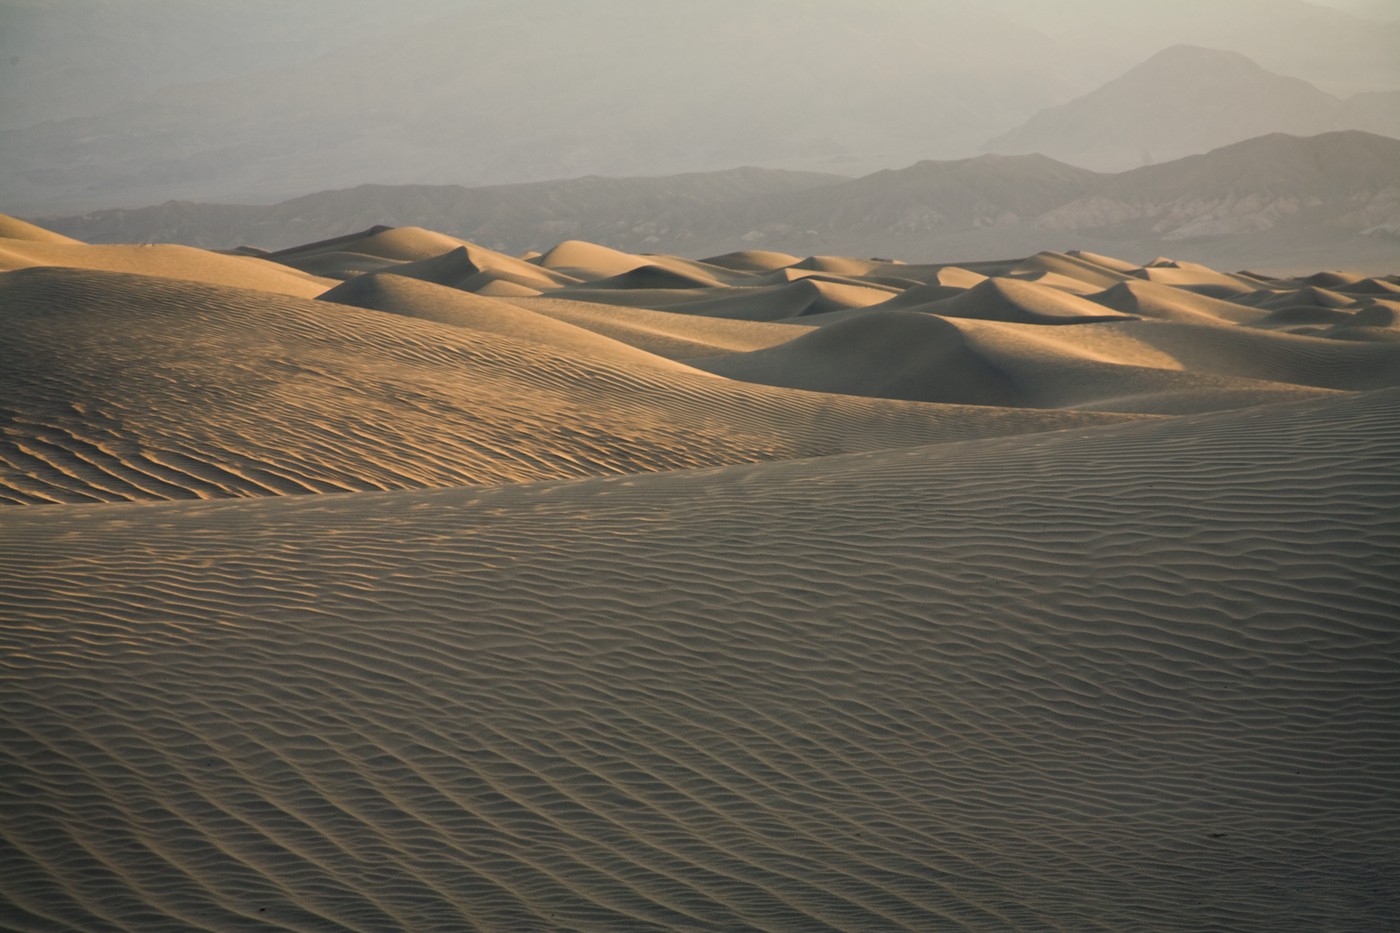
Figure 10-8: As the sun creeps over the horizon, you can watch the light enter the scene.
Morning and evening sunlight
When the sun is between 15 and 45 degrees in the sky (which indicates morning and evening), it’s still low enough to reveal texture and shape. If it’s positioned slightly (or directly) behind the scene, it works as an excellent backlight. A backlit scene is great for emphasizing depth because texture is revealed from front to back rather than side to side.
During these morning and evening times, you can create loop and Rembrandt lighting patterns in portraits. (Refer to the earlier section “Positioning your light source to create lighting patterns” for more on these patterns.) This also is a great time to shoot landscapes and city scenes.
In Figure 10-9, I was able to emphasize texture and depth by shooting the scene with the sun behind it and about 30 degrees in the sky. Notice how the texture in the sand is revealed from front to back, showing separation that gives you an idea of how far the beach extends into the background.
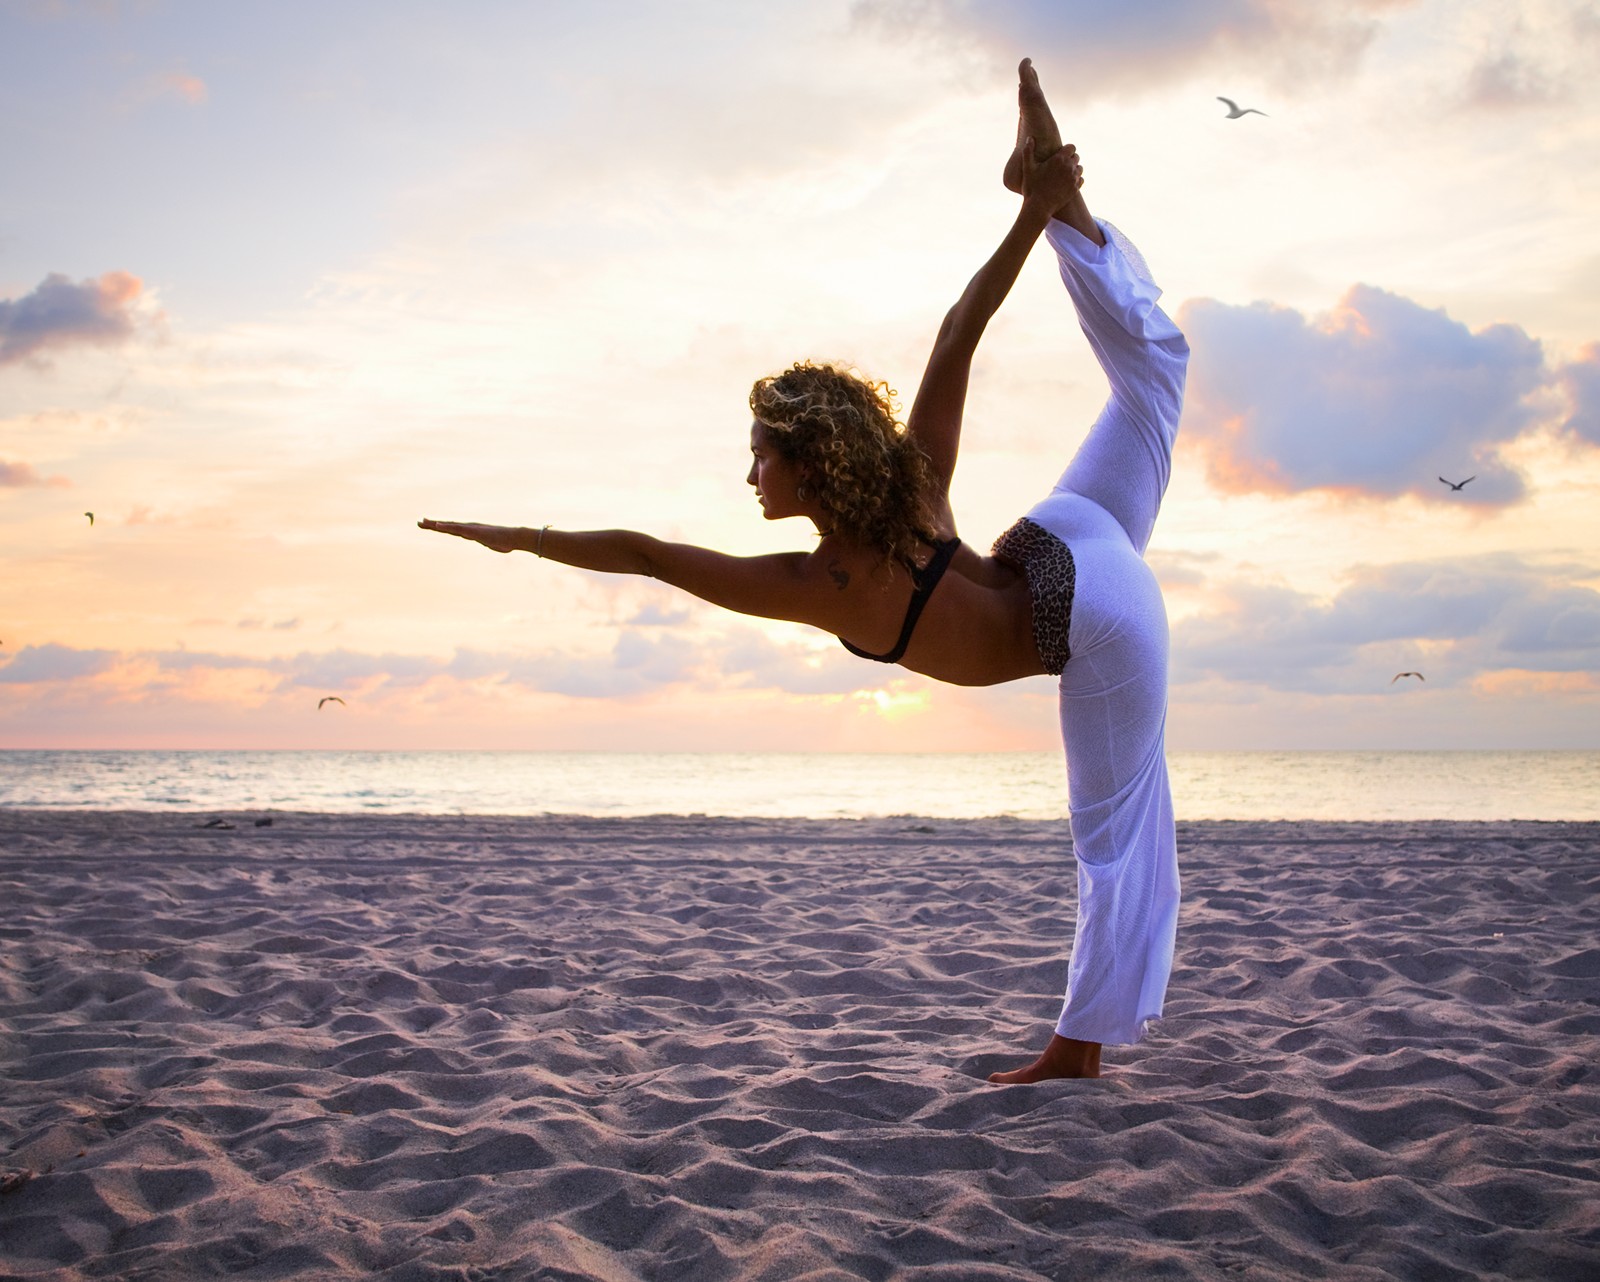
Figure 10-9: Backlighting a scene helps to reveal depth in a textured surface.
Midday sunlight
During the times when the sun is at 45 degrees, you can achieve the paramount lighting pattern (see the earlier section “Positioning your light source to create lighting patterns”) in portraits; however, after the sun goes much higher than that, you don’t want to use it as a direct key light. When the sun is high in the sky, it casts shadows over the eye sockets that are referred to as raccoon eyes.
When photographing people in the middle of the day, I suggest that you look for shade. The shade provides a more even light. When your subject is in the shade, you can have an assistant bounce in some sunlight with a reflector (see “Modifying the quality and contrast of light,” earlier in this chapter, for details about reflectors). Doing so enables you to choose what light direction works best with your subject and composition.
You usually won’t get good results when photographing landscapes during the middle of the day when the sun is high. If you don’t have a choice to wait around for better light, experiment and make the best of every situation. It’s possible — just not likely — to get beautiful results in the middle of the day. In fact, sometimes you get your best and most creative results at those times when you normally wouldn’t even take your camera out of its bag. So don’t let yourself get too caught up in the rules and common practices.
Appreciating different results in different seasons
The sun’s elevation is drastically different in the summer months than it is in the winter months, so factor this in when determining what time to arrive on a specific location. After all, the direction of light and how it affects your scenes depends on the sun’s elevation. In downtown metropolitan areas and in the valleys of mountains, you lose your direct sunlight much quicker than you do in flat areas — especially in the dead of winter. Arrive earlier than you normally would to these types of locations in order to capture the sunlight before it creeps behind the buildings or mountains.
The quality of light in a specific region also may be different throughout the year due to changing weather patterns. In San Francisco, for example, the summer is filled with hazy days causing direct sunlight and distant visibility to become severely limited.
Pay attention to the seasonal patterns in your home region and create a log of the pros and cons for shooting at certain times of the year. When you plan a trip, do some research to find out what time of year best suits photographing in your desired destination.
Setting Light in Motion
Most photographs are captured in a fraction of a second. Quick shutter speeds eliminate motion as much as possible to give you the sharpest, clearest image. When you leave your shutter open for extended periods of time, anything moving in the frame starts to blur or streak; if the source of light moves, the light in your scene changes throughout the course of the exposure.
Some common subjects to photograph with long exposures are waterfalls, flowing creeks, rivers, and windy sand dunes. When you capture light in motion, you let go of the desire to achieve technical perfection and instead create something that’s more surreal than real.
To shoot with a long exposure during the day, set your camera to its lowest ISO rating and use the smallest aperture setting available. (See Chapter 3 to get the details on ISO and aperture.) If these settings don’t slow down your exposure enough to achieve the amount of motion you want, use a neutral density filter in front of your lens. This filter is made of glass and is neutral in color. Its purpose is to decrease the amount of light entering the lens without changing the colors in a scene. You can buy these filters in a variety of densities, or you can purchase a variable density filter that enables you to choose between a variety of densities on a single filter. The darker the filter, the more light it blocks out.
Nighttime also provides a great opportunity to experiment with photographing motion. The light reflected off the moon isn’t nearly as intense as direct sunlight, so you can leave your shutter open for long periods of time, capturing drastic lengths of motion. Flowing water begins to lose texture when photographed for long periods of time. A one-minute exposure can cause the ocean to appear as calm as a lake on a windless day. I exposed Figure 10-10 for 8 seconds, which caused the ocean to become smooth while maintaining some of its detail.
On nights with a full moon, I tend to include the moon in my composition or to use the moonlight to expose my scene. When the moon is just a sliver in the sky, I like to go far away from the city lights into the wilderness and use a wide-angle lens to compose a scene that has a great deal of sky in it. With such a small intensity of light in the scene, you can leave the shutter open for hours and capture the illusion of the stars moving through the sky. Of course it’s the earth that’s rotating, but your camera is grounded here and records the stars as moving. This phenomenon is referred to as star trails.
Base your nighttime composition around the position of the North Star because that’s the only star that remains in the same spot throughout the night. The other stars circle around it, creating a neat effect in a photograph. Also, make sure your camera battery is fully charged before starting your exposure; otherwise you may run out of juice before the exposure is complete. (Check out Chapter 14 for more info on photographing nature.)
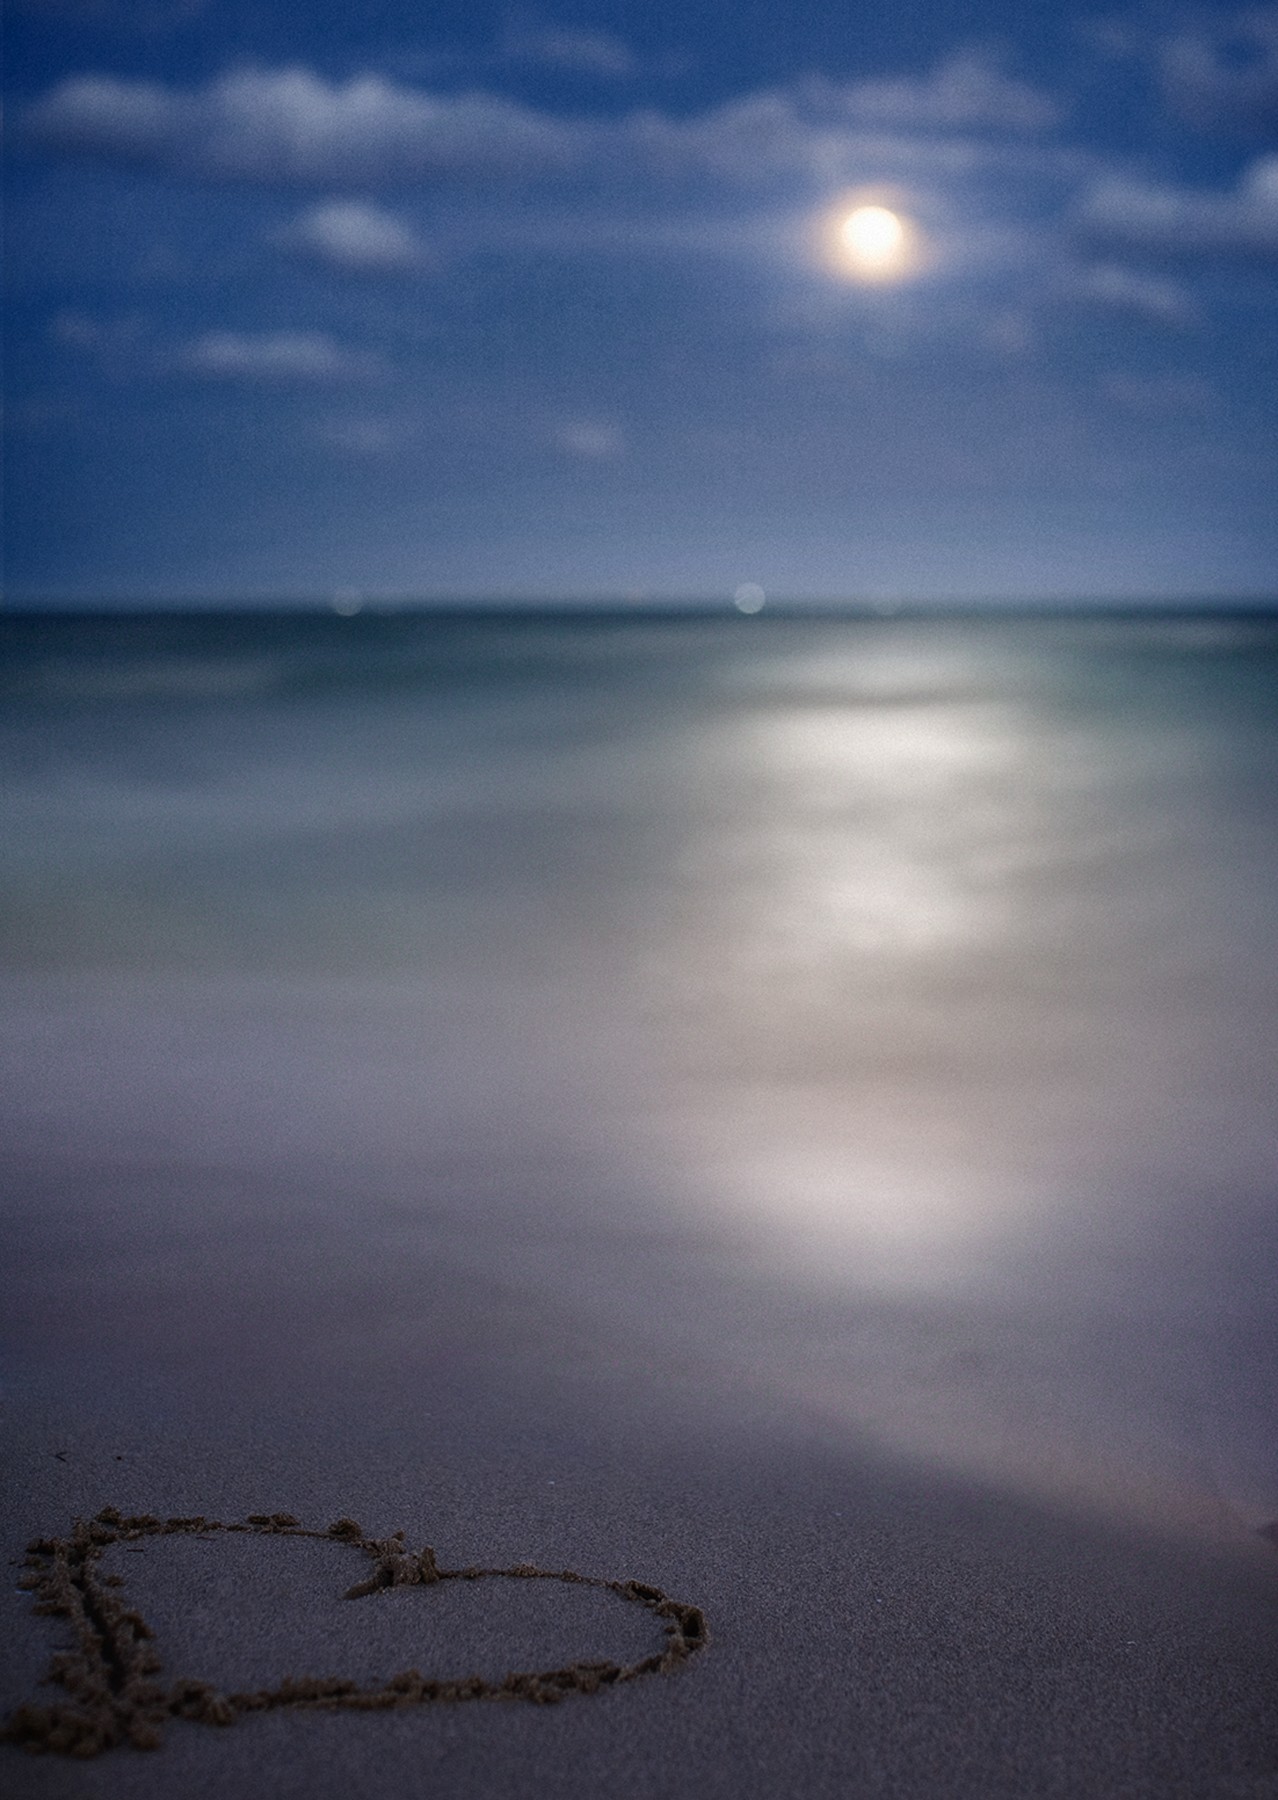
Figure 10-10: Photographing a scene at night makes capturing light in motion easy.
Accounting for the Color of Light
The impact of color in your scene comes not just from the color of the elements in it but also from the color of light in it. Each light source you use in a scene has a dominant color. Light burns at a specific Kelvin temperature, and that temperature determines the color of the light. The term red-hot, for example, refers to something that’s burning at the Kelvin temperature of the color red. Warm colors are created from lower temperatures (like 1000K candle light), and cool colors are created from higher temperatures (like 9000K open shade).
Here’s how lights commonly used in photography fall into the Kelvin scale:
1000K = candlelight
3200K = household tungsten lighting/photographic hot lights
5000K = typical flash bulb used in photographic strobes
5500K–6000K = direct sunlight
7500K = overcast sky
9000K = open shade (subject is in shadows that are exposed to the blue sky)
Your digital camera’s sensor reacts differently to each of these light temperatures, which is why the camera has a separate setting to shoot in each one of them. You access your camera’s color balance through the shooting menu. Refer to your owner’s manual to find out how your specific camera enables you to choose the color balance.
When preparing to take a photo, evaluate the lighting in your scene and determine which setting will provide the most appropriate results. For instance, when you’re indoors and regular household lights are lighting your scene, set the camera’s color balance to tungsten. When you’re outdoors, shooting in cloudy conditions, set the color balance to the overcast setting.
The way you see things in the direct sunlight is what you use as the standard for how things should look. And your camera does the same. Your white balance is the setting on your camera that determines how your sensor will react to the color of light. Consider the following examples:
If you shoot under tungsten lighting and set your white balance to tungsten, the camera compensates for the orange light by making it bluer. This compensation makes the light appear to have the color temperature of daylight instead of tungsten light.
If you shoot in the daylight and set your white balance to tungsten, the image will come out extremely blue. This can be used as a creative technique to produce images with a cool, blue tone.
When shooting in the open shade with the appropriate color balance, the camera will compensate for the cooler light and make it appear normal.
If you shoot in the daylight with your color balance set to open shade, the camera will compensate by making the image warmer. Because your scene was normal to begin with, the result will be an image that’s very warm.
If the sun is out and you want to create the warm feeling of sunset but it’s only 3 p.m., simply set your color balance to the overcast setting. The result will be a warm image. If you want to make it even warmer, set the color balance to the open shade setting.
On an overcast day, you can set your color balance to the sunlight setting in order to create a photograph that has a cooler tone.
Photographers used to place color filters in front of the lens to achieve all these results, but with digital cameras you can control the color balance with the camera’s settings and don’t have to purchase expensive filters.
Do some tests with the different color balance settings on your camera in different lighting scenarios and figure out which scenarios cause effects that you find interesting. You can control the color of your photographs with photo-editing software as well. I show you how to do so in Chapter 18.