Chapter 14
In Nature: Landscapes and Wildlife
In This Chapter
Considering composition in nature photography
Photographing wildlife
Respecting nature and protecting yourself and your equipment
Experimenting with photography in a forest setting
Nature provides settings that offer limitless opportunities for creating beautiful, peaceful, meaningful, sublime, surreal, or tragic photographs. Putting yourself in situations that are relevant to the photo you want to capture assures that you’re there when the moon rises over the mountains, the forest fills with morning mist, the storm begins to form in the distance, or the eggs hatch and the baby turtles begin to race toward the sea.
The natural world offers all these wonderful photo opportunities, but it also provides some special challenges that you must consider to get the photo you seek. For example, you must understand composition in context of a natural setting. You also need to consider how to best capture a photo of an awesome, yet dangerous creature (or one that’s harmless but skittish around humans). Finally, lighting can be an issue in certain settings, such as in a shadowy forest or on a sunny beach or desert. In the following sections, I offer tips to help you with all these challenges.
 If you want to get great images of nature, spend some time in it. The perfect vantage point won’t come and find you, and the eagle won’t pose for you if it senses your eagerness to capture its image. Patience is a virtue that enables you to be presented with nature’s beauty rather than having to search for it or force it. By spending time in an area and exploring its diversity, you’ll start to notice things that you couldn’t see if just passing through. You’ll also get to see how the area is affected by the sun and weather at different times during the day. After you’ve been still for a while and the wildlife has grown to accept your presence, perhaps animals will get nearer to you and provide you with the chance to get some great images.
Recognizing Compositional Elements in Nature
The natural world consists of relationships between elements. The elements consist of things like the sky, mountains, fields, meadows, water sources, rocks, trees, brush, flowers, beaches, and of course, living creatures. These natural compositional elements vary greatly in size, causing photographers to think about focusing on elements both big and small.
The basic rules of composition help you make the most of any situation with any elements. These guidelines help you determine where to place your subject in the frame and how to work with the lines and elements in a scene in order to captivate a viewer. The rules also help you decide where you should position yourself to achieve the best vantage point. After you study the rules and put them to use, everything starts to become second nature. (Chapter 5 provides plenty more information on the compositional rules.)
 Creating the appropriate composition depends on what’s in front of you and how you want to show it. If you know what does and doesn’t look good, you can make wise decisions based on how you feel a scene could best be represented. In this section, I tell you about the three most common types of scenes in nature photography.
Expansive landscapes: Basking in your surroundings
Expansive landscapes are those that cover large areas. They show the big picture, revealing the type of environment that you’re photographing and the elements that exist in it. Figure 14-1 represents an expansive landscape scene.

Figure 14-1: An expansive landscape shows a large area.
When you hike to the top of a mountain, a certain sense of accomplishment inevitably runs through your blood. To capture the feeling you get from this achievement, find the best spot to photograph the view from the mountain you’ve tackled. This view is a perfect example of an expansive landscape. And taking that picture is sort of like receiving a trophy for the hard work you put in to get there. With this expansive photo, you want to show as much of the scene as possible in order to emulate the experience you’re having by being surrounded by open space and being able to see far into the distance. Being on top of a mountain also allows you to see over smaller mountains, causing a layering effect that provides depth in your compositions.
Some elements that may intrigue you to shoot expansive landscapes include mountains, rivers, wide-open spaces (salt flats, meadows, dunes, rolling farm fields, and so on), tropical beaches, and arrangements of trees.
When composing a landscape, try to find a perspective that shows the scene as you want it to be seen. (Chapter 8 explains perspective in greater detail.) Your perspective determines how much depth your composition has and the physical relationships between each element. Consider shooting landscapes in the early morning or late afternoon. The lighting tends to be more directional at these times, so colors seem to be enhanced. (See Chapter 10 for more information on lighting.)
Narrowing in on intimate landscapes
Intimate landscapes cover specific details in an environment. Instead of including the entire area in the frame, an intimate landscape composition focuses on a specific element, revealing the details in it. You still get an idea of what the environment is, but you don’t get the big picture as you do in an expansive landscape shot. If an expansive landscape were compared to a photo of the New York City skyline, an intimate landscape could be compared to a photo of your favorite store in the Italian Market. Figure 14-2 shows an intimate landscape.
You’ll be most successful shooting intimate landscapes when you notice a specific detail that’s strong enough to give meaning to an image without needing the whole environment to tell the story. For example, a rock in a stream could cause the flowing water to create an interesting pattern as it pushes past it. Or you may notice that the light is reflecting on the surface of a tree or a rock in a way that has narrative qualities.
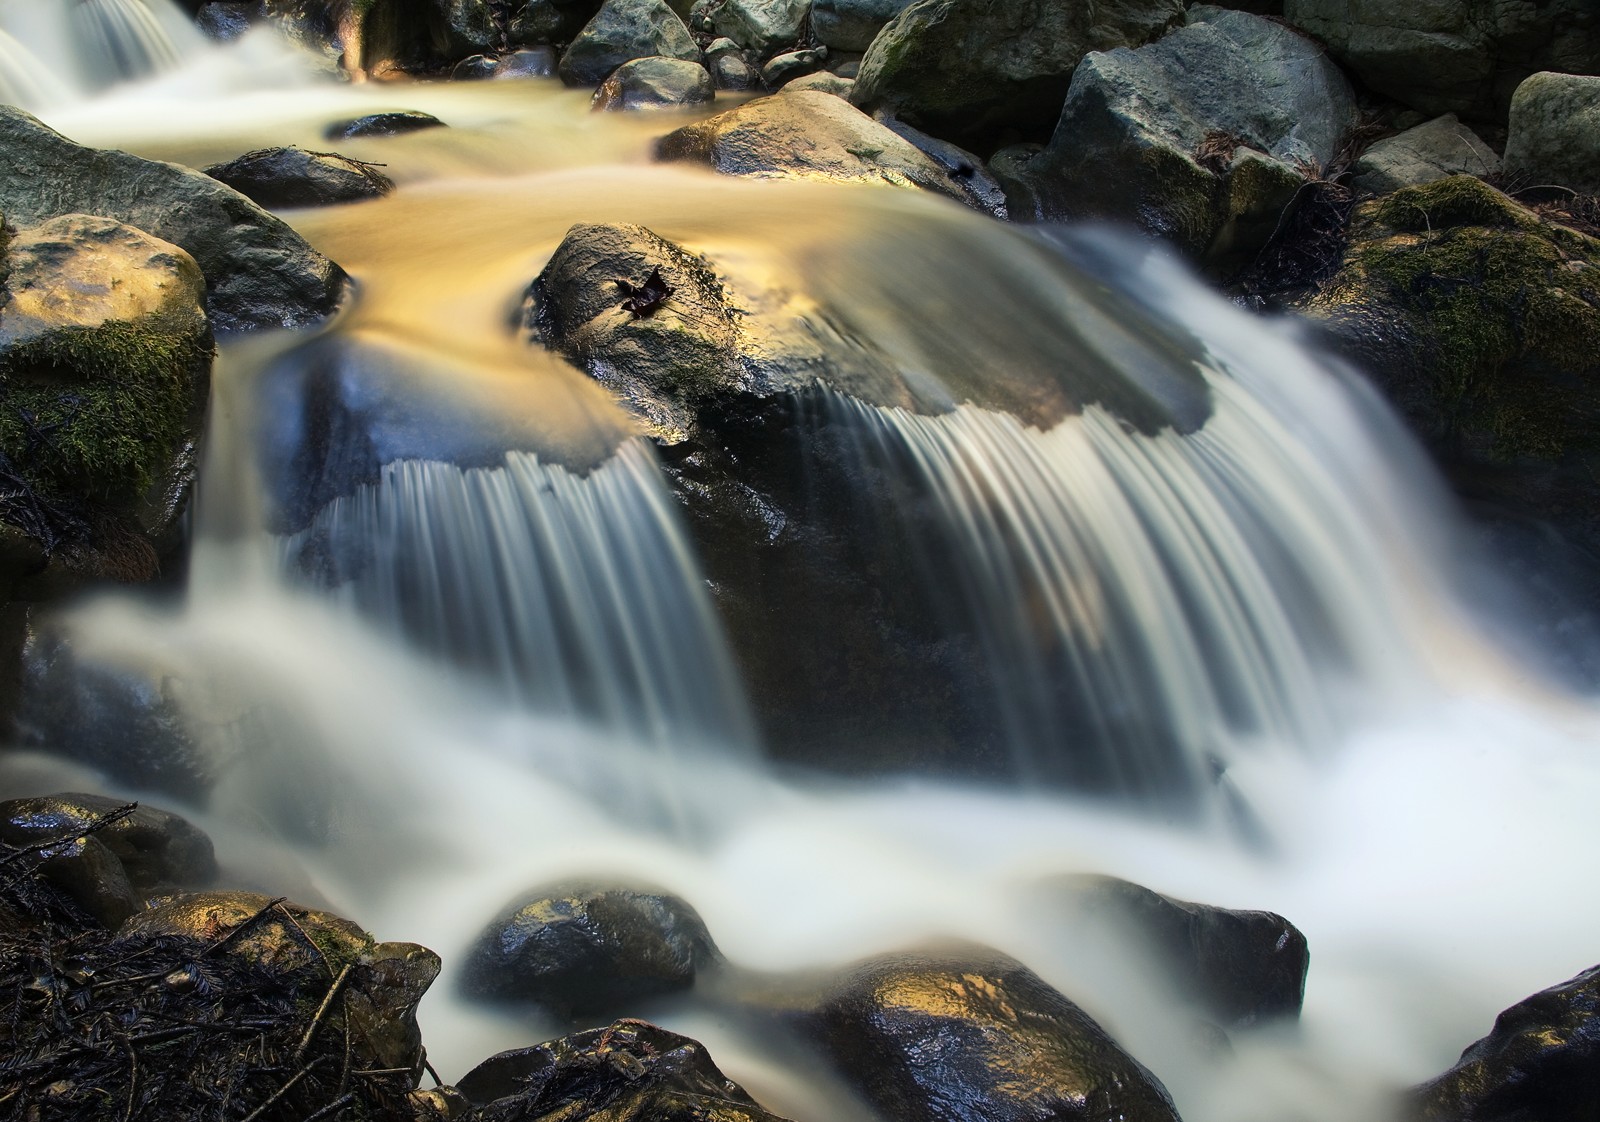
Figure 14-2: An intimate landscape highlights a revealing detail, such as reflections on a rushing waterfall.
In Figure 14-2, the light was shining on the water in a way that highlighted the difference between the direct sunlight and the blue sky. Had I shot the photo with a wider lens and included more of the environment, it would have become more difficult to see what was happening in the reflections.
Keep the quality of light in mind whenever you’re photographing intimate scenes outdoors. While direct sunlight works well to reveal as much detail as possible in expansive landscapes, it may create too much contrast in a more intimate scene. Similarly, if your shadows are much darker than your highlights in an intimate scene, you may lose valuable details in your exposure. Be aware of the weather forecasts and make the most out of any situation. Chapter 10 tells you more about working with sunlight.
Exploring fine detail through macro photography
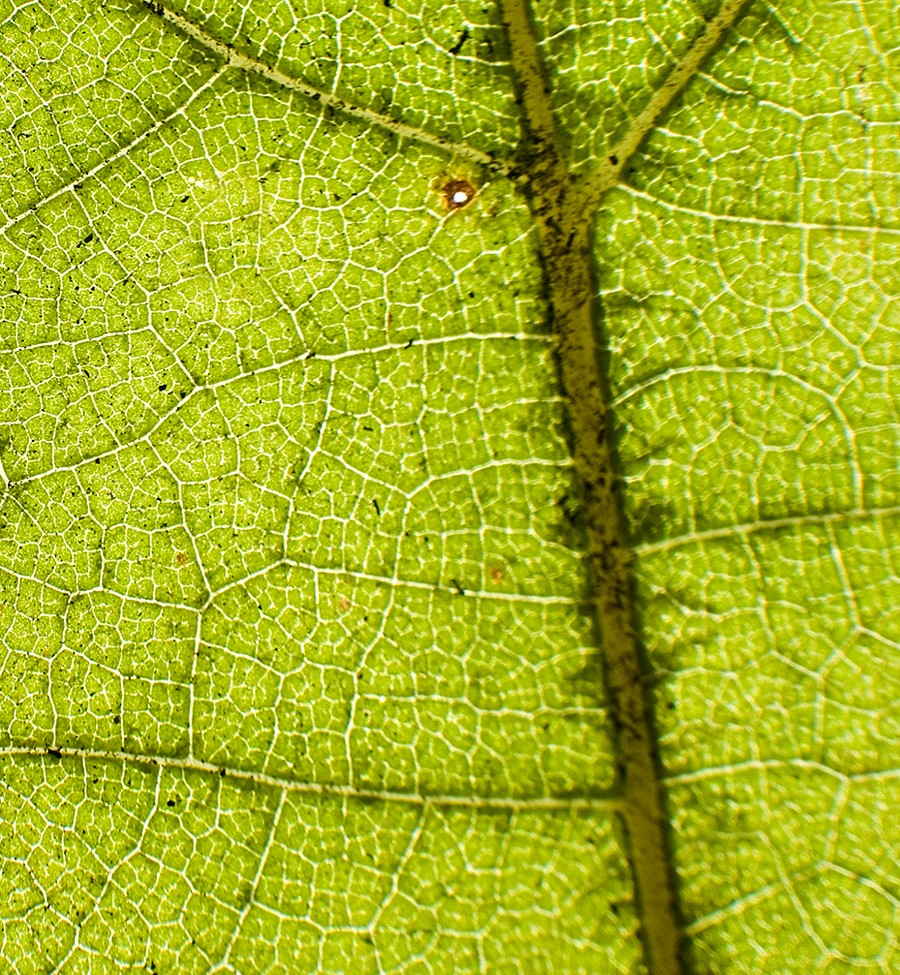
Macro photography uses a macro lens, which allows you to get very close to your subjects and still achieve sharp focus, to capture intimate scenes in nature on a very small scale. (Flip to Chapter 3 for more on macro lenses.) Insects on a log, tiny flowers, spiders and their webs, and grains of sand are some of the elements that may be best represented through a macro lens. By using this type of lens, you can photograph an ant so that it’s fairly large in your frame, revealing details and textures that otherwise would be unnoticeable. Figure 14-3 shows the fine details of a leaf’s texture and biological design.
Keep the following points in mind when shooting macro photography:
Increasing magnification decreases depth of field. As a result, images taken with a macro lens often have a very shallow depth of field. (Chapter 7 explains depth of field in more detail.) If you want your composition to show more sharp detail by increasing your depth of field, shoot with a small aperture, such as f/16.
The smaller your aperture, the longer your exposure. Because of this long exposure, the slightest movement has a great effect on the sharpness of your image. As a result, you should use a tripod when shooting with a macro lens.
When you get extremely close to a small subject, you may block the available light. If you do, rotate to a position where you aren’t in the way of the light source. If you can’t rotate your position appropriately, a small, battery-powered flash off-camera and to the side of your subject produces a nice quality of light in most cases. Some photographers use a small ring flash, which covers the rim of your lens and provides a flat, ambient light.
If you want to keep the light as natural as possible, bring a collapsible reflector into the field. This type of reflector can be used to bounce sunlight toward your subject, or it can block the wind from causing your subject to sway.
Macro photography can be misleading regarding the size of your subject or the other elements in your photo. Providing something with an easily recognizable size in the composition gives your viewers a sense of scale and helps reveal the true size of the other elements. For more on scale, check out Chapter 12.
Even if you don’t own a macro lens, you can shoot macro photography with your 50mm lens if the need arises. To do so, attach an extension tube to your normal lens; this tube allows you to get closer to your subjects and still achieve sharp focus. An extension tube connects to the back of your lens and then to your camera body. It extends the distance between the glass in your lens and your digital sensor. The closer you get to a subject, the farther your focus gets from the backside of the lens. By adding distance from the lens to the digital sensor, you enable yourself to move in closer to your subjects. Keep in mind that when you use an extension tube, light has to travel farther to reach the sensor, which affects your exposure. You can compensate by opening up your aperture or slowing down your shutter speed.

Figure 14-3: Macro photography shows the fine detail of small subjects by enabling you to achieve focus at close distances.
Capturing Wildlife
Photographing wildlife is exciting, but it requires patience and skill. You gain a certain level of satisfaction from simply seeing an animal in the wild; but, having the photo to prove it is like having a trophy. Photographing wildlife is sort of like a nonviolent form of hunting. Knowing where to see animals in their natural element is the first skill you need to acquire; getting the shot is the second. I explain both in the following sections.
Finding animals to photograph
If you want to take photos of wildlife, you first have to figure out where to go to see the animals you’re interested in. You have several options:
Go out into the wild and explore. This option is probably the most exciting and respectable way to photograph wildlife, but, depending on the subject of your photo, it also can be the most dangerous and least likely to provide results.
 Always be cautious of wildlife, and put your safety ahead of capturing the shot. Getting too close to a potentially violent creature is never a good idea. Also, don’t taunt or bother wildlife to gain a reaction either. It’s your duty to respect and preserve wildlife and your relationship with it. Maintain your distance for its sake as well as yours.
Sign up for a tour or a safari. These group activities are designed for photographers and enable you to capture images of animals without putting yourself in harm’s way. They’re great for guaranteeing that you see the animals you want to see and ensuring a safe journey.
Contact a local exotic-pet handler. This option is helpful if you don’t have the time, money, or expertise to go exploring in the wild or to go on an expensive tour. These companies usually allow you to photograph the animals in their care for a reasonable rental fee. Some even come to your location and provide unique and interesting insects, lizards, snakes, and various sizes of fuzzy creatures. You may have to shop around to find the specific animals you want.
The tarantula in Figure 14-4 was photographed in a class that I attended. This particular spider is very aggressive and contains venom. So, of course, I was more comfortable encountering it with knowledgeable handlers in the area as opposed to finding it on my own in the wild.
Visit the zoo. If you can’t get into the wild and haven’t found a handler who has the animal you want to photograph, consider the zoo. Choose a day fewer people are visiting. The middle of the week and early in the morning are your best bets for finding the freedom and space to work with. Large crowds can make it difficult for you to get the compositions you desire. By cropping in close and using a shallow depth of field, you usually can create compositions that are believable as being taken in the wild.
Don’t try to literally pass off your images from the zoo as being captured in the wild. Nobody likes to be lied to, and this includes stock photo agencies, magazine editors, and friends and family.
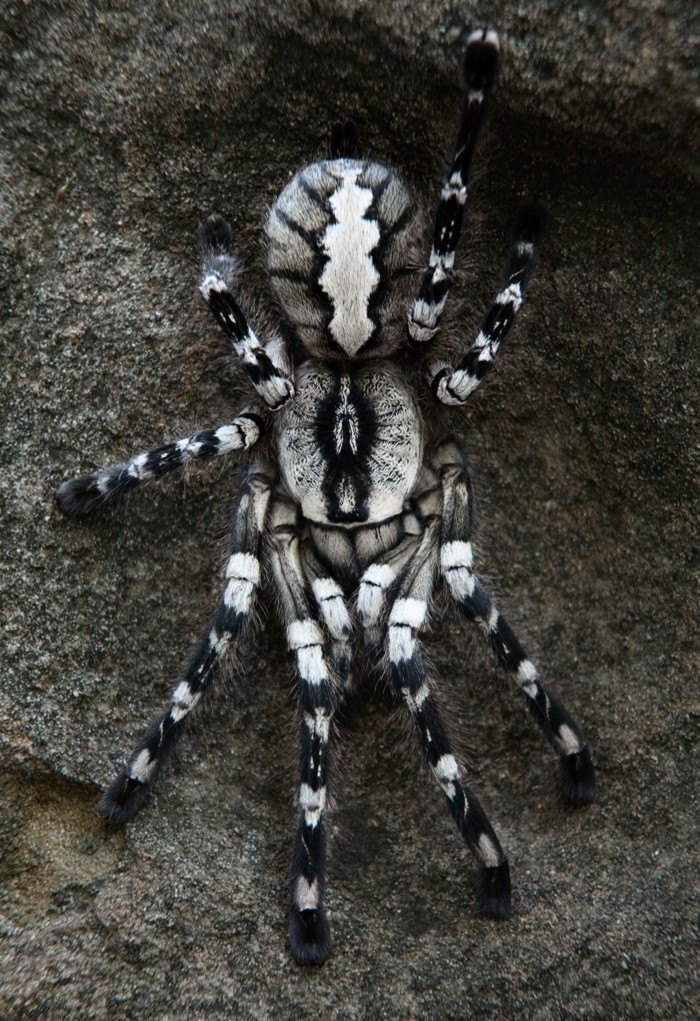
Figure 14-4: A tarantula photographed during a wildlife photography class.
Getting the best-composed shot
When composing an image, consider wild animals as you would any other photographic subject. To make great images of wildlife, make sure that you
Seek out interesting moments. Scenes showing a mother interacting with her young or two animals engaged in a turf battle always provide great compositional material. Even a moment where an animal makes eye contact with your camera can be great. Pay attention to the animals rather than photographing them randomly; you’ll better enjoy your personal experience, and you’ll capture the most interesting moment.
Look for great lighting. The best way to increase your chances of great light when photographing wildlife (because it’s wild and somewhat unpredictable) is to go out during the best hours of the day. The best hours are during the beginning or end of the day. On bright, sunny days, perhaps you can use the middle of the day to take a nap or a long lunch. (Head to Chapter 10 for more information on lighting.)
Find supporting elements that say something about the subject. A shot of a cheetah is cool, but a cheetah in a tree is even cooler. This says something about how the cheetah lives its life. An eagle landing by a nest suggests that it has offspring. A photo of a lone wolf tells a different story than one that shows a wolf backed by its pack.
Use the key elements of design. Regardless of the subject, you should always apply the elements of design. Think about how your subject fits into your frame and how you’re composing the other elements that surround it. Draw the viewer to the subject by incorporating leading lines and paying attention to contrast in your scene. You can read more about design principles in Chapter 4.
Make your subject stand out as the focal point. Get your subject in focus to ensure that your image has the highest quality. It would be confusing to a viewer if a twig in the background was in focus but the lion’s face was blurry. To discover how to work the focus features on your camera, refer to Chapter 3.
To get the best composition possible when photographing lions, tigers, and bears (and other dangerous animals), bring a telephoto lens. By zooming in on your subject with a long lens, you can give the illusion that the image was taken up close and personal without having to risk your life.
Figure 14-5 was taken at about 100 feet from the buck in the scene. I used a long lens to get as tight a crop as possible. As I began to move in for a closer shot, he made it very clear that I was going to have to fight for the territory. I packed up and left, knowing that no photograph is worth getting in a tussle with a male elk.
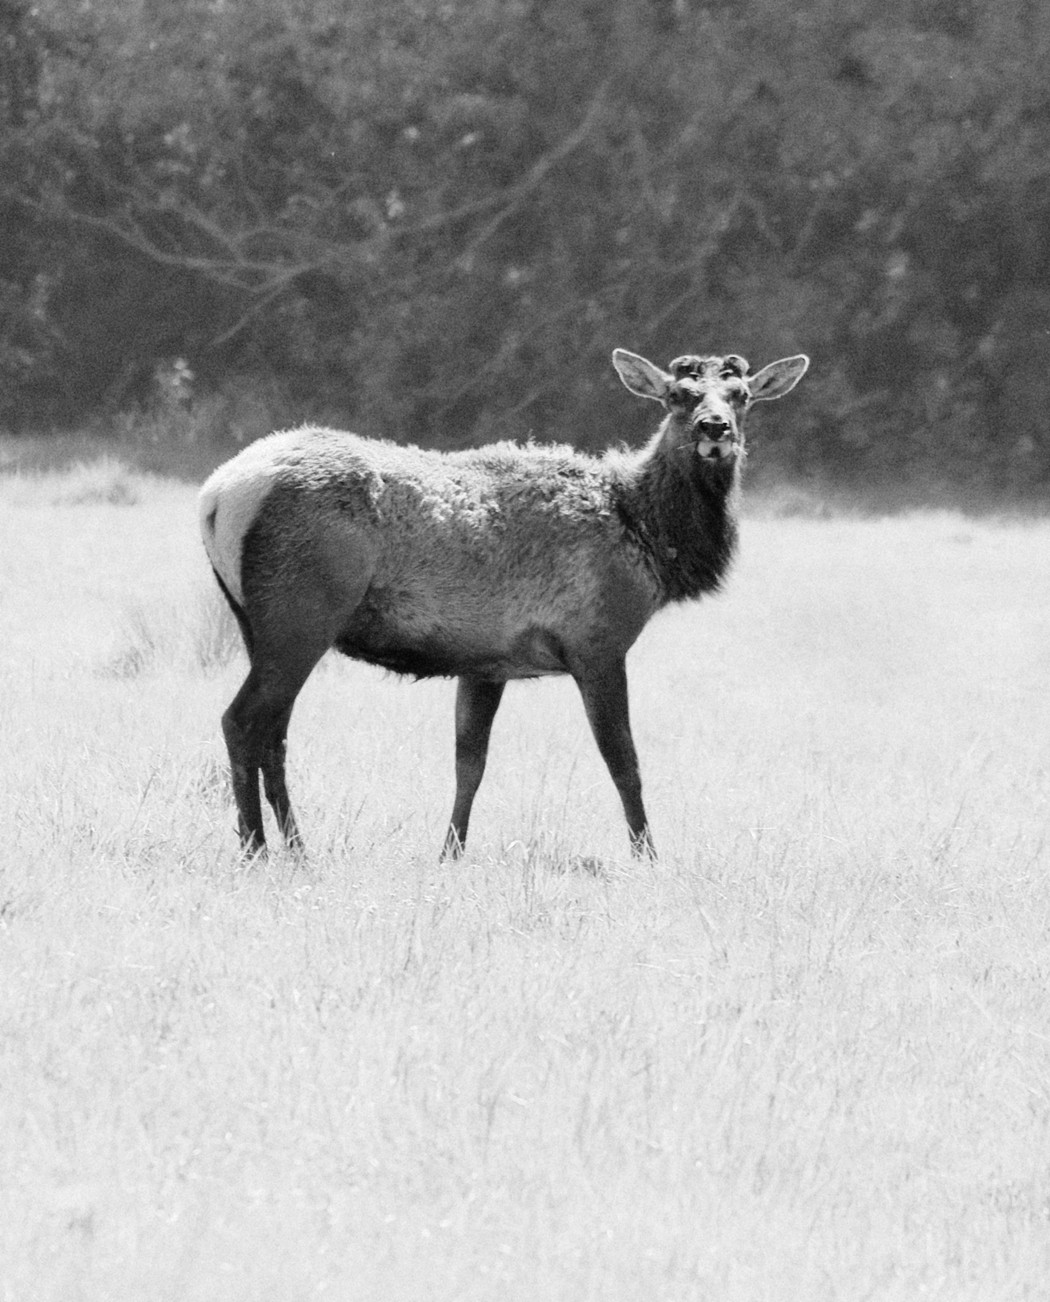
Figure 14-5: Photograph wildlife without overstepping your bounds.
Developing a Respect for Nature’s Elements
Nature is one of the most common and fun subjects to photograph. It’s also potentially the most dangerous for you and for your equipment. Before embarking on a journey through nature, be prepared with the necessary tools and information regarding your specific destination. The Internet is filled with valuable information, making researching an area easier than ever. Some things to look out for include:
Water: In nature, you develop a love/hate relationship with water. You love water because it makes for a great photographic element, and you need it to survive. It’s refreshing to drink and to swim in or to rinse yourself with. All in all, staying relatively close to a fresh water source is a good idea when you’re out in nature. However, you may start to hate water when it begins to rain and you’re out in the middle of nowhere, when the tide comes in to drench all your camera gear, or when you slip while crossing a stream.
Keep an eye on the weather before going out, and know what you’re up against. Bring a poncho or some strong plastic bags to protect yourself and your gear in case it rains. If you’re shooting on the beach, find out the times for high tide and low tide. And before setting your camera on a tripod along the ocean’s edge, make sure the tide is going out and not coming in. When hiking in the woods, wear shoes that have decent traction. Falling on slippery rocks can get you seriously hurt and can damage your equipment.
The sun: If you go out in the summer, the sun is going to be in the sky for long periods of time. So, as mom always says, bring sunscreen! I do most of my photographing in the morning, late afternoon, and at night. Doing so allows me to use the time during the middle of the day (which is when the sun does its worst damage) to rest in the shade, go for a swim, or explore new territories. Besides messing up your skin, the sun can provide not-so-flattering results as far as lighting your scenes during the middle of the day.
Keep in mind that without the sun, navigating an area will be much more difficult. If you’re not completely familiar with your surroundings, and you’re away from camp as the sun is going down, be sure to give yourself enough time to get back before it gets too dark. And always be prepared with a flashlight! When shooting night scenes, it’s wise to set up camp near where you’ll be placing your camera.
Location: Always know where you are and how to get to where you’re going. As a precaution, keep a compass packed with your camera gear. If you don’t know how to navigate with a compass, research it. If GPS is more your style, nowadays you can get a system for fairly cheap. However, if you’re relying on GPS to keep you from getting lost, be sure not to run out of battery power. Otherwise, it will act only as dead weight you have to carry.
Local wildlife: Know what’s out in the wilderness with you. You need to know whether an animal is a threat or not. Pay attention to which snakes are common in the area, and what to do if you encounter any large animals. If you’re camping out, be sure to wash any dishes before going to sleep at night. And hoist your food up in the air to help keep wild animals from getting into it throughout the night. Also, keeping the food at a good distance from your campsite helps keep bears and mountain lions at a safe distance from you.
Never go out into the wilderness alone. If you get injured or lost, you probably won’t be able to get help.
Photographing the Forest
The forest is familiar, mysterious, expressive, and secretive all at the same time. You can reveal the secrets of the forest or keep them hidden depending on when and how you photograph it. Spending time in the forest is the only way to develop an appreciation for its beauty. In the following sections, I provide pointers to help you succeed when taking photos in a forest setting. (If you’re shooting another location, like the beach or the mountains, follow the tips I give you earlier in this chapter.)
Determining what you want to photograph
If you’re well equipped while you’re in the forest, you can almost always find something right in front of you that’s worthy of photographing. If the grandiose scene doesn’t appeal to you, perhaps you’ll notice something happening on the intimate level, such as insects, spider webs, or wild mushrooms. (Check out the earlier section “Recognizing Compositional Elements in Nature” for more on expansive and intimate compositions.) Seek a nuance of personality in a tree or rock. Pay attention to patterns and textures. Notice what the lines in a scene are doing — where and how they lead your eyes.
Factoring in light when in the forest
The most important factor in photographing a scene in the forest is light. Direct sunlight entering through the trees in the forest creates very high contrast. The shadows aren’t filled in by the sky’s ambient glow. Areas being hit by the sun are much brighter than areas in deep shadow, and your digital sensor isn’t capable of exposing both of these areas properly at one time.
You can create mysterious compositions by using the high contrast to your advantage, however. Be sure to include some interesting elements of composition in your frame. Give purpose or meaning to the image; otherwise, it comes across as a poorly executed snapshot of the forest in a bad lighting scenario. When shooting a high-contrast scene in the forest, you most likely rely on lines and shapes to tell your story. Remember to avoid merging lines, especially in the trees (see Chapter 9 for more information). Find a perspective that separates each tree as much as possible. Doing so provides a clear and descriptive view.
Soft, diffused light is the best for getting images of the forest with the most detail. Because the forest itself is already high in contrast, you don’t need an intense key light to add any more. A little directional light is nice, though. The ideal scenario is when a thin layer of clouds is blocking the sunlight, softening it just enough to tone down the contrast.
Figure 14-6 shows an example of a forest scene photographed on a partially cloudy day with the sun being diffused by a thin layer. Notice how you can see detail throughout the entire scene. The scene shows no blown-out highlights or shadow areas that are too dark to see. The forest’s natural level of contrast is enough to work well in this lighting condition.

Figure 14-6: A forest photographed in cloudy conditions to reveal an ideal amount of detail.
Find ways to make your subject stand out when shooting in this condition. Here’s how:
Shoot from a perspective that gives a clear view of your subject with no merging background elements. Head to Chapter 8 for more information on perspective.
Use a shallow depth of field to eliminate the impact of competing elements. Chapter 7 provides detail on using depth of field.
Give closure to your image by paying attention to the edges of your frame. The elements around the edges are equally important to your message as the subject. The forest is continuous, but your photo shows one portion of it for a reason. If the edge of your frame leads viewers away from the subject, they won’t feel the need to go back to it. For this reason, avoid letting lines go off the edge of your frame. Refer to Chapter 11 for more information on framing a composition.
Taking advantage of night in the forest
In the forest, the most interesting light occurs just before, during, and right after sunrise and sunset. The easiest way to be ready for that light is to set up camp overnight. Doing so allows you to shoot until after sunset and not have to hike out in the dark (which can be dangerous). By camping out, you also can wake up in the morning before sunrise and be ready to shoot.
The best part of camping in the forest is that you get to shoot at night. You’ll likely find that some of your most interesting images are ones that were taken in the dark. Sometimes I set up my composition while some light is still available, and then I leave the camera in place on the tripod for later.
Here are some tips to consider when shooting at night:
Test your shutter speed. With a full moon, you can get decent exposures of most scenes with a 15- to 30-second shutter speed. On darker nights you may want to shoot on bulb (the camera setting that enables you to keep the shutter open for extended periods of time) and do some test shots to find out how long to leave the shutter open.
Purchase a cable release for your shutter. This cable enables you to leave the shutter open without having to touch the camera during the exposure. Not touching the camera during exposure is important so you don’t introduce blurriness. When the shutter is open for a long time, every movement, including the natural shaking of your hands, will be shown as blurriness or motion.
Take advantage of the campfire. The light provided by your campfire sometimes adds an interesting quality to your nighttime images. The night’s light is cool in temperature, and the fire’s light is warm. (Flip to Chapter 10 for more on color temperatures in light.) In other words, the moonlight provides a bluish color to the scene, and the fire produces an orange glow on the elements that are affected by it. Color temperature is good for adding some color contrast to your composition. The trees closest to the fire will have a warm glow, and the elements farther away will remain cool and blue.
Use your flashlight to paint light into the scene. With the shutter open, shine the light on your subject or supporting elements and move it around as if you were painting with it.
In Figure 14-7, I used a 15-second exposure to capture the sky and the stars. While the shutter was open, I used my flashlight to paint light onto the limestone in the foreground to brighten it and reveal it as the subject.
Shoot at night near a river, stream, ocean, or lake. These bodies of water can provide amazing results. The motion of the water causes a smoothing effect on your final image and causes interesting things to happen to reflections.
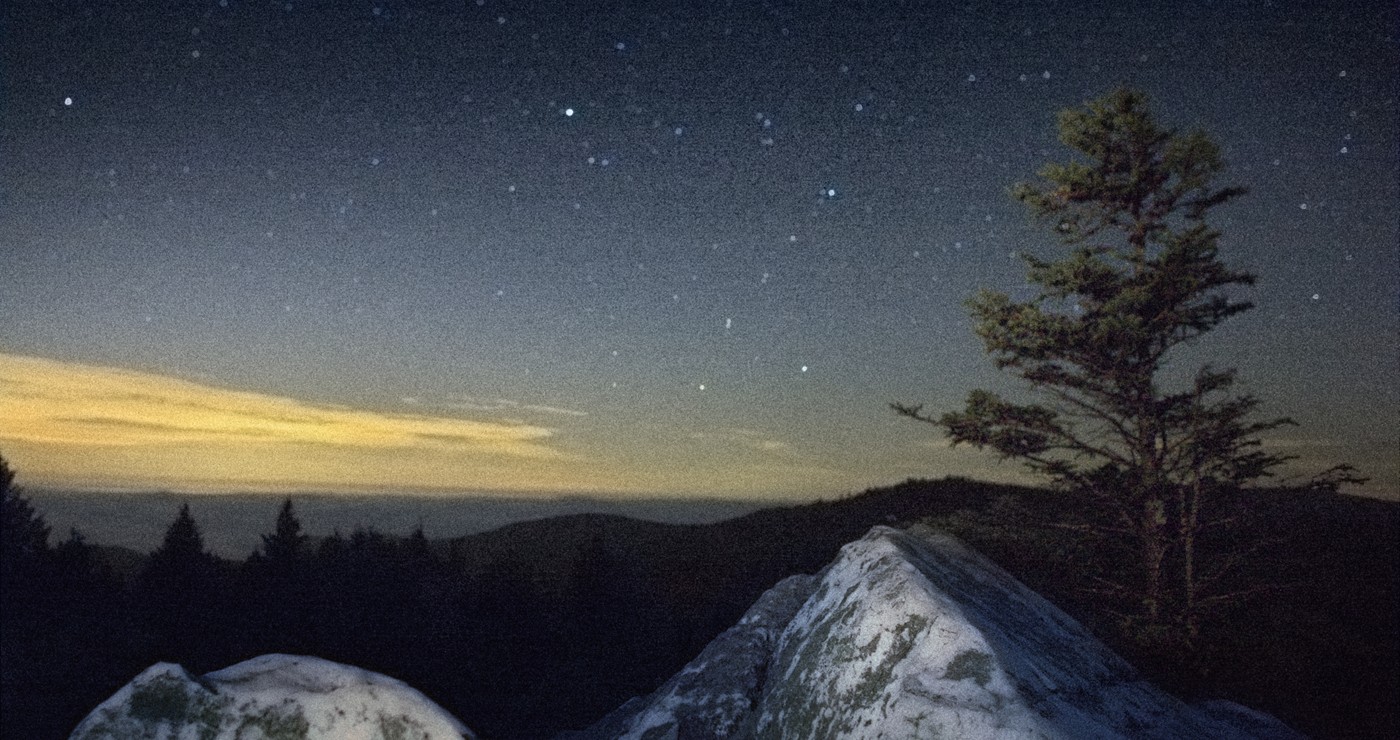
Figure 14-7: Painting with light when capturing a nighttime image in the forest.