
Mount Inglismaldie 2964 m moderate
Mount Aylmer 3163 m moderate
Cascade Mountain 2998 m moderate
Mount Brewster 2859 m moderate
Mount Rundle 2949 m easy
Mount Norquay 2522 m difficult
Mount Edith 2554 m moderate
Mount Cory 2802 m easy
Cockscomb Mountain 2776 m easy
Mount Bourgeau 2930 m easy
The Monarch 2904 m moderate
Pilot Mountain 2935 m difficult
Mount Brett 2984 m difficult
Copper Mountain 2795 m moderate
Castle Mountain 2766 m easy
Stuart Knob 2850 m moderate
Helena Ridge 2862 m easy
Television Peak 2970 m easy
Mount Whymper 2845 m moderate
Boom Mountain 2760 m moderate
Storm Mountain 3161 m moderate
Mount Ball 3311 m moderate
Stanley Peak 3155 m difficult
Vermilion Peak 2622 m moderate
Isabelle Peak 2938 m difficult
Peaks described in this section lie near Banff, to the west along the Trans-Canada to Castle Junction and in nearby Kootenay National Park to the southwest. Banff National Park is undeniably the most visited of the four contiguous mountain parks, with the town of Banff hosting most of the influx. Backcountry destinations are also busy. This area boasts several Rockies “postcard peaks” where camera-laden tourists snap classic shots like Cascade, Castle Mountain and the great uplifted slab of Mount Rundle. To many roadside visitors, these three peaks epitomize Banff Park. Coincidentally, each of these has a popular scramble route to the summit, and each sees a large number of ascents and occasional mishaps. Each scramble in this chapter can be done as a day trip, although Mount Ball, the highest scramble included in this area, is better done as a two-day trip.
Most of these peaks still fall (or rise!) within the Front Ranges, and not until Castle Mountain do you reach the Main Ranges. Cambrian-age rock, the oldest in the Rockies (600–800 million years), is found in this latter range. So too are the highest peaks. The topography changes near the Continental Divide and is quite evident if you know what to watch for. Tilted, dip-slope mountains in the east give way to less disturbed mountains that are vertically uplifted and deeply eroded. The soaring walls and steep buttresses guarding Castle Mountain are prime examples.
Unless close to or west of the Continental Divide, underbrush in this area is seldom problematic. Nonetheless, areas west of Banff are wetter than to the east, and winter snow melts slowly at the higher elevations. June, normally the rainiest of the three summer months, often dumps additional snow on the summits. Impatient mountaineers agonize over when (or whether) the big peaks might come into condition, and in some years they never really do. Late June blesses the Canadian Rockies with about 18 hours of daylight, yet sadly the very peaks that would best benefit from these longer days are often choked with snow.
As July progresses, weather patterns stabilize and snowmelt on big peaks begins in earnest. Historically, the best weather typically occurs during the last week of July and the first week or two of August. After that, sporadic storms may again dust the big peaks with new snow, although it does not usually last. September and October can be fine scrambling months, but overnight temperatures drop close to or below freezing. Overnight rain leaves iced-up rock, so big peaks may no longer be in ideal dry condition. Summer crowds have departed, however, and many successful ascents to lower summits are enjoyed by locals and the few visitors that remain.
Access Banff, in the heart of the Canadian Rockies, is a 90-minute drive west of Calgary. Stopping in any national park requires a permit, available at the entrance gate. Besides the Trans-Canada Highway, the other thoroughfare is Bow Valley Parkway (Highway 1A). This quieter scenic route begins 6 km west of Banff and runs for 30 km along the north side of the Bow River past Castle Junction to Lake Louise. To protect wildlife, the public is asked to refrain from using Highway 1A between 6 pm and 9 am during spring and until June 25 from Johnston Canyon east to Banff. Kootenay Parkway (Highway 93), meets the Trans-Canada at Castle Junction and runs southwest toward Radium, BC.
Facilities When the mountain weather doesn’t co-operate, you can always brave the crowds of Banff. There is everything one could want here, be it entertainment, equipment, food, knick-knacks or information. The Cave and Basin hot springs, around which Banff Park was created, are always popular. The Whyte Museum offers mountain-related exhibits, books and an interesting archive section on mountain areas of the world. Special emphasis has been placed on material relating to the Canadian Rockies. An extensive collection of excellent turn-of-the-century climbing photographs is also available for viewing, as are numerous climbing and reference books. If you cannot climb the peaks, you can browse through many excellent pictures of them and dream!
Climbing equipment and rental gear are available at Monod’s Sports on Banff Avenue.
West of Banff there is a small store and a gas station at Castle Junction on Highway 1A. Located farther east at Johnston Canyon is a restaurant. On Highway 93, meals are available at Storm Mountain Lodge when open.
Accommodation Budget-wise, the best deals are the campgrounds at Two Jack Lake, Tunnel Mountain in Banff or the co-ed YWCA, also in Banff. Most other local lodging is expensive. Farther west there are additional campgrounds along Highway 1A at Castle Mountain, Protection Mountain and Johnston Canyon (showers), and at Marble Canyon in Kootenay Park. A youth hostel and bungalows are found at Castle Junction; rooms can be rented at Baker Creek, Storm Mountain Lodge and Johnston Canyon. The latter are not cheap and often are booked up far in advance. Campgrounds fill early in the day as well. A no-frills roadside camping area on the south side of the Trans-Canada between Castle Junction and Lake Louise is a last resort and is best suited for RVs. It is most tolerable late at night.
For anyone contemplating parking at a trailhead and dozing harmlessly in a vehicle, be aware that this is allowed only during daylight hours. Personal experience has shown that, come dusk, Parks Canada (especially in Banff Park) spares no effort to roust one out just when sleep comes. A misguided park policy deems sleeping in a vehicle at night a truly heinous crime. So enthusiastically do staff pursue illegal campers, that I once found a warning on my car left by overzealous park personnel who assumed that anyone parked at a trailhead at 7 am could only be camping illegally. The “alpine” start concept is apparently unknown to these individuals. I suggest checking campgrounds for someone (a cyclist, for example) not using their allotted parking space and offer to sublease it. Park campgrounds simply cannot meet peak demand. Ironically, while big hotels continue to expand and new development flourishes, no thought is given to the low-impact, environmentally friendly visitor needing only a patch of ground, a privy and a picnic table.
Information The information centre in Banff is on the main drag at 224 Banff Avenue, 403-762-1550. Permits, maps, trail information, bear warnings and smiles are dispensed here. Just look for a crowd of folks in a variety of attire (and with backpacks!) studying maps and brochures along the street. In Kootenay Park, information is available at Vermilion crossing, 31 km west of the Continental Divide.
Wardens Thinking of having an epic? Don’t bother, it has already been done. To avoid epics, the warden office is just east of the townsite on the north side of Banff Avenue in the Parks compound. Specific information about particular routes and current climbing conditions on local peaks can often be obtained here. You can also register your itinerary. Emergency 911 service is available within cell phone coverage areas but typically does not include the backcountry.
Difficulty: Moderate scrambling; tedious approach
Round-trip time: 12+ hours, a very long day
Height gain: 1450 m
Maps: 82 O/3 Canmore; Gem Trek Banff–Assiniboine
As you drive toward Banff from the west, Mounts Inglismaldie and Girouard form a balanced and symmetrical backdrop on the eastern horizon. Mount Inglismaldie never was a busy peak and the heavy rains of 2013 toppled so many trees into the approach drainage that it will see even fewer ascents. The views from the top are excellent, but scramblers will suffer for those views. A wildlife corridor with restricted user access begins just east of this drainage, though the approach to Inglismaldie is not affected. Try from late June on if you must.
From Banff east overpass, follow Lake Minnewanka Road for about 1 km, then turn right and drive 3.5 km toward Johnson Lake road. Park on the shoulder just 800 m before Johnson Lake. An old cross-country ski trail starts at this bend.
From the pullout, follow the trail clockwise around behind Johnson Lake to avoid the marsh. You will intersect the dry drainage originating between mounts Girouard and Inglismaldie in 10 minutes (cairn). Follow this. Farther upstream, you should pass remnants of two collapsed log cabins. Banff bandleader and historian Louis Trono wrote of a mysterious recluse named Billy Carver, “the hermit of Johnson Lake.” Apparently this enigmatic figure holed up somewhere nearby each winter between about 1912 and 1935, but few knew where. This was likely it. Little is known about him except that he worked summers at Brazeau Collieries and he was British. As you pass by, you may understand why he entertained few visitors: this place is right on the way to nowhere.
In early summer the creek is big enough to make crossings bothersome. Animals may develop traverses above the stream over time and it may be worth searching for one of these rather than flail up the tree-jammed drainage. After several hours you reach the upper drainage forks, where you go right. When possible head left to the long slope of good scree facing southwest, the easiest way up. Mount Girouard looms above but is not a scramble.
Rock bands intrude near the top, so traverse left over scree and slabby ledges to make a final dash up to the summit. The summit grants a fine view of lengthy Lake Minnewanka and a daunting perspective of Devil’s Head to the north.
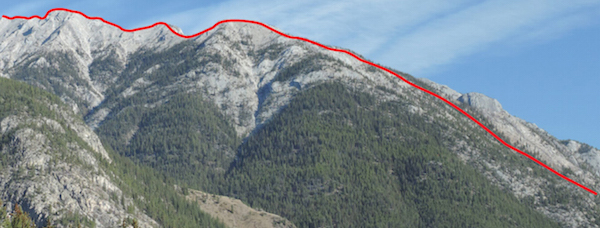
As an alternative return you can descend the entire face directly below the summit with little problem. When seen from the Banff east overpass, this face appears deceptively steep, but only a few short rock steps require detours. With good snow conditions and an ice axe this line can make for a rapid glissade to the left (north) branch of the drainage forks. Then rejoin the approach route and return the same way.
Back in 1886 or ’87, when the Earl of Kintore visited, there were many unnamed peaks around, “blocking the view,” as prairie folks might say. George Stewart, the park superintendent, changed that. He quickly named the peak for Inglismaldie Castle in Kincardineshire, Scotland, the Earl of Kintore’s seat. While it continued to block the view, it now at least had a name.
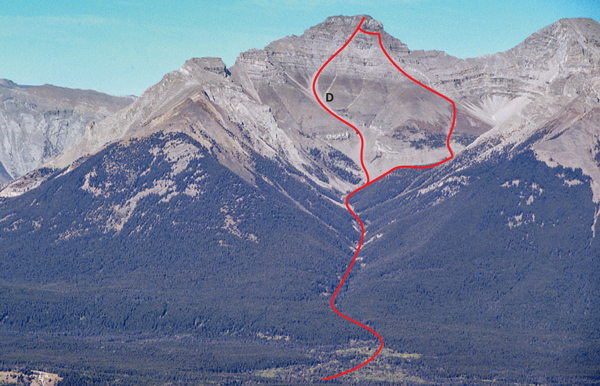
Southwest slopes of Inglismaldie. D: alternative descent.
Difficulty: Moderate scrambling via southwest slopes
Round-trip time: A very long day
Height gain: 1680 m
Maps: 82 O/6 Lake Minnewanka; Gem Trek Banff–Egypt Lake or Banff–Assiniboine
Mount Aylmer is one of the more prominent points in the Front Ranges and is Banff’s highest summit. Although the Palliser Range hides much of it, the lofty summit still projects enough to draw attention. Each season many parties make the ascent despite a long approach. Some camp at the Aylmer campsite, though fit parties will find this unnecessary. Summer restrictions due to grizzlies include a bike ban on the approach trail. Hikers must travel in tight groups of 4 or more, all must carry bear spray and no dogs are allowed. Check at the Banff info centre for the specific times when restrictions are in effect. Stiff fines apply if contravened. Some years, the upper ridge dries off by June, but a cold rain will often deposit snow high up. These upper slopes are visible from the Banff east overpass, so check before dashing off.
From the Banff east overpass, drive 5.5 km east on Lake Minnewanka Road to the concession area. Park on the left.
From the parking lot, go past the picnic tables, concession and washrooms. Continue along the lakeshore trail to Aylmer campsite at 7.6 km. This is a pleasant spot to rest and fill water bottles for the long, waterless grind ahead. Follow the signed Aylmer Pass–Aylmer Lookout trail that starts uphill of the campsite. Upon reaching a fork you have a choice. The right branch leads to where the fire lookout once stood and has some unnecessarily long switchbacks. From the old lookout site, you simply go north along the ridge. The left branch to Aylmer Pass is more pleasant, gradually rising through semi-open forest. Follow this until you emerge into the open in a large avalanche gully – about an hour of fast walking. The hiking path crosses the gully and angles steeply to the left; scramblers heading for Mount Aylmer will want to leave the trail here and instead hike up this twisting gully onto the hillside near a small hump of brown scree. The two routes join on the crest of this slope.
Continue along on the ridge as it sweeps around to the right and rises east to the summit. Ahead are three short rock bands; the middle one requires downclimbing a 5 m crack. All this can be easily bypassed. At the little saddle where darker-brown scree meets lighter rubble, traverse diagonally to the right across the talus, then follow an easier trail along the base of the rocky face and up to the next notch on the ridge, just past the 5 m downclimb. Toilsome talus leads to the top. The zigzag path is more useful on descent, but ski poles do help on ascent. As you top out, stay back from the summit cornice that often partially obstructs the view to the east.
The view is pleasing but not breathtaking. The panorama includes many nameless piles of brown rubble, although green hues of the Upper Ghost river and meadows beyond Aylmer Pass make a valiant effort to add colour. Front Range peaks typically dip to the southwest, and the eastern escarpments are usually most impressive. Mounts Inglismaldie, Girouard and Peechee across the lake are prime examples.
There are a few theories regarding the namesake. A popular one suggests that J.J. McArthur, a Dominion land surveyor, named the peak for his hometown in Quebec. Given he was the first ascender, in 1889, this explanation sounds the most plausible.
Aylmer was known as “Spirit Mountain” to Assiniboine Indians. Lake Minnewanka, or “Water of the Spirits,” was thought to be the home of a half-human, half-fish creature, and until white men arrived, Indians avoided canoeing or fishing here. Today the lake swarms with fishers, and although stories abound of big ones that got away, nothing extraordinary has been caught yet.

Aerial view of Lake Minnewanka and two approaches to Mount Aylmer. PHOTO: BRAD WHITE, PARKS CANADA
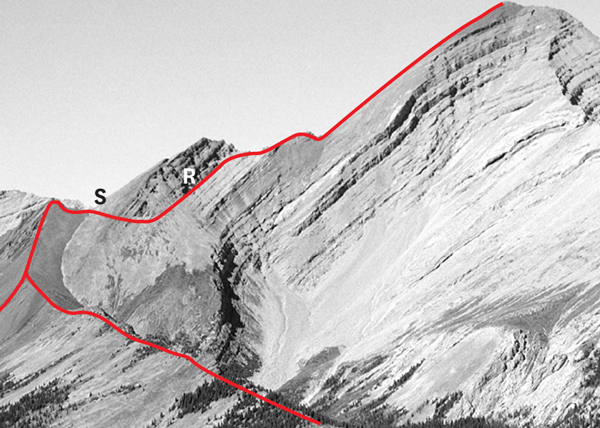
A close-up view: S: saddle; R: rock bands. PHOTO: BRAD WHITE, PARKS CANADA
Difficulty: Moderate scrambling
Round-trip time: 8 hours
Height gain: 1380 m
Maps: 82 O/4 Banff; Gem Trek Banff Up Close, Banff–Egypt Lake, Banff–Assiniboine
Cascade and Rundle are the two classic scrambles at Banff, and ever since the first ascent, by Tom Wilson in 1887, thousands have probably tramped to the top. Decades ago, locals placed a mirror on top that reflected down Banff Avenue. Canmore writer Ralph Connor once wrote an entertaining, whimsical account of finding fossil remains of a prehistoric monster at the top. The party graciously claimed to have left the remains up there for all to see. Suffice to say, it is unlikely that scramblers will discover anything so unusual, although you may see interesting rocks if nothing else. Try this peak from July on, when the snow has cleared off the fossilized monsters.
From the Banff west overpass, drive up the Norquay ski area access road. Park in lot #1, next to the Cascade day lodge.
From the north end of the parking lot, walk past the day lodge and follow the signed hiking trail to Cascade Amphitheatre for 6.6 km. It descends to cross Forty Mile Creek, then rises in endless switchbacks to Cascade Amphitheatre. Be sure to take the right branch at the fork.
Upon entering Cascade Amphitheatre, you can see the gently angled ridge sweeping skyward from right to left, straight ahead. The summit lies 800 vertical metres above, and this ridge grants the scrambler an uncomplicated route to the top.
Turn hard right at the amphitheatre to gain this ridge crest. Owing to regular traffic, there are several trails. Still, in 1997 a fatal fall occurred here when someone explored farther into the amphitheatre and then began ascending steep, snowy slabs instead of gaining the ridge the easy way.
The view from the ridge above treeline is infinitely better than the claustrophobic environs of the amphitheatre. The only obstacle you’ll meet is the false summit, visible as a big bump along the summit ridge when seen from the highway. At that point you have a choice of routes. Most people don’t even realize they are on the false summit until confronted with a drop-off and they end up climbing down over the front (south) side to regain the ridge. The correct way is now clearly marked with large cairns below the ridge crest and false summit. Note that snow clings along the foot of this bump right into July. The terrain is slabby and becomes dangerous if snowy. You should have a good, close look from the highway beforehand to be sure that this unavoidable bit is bare. Otherwise, you may have to retreat.
On your return, stay on the ridge crest until you can angle right and descend to the amphitheatre again. For your safety, please resist the urge to try other descents.
Cascade is Dr. James Hector’s abbreviated translation of an Indian name for the peak, describing the impressive waterfall that emerges from barren rock high upon the south flanks. This learned member of the Palliser Expedition labelled many nearby landmarks, including mounts Rundle and Bourgeau. A major peak north of Lake Louise bears his name.

Aerial view of Cascade’s ascent route. A: amphitheatre; F: false summit; W: wrong way! PHOTO: BRAD WHITE, PARKS CANADA

Close-up showing detour around Cascade’s false summit. PHOTO: BRAD WHITE, PARKS CANADA
Difficulty: Moderate by west-southwest gully; short, difficult chimney by south ridge
Round-trip time: 11–13 hours
Height gain: 1250 m
Map: 82 O/4 Banff;Gem Trek Banff Up-Close, Banff–Egypt Lake, Banff–Assiniboine
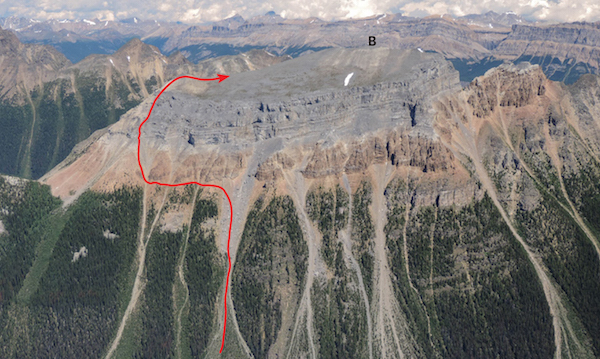
Though infrequently ascended, Mount Brewster is easily seen from the Trans-Canada Highway when approaching Banff from the east. The peak rises between Mount Norquay and Cascade Mountain at the southern end of the Vermilion Range. The simplest way up is via a gully system on the west-southwest side above the Mount Fifi backcountry campsite on Forty Mile Creek. Try from about mid-June on. Ice axe needed in early season.
Park at the Norquay ski hill as for the Cascade Mountain ascent. Walk past the lower lodge and lifts. Shortly before the last lift a signed trail for Forty Mile Summit and Mystic Lake branches leftward uphill. This wide track sees much horse use and is unpleasant if muddy. Go left at the next junction, again choosing Forty Mile Summit. The path descends, losing 60 m, and crosses Forty Mile Creek to the north side, one hour from the start.
If you are interested in a more challenging ascent route, a small drainage immediately past the bridge leads up into a basin on the south end of the peak. From here the ridge above on the left can be followed until it is apparent that a steep rock band blocks the way to the summit. On our ascent, we traversed the slope and gained a short, steep 8-m-high chimney (difficult scrambling) to overcome the rock band. This chimney still held snow in mid-June. This ridge can be followed to the summit without difficulty.
An easier ascent option is the open west-southwest gully, which we descended without problem. Continue along the Forty Mile Creek trail to a campsite at 923766, about 8.5 km and two hours from the trailhead. Debris from this gully above the camp is evident beside the trail just as you reach the campsite. Head uphill through forest here onto an open slope and into the gully. An impressive 20-m-high boulder perches on the steep slope left of the gully, at 926769, about 170 m above the trail. This boulder is large enough to be visible from the north side of the Edith Pass hiking trail, far to the south. Pass the boulder and continue into and up the obvious gully, ascending debris and slabs higher up. Follow the path of least resistance to the summit. Expect exceptional views that include the Goodsirs and mounts Assiniboine, Hector and Balfour.
Not surprisingly, you return the same way. Our descent rewarded us with fabulous long glissades – ice axe needed. Expect a long day unless camping nearby.
John Brewster and family settled in Banff in 1886 and built a family empire that included guiding, outfitting and eventually transportation.
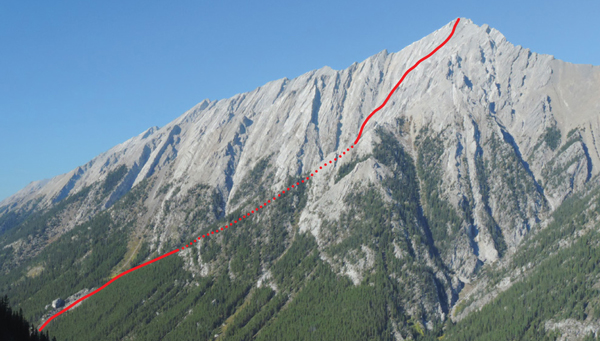
Ascent route for Mount Brewster’s west-southwest gully as seen from near Edith Pass. The dashed line indicates the gully. Note the huge boulder near the start.
Difficulty: An easy scramble via west slopes
Round-trip time: 6–10 hours
Height gain: 1570 m
Maps: 82 O/4 Banff; Gem Trek Banff Up Close, Banff–Egypt Lake, Banff–Assiniboine
Mount Rundle is possibly the most popular scramble around Banff, if not in all of the park. From the west its unique shape demonstrates a classic dip-slope or writing-desk geological formation. When snow-free you’ll encounter little trouble ascending the gentle west slopes, which offer a fine view of beautiful Bow Valley and distant summits. Although the route is straightforward, this alluring mountain has, over the years, contributed more than its share of calls to Parks for rescue service. The windswept route is often clear of snow and in shape by May.
Follow Spray Avenue in Banff toward the Banff Springs hotel and take the Bow Falls–golf course turnoff just before the hotel. Park at Bow Falls.
From the parking lot, walk across the bridge to a trail that cuts back sharply to the right immediately past the first golf course green (trail sign). Minutes later a more detailed sign shows the Spray River and Rundle trails heading left. The signed Rundle trail diverges left again soon after this.
Rising gently through pine and fir forest, the first section is typical of eastern slope valleys in the Rockies. Before long, you grind up a series of switchbacks through the first cliff band. Thoughtless twits are causing serious erosion here by shortcutting these switchbacks on descent. This ruins the trail – please don’t take shortcuts! Just past the switchbacks (1.5 hrs.), the trail splits. The left-hand path goes to the first peak; the trail to the second (main) peak continues straight ahead.
The lower first peak is more technical and sees fewer ascents. From the junction, the trail rises steeply to treeline and a vertical cliff band. Just before the last trees, angle to the right on a narrower trail. This path traverses across well below the cliffs and crosses two gullies. You then turn left and follow the path to the right of cliffs and beside another gully. The cliff band is overcome by ascending some 50 m of downsloping, rubble-strewn slabs. This is the crux and it must be dry; scramble up carefully. For your return, be sure to look back and note the exact descent spot, as there is only one possibility.
This higher peak is more popular. Continue past the junction to where the trail emerges into the Central Gully, a large watercourse that reveals the upper mountain far above. DO NOT head up this gully. This is wrong. The route lies almost directly across this gully and enters forest. Conspicuous arrows clearly mark the proper route.
Continue through forest and up a feature called the Dragon’s Back. This is a section bordered by the Central Gully on the left and a similar gully on the right. The last few hundred metres of scree above are tediously loose – rubble without a pause. If ever a route required ski poles, this is one. On a hot summer day when heat waves shimmer off these barren slopes, you’ll truly appreciate water, a shade hat and a good pair of sunglasses.
Mounts Assiniboine and Temple are two of the bigger peaks you’ll see from on top. When you’ve seen enough, return the same way. If you’re contemplating a traverse over to the first peak, be aware it is difficult, exposed and NOT A SCRAMBLE. Climbing equipment and experience are recommended. Below the Dragon’s Back, watch for the arrows so you don’t descend too far before turning right to cross the Central Gully. Cliffs lie below and park wardens dislike rescuing inattentive novices from there.
Reverend Robert Rundle was a Wesleyan missionary and early tourist who visited Banff in the 1840s. Although he never actually attempted this peak, he apparently did try one somewhere farther east.

Routes to first and main peaks of Mount Rundle as seen from the Sulphur Mountain gondola. C: Central gully; D: Dragon’s Back.
Difficulty: Moderate scrambling by the south ridge; difficult by the ski hill route
Round-trip time: 6–9 hours
Height gain: 1100 m Big Gully; 1265 m South Ridge
Maps: 82 O/4 Banff; Gem Trek Banff Up Close, Banff–Egypt Lake, Banff–Assiniboine
Mount Norquay has two scramble routes in common use: the South Ridge route and the ski hill (Big Gully) route. The latter has been the most popular, and since the opening of Norquay’s via ferrata in 2014, Parks Canada has implemented certain procedures for scramblers to follow. This is to ensure the safety of scramblers as well as patrons paying to be guided up the via ferrata (a specific ascent route with continuous fixed steel cables that users are attached to while ascending). The Big Gully scramble route is also the descent route from the via ferrata, and due to this a helmet is required. Try from June on. Note: You may want to check with Parks Canada visitor services in case this access policy has changed.
From the Banff west overpass, drive up the winding Norquay ski area access road for 6 km and park on the left in the lot. The base station lies straight ahead.
The normal scramble route ascends the big gully just slightly right of the Cliffhouse bistro or upper lift station. Parks Canada prefers that you purchase a lift ticket and avoid any potential wildlife conflicts in reaching the Cliffhouse, but whether you do or not, you should check in with the base station (opens at 08:30) and tell them you will be scrambling up the Big Gully route. They will inform the via ferrata mountain guides by radio and this will help ensure safe group management and coordinate public use. Once you reach the Cliffhouse, depending on when you start, you may have to wait until via ferrata parties (via fer-rats!) finish descending. Start early to avoid this.
The easiest start is directly behind the Cliffhouse, close to the via ferrata. A more challenging option (if available) is to follow the path from the right-rear corner leading to a sometimes wet rock wall. This short, strenuous wall is climbed using solution pockets, and some consider the upper part to be the crux of the entire ascent. Beyond that wall, simply follow the trail up the big gully to the east ridge, taking care not to drop rocks on parties below.
Although you have a fine view from the east ridge, it is disheartening to see the true summit still a considerable distance away to the west. As well, you must lose and regain elevation along the way. Fortunately, the route crosses a high col between the east and west peaks and it is not as far as it looks.
Continue north along the ridge toward the crux, 10 minutes away. A trail has developed that bypasses this lower, east summit on the left (west) side well below the ridge if you are only interested in the higher, west summit. This also eliminates the exposed crux, a difficult bit of scrambling before reaching the east summit. There you must climb up and across a downsloping ledge that tilts to the right toward a huge drop-off. This must be dry, as a slip could be fatal. Scramble leftward up a ramp beside a steep wall and ascend this wall in a corner. The flat spot above is a logical place to snack while you study the rest of the route.
Continue past the east summit and hike across the col. Where the col meets Norquay’s west summit mass, angle to the right, crossing a gully which hopefully will be free of snow. At least one accident has occurred here due to a slip and you may need an ice axe in early season. Angle up and across easy ledges to the summit ridge, then scramble south to reach the true summit in minutes. If ledges to the right of the gully hold snow, an alternative but more difficult line can be taken directly upward when dry.
The most impressive view lies to the northwest, where the striking limestone fang called Mount Louis pierces the sky. Climbers are drawn by several technical rock routes on the south side. The peak was first ascended by the famous guide Conrad Kain along with Albert MacCarthy in 1916, the same party that made the first ascent of Mount Robson.
Most parties descend the same way, although the gully between the east and west summits has been descended to the highway. A gate on the east side of the south ridge exits the 3-m-high animal fence.
This route avoids the hubbub of the ski hill and there are two ways to begin. From the Banff west overpass on the Trans-Canada Highway, drive 3.4 km west and park on the shoulder. A nearby gate provides access through the animal fence to the south ridge.
The other option is to drive farther west and turn onto Bow Valley Parkway. Follow the parkway about 500 m and park at the Fireside picnic area. From the picnic area, hike Edith–Cory Pass trail for about 1 km until the route makes a sharp bend left and heads north (949704). At this point, turn right and follow a faint trail for 275 m downhill until you are under a power line. Hike east beneath the power line to a set of power poles clearly visible against the sky. This is Norquay’s south ridge (about 957703). Once you’re on the ridge you simply ascend through open forest and scramble up the ridge, which leads to the west (true) summit. The ridge makes a few dips en route to the high point at the far (north) end. This route is not difficult but has slightly more elevation gain than the Big Gully route. Most parties descend the same way.
John Norquay was a popular premier of Manitoba who climbed this peak during his time in office (1878–1887), although we are not sure he made the true summit. We do know he did not ride the lift.

Mount Norquay Big Gully ascent route as seen from Cascade Mountain. C: crux; E: east summit; W: west (true) summit; S: South Ridge route; L: upper lift terminal. The left-hand line is an easier start.
Route to the west summit from the saddle between the east and west peaks.
Mount Norquay South Ridge route as seen from the highway west of Banff.
Difficulty: Moderate to difficult scrambling for each peak
Round-trip time: 6–10 hours
Height gain: 1120 m
Maps: 82 O/4 Banff; Gem Trek Banff–Egypt Lake, Banff–Assiniboine
Mount Edith sports three separate summits offering interesting and sometimes exposed scrambling. Access is by a popular hiking trail. A dogtooth mountain like its northerly and more famous neighbour Mount Louis, Mount Edith is an uplift of Devonian-age Palliser limestone – a 500-m-thick formation of sound rock prized by climbers. Palliser rock forms great grey cliffs on many mountains, and fortunately it does not present a barrier to scramblers on this one. Dry conditions and a helmet are recommended. Try this from June on.
From the Banff west overpass, drive west to Bow Valley Parkway and follow it for 300 m. Turn right and continue to the Fireside picnic area, where the trailhead for Cory–Edith Pass is found.
Hike 6 km along Cory Pass trail (left at the only fork) to Cory Pass. A worn path then leads east (right) up scree to the north and highest peak 200 m above. The top is guarded by a band of cliffs, but two chimneys break through this band. They emerge close to one another. The first (steeper) is on the northwest side and may be seen from the pass. A less visible chimney –hip-width, less steep, and easier – starts a short way south of the first chimney and faces south, not west. At the summit, cross a notch to reach the cairn. Mount Louis is brilliantly revealed to the north.
Many people seem to find the 20-minute scramble to the slightly lower Centre Peak short but entertaining. Go along the west side of North Peak, then gain the connecting ridge. After that, either traverse leftward (exposure) to gain a scree gully to the summit or scramble along on top of the ridge the whole way. The ridge has two or three short tricky moves but is safer if the traverse option is not bare and dry.
You can descend Centre Peak via a deep gully on the south side toward the South Peak (helmet advisable). Turn right and continue down a trail to Cory Pass trail as for the South Peak descent.
South Peak is the most difficult of the three and ascends the climbers’ descent route on the airy west side. The route begins just below the Centre–South col in a north-facing gully (trail). This spot can also be reached from Cory Pass trail by various paths up steep, open slopes.
Scramble up steepish rock in the gully for about 5–8 m toward a narrow tunnel. Alternatively, there is also an exposed ledge that detours around to the right. Unless size (your size!) is a factor, the tunnel is probably better. From the top of the tunnel, the idea is to work your way across ledges to the right (south) without gaining too much elevation. Notice trails and cairns. Scramble up a short (5–7 m) steep bit and angle right so as to intersect the south ridge. The correct way is not too exposed, but if you’re off route a slip could be deadly. Good routefinding is important. You should look back to recognize your route periodically.
Getting onto the south ridge may involve a strenuous heave up on two rocks wedged behind a big vertical flake. You can also scramble around to the right of this flake. The remaining short bit of the south ridge is exposed, so use care. Allow 40–60 minutes round trip from the col.
Return to the Centre–South col via the same route. From there, follow a beaten path beginning closer to Centre Peak, which avoids downsloping slabs in the middle of the gully below. This takes you back to Cory Pass trail.
Edith Orde accompanied Lady Agnes Macdonald, wife of Canada’s first prime minister, on her 1886 journey through the Rockies upon completion of the transcontinental railway.
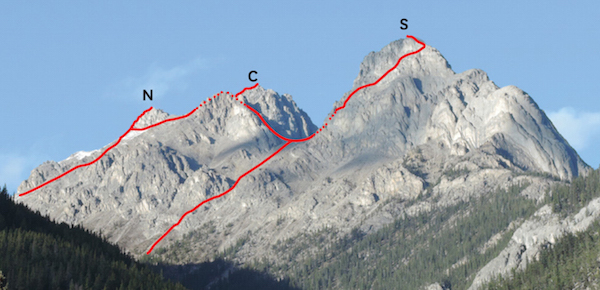
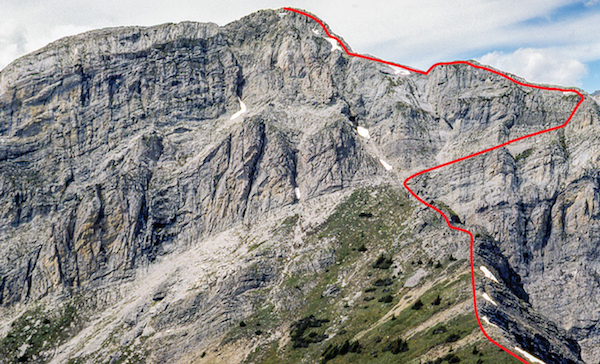
Mount Edith routes as seen from the highway. N: North Peak; C: Centre Peak; S South Peak.

Mount Edith, showing approximate routes for North, Centre and South peaks. Cory Pass is at lower left.

Mount Edith South Peak, showing approximate route. T: tunnel.
Difficulty: An easy to moderate scramble via the south ridge
Round-trip time: 6–10 hours
Height gain: 1370 m
Map: 82 O/4 Banff; Gem Trek Banff–Egypt Lake, Banff–Assiniboine
Mount Cory is a straightforward scramble in the Banff area that provides a fine view. From the Trans-Canada Highway two notable features distinguish the peak: a 300 m vertical groove in the southwest face that climbers call “Cory Crack”; and a gaping, dark cave to the right of Cory Crack known as “Hole in the Wall.” The lower flanks offer several technically difficult rock-climbing routes on firm limestone. Located on the south side of the peak are three parallel treed ribs rising to half height and separated by drainage gullies. The right-hand rib, identified by light-coloured, shaley cliffs visible from the road and a deep ravine to the right, is a straightforward route up. Try this ascent from mid-June on.
From the Banff west overpass, drive west on the Trans-Canada Highway to Bow Valley Parkway. Follow the parkway for 1.9 km (1.6 km west of the Fireside picnic area) to a pull-off spot on the shoulder.
The pull-off is at the base of the correct rib. Walk across the hydroline clearing and immediately turn right on a good trail that rises through forest onto the rib crest. Cairns appear in places and the way is obvious. Farther up, this rib eases and descends slightly to a small plateau, an ideal spot to enjoy a view of the Bow Corridor.
A further 2 hours’ plod up the ridge, interrupted only by the odd little “dip,” brings you to the more southerly of Mount Cory’s two equally high summits. The north peak is easily reached in a further few minutes, although a cornice sometimes stops early season visits. On return, it is possible to descend on the east side from between the summits to gain Cory Pass trail, or from part way down the northwest ridge to reach Gargoyle Valley. Most parties simply return the same way.
Like so many mountains in the Rockies, Mount Cory, in typical bureaucratic tradition, exalts another politician. William Cory was deputy minister of the Interior from 1905 to 1931.

The long south ridge of Mount Cory leads to a double summit. PHOTO: BRUNO ENGLER
Difficulty: A rugged approach but an easy scramble via westerly scree slopes
Round-trip time: 9–12 hours
Height gain: 1350 m
Map: 82 O/4 Banff;Gem Trek Banff–Egypt Lake or Banff–Assiniboine
As of 2012 Cockscomb Mountain, west of Banff, had seen fewer than two parties per year, probably because the summit is not obvious from either the Trans-Canada or Highway 1A. Ranger Creek gives access to easy west-facing slopes but this drainage is not particularly visitor-friendly. Since the 2003 burn and the 2013 flood, deadfall and rock debris make the approach more challenging than the actual ascent. However, solitude should be a certainty. In the upper canyon you must hike up the bouldery creek bed, and summer streamflows would present a problem. Save this for September and October when Ranger Creek is low. A headlamp might be more useful than an ice axe in late season.
Drive to the Sawback picnic area on the north side of Bow Valley Parkway (Highway 1A), 11 km west of Banff and 12 km east of Castle Junction.
From the picnic area hike northwest through the forest across the creek and gravel debris, then head upstream, staying left of it all the way to the canyon. The best animal trails here lie barely within earshot of the creek. Once in the canyon, stay on the left for much of the approach up Ranger Creek. About a third of the way along, a trail leads up onto the canyon shoulder and you must descend on a rickety ladder of lodgepole pine. Treat the ladder with suspicion as it ages; it was old in 2013. Without it you’ll need to wade the creek. A notable washout on the left comes down from behind Mount Ishbel, and farther on, mossy waterfalls flow down on the right side. Soon after these you’ll likely be boulder hopping.
After 2.5–3 hours and about 6.5 km the drainage opens up at 877782. Watch carefully on your right for the long, narrow gully leading to a high col between Cockscomb Mountain and an unnamed point. If you’re too focused on the bouldery creekbed you could miss it. On my second ascent I grovelled up this ever-steepening rubble right to the col. This is not recommended, especially when it is frozen or snowy. Instead, proceed just a short way up this gully, then easily ascend moss and treed slopes on the left. Continue straight uphill to gain the northwest ridge, which leads easily to the false summit and avoids much tedious rubble.
From the false summit, the true summit is a 10-minute walk. Views include dominant peaks like mounts Temple, Assiniboine and the Goodsirs, as well as a glimpse up the Cascade River valley to Flints Peak.
With a helmet, the steep, confined gully could suffice as a descent route, so long as it is dry. To gain it, simply tramp downhill (southwest) from the false summit to the col. Otherwise, return via your ascent route.
Cockscomb refers to rock formations on the peak that resemble a rooster’s comb.
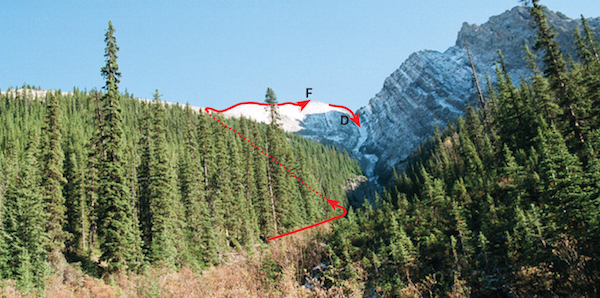
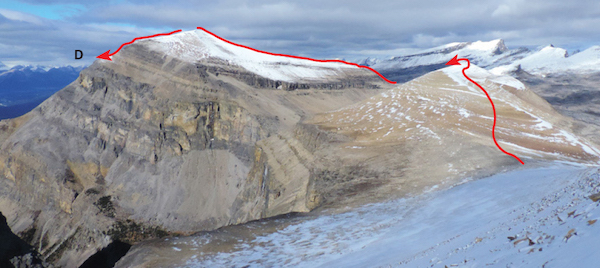
Cockscomb ascent route as seen from Ranger Creek in 2012. The gully terminus now has much more rock debris. F: false summit D: alternative descent.
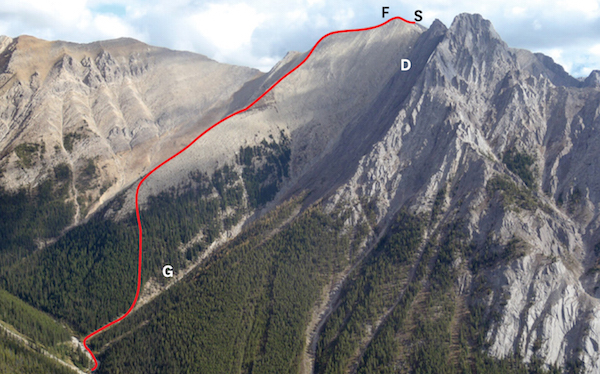
Cockscomb route as seen from Mount Ishbel. G: gully; F: false summit: D: alternative descent; S: summit.
Difficulty: An easy scramble via west slopes
Round-trip time: 7–10 hours
Height gain: 1500 m
Maps: 82 O/4 Banff; Gem Trek Banff–Egypt Lake or Banff–Assiniboine
Bourgeau Lake is a popular Banff area day hike that provides an easy but long approach route to Mount Bourgeau. The peak was first ascended in 1890 by surveyor J.J. MacArthur and packer Tom Wilson, although they probably did not use this approach. The route used today visits no less than three distinctly unique mountain tarns along the way and is one of the prettier day hikes around Banff. This area records heavy snowfall, and in early summer you can often find lingering snow patches near the second lake. These slopes are ideal for practising ice axe self-arrest and make for a great glissade too. Try from late June on.
Park at Bourgeau Lake parking lot on the southwest side of the Trans-Canada Highway, 2.9 km west of the overpass for the Sunshine ski area.
From the parking lot, follow the hiking trail for 7.5 km to Bourgeau Lake. Upon reaching this clear body of water, follow any of the paths down the right-hand side toward the west end and the inlet stream. The easiest way is to hike along the right side of this rushing stream to reach the high alpine basin lying to the west at 835655. This glacially carved cirque is far more attractive than Bourgeau Lake itself, yet the majority never see it. Picturesque tarns and meadows invite you to relax and enjoy. Harvey Pass, the low saddle to the south near tiny Harvey Lake (838651), reveals expansive views of alpine meadows. Beyond the scars of Sunshine ski area rises magnificent Mount Assiniboine, a prized jewel among alpinists. More importantly for the scrambler, though, this pass lies next to the gentle west ridge leading to Bourgeau’s top.
A pleasant walk up the ridge leads to the broad summit 400 m higher. Loose scree is practically non-existent on this slope, and many varieties of delicate wildflowers bloom through much of the summer. In complete contrast to the pastoral panorama, assorted manufactured paraphernalia including a building clutters the summit. Despite these intrusions, there is still plenty of room for wandering around the expansive plateau.
Mount Ball is the hulking snowcapped peak directly to the west, and despite its challenging appearance from here, it too is a scramble. To the north lies the Sawback Range. These long, uplifted rock ridges have been sculpted by about 350 million years of erosion to form textbook examples of sawtooth mountains.
Dr. James Hector of the Palliser Expedition named this peak for Eugène Bourgeau, the botanist who accompanied the mission on explorations through the Rockies during 1857–60. Highly esteemed in scientific circles, Bourgeau quickly won the admiration of his fellow expedition members during their travels.

Bourgeau’s gentle west ridge ascent route starts at ice-bound Harvey Lake. Also visible is the approach route from Bourgeau Lake (bottom left).
Difficulty: Moderate scrambling via northwest side
Round-trip time: 12+ hours, a long day
Height gain: ~1400 m, including elevation loss and regain
Maps: 82 O/4 Banff; Gem Trek Banff–Egypt Lake or Banff–Assiniboine
The Monarch is a pyramidal summit seen from Healy Pass and the Sunshine ski resort and sits just within Kootenay National Park. The peak reigns over popular wildflower meadows complete with lakes and larch trees but is not ascended frequently. When snow-free, a gully and rubble slopes on the northwest side offer a reasonable way up. The only catch is the 10-km-long approach. A backcountry campsite at km 5.5 on Healy Creek can be reached the day before and would work out well. This area near the Continental Divide gets heavy snowfall, and I discovered first-hand that if the ascent gully has not cleared, rockfall and small avalanches make it dangerous. To save yourself a second attempt, try from late July or August on. Helmet and ice axe recommended.
From Banff drive 8 km west on the Trans-Canada Highway to the Sunshine ski resort exit and follow the Sunshine access road south for 9 km to the gondola station. Healy Pass trail starts immediately behind this building at a small Parks Canada info kiosk near the creek.
The initial 10–15 minute hike follows the winter ski-out. At the Healy Pass/Egypt Lake trail sign, descend and cross a bridge. Pass a backcountry campsite at 5.5 km; go another 500 m to the Simpson Pass trail intersection. Turn left and hike to Simpson Pass, which offers early views of The Monarch. Now follow the trail for Eohippus Lake, which heads up to the right into forest. Go left at a signed junction. The Monarch rises above Eohippus at the south end of a long, open ridge called Monarch Ramparts that runs 3 km northwest to Healy Pass. If desired you can shortcut through forest and meadows at about 817579 after passing a pond and gain The Ramparts close to the north ridge rather than go to the right to Eohippus Lake. Otherwise, continue to the lake, where a trail at the west end leads up onto The Ramparts.
Where The Ramparts meet the north shoulder of the peak, go up a larch slope, then drop down around the mountains’ north buttress below steep walls toward a big rubble cone fed by a narrow gully. Allow 3+ hours to here. This descent entails a loss of perhaps 100 m elevation. Paw your way up the rubble cone and up the gully. Narrow and loose at first, at half-height it transitions to a wide, curving slope and is still loose. The route will be obvious as you angle left toward the summit, which lies near the left skyline. Expect no real challenges if snow-free but be wary of objective hazards from cliffs on the right. A helmet is recommended. Allow about 7 hours from the trailhead.
The summit grants a stunning scene of meadows, peaks and ponds, but given the long trip back it may be a short visit and require a headlamp on return. September is an especially gorgeous time, with golden larches in abundance. Return the same way. The rubble descent is quick, but everything after that will seem notably longer than necessary.
According to Canadian Mountain Place Names, the peak is so named because it appears dominant over its neighbours.

A late July afternoon view of The Monarch from The Ramparts. From Eohippus Lake the route comes over the shoulder and descends to a rubble cone. Healy meadows and Eohippus Lake would be to the left.

Topping out on The Monarch, with Healy meadows and many ponds far below. Healy Pass is at far left. The Simpson Pass approach and the shortcut between two ponds is shown here.
Difficulty: Two difficult steps via northwest ridge
Round-trip time: 6–12 hours
Height gain: 1500 m
Maps: 82 O/4 Banff; Gem Trek Banff–Egypt Lake or Banff–Assiniboine
Pilot Mountain is a striking Bow Valley landmark, highly visible from the highway. The ascent requires a little more perseverance and routefinding than most other Banff area scrambles. While you won’t find a nice little path to the top, it is seeing more ascents and the route up is reasonable. Carry an ice axe for early season trips. Try it from late June on.
Park in the Redearth Creek lot on the south side of the Trans-Canada Highway, 19 km west of Banff west overpass and 10 km east of Castle Junction. Cycling is allowed to km 10; watch for horse traffic.
When I ascended this peak long ago, we walked up the Redearth fire road for less than an hour to the first avalanche slope, which was obvious then. Over time, trees steadily grew in, making the road harder to identify until in 2012 a massive avalanche wiped it clear again. This slope was my original route recommendation; Bob Spirko used a different approach with less sidehilling and more scrambling. Both are described here.
Hike or bike the fire road to the first avalanche slope, about an hour on foot, at 806736. Ascend this slope to treeline and angle to the right, going through or around the rock band toward the right side, then over a shoulder. Stay well below the major rock band and traverse to the right across a northwest-facing basin to reach the northwest ridge. There you can easily overcome the rock band to the right.
Continue along the fire road past the first avalanche slope for some 15 minutes, or 1.2 km. En route you pass a conspicuous 2-m-high boulder on the right side, then a small pond on the left, and reach an inconspicuous drainage at 800727 (as of 2014). A short distance farther, a cairn or flagging on the left indicates a trail heading into mossy forest. It stays above and to the right of the drainage. Higher up it crosses a rubble field, then a steep side gully, and continues on through forest to emerge below a vertical rock band. Detour right and bushwhack through trees to reach a series of ledges traversed from right to left, crossing flowing water. Don’t cross to the left side too soon – the higher, wider treed ledge is preferable. Above here it opens up. Angle right to reach the northwest ridge, which from here resembles a pinnacle. Easily overcome the rock band to the right.
Above the rock band, scree leads to cliffs and a 10- to 15-m-high chimney–gully behind a huge detached flake, a logical spot to go up. On our ascent in early June one year, this big groove was still a little snowy, although we were able to bridge across awkward spots. An ice axe and perhaps even crampons might be required in early season some years.
At the top of this chimney, move horizontally left on a ledge to easier, less-exposed terrain and scramble higher. The crux is at two short, steep walls just below the top, and then a walk leads to the broad summit plateau. The view of Copper Mountain’s scramble route is ideal from this location.
As an alternative descent route, or to bag nearby Mount Brett (2984 m), you can drop down into the seldom visited glen southwest of Pilot Mountain. Retrace your steps to the bottom of the chimney at the base of the northwest ridge. Angle down west-facing rubble slopes through short rock bands into this pristine valley. To reach the Redearth fire road from here, follow the faint, bushy gully northwest to emerge near the second avalanche slope, at 797725.
If you are willing to lose hard-won elevation down Pilot’s west slopes, it is possible to continue over and scramble up Mount Brett as well, eliminating the need for a return visit. However, the ascent is not without challenge. Compared to just a few short scrambly parts on Pilot, the scrambling on Mount Brett gets steadily more difficult and sustained as you go. Regardless whether you downclimb the route or detour around some of it, the day will be long and tiring. Bagging Brett adds at least 750 m of elevation gain to your trip, so it is likely that Brett and you will both be bagged. The extension goes as follows.
From the chimney on Pilot, angle sharply left (southwest) to descend the second scree slope to the left, which breaks through the rock band. The farther left you go on descent, the less elevation you’ll have to regain. Descend easily to the glen below. Cross piles of rock debris and patches of green to a feasible place to attain Mount Brett’s northwest ridge. An obvious dip in the ridge is one such spot. Once you reach the ridge, turn left and head southeast. The route begins innocently enough, but the challenge soon increases, requiring a lot of hands-on scrambling on a sometimes narrow ridge. Expect two cruxes near the top which can be bypassed but are often tackled directly. From the second crux you are just minutes from the top.
On descent, low-angle rubble on the west slopes can be used partway to avoid trickier bits. Be sure to contour back around right as you descend. The only other option is to descend the ridge. Once back on the broad lower shoulder, drop down into the glen and hike northwest down the faint, bushy drainage to reach the Redearth fire road. Note: If ascending Brett from the fire road, this drainage is at 797725, just 5 minutes’ walk from the Spirko Pilot Mountain approach. Watch for roadside cairns and several large, pointy boulders on the uphill side.
The familiar outline of Pilot Mountain helped guide early travellers along the Bow Valley. Dr. R.G. Brett once ran the Sanatorium Hotel in Banff and later served as Lieutenant-Governor of Alberta from 1915–1925.
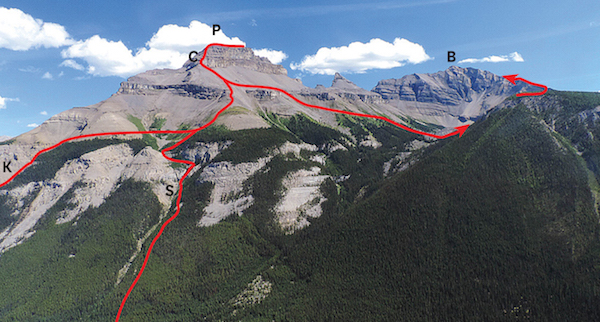
Pilot Mountain and Mount Brett routes as seen from lower slopes of Copper Mountain. K: Kane approach; S: Spirko approach; P: Pilot Mountain; B: Mount Brett; C: chimney.
Difficulty: A moderate scramble
Round-trip time: 6–9 hours
Height gain: 1425 m
Maps: 82 O/4 Banff; Gem Trek Kootenay National Park or Banff–Assiniboine
The Redearth fire road provides access to popular Egypt and Shadow lakes and passes right beside Copper Mountain, but the peak still doesn’t see that many ascents. It is neither a major peak nor a major undertaking, especially if you use a bike on approach. Try from mid-June on.
Park at the Redearth Creek lot on the south side of the Trans-Canada Highway, 19 km west of the Banff west overpass and 10 km east of Castle Junction. Cycling is allowed to km 10; watch for horse traffic.
The most direct way up Copper Mountain is to wade Redearth Creek and ascend a long, open avalanche slope on the southeast side at 790725. Hike or bike 6.1 km up the Redearth fire road to 794721, 20–25 minutes’ walk past the first avalanche slope on the left. Watch for flagging. If you reach a clearing on the right allowing a first glimpse of the peak, you’re probably too far. From the correct point simply tramp down through mossy forest for a few minutes, wade Redearth Creek (calf-deep in late summer) and head up the open avalanche slope straight ahead. During runoff the original route option below can be used.
Original route: Continue to Lost Horse campsite at 7.2 km. Walk north through the campsite and follow a promising bit of trail heading downvalley to the first open slope. This slope leads to a loose gully left (south) of a huge, pointy pinnacle looming above, but due to looseness it works better for descent, so keep traversing. A stint of forest follows where you’ll cross rock debris from two separate drainages. There are snippets of animal trail in places, especially if you resist the urge to gain height as you go. After the forest, some 30–40 minutes from the campsite, emerge onto a wide, open avalanche slope as mentioned above. It runs from the summit clear down to Redearth Creek. The grassy ridge in the middle of the slope gradually steepens as you ascend. At half-height, angle right and gain the adjacent, rubbly gully. It rises diagonally to the right below slabby walls on the left and leads to the broad summit, granting a unique view of nearby Castle Mountain.
Both of two gullies south of the broad summit offer descent routes and are easily reached. The first is the aforementioned gully alongside (south of) the pinnacle, just minutes away down the ridge. It is the steeper of the two and emerges downstream of the campsite. The second descent gully is farther south and emerges just upstream of the campsite. This is the preferable descent route if snow remains.
Prospector Joe Healy once discovered copper in this area, hence the name.

From Redearth Creek, a much foreshortened view of the open avalanche slope and route to the summit. P: Big pinnacle.
Difficulty: An easy scramble via northeast side
Round-trip time: 7–11 hours
Height gain: 1400 m
Maps: 82 O/5 Castle Mountain; Gem Trek Kootenay National Park or Banff–Assiniboine
Castle Mountain has caught the imagination of Bow Valley visitors since the earliest presence of humans. Although it looks steep and intimidating from the road, it is easily ascended from the back side. The approach is a pleasant and popular hike. When James Hector saw the mountain in 1858, he noted its suggestive appearance, named it accordingly, and the title sufficed for nearly a century. Then, with the stroke of a bureaucrat’s pen it was changed to Mount Eisenhower to commemorate the post-war visit of US president Dwight Eisenhower. In 1983, because of public pressure, the original name was rightfully restored. The isolated pinnacle at the southeast end is now called Eisenhower Tower, while the cairn and register are on a higher point slightly northwest of the tower. The highest point actually lies some 3 km northwest at 720863, but it is seldom visited. Try this outing from July on.
Drive to Castle Junction 31 km west of Banff via either the Trans-Canada Highway or Bow Valley Parkway (Highway 1A). Park at the trailhead for Rockbound Lake, on the north side of the Bow Valley Parkway 300 m east of the Castle Junction service station and across from the youth hostel by the warden residence.
From the parking area, follow the hiking trail for 8.4 km to Rockbound Lake, passing Tower Lake on the way. Rockbound Lake, enclosed by steep walls of dolomite and limestone, lies in the centre of the Castle Mountain syncline, a product of the geologically significant Castle Mountain Thrust. The fault line is slightly east near Helena Ridge. This transitional feature separates the older Main Ranges of the Rockies from the younger Front Ranges.
Dipping strata of Helena Ridge provide access to the first part of the route. Hike up the lower flanks on the east side of Rockbound Lake and go through a gully in the rock band close to a large knoll at 746856. Although a beaten path winds up and over this hump, you can also skirt along the foot of it. Circle the lake counterclockwise across a broad, grassy terrace. This spacious ledge with its trickles of meltwater sits on limestone formed during the Middle Cambrian period, 530 million years ago.
Where the grassy terrace peters out, a short scramble up a gully leads to the upper bench, which slopes gently toward many high points crowning the 4-km-long massif. If you plod along the crest, chasms reveal glimpses of the Bow Valley framed by buttresses of ancient Eldon limestone. While the view is more scenic along the crest, the least tedious route is to stay low where the terrain is flatter, then angle up rubble to the right once you’re close to the final slopes.
From the top there is an excellent view along the Bow Valley, with summits of the Lake Louise group dominating the skyline. If you are energetic, it is possible to traverse the entire mass of Castle Mountain end to end in a long day. As it is difficult to descend at the northwest end, you are advised to head northeast from the highest point at 720863, hike toward Stuart Knob and descend scree slopes back to the terrace above Rockbound Lake. You could also traverse farther around to include Helena Ridge. This all-inclusive excursion is recommended for scramblers with boundless energy and enthusiasm for trudging. Expect a very long day!
Stuart Knob is the pointy little peak flanked by huge talus slopes behind Castle Mountain and is readily apparent from the Trans-Canada Highway west of Banff. Lying 1.5 km northwest of Rockbound Lake, it is easily ascended by rubble slopes beyond the grassy terrace above the lake and knoll at 746856. Allow 2–3 hours return from Rockbound Lake. Wander around left to the opposite side and scramble to the top, which is actually higher than Castle Mountain. Who would have guessed?
For scramblers wanting a better view but feeling not quite up to the lengthy tramp up Castle Mountain, there is little difficulty in attaining the highest summit of Helena Ridge. This 5-km-long ridge lies north and east of Rockbound Lake and is a wee bit higher than Castle. Try from July on.
From Rockbound Lake a wide gully gives access to the top at 745865 via gentle southeast slopes. Only moderate challenges are involved in continuing to a neighbouring vantage point 1 km east and 75 m lower. The views include Bonnet Peak directly north and Mount Ball to the south. From either position you get a fuller appreciation of the considerable mass of Castle Mountain but without the drudgery of walking it.
Although scree on this ascent is the tedious ski-pole type, keep in mind that this is not just any old scree – this is 530-million-year-old scree. What caused it? A geologist might say a movement known as the Castle Mountain Thrust is at fault.
TV Peak is the unnamed point much farther along the Castle Mountain massif at 708893. You can reach it in about 1.5 hours from Stuart Knob. This unnamed peak lying northwest of Castle Mountain eclipses both Stuart Knob and Helena Ridge in elevation. From Stuart Knob the ascent is merely a long and unexciting plod. Continue north to circle the intervening bowl (718895), then gain a gentle ridge extending northeast from TV Peak. The view from the top is respectable but the walk is very long. Special note to TV repeater technicians who helicopter up: please don’t sign the summit register unless you’ve earned it!
Confident scramblers wishing an alternative return can descend the southwest side of TV Peak below the repeater building to gain the road. Downclimbing a short, steep wall right near the top is the crux. Note the rock’s resemblance to precariously piled stacks of shingles: use care. Continue west down easy terrain to treeline and eventually the Bow Valley Parkway.
Yet another plod follows as you head for your vehicle 9 km down the road near Castle Junction. By this time the whole affair of peak-bagging will have begun to take on an air of pointlessness. Curious stares by tourists speeding by adds to the lark.
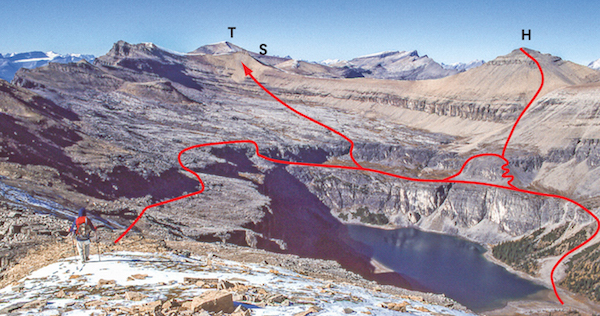
Castle Mountain ascent route from Rockbound Lake. H: Helena Ridge; S: Stuart Knob; T: TV Peak.
The final long trudge to Castle Mountain summit as seen from Helena Ridge. The less toilsome route stays low, while the more scenic route follows the ridge. PHOTO: COLLIN SMITH
The long walk to TV Peak as seen from Stuart Knob. The objective is farther than it looks. D: optional descent to highway.
Difficulty: Moderate scrambling via southeast slopes
Round-trip time: 6–8 hours
Height gain: 1270 m
Maps: 82 N/1 Mount Goodsir; Gem Trek Kootenay National Park or Banff–Assiniboine
Mount Whymper is an excellent viewpoint for the icy north face of neighbouring Mount Stanley, and despite being close to a main highway, the summit is visited infrequently. When dry, gullies on the southeast side are a direct way up and offer good scrambling. Try from about June on.
From Castle Junction on the Trans-Canada, follow Kootenay Parkway (Highway 93) to the Stanley Glacier parking lot, 3.4 km south of the Continental Divide.
The preferred route up Mount Whymper ascends the major gully on the southeast side right above the highway. This avoids tedious deadfall on the south flanks of the peak. Start at the avalanche gully 500 m up the road from the parking lot at 646735. Note: Parks Canada uses explosives for avalanche control here in winter. If you find any object resembling an explosive device, do not touch it; it may still be live. The first rock band is perhaps steepest where you scramble up waterworn bedrock. More scrambling and slogging takes you through larger cliff bands but shouldn’t pose problems for the experienced. As this is a huge avalanche chute, conditions must be snow-free. When the rubble gets tedious near the top, angle left to the ridge.
The deadfall-laden south slopes are best avoided as a descent route. For the return, walk south down the ridge almost to the end, then drop down into the obvious rubble gully on your right. Descend this only until you can traverse left out of it. Now angle down left again over coarse grey rubble to the next wide gully, which passes through the orange rock band. Traverse left at the foot of this steep band to a wide gully and the drainage leading back toward the parking area.
For internationally famous Edward Whymper, a first ascent of this little peak in 1901 must have seemed trivial compared to his climb of the Swiss Matterhorn some 30 years earlier. Blame it on liquor and age: despite four top-notch Swiss guides, his mountaineering triumphs in the Rockies were minor. Although he was expected to recommend ways to boost tourism, he spent much time criticizing his host, the CPR.

Upper slopes of Mount Whymper as seen from the Stanley Glacier trail, showing ascent and suggested descent via unseen gully.
Difficulty: Moderate scrambling via southwest end; bushwhacking
Round-trip time: 7–10 hours
Height gain: 1090 m
Maps: 82 N/8 Lake Louise, 82 N/1 Mount Goodsir;Gem Trek Lake Louise & Yoho
Boom Mountain is an infrequently ascended peak west of Vermilion Pass, and its summit crest sits exactly on the Continental Divide. Highway views reveal no obvious route up and it does not attract many scramblers. The approach via Chickadee Valley uses bits of animal trails, and then a long avalanche slope leads to the upper cliffs and minor scrambling. Expect a bit of bushwhacking and tonnes of rubble. The surprisingly spacious summit offers fine views of Boom Lake, surrounding peaks and receding glaciers. It is occasionally approached on skis in winter. Try from about July on.
From Castle Junction on the Trans-Canada Highway, drive 10 km southwest on Kootenay Parkway (Highway 93). Park in the Continental Divide–Fireweed parking lot.
From the parking lot, cross the road and follow the small stream back into Chickadee Valley, trending left in a few minutes to join the main stream. Stay to the right of this brook initially, then hop across and follow various animal trails left of the stream back into the valley. Many steep avalanche chutes come off Boom Mountain and offer potential ascent routes; the third one from the west end, showing much grey rubble down its length at 633770, worked well. Gullies farther west (left) will also suffice. If you are near the creek, at 629767, you would be straight south of the most westerly (farthest) open avalanche slope. This is the first gully to the right (east) of the high col at Boom Mountain’s west end, though you need not go that far. Follow your chosen avalanche slope up to the base of orange cliffs and traverse left. It is better here than at the foot of the grey cliff band, especially if you find the good goat trail. Once you traverse far enough, the easiest place to overcome the cliff band is near the southwest corner of the peak. Choose the least steep place, as these cliffs are horribly loose, particularly the black rock. Grovel up coarse rubble toward the ridge, which is readily followed east to the summit. A huge drop on the north side reveals beautiful Boom Lake below, while all around is clear evidence of the rapid retreat of glaciers. Return the same way.
Boom Lake is named for a natural log boom of avalanche debris at the outlet, which can be seen from the summit.
Boom Mountain ascent route from Chickadee Valley as seen from Mount Whymper. Adjacent avalanche gullies may also be ascended. B: Boom Mountain summit.
Difficulty: A moderate scramble via west slopes
Round-trip time: 6–11 hours
Height gain: 1500 m
Maps: 82 N/1 Mount Goodsir; Gem Trek Banff–Assiniboine or Banff–Egypt Lake or Kootenay Park
Storm is a large, brooding summit overlooking Castle Mountain Junction and Twin Lakes. Rock climbers ascend the sweeping northeast ridge but use the west side only for descent. Early in the summer, though, when firm snow covers some of the tedious scree, and vegetation in the old Vermilion burn hasn’t had too long to flourish, this climbers’ descent route makes an acceptable non-technical way up. Don’t expect a crowd; you may even have the peak all to yourself. Try from June on.
From Castle Junction on the Trans-Canada Highway, drive 10 km southwest on the Kootenay Parkway (Highway 93). Park in the Continental Divide–Fireweed lot. The scramble route starts 700 m south.
From the parking lot, walk 700 m south, cross the stream and head for burnt forest just left of the drainage (cairn, faint trail), aiming for a small valley on the peak’s west side (675738). Pick up an obvious trail against the hillside left of the drainage at 658746. Expect rugged going for the first while, but travel becomes easier once you reach the valley. As you cross a boulder field, observe a house-sized mass of quartzite. Apart from the sheer size of it, its ability to have withstood what must have been a substantial fall from adjacent cliffs says much for the quality of the rock. Limestone would undoubtedly have shattered.
Continue east toward laborious scree slopes at the end of the valley. Foreshortening makes these look smaller than they actually are, which is a good reason to go during June, when snow patches and an ice axe lessen the toil. As you gain elevation, a quiet cirque to the north becomes visible, complete with two alpine tarns, characteristically rimmed by Lyall’s larch. Higher up on the route, short cliffs can be avoided by detouring left. Once past these the angle relents. As you trudge to the top, avoid the overhanging cornice by keeping to the right.
From the top, the view is stupendous. The north face of nearby Mount Ball, resplendent under its icy cap, rivets the gaze and reveals nothing of the easier south side that scramblers occasionally ascend. To the west stand some of the Rockies’ more dominant and sought-after summits: Hungabee, Deltaform and the two Goodsirs, all more than 3353 m. On descent you may decide to detour over to the nearby tarns to while away any extra time, otherwise return the same way.
Storm Mountain was a qualifying climb for new members at the Alpine Club of Canada’s Vermilion Pass Camp in 1912. These were formative years for the club, and anyone with the time and money and a yearning to climb was welcomed. Many came from flatter places and not surprisingly found these ascents a tough way to holiday. As one participant noted, “Those yielding slopes of splintered rock were a tiresome treadmill, but the climb seemed more worth the effort when the summit was reached… and the scenery at last began to present elements of beauty.” The name Storm Mountain is, of course, weather-related.

Approach route and west slopes of Storm Mountain from Mount Whymper.
Difficulty: Moderate scrambling; remoteness; bushwhacking
Round-trip time: 2 days
Height gain: 1820 m
Map: 82 N/1 Mount Goodsir; Gem Trek Banff–Assiniboine or Banff–Egypt Lake
Mount Ball is a major but remote peak with no easy access. This familiar domed cap of snow and ice can be seen from countless other Rockies summits. The described route, though tedious for the first few hours, does get you on top without much technical difficulty. A few parties undertake it each year, but fewer would care to repeat it. The 2003 Kootenay fire resulted in less bush but more deadfall, and over time the bush will grow back in also. Haffner Creek flooded badly in 2013. Expect the worst – as others have – and the trip might not seem as bad. There may or may not be flagging. The charming upper valley, reached after several hours, offers fine bivy spots (permit required). Try from mid-July on; ice axe useful.
From Castle Junction on the Trans-Canada Highway, follow the Kootenay Parkway (Highway 93) to Haffner Creek and the Marble Canyon campground, 7 km south of the Continental Divide. Unless using the campground, you should park in the gravelled pull-off by Haffner Creek.
Start along the creek from the southeast corner (Loop J) of the campground by a brown water tower (617705). Below to the right is a gravel road by the creek, which unfortunately ends abruptly and at that point you should head left up the hillside above the creek. The first half hour or so isn’t too bad. When the travel gets tougher you may someday find flagging again but until then the general rule is stay near the creek unless flagging indicates otherwise. Sidehilling up above is not worthwhile; expect deadfall wherever you wander. In some 3 hours you should be near the upper valley (665665). The cliff band is easily bypassed on the right. Beyond are larch meadows which, coupled with inspiring views of Mount Ball, are a welcome change. The worst is over now.
Despite horizontal cliffs, the squat, snowy dome definitely appears doable. Long moraines and a shrunken cascade of ice are reminders of a time when a glacier filled this cirque. The ascent route leaves the moraine, crosses karst pavement and enters the scree-filled basin on the left between Beatrice Peak and Mount Ball (675678). You need to gain the ridge between these, and a gully right below Beatrice works well for this. Plod along the undulating ridge, passing a rocky buttress on the left en route, and walk up snow patches to finish.
As one might expect from a high vantage point, summit views are fabulous. Day trippers shouldn’t linger, as round-trip times may exceed 14 hours, which is why bivying here is popular. A few enthusiastic parties (Bou, Dewit and others) have managed to bag Stanley Peak from back here, traversing ledges above treeline to scramble Stanley’s southwest ridge, thus avoiding difficult scrambling of the west side.
Irish-born alpinist John Ball aided the Palliser Expedition in his position as Under-secretary of State for the Colonies. Beatrice Schultz ascended the so-named peak as her graduating climb for membership in the Alpine Club of Canada. Simply paying dues will get you in nowadays.

Panorama from Vermilion Peak: S: Stanley Peak; Bt: Beatrice Peak; B: Mount Ball.
Difficulty: A difficult, exposed scramble requiring much routefinding
Height gain: 1650 m
Round-trip time: 12+ hours, a full day
Maps: 82 N/1 Mount Goodsir; Gem Trek Banff–Egypt Lake or Banff–Assiniboine
As seen from Kootenay Parkway, Mount Stanley’s glaciated north face is impressive. This face presents a superb alpine climb and most parties summit by this elegant route. A far less aesthetic line is to thrash up Haffner Creek, ascend avalanche gullies on the back side and routefind your way up rubble, ledges and steep rock bands. This approach to Stanley Peak shares part of the same tedious approach as Mount Ball and it is not a trek one would rush to repeat. Although Stanley is closer, it requires more routefinding on the actual peak, so, like Mount Ball, this too will be a full day. Purists will undoubtedly label a “slog” route up this beautiful peak sacrilegious, potentially opening the floodgates to the hordes. Realistically, though, the tedious approach combined with intricate routefinding and a short ascent season will ensure that only a few parties will ever actually get up it. If you are serious about scrambling up Stanley, it is worthwhile going up nearby Vermilion Peak first for a view of the approach and possible routes up the south side. As conditions for Stanley must be snow-free, the feasible ascent window will probably be limited to August and part of September. Start early and carry an ice axe.
From Castle Junction on the Trans-Canada Highway, follow Kootenay Parkway (Highway 93) to the Marble Canyon campground, 7 km south of the Continental Divide.
Start along the creek from the southeast corner (Loop J) of the campground by a brown water tower (617705). There is a gravel road down by the creek that ends abruptly, at which point you should head left up the hillside above the creek. The first half hour or so isn’t too bad. When the travel gets tougher you may find flagging in places, and generally you stay near the creek unless flagging indicates otherwise. In some 2 hours you should reach the bottom of a wide, open avalanche slope on the left that comes down close to the creek. As well, gullies farther on also suffice. Even if you’re crashing about in the bush by the creek here, the open slope should still be evident. By way of further orientation, from the edge of this slope there is a view of an ice-clad hump far upvalley. I was tired of Haffner Creek here and welcomed the opportunity to ascend an open slope, especially one headed toward Stanley Peak. Note that the view from Vermilion Peak suggests that either the avalanche slope before this or others farther upstream would likely suffice too. I, however, will not be going back to find out.
Tramp easily up this gully, then stay right when it splits. It is not necessary nor advisable to continue up onto the ridge, as towers along it require detours and downclimbing. It is better to angle right over much broken rock toward the main mass of the objective. While in some places you can scramble along the ridge, often you will find that gullies and ledges to the right are preferable. A cairn here and there will help you identify your route for return. If on the ridge crest, a tower followed by a notch (at 652688) right where the ridge meets the main summit requires backtracking and traversing lower down between towers. From here on, things get interesting and will test your routefinding skills. It is worth carefully studying the remaining steep terrain ahead, and as you might expect, it is not a feasible scramble if snowy.
I next found it necessary to make an ugly descent down a steep, dirty gully so I could cross the top of the major gully below the notch to reach the main summit mass. A traverse to the right at the same level as the notch and below a rock band led to a promising gully, and I began to work my way up from there. Frequent detours were necessary. Rather than attempt to give specifics (which will be subject to misinterpretation anyway), I’ll mention that perseverance paid off despite some trying moments. Expect several steep parts, loose gullies and considerable searching about. Remember, you have to find your way back down this beast, too. There appears to be easier terrain much farther right. The right-hand skyline (southwest) ridge has been ascended as well and is more straightforward than this route.
The route to the spacious summit finishes over brown shale and snow patches to a small cairn and register. An incredible view includes familiar big Lake Louise peaks such as Temple and Deltaform, also Assiniboine, Hector, the Goodsirs, the Bugaboos and nearby Mount Ball. In spite of the panorama, your mind may be preoccupied with worries about the descent. Return cautiously the same way. Any cairns made on ascent will be pleasantly reassuring on the way down!
Edward Whymper, who made the first ascent, named the mountain for Frederick Arthur Stanley, the sixth Governor General of Canada. Hockey fans may also recognize the name in relation to a certain well-known trophy.
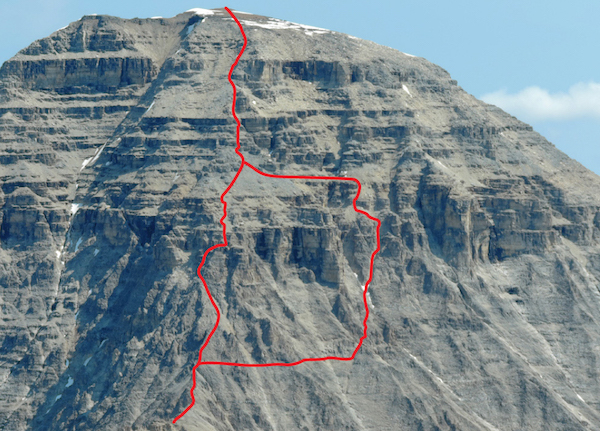
Telephoto shot showing two possible options on the upper part of the Stanley Peak ascent route as seen from Vermilion Peak.
Difficulty: Moderate scrambling on loose shale at the top
Round-trip time: 5–7 hours
Height gain: 1230 m
Maps: 82 N/1 Mount Goodsir; Gem Trek Kootenay National Park
Most scramblers are oblivious to this fine little peak in Kootenay National Park, probably because it is out of sight from the busy Trans-Canada Highway. Starting mere minutes from Highway 93, this steep but satisfying ascent requires no routefinding and offers a view almost immediately. Apart from the final shaley ridge, the outing is little more than a strenuous hike. Try from mid-June on.
From Castle Junction on the Trans-Canada Highway, follow the Kootenay Parkway (Highway 93) 11 km south of the Continental Divide, or 3.8 km south of Marble Canyon. Park on the shoulder near a clearing on the north side of the road.
Vermilion Peak sits on the northeast side of the road, and on its southwest side is an obvious open avalanche gully that does not quite extend to the present highway. It does, however, just barely reach what was the original roadbed, 40 m uphill. Hike up through a clearing to this old road, now becoming overgrown. If you walk south for perhaps 100 m (possible cairn), you can then head up through brief forest to easily reach the terminus of this open, grassy avalanche gully.
As you ascend, remember that bears often feed along avalanche slopes like this. Once, while scouting out this route from the car, I did see a grizzly here. To avoid surprise encounters you should holler periodically. Human voices have proven more effective than bells or whistles. For scramblers who prefer to go quietly and trust luck, it is but a short crawl to the road anyway.
Two minor rock bands interrupt the gully, but these pose no challenge. A glance over your shoulder reveals Tumbling Glacier and mounts Gray and Drysdale in the Vermilion Range. To the northwest the mighty Goodsirs preside over lesser summits. Lyall’s larches appear just before treeline, and here the gully splits, though it is much less obvious since the slope burned in 2003. Either branch of the gully will work, although the right-hand one reduces traversing once you near the steep shale slope of the summit. Avoid these loose slopes and contour to the right to gain the right-hand end of the skyline ridge.
Follow the ridge to the top, detouring to the right at narrow or rotten sections. The summit is a perfect viewpoint for the Haffner Creek approach to Mount Ball, while also revealing the tamer back side of Mount Stanley. Pyramidal Mount Deltaform is visible, while to the southwest are the Howser Towers in the Purcell Range, three shadowy granite spires ruggedly framed between Vermilion Range peaks. When your senses have been satisfactorily sated, return the same way.
Vermilion describes the colour of the iron-rich Paint Pots found just off the highway a couple of kilometres north. Indian tribes coveted and traded this resource, which they used in making body paint. From the top the Paint Pots look like two orange streams emerging from forest to the west.
Mount Haffner, the adjacent small peak to the southeast, can be ascended by following the connecting ridge from Vermilion Peak. Descend to the low point, pass through burnt forest and pleasant larch meadows before reaching the shaley summit. There are no difficulties, but total elevation gain for both ascents is a whopping 1850 m and adds about 3 hours round trip. The route will become more tedious as the still-standing burnt trees topple with time.

Roadside view of ascent gully up Vermilion Peak, taken 12 years after the 2003 Kootenay fire. Route follows right skyline ridge at top.
Difficulty: Moderate to difficult scramble; brief exposure
Round-trip time: 8–11 hours
Height gain: 1565 m
Maps: 82 N/1 Mount Goodsir; Gem Trek Banff–Assiniboine, Kootenay National Park
Isabelle Peak is a good scramble with a well-graded approach trail. Because it is not clearly visible from any highway and is greatly overshadowed by neighbouring Mount Ball, the mountain has seen very few ascents in the past. For an interesting scramble and an excellent vantage point that lacks a crowd, it is a fine objective. Try from about early July on. Ice axe recommended.
Drive to the Floe Lake–Hawk Creek trailhead on the west side of the highway in Kootenay National Park, 22.2 km south of the Continental Divide and 8.4 km north of Vermilion Crossing. Hawk Creek trail starts on the east side of the road. If you look carefully, Isabelle Peak is barely visible to the northeast through tall roadside trees.
Cross the road and hike northwest alongside it for 200 m to Hawk Creek. A good trail then follows the left (west) streambank. In about an hour cross a bridged tributary stream (680624), continue across rocky open slopes below steep cliffs, going past a major waterfall on Hawk Creek, whereupon the trail suddenly gains elevation through a series of four or five switchbacks. The grade eases off, the forest (now replete with larches) opens and the path crosses the bottom of an avalanche slope (704631 by GPS) on the left (possible cairn). You have an unobstructed view of rubbly slopes leading to a broad gully on Isabelle’s south slopes. Allow 2–2.5 hours to here (700 m elevation gain).
Head up the hillside, scrambling easily up the grey rock band near the bottom. A watercourse in the middle of the slope offers firm rock steps rather than scree for much of the way. You’ll progress rapidly here but will undoubtedly find yourself pausing to admire the Rockwall to the southwest and Mount Assiniboine to the east. Scramble up firm ledges in the gully but be careful of loose debris. The gully tops out on a broken ridge where a more complete panorama unfolds around you. Isabelle’s summit is off to your left, but you should familiarize yourself with exactly where you came up – it may well look different and more intimidating on return.
Continue farther up the ridge, and when it looks simplest, begin traversing left across rubbly gullies below the undulating crest that curves left. To reach the highest point, scramble up a 50- to 75-m-high gully that is steep at the bottom, but solid. This is likely the crux and you should note it for return. Now you emerge on a plateau with the summit close by and some 10–15 m higher. The easiest way up this last bit is around to the left.
The near horizon is dominated by snowcapped Mount Ball and Ball Glacier. To the right are Copper and Pilot mountains and Mount Brett. Major peaks of the panorama include the Goodsirs, Sir Douglas and Assiniboine, as well as Farnham Tower and the Bugaboos in the Purcell Range. On a clear summer day, one could literally spend hours on this peak, which we did.
The return is via the same way and you may find scrambling more difficult going down.
C.S. Thompson visited, explored and climbed in the Rockies at the turn of the century and named the peak for his sister.
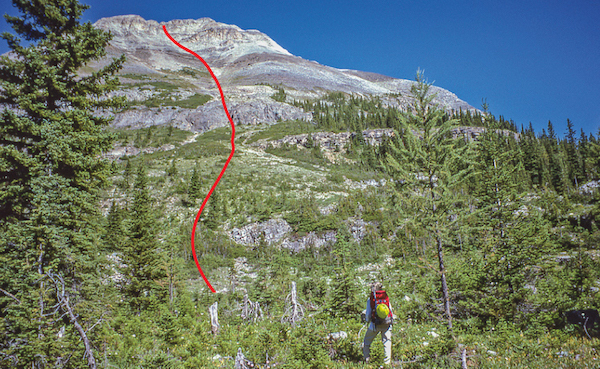
A trailside view of Isabelle Peak.
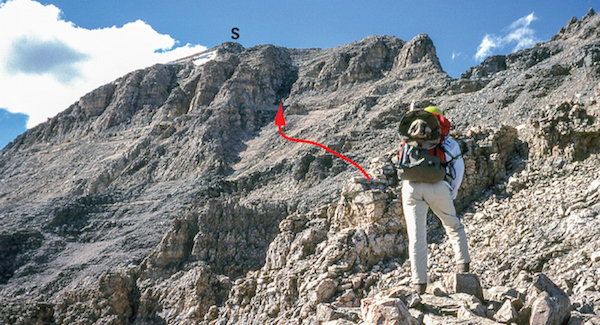
Eyeballing the summit mass. S: summit.