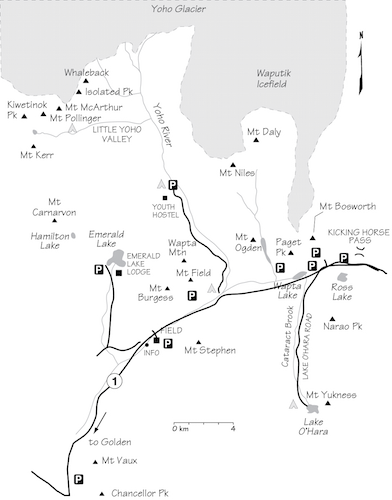
Walcott Peak 2599 m moderate
Mount Burgess 2679 m difficult
Wapta Mountain 2778 m difficult
Mount Field 2635 m easy
Mount Bosworth 2771 m difficult
Paget Peak 2560 m easy
Mount Ogden 2695 m difficult
Narao Peak 2974 m moderate
Mount Yukness 2847 m moderate
Mount Stephen 3199 m difficult
Mount Vaux 3319 m difficult
Chancellor Peak 3280 m difficult
Mount Niles 2972 m moderate
Mount Daly 3152 m difficult
Isolated Peak 2845 m moderate
Mount Kerr 2863 m easy
Kiwetinok Peak 2902 m difficult
Mount Pollinger 2816 m easy
Mount McArthur 3015 m difficult
Mount Carnarvon 3040 m difficult

Field, BC, is the quieter neighbour of dazzling Lake Louise, lying 25 km west on Trans-Canada Highway and some 300 m lower in elevation. Field is the administrative centre for the 1300-km² Yoho National Park, which encompasses a section of the western slopes of the Rockies where rushing streams begin their headlong journey to the Pacific Ocean. Many rare fossils have been discovered here, and the renowned Burgess Shales is a World Heritage Site.
“Yoho” is said to be an exclamation of wonder in the Stoney Indian tongue. Field huddles at the foot of massive Mount Stephen, the highest in the vicinity, towering more than a mile above. The ascent presents daunting elevation gain but the view is worth every tedious step. Like Lake Louise, Field experiences heavy snow. Summer can be short, effectively reducing the scrambling season to as little as two months or less for the bigger peaks. In winter and spring, Pacific storms from BC get caught up along the Continental Divide and the air rushes down the east side, warming as it goes, causing very strong, warm winds through the foothills. These “chinooks” are much appreciated along the eastern slopes. While Calgary, Kananaskis and Canmore bask in warm breezes, Field and Lake Louise may well be enduring a blizzard.
A variety of rock is encountered in this area, and peaks vary considerably in how they were formed. Some have undergone tremendous upheaval, with evidence of severe folding. Others have been uplifted evenly and thus are of “layer-cake” formation. Loose shale exists in great quantity lower down, but higher peaks often have firmer rock. Caution is imperative, owing to loose rock, and an ice axe is often useful. Rentals are available in Lake Louise at Wilson’s Sports.
Access Field lies 35 minutes east of Golden and 20 minutes west of Lake Louise on the Trans-Canada Highway. Greyhound buses stop here daily.
Facilities and accommodation Field has several bed and breakfasts, hostels, chalets and bungalows. There is a hostel in the hamlet, while Whiskey Jack Hostel is near the end of Yoho Valley Road. This road branches off the Trans-Canada Highway at the bottom of Field Hill, east of town. Monarch and Kicking Horse campgrounds, Cathedral Mountain chalets and a small store are found within the first 2 km of this road. Walk-in campsites are near thundering 300-m-high Takakkaw Falls at road’s end. Situated west of Field is an additional campground at Hoodoo Creek, by Chancellor Peak. Emerald Lake Lodge is definitely not for the budget traveller but does offer pleasant little perks like a sauna and hot tub. Weather not co-operating? Head for the exercise room. For shopping, “The Siding” in Field has meals, groceries and liquor.
If visiting Lake O’Hara, you’ll need a reservation on the bus, and a strict quota system is in place. Call 250-343-6433. For overnight visits, a backcountry pass is required and can be purchased beforehand or upon boarding the bus. Located at Lake O’Hara are a campground, Lake O’Hara Lodge and Elizabeth Parker Hut. The hut is booked by contacting the Alpine Club of Canada at 403-678-3200 or info@alpineclubofcanada.ca. It is normally locked when no custodian is present. The lodge is pricey and has its own faithful clientele, many of whom book months or years ahead and return annually. Only a few of the 30 campground sites are first come, first served. Contact Parks Canada in Field at 250-343-6433 for reservations.
Le Relais is a small day facility at Lake O’Hara that sells snacks, soft drinks and tea. This non-profit service is fulfilling its main purpose: at teatime, day trippers no longer block the lodge’s front steps.
Information is happily dispensed at the seasonal Parks Canada information centre at the entrance to Field: 250-343-6783. Whether your questions concern trails, permits, reservations, route conditions or lodging, staff will be pleased to assist. Owing to past thefts from the adjacent fossil beds, climbing Mount Stephen is not encouraged by Yoho National Park and involves obtaining a special permit which must be applied for at least 24 hours in advance. You can apply at the info booth or by calling 1-250-343-6783.
Wardens The Yoho Park warden office is located at Boulder Creek Compound, a few kilometres west of Field on the right (north) side of the highway.
Difficulty: An easy/moderate ascent from the Burgess Pass trail
Round-trip time: 5–8 hours
Height gain: 1350 m
Maps: 82 N/8 Lake Louise, 82 N/7 Golden; Gemtrek Lake Louise–Yoho
Walcott Peak is a quick and straightforward scramble with an excellent approach trail. In earlier editions this peak was listed as Mount Burgess. The more difficult south peak is now officially named Mount Burgess and this easier north summit is officially Walcott Peak as of 1996. Yes, the name has moved but the peak still overlooks the braided Kicking Horse River and the hamlet of Field to the south. To the north is beautiful Emerald Lake ringed by Mount Carnarvon, The President and the The Vice President. This area is world-renowned for the Burgess Shale beds, where many unique and previously unknown fossils of invertebrate life forms have been found. From the summit, competent scramblers can include a challenging ascent of adjacent Mount Burgess if desired. That ascent involves exposure and difficult scrambling, and requires routefinding skills. Try these peaks from late July on. Helmet advisable.
Park at the Burgess Pass trailhead, on the north side of the Trans-Canada Highway, 1.1 km east of Field.
Follow the steep Burgess Pass trail, in 20 minutes passing the only source of water, and continue through cool, sombre forest. You may notice evidence of trail washouts from periodic heavy rains here. Shortly before reaching Burgess Pass, you emerge onto a huge avalanche slope a couple of hundred metres wide with an unobstructed view of Mount Stephen across the valley. Of more interest, though, are the steep walls of Walcott Peak and Mount Burgess above you. Allow 1 hour of fast walking to here.
The open slopes up to the base of the mountain are mostly bare, with only stunted evergreens and limited scrub surviving. A wide gully immediately to the right of a large, treed island hugging the base of this face is the route of ascent. This prominent gully is visible from the highway below but suffers foreshortening as you stand immediately below and gaze up at it. Farther to the right the lower mountain flanks are also quite heavily treed, but there is no indication of any reasonable way up. Once you plod up the rubble toward the face it will become clear where to go. The correct gully is comparatively low-angled and not difficult. Keep to the right once you’re in it until you reach open scree below the top.
The intervening ridge to Mount Burgess is a much more difficult scramble than Walcott Peak. Walcott does, however, provide the perfect location to study this challenging route and discuss whether an attempt is warranted. Many did not bother before the name change but it does count as a second summit now. To reach it, drop down into the rocky basin between the two summits. Ascend a narrow gully identified by a pinnacle above it and probably marked with a cairn. This gully is toward the north end of the ridge that trends south to Mount Burgess. Detour left (east) and descend slightly to avoid the narrowest bit along the ridge. To bypass these exposed parts, you may have to traverse across ledgy slabs toward little gullies that lead more directly to the summit. Return to Burgess Pass by descending the same gully you ascended from the Burgess Pass trail; it is reached from the rocky basin between the two peaks by contouring east (left). All other gullies are steep and are not feasible descent routes.
Alexander Burgess was commissioner of Dominion Lands for Canada in 1897. Charles Walcott was an American paleontologist of invertebrates who discovered the nearby Burgess Shale, known for its remarkable fossils.
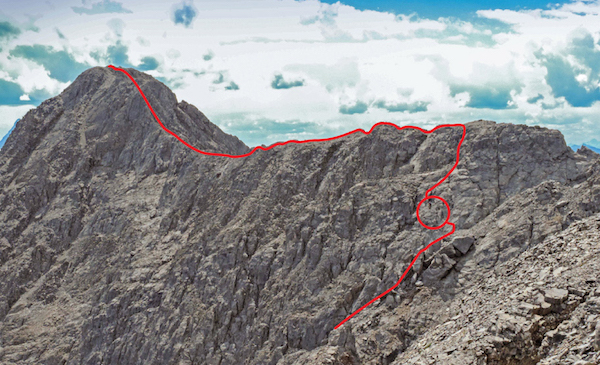
Mount Burgess route as seen from Walcott Peak. Note the barely visible scramblers circled.
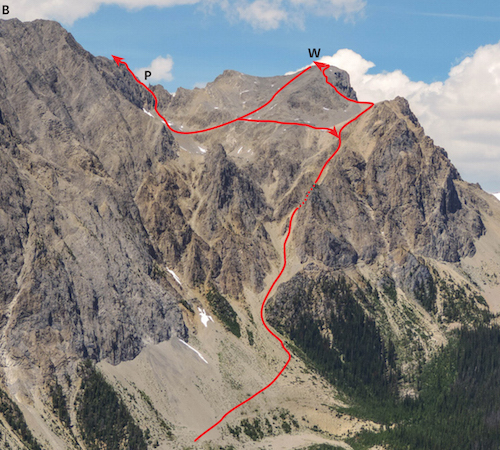
B: Mount Burgess and W: Walcott Peak routes as seen from the Mount Stephen trail. Burgess Pass would be at far right. P: pinnacle.
Difficulty: Difficult, exposed steep section near summit; low 5th class
Round-trip time: 6–9 hours
Height gain: 1275 m
Maps: 82 N/8 Lake Louise; Gem Trek Lake Louise–Yoho
Wapta Mountain forms part of the backdrop of beautiful and popular Emerald Lake. The ascent route lies at the north end and is readily reached by Yoho Lake hiking trail. This is one of the most difficult scramble ascents described, and not surprisingly the peak does not see heavy traffic. Most folks find the crux both challenging and exhilarating; summit views of surrounding peaks and glaciers are fabulous. Try from July on.
Drive east from Field, BC, and follow Yoho Valley Road 13 km to the Takakkaw Falls parking lot. The approach trail starts at Whiskey Jack Hostel, 600 m before the falls.
From Whiskey Jack Hostel, hike the Yoho Pass trail and reach Yoho Lake in about an hour. DO NOT follow the Iceline trail. Continue past Yoho Lake toward Emerald Lake and in 10 minutes take the left fork toward Burgess Pass. After passing some trailside cliffs, briefly enter forest, then emerge onto an avalanche slope with open views at 351009, about 25 minutes past Yoho Lake. An obvious wide gully gives access to the northwest side of the peak. There is no advantage to trudging up the gully; instead, ascend an animal trail on the hillside to the right. The impressive cliffs above you are lower to the right of this gully, so aim for that general area. Overcome the first rock band by easily scrambling up blocky steps and a right-leaning gully, usually cairned or flagged.
Plod up tedious scree, trending right and passing buff-coloured cliffs. Then traverse south along the right side of the vertical summit cliffs. The only feasible place to scramble up is on this side, some 50–75 m before the far south end. Having checked, I found routes on the southeast (back) side are far more exposed. Instead, look for three steep, parallel vertical cracks about 1.5 m apart which slice into the flanks on this west side. The middle crack is least difficult but still steep. Watch for cairns or flagging. Above the steep bit, traverse right on ledges and scramble higher. Now move left and angle up onto the exposed summit ridge. Take care on this ridge; a slip would be fatal. Once you’ve enjoyed the views and are ready for more challenge, return the same way. On descent, some parties make a short rappel off fixed anchors at the flat area near the south end. The rest of us have to climb back down.
“Wapta” is a Stoney word for “river” and makes no sense at all as a summit name.
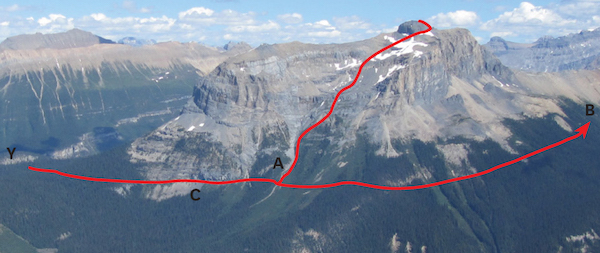
Wapta Mountain route as seen from near Emerald Peak. Y: Yoho Lake; C: cliffs beside trail; A: avalanche gully. The trail continues to B: Burgess Pass. PHOTO: BOB SPIRKO
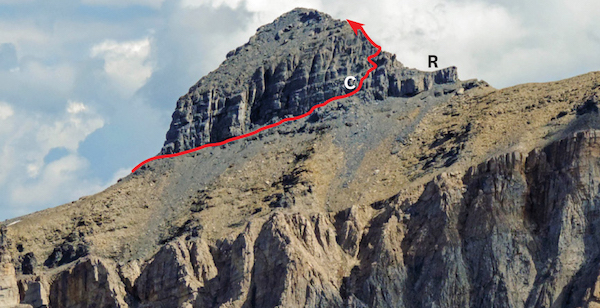
Upper Wapta Mountain from Walcott Peak, showing upper crux section. C: crux; R: rappel point.
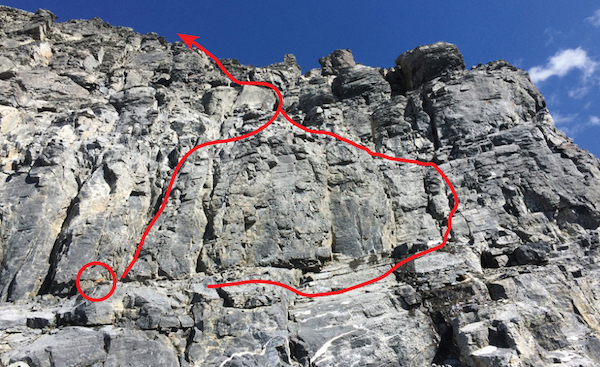
Close-up of crux section on upper Wapta Mountain showing two easiest options. Note orange flagging near start (circled). PHOTO: GARY FAULAND
Difficulty: An easy ascent from Burgess Pass
Round-trip time: 5–8 hours
Height gain: 1365 m
Maps: 82 N/8 Lake Louise; Gem Trek Lake Louise–Yoho
Mount Field is a very non-committing ascent offering a unique viewpoint for Mount Stephen’s north glacier and distant Takakkaw Falls. One wonders why this bump at the southeast end of Wapta Mountain has been designated a separate peak. The ascent of Mount Field is one of the simplest in the vicinity, since all but the final, 400-vertical-metre slog uses the well-graded Burgess Pass hiking trail. The view is worthwhile, though your accomplishment may not totally amaze your friends. Try from mid-June on.
Park at Burgess Pass trailhead on the north side of the Trans-Canada Highway, 400 m east of Field.
Follow the Burgess Pass hiking trail, crossing the only source of water within 20 minutes. Continue for about 2 hours to a signed junction at the top of the pass. Take the YOHO PASS/YOHO LAKE option only to where it curves left (north) toward Mount Wapta. Leave the trail here and trudge up open shale and scree slopes. Trend right, aiming to intercept a dry gully that drains south and over the south side of the pass. The simplest place to breach the short rock band is above this gully at the southernmost end.
From the top you can see Mount Stephen’s north glacier in a much-expanded and more engaging view than the normal foreshortened glimpse from Field Hill. The distant, pointy snow peak left of Mount Wapta is Mont des Poilus; farther right are Yoho Glacier, Mount Balfour and Takakkaw Falls. Slightly north of you along the ridge toward Mount Wapta sits the Walcott Quarry of the world-famous Burgess Shale fossil beds. This site is a restricted access area and unescorted visitors are FORBIDDEN. Spot checks for would-be fossil hunters are continuous, and thieves are prosecuted. Take solace in knowing you would find little of interest anyway – authorized “digs” occur periodically through summer months and these meticulous groups generally leave no stone unturned.
Cyrus West Field, promoter of the first trans-Atlantic cable, visited this area at the insistence of CPR bigwig Cornelius Van Horne, who then patronizingly named it after his guest – the sole reason being to secure investment for continued railway construction. Mr. Field was amused, though, but that was about all.
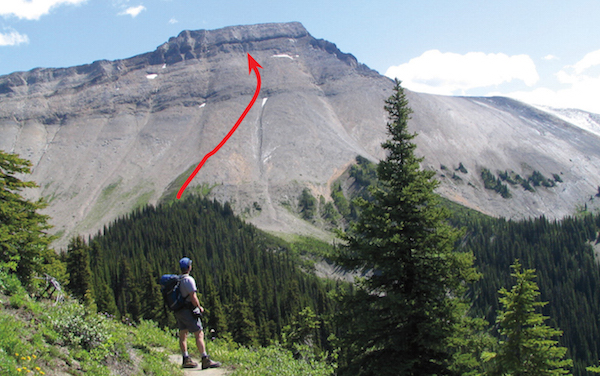
Near Burgess Pass, an alert scrambler suddenly notices an obvious route up Mount Field. PHOTO: DINAH KRUZE
Difficulty: Difficult scrambling for 30 m at top
Round-trip time: 5–7 hours
Height gain: 1160 m
Map: 82 N/8 Lake Louise; Gem Trek Lake Louise–Yoho
Mount Bosworth is a small, unpretentious roadside peak rising directly on the Continental Divide that provides a fabulous view of much larger, more famous peaks nearby. A steep rock band just below the top is the crux. If you are near Field or Lake Louise, this is a good little trip that still does not see that many visitors. The view is less foreshortened if you walk 10 minutes east along the now-closed Highway 1A, which branches left 600 m farther west. Try this route about late June or early July.
Start at the huge avalanche slope on the Trans-Canada Highway, 600 m east of the Highway 1A (Lake O’Hara) intersection and 2.3 km west of the Yoho National Park boundary east of Field, BC.
Assuming there is no longer any snow on the avalanche slope, tramp up the left edge of it where brush is thin. A minor cliff band partway up is surmounted via a gully that may have a trickle of water in it. Above treeline, cross over into the next gully and continue working up and left, crossing yet another gully. Aim to top out on the main ridge immediately east of the summit block. It is a steepish face with a horizontal band of black rock just below the top. This band is the crux, requiring 30 m of more difficult scrambling on ledges and up corners to overcome. There are many possibilities, depending on your expertise. The cairn and register are 10 minutes farther.
On a clear day, you will be treated to a panorama that includes the icy north face of Mount Victoria to the south with the stark, brooding Goodsirs just to the right. Ski tourers may recognize landmarks on the Wapta Icefield to the north such as the snowy face of Mount Collie. An alternative descent suggested in previous editions has not proven popular, so you may as well return the same way. If you decide to descend the main gully right under the summit, all goes well until the black band lower down. You must then hillside traverse two gullies east to reach the original line of ascent. This option avoids the 30 m crux but has little else to recommend.
G.M. Bosworth was fourth vice-president of the Canadian Pacific Railway.
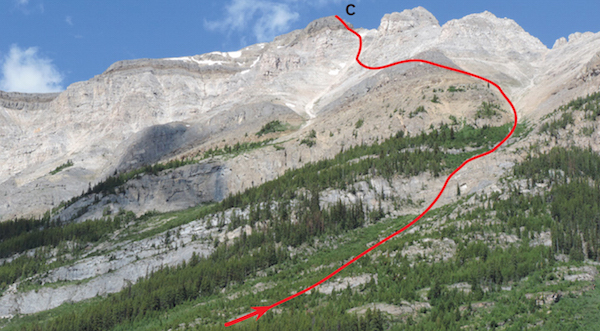
Mount Bosworth ascent route up avalanche slope as seen from the old Highway 1A. C: crux on east ridge.
Difficulty: An easy ascent via Paget Lookout trail
Round-trip time: 4–5 hours
Height gain: 1000 m
Maps: 82 N/8 Lake Louise; Gem Trek Lake Louise–Yoho
Paget Peak, near the Continental Divide, is the end of a long ridge that rises high above the Kicking Horse river and Field. This nondescript nubbin provides a view and a feeling of accomplishment that far surpass the actual effort involved in the ascent. Overlooking Sherbrooke and Wapta lakes, it is easily reached via a popular hiking trail to an abandoned fire lookout. You gain almost three-quarters of the elevation on the hiking trail, so you could sleep in and still make the top. The glaciated north face of Mount Victoria, snowy Mount Balfour and distant Selkirk Range peaks are just a fraction of the panorama. Try from late June on.
Drive to Wapta Lake picnic area at the west end of Wapta Lake, BC, 5.1 km west of the Continental Divide.
From the parking area, follow the Sherbrooke Lake–Paget Lookout trail, which starts near the picnic shelter. Almost immediately it splits: the right branch descends to West Louise Lodge; Paget and Sherbrooke are to the left. At the next and only other junction take the right fork for Paget Lookout. As of 2012 the small, square lookout building was still perched on the lower slopes of the peak. It is no longer used, as satellite technology has now superseded human observation as the preferred method of spotting forest fires.
Well-worn paths behind (north of) the lookout take you through the last belt of trees and onto shale and talus slopes that lead to the summit, some 425 m above. The ascent has always been straightforward, and now time and popularity have further simplified things with beaten paths and many superfluous cairns. The view is unobstructed the whole way up.
Having reached Paget Peak with so little trouble, it is possible to continue north along the ridge for an additional half hour or so to a slightly higher viewpoint. It offers a correspondingly fuller panorama. From either perspective, the imposing relief of Mount Stephen’s north side glowering 2000 m above the Kicking Horse flats is a particularly striking feature of the landscape. Equally close are mounts Niles and Daly, just north of Sherbrooke Lake. These two scrambles are also described in this volume.
Paget Peak is a part of what geologists call the Main Ranges. Geology and topography here are quite different and more interesting than in the younger Front Ranges to the east. Staring groundward on Main Range ascents often reveals a much wider diversity of rock types and colours, including Gog quartzite, the hardest rock in the Rockies. This delightfully solid rock makes up the lower sections of peaks at Lake Louise and Moraine Lake, including the popular climbing crags at the back of Lake Louise.
Another difference between front and main range topography is the number of glaciers and icefields in the Main Ranges. This is the backbone of the Rockies and a major barrier to Pacific storm systems. These big peaks literally wring out the moisture, resulting in a localized climate that is both cooler and wetter. As proof, we still see significant glaciation on mountains like Victoria, Temple and Lefroy, all of which are over 3353 m (11,000 ft.). While on the subject of glaciers, some editions of the topo map show glaciation on the south- and east-facing slopes of Paget and nearby Mount Bosworth. You can plainly see bare scree slopes everywhere, and glaciers probably haven’t existed here for centuries.
Paget Peak was first ascended by Reverend Dean Paget of Calgary with A.O. Wheeler, a founding member of the Alpine Club of Canada.
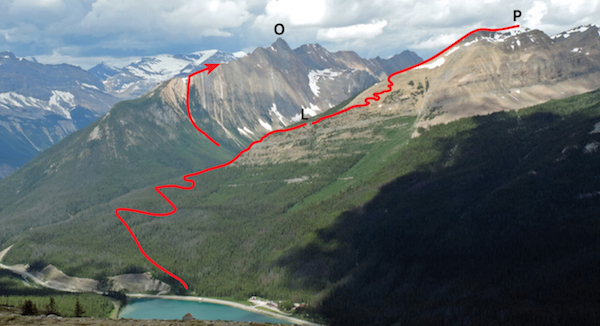
Scramble routes up O: Mount Ogden and P: Paget Peak from lower slopes of Narao Peak. L: old fire lookout.
Difficulty: Difficult, exposed scrambling near top
Round-trip time: 7–9 hours
Height gain: 1100 m
Maps: 82 N/8 Lake Louise; Gem Trek Lake Louise–Yoho
Mount Ogden rises high above the Yoho River, just east of Field, BC, and sits next to a subalpine lake amid several other scramble peaks. The ascent route is reached via the Sherbrooke Lake trail, where the peak forms a long backdrop above blue-green waters. For much of the ascent you are well above treeline as you traverse a long summit ridge while being treated to wondrous, unobstructed views. This area receives heavy snow and takes time to clear. Try from about July on. An ice axe may be useful.
Drive to Wapta Lake picnic area at the west end of Wapta Lake, BC, 5.1 km west of the Continental Divide at Kicking Horse Pass.
The trail starts at the picnic shelter and biffy and leads 3 km to Sherbrooke Lake. The ascent begins on the west side of the lake, so you must first cross the outlet stream, either rock-hopping or on a logjam. Once across, hike north along the shore for a few minutes until you are below a stand of larger timber surrounded by avalanche slopes. The ascent gully runs directly down into this timber, and shale debris has been washed right down to where the shoreline curves back against the hillside. Follow this debris up into the gully, which after the 2013 rains became 2 m deep in places.
The gully becomes increasingly steep and you’ll be glad you brought ski poles or an ice axe. If still snowy it could be dangerous – bone dry is preferable. Upon reaching the forks at about two-thirds height, follow the loose, shaley and narrower right-hand gully, which angles steeply up to the right. Without fanfare, it deposits you on open slopes and the broad southeast ridge of Mount Ogden, some 700 m above the lake and about twice that far above the Kicking Horse river. This is a fine place to snack and enjoy the tremendous views before continuing along the ridge. Note that the ascent has also been done by starting from the highway at the pullout sign for “Old Bridge on the Big Field Hill.” The entire ridge is followed from there, which adds about 70 m elevation and lacks an actual trail.
From the open ridge, follow a goat trail north along the ridge crest, and when that becomes too unpleasant you can sidehill along below it on loose shale rubble to the left. The summit block is farther away than expected. Hug the base of the summit block on the west (left) side until you reach the north end of the peak. In 1996 the only reasonable ascent spot, to me, appeared to be here, but when I re-examined it in 2013 even that location appeared distasteful. Ascend downsloping ledges against a wall while you’re above a long gully of either rubble or snow. Easier scrambling on prickly limestone completes the ascent.
I have mused whether a chunk of rock had since broken off, making the finale somewhat more challenging than previously. There may be another option on the west-facing wall of the summit, where the rock at least appears more solid, but it is steep. The shortest distance up would again be near the north end. Return the same way.
Isaac Ogden was an auditor and vice-president of the CPR after 1883.
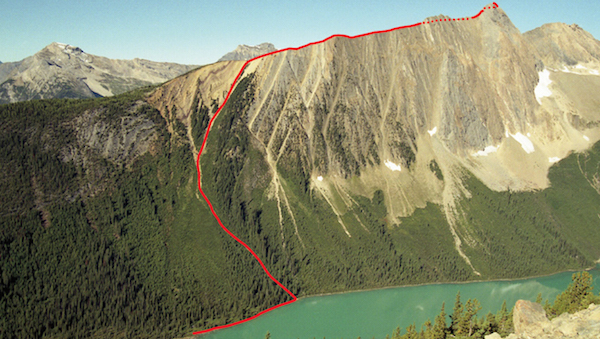
Mount Ogden’s steep ascent route as seen from a shoulder of Paget Peak. Rising behind at upper left are Mount Field and Wapta Mountain.
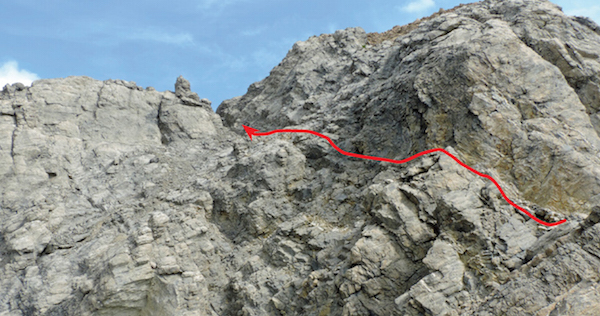
The scary-looking crux on Mount Ogden, not showing the steep gully below.
Difficulty: Moderate scrambling along north ridge
Round-trip time: 6–10 hours
Height gain: 1225 m
Maps: 82 N/8 Lake Louise; Gem Trek Lake Louise–Yoho
An ascent of Narao Peak rewards you with a fine panorama of major summits along the Continental Divide. The north ridge is a long, enjoyable scramble, largely walking, highlighted by short, horizontally bedded rock steps. Because much of the west side is a boring scree slope flanked by forest, scramblers ascend the peak infrequently. Two steep, parallel ice couloirs on the north side are the most striking features, and they attract keen alpinists who perhaps make just as many ascents. Although the ice couloirs are more challenging, the view along the scrambler’s route is far more scenic. Try from July on.
Drive to the Lake O’Hara parking lot turnoff on the south side of the Trans-Canada Highway, 3.1 km west of the Continental Divide and about 1.5 km east of Wapta Lake. Cross the railway tracks and turn right.
Narao Peak’s north ridge can be gained via the connector trail between Ross Lake and Lake O’Hara Road. Hike east along the now-closed Highway 1A from the train tracks and after 15 minutes branch right to follow the signed hiking trail up to Ross Lake, just moments past a large billboard-sized sign. Just before Ross Lake, branch right and follow the connector trail toward Lake O’Hara Road for about 10 minutes, then bushwhack directly uphill toward the north ridge. Short rock bands in the forest are easily ascended and upon reaching treeline (2 hours), the start of Narao’s north ridge sits right above. You can start up it by going to the left. This approach has much less rubble and bush and this makes it preferable to the forested slopes above Lake O’Hara Road that were previously suggested.
Once you’re on the ridge, small crumbling cliffs encountered can either be ascended directly or detoured to the right. Just before the summit you reach the exit of Narao’s steadily shrinking 300-m-long north ice gully, a wide, gaping maw. The summit cairn lies a few minutes beyond.
Nearby, Mount Victoria’s brooding icy north face rears up; beyond, the tranquil, mysterious Goodsir Peaks loom over rarely visited Ice River and Ottertail valleys. The emerald waters of Sherbrooke Lake are flanked by a backdrop of mounts Niles, Daly and Balfour on the Waputik Icefield.
On return you can either descend the same way or, for more adventure, from the end of the ridge, turn right and contour down around into meadows of Popes–Narao Cirque (481975). Then hike north toward the low point and head gently down to the left on a path which gains a broad horizontal ledge clinging to the vertical northeast flanks of Narao Peak. This ledge is several hundred metres above Ross Lake and the goat path heading north on it provides climbers with access to Popes Peak and Narao ice routes. When feasible, from the ledge, descend bush (steep!) to the south end of Ross Lake. Hike out via the approach trail.
Narao is reputed to mean “hit in the stomach” in the Stoney Indian language. In 1858 a spooked horse that had fallen into the nearby Kicking Horse River kicked James Hector in the chest. This may explain the name, since nothing else does.
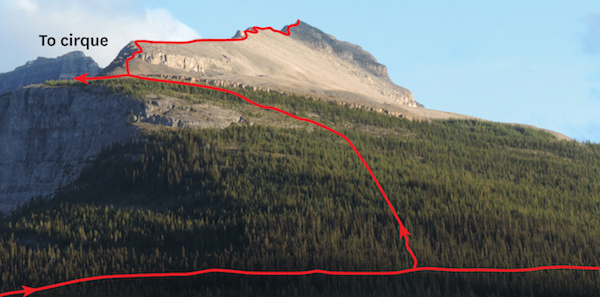
Narao’s north ridge ascent route and the Ross Lake–Lake O’Hara Road connector trail. Ross Lake and Popes–Narao Cirque are to left, Lake O’Hara Road to right.
Difficulty: From Opabin Lake, easy scramble to col and northwest summit; moderate scrambling to southwest (true) summit
Round-trip time: 6–9 hours
Height gain: 810 m
Maps: 82 N/8 Lake Louise; Gem Trek Lake Louise–Yoho, Lake O’Hara
Mount Yukness is a strategic viewpoint in surroundings unmatched almost anywhere in the Rockies. The biggest challenge, though, is getting to Lake O’Hara, the starting point. It is a lovely but fragile area and Yoho Park places a quota on visitor numbers. Because a bus reservation is required, you can seldom visit on short notice. Although you can ascend the peak and ride the bus out in a day, it is far more enjoyable to camp overnight and enjoy the fabulous scenery instead.
Access to Lake O’Hara, the starting point, is via a 12 km bus ride. (Call Parks Canada at 250-343-6433 for bus/campground/backcountry permit information.) The Lake O’Hara parking lot is on the south side of the Trans-Canada Highway, 3 km west of the Continental Divide and 1.5 km east of West Louise Lodge. After you cross the railway tracks, the parking lot and washrooms are to the right. A shuttle bus runs daily, June through September. Cycling into the area is not allowed.
From Lake O’Hara Lodge, hike along the south (right) shore and up the Opabin East trail to Opabin Lake at the southeast end of the plateau (1 hour). From Opabin Lake it is a straightforward scramble up the south side of Mount Yukness to a col between the two summits. Begin on a path along the left shore of Opabin Lake signed “Opabin Alpine Route,” that goes up to the right side of a wet rock wall. An unmaintained but well-cairned trail then heads up to the left near the base of the cliffs. Go through the cliff via ledges on the right side of the leftmost of the visible gullies. If the lower northwest summit is your destination, do not go to the col, but instead angle left across talus from here.
To reach the true (southeast) summit, continue up the trail to the col. The least problematic, least exposed route from there does not follow the ridge, despite a path. Instead, traverse at about the same level as the col, staying well below both the spectacular pinnacles and the steep walls around them. Routes closer to the pinnacles are exposed and difficult. Cross a couple of scree gullies before scrambling back up toward the top.
Upon topping out, you will undoubtedly be inspired by the grand surroundings. For a little alpine flavour, you might try a yodel or two: this summit is an especially good place to hear echoes. If you face Lake Oesa and Abbott Pass, reverberations bounce back at you from a natural amphitheatre amid quartzite walls of mounts Yukness, Lefroy and Victoria. If you can’t yodel, a simple, “S-o-o-o-e-e-e!” or two will do. Once the novelty has worn off or your voice has gone hoarse, return the same way.
Yukness is the Stoney Indian word for “sharpened,” such as a knife. Oesa means “ice” and that is exactly what covers the lake for most of the year. So much for a cool dip.
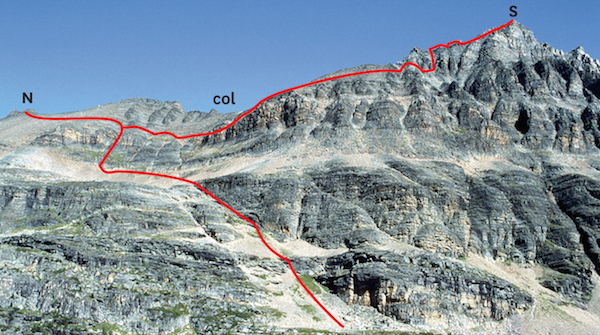
Mount Yukness from west Opabin Plateau. N: north summit; S: south (higher) summit.
Difficulty: Difficult for final 125 vertical metres via southwest slopes
Round-trip time: 8–12 hours
Height gain: 1920 m
Maps: 82 N/8 Lake Louise; Gem Trek Lake Louise–Yoho
Mount Stephen is a demanding ascent that requires more routefinding and stamina than most other scrambles do. It is the first Rockies peak above 3050 m for which there is irrefutable evidence of ascent. While employed by the government to chart the railway’s mountain section, in September 1887, McArthur and Riley struggled up, lugging heavy surveying gear. Tom Wilson’s claim of a prior ascent was never substantiated.
The vertical relief between this brooding behemoth and Field is imposing, rising as a largely uninterrupted face towering 1900 m above. No doubt this loftiness accounts for most of the attention Mount Stephen receives today. The mountain consists mainly of dolomites and shales from the Cambrian period, some 550 million years ago, a time that produced the first abundant fossils. It is against the law to damage or remove fossils from the national park. Parks Canada has restricted public access to protect the fossil beds. The area is monitored electronically and with periodic foot patrols. In dry years you can try this ascent from about mid-July on. A summit cornice turns back too-early attempts, so if in doubt, wait until August. An ice axe is recommended.
Park at the Stephen Fossil Beds trailhead near the creek at the end of First Street East in Field. A special permit is required to travel beyond the Stephen Creek footbridge and ascend the scramble route beside the fossil beds. This permit must be applied for at least a day in advance and in person at Yoho Park Information Centre at the highway turnoff.
From the trailhead, an unrelenting grind takes you to the first part of the fossil beds in an hour. Not surprisingly, the path dwindles soon after. Only parties ascending the peak are given Parks permission to pass freely through this area, and they MUST NOT stop and search for souvenirs. Violating this regulation will prevent access entirely, so for the sake of future parties, please don’t abuse the privilege and ruin it for all!
When you’re close to the fossil beds, the less obvious scramble route heads directly upward at a switchback and is marked with a sign and small arrows. Do not follow the wider path which heads left toward the closed area. It is open only to guided interpretive hikes. Above the fossil beds, continue up broken rock to a wide shoulder where again a path appears, wending its way over shale and scree toward a short rock band. A gully cleaves this to your right. Continue up more scree. Behind you a panorama of peaks unfolds. The distant, snowcapped Selkirks rise to the west, and to the north The President and The Vice President emerge.
The last 125 m of elevation gain requires routefinding through numerous short cliffs. Detour right to surmount most of the rock bands encountered. Innumerable cairns clutter ledges, and you could conceivably spend the day just traipsing back and forth visiting these. Finally, after gaining the nearly horizontal summit ridge, an exposed ridge traverse completes the ascent. This crest is NOT for anyone prone to vertigo. If the tedious trudge up didn’t leave you breathless, one quick glance down the front may do it – Field lies nearly two airy kilometres below. Because a stubborn cornice often clings to this crest, you would be well advised to save this endeavour for later in summer. During one “dry” year, early July was too soon, and disappointed parties were rebuffed just minutes short of success. Note: Parties apparently have traversed around more to the south (right) and continued to the top on ledges, thereby avoiding the ridge entirely. Feasibility of this route too depends on remaining snow.
Scotsman George Stephen, later Lord Stephen, was a stalwart supporter and president of the CPR during its difficult formative years. Upon realizing that the peak was to bear his name, he reciprocated by adopting the title “Mount,” thereby becoming Lord Mount Stephen, in what will surely stand throughout history as a unique case of name-swapping.
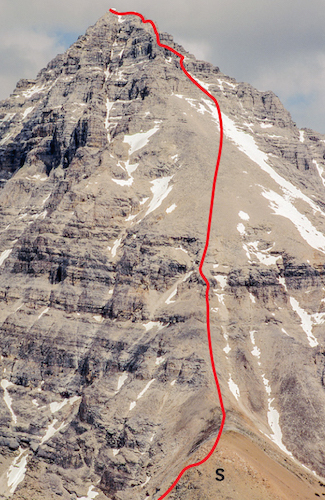
Farther than it looks: Mount Stephen from Mount Dennis. S: shoulder.
Difficulty: A difficult, steep climber’s scramble with massive elevation gain
Round-trip time: 10–13 hours
Height gain: 2200 m
Maps: 82 N/7 Golden, 82 N/2 McMurdo; Gem Trek Lake Louise–Yoho
Mount Vaux (pronounced “vawks”) likely requires the greatest elevation gain of any scramble in the Rockies. Falling just short of the magical height of 11,000 ft (3353 m) this roadside giant has been largely overlooked in the past, despite towering right above the busy Trans-Canada Highway. Simply attaining treeline is equivalent to summiting other peaks, and that’s just the halfway point. Much of the route involves hours of trudging up rubble, but the crux comes right near the top at a black band of steep, loose rock. Ideal conditions would be to have enough snow in the big gully for step-kicking and glissading, but not enough snow above on the right to sluff down on you. Such conditions are most likely to occur during late July, August and into September. This demanding ascent is for fit, capable parties. Helmets, ice axes and perhaps crampons should be carried. This route would be a dangerous choice for large groups.
From Field, BC, drive 22 km west toward the Hoodoo Creek campground. The avalanche slope you ascend starts at a small roadside clearing 800 m before the campground entrance.
Head up the wide avalanche slope, which steepens and curves left as it rises. Not all the rubble in this massive gully is loose, but any snow for step-kicking will be welcome. There should be nothing more than moderate scrambling as you ascend this long gully, although two heavy rainstorms since my ascent seem to have exposed more bare rock. The logical exit is to the right at a point almost directly below the summit and just before the gully ends. Scramble up wherever it looks easiest and then angle slightly to the right, following a shallow gully. This leads to a point where this easier terrain abuts the steep wall. A crack should be evident; a snow arête often remains here. This is the obvious place to overcome the 10- to 15-m wall of steep, black rock. You descend this same terrain, so choose your route through this band carefully and be extremely wary of large, loose blocks. Once above the black band, angle rightward on splintery brown Yoho shale and gain the summit ridge. It quickly leads back left to the permanently snow-covered summit.
The incredible views include the mighty Goodsir peaks, the much-photographed summits at Lake Louise, the glistening Wapta Icefields and the steep north face of nearby Chancellor Peak (see next page). On return, if you’re lucky you’ll be able to glissade some of the gully; otherwise your knees may well feel the endless pounding.
Sir James Hector named this peak for his friend William Sandys Wright Vaux, who was resident antiquarian at the British Museum for 29 years.
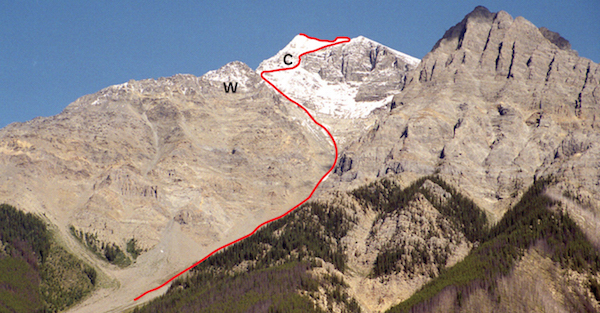
Mount Vaux route from the highway. C: crux; W: west face.
Difficulty: Difficult scrambling, routefinding, serious exposure, big elevation gain; a climber’s scramble.
Round-trip time: A long day, 11–14 hours
Height gain: 2160 m
Map: 82 N/2 McMurdo
Chancellor Peak is the most serious ascent in this guidebook. Elevation gain almost equals that of neighbouring Mount Vaux, but Chancellor involves more routefinding and exposed, slabby scrambling near the summit. Follow animal trails to treeline, scramble up rock, descend ledge into huge gully, step-kick up snow and scramble exposed slabs to the top summarizes this trip. Stamina, good routefinding and an early start are imperative. This is a committing ascent requiring good weather, as there is no quick way off. Slabs near the top are only feasible when dry. Parties should warm up for this one by doing mounts Chephren, Carnarvon and Smuts. For small, competent parties with ice axes, helmets and experience, try from late July on.
From Field, BC, drive 22 km west to the Hoodoo Creek campground. Proceed past the camping area on the left to the sani-station at the end of the road and park (303743). Note: Route photos here were taken from a southwest angle across the Kickinghorse River valley at Wapta Falls overlook on the Beaverfoot forest service road at 295700 prior to a prescribed burn. This road leaves the main highway 7 km west of the Hoodoo campground. It is worth driving to scope out the route with binoculars beforehand. Travel about 7 km southeast and watch carefully on the left for a small side road. A logging clearcut at 6 km also works well. Little of the ascent route can be seen from the Trans-Canada.
My original approach to Chancellor’s huge SW gully followed the confined drainage right from the valley. Since then, heavy rains have washed down tonnes more debris and unearthed huge boulders, making this approach very unpleasant. A better way is as follows.
Walk southeast for 5 minutes along an old gravel road toward a visible pond, then head across a clearing parallel to the base of the peak. Enter forest (some deadfall) and continue SSE past a lesser drainage until you intercept debris from the next drainage – the big one. Here, heavy rains have carried vast amounts of rock from the peak’s huge SW gully far into the forest, even uprooting trees. Follow this up to the base of the mountain where the drainage emerges at 311732, some 30+ minutes from the start. Bash through forest on the left to get above the drainage and onto more open lower slopes that were part of Parks’s prescribed burn. A reasonable animal trail exists close to the edge above the drainage and avoids most deadfall as you head for treeline, a mere 700 m above.
Once at treeline (about 3 hours), a couple of different gullies allow you to scramble through the rock band and onto the west face. Ascend this face, working to the right, and continue up gullies and ribs of loose rock to a wide (high) band of lighter brown rock. Cairns along the way will be reassuring on descent. If you’re far enough right, you should at some point notice a ledge where brownish to orangeish rock allows an easy traverse down into the huge SW gully. About here the light brown–orange rock on the west face ends and darker, steeper, grayish rock begins above. You must find this spot. There are actually two separate places where you can descend into the SW gully from this west face, but the lower one is quite a bit steeper, loses more height and puts you below a steep rock band that would be difficult to descend. That realization turned me back when I ascended the huge gully. I scrambled up the first rock band but turned back at the second, steeper one. To kill time, I grovelled up a narrow but easy gully onto the west face, scrambled higher for a look and inadvertently found this key traverse ledge described above. I even saw a cairn.
When you get into the gully, a snow patch probably follows. After you’ve fully rehydrated at the upcoming waterfall, scramble up slabs to the right, then slog up rubble to a long, permanent snow patch which curves left higher up. Step-kicking here is a pleasant respite, but above here both challenge and exposure increase noticeably. Work your way up and left over the most feasible terrain, using a narrow watercourse, downsloping slabs and loose shale. The odd hastily built cairn here will be useful on descent. When you come level with the connecting ridge to the nearby peak south, some 150 airy metres of vertical remain – a pittance considering what’s behind! An overhang higher up forces a detour to the left and requires care, as do shale-covered slabs. A fall here would be fatal but this slabby terrain would not be conducive to belaying. As of 2013 the mountain has been subjected to two extremely heavy downpours since my ascent, which may have washed away some shale debris from upper slabs, or perhaps merely loosened more. After yet more exposure, a level ridge appears and a short walk left leads to the top. When James Outram’s party made the first ascent in July 1901, this upper part was snowy and icy. They spent six hours from treeline to summit and it is surprising they even made it. It was their third attempt, which underscores the advantage of having a guidebook.
The summit is small, making this high, exposed perch feel doubly exhilarating. While there are many impressive peaks nearby, distant views are no less remarkable and extend far west into the Purcell and Selkirk ranges. On return, those cairns you scooped together will be pleasantly reassuring. Once you reach snowline the scariest part is over. Be sure to watch for that key traverse ledge back up onto the west face. You’ll know if you miss it – steep terrain below it will have you muttering, “I don’t remember this at all.” Retrace your steps back to the starting point.
Sir John Alexander Boyd (1837–1916) was a renowned jurist who served as chancellor of the Ontario High Court of Justice, according to the Dictionary of Canadian Biography.
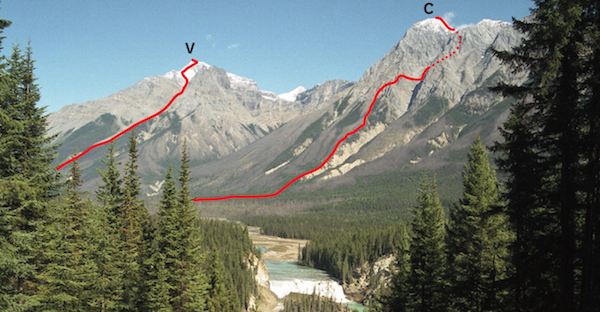
Ascent routes for V: Vaux and C: Chancellor as seen from Wapta Falls overlook.

Chancellor Peak showing ascent route. T: traverse ledge; G: huge SW gully; R1, R2: steep rock bands.
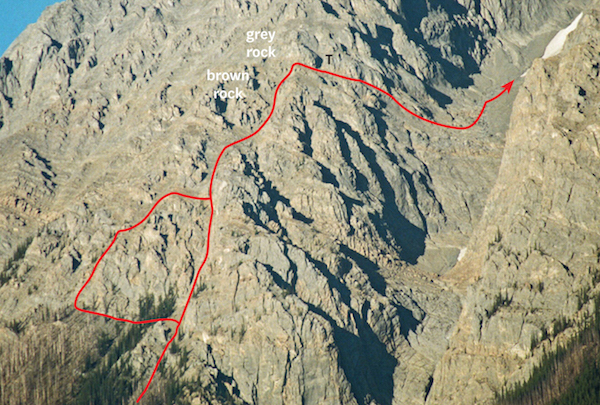
Close-up of Chancellor’s west face and the T traverse ledge.
Difficulty: Moderate scrambling via west slopes
Round-trip time: 8–12 hours
Height gain: 1350 m
Maps: 82 N/9 Hector Lake; 82 N/8 Lake Louise; Gem Trek Lake Louise–Yoho
Mount Niles is Mount Daly’s nearby partner. Both are in a true wilderness setting of rock, ice and meadow. Despite a good approach trail and a lack of difficulties, it has not been ascended frequently in the past, probably because it is not clearly seen from the highway. As it borders the expansive Wapta Icefield system, the resultant heavy snowfalls shorten the scrambling season. Expect a unique view of Yoho Valley, local peaks and adjacent glaciers, together with plenty of Yoho rubble. You should carry an ice axe. Try from about mid-July on.
Drive to Wapta Lake picnic area at the west end of Wapta Lake, BC, 5.1 km west of the Continental Divide at Kicking Horse Pass.
The first step is to reach Niles Meadow. From the parking area, hike to Sherbrooke Lake via the signed trail near the picnic shelter and continue down the east shore. Two peaks rise north of the lake: leaning Mount Niles on the left and Daly on the right, looking more like a ridge. The trail continues past the lake, gains height to a meadow, re-enters mature forest and curves left up Sherbrooke Creek. The trail is well defined and stream crossings are usually bridged. About 2 hours from the parking lot, the path crosses to the left (west) side of Sherbrooke Creek. Hop a side stream and cross the main channel on a large log. Within 10 minutes you cross back again and then hike near a 20-m-high waterfall above an avalanche slope. After switchbacking over a hump, the path descends to emerald-green Niles Meadow, right below Mount Niles. Mount Daly lies to the east, beyond the ridge bordering the meadow. Both peaks could be done from a nearby bivouac.
From Niles Meadow a switchbacking trail rises on the hillside to the right and leads toward the south end of Niles. Look for a stand of about 15 firs at the right edge of the meadow by a shaley watercourse (cairn). A good path leads up open slopes, or you can simply hike up alongside the gully directly toward the peak. Head for the west (left) skyline ridge where stands a big pinnacle, crossing a boulderfield en route. Lingering snow patches at the col will require step-kicking. Upon reaching the col, you’ll see glistening Waputik Icefield and glaciated Mount Balfour to the north, both of which drain into a silty, grey-green collecting basin. This milky pond in turn feeds thundering Takakkaw Falls below in Yoho Valley.
From the col, follow a hint of a trail up the slope on the back side of the pinnacle. Angle right when the terrain steepens and easily work your way up shaley rubble to the snowcapped summit, an hour or less from the col. Be wary of cornices on top.
Despite cloud, I could briefly savour a glimpse of Mount Stephen and its north glacier to the southwest and familiar peaks encircling Little Yoho Valley. With luck you will see much more. Whatever the conditions, return by the same route.
A horrific grizzly bear attack occurred near Sherbrooke Lake in 1939, involving Canadian Pacific Railway photographer Nick Morant and Swiss guide Christian Haesler. Haesler was badly mauled. Although he survived, he never fully recovered, despite having been in excellent health beforehand, and died within two years. Mount Niles honours W.H. Niles, an early climber in the area.
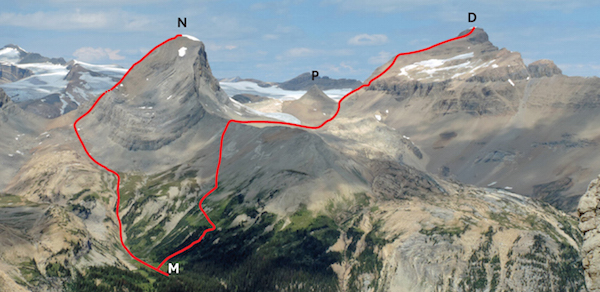
As seen from Mount Ogden, M: Niles Meadow; N: Niles; P: pyramid; D: Daly.
Difficulty: A moderate to difficult scramble via southwest slopes
Round-trip time: 10–14 hours
Height gain: 1530
Maps: 82 N/9 Hector Lake; 82 N/8 Lake Louise; Gem Trek Lake Louise–Yoho
Mounts Daly and Niles form the portal through which ski tourers pass when completing the famous Wapta Icefield traverse. Looking west from the highway at Lake Louise, Daly appears as a long ridge on the horizon; Niles is a rounded peak behind. Mount Daly rates as a fairly serious trip, as it is in a less travelled area. The ascent involves avoiding a glacier, doing a bit of steep scrambling, traversing a loose ridge and perhaps ascending a steep snow slope. Therefore, it is recommended for experienced parties. The mountain is readily approached via the Sherbrooke Lake hiking trail. Given the heavy snowfall the region receives, this ascent is recommended for late July or August, when conditions should be drier. An ice axe is recommended.
Drive to Wapta Lake picnic area at the west end of Wapta Lake, BC, 5.1 km west of the Continental Divide at Kicking Horse Pass.
The first step is to get to Niles Meadow. From the parking area, hike to Sherbrooke Lake via the signed trail near the picnic shelter and continue down the east shore. Two peaks rise north of the lake: the leaning Mount Niles on the left, and Daly on the right, looking more like a ridge. The trail continues past the lake, gaining height to a meadow. It then re-enters mature forest and curves left up Sherbrooke Creek. The trail is well defined and stream crossings are usually bridged. About 2 hours from the parking lot, the path crosses to the left (west) side of Sherbrooke Creek. Hop a side stream and cross the main channel on a large log. Within 10 minutes cross back to the right side again, then hike near a 20-m-high waterfall above an avalanche slope. After switchbacking over a hump, the path descends to emerald-green Niles Meadow, right below Mount Niles. Mount Daly lies to the east beyond the ridge bordering the meadow. Both peaks could be done from a nearby bivouac.
A good trail rises on the hillside to the right of Niles Meadow and leads toward the south end of Niles. To reach Mount Daly you must hike up over the long ridge extending south of Niles. From a stand of about 15 fir trees at the right edge of the meadow, find a trail by a shaley watercourse (cairn). This path switchbacks high up onto the ridge crest, which is then easily crossed and grants a clear view of Daly’s ascent route.
As seen from this ridge crest, the line of ascent begins on a west-facing cone of tedious rubble close to and facing a small, rocky pyramid. The topo map shows the snout of Niles glacier extending between Niles Ridge and this pyramid. Unless properly equipped, do not contour high to avoid elevation loss, as you will be crossing glacier and there just might be crevasses. To be safe, you should descend into the basin and go around below. Cross the outflow stream, then ascend steep snow or scree slopes to the col between Daly and the little pyramid. Trudge up steep, loose rubble on Daly (snow toward the northwest side of the rubble cone may be preferable) to a cliff band. From just below the high point of this slope, traverse right (south) on a good-sized ledge and scramble through the loose cliffs where it’s least steep. This is the crux and an accident has occurred here. Rubble or short rock steps above lead to shale slopes, snow patches and the summit ridge. Beware of cornices! On my ascent, a 6-m-high overhanging snowcap covered the summit.
Farther north beyond this snowcap waits an apparently higher summit and a register. The 20-minute traverse to this grey summit is not as difficult as it appears. However, from there, the southern summit of brown rock looks higher. Both, however, are typical crumbly Yoho rubble.
On a clear day the view includes the Dawson Group, a line of four glaciated peaks thrusting up in the distant Selkirk Range to the west. Closer by, peaks near Lake Louise are every bit as entrancing. Anyone who has skied the area will find this lofty perspective ideal to scout out crevasses on the Waputik Icefield. Few are evident. Once you’re all scouted out, return the same way.
According to Peakfinder.com, published by the Interpretive Guides Association, Mt. Daly was named by Charles Fay in 1898 in honour of Charles P. Daly of New York, who served as president of the American Geographical Society. Official acceptance of the name may have been bolstered by Reginald Aldworth Daly, a famous Canadian-born geologist.

Telephoto shot of Mount Daly route as seen from Mount Ogden.
Difficulty: Moderate scrambling on loose rock if dry; possible steep snow-climbing
Round-trip time: 8–10 hours from Takakkaw Falls parking lot; 5+ hours from Little Yoho Valley
Height gain: 1400 m from Takakkaw Falls; 700 m from Little Yoho Valley
Maps: 82 N/10 Blaeberry River; Gem Trek Lake Louise–Yoho
Isolated Peak adjoins a large glacier and is close to both hut and campground. It can be comfortably done as a loop day trip from Takakkaw parking lot to include a traverse of Whaleback Mountain, or as a shorter day trip from a base in Little Yoho. Both objectives are visible as you look northwest from the Spiral Tunnel viewpoint on Field Hill east of Field, BC. “Fabulous” best describes the location, and the approach trails are excellent too. The rock, unfortunately, is trashy Yoho shale. It may be fine for fossils, but it’s crud for climbers. Unless you’re competent at climbing steep snow slopes, wait until late July, when the west slopes will be steep, loose shale instead. Folks seeking an aesthetic experience will be disappointed on this ascent unless roped up and ascending the adjacent glacier.
Park at the Takakkaw Falls parking lot at the far end of Yoho Valley Road east of Field, BC. The Little Yoho Valley trail starts at the north end of the parking lot.
Hike the Yoho Valley trail to Laughing Falls Campground, then follow the left branch signed Little Yoho–ACC Hut. In 1.5–2 hours from the trailhead, branch off to the right up a steeply switchbacking trail to the Whaleback. Whaleback Mountain is the long southeast ridge of Isolated Peak, and the open south end where the Parks trail crests it is called the Whaleback. Allow at least 2 hours to here. The hiking trail then descends toward Twin Falls, but DO NOT continue on past here.
Upon reaching the Whaleback, leave the Whaleback trail and hike left up a faint path (cairns initially) leading toward the ridge above you. This is just left of the rock face on the skyline, part of Whaleback Mountain. Vast, glistening icefields and towering peaks are now your companions for the rest of the trek. Due south are north faces of The President and The Vice President, each dominating its respective glacier below, while your objective, though less impressive, is clearly visible straight ahead.
As you approach Isolated Peak it is tempting to continue on to the south slopes to avoid losing elevation unnecessarily. The fact is, though, the ledges on that aspect are awash in heaps of precariously perched shale and are very exposed. Do yourself a favour and simply follow the trail down from the col and regain this height as you slog around to the west side. Avoid the adjacent glacier. On the west side, a lengthy shale or snow slope narrows to a gully above, at which point it is possible to work left on big ledges (not clearly seen from below) onto easier ground. It is important to go all the way left to the easiest gully. Continue up toward the summit. Unless you are competent at climbing steep snow, you should stick to the shale. By August there will probably be nothing but shale anyway. The final slope rises above a small plateau jutting out into des Poilus Glacier on the northwest side and is a mere walk.
A surprisingly good approach trail leads to the hanging valley between Stanley Mitchell Hut and Isolated Peak. It begins at the outhouse at the east (right) end of the hut, rising quickly through mature forest to heathery alpine meadows complete with a bubbling stream and waterfalls. Cairns direct you north across glacial outwash below steep rock walls and alongside cascades toward Isolated Peak. The two approach routes coincide below the col (note the pinnacles). Trudge left around the base and continue to the summit as described previously.
The summit view is adequate compensation for the thrash you’ve endured and includes the distant Howser Towers in the Bugaboos of BC and more recognizable giants surrounding Lake Louise. You should also be able to pick out the return trail to the right of the stream as it wanders south through meadows to the hut below. These meadows are an idyllic and special place. Carpeted in heather, fed by a clear stream and far removed from the human traffic of Little Yoho, they beg you to have a snooze before descending. Try it, you’ll like it. Once you reach the hut, turn left and hike east back to Takakkaw Falls in 2 or 3 hours.
Isolated Peak was first ascended in 1901 by four Swiss guides and two very notable climbers. Reverend James Outram, who a month later bagged “the Matterhorn of the Rockies” (Assiniboine), and Edward Whymper, who had already conquered “the Assiniboine of the Alps,” the Matterhorn. According to Place Names of the Canadian Rockies, by Boles, Laurilla and Putnam, Isolated Peak is so named because it is a part of neither the Balfour group to the east nor the Rockies to the west. Outram found it “extremely valuable for a survey of the glaciers surrounding the head of Yoho, and of the various tributary valleys.” You probably will too.
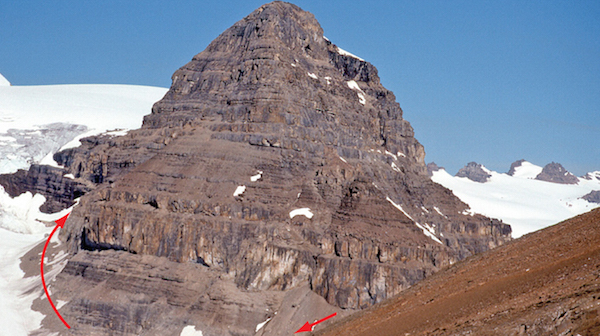
Approaching Isolated Peak from the Whaleback. The route circles to the west side.
Difficulty: An easy scramble from Kiwetinok Pass
Round-trip time: 3+ hours from Little Yoho Campground
Height gain: 790 m from campground
Maps: 82 N/10 Blaeberry River; Gem Trek Lake Louise–Yoho
The most straightforward ascent in Little Yoho Valley, Mount Kerr is readily approached by a well-trodden hiking trail to Kiwetinok Pass. The summit view is vastly better than what you glimpse from the pass, and includes glaciated peaks in the Purcell and Selkirk ranges far to the west. An ice axe could be needed if snow patches linger; try from mid-July on.
The hiking trail to Kiwetinok Pass lies on the south side of Little Yoho River. From Stanley Mitchell Hut, cross the meadow and the bridge, turn right and hike to the pass in about an hour. Mount Kerr, the south buttress of the pass, is visible on the skyline, and most of the ridge you see as you approach is the line of ascent.
Once you reach the pass, simply follow the adjacent ridge south toward the peak. Work around to the right onto more westerly slopes at steeper rock bands, scrambling over blocks and large plates of loose shale. If you’re a photographer, morning light will emphasize the distant view west toward the Selkirks, while afternoon is more favourable for seeing the Waputik and Wapta icefields. From this side, Mount Carnarvon, just south, presents a pyramidal shape even more striking than that seen from the Trans-Canada Highway. One wouldn’t think it would be a scramble.
The higher point to the south can also be scrambled and should be considered the true summit, despite the NTS map. Some make a point of summiting that one as well, while others don’t bother. Your choice.
Robert Kerr of the CPR did much arranging for Matterhorn conqueror Edward Whymper to visit and publicize the Rockies. Yoho Valley itself played host to Whymper and his four Swiss guides in 1901. All completed the first ascent of this mountain, but it’s unlikely their skills were taxed by it.
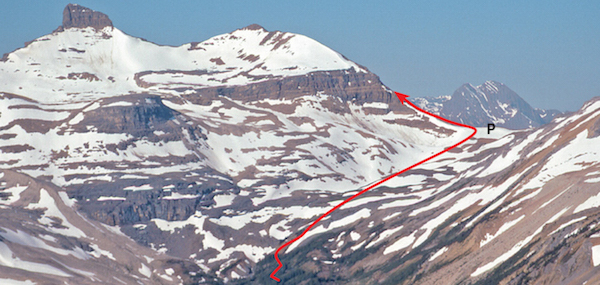
Mount Kerr from the Whaleback. P: Kiwetinok Pass.
Difficulty: A difficult, loose and exposed scramble by the east slope
Round-trip time: 4–5 hours from Little Yoho Campground
Height gain: 825 m from campground
Maps: 82 N/10 Blaeberry River; Gem Trek Lake Louise–Yoho
Kiwetinok Peak forms the north buttress of the pass of the same name but is probably ascended less frequently than its companion, Mount Kerr. Care is needed because of loose rock, and although the route is short, it is exposed. You can readily combine this ascent with mounts Pollinger and McArthur for a three-summit day. A fine view of big Rockies and Selkirk peaks almost makes you forget the miserably loose rock. Almost. Try from late July on.
From Kiwetinok Pass, hike around the west shore of Kiwetinok Lake and trudge up rubbly slopes to the ridge connecting Kiwetinok Peak with Mount Pollinger, 1 km northeast. This ridge is broad but scramblers should avoid the large, permanent ice patch on the face above the ridge.
Stay left of the ice patch, angling across rubble and slabs to reach short, rotten bands of shale. The farther left you go, the more eroded and easier it is. Where steep, this shale can be dangerously loose, so look for gentler slopes. The horizontal summit ridge leads quickly to a crumbling cairn.
The view is similar to what you see from Mount Kerr, and includes Mount Forbes and the Goodsirs as well as Mount Sir Donald in the distant Selkirk Range to the west. Below, the wide Amiskwi valley lies scarred by both logging and burning. As for the name, Kiwetinok is apparently an Indian word for “on the north side.”
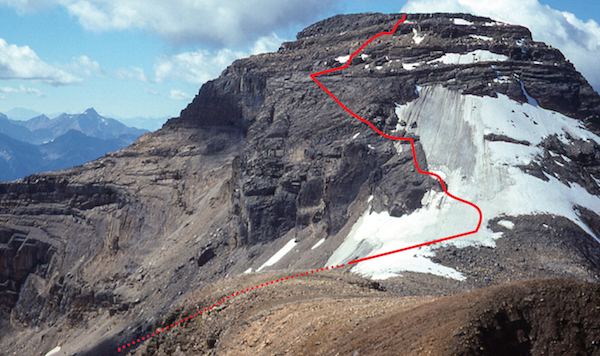
The summit “hump” of Kiwetinok Peak as viewed from Mount Pollinger. Kiwetinok Lake is to left.
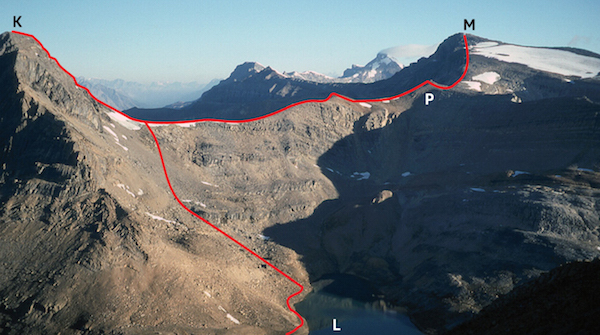
Viewed from Mount Kerr: K: Kiwetinok Peak; M: Mount McArthur: L: lake; P: Mount Pollinger.
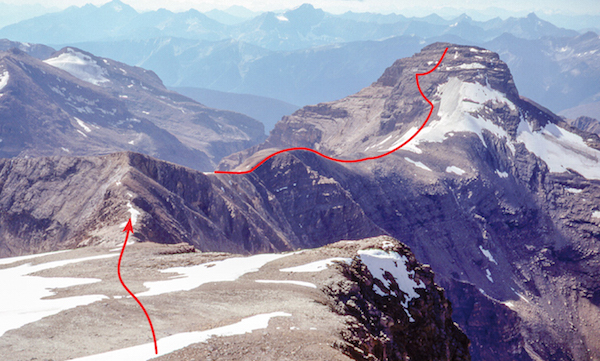
Kiwetinok Peak and connecting ridge as seen from Mount McArthur.
Difficulty: Easy hiking to Pollinger; one short, steep downclimb to reach McArthur
Ascent time: 1.5 hours from either Kiwetinok Lake or Kiwetinok Peak
If you’ve climbed Kiwetinok Peak, it is worth the extra effort to traverse Mount Pollinger – a mere bump along the ridge – and continue over to Mount McArthur. Follow the ridge northeast from Kiwetinok Peak. The only difficulty en route is a short but steep downclimb (5–7 m) right after Mount Pollinger. The rock is solid, but when it’s snowy, parties rappel this part. It is possible that a ledge on the east side would be an alternative.
There is a large permanent snow patch before you reach McArthur’s summit, but no actual glacier on the south side, despite what maps show. Note that des Poilus Glacier does abut the summit ridge on the north and east sides, though. After a few hundred years of global warming, this vast glacier and its accompanying crevasses will be gone. Lucky scramblers will then continue unimpeded over bare, scoured rock to Isolated Peak and the Whaleback. That’s the complete reverse of Outram’s traverse done in 1901, and probably no worse. (Hey, that rhymes!)
Mountain ranges between Mount McArthur and the Selkirks are comparatively low, and this allows an unrestricted view of heavily glaciated peaks in BC’s Interior ranges. The Bugaboos and the Mount Sir Donald Range are particularly dominant, and on a clear day, time will pass quickly if you’ve brought maps and binoculars along.
The return can be shortened if you don’t mind slogging across a boulder-strewn valley. Several places between Pollinger and McArthur allow you to drop down to the hanging valley on the southeast side. They are evident from near Pollinger. You may encounter short rock bands initially, but a carefully chosen line will simply be knee-jarring rubble. Tramp back toward Little Yoho Valley, descend open talus slopes and meet Kiwetinok Pass trail just upstream of the campground.
J.J. McArthur was a topographic surveyor involved with both the railway project and the 49th parallel. His work yielded several first ascents, including Mount Stephen. Joseph Pollinger was one of Whymper’s Swiss guides in the Rockies in 1901.
Difficulty: Difficult scrambling via south ridge for final 100 vertical metres
Round-trip time: 7–10 hours
Height gain: 1760 m
Maps: 82 N/7 Golden; Gem Trek Lake Louise–Yoho
Mount Carnarvon is possibly the best scramble near Field. It boasts a well-maintained approach trail and fine surroundings, and unlike many Yoho peaks it offers good, solid rock. Elevation gain is significant, but similarly unlike many Rockies scrambles, very little of this ascent is spent toiling up tedious loose scree. When travelling the Trans-Canada Highway, glancing north at a point some 12 km west of Field, you can see Mount Carnarvon rising like a great pyramid to eclipse snow-capped peaks of The President and The Vice President to the right. Carnarvon’s striking shape and challenging scrambling on good rock make it worth a visit. This route requires dry, snow-free conditions. An ice axe is recommended; try from late July or August on.
From Field drive west 2.6 km to Emerald Lake Road and follow it for 9 km to the Emerald Lake parking lot.
Find the trailhead for Hamilton Lake on the west side of the parking lot near the entrance. Hike the steep 5.5-km trail to scenic Hamilton Lake. After the unforgiving approach hike, this is a perfect place to rest and fortify yourself for the tough 900 m of elevation gain ahead. Cross the lake’s outlet stream and ascend the meadowy hillside that leads to brown shale and the south ridge. You can stay on the ridge most of the way to the summit, with few detours necessary. Steeper rock steps are typically quite solid (by Rockies standards!) and are great fun when tackled head-on. Detour left onto easier terrain if needed. The strata are horizontal or dip inward, and the abundance of good handholds makes for an enjoyable ascent.
One hundred vertical metres below the top the route becomes more serious. Walls rear up steeply. Here you must traverse left 75 to 100 m and ascend gullies to overcome this last section. It is likely you will encounter snow in these gullies and it will require an ice axe and perhaps crampons too. Cairns and a bit of trail have magically appeared over the years, but you should note your ascent gully carefully anyway. They may all look alike on descent.
A short walk leads to the cairn and the often snow-clad summit. To the northwest is the large, glaciated Mummery Group, while closer by are Mount Balfour and the Wapta Icefield. When you have frittered away enough of the afternoon, return the same way.
Mount Carnarvon is named for Henry Howard Molyneux Herbert, Fourth Earl of Carnarvon and parliamentary author of the British North America Act.
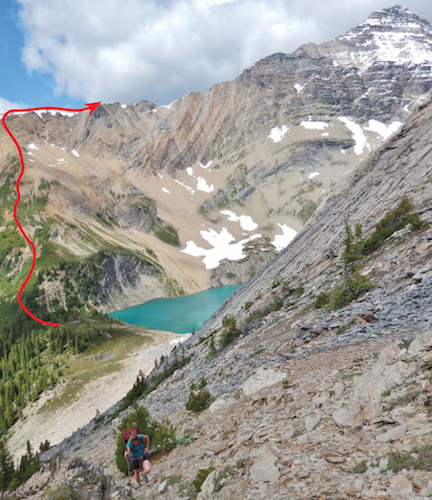
The challenging ascent route up Mount Carnarvon as seen from Emerald Peak. The ascent route follows the left skyline ridge. PHOTO: MATTHEW HOBBS
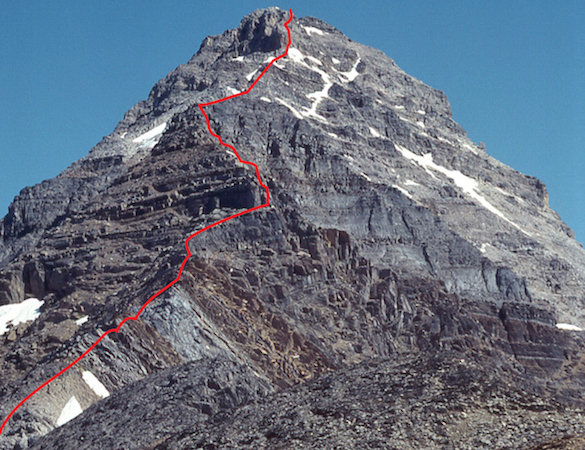
A head-on view of Carnarvon’s south ridge (route approximate).