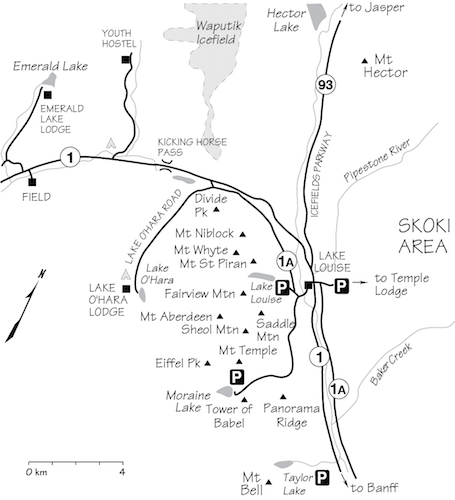
Mount Bell 2910 m moderate
Mount Niblock 2976 m moderate
Mount Whyte 2983 m difficult
Mount Aberdeen 3151 m easy
Sheol Mountain 2779 m moderate
Divide Peak 2503 m difficult
Mount Temple 3543 m moderate
Mount St. Piran 2649 m easy
Fairview Mountain 2744 m easy
Panorama Ridge 2800 m easy
Tower of Babel 2360 m easy
Eiffel Peak 3084 m moderate

Lake Louise is without question the gem of the Canadian Rockies. Few places in the entire chain can match the grandeur of this area. Before the turn of the century, the Canadian Pacific Railway recognized Lake Louise’s unparalleled beauty and used it unabashedly to entice wealthy visitors from afar. The lure? A stunning picture of glaciated Mount Victoria soaring high above emerald green waters of Lake Louise. “Fifty Switzerlands in One!” boasted one poster. The ploy worked. Hordes soon began arriving and have not let up since. Even today, to miss Lake Louise is to miss the Canadian Rockies. Because of its popularity, one cannot expect solitude here. It is heavily used, to say the least, but spectacular nonetheless.
Lake Louise straddles the Continental Divide, and in fact the summit ridge of Mount Victoria sends water into both Alberta and British Columbia. This is an area of high precipitation that hosts not only big mountains but also large glaciers. While many summits are alpine ascents requiring glacier travel and technical climbing, you can find good scrambles too. The highest peak in the area is Mount Temple (3543 m), and on a sunny summer day a few dozen or more parties may be scrambling up the south slopes toward the top. Although this number pales when compared with masses of 100–200 seen daily on popular summits in Europe and the United States, for the Canadian Rockies it is an army.
The peaks and lakes in the Skoki area just north of Lake Louise were much less visited in the past. As hiker and horseback traffic increased through the mid-1990s, a quota system was contemplated, but this may not be required after all. As the generation of scramblers, hikers and riders ages there will be fewer visitors, and unless technology can somehow be pried from the hands of younger people, it is unlikely many of them will even visit these wonderful places, much less overuse them.
Scrambles around Lake Louise are distinctly different from those found in the Front Ranges. While the rock is still of sedimentary origin, many mountains here are layer-cake formations that have been uplifted levelly rather than tilted as dip-slope formations. Weathering often forms alternating bands of short, steep cliffs interspersed with flat, rubble-strewn ledges. You may find this a pleasant change from the tilted, downsloping strata of Kananaskis, Canmore and other Front Range areas. The scree is as tedious as anywhere, though. Quartzite is found in the lower layers of peaks surrounding Lake Louise, and cragging is well established. Most popular are steep and overhanging walls along the back of the lake in an area cleverly known as “The Back of the Lake.” Note that quartzite on the peaks is often clad with lichens and when wet it is much more slippery than limestone.
Snow persists for much of the summer at higher elevations of Lake Louise, especially on north-facing aspects. Many fine alpine ice routes exist nearby. An ice axe is standard equipment just about anytime, even for scrambles, and never looks out of place here on a pack. Until July some scrambles may in fact be more like mountaineering in nature because of remaining snow. The Continental Divide bears the brunt of major Pacific storms, and peaks here can sock in for days. A cold overnight rain will often dump snow at higher elevations even in midsummer, and a couple of days’ precipitation may spoil conditions on big peaks for even longer. Valuable vacation time can be wasted here waiting for improvement, whereas conditions may be much better just a short drive east to Banff, Canmore or Kananaskis. Statistically, you can expect good weather about one day out of three around Lake Louise. Historically, late July and the first half of August have stable periods of good weather.
Access Lake Louise is 2 hours west of Calgary on the Trans-Canada Highway. The nearest town to the east is Banff; to the west, Golden. Brewster’s runs a daily shuttle from Calgary International Airport to Lake Louise, and Greyhound buses stop here as well. Like anywhere in these mountains, though, a car is really what you need. Within the village, a well-marked road runs 5.5 km to Chateau Lake Louise. Moraine Lake Road branches left at 4 km and travels 12 km to the Valley of the Ten Peaks.
Facilities Lake Louise has grown considerably over the decades and facilities for visitors are now more complete. Samson Mall has a grocery store, liquor outlet, showers, laundromat, a great little bookstore, sporting goods and a photo shop. Laggan’s Bakery gives probably the best dollar value of any eatery you’re likely to find anywhere around, and most locals’ itinerary includes the requisite stop (or start!) here. Wilson Mountain Sports both sells and rents equipment, including ice axes and bikes. The two gas stations in town are not open 24 hours, nor are any restaurants. The Canadian Alpine Centre and Hostel has excellent, affordable cafeteria-style meals and, not surprisingly, gets crowded at peak times.
Accommodation A large Parks Canada campground is found in Lake Louise, as is the Canadian Alpine Centre, jointly run by the Alpine Club of Canada and the Southern Alberta Hostelling Association. This facility has a cafeteria, meeting rooms, a cooking area, sleeping and family rooms and a lounge. Reservations are usually required owing to popularity. Expect to pay big bucks anywhere else if you can even get in: hotels here are expensive.
In the adjacent backcountry are the Lake Agnes Teahouse, on the approach to mounts Niblock and Whyte, and the Plain of Six Glaciers Teahouse, below Mount Victoria and upvalley from a descent route on Mount Whyte. Both are popular hiking destinations, but remember to take cash. Neither credit card nor singing for your supper will suffice.
Information Parks Canada, located next to Samson Mall, supplies info on backcountry permits, trail conditions, closures and weather forecasts (403-522-3833). To prevent grizzly encounters during prime hiking season, most routes around Moraine Lake and Lake Louise require, by law, “tight groups of four or more,” each with bear spray. Inquire at the info centre or online before setting out. This law is in effect for most of prime season and there are stiff penalties for contravening it.
Wardens keep 8–4 office hours in the government building at the west end of Village Road (911 or 1-888-WARDENS). If the information centre can’t update you on conditions for a particular route or peak, it is sometimes possible to talk to a warden. They will be happy to help you stay out of trouble.
Difficulty: A moderate scramble via southwest slopes
Round-trip time: 7–10 hours (26+ km)
Height gain: 1500 m
Maps: 82 N/8 Lake Louise; Gem Trek Kootenay National Park, Lake Louise–Yoho, Banff–Assiniboine
Mount Bell is an outstanding viewpoint overlooking Taylor, Boom and O’Brien lakes. The approach is long but pleasant, circling around to easier slopes on the back side. En route you visit four separate alpine tarns. The view includes the seldom-glimpsed Boom Glacier, the Rockwall in Kootenay Park, and farther west the Bugaboo Peaks of the Purcell Range. Depending on snow conditions, part of the descent may provide an exhilarating glissade. An ice axe is recommended for this route; try from about mid-June on.
Drive to the Taylor Lake trailhead at a gravel pull-off on the south side of the Trans-Canada Highway, 8.1 km west of Castle Junction.
From the parking lot, cross the creek and follow the well-graded hiking trail 6.3 km to Taylor Lake. Lakeside picnic tables offer a convenient rest stop. From Taylor Lake the north side of Mount Bell looms threateningly above and reveals no easy line of ascent. Cross the bridged outlet stream and follow the trail for 40 minutes (2 km) to O’Brien Lake. Follow the right-hand shore through stands of feathery Lyall’s larch and across carpets of wildflowers to the waterfall at the west end of the lake. A faint trail ascends the hillside to reach several secluded tarns ringed by larches.
From here your goal is a col at the far end of the valley, past the ponds and the intervening rock debris. This col, or rather this notch in the ridge, gives access to easy-angled south slopes of Mount Bell. Since the wide, 150-m-high gully leading up to the col faces north, the snow may well be frozen in the morning. This is especially true after a crisp, clear night. Early in the season (June), such conditions would require an ice axe and possibly crampons too. However, by the time you return, this snowslope should have softened and the potential glissade may be the best part of the trip.
Ascend this slope to the col. Looking west from there, successive ranges rise in an infinite array of shapes, forming the backdrop to surrealistic deep blues of Boom Lake. Turn right to gain Mount Bell’s south and southwest slopes of scree and eroded sandstone. Continue toward huge, lichen-covered quartzite blocks. You may also opt to scramble up the short chimneys in this firm rock just for fun. A trail leads up to pinnacles that are readily bypassed by going right. Not far beyond, a large block straddles the final section, offering a photo op. This finale is also bypassed on the right. Once you’ve had enough spectacular scenery, return the same long way.
Mount Bell is named for Dr. Frederick Bell, a founding member of the Alpine Club of Canada, and his sister, Nora Bell, also a club member, who accompanied the first-ascent party in 1959.
Boom Lake hiking trail provides an optional approach. The total distance of this route is shorter and although it should not require an ice axe or crampons, at least part of it is bushy. It has not been as popular as the Taylor Lake approach.
Begin 7 km west of Castle Junction on the Kootenay Parkway (Highway 93) at Boom Lake trailhead and picnic area. Hike to the lake, then continue along the right-hand shore to the avalanche slope above a heaped-up boulder field a few minutes farther. The slope’s right side is generally open, but expect a short stint of bushwhacking lower down. It is not necessary to go completely to the ridge crest, so angle left above treeline and traverse to the col, a pronounced dip in the blocky ridge. The two approach routes join here. Ascend the south side of Mount Bell as described for the O’Brien Lake approach. Return the same way, noting that your descent slope is above where the shoreline has been pushed well out into Boom Lake.
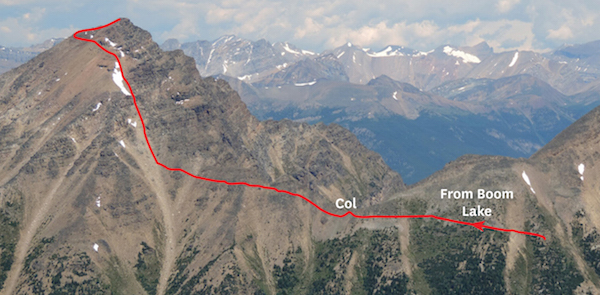
Mount Bell routes as seen from Mount Whymper. The two possible routes are from Taylor Lake and Boom Lake and these meet at the col.
Difficulty: Moderate scrambling from Lake Agnes
Round-trip time: 6–9 hours
Height gain: 1260 m
Maps: 82 N/8 Lake Louise; Gem Trek Lake Louise–Yoho
Mount Niblock is one of the most popular Lake Louise scrambles and is reached via an even more popular hike. Neighbouring Mount Whyte is a significantly harder, more exposed scramble but capable parties can include it too. Doing so allows a different, albeit longer, descent route on south slopes toward the Plain of Six Glaciers Teahouse. While not as grandiose as surrounding giants Lefroy, Victoria and Temple, both Niblock and Whyte are well worth the effort and a beaten path takes you most of the way. Do not attempt either peak too early in the summer, particularly Mount Whyte or the optional south slope descent. It might be snowy and prone to avalanche. Snow-free conditions are ideal, and July through September is generally the best time. Regardless, I recommend an ice axe. Crampons could also be considered but are not usually necessary – during summer any snow on these routes normally softens considerably by mid-day. If you do carry this equipment, it is sure to spark conversation among the curious hordes. Be prepared to pose for pictures and answer questions in peak season.
From the Lake Louise townsite, follow the access road 5 km to Lake Louise. Turn left 100 m before the Chateau and park in the huge paved lot.
Elbow your way along the paved lakeshore path (crux, sort of) past the Chateau to the signed Lake Agnes trail, which immediately forks right. Follow this for 3.4 km to Lake Agnes. The Lake Agnes Teahouse will still be closed if you’ve got off to a real alpine start, so continue along the right-hand shore. At the far end of the lake, you’ll find an obvious trail heading for big scree slopes and short cliffs under the high col connecting mounts Niblock and Whyte. If you stay far to the right side, you’ll find a good trail leads right toward the top of the scree cone. Tiny, furry rock-rabbits called pika occasionally dart among the rocks here. Nearby boulders are prime spots for drying carefully harvested leaves and grasses for their winter hay pile.
Go through the first cliff band from near the top of the scree cone (beaten trail). Above that, the easiest line up to the Niblock–Whyte col angles more to the right toward Niblock, avoiding steep cliff bands. Although these steeper rock bands are generally sound, the masses of rubble perched precariously on ledges dampens the charm. Depending on conditions, you may encounter firm snow patches in places. With an ice axe, step-kicking up snow is infinitely more efficient, especially for those simply following the steps! When dry, expect obvious trail(s).
On an early June ascent one year, an experienced party descended by a narrow snow gully that hid a meltwater stream underneath soft snow. A weak snowbridge collapsed, dropping the victim into a moat between a short cliff and the surrounding snow. Her partner was unable to extricate her in time. Scramblers should heed this tragedy and select the route and time of ascent carefully.
Once you reach the col and catch your breath, turn right and walk toward the buttress of Mount Niblock. Notice the weird rock here – black, blobby stuff that almost appears to have been molten once. It wasn’t, though. The only known occurrence of igneous rock anywhere in Banff Park occurs just south of Bow Lake; the rounded shape here is just due to weathering.
You can ascend either side of the brown buttress. Most popular is a gully around the shadier left side. You might encounter lingering snow, but it otherwise offers no difficulties. Continue along the ridge to reach the top in an easy 20 minutes. Mount Niblock is one of the more favoured scrambles in the vicinity and many parties make the ascent during the course of the season, especially during periods of fine weather. Nude sunbathers be warned!
The ascent of Mount Whyte is more technical than Mount Niblock, requiring better scrambling and routefinding abilities. It is also more exposed. Judging by numerous trails leading the wrong way, it seems that many folks are still honing those routefinding skills. There is no quick, easy way down and this ascent is definitely NOT recommended for beginners. Allow about 35 minutes to ascend Mount Whyte and about the same to return to the Niblock–Whyte col. The return to the col will prove more difficult than the ascent.
Walk toward Mount Whyte from the Niblock–Whyte col and find an easy spot (probably to the right) to gain the crest of the ridge. Scramble along, and when the ridge narrows you may have to make a brief detour to the right before it steepens. Higher up, traverse left on a prominent scree ledge (exposure) toward a right-slanting gully. Do NOT climb the gully. It could be icy or wet and it is dangerously exposed. Scramble up the easiest place to the right of the gully. Use caution, as a fall would be fatal. Above this, traverse on a ledge to the right of a steep rock wall to the first broad gully (easiest). Scramble up on firm ledges of limestone to the ridge above, then continue along the ridge to the cairn a few minutes away.
The summit immerses you in some of the finest scenery the Canadian Rockies offer. Upper Victoria Glacier is complemented by Mount Lefroy and the ancient receding tongue of ice snaking from Abbott Pass to the Death Trap below. Abbott Pass Hut is barely visible – a minuscule dot straddling the pass between Lefroy and Victoria. With its rooftop diverting drizzle into both Alberta and BC since 1922, the shelter stands in simple, silent testimony to the unwavering persistence and foresight of the Swiss guides who built it.
On return, either retrace your steps or descend south slopes toward the Plain of Six Glaciers Teahouse. Note that the south slope descent is no cakewalk either, but here’s the route. Scramble down a short distance on the south side of Mount Whyte toward the gully between it and the next peak south (avalanche danger if much snow remains). It is steep initially, but eases to scree–snow slopes and occasional short rock bands. When feasible, work your way to the right over a hump to gain the next major gully. If you continue straight down instead, cliffs will require major routefinding or even rappels. Unless visiting the red-roofed teahouse for goodies, turn left upon hitting Plain of Six Glaciers trail and tramp 5 km to your car. This descent may be longer than returning to Lake Agnes, but does add variety. Expect a long day.
In 1886 two Canadian Pacific Railway officials visited Lake Louise. Today mounts Niblock and Whyte commemorate these none-too-modest dignitaries.
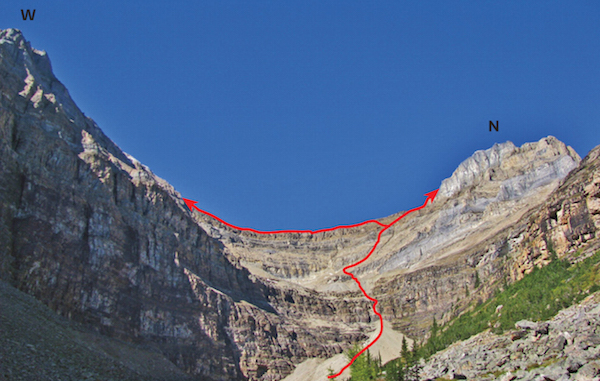
Niblock and Whyte ascent routes as seen from Lake Agnes. PHOTO: MATTHEW HOBBS
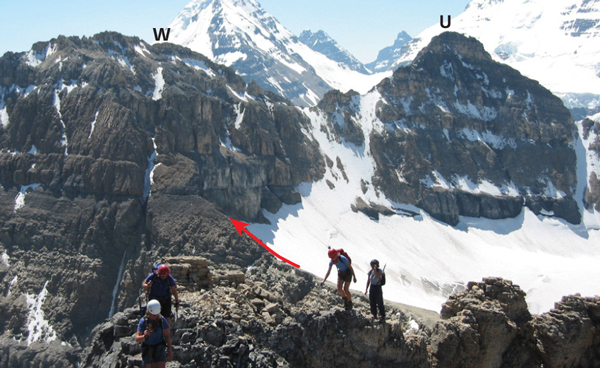
Scramblers approaching the summit of Niblock. Behind are: W: Mount Whyte; U: unnamed. Mount Lefroy rises behind Mount Whyte. PHOTO: BOB SPIRKO
Difficulty: Easy scrambling; much loose rubble
Round-trip time: 10–12 hours
Height gain: 1500 m
Maps: 82 N/8 Lake Louise; Gem Trek Lake Louise–Yoho
Mount Aberdeen is usually climbed as an alpine ascent via the steep, north-facing Aberdeen Glacier, but for scramblers, the climber’s descent on the Paradise Valley (south) side offers a long but non-technical trudge up. There are two approach options, depending on whether you prefer long walks and wading or short walks with bushwhacking. You then toil up endless rubble to the top. Summit views from this peak are simply outstanding, but the ascent makes for a tiring day. Note that the “minimum group of four” law is in force here during most of prime season. Try from about July on. Ice axe and helmet suggested.
Start as for Sheol Mountain, except much earlier. After 1 hour from the trailhead you reach the third bridge, an important decision point. One minute before this is the decommissioned trail to the right of the creek which once led directly to the Giant Steps. The distance to reach the correct Aberdeen avalanche slope (of endless scree) is much shorter on this west side, but expect bushwhacking. This deterrent will only become worse over time.
The longer option is to hike the signed Lake Annette trail for some 10 km to Giant Steps, actually losing precious elevation at the end in descending to Giant Steps. Somewhere below Giant Steps you must wade a fast-flowing stream. Early season flows here can be problematic; braided sections downstream may make it easier to ford. Once across the creek, continue into greenery and scrub brush toward the base of the obvious long avalanche slope on the south side of Aberdeen. This straightforward gully eventually leads to the summit. For any remaining snow patches here an ice axe can allow step-kicking (step-kicking is a standard mountaineering term being overlooked these days in favour of the less descriptive “boot packing,” but I digress). You may also be able to glissade these snow patches on descent if familiar with ice axe self-arrest. From the bottom the view is extremely foreshortened, as you will surely discover.
Above greenery, follow the stream through a break in the cliff band, perhaps guzzling plenty of water here while available. Endless rubble soon follows and water disappears. At the top end of this slope, turn right and scramble easily to the summit. Beware the steep glacier down the Lake Louise side and stay off the snow there. At one time, permanent snow made a traverse to adjacent Haddo Peak (3070 m) relatively easy. Unfortunately, the glacier between has lost much snow depth and the crossing now involves a short, difficult scramble and possible ice or glacier travel. This makes it significantly more hazardous than Aberdeen. You also lose and regain some 100 m and add 2+ hours to an already long outing, all for a peak that is 80 m lower.
Aberdeen’s summit provides one of the finer viewpoints in the area, so save this ascent for a clear day. Return the same way you came up. While the gully will be quicker, the walk out may seem longer.
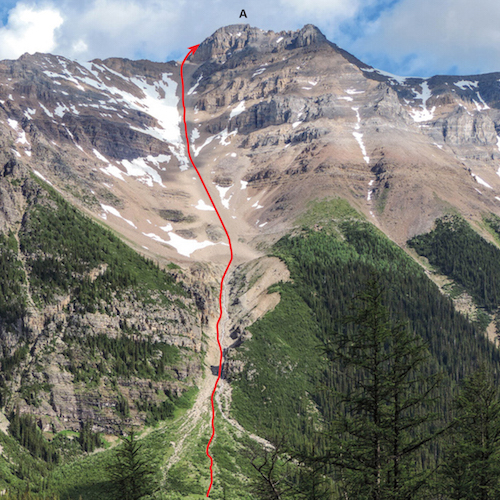
The scramble route up Mount Aberdeen as seen from Giant Steps trail. Route starts downstream from Giant Steps. A: Aberdeen, with Haddo Peak to the right.
Difficulty: Mostly moderate scrambling
Round-trip time: 5–9 hours
Height gain: 1060 m
Maps: 82 N/8 Lake Louise; Gem Trek Lake Louise–Yoho
Though an unlikely choice for a first scramble, this infrequently visited peak gives impressive views of Paradise Valley and the forbidding north face of Mount Temple. It really isn’t a separate peak but merely the end of Haddo Peak’s north ridge. Most of the approach uses a popular hiking trail but you will probably have the peak to yourself. Try from July on; earlier than that, an ice axe may be needed. Minimum group size of four applies here from early July into fall.
Park at Paradise Valley trailhead, about 2.3 km along Moraine Lake Road.
Follow the Paradise Valley trail for about an hour, at which point you should be immediately before the third bridge which crosses the stream to the east side. A minute before this there may be a sign marking trail rehabilitation. Prior to closure, a 10-minute walk up this original Giant Steps trail led to Sheol’s ascent route. Now, though, you must either hike upstream beside the creek or bushwhack through forest for 10–15 minutes to reach the open avalanche slope. Even from alongside the creek, an opening reveals the proper slope above. Bear slightly right to get on the correct one, as it splits into two gullies higher up. The least bushy way initially is along the left side. If much snow remains, this slope could be avalanche prone and should be avoided. As you toil upwards toward rock bands above, Lake Annette gradually appears, huddled below the sombre north face of Mount Temple. At the split, either of the two gullies will suffice but the right-hand one has less rubble and better scrambling. Once you reach the ridge, Mount Hector dominates the skyline to the north. Continue along the ridge to the summit, which lies to the right.
From the top are fine views of Paradise Valley far below, including a giant mud puddle catching meltwater from ever-shrinking Horseshoe Glacier below brooding Mount Hungabee.
Return the same way; there is no easy way down the back side toward Fairview.
Samuel Allen, an early explorer of Lake Louise, thought the adjacent valley a gloomy place and named it “Sheol,” a Hebrew word for the Underworld. He may have just been having a bad day, though.
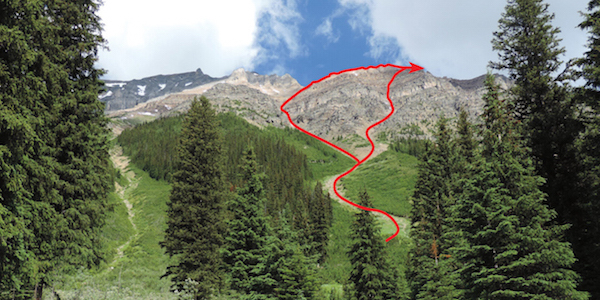
The Sheol Mountain ascent route as seen from the avalanche slopes below.
Difficulty: Short section of more difficult, exposed scrambling near top; bushwhacking
Round-trip time: 5–7 hours; 7–10 hours to highest point
Height gain: 900 m
Maps: 82 N/8 Lake Louise; Gem Trek Lake Louise–Yoho
Divide Peak is the unofficial name of a small peak southeast of Ross Lake which sits exactly on the Continental Divide. From the Trans-Canada Highway, a large cairn is visible on the summit. A short hike, a bushwhack, rubble and finally an interesting bit of scrambling takes you to the top. A higher point along the ridge farther south can also be visited if desired. Try from about July on.
Drive to the Lake O’Hara parking lot turnoff on the south side of the Trans-Canada Highway, 3.1 km west of the Continental Divide and about 1.5 km east of Wapta Lake. Cross the railway tracks and turn right.
Hike east along the now-closed Highway 1A from the train tracks and after 15 minutes branch right to follow the signed hiking trail up to Ross Lake, moments past a large, billboard-sized sign. Divide Peak forms the left backdrop of Ross Lake, and from the shoreline the upper part of an open avalanche slope at treeline is just visible. This is where you are heading. The route can be studied from The Great Divide highway pull-off.
Follow the connector trail east from the lakeshore for no more than 5 minutes, then turn right and begin a 45–60 minute bushwhack straight uphill. The avalanche slope you are aiming for has a deeply washed-out gully in the centre and it is worthwhile finding this to avoid fighting stunted balsam fir on either side. A shale rockband at treeline is easily overcome. Either scramble the next band near the gully or go left up easier, light-brown shale near the ridge (large cairn). As you gaze up at the steep walls above, note that the skyline shows an obvious dip as you scan from left to right, and this appeared to be the best choice of few options. This scramble route is slightly to the right of where the avalanche gully drainage originates. Traverse to it, staying below a wet slabby rockband. At the crux the grey limestone offers small but generally solid ledges and handholds. It steepens as you go and at one point I chose to ascend a bit of a chimney. On descent, ledges to the right (west) of this chimney were preferable. Closer to the top the angle eases and you trend right. It is worthwhile marking the key spot where you emerge onto easy terrain before trudging to the top. I was certainly wishing I had done so when I hastily began my descent in the face of an approaching storm.
The summit cairn is surprisingly large for a small, infrequently visited peak, probably due to the abundance of ideally shaped rocks. This spot provides a fine view of the two ice gullies on Narao Peak. These were often climbed on continuous ice in autumn during the ’90s, but in August 2014 only the very upper reaches had any ice left at all. A ridge continues south from Divide Peak toward the unnamed peak between Popes Peak and Mount Whyte and has a couple of serrated higher points visible not far away. The farthest point is 200 m higher, and although it adds nearly 1.5–2 hours, it is worth visiting. As you may have guessed, the descent is via the same route.
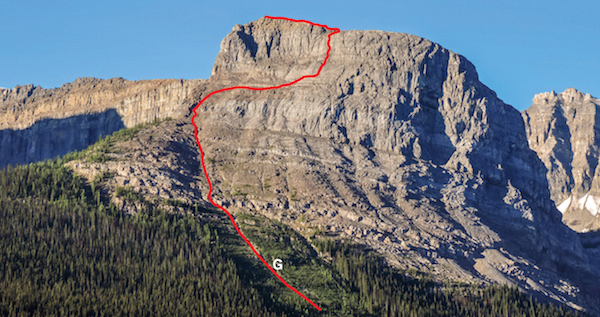
A roadside view of the Divide Peak scramble route from the Trans-Canada Highway pullout. G: drainage gully in avalanche slope.
Difficulty: A moderate scramble via southwest scree/snow slopes
Round-trip time: 7–12 hours
Height gain: 1690 m
Maps: 82 N/8 Lake Louise; Gem Trek Lake Louise–Yoho
Mount Temple is the ultimate scramble. Towering majestically over Lake Louise, this hulking giant, third highest in the southern Rockies, presents a dauntingly impregnable wall of vertical rock capped by perpetual snow and ice. This impression is a facade. Hidden away on the southwest side lies the heavily used “tourist” route. Temple is the most accessible 3353 m (11,000 ft.) peak in the entire Canadian Rockies and probably the most often climbed. With an apparent blessing by Mother Nature one summer’s day in 1996, the sun shone while a small wedding ceremony was performed on the top. It is believed the wedding night was spent elsewhere.
Since 1894 when three intrepid members of the Yale–Lake Louise Club clambered up this face, hundreds of adventurers have uneventfully wheezed their way to the snowy summit. However, in 1955 seven teenaged American boys, poorly equipped and inexperienced, perished here in Canada’s worst-ever mountaineering accident. Ironically, adults supervising the group attempted to hold Parks Canada liable in the aftermath. They claimed their own ignorance was owing to inadequate information from Parks Canada. Sadly, such irresponsible behaviour is even more prevalent today. Therefore, anyone doubting the conditions (either their own or those of the mountain!) should consult the Lake Louise warden office before heading out. In a typical year, the route is in condition by mid-July. Carry an ice axe. For most of the season, Larch Valley trail, by law, requires tight groups of at least four people, each carrying bear spray. Check at the info centre first.
From the Lake Louise townsite, drive 15 km to the Moraine Lake parking lot.
Hike along the right-hand shore of Moraine Lake past the lodge to the Larch Valley trail. Relentless switchbacks rise past a junction (keep right) and continue to open meadows at Larch Valley. Above treeline as you hike towards Minnestimma Lakes you get a very foreshortened view of the scramble route. More switchbacks lead to Sentinel Pass, and a beaten path continues over to the ridge of Temple. Cairns mark the way up a loose, broad gully which is better ascended on the left side. Above the gully, traverse diagonally up to the right toward the first rock band. Go below a yellow rock wall and traverse past two gullies to an easier, shallow gully. Note that below it are two obvious scree paths. Do not follow the misleading trail farther right; this is easiest spot.
Scramble up the shallow gully over rock steps, following cairns and trails. Look back so you’ll remember it on descent. Above this, angle up to the right toward the grey rock band. Aim for the right side of the second gully to the right. This part is the crux, as you must ascend steep rock steps with noticeable exposure. Stay out of the gully to avoid rockfall from parties above. Paint markers will indicate the best way. Once past these steps, gravelly ledges and slabs require caution, especially on descent. More paths coax you up to the left to the ridge crest and the final band of light-brown rock. You’ll be just right of the ridge; stay to the side of the gully to avoid rockfall. Handholds are plentiful and this short bit is pleasant. The rest of the ascent as you follow the ridge is straightforward if snow-free, but still steep and rubbly. An ice axe or ski poles help immensely. About when you feel you’ve run out of wind, the angle eases. Stay well left of cornices on your right that project over the steep east face.
On a clear day views extend to the stark shapes of the Bugaboos, 80 km southwest. The panorama is particularly pleasing in autumn with a dusting of snow and a smoke-free sky. Though this ascent is fairly straightforward in dry conditions, it is a major peak and should be treated with respect. It is not an ascent for the tee shirt, shorts and runners crowd. Wear proper boots and carry warm clothing, as the top will be much cooler. A helmet and ice axe are suggested too. When Walter Wilcox made the first ascent in 1894, this scholarly mountaineer surmised that given the temperature at Lake Louise and what he recorded on top, it would never exceed 4°C on the summit. It actually does sometimes, though.
Sir Richard Temple presided over the Economic Science and Statistics Section of the British Association for the Advancement of Science conference in Montreal in 1884.
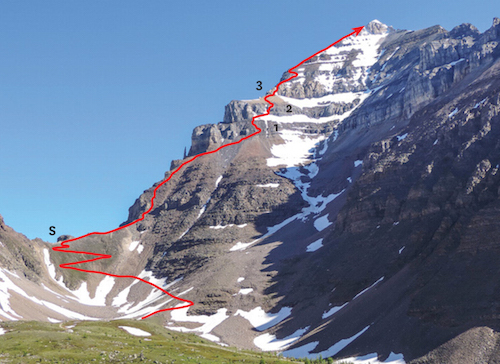
Mount Temple’s scramble route as seen from the shoulder of Eiffel Peak: S: Sentinel Pass; 1: first rock band; 2: second rock band; 3: light brown rock band.
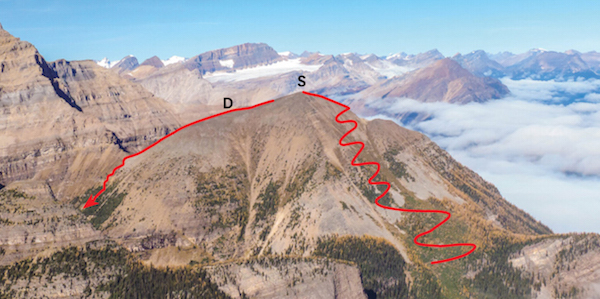
Mount St. Piran from Fairview Mountain. S: summit; D: optional traverse descent.
Difficulty: Easy, no difficulties
Round-trip time: 4–7 hours
Height gain: 900 m
Maps: 82 N/8 Lake Louise; Gem Trek Lake Louise–Yoho
Like nearby Fairview Mountain, Mount St. Piran is just a hike, but for an easy day out with a fine view it is worth doing. The view of surrounding peaks is outstanding, and whether you decide to traverse it or not, the return ties in well with a visit to Lake Agnes Teahouse for eats and treats. An ascent of Mount Niblock (p. 297) could easily be tagged on for a very full day. To traverse it in early summer usually requires an ice axe. Try from mid-June on.
From the Lake Louise townsite, follow the access road to Lake Louise. Turn left 100 m before the Chateau and park in the paved parking lot.
Thread your way through crowds along the lakeshore trail past the Chateau to the signed Lake Agnes trail, which branches right. Hike past Mirror Lake, watching for the marked trail to Little Beehive. This trail cuts back sharply to the right at 3.3 km, moments before you reach the stairs leading up to Lake Agnes Teahouse. Crowds disappear once you branch off onto this less travelled path. Within a few minutes, and before Little Beehive, the signed Mount St. Piran trail, much narrower, heads left into the trees. After winding through delicate larch forest you emerge onto open alpine terrain where stunted patches of evergreen known as “krummholz” hug the ground. As the final rising switchbacks methodically zigzag to the top, they grant a beautiful view of a rugged landscape of peaks and glaciers.
The broad summit is where ardent cairn-builders practise their craft. Depending on recent wind velocity, spectacular cairns may be standing, including a rock windbreak for overnight bivouacs. To the northwest, Hector Lake and Bath Glacier are evident, while closer by, snowcapped mounts Lefroy and Temple rule the heights. Other scramblers are often seen trudging up adjacent talus slopes of Mount Niblock.
If you fancy a traverse, continue west toward Mount Niblock and down rubble to the Niblock–St. Piran col. Although the curvature of the slope below this col suggests there could be cliffs, there are only minor rock outcrops. Angling down to the right toward Mount Niblock works well. As the angle is steep, snowcover would render this part significantly more technical, while also creating a potential avalanche slope. Dry conditions are preferred.
If, upon reaching the teahouse, you are without money for goodies, you may as well forget begging: many small but learned creatures will have been working the crowd long before you arrive. They have been begging for generations and competing will be fruitless.
According to Canadian Mountain Place Names, by Boles, Laurilla and Putnam (2006), the town of Piran in Cornwall, England, was the birthplace of Willoughby John Astley, the first manager of Lake Louise Chalet.
Difficulty: Largely a hike via Saddleback
Round-trip time: 4.5–6 hours
Height gain: 1000 m
Maps: 82 N/8 Lake Louise; Gem Trek Map Lake Louise–Yoho
Fairview Mountain provides a terrific view of Mount Victoria, Victoria Glacier and Bow Valley. The ascent has been a popular addition to a favourite Lake Louise hike for decades. Adjacent Saddle Mountain (2434 m) can be ascended with minimal extra effort. If, while in Lake Louise, your time and energy are limited, this trip probably makes the best use of those precious resources. Try from mid-June on.
From the Lake Louise townsite, follow the access road 5 km to Chateau Lake Louise. Turn left 100 m before the Chateau and park in the paved parking lot.
Saddleback trail starts near the boathouse along the lakeshore and leads to Saddleback in 3.7 km. You may still see charred remains of the resthouse that was here until its lease was cancelled back in 1937. The southeast slopes of Fairview Mountain are straightforward and a beaten trail zigzags upwards from among scattered Lyall’s larches. Although not as lofty as nearby mounts Niblock or Whyte, Fairview Mountain is aptly named, and if the weather co-operates, I’m sure you’ll agree – the view is fabulous! Return by the same route. DO NOT attempt to descend gullies toward Lake Louise.
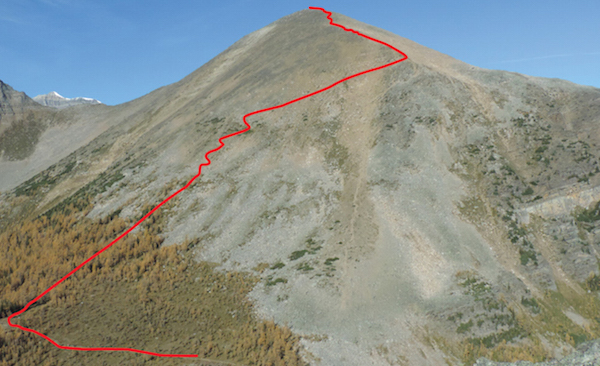
A straightforward hike up Fairview Mountain leads to an excellent viewpoint above Lake Louise and is well worth the effort. Popes Peak barely peeks over the ridge at upper left in this photo taken from Saddle Peak.
Difficulty: Easy
Round-trip time: 4–6 hours
Height gain: 975 m
Maps: 82 N/8 Lake Louise; Gem Trek Lake Louise–Yoho
Although Panorama Ridge is not an eye-catcher, it offers a dazzling view of Mount Quadra’s north face, the east face of Mount Temple and an unrestricted view of the Bow valley. It’s an easy ascent; the only challenge is keeping your feet dry crossing Babel Creek. Due to grizzly activity for most of the season, this area, by law, requires tight groups of at least four people, each with bear spray. Check at the info centre first. Try from mid-June on.
From the Lake Louise townsite, drive the Moraine Lake access road 15 km to the Moraine Lake parking lot.
Follow Consolation Lakes hiking trail beginning near the parking lot washrooms and the bridge over Moraine Creek. You will reach Lower Consolation Lake in a half hour. Panorama Ridge, mostly a big scree slope, lies along the opposite side and you can hike up most any open avalanche path to the top.
Cross the outlet of the lower lake, either on logs and rocks or simply by wading (calf deep). A short bit of forest intervenes before an open avalanche slope leads to the top. Travel is easy and the scenery breathtaking almost immediately. Naturally, if there should happen to be enough snow to avalanche, you should not be walking up this slope. Firmer snow, however, would alleviate the plod and could grant a glissade descent if you have an ice axe.
You can continue along the ridge crest as far as you like, but even if you don’t, you can still claim the summit. Continuing on involves much clambering over big quartzite boulders as you approach obvious pinnacles farther along. These pinnacles require steep scrambling, routefinding and a few detours. You’re on your own there. From where you first gained Panorama Ridge you should allow two or three hours to reach the higher point beyond. It is actually less than 60 m higher but a full 2 km away.
Steep, icy north faces of mounts Quadra and Bident dominate the view, rivalled by mighty Mount Temple’s hulking east side. The east ridge of Mount Temple is clearly visible too, the site of periodic climbing rescues. These spectacular peaks contrast with the gentler landscape of the Bow Valley and the serrated Sawback Range to the east. Once you reach the top of Panorama Ridge the name seems entirely logical.
To descend, almost any spot will take you back to Consolation Lakes. Ski poles lessen the toil, as the terrain is mostly coarse, bone-jarring rubble rather than fine, pleasant scree. Above the upper lake, watch for a trail on the crest of the adjacent moraine that joins the east shoreline trail.
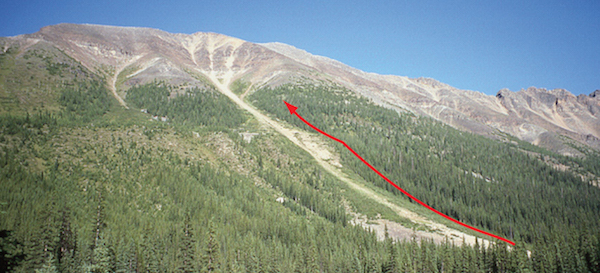
Panorama Ridge and the easy gully from Consolation Lake.
Difficulty: An easy scramble, mostly grovelling up a gully
Round-trip time: 2.5–4 hours
Height gain: 450 m
Maps: 82 N/8 Lake Louise; Gem Trek Lake Louise–Yoho
The Tower of Babel is a quartzite monolith that has long been popular with rock climbers. It is a lesser outlier of Mount Babel, one of the Ten Peaks towering above world-famous Moraine Lake. Although considerably overshadowed by its larger neighbours, the top gives a wonderful perspective of the lake and more grandiose nearby peaks. The route described is actually the climbers’ descent route, but if you can spare a few hours, the view justifies the trudge. You could even do it as an alternative to a rest day. Try from late June on or whenever the gully is snow-free. The ascent gully is very confined; a helmet is recommended.
From the Lake Louise townsite, drive 15 km to Moraine Lake. The Tower of Babel and the described route are visible from the road just before you reach the lake.
From the Moraine Lake parking lot the hiking trail begins near the washrooms and picnic area by the outlet stream. The normal beaten path to the Tower of Babel is about 5 minutes along the trail toward Consolation Lakes. Parks Canada moved the boundary of the restricted access zone in 2015, so you no longer need a group of four to scramble up the route. The route ascends the convenient gully to the right of the Tower. Before you enter this gully, be aware that this is a confined chute that narrows and steepens as it rises. Owing to much loose talus, bouncing rockfall generated by parties above poses a very real hazard, especially if they are descending. Wear a helmet and be alert. For protection, the left side of the gully offers overhanging rock walls to duck behind, while on the right side you can scramble up rock ledges above the gully for at least part of the way. The middle of the gully is the WORST place to be. Parties are more likely to be descending in afternoon, making morning ascents safer.
From the top of the gully, a clear view of Mount Bident rising above Consolation Lakes unfolds. Here you turn left and follow the path to the broad summit plateau, just moments away. The summit consists of huge, lichen-covered plates of quartzite. Almost as impressive as the Ten Peaks is the number of large cairns perched along the edge of the plateau, possibly the handiwork of wishful or unemployed stonemasons.
Once you’ve frittered away enough time admiring the scene, return the same way. Keep in mind that others may be ascending, so knock down only as many rocks as you would enjoy dodging if you were below.

Tower of Babel and obvious ascent trails in the scree, as seen from Moraine Lake road. The route circles left above the gully.
Difficulty: Moderate scrambling via southeast slopes
Round-trip time: 4.5–9 hours
Height gain: 1230 m
Maps: 82 N/8 Lake Louise; Gem Trek Lake Louise–Yoho
Eiffel Peak overlooks the Valley of Ten Peaks, a scene once pictured on Canadian $20 bills. A less demanding alternative to Mount Temple, this peak is also an option if weather is unsettled. With a strategic location among so many big mountains, views are dazzling and this outing should be on any scrambler’s list. Due to grizzly activity during most of the season, this area requires, by law, tight groups of at least four people, each with bear spray; check at the info centre first. Try from July on.
From the Lake Louise townsite, drive 15 km to the Moraine Lake parking lot.
Hike along the shore of Moraine Lake to the Larch Valley trail, beginning just past the lodge. Relentless switchbacks lead to the flat, open meadows of Larch Valley where three peaks command the scene. Mounts Temple and Pinnacle form the stalwart buttresses of Sentinel Pass, while to the left a sweeping ridge rises to the uppermost heights of Eiffel Peak.
Wander south across a small stream and gain the broad shoulder arcing gracefully skyward toward Eiffel’s summit, 850 m above. Many trails in the scree suggest the popularity of the objective. To put difficulties into perspective, a past summit register entry recorded a successful canine ascent. Near the top, wide gullies lead through the rock band upon which short, rubbly slabs give way to the summit and cairn.
On the northwest side stands an imposing 70-m-high pillar called Eiffel Tower, and the peak is named for this feature. Although details of the 1951 first ascent are lacking, the 1952 ascent required nine hours from the notch. It has been largely ignored since then.
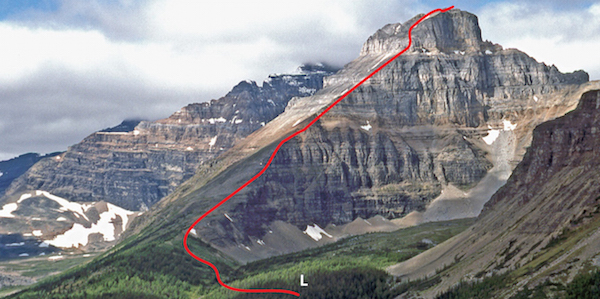
Eiffel’s southeast slopes from Tower of Babel. L: Larch Valley.
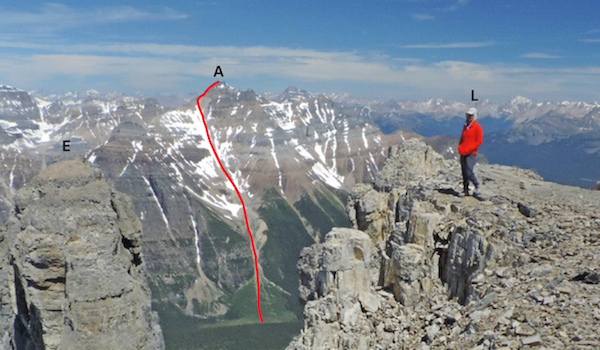
L: Lady in red surveys the scene from the summit; E: Eiffel Tower. The straightforward scramble route up A: Mount Aberdeen is also readily studied from this vantage point.