Chapter 5
Going Online
In This Chapter
![]() Browsing the web with Silk
Browsing the web with Silk
![]() Personalizing Silk’s settings
Personalizing Silk’s settings
![]() Setting up e-mail
Setting up e-mail
Kindle Fire HD can become your new go-to device for keeping informed and in touch by using Amazon’s Silk browser and the pre-installed e-mail client.
In this chapter, you discover the ins and outs of browsing with Silk and the simple tools you can use to send and receive e-mail on the Kindle Fire HD.
Browsing with Silk
Silk is the browser that takes advantage of Amazon’s ability to use its own servers to make your browsing experience speedy. The browser is designed to make your browsing experience as fast and smooth as, well, silk!
Many of Silk’s tools and features will be familiar to you from other browsers, but a few are unique to Silk.
Using navigation tools to get around
From the Kindle Fire HD Home screen, tap Web in the list displayed across the top of the screen to see Silk, shown in Figure 5-1.
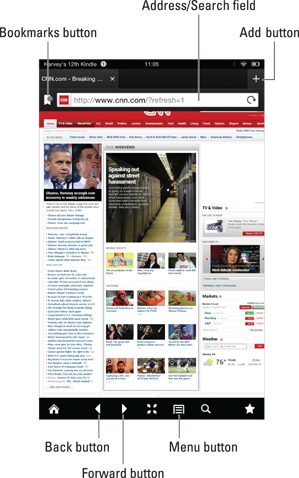
Figure 5-1: Silk offers a familiar browser interface.
You can use the Back and Forward buttons to move among pages you’ve previously viewed. To go directly to a page, tap in the Address field (note that this field will act as a Search field if you enter a word or phrase, or as an Address field if you enter a website’s address, or URL). Tap in the field, enter a site address using the onscreen keyboard, and tap Enter. The website is displayed.
Silk uses tabs that allow you to display more than one web page at a time and move among those pages. Tap the Add button — which features a plus sign (+) — to add a tab in the browser. When you do, thumbnails of recently visited sites appear. You can tap a thumbnail to go to that site, or you can tap in the Address bar and enter a URL by using the onscreen keyboard.
Bookmarking sites
You can bookmark sites in Silk so that you can easily jump back to those sites again. With a site displayed onscreen, tap the Bookmark icon to the left of the Address bar to easily add a bookmark for that site.
Another way to add a bookmark is to tap the Add button and then tap Bookmarks. In the Add Bookmark dialog box that appears (see Figure 5-2), tap OK to bookmark the currently displayed page. You can then tap the Add button shown in Figure 5-2 and tap Bookmarks to display thumbnails of all bookmarked pages. Tap one to go there.

Figure 5-2: Bookmarks help you quickly return to a favorite page.
 To delete a bookmark, after tapping the Bookmarks button to display thumbnails of bookmarked pages, press and hold a page. In the menu that appears, tap Delete. In the confirming dialog box that appears, tap OK and the bookmark is removed.
Searching for content on a page
Web pages can contain a lot of content, so it’s not always easy to find the article or discussion you want to view on a particular topic. Most browsers provide a feature to search for content on a web page, and Silk is no exception.
To search the currently displayed page by using Silk, follow these steps:
1. Tap Menu on the Options bar.
2. On the screen that appears, tap Find in Page.
The onscreen keyboard appears with the Search field active.
3. Type a search term.
The search term appears in an orange highlight on the first instance of that word on the page. Other instances of that word on the page are highlighted, as shown in Figure 5-3 (and appear in yellow on your device).
4. Tap Done to end the search.
Searching the web
Most of us spend a lot of our time online browsing around to find what we want. Search engines make our lives easier because they help us narrow down what we’re looking for by using specific search terms.
To search the entire web, follow these steps:
1. Tap the plus sign (+) to add a tab in the browser if you want search results to appear on a new tab.
Thumbnails of recently visited sites appear.

Figure 5-3: The first instance of a word on a page is indicated by an orange highlight.
2. Tap in the Search field.
The thumbnails change to a list of bookmarked sites, and the onscreen keyboard appears.
3. Enter a Search term and tap Go.
As you enter the first few letters of the search term, suggested search terms appear below the Search field (see Figure 5-4). When you tap Go, results appear in your default search engine.
4. Tap a result to go to that page.
To specify a search engine to use other than the default, tap the Menu button in the Options bar and then tap Settings. Tap Search Engine option to choose Bing, Google, or Yahoo! as the default search engine.
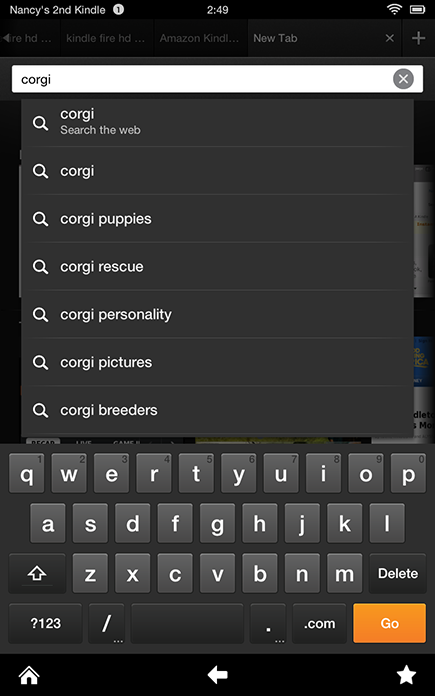
Figure 5-4: Suggestions are displayed as you type your search term.
Reviewing browsing history
You can review your browsing history to see what sites you visited recently.
With Silk open, tap the Add button. Tap History, and sites you’ve visited on the Kindle Fire HD appear in a list divided into categories such as Today and Last 7 Days. When you find the name of the one you want, tap it to go there.
To avoid losing a site that you know you want to revisit, bookmark it as described in the earlier section, “Bookmarking sites.”
Working with web page content
Sometimes you may find online content, such as a PDF file, that you want to download to your Docs library. Or maybe you’ve found an image that you want to download to the Photos library on your device. You can also open or share content you find online.
Here’s how these work:
 View downloads. Tap Menu on the Options bar and then tap the Downloads button that appears to view completed downloads.
Save or view images. Press and hold an image. A menu appears, offering options such as Save Image or View Image (see Figure 5-5).
Work with links. Press and hold your finger on any linked text. A menu appears with options, including Open, Open in New Tab, Open in Background Tab, Bookmark Link, Save Link, Share Link, and Copy Link URL.
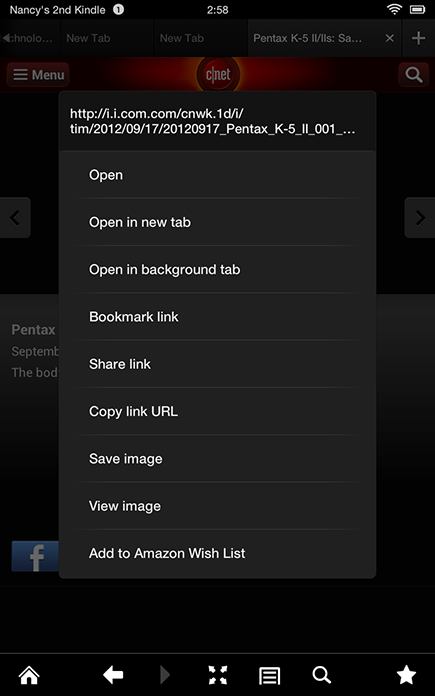
Figure 5-5: You can work with links and images by using this menu.
Personalizing Silk
Silk sports a nice, clean interface. Still, you can do a few things to personalize the way Silk looks and acts and make it work better for you.
With Silk open, tap the Menu button on the Options bar and then tap Settings. A screen appears (see Figure 5-6), showing some of the options you can use to control the Silk browser’s behavior. Swipe your finger down to see all the options available, including the following:
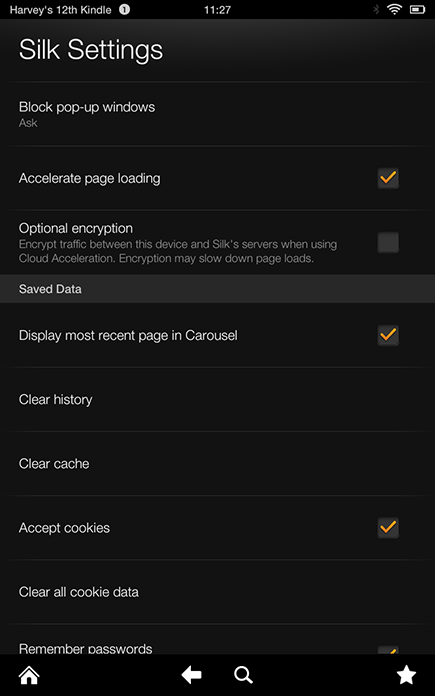
Figure 5-6: The various settings for the Silk browser.
Block Pop-up Windows: Require Silk to ask about displaying pop-up windows; never display them; or always display them.
Display Most Recent Page in Carousel: Specify whether recently visited web pages are displayed in the Carousel.
You can double-tap a page to enlarge the view and double-tap again to reduce the view. Or place your fingers pinched together on the screen and then spread them out to enlarge the view. To reduce the view size, start with your fingers spread apart and then pinch them together.
Remember Passwords: This option saves you the time of entering usernames and passwords for sites you visit often. Just be aware that this setting puts your accounts at risk should you ever misplace your Kindle Fire HD.
If you want to get rid of all the settings you’ve made to Silk, make sure that you have Silk open. On the Options bar, tap the Menu button and then Settings. Scroll down to Advanced Settings and then tap Reset All Settings to Default.
Working with E-Mail
The Kindle Fire HD has a built-in e-mail client. A client essentially allows you to access e-mail accounts that you’ve set up through various providers, such as Gmail and Windows Live Hotmail. You can then open the inboxes of these accounts and read, reply to, and forward messages by using your Kindle Fire HD. You can also create and send new messages, and even include attachments.
In the following sections, we provide information about setting up and using your e-mail accounts on the Kindle Fire HD.
Setting up an e-mail account
Setting up your e-mail on the Kindle Fire HD involves providing information about one or more e-mail accounts that you’ve already established with a provider such as Gmail.
Follow these steps to set up an e-mail account the first time you use the app:
1. Drag from the top of the screen to display Settings.
The Quick Settings appear.
2. Tap More.
The Settings panel appears.
3. Tap My Account.
4. Tap Manage E-mail Accounts.
5. Tap Add Account.
The dialog box shown in Figure 5-7 appears.
6. Tap AOL, Exchange, Gmail, Hotmail, Yahoo, or Other Provider.
7. Enter your username, e-mail address, and password in the appropriate fields and then tap Next.
A new screen appears, displaying two fields.
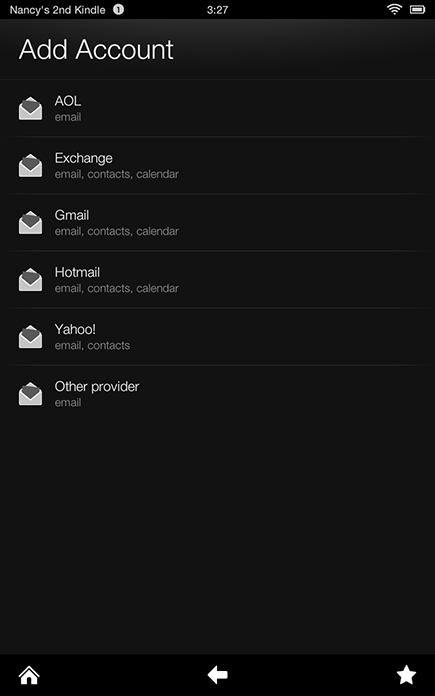
Figure 5-7: Choose your e-mail account.
8. Enter the name that will appear on outgoing messages in the Name field and an address in the E-mail Address field for your e-mail account.
The account name is optional.
9. Enter the password for your e-mail account in the Password field.
10. Tap the Send Mail from This Account by Default check box if you want to set this up as your default e-mail account; then tap Next.
11. If a message appears about how some accounts sync with your Kindle Fire, tap OK to proceed. In the final screen, tap Save. Tap the View Inbox button to go to the inbox for the account you just set up.
You can set up as many e-mail accounts as you like. When you open the Kindle Fire HD Email app, you see a Unified Inbox that combines messages from all accounts you set up. You also see individual inboxes for each account.
Sending e-mail
After you set up your e-mail account(s), as described in the preceding section, you’re able to send e-mails from your Kindle Fire HD. To create and send an e-mail, with the Email app and an e-mail account inbox open, follow these steps:
1. Tap the New button.
A blank e-mail form appears, as shown in Figure 5-8.
2. In the To field, enter a name.
Alternatively, tap the Add Contacts button, which features a plus sign (+), to open the Contacts app and tap a name there to add that person as an addressee.
3. If you want to send a copy of the e-mail to somebody, tap the Options button to make those fields appear; then enter addresses or choose them from the Contacts app by tapping the Add Contacts button.
4. Tap in the Subject field and enter a subject by using the onscreen keyboard.
5. Tap in the Message text field and enter a message.
6. (Optional) If you want to add an attachment to an e-mail, tap the Attach button shown to the right of the Cc field and, in the menu that appears, choose to attach an item from the Photos app, OfficeSuite, or Personal Videos.
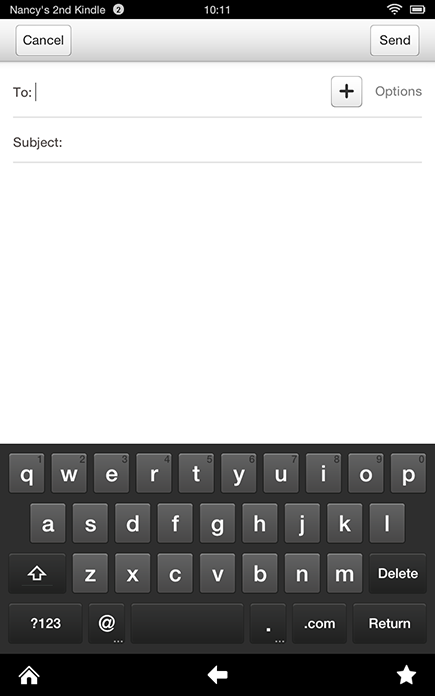
Figure 5-8: A blank form waiting for you to enter an e-mail address, subject, and message.
7. To send your message, tap the Send button at the bottom of the screen.
If you decide that you’re not ready to send the message quite yet, you also have the option of tapping the Cancel button and then tapping Save Draft.
Here are a couple of handy shortcuts for entering text in your e-mail. First is the Auto Complete feature, which lists possible word matches as you type; tap one to complete a word. In addition, you can double-tap to place a period and space at the end of a sentence.
Receiving e-mail
The Kindle Fire HD can receive your e-mail messages whenever you’re connected to a Wi-Fi network.
When an e-mail is delivered to your inbox (see Figure 5-9), simply tap to open it. Read it and contemplate whether you want to save it or delete it (or forward or reply to it, as covered in the following section). If you don’t need to keep the message, you can delete it by tapping the Delete button at the top of the screen.

Figure 5-9: Your inbox.
If you’re expecting an e-mail but don’t see it in your inbox, try tapping the Menu button in the top-right corner and tapping Refresh. Doing so pulls any new e-mails into your inbox.
Forwarding and replying to e-mail
When you receive an e-mail, you can choose to reply to the sender, reply to the sender and anybody else who was included as an addressee on the original message, or forward the e-mail to another person.

To forward or reply to an e-mail, with the Email app inbox displayed, follow these steps:
1. Tap an e-mail to open it.
2. Tap the Respond button.
A menu of options appears.
3. Tap Reply, Reply All, or Forward.
4. If you’re forwarding the message, enter a new recipient.
If you’re replying, the message is already addressed, but you can enter additional recipients if you want.
5. Tap in the message area and enter your message.
6. Tap the Send button to send your message on its way.
When you read a message, it is marked as read when the sender’s name no longer appears in bold. To mark it as unread again (if, for example, you want to draw your attention to it so that you know to read it again), tap the box to the left of the e-mail in your inbox and then tap the Mark button in the top-right corner. To delete an e-mail from your inbox, select it and tap the Delete button.
Sending E-Mail to Your Kindle Account
When you register your Kindle Fire HD, you get an associated e-mail account, which essentially allows you or others to e-mail documents in Word, PDF, RTF, or HTML format to your Kindle Fire HD.
The address of the account is displayed in the Docs library. Tap the Docs Library button on the Home screen and then tap the Cloud button; you see a line that reads Send Documents to YourE-MailAccount@kindle.com, where Your E-Mail Account is the name of your Kindle e-mail account.
You or others can e-mail documents to this address, and those documents automatically appear in your Docs library. Note that you might need to go to Amazon by using a browser and change the approved e-mail accounts. Click Your Account and then Manage Your Kindle under the Digital Content section. Click the Personal Document Settings link on the left side of the screen, and make sure that the account is listed under Send to Kindle Email Settings as approved.