Finished Table Rug: 19½˝ × 19½˝
Ihave a great affinity for the heart motif. It is timeless and versatile, and I never tire of working it into a design. My inspiration for this particular piece came from antique valentines that were cut out of folded paper and embellished with ink and watercolor. They were often symmetrical and ranged from simple to complex designs. These valentines were usually inscribed with poems or verse. They were given as mementos and are sometimes found tucked away in old books. The heart can be found in all areas of American folk art and is an easy motif to weave into a project.

This early valentine has both hand-painted and hand-cut embellishments.
In this rug I worked in some medium brown velvet for the background. It has a beautiful, soft look and is surprisingly easy to work with. Feel free to replace the velvet with wool if you like. My earth-toned color choices are the result of simply knowing how I wanted the piece to look and feel. Of course, it would be just as wonderful done in reds.

MATERIALS
Wool
•1 dark brown square 21˝ × 21˝ for backing and scalloped border
•1 mustard square 10˝ × 10˝ for center background
•2 tan strips 1˝ × 12½˝ for borders
•2 tan strips 1˝ × 14½˝ for borders
•1 dark brown rectangle 8˝ × 14˝ for 4 large hearts, 2 small hearts, and center circle
•1 dark green rectangle 6˝ × 10˝ for 4 small hearts and 2 leaves
•1 light green rectangle 3˝ × 5˝ for 2 leaves
•1 orange rectangle 3˝ × 6˝ for 2 small hearts
•1 medium brown square 8½˝ × 8½˝ for 4 large hearts
•1 tan square 3˝ × 3˝ for center circle
Other materials
•1 brown velvet square 14˝ × 14˝ for appliqué background
•Embroidery floss: 1 skein each of antique white, dark brown, and dark mustard
GETTING STARTED
Refer to Preparing the Wool Pieces as needed for additional details on these steps.
1 Cut a 20˝ square of freezer paper and trace the pattern for the background onto it 4 times to make the complete pattern. Cut out the pattern.
2 Iron the freezer paper pattern to the dark brown wool 21˝ square and cut it out.
3 Cut out the wool appliqué pieces using the patterns.
4 Lay out your appliqués according to the pattern to be sure you have all of the pieces.

SEWING FUN
Refer to Stitching Your Project for details on the blanket stitch and embroidery stitches.
1 Stitch the circles, hearts, and leaves to the mustard background. Add embroidery details.
2 Using steam, press on the wrong side and trim to 8½˝ × 8½˝. Refer to Finishing Your Project as needed.
3 Stitch the mustard square to the velvet background and add the hearts in the corners. Add the embroidery details.

Details of the stitching
4 Steam press on the wrong side and trim to 12⅝˝ × 12⅝˝.
5 Pin the finished velvet piece to the scalloped wool background, making sure it is centered.
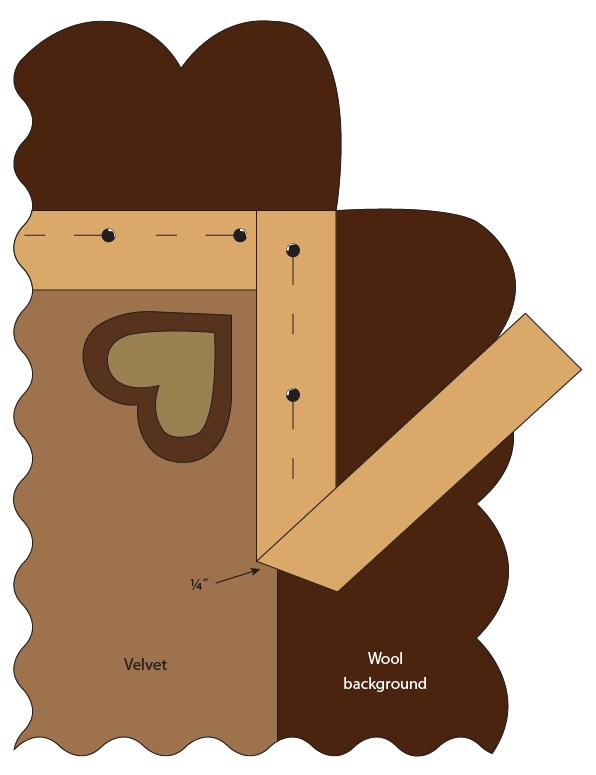
6 Place a tan wool 1˝ × 12½˝ strip on the background, overlapping the velvet ¼˝. Pin along the edge. Add a strip to the opposite side and pin. Repeat to add the tan 1˝ × 14½˝ strips to the remaining 2 sides. Trim the ends of the strips as needed.

Position and pin the wool strips securely.
7 Blanket stitch the strips in place.
8 Finish the outer scalloped edge with a blanket stitch and stars.
9 Using steam, press the finished piece on the wrong side. I’m thrilled you chose this project!

Detail of stitching in the scalloped background