There are two objectives to the training you do within a Racing Weight quick start. The first is to perform workouts that cooperate with your diet to make you leaner. The second is to establish a solid sport-specific fitness foundation to build upon after you complete the quick start and begin your race-focused training cycle. To maximize your success in pursuit of these two objectives you need to train somewhat differently than you would if you were just pursuing one or the other. The special quick start training approach I will outline in this chapter represents the best way to simultaneously maximize fat loss and build foundational fitness for your sport.
Your quick start training will include three types of workouts: high-intensity interval sessions, prolonged fat-burning workouts, and strength workouts. Short (10–30-second) intervals of maximum or near-maximum intensity contribute to fat loss by creating a huge post-workout fat-burning effect. At the same time, high-intensity intervals help prepare the body for race-focused training by increasing raw speed and power that will in turn enable you to perform all your subsequent training at a higher level. For endurance athletes, speed and power play a much smaller role later in training when the focus shifts to race-specific training, which should include longer intervals. Intervals lasting more than a minute each will be more productive later in your training because, to be done most effectively, these workouts require a higher level of calorie and carbohydrate intake than you will have during a quick start. They are also more effective when you’ve laid down a solid foundation of fitness beforehand, as you will do in your quick start.
Prolonged fat-burning workouts contribute to fat loss by maximizing fat burning within the sessions themselves and by increasing your muscles’ capacity to burn fat. No other type of workout burns more fat than a long one performed at a steady, moderate intensity, especially when the workout is conducted in a carbohydrate-deprived state. Prolonged fat-burning workouts also prepare your body for future race-focused training by developing your raw endurance in a gentle way. Your ultimate goal in racing is to sustain a high rate of speed for a prolonged period of time. To do that you must first perform some lengthy workouts at challenging tempos. But before you do that you must prepare your body to handle such challenging race-specific workouts by performing longer workouts at more relaxed speeds. That’s where prolonged fat-burning workouts come in; their function is to give you more than enough endurance to merely “go the distance” in races so you can then work on sustaining greater speeds over distance.
Strength training contributes to fat loss by increasing muscle mass and with it your body’s resting metabolic rate, so your body burns more fat around the clock. It also prepares your body for the training cycle by making you stronger. Raw muscle strength is undervalued by most endurance athletes. The stronger you can get without sacrificing endurance, speed, and technique, the better you will perform as a cyclist, runner, or triathlete. Obviously, if you were to quit cycling, running, and/or swimming in favor of lifting weights for two hours every day, you would get a lot stronger but your sport performance would suffer due to loss of endurance, speed, and technique. Maximizing strength without sacrificing these attributes requires a balancing act in training. One way to maintain the right balance is to mix a modest amount of strength training with a greater amount of sport-specific endurance training throughout the training cycle. But you can achieve further benefit by making strength training a higher priority before the training cycle begins. Focusing on strength training in a quick start allows you to get stronger than you ever could if you never prioritized strength training, yet it does not interfere with your race fitness development because this strength-focus period falls before the start of the formal training cycle.
Let’s take a closer look at how you will implement high-intensity intervals, prolonged fat-burning workouts, and strength workouts in your quick start.
HIGH-INTENSITY INTERVALS
It’s not surprising that high-intensity intervals are a more time-efficient way to stimulate fat loss than steady, moderate-intensity workouts. Obviously, the more intensely you exercise, the more calories you burn per minute. Therefore, a high-intensity interval workout of a given duration always stimulates more fat loss than a steady, moderate-intensity workout of equal duration. But it might surprise you to learn that, in addition to stimulating more fat loss when time is held constant, high-intensity intervals also stimulate more fat loss when the total energy cost of the two types of workouts is held constant. For example, a previously sedentary person who starts an exercise program in which she burns 400 calories per day in high-intensity interval workouts will probably lose more body fat than she would if she started an exercise program in which she burned exactly the same number of calories in steady, moderate-intensity workouts (which, of course, would take longer to complete than the interval workouts). The reason is that the new exerciser would burn a lot more fat between high-intensity interval workouts than between steady, moderate-intensity workouts.
Experts on the use of high-intensity intervals for fat loss, including Martin Gibala at McMaster University, favor very short, maximum- or near-maximum-intensity intervals (10 to 30 seconds) to stimulate fat loss in obese and low-fitness individuals. Even though these sessions are very hard, they are generally more tolerable to beginners than the sorts of intervals more often practiced by endurance athletes, which are still very intense but last much longer (1 to 5 minutes). The average sedentary person can get through a bunch of 10- or 30-second sprints separated by plenty of recovery time without experiencing undue misery, but a handful of 3-minute supra-threshold intervals would be hell on earth.
In addition to being the best form of interval training for obese and low-fitness individuals, these very short, very high-intensity intervals are also the best form of interval training for endurance athletes within a quick start. That’s because sprints are not only more manageable than longer intervals for the beginner but also more manageable for the experienced endurance athlete who is relatively far from peak fitness at the moment, and endurance athletes typically are farthest from peak fitness in the several weeks before they begin a new training cycle. And again, by developing reserves of raw speed and power, this type of training does a good job of preparing athletes for the base training period that comes at the start of a new training cycle.
The most appropriate way to approach quick start interval training varies by sport. Here are some guidelines for cyclists, runners, and triathletes.
CYCLISTS
There are three types of near-maximum- to maximum-intensity intervals you can do on the bike: speed intervals, power intervals, and short hill intervals. Speed intervals emphasize leg turnover. They entail sprinting at a very high cadence in a moderate gear. Power intervals emphasize pushing against resistance. The intensity is the same as in speed intervals—both are all-out efforts—but power intervals are performed in your bike’s highest gear (outdoors) or against very high resistance (indoors). Short hill intervals are short maximum-intensity hill climbs performed out of the saddle on a moderately steep (5–8 percent) grade.
The metabolic benefits of the three interval types are the same. In other words, each will stimulate about the same amount of fat loss as the others. There are slight differences, though, in the fitness and performance benefits of the three workouts. As you might expect, speed intervals do the best job of enhancing maximum cadence and efficiency at very high cadences, power intervals do the best job of increasing maximal power output, and short hill sprints do the best job of enhancing hill-climbing ability.
Here are example formats of each workout type:
Speed Intervals
Warm up with 10–15 minutes of easy spinning. Ride 12 x 30 seconds at maximal effort (that is, the greatest effort you can sustain through all 12 intervals) at 120+ rpm in a gear that is slightly below the preferred gear. Spin for 1 minute after each sprint. Cool down with 10–15 minutes of easy spinning.
Power Intervals
Warm up with 10–15 minutes of easy spinning. Ride 20 x 10 seconds at maximal effort (that is, the greatest effort you can sustain through all 20 intervals) in your highest gear or at whatever resistance level yields the highest power output on your indoor bike. (Power intervals are indeed best done on an indoor bike.) Spin for 1 minute after each interval. Cool down with 10–15 minutes of easy spinning.
Short Hill Intervals
Warm up with 10–15 minutes of easy spinning. Ride 16 x 20 seconds at maximal effort (that is, the greatest effort you can sustain through all 16 intervals) out of the saddle on a moderately steep (5–7 percent) hill. Coast back down the hill and spin for 1 minute after each interval. Cool down with 10–15 minutes of easy spinning.
RUNNERS
Sprinting on level ground is very stressful on the muscles and tendons. For this reason, I seldom prescribe it. You can get the strength, speed, power, and fat-loss benefits you seek from maximum-intensity running with less chance of injury if you sprint uphill instead. Hill sprints (10-second efforts) and hill intervals (20- to 30-second efforts) together represent one of two types of interval training I recommend for runners in a quick start.
The other type is indoor cycling power intervals as described above. Cycling intervals for runners? That’s right. The reason I have runners perform power intervals on a bike instead of on foot is that a running workout that yields the equivalent neuromuscular and metabolic stimuli would leave you unable to get out of bed the next day. Legs are legs. The power that the cycling workout creates in your legs will transfer over to your running. And fat burning is fat burning. As a runner you will burn just as much fat with cycling power intervals as a cyclist. Of course, no alternative form of exercise offers as much running-specific fitness benefit as running itself, but you will do plenty of running in your quick start. This cross-training workout will complement that running to provide more of the special benefits you seek in a quick start than any type of additional run would do.
Here are some examples of hill sprint and hill interval workout formats.
Hill Sprints
Run 45 minutes easy. Sprint 8 x 10 seconds up a moderately steep to steep hill (5–10 percent grade). Walk back down the hill to recover after each sprint. Hill sprints should always follow an easy run because an easy run serves as a good warm-up for sprints. Furthermore, it’s unlikely that you will ever do enough hill sprints to make a complete workout of them.
Warm up with 10 minutes of easy running. Run 12 x 30 seconds uphill at the greatest speed you can sustain through the last interval. Jog slowly back down the hill for recovery. Cool down with 10 minutes of easy running.
TRIATHLETES
As a triathlete you will do the same high-intensity cycling interval sessions cyclists do and the same high-intensity running sessions runners do, but you will also do high-intensity swim intervals. High-intensity intervals are not as special in swimming as they are in cycling and running, because swimming is much gentler on the musculoskeletal system; therefore speed and power work is less stressful and easier to recover from when done in the water. Consequently, triathletes traditionally do much more high-intensity interval work in the pool than they do on the bike or on foot. Still, I recommend that triathletes approach their swim training differently in a quick start than at other times, specifically by focusing more on the shortest sprints and on strength work with fins and paddles (separately).
Following are some examples of short sprint sets, kick sets with fins, and pull sets with paddles. All three can be incorporated into a single workout, but they can also be done in separate workouts or together in any combination of two of the three.
Sprint Set
12 x 25 yards/meters at maximum speed. Recover 10 seconds.
Kick Set
12 x 25 yards/meters kicking on sides with fins. Recover 10 seconds.
Pull Set
10 x 50 yards/meters pulling with small paddles. Recover 15 seconds.
PROLONGED FAT-BURNING WORKOUTS
If high-intensity interval sessions are the most efficient workouts for fat loss, why would you ever do any other types of workouts? Three reasons. First, high-intensity interval rides and runs are very stressful and cannot be done every day. But you need to train every day, so it’s necessary to do some other types of workouts between interval sessions.
Second, while high-intensity interval workouts are the most efficient means to stimulate fat loss, they are not the only means, nor are they necessarily the most potent. Extended moderate-intensity workouts stimulate fat loss in ways that are largely complementary to the ways in which high-intensity intervals stimulate fat loss, so it’s best to do both. Specifically, high-intensity intervals deplete your muscle carbohydrate stores, causing your body to burn a significant amount of fat after the workout, while your carbohydrate stores are being replenished, whereas longer moderate-intensity workouts burn lots of fat within the workouts themselves and cultivate your muscles’ general fat-burning capacity. Also, even though high-intensity intervals stimulate more fat loss than steady, moderate-intensity workouts, when either the duration or the total energy cost of the two workout types is held constant, moderate-intensity training ultimately has greater potential to stimulate fat loss. You can go much longer at a moderate intensity and thus greatly exceed the maximum energy cost you can achieve with an exhaustive interval workout.
A third reason not to rely on high-intensity intervals exclusively in a quick start is that fat burning is not the only goal of the training you do within a quick start. Remember, your other objective is to lay a foundation of sport-specific fitness to build on later. As an endurance athlete, you need the endurance you get from prolonged fat-burning intensity workouts as much as you need the speed and power you get from high-intensity intervals.
Research has shown that trained endurance athletes burn fat at the highest rate at exercise intensities of 69 to 74 percent of their maximum heart rate.1 So this is the intensity you’ll want to target in prolonged fat-burning workouts. If you don’t use a heart rate monitor, don’t sweat it. Fat burning hovers within 10 percent of the maximal rate through a broad spectrum of intensity levels, from about 65 to 82 percent of maximum heart rate, and it’s pretty easy to find that range by feel. For the fit individual, it’s an intensity that feels very comfortable but not dawdling. The mistake you most want to avoid in these workouts is going too fast, because the rate of fat burning drops precipitously at intensities above 82 percent of maximum heart rate as carbohydrate burning takes over. Keep the following mantra in the back of your mind when doing prolonged fat-burning workouts: Cruise, don’t push.
Even within the so-called fat-burning intensity range, fat burning is suppressed when carbohydrates are consumed during the workout. Your muscles are smart enough to use the fast extra energy provided by the carbs in a sports drink or energy gel in preference to body fat when given the opportunity. Therefore you are not to consume any carbs during the prolonged fat-burning workouts in your quick start. In fact, ideally you will not consume any carbs within several hours before these workouts either, because fat burning is truly maximized when your muscles are already in a carbohydrate-depleted state at the start of the workout. For most athletes, the most practical way to train in a fasted state is to do the workout early in the morning without a preceding breakfast.
If you’ve never done this type of workout before, be prepared. You will probably feel lethargic and, well, lousy the first few times as your muscles struggle to keep the “furnace” stoked for an hour or more with nothing but “low-octane” intramuscular triglycerides and free fatty acids. But after surviving a few such sessions you will begin to feel more comfortable in them, and that’s a sign that your muscles are indeed becoming better fat burners.
“Prolonged” is always a relative term in endurance training. Advanced athletes can handle longer workouts than beginners, long-distance racers require longer endurance-building sessions than short-distance racers, and cycling is more conducive to prolonged training than running. Prolonged fat-burning workouts need to last at least 60 minutes, preferably at least 90, to fulfill their purpose, so I encourage even relative beginners and short-distance racers to push beyond the hour mark. Because the intensity is moderate, it’s not so hard. At the same time, it is not necessary or even advisable to cover epic distances in these workouts because the carbohydrate deprivation will greatly reduce your normal range.
Following are prolonged fat-burning workout guidelines for cyclists, runners, and triathletes. They’re pretty simple.
Fat-Burning Workouts for Cyclists
First thing in the morning, without eating breakfast, hop on your bike and ride 90 minutes to 3 hours at 65 to 75 percent of your maximum heart rate, drinking only water or a zero-calorie electrolyte solution as you go.
Fat-Burning Workouts for Runners
First thing in the morning, without eating breakfast, run 1 to 2.5 hours at 65 to 75 percent of your maximum heart rate, drinking only water or a zero-calorie electrolyte solution as you go.
Fat-Burning Workouts for Triathletes
Perform one prolonged fat-burning ride and one prolonged fat-burning run every other week in alternate weeks. Also do a longer, steady, moderate-intensity swim each week. The swim workout does not need to be performed in a fasted state, however, nor does it need to last a full hour.
Most endurance athletes do not love lifting weights. Knowing this, I design the simplest and most time-efficient strength workouts possible for endurance athletes for all circumstances, including quick starts. All the strength workouts included in the training plans in the next three chapters share the same basic format: 10 total exercises, including three each for the lower body, core, and upper body, arranged in repeating lower body/core/upper body sequences, with one extra lower-body exercise tacked onto the end.
The least challenging version of this workout requires that each exercise be performed just once. The more challenging versions require that each exercise be performed twice or even three times in a circuit format, meaning you do each exercise once, then go back and do it a second time, and so on. All the training plans include two to three strength workouts per week.
The specific exercises included in the workouts vary from sport to sport and from week to week. The cycling plans include those exercises I judge best for cyclists, the running plans are built from the most beneficial exercises for runners, and the triathlon plans combine these with the best exercises for swimmers. The strength workouts in all the plans are dominated by basic bodyweight exercises in the first week, then gradually introduce more advanced exercises involving external resistance in subsequent weeks.
Following are descriptions and illustrations of all the exercises used in the quick start strength workouts. Note that recommendations for the number of repetitions will be given within the training plans themselves in the next three chapters. Some of the exercises involve a form of external resistance (dumbbells, cable pulley weight stacks, etc.) while others do not, and still others may be done either way. For those exercises where external resistance is optional or required, choose a level of resistance appropriate for the designated number of repetitions. Specifically, chose a resistance level that leaves you significantly fatigued but not exhausted at the end of a set, able to complete one or two more repetitions if you had to but no more.
LOWER BODY
These 15 exercises target the hips, groin, gluteals, quadriceps, hamstrings, calves, and feet. Some also have secondary benefits for the core and upper body.
BALANCING BEND AND REACH
Feet, calves, hamstrings, glutes, hips, quads
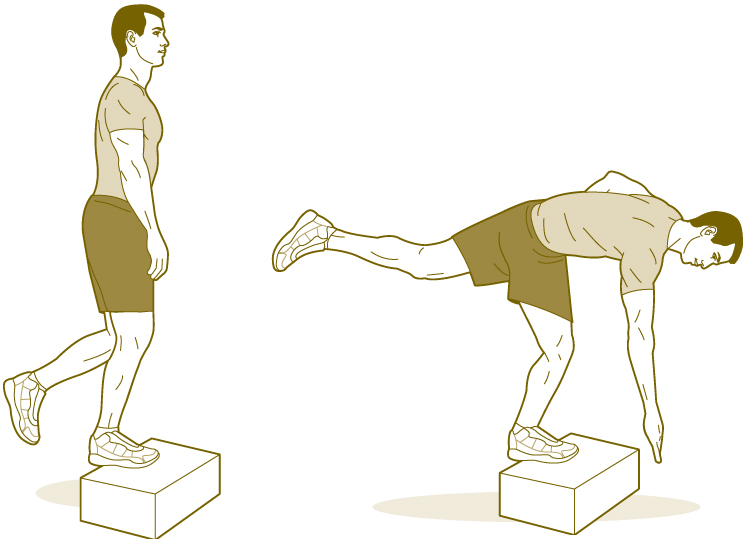
Stand on your right foot on the edge of a box or other sturdy support with your forefoot supported and your heel dangling off the edge. Your left leg is slightly bent to elevate your left foot. Bend at the waist, hip, and knee and reach toward the floor in front of you with your right hand. Extend your left leg behind your body for balance as you bend and reach. Stretch your fingertips as close to the floor as you can get them without losing balance. Return to the start position. Complete a full set and then repeat the exercise standing on your left leg.
BALANCE BALL LEG CURL
Hamstrings
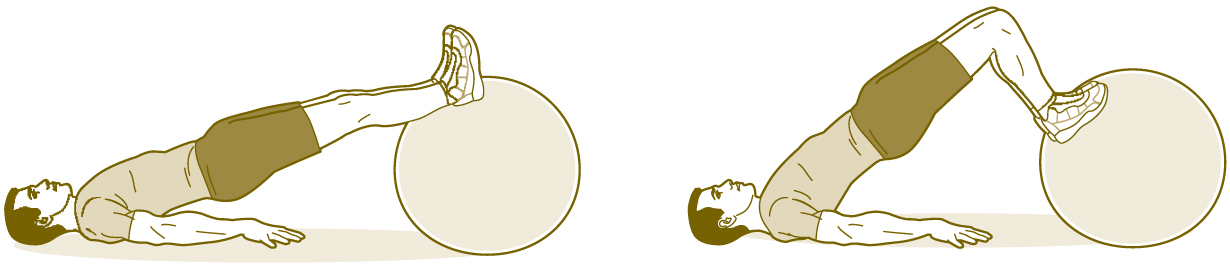
Lie on your back and place your heels together on top of a stability ball. Raise your pelvis so that your body forms a straight plank from head to toes. Contract your gluteal muscles and hamstrings and roll the ball toward your body. Pause briefly and return to the start position. Focus on keeping your pelvis from sagging toward the floor throughout this movement. To make this exercise more challenging, perform single-leg curls with one heel on the ball and the other foot elevated a few inches above it.
ECCENTRIC HEEL DIP
Calves
Balance on one foot on a sturdy platform such as an aerobics step, with the ball of the foot resting on the edge of the platform so that the heel is unsupported and hanging off the back of the platform. Rest your fingertips against a wall or some other support for balance. Lower your heel toward the floor until you feel a stretch in your calf muscles. (Your heel will now be below the level of the ball of your foot.) Then raise your heel back to a neutral position. At first, when you lift your body back to the starting position, do so with both legs so that you are not overloading the calf muscles. Once you’re stronger, you may attempt the lifting phase with one calf. Always use one for the lowering phase. Complete a full set and then work the other calf.
ELEVATED REVERSE LUNGE
Hips, groin, gluteals, quadriceps, hamstrings
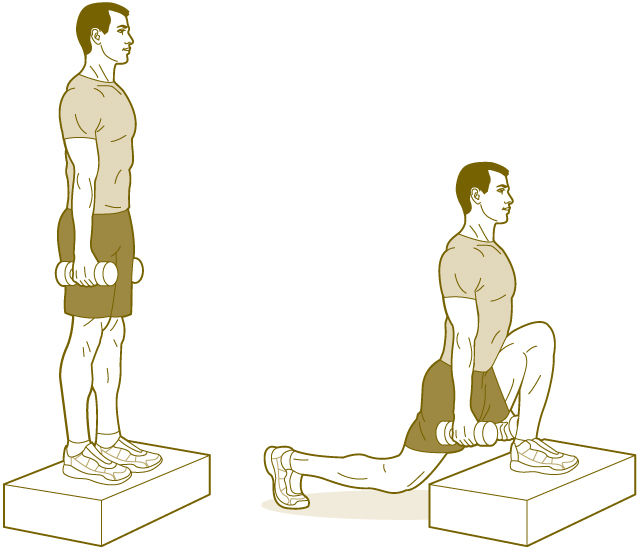
Stand on a 4- to 6-inch step with your arms resting at your sides and a dumbbell in each hand. Take a big step backward with one leg and bend both knees until the back foot hits the ground and the back knee almost grazes the floor. Now forcefully contract the quads and gluteals of your forward leg to draw your rear leg forward and your body back to a standing position. Be sure to maintain an upright torso posture throughout the movement. Complete a full set with one leg, rest, then work the opposite leg.
GIANT WALKING LUNGE
Hips, gluteals, quadriceps, hamstrings
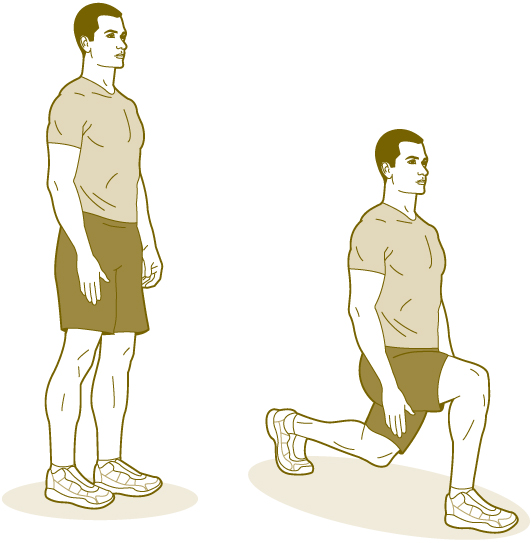
Walk slowly forward by taking the longest steps possible. With each new step, imagine you’re trying to break your “personal record” for the largest step you’ve ever taken. Keep your arms relaxed at your sides. If this is not challenging, perform the exercise with a dumbbell in each hand.
GLUTEAL-HAMSTRING RAISE
Gluteals, hamstrings
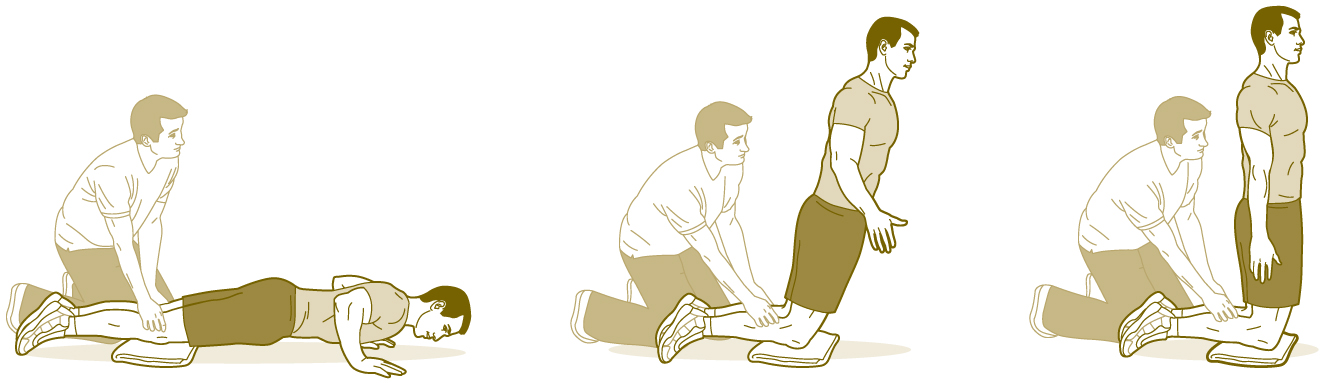
Lie on your stomach and have a partner press your lower legs down into the floor so your body can only move from the knees up. With your arms in standard push-up position, give a slight push off the floor while you contract your hamstrings and gluteals and lift your body (from knees to head) upward until you are in a fully upright kneeling position. Try to keep your torso aligned with your thighs (don’t bend at the waist) throughout the movement. Lower yourself back to the floor.
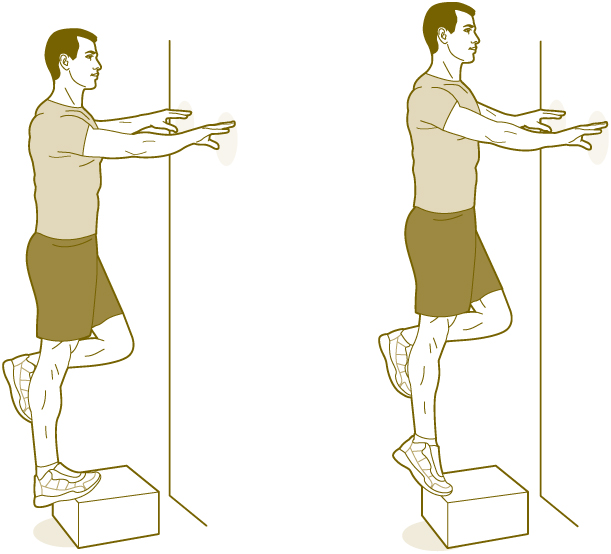
Hips
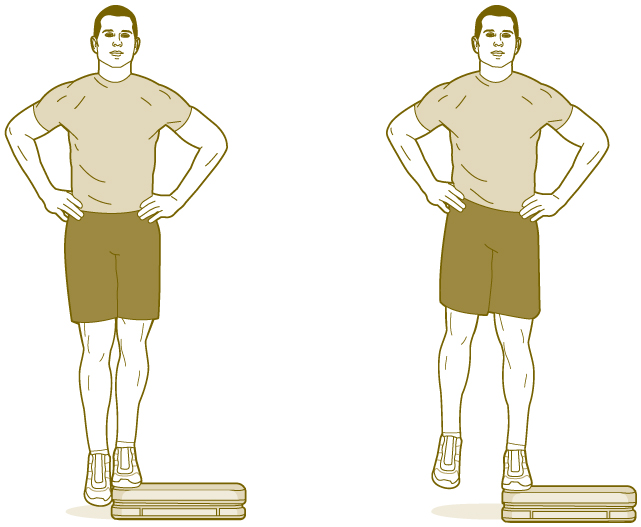
Stand on your left foot on a sturdy platform that’s at least eight inches high. Position yourself so that the instep of your foot is close to the edge of the platform and your right foot is hovering above the floor. Begin with your hips aligned so your right foot is level with your left. Now relax the muscles of your left hip and allow your right foot to sink a few inches toward the floor. Be sure to do this without bending your left knee. Next, contract the muscles of your left hip and lift your right hip as high as possible, bringing your right foot a few inches higher than the left. Complete a full set and then reverse your position and repeat the exercise.
KETTLEBELL SQUAT SWING
Gluteals, quadriceps, hamstrings, abs, lower back, upper back, shoulders

Stand with your feet slightly wider than shoulder-width apart, knees bent roughly 15 degrees, toes turned out slightly, and a kettlebell placed on the floor between your feet. Bend over and grab the kettlebell with both hands, then return your torso to a fully upright position, keeping your arms fully extended toward the floor in front of your body so the kettlebell is between your upper thighs. To start the exercise, bend your torso forward from the hips (not the waist) and swing the kettlebell backward between your legs as though you’re preparing to take a “diaper shot” with a basketball. Next, with a fluid, powerful motion, extend your hips and shoulders, swinging the kettlebell upward and forward until it reaches the level of your shoulders in a standing position. Now reverse this movement, bending forward, lowering your arms and allowing the kettlebell to swing back through your legs. If you don’t have access to a kettlebell, use a dumbbell, holding it by one end with both hands.
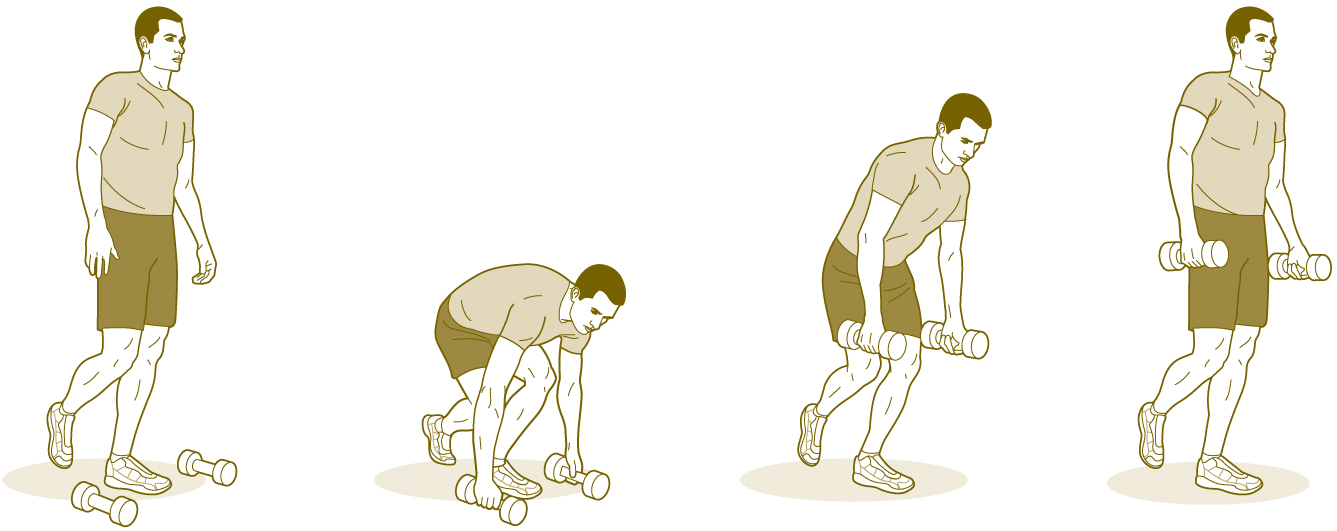
ROMANIAN DEADLIFT
Hamstrings, lower back
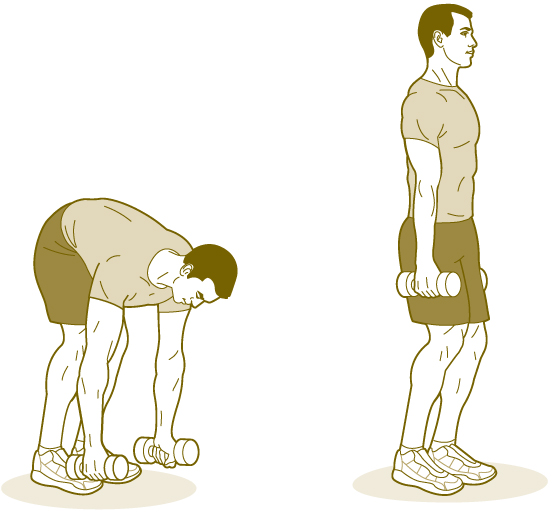
Stand with your feet close together, knees bent very slightly, with a dumbbell next to each foot. Bend forward at the waist and grab the dumbbells. With arms at your sides and knees locked in a slightly bent position, return to a standing position. Pause briefly and then bend forward to do another repetition.
SINGLE-LEG SQUAT
Hips, gluteals, quadriceps, hamstrings
Stand on your right foot and bend the left leg slightly to elevate the left foot a few inches above the floor. Lower your posterior slowly toward the floor, keeping most of your weight on the heel of your support foot. Reach the left leg either behind your body (easier) or in front of your body (harder) to keep it out of the way and to help maintain balance. Squat as low as you can go without your pelvis swinging outward. Return to the start position. Complete a full set and then repeat the exercise on your left foot.
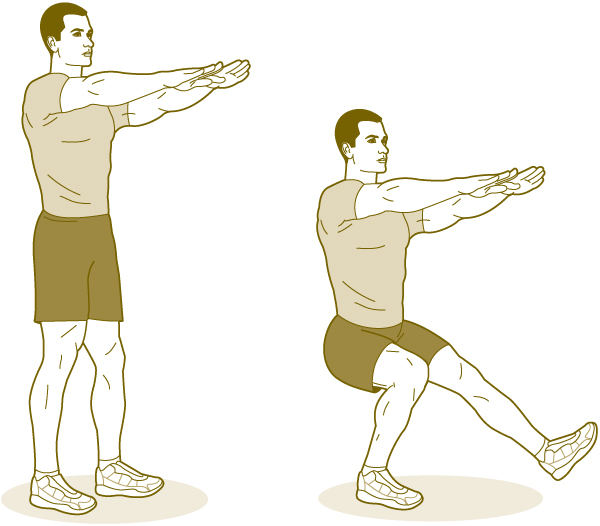
SPLIT SQUAT JUMP
Quadriceps, hamstrings, gluteals, calves, hips
Start in a split stance with your right foot flat on the ground and your left leg slightly bent with only the forefoot of your left foot touching the ground a half step behind the right. Lower yourself into a deep squat and then leap upward as high as possible. In midair, reverse the position of your legs. When you land, sink down immediately into another squat and then leap again. Use your arms for balance and to generate extra upward thrust with each leap.
SPLIT-STANCE DUMBBELL DEADLIFT
Gluteals, hips, hamstrings, quadriceps, lower back, upper back
Stand with your left foot directly beneath your left hip and your right foot half a step behind the right hip with only the toe touching the floor. Put all your weight on your left foot; use the right only for balance. Begin with a dumbbell positioned on the floor directly underneath your hands as your arms hang at your sides. Bend down and grab the dumbbells. Press your left foot into the floor and stand fully upright. Concentrate on extending your left knee and hip first and then lifting your torso. Keep your weight fully on your left foot throughout this movement. Pause briefly in a standing position and then lower the dumbbells back to the floor. Complete a full set, then reverse your position and do another set.
STEP-UP
Quadriceps, hamstrings, hips, groin, gluteals

Stand facing a sturdy 12- to 18-inch platform such as an aerobic step with your right foot on it and your left foot on the floor. Now use your right leg to pull your body upward until you’re standing on the bench on your right foot. Concentrate on not pushing off the floor with your left foot. (One way to ensure you do this is to lift the toes of your left foot before you engage your right leg to lift your body.) Make your right leg do all the work of lifting your body. Step back down with your left leg. Repeat until you’ve completed a full set, then switch legs.
SUPINE GLUTEAL ACTIVATION
Gluteals, abs
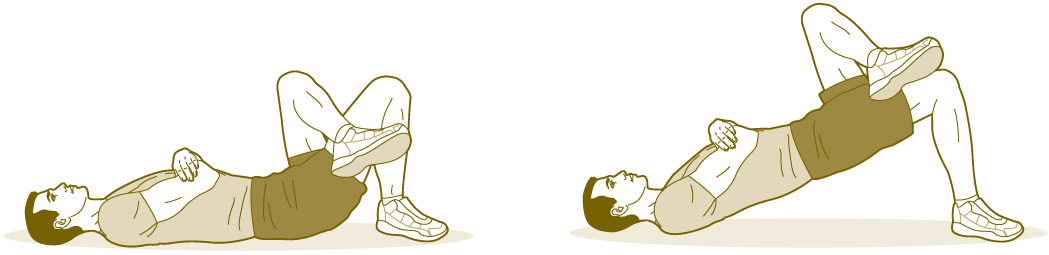
Lie on your back with your right leg bent 90 degrees and your right foot flat on the floor close to your posterior. Begin with your left knee sharply bent and crossed over the right leg so that the lateral side of your left ankle is resting against your lower right thigh. Your hands are folded on your chest. Now contract your right gluteals and lift your hip until your right thigh and torso form a straight line. Concentrate on using your gluteals more than your hamstrings to achieve this lifting. Pause one second with your hip elevated and return to the start position. Complete a full set, then reverse your position and repeat the exercise.
X-BAND WALK
Hips, groin
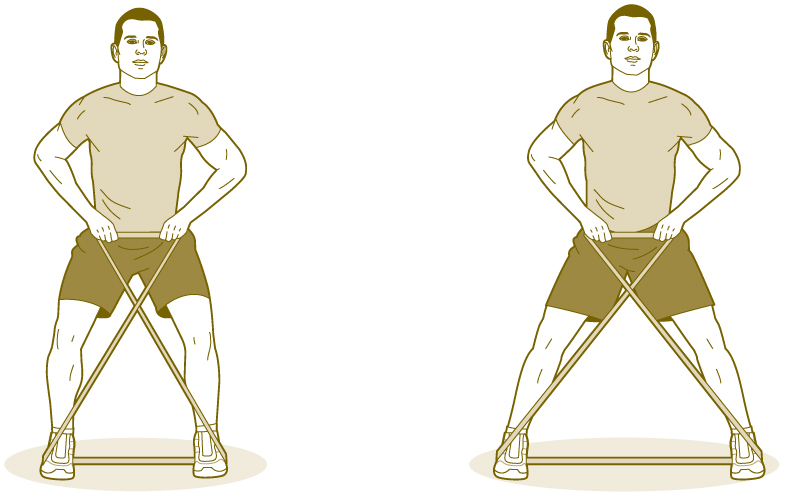
Loop a half-inch or one-inch exercise band under both feet and stand on top of it. Your feet should be roughly 12 inches apart at the start. Cross the ends of the band to form an X and grasp one end in each hand. Pull your chest up and shoulders back, keeping tension on the band throughout the ensuing movement. Start walking sideways with small lateral steps. The leg that’s on the side of the direction you’re moving will have to overcome the band’s tension to take each step. Make sure you keep the hips and shoulders level, and don’t deviate forward or backward as you step to the side. When this exercise is performed correctly, you’ll feel the movement in your gluteals. Complete 10 steps in one direction, then 10 more moving in the opposite direction.
These seven exercises target various parts of the abdominal region and the lower back. Some have secondary benefits for other areas.
L-OVER
Abs, obliques
Lie on your back with your arms resting at your sides and your palms flat on the floor. Extend your legs directly toward the ceiling, touch your feet together, and point your toes. Keeping your big toes together, tip your legs 12 to 18 inches to the left by twisting at the hips, so that your right buttock comes off the floor. Fight the pull of gravity by maintaining stability with your abdominals and obliques. Pause for a moment, then return slowly to the start position, again using your core muscles to control the movement. Repeat on the right side, and continue alternating from left to right until you’ve completed a full set.
ALTERNATING SINGLE-LEG REVERSE CRUNCH
Abs, hip flexors
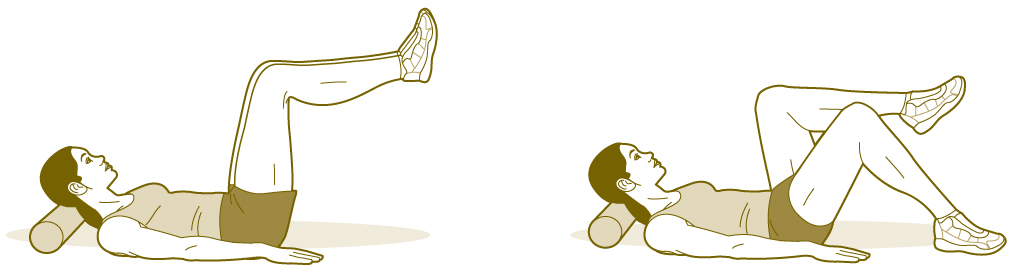
Lie on your back with your head supported by a large pillow or foam roller. Begin with your legs bent 90 degrees and your thighs perpendicular to the floor, feet together. Engage your deep abs by drawing your navel toward your spine and trying to flatten your lower back against the floor. While holding this contraction, slowly lower your right foot to the floor. Return immediately to the start position, and then lower the left foot. If you find this movement easy, you are failing to hold the contraction of your deep abs. Keep your back pressed so flat to the floor that a credit card couldn’t be squeezed between them! Lower each foot to the floor 8 to 10 times.
PLANK
Abs, lower back

Lie on the floor on your stomach, with your upper body supported on your forearms and your toes pressing into the ground. Maintain a 90-degree bend in your elbows and make sure they are placed directly underneath the shoulders. Tighten your entire core area and lift your hips up and in line with your legs and torso. Hold this position for up to 30 seconds without allowing your hips to sag. If you can hold the prone plank position longer than 30 seconds, make this exercise more challenging by doing it with your left foot elevated a few inches above the floor for 15 seconds, then your right foot elevated for 15 seconds.
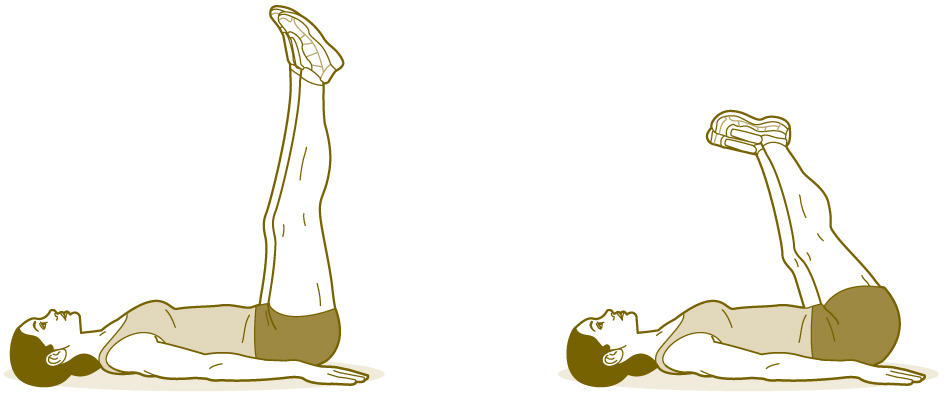
REVERSE PLANK
Abs
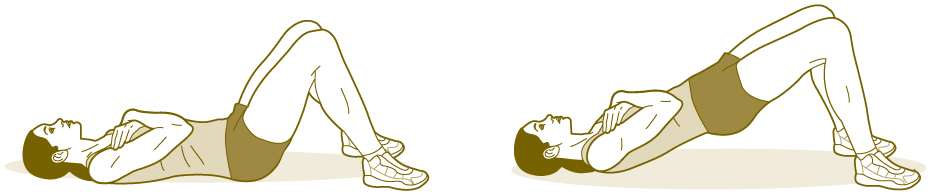
Lie on your back on the floor with your arms folded on your chest, your knees bent 90 degrees, and your feet flat on the floor. Contract your gluteals and lift your hips until your body forms a straight line from neck to knees. Hold this position.
Abs, obliques, hips
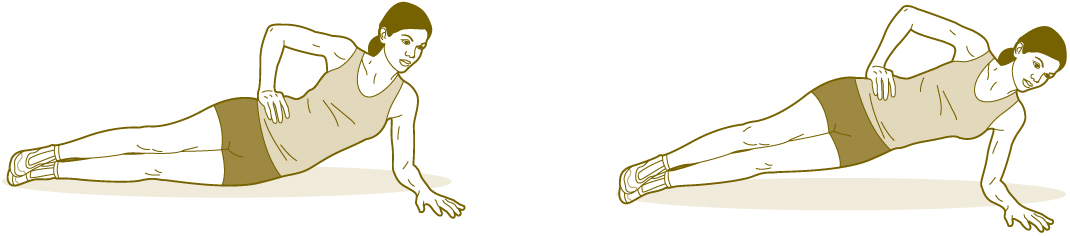
Lie on your left side with your ankles together and your torso propped up by your upper arm. Lift your hips upward until your body forms a diagonal plank from ankles to neck. Hold this position for 20 to 30 seconds, making sure you don’t allow your hips to sag toward the floor. (Watch yourself in a mirror to make sure you’re not sagging.) Switch to the left side and repeat the exercise.
STICK CRUNCH
Abs
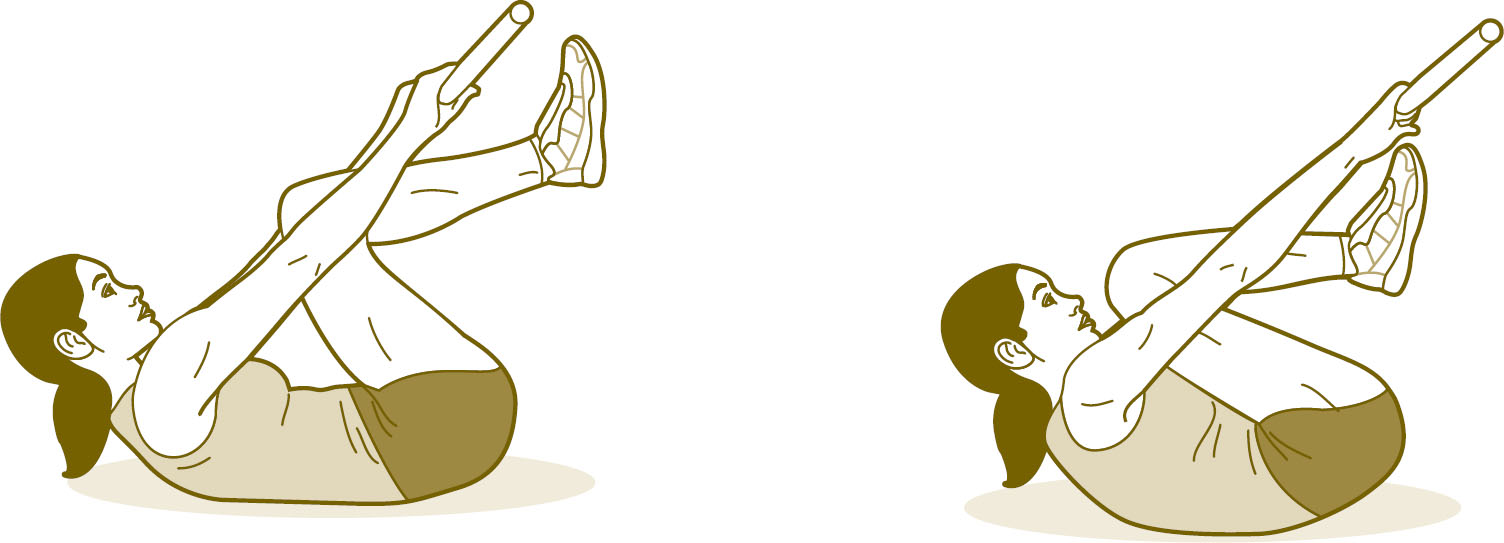
Lie on your back, bend your knees, and draw them as close to your chest as possible. Grasp any type of stick or rod (such as a broom handle) with both hands, positioned shoulder-width apart. Begin with your arms extended straight toward your toes, your abs tightened, and your head and upper back curled slightly off the floor. Now squeeze your abdominal muscles and reach forward with the stick until it passes beyond your toes. (This is a very small movement—just a few inches.) Pause for one second and return to the start position. Don’t allow your abs to completely relax.
Obliques, hips, lower back, upper back, gluteals, hamstrings, quadriceps
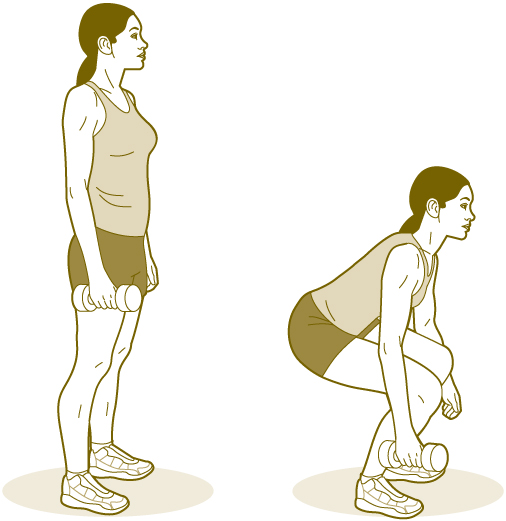
Stand with your arms hanging at your sides and a dumbbell in one hand. Push your hips back, bend the knees, and reach the dumbbell down as close to the floor as you can while maintaining a neutral spine (some people have a tendency to round their back at the bottom of this movement). Now stand up again. Don’t allow your torso to tilt to either side while performing this movement. Complete a full set, rest for 30 seconds, then repeat the exercise while holding the dumbbell in the opposite hand.
UPPER BODY
These nine exercises target the shoulders, chest, upper back, and arms. Some have secondary benefits for other parts.
BENT-OVER CABLE SHOULDER LATERAL EXTENSION
Shoulders, upper back
Stand in a wide stance with your knees slightly bent and your right side facing a cable pulley station with a D-handle connected to the low attachment point. Grasp the handle in your left hand using an underhand grip. Bend forward 45 degrees from the hips. Begin with your left arm extended toward the floor and the handle positioned directly underneath your breastbone. Tighten your core. Now pull the handle outward and upward until your left arm is fully extended away from your body and parallel to the floor. Pause briefly and return to the start position. Complete a full set, then reverse your position and work the right shoulder.
CABLE EXTERNAL SHOULDER ROTATION
Shoulders
There are two versions of this exercise: neutral rotation and overhead rotation.
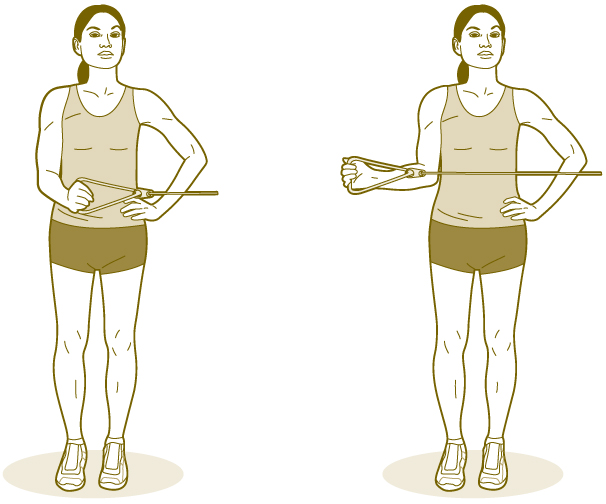
Neutral Rotation: Stand with your left side facing a cable pulley station. Grasp the handle in your right hand and begin with your right arm bent 90 degrees so that your forearm is pointing toward the cable pulley station across your belly. Now rotate your shoulder externally and pull the handle across your body. Return to the start position. Complete a full set and repeat the exercise with your left arm.
Overhead Rotation: Stand with your right upper arm extended away from your body at shoulder level, your elbow bent 90 degrees, and your shoulder rotated internally so your forearm is pointing toward the floor. Hold a small dumbbell in your right hand. Now rotate your shoulder externally 180 degrees, stopping when your right forearm is pointing toward the ceiling. Return to the start position. Complete a full set and repeat the exercise with your left arm.
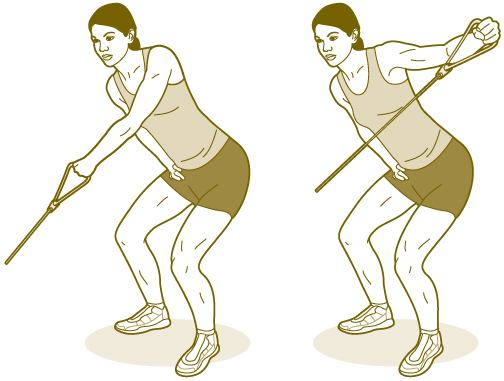
Shoulders, upper back

Set up a pulley with the rope attachment just above forehead level. Stand facing the pulley in a split stance and hold the rope with a neutral grip (palms facing in). Your arms are extended straight out in front of you with the hands slightly above shoulder height. Pull the center of the rope attachment toward your forehead by retracting the shoulder blades and forcing the elbows out (not down). As the rope approaches your face, your shoulder blades should be pulled back and down, with the chest high and your hands coming even with your ears. You should feel the resistance in your mid back and in the back of your shoulders.
CHIN-UP
Upper back, arms, shoulders
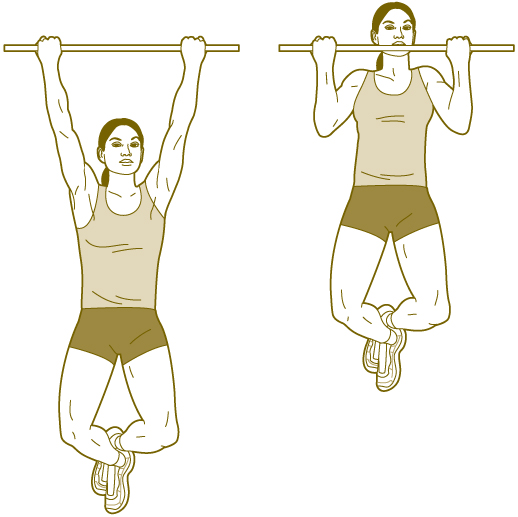
Begin by hanging from a chin-up bar with an underhand grip on the bar and your hands positioned slightly farther than shoulder-width apart. Pull your body upward toward the bar until your chin is at bar level. Pause briefly and slowly lower yourself back to the start position.
If you cannot complete at least eight chin-ups, do a modified chin-up. Set a Smith machine barbell at a height of three to four feet above the floor. Sit under the bar and grab it underhand with your hands positioned at shoulder width. Raise your hips up and form a straight line with your whole body. You are now “hanging” from the bar with only your heels touching the floor. Pull your chest to the bar and then return slowly to a hanging position.
Chest, upper back, shoulders, lower back, abs, obliques
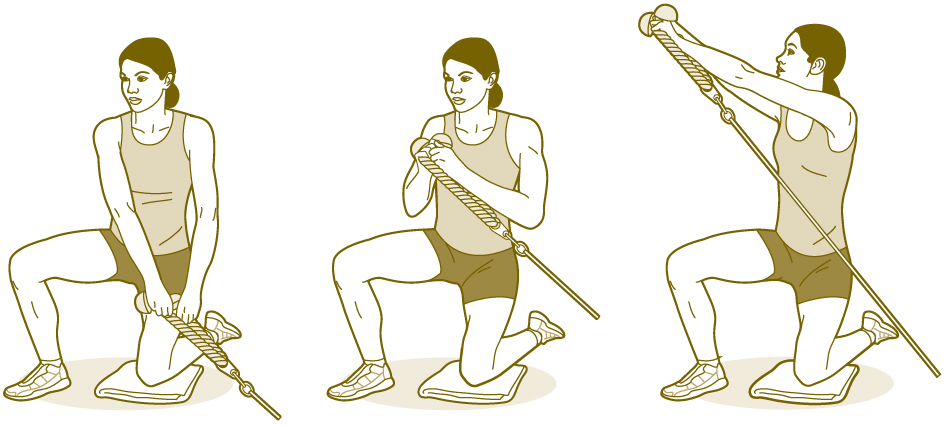
Assume a half-kneel position with your left knee and your right foot on the floor. You may want to place a pad under your knee for comfort. Position yourself three feet away from a cable pulley station with your torso facing it at a 45-degree angle. Attach a V-rope to the cable at ankle height. Grab a segment of the rope in each hand. Begin with your arms fully extended toward the attachment point. Pull your hands to your chest, pause briefly, and then extend your arms fully upward and away from your body. The cable should move in the same line in both parts of this movement. In other words, when you extend your arms in the second part of the movement, the cable should continue to move in exactly the same direction it did when you pulled your hands to your chest. After extending your arms fully, pause briefly once more and then return to the start position in one fluid movement. Your torso should not rotate while performing this exercise. Complete a full set, then reverse your stance and do another set.
INVERTED SHOULDER PRESS
Shoulders, arms, chest
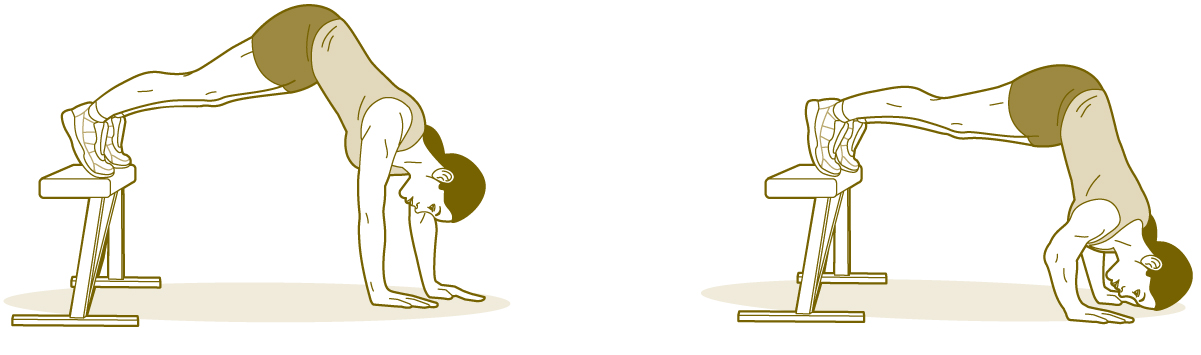
Assume a push-up position but with your feet elevated on an exercise bench or other sturdy platform of similar height. Position your hands close enough to your feet so your body forms an inverted V with a 60 to 90 degree bend at the waist. Bend your elbows and lower the top of your head toward the floor between your hands, stopping just short of making contact. Press back to the start position. The higher you elevate your feet and the more you bend at the waist, the more challenging this exercise will be.
ONE-ARM DUMBBELL SNATCH
Shoulders, upper back, arms, lower back, gluteals, quadriceps, hamstrings
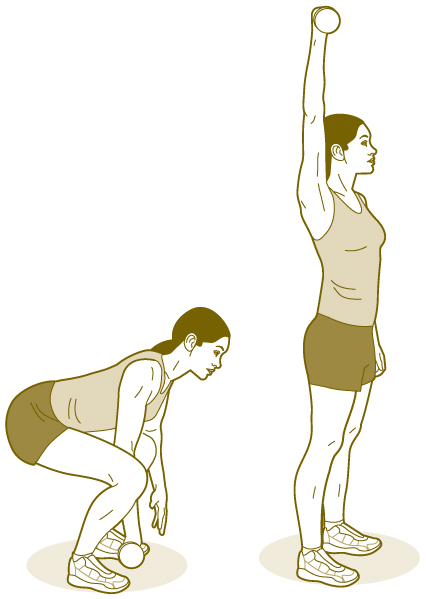
Stand in a wide stance with a single dumbbell placed on the floor between your feet. Bend your knees, tilt forward from the hips, and grasp the dumbbell with your right hand using an overhand grip (knuckles facing forward). Begin with your right arm fully extended. The object of this exercise is to lift the dumbbell in a straight line from the floor to a point directly overhead. To do this, begin by contracting your gluteals, hamstrings, and lower back so that the dumbbell rises to thigh height as you assume an upright standing position. From this point, keep the dumbbell moving in a straight line close to your body by bending your elbow and pulling from the shoulder. As the dumbbell approaches head level, rotate your shoulder and extend your arm until it is pointing toward the ceiling. Pause briefly, then reverse the movement, allowing the dumbbell to come to rest again on the floor briefly before initiating the next lift. Complete a full set, then switch to the left arm.
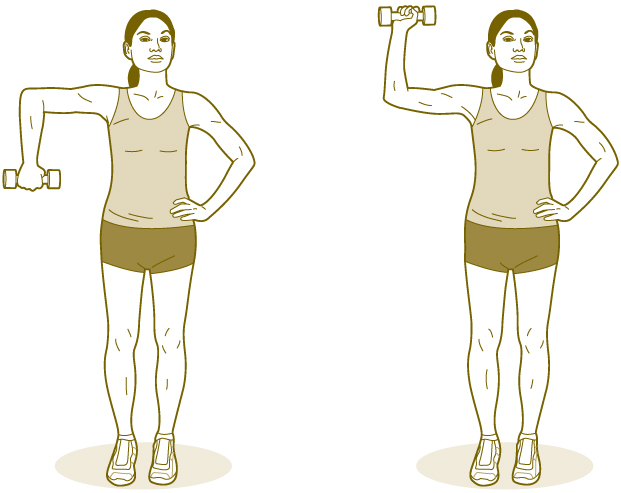
Shoulders, gluteals, hamstrings, quadriceps
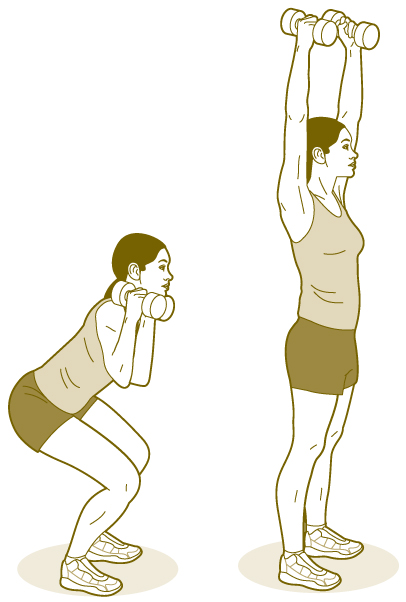
Stand with a dumbbell in each hand and your elbows fully flexed so the weights are at your shoulders. Your palms are facing each other and your feet are shoulder-width apart. Bend your knees and lower yourself into a half-squat. Immediately reverse this movement, powerfully straightening your legs and hips. As soon as you’re once again fully upright, press the dumbbells straight overhead. The idea is to use the upward momentum created by straightening your legs to assist your shoulders and arms in pushing the dumbbells toward the ceiling. This allows you to lift more weight than you could with a standard shoulder press. (But keep the weight light until you’ve mastered the movement.)
To complete the movement, lower the dumbbells back down to your shoulders.
PUSH-UP
Chest, upper back, shoulders, arms, abs, lower back
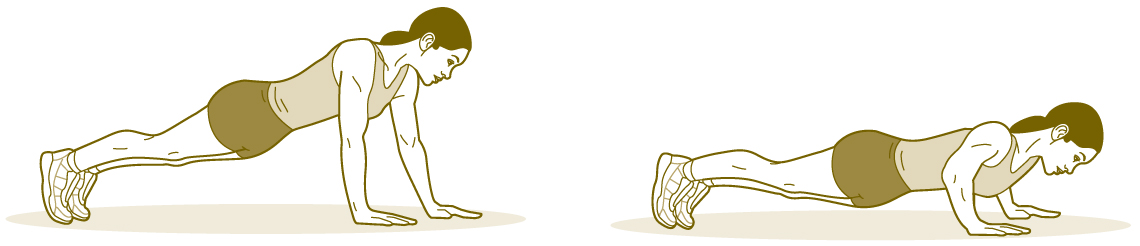
Assume a standard push-up position with your hands just outside shoulder width. Imagine your body being a straight line from ankles to neck; don’t allow the hips to sag or your butt to stick up too high. Tuck your chin so that your head is close to being in line with your body. Lower your chest to within an inch of the floor. Look straight at the floor the entire time and keep your core braced tightly. Press back to the starting position.
If you can’t do at least 10 standard push-ups, instead do elevated push-ups with your hands positioned on an exercise bench. If you can do more than 20 push-ups, instead do resisted push-ups with a resistance band wrapped over your shoulder blades and the ends pressed to the floor under your hands.
![]()
Strength training is something you should do not only during a quick start but also throughout the training cycle. Your time commitment to strength training should be somewhat less during the training cycle, though. See Racing Weight for strength workouts appropriate for race-focused training periods.
![]()
1 J. Achten, M. Gleeson, and A. E. Jeukendrup, “Determination of the Exercise Intensity That Elicits Maximal Fat Oxidation,” Medicine & Science in Sports & Exercise 34, no. 1 (January 2002): 92–7.