12) Tutorial to create a NAT Gateway using the Azure portal and test the NAT service:
In this tutorial, we will create a NAT gateway to provide outbound connectivity for virtual machines in Azure. To test the NAT gateway, you deploy a source and destination virtual machine. You'll test the NAT gateway by making outbound connections to a public IP address from the source to the destination virtual machine. This tutorial deploys source and destination in two different virtual networks in the same resource group for simplicity only.
If you prefer, you can do these steps using the Azure CLI or Azure PowerShell instead of the portal.
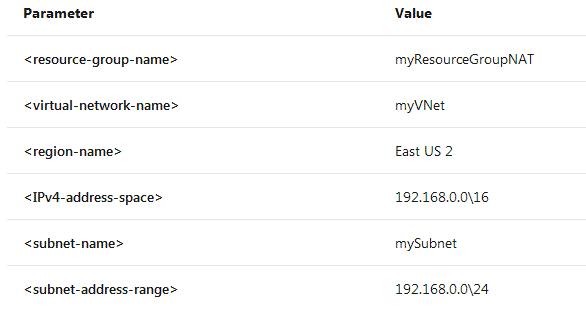
In this section you can replace the following parameters in the steps with the information below:
1. Sign in to Azure
Sign in to the Azure portal https://portal.azure.com/#home. Before you deploy a VM and can use your NAT gateway, we need to create the resource group and virtual network.
2. Create the virtual network
On the upper-left side of the screen, select Create a resource > Networking > Virtual network or search for Virtual network in the search box.
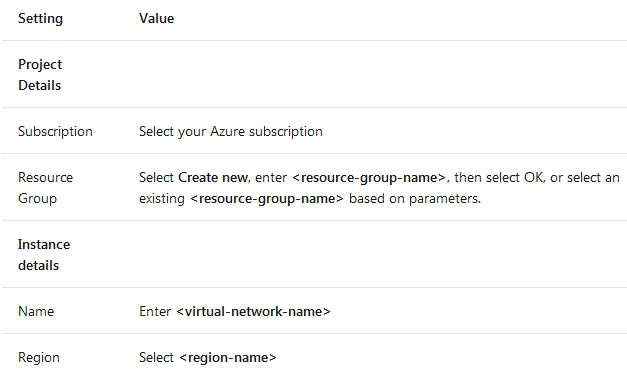
In Create virtual network, enter or select this information in the Basics tab:
Select the IP Addresses tab or select the Next: IP Addresses button at the bottom of the page.In the IP Addresses tab, enter this information:

Select Save. Select the Review + create tab or select the Review + create button. Select Create.
3. Create a VM to use the NAT gateway
We'll now create a VM to use the NAT service. This VM has a public IP to use as an instance-level Public IP to allow you to access the VM. NAT service is flow direction aware and will replace the default Internet destination in your subnet. The VM's public IP address won't be used for outbound connections.
- On the upper-left side of the portal, select Create a resource > Compute > Ubuntu Server 18.04 LTS, or search for Ubuntu Server 18.04 LTS in the Marketplace search.
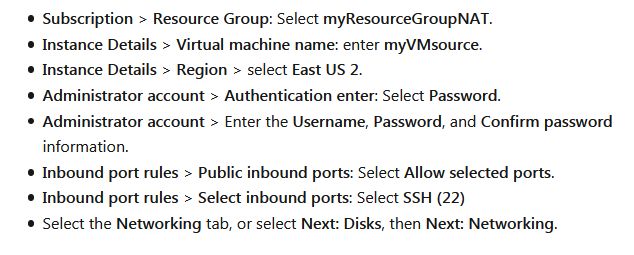
- In Create a virtual machine, type or select the following values in the Basics tab:
- In the Networking tab make sure the following are selected:

- In the Management tab, under Monitoring, set Boot diagnostics to Off.
- Select Review + create. Review the settings and click Create
4. Create the NAT Gateway
- You can use one or more public IP address resources, public IP prefixes, or both with NAT gateway. We'll add a public IP resource, public IP prefix, and a NAT gateway resource. This section details how you can create and configure the following components of the NAT service using the NAT gateway resource: A public IP pool and public IP prefix to use for outbound flows translated by the NAT gateway resource.
-
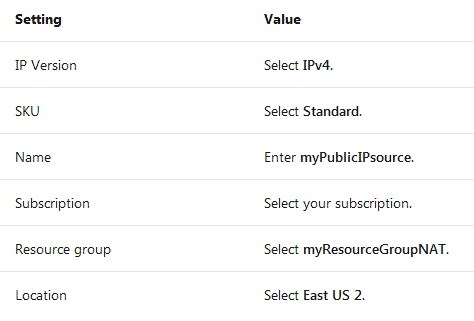
Create a public IP address: On the upper-left side of the portal, select Create a resource > Networking > Public IP address, or search for Public IP address in the Marketplace
search. In Create public IP address, enter or select this information. Leave the rest of the defaults and select Create.
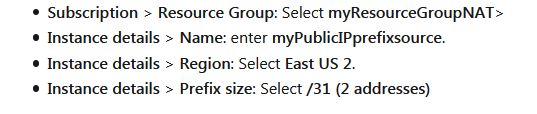
- Create a public IP prefix
- On the upper-left side of the portal, select Create a resource > Networking > Public IP prefix, or search for Public IP prefix in the Marketplace search. In Create a public IP prefix, enter or select the following values in the Basics tab:
- Leave the rest the defaults and select Review + create. Review the settings, and then select Create.
5. Create a NAT gateway resource
- On the upper-left side of the portal, select Create a resource > Networking > NAT gateway, or search for NAT gateway in the Marketplace search. In Create network address translation (NAT) gateway, enter or select the following values in the Basics tab:
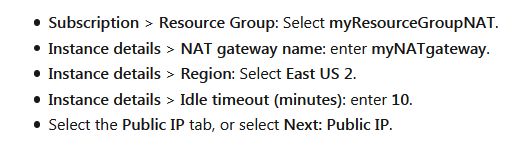
- In the Public IP
tab, enter or select the following values:
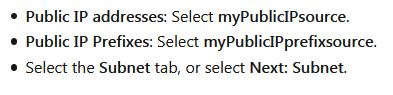
- In the Subnet
tab, enter or select the following values:

- Select Review + create. Review the settings, and then select Create.
- All outbound traffic to Internet destinations is now using the NAT service. It isn't necessary to configure a UDR.
6. Discover the IP address of the VM
- On the left side of the portal, select Resource groups.
- Select myResourceGroupNAT.
- Select myVM.
- In Overview, copy the Public IP address value, and paste into notepad so you can use it to access the VM.
7. Sign in to VM
Open an Azure Cloud Shell in your browser. Use the IP address retrieved in the previous step to SSH to the virtual machine. Azure CLI
ssh <username>@<ip-address-destination>
You're now ready to use the NAT service.