17) Quick start to configure Load Balancer:
With Azure Load Balancer, you can spread user requests across multiple virtual machines or other services. That way, you can scale the app to larger sizes than a single virtual machine can support, and you ensure that users get service, even when a virtual machine fails.
1. Distribute traffic with Azure Load Balancer
Azure Load Balancer is a service you can use to distribute traffic across multiple virtual machines. Use Load Balancer to scale applications and create high availability for your virtual machines and services. Load balancers use a hash-based distribution algorithm. By default, a five-tuple hash is used to map traffic to available servers. The hash is made from the following elements:
Source IP: The IP address of the requesting client.
Source port: The port of the requesting client.
Destination IP: The destination IP of the request.
Destination port: The destination port of the request.
Protocol type: The specified protocol type, TCP or UDP.
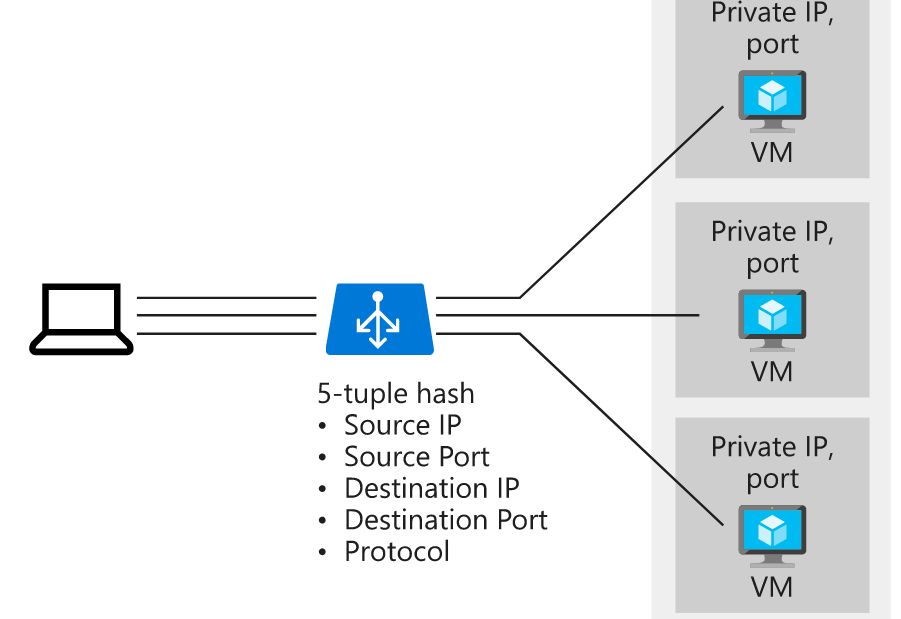
Load Balancer supports inbound and outbound scenarios, provides low latency and high throughput, and scales up to millions of flows for all TCP and UDP applications. Load balancers aren't physical instances. Load balancer objects are used to express how Azure configures its infrastructure to meet your requirements.
To achieve high availability with Load Balancer, you can choose to use availability sets and availability zones to ensure that virtual machines are always available:
2. Select the right Load Balancer product
Two products are available when you create a load balancer in Azure: basic load balancers and standard load balancers.
a) Basic load balancers allow:
- Port forwarding
- Automatic reconfiguration
- Health probes
- Outbound connections through source network address translation (SNAT)
- Diagnostics through Azure Log Analytics for public-facing load balancers
- Basic load balancers can be used only with availability sets.
b) Standard load balancers support all of the basic features. They also allow:
- HTTPS health probes
- Availability zones
- Diagnostics through Azure Monitor, for multidimensional metrics
- High availability (HA) ports
- Outbound rules
- A guaranteed SLA (99.99% for two or more virtual machines
3. Internal and external load balancers
- An external load balancer operates by distributing client traffic across multiple virtual machines. An external load balancer permits traffic from the internet. The traffic might come from browsers, module apps, or other sources.
- An internal load balancer distributes a load from internal Azure resources to other Azure resources. No traffic is allowed from internet sources.
4. Create a public load balancer to load balance VMs using the Azure portal
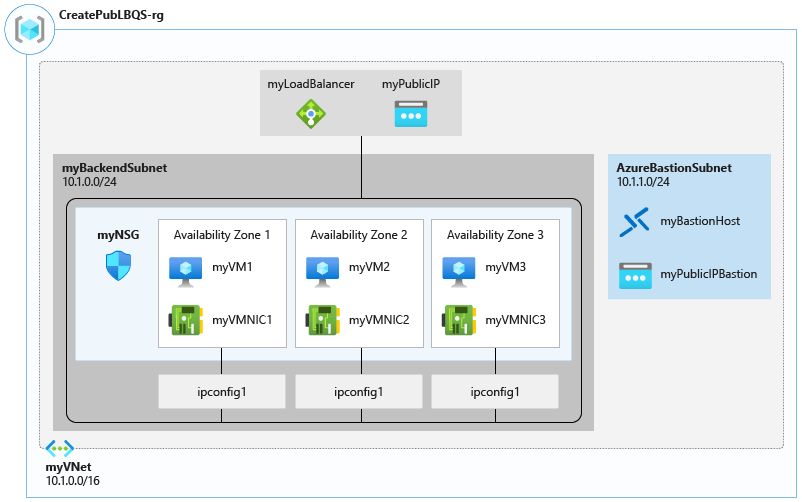
In this section, you create a load balancer that load balances virtual machines. When you create a public load balancer, you create a new public IP address that is configured as the frontend (named as LoadBalancerFrontend by default) for the load balancer.
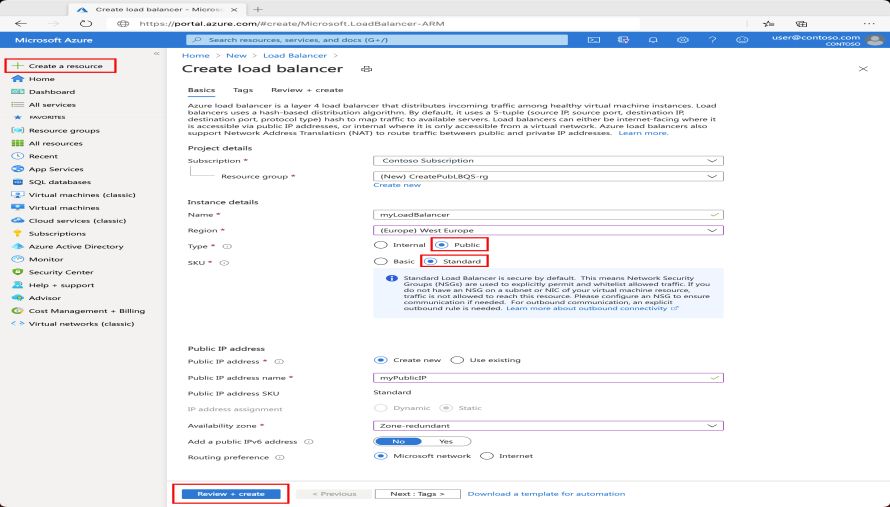
- On the top left-hand side of the screen, select Create a resource > Networking > Load Balancer. In the Basics tab of the Create load balancer page, enter, or select the following information:
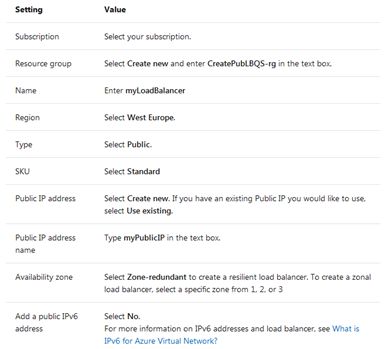
- Accept the defaults for the remaining settings, and then select Review + create
.
- In the Review + create
tab, select Create
.
5. Create a backend address pool
To distribute traffic to the VMs, a backend address pool contains the IP addresses of the virtual (NICs) connected to the Load Balancer. Create the backend address pool myBackendPool to include virtual machines for load-balancing internet traffic.
- Select All services in the left-hand menu, select All resources, and then click myLoadBalancer from the resources list.
- Under Settings, click Backend pools, then click Add.
- On the Add a backend pool page, for name, type myBackendPool, as the name for your backend pool, and then select Add.
6. Create a health probe:
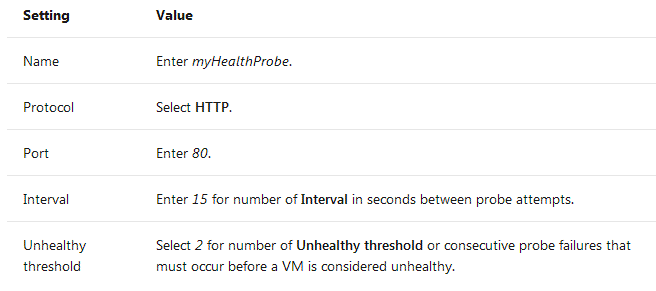
To allow the Load Balancer to monitor the status of your app, you use a health probe. The health probe dynamically adds or removes VMs from the Load Balancer rotation based on their response to health checks. Create a health probe myHealthProbe to monitor the health of the VMs.
- Select All services in the left-hand menu, select All resources, and then click myLoadBalancer from the resources list.
- Under Settings, click Health probes, then click Add.
- Use these values to create the health probe:
7. Create a Load Balancer rule
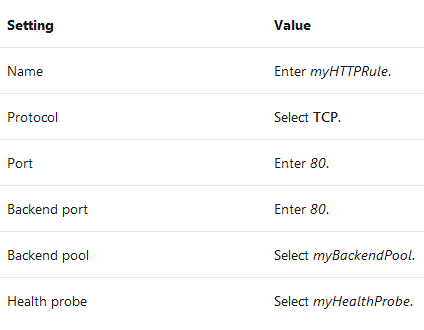
A Load Balancer rule is used to define how traffic is distributed to the VMs. You define the frontend IP configuration for the incoming traffic and the backend IP pool to receive the traffic, along with the required source and destination port. Create a Load Balancer rule myLoadBalancerRuleWeb for listening to port 80 in the frontend FrontendLoadBalancer and sending load-balanced network traffic to the backend address pool myBackEndPool also using port 80.
- Select All services in the left-hand menu, select All resources, and then click myLoadBalancer from the resources list.
- Under Settings, click Load balancing rules, then click Add.
- Use these values to configure the load-balancing rule:
- Leave the rest of the defaults and select OK
.
8. Create backend virtual network
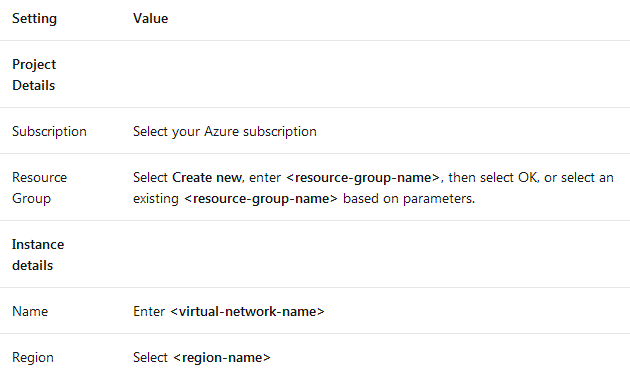
Next, you will create a backend virtual network, You'll need to replace the following parameters in the steps with the information below:

- On the upper-left side of the screen, select Create a resource > Networking > Virtual network or search for Virtual network in the search box. In Create virtual network, enter or select this information in the Basics tab:
- Select the IP Addresses tab or select the Next: IP Addresses button at the bottom of the page.
- In the IP Addresses tab, enter this information:

- Under Subnet name, select the word default.
- In Edit subnet, enter this information:

- Select Save. Select the Review + create tab or select the Review + create button.
9. Create backend virtual machines
Standard Load Balancer only supports VMs with Standard IP addresses in the backend pool. In this section, you will create three VMs (myVM1, myVM2, and myVM3) with a Standard public IP address in three different zones (Zone 1, Zone 2, and Zone 3) that are added to the backend pool of the Standard Load Balancer that was created earlier.
- On the upper-left side of the portal, select Create a resource > Compute > Windows Server 2016 Datacenter.
- In Create a virtual machine, type or select the following values in the Basics tab:

-
Select the Networking tab, or select Next: Disks, then Next: Networking.
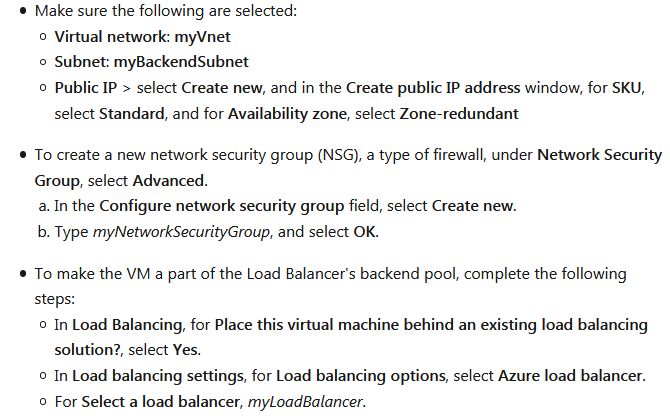
Make sure the following are selected:
- Select the Management tab, or select Next > Management. Under Monitoring, set Boot diagnostics to Off. Select Review + create.
- Follow the steps to create two additional VMs - myVM2
and myVM3
, with a Standard SKU public IP address in Availability zone 2 and 3 respectively, and all the other settings the same as myVM1
.
10. Create network security group rule
In this section, you create a network security group rule to allow inbound connections using HTTP.
- Select All services in the left-hand menu, select All resources, and then from the resources list click myNetworkSecurityGroup that is located in the myResourceGroupSLB resource group.
- Under Settings, click Inbound security rules, and then click Add.
- Enter these values for the inbound security rule named myHTTPRule to allow for an inbound HTTP connections using port 80:

11. Install IIS on VMs
- Select All services in the left-hand menu, select All resources, and then from the resources list click myVM1 that is located in the myResourceGroupSLB resource group.
- On the Overview page, click Connect to RDP into the VM.
- In the Connect to virtual machine pop-up window, select Download RDP File, and then Open the downloaded RDP file.
- In the Remote Desktop Connection window, click Connect.
- Log into the VM with the credentials that you provided during the creation of this VM. This launches a remote desktop session with virtual machine - myVM1.
- On the server desktop, navigate to Windows Administrative Tools>Windows PowerShell.
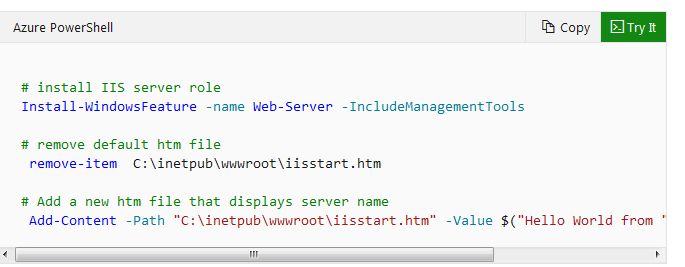
- In the PowerShell Window, run the following commands to install the IIS server, remove the default iisstart.htm file, and then add a new iisstart.htm file that displays the name of the VM:
# install IIS server role
Install-Windows Feature -name Web-Server -IncludeManagementTools
# remove default htm file
remove-item C:\inetpub\wwwroot\iisstart.htm
# Add a new htm file that displays server name
Add-Content -Path "C:\inetpub\wwwroot\iisstart.htm" -Value $("Hello World from " + $env:computername)
- Close the RDP session with myVM1
.
- Repeat steps 1 to 6 to install IIS and the updated iisstart.htm file on myVM2
and myVM3
.
12. Test the Load Balancer
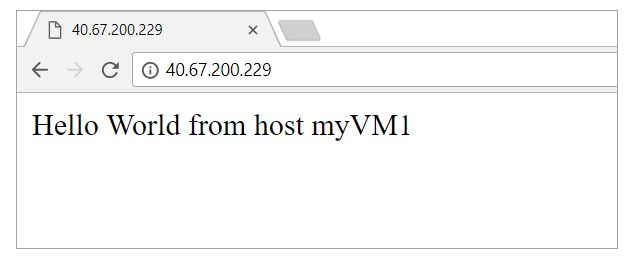
- Find the public IP address for the Load Balancer on the Overview screen. Select All services in the left-hand menu, select All resources, and then click myPublicIP.
- Copy the public IP address, and then paste it into the address bar of your browser. The default page of IIS Web server is displayed on the browser.
13. Remove VM from a backend pool
- To remove myVM1 from the backend pool, complete the following steps:
- Select All services in the left-hand menu, select All resources, and then click myLoadBalancer from the resources list.
- Under Settings, click Backend pools, then within the backend pool's list, click myBackendPool.
- On the myBackendPool page, to remove VM1 select the delete icon at the end of the row that displays myVM1, and then click Save.
With myVM1 no longer in the backend address pool, you can perform any maintenance tasks on myVM1, such as installing software updates. In the absence of VM1, the load is now balanced across myVM2 and myVM3.
14. Add VM to a backend pool
To add myVM1 back to the backend pool, complete the following steps:
- Select All services in the left-hand menu, select All resources, and then select myVM1 from the resources list.
- In the VM1 page, under Settings, select Networking.
- In the Networking page, select the Load balancing tab, and then select Add load balancing.
- In the Add load balancing page, do the following:
- For Load balancing options, select Azure load balancer.
- For Select a load balancer, select myLoadBalancer.
- For Select a backend pool, select myBackendPool


