CANNING
Heat is the weapon the home canner wields in the battle against decay and toxins. Thermophiles—bacteria that thrive at relatively high temperatures that would kill most other microorganisms—are of special concern for canners. Improper canning procedures can be deadly. It is very important to work with contemporary recipes that take into account the latest technology and science. Follow instructions carefully—this is not the time for experimentation, as consequences could prove lethal. Never does it count more to play things safe and by the rules than when you are canning.
IMPORTANT FACTORS FOR CANNING SUCCESS
Clean Food: The more microorganisms in food to start with, the more heat treatment is needed to eliminate them. Start with fresh, unspoiled food free from bruises or spots of decay and wash thoroughly in clean water.
Acidity: Different foods naturally contain varying amounts of acid, which works to control microbial activity. Acid level is measured by the pH scale, which runs from 1 to 14: 7 is neutral, neither alkaline nor acid; numbers lower than 7 indicate greater acidity levels. (See chart, opposite.)
Canning Temperature: High-acid foods can be processed more quickly and at slightly lower temperatures—that is, the boiling point or 212°F—than low-acid foods. To be safe, low-acid foods must be processed at 240°F; you must use a pressure canner to get sustained temperatures that high.
Processing Time: The higher the temperature, the shorter the time needed to kill dangerous microorganisms. Whether you hot pack or raw pack affects processing time; packing instruction and processing times are indicated in canning recipes. Hot packing involves filling jars with hot, precooked food. When raw packing—preserving food that is jarred at room temperature or colder—the food must be processed for longer periods.
Pack Density: When processing, heat travels from the outer surface of the jar inward toward the center. Large jars and food with an especially dense texture, such as solid-pack squash, require longer heat processing to ensure that the appropriate temperature, necessary to kill dangerous bacteria, is reached throughout the contents. Loosely packed food bathed in liquid heats much more quickly and efficiently.
THE PH OF COMMON FOODS
| 212°F Water bath | 1 | n/a |
| 2 | Plums, pickles |
| 3 | Gooseberries, sour cherries, apricots, apples, blackberries, peaches |
| 4 | Sauerkraut, sweet cherries, pears, tomatoes* |
| 240°F Pressure can | 5 | Okra, pumpkin, carrots, turnips, cabbage, beets, snap beans, spinach, asparagus, cauliflower |
| 6 | Lima beans, corn, peas |
| 7 | n/a |
| *Researchers have determined that the acid content of tomatoes at harvest is dependent on variety, degree of ripeness, and the conditions under which they were grown. |
ABOUT BOTULISM
Clostridium botulinum is a bacterium prevalent in most soils. The mature bacteria are not poisonous, but in spore form it is a naturally occurring, poisonous nerve toxin responsible for botulism, a rare but deadly illness. Approximately one hundred botulism cases are reported each year in the United States. Most of these involve infants whose not-yet-fully-developed intestinal tract is less resistant to the bacteria in any form; for this reason it is recommended that children under the age of one not play in garden soil. The small number of reported cases of food-borne botulism can generally be traced to home-canned foods.
Foods with a high sugar or acid content are naturally inhospitable to this deadly spore, which is why fruit, pickles, and jams may be processed at lower water-bath temperatures. However, in the absence of sugar and acid, heat is the only remaining defense. If unchecked by heat, the spores replicate and give off an invisible, tasteless, but powerful toxin. Heat-resistant botulism spores are reliably killed at 240°F—a temperature achieved only by heating under pressure—“pressure canning.” Botulism-contaminated food does not look or smell “off” yet this poisoning is usually fatal—an unnecessary risk you can avoid by assiduously following proper canning instructions and rules. Better safe than sorry: when in doubt, throw it out!
Equipment and supplies
Jars—To minimize spoilage, select jars based on what you are canning and how quickly it will be consumed. Canning jars are available in ½ pint, pint, and quart sizes. Wide mouth jars have an opening the same as their diameter, making them easy to fill and thoroughly clean. Jams, jellies, and specialty condiments are generally processed in ½ pint or pint jars; pickles, vegetables, and fruits fit best in larger jars. Note: Do not use antique canning jars—neither the zinc-lidded jars nor the old two-piece glass-lidded type—because their seals are not dependable. New decorative and “European” style jars are available in specialty kitchen stores and make a nice presentation for gifts.
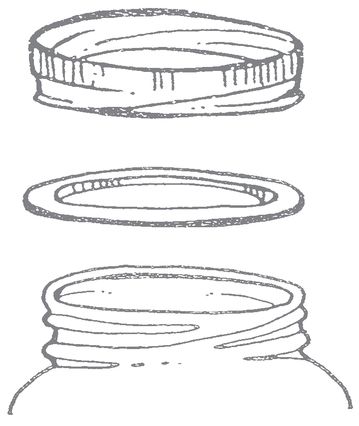
Lids—Common two-piece lids consist of a single-use lid and a matching screw band; make sure you purchase the right size lids and screw bands to match your jars. The screw bands, like jars and unlike lids, can be used over and over until they rust or get bent, either of which can hinder a complete seal.
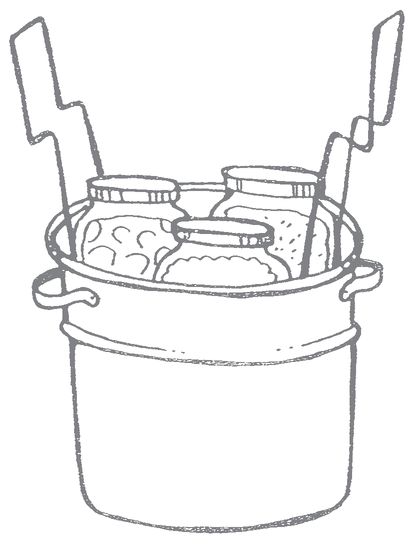
Water-bath canning kettle—Any container large enough to hold jars covered with boiling water can serve as a water-bath canning kettle. Traditional enamel canning kettles come equipped with a jar-holding rack to keep jars off the bottom of the pan; this prevents jostling and breakage during processing.
Pressure canner—A somewhat expensive but one-time cost, and absolutely necessary if you plan to can low-acid foods. Note: Pressure canners are potentially dangerous. Make sure you have a manual and follow its instructions to the letter.
Wide mouth canning funnel—Facilitates handling hot food and filling jars with fewer spills.
Jar lifter—Heat-resistant, pincer-like tongs for safely removing hot jars from a water bath.
Lid lifter—A plastic wand with a magnet at one end for lifting metal lids out of hot water.
The following common kitchen utensils will ease processing and protect you from the heat involved:
◗ Hot pads, mitts, heavy potholders
◗ Jar/bottle brush
◗ Kitchen timer
◗ Ladle
◗ Slotted spoon
◗ Tongs
GENERAL INSTRUCTIONS
Preparing and packing
1. Before you begin, inspect jar rims for cracks and nicks, which can prevent a proper seal.
2. Meticulously clean jars, lids, and screw bands in hot soapy water and rinse thoroughly. Keep jars and lids hot in scalding water until ready to fill. Although a dishwasher is not a must, it is a real timesaver, as it can wash large batches of jars and lids and hold them at the proper temperature until needed. Note: To avoid possible shattering, never pour boiling water or hot food into a cool jar, and never place a cool jar directly into boiling water.
3. Fill hot jars with the prepared recipe, carefully following directions for either hot pack or raw pack procedures. Work quickly to ensure the jars do not cool, or they may crack when they contact the boiling water.
4. When packing jars, allow the proper headspace indicated in the recipe to accommodate expansion of food during processing. Too little headspace can force food past the lid and prevent a sound seal.
5. After filling, release any air bubbles trapped in the jar by running a kitchen knife or other thin, flat utensil around the inner walls of the jar.
6. Wipe the rims with a clean damp cloth before placing the heated lid on the jar, with the “composition” side next to the glass. Secure the lid with a screw band.
7. Proceed according to the processing method.
Water-bath canning procedure
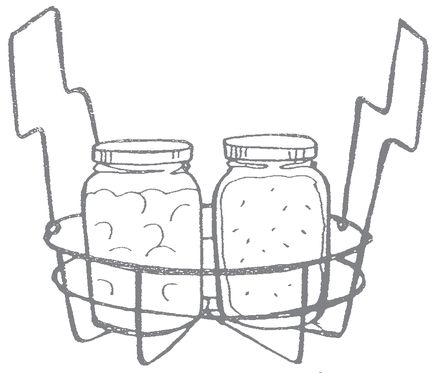
1. Load the jars into the jar rack and, using the two handles, carefully lower it into the boiling water in the canning kettle. Adjust the water level so that it is at least 1 inch above the tops of the jars. Cover the canner with its lid.
2. Start timing when the water returns to a full boil and process for the length of time indicated in your recipe. Do not allow the water to fall beneath the appropriate level or drop below a boil.
ALTITUDE ADJUSTMENTS FOR WATER-BATH CANNING
At sea level water boils at 212°F. With increasing altitude, water will boil at lower temperatures, which are less efficient to sufficiently kill dangerous bacteria. Therefore, for canning safety you must increase your processing time based on your altitude. Most recipes are written for processing from sea level to 1,000 feet.
| Altitude | Processing Time |
|---|
| Under 1,000 feet | As stated in recipe |
| 1,000 to 3,000 feet | Time stated plus 5 minutes |
| 3,000 to 6,000 feet | Time stated plus 10 minutes |
| Above 6,000 feet | Time stated plus 15 minutes |
Pressure canning procedure
Pressure canning is the only safe method for processing low-acid food, meats, fish, and vegetables. (Although you can also pressure-can fruit, the elaborate process of heating and cooling for such short processing times is inefficient. When appropriate, as it is for fruit, water-bath processing saves both time and fuel.) Here are the steps:
1. Place the pressure canner, containing its wire basket, on a cold stovetop element.
2. Refer to your manual to determine how much water to add to the canner to begin.
3. Place filled jars, tops screwed on, in the wire basket.
4. Tightly secure the lid on the pressure canner according to instructions.
5. Check the petcock valves with a toothpick or fine wire to determine that they are clear.
6. Turn on the heat under the canner and watch for steam; when it appears, begin timing and maintain a steady flow of steam for 10 minutes. This exhausting or venting of the canner is air leaving the jars and canner. If the canner isn’t properly exhausted, the air will cause the reading on the gauge to be inaccurate, and your canning temperatures may be too low to be safe.
7. After the canner has exhausted for 10 minutes, close the vent or place the weight control over the steam valve.
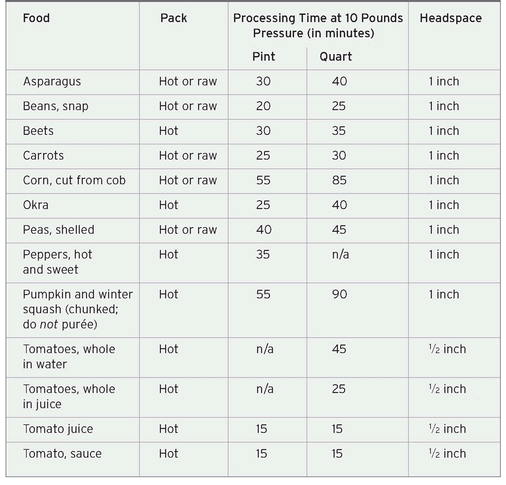
8. Watch for the pressure gauge to reach the correct pressure (this is the time to make altitude adjustments—add ½ pound pressure for every additional 1,000 feet above sea level; refer to the instructions that came with your canner). Then set your timer and begin the designated processing time (see chart, opposite). Refer to the “Processing Times for Pressure Canning” table for general guidelines. Adjust the heat source so the gauge stays at the correct pressure called for in your recipe. Half-pint jars and smaller are processed in the same way as pints.
9. When jars have been processed for the correct amount of time, move the pressure canner off the heat and let it cool completely. Caution: The canner will be very hot; protect yourself with oven mitts and pot holders.
10. The steam and heat inside even a “cool” canner can be dangerous. Wait until the pressure gauge has gone down to zero, or until you can no longer see steam coming from the vent. On average it takes 45 to 60 minutes for the pressure to go down in a pressure canner.
11. Open the petcock slowly or remove the weighted gauge (remember, it’s hot!). Unlock the canner lid and slide it across the top of the canner toward you, letting any remaining hot steam escape from the far side of the canner. Allow the canner to sit without its lid for 10 minutes before removing the jars.
PROCESSING TIMES FOR PRESSURE CANNING
Cooling and storage
1. Insulate the counter with a cutting board, cooling rack, or several layers of newspaper or towels to avoid breakage due to a temperature contrast between the hot jars and a cool surface.
2. Using the jar lifter, remove the jars from either the canning kettle or the pressure canner while they are still hot. Place the jars upright where they can fully cool and remain undisturbed for the next 12 to 24 hours, during which time the final seal will form.
A vacuum develops within the jars as they begin to cool, often indicated by a “ping” as the canning lid is pulled downward and a seal is formed. Many home canners refer to this sound as a welcome indicator of a job well done. A fully sealed lid will not have any play or give to it when pressed. Some manufacturers have incorporated a “safety button” in the center of their lids that visibly flattens to indicate a good seal. Any jar that does not seal properly should be refrigerated immediately and used within a week.
3. When the jars are fully cooled after their resting period, remove the screw bands and clean off any remaining stickiness. Clearly label the jars with their contents and their processing date.
4. Store the canned goods in a dry, cool, dark area for the best quality retention.
HOW LONG WILL CANNED FOOD KEEP?
Canned food is safe to eat as long as the seal holds. However, with each passing year some of the food’s quality—its color, texture, taste, and nutritional value—is lost. For the greatest return on your efforts, both in flavor and nutrition, plan to consume your canned goods within a 6- to 8-month period. At that point the next growing season will be fully under way and the preserving cycle can begin again.
If at any point during storage a jar should lose its seal, indicated by some give in the lid, you should immediately discard its contents. A jar with an intact seal will “pop” when its lid is removed, indicating the vacuum has been broken. If there is any doubt or the food has developed an “off” or sour odor, do not taste it; discard the contents immediately.


