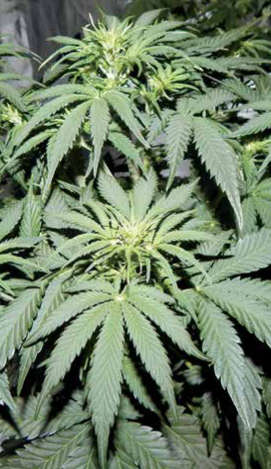
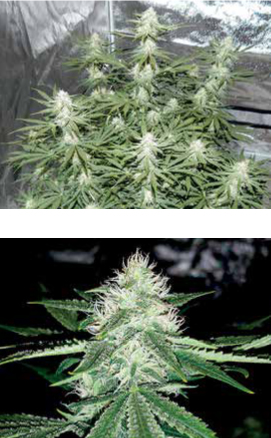
Ripley’s OG, Day 2. GBD/DAZ MEPHISTOGENETICS
YOU HAVE ENOUGH information. It is time start growing your first Autoflowering Cannabis plants.
There is a reason that the slang name for Cannabis is weed. You can simply plant a seed, walk away, and it will probably grow into a plant. It is that easy. If you want a better plant, however, you need to pay just a bit of attention.
Follow my directions until you can take full measure of this plant. Learn the ways of Autoflowering Cannabis just as you did the tomato, and growing them will become second nature (and just as easy). Later, you can experiment with different growing procedures to match your own particular experience, needs, and conditions. Remember to check your regional laws and rules on how many plants you are allowed to grow.
Finally, I am going to assume you are growing in a container and indoors for the purposes of this chapter. Obviously, growing Autoflowering Cannabis directly in the garden is not that different. Nor is growing outdoors on a deck. It is the same plant. The big advantage is that you do not need lights outdoors. The disadvantage is that you cannot control the temperature and humidity.
Growing Autoflowering Cannabis a whole process, not just one point in time such as, say, when you harvest flowers (or try them). These are amazing plants. Their rapid growth, alone, makes them unusual and fun. Growing them should be a journey (and an engaging one at that).
Here is a quick overview of what to expect over the course of the plant’s life. This is followed by a more detailed discussion of the steps necessary to get there.
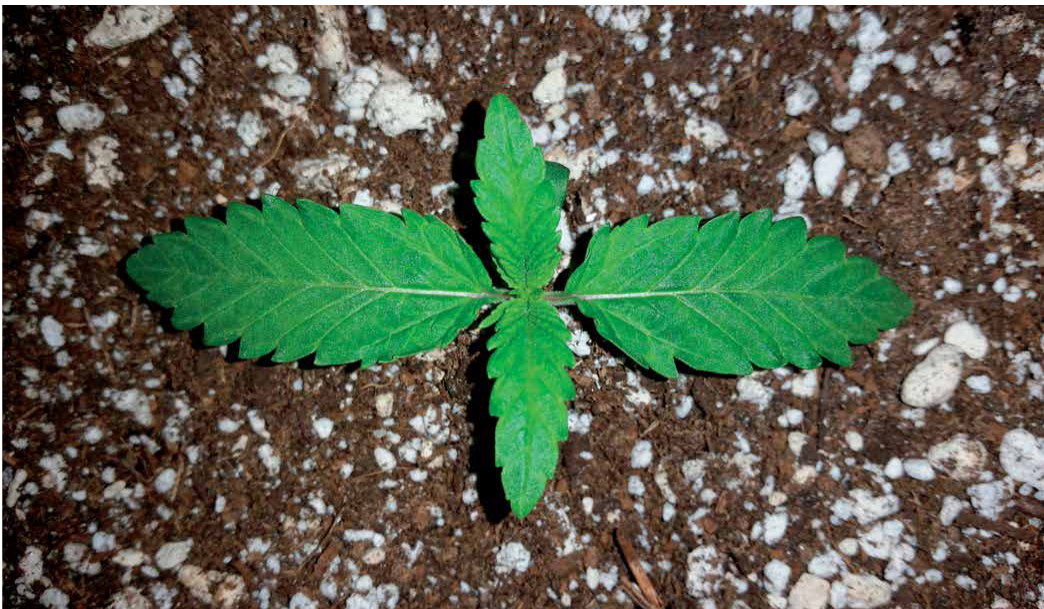
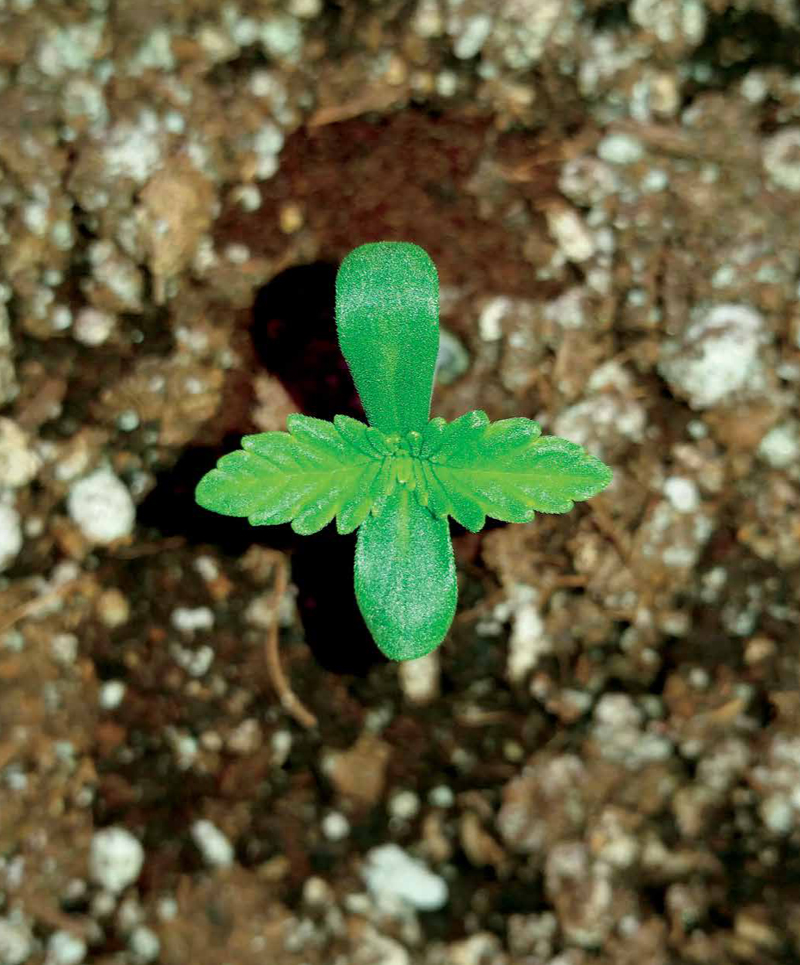
Germination of seed planted directly in soil can take up to 5 days, but usually happens rapidly, between 24 to 48 hours after the seed is exposed to water. The seedling opens as the plant’s taproot sprouts and elongates. The two cotyledons, so-called seed leaves, are followed by the first set of true leaves. The second set of leaves quickly follow and then a third, all within an extremely short period of 10 days or so.
Day 12. GBD/DAZ MEPHISTO.
Each successive set of briskly growing leaves has more of the characteristic serrated fingers, with the third set finally looking distinctly Cannabis-like. It is at this stage that the desired hormones are fully active in the growing tip. If plants are going to be trained, this is when to start.
Below ground, the root system is developing and spreading into the soil mix. The plant’s exudates are attracting and supporting a working soil food web. Signals are also being sent to Rhizophagus intraradices, the mycorrhizal fungi you added to the soil mix, inviting them to invade root hairs and enter a symbiotic relationship.
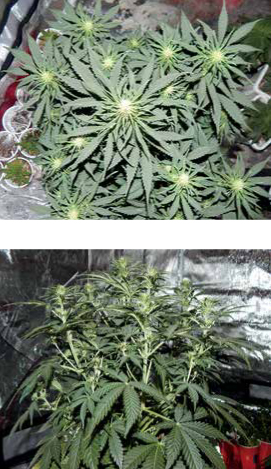
Day 23. GBD/DAZ MEPHISTO.
Day 28. GBD/DAZ MEPHISTO.
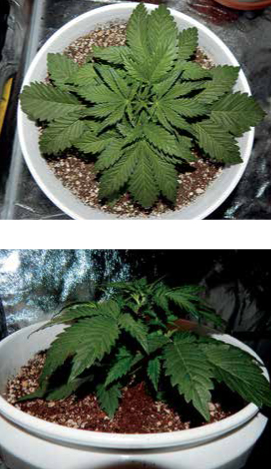
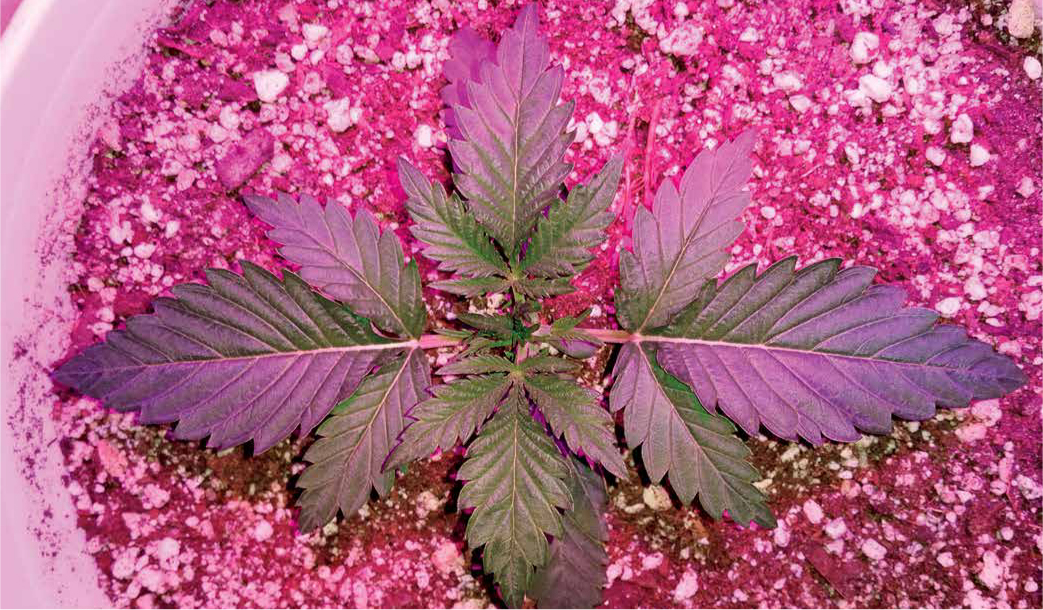
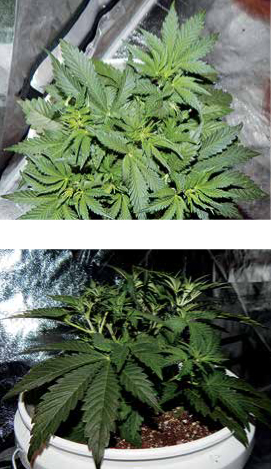
The plant quickly puts on vertical growth with increasing internodal distances. Depending on variety, a growth rate of 4 cm (1.5 in.) a day can be achieved. You can see the plants growing. At the end of this phase, the plant is up to 1 meter (3 ft.) tall if it is of the super Auto-flowering types, or at full height of around 18 inches if it is a regular Autoflower.
White pistils appear as early as the third week and continue to show up through week 5 depending on variety. Flower buds develop. The plant is putting everything into growth, and it is hard for it to keep up, so it may look a bit dull. Keep an eye on it for any drastic color or leaf changes—otherwise, a loss of some green color is normal.
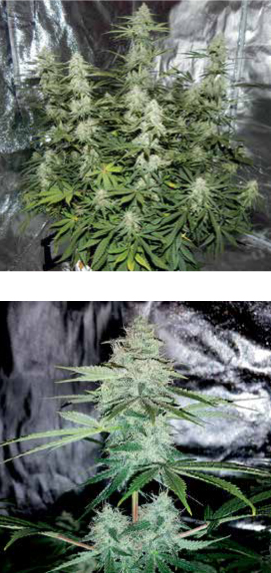
Growth slows and blooms (female, though possibly male) grow bigger. Side buds appear and grow. The plant’s aroma strengthens as trichomes develop. At the end of the period, some clear trichomes start to cloud up. Individual pistils start to turn brown.
Day 33. GBD/DAZ MEPHISTO.
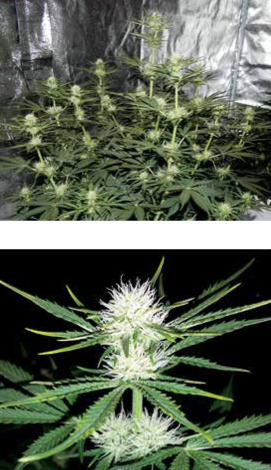
Day 39. GBD/DAZ MEPHISTO.
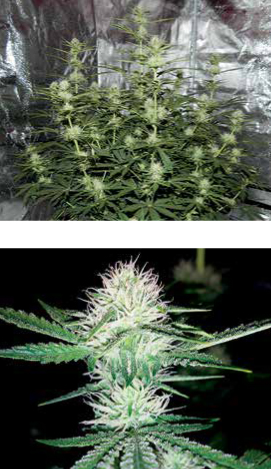
Day 44. GBD/DAZ MEPHISTO.
Growth slows and the plant may green up a bit as it is finally able to keep up with nutrient demands. If the plant continues to lose its green color, add nutrients—just once and diluted, of course.
Trichomes start to turn from clear to cloudy to amber. The vast majority of pistils turn from white to brown. The top flowers usually ripen about a week ahead of lower flowers that continue to develop.
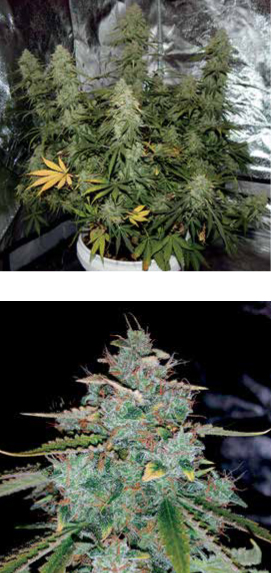
The big early fan leaves lose color because there are not enough nutrients left in the soil. These leaves should be removed. Harvest is near.
All the pistils turn brown, and the trichomes become milky. It is time to harvest. Some gardeners will want to wait until 20% of the trichomes are amber. Others, until more are amber, depending on the desired cannabinoid to THC ratio.
Day 50. GBD/DAZ MEPHISTO.
Day 60. GBD/DAZ MEPHISTO.

Day 65. GBD/DAZ MEPHISTO.
Autoflowering Cannabis seed germinates best at 25°C (77°F). Consider using a heat mat (just like you would when starting your tomatoes). Room temperature is fine, although it may take a bit longer for the seedlings to emerge.
Once germinated, Autoflowering Cannabis does best when grown in a temperature range between 24 to 30°C (75 to 86°F). Again, these are perfect temperatures for tomatoes. Night temperatures really shouldn’t drop below 10°C (50°F) even though the plants can survive at cooler temperatures.
Keep water temperatures in the same range as the ambient air temperatures (which is easy: set aside a bucket filled with water). This way you won’t shock roots or the soil food web that surrounds them.
Day 75. GBD/DAZ MEPHISTO.
Day 80. Harvest Day! GBD/DAZ MEPHISTO.
There are a number of ways to germinate an Autoflowering Cannabis seed. All it takes is for the seed to be able to absorb water through its shell. Any way you can germinate a tomato seed will work for starting Autoflowering Cannabis.
The easiest method to germinate an Autoflowering Cannabis seed is to poke a hole in damp soil about 25 to 38 mm (½ to 1½ in.) deep. Use your finger or a pencil. (Isn’t this how most of us start tomatoes and other vegetables?) Cover the seed with soil mix, and a seedling should emerge within 2 to 5 days.
A variation of this method is to use a seed starting wafer, the kind used for tomatoes and other vegetables. Comprised of compressed soil, coir, or various mixes, they expand when wet. Stick a seed in and wait for germination. They usually hold enough moisture so you don’t need to add any water for several days.
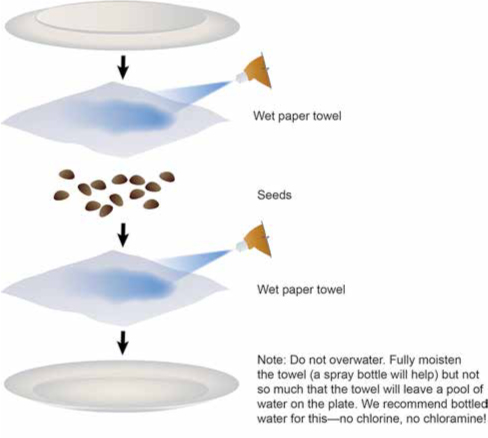
Plate/Paper towel germination method. WINNIE CASACOP.
Of course, these methods can be a hit-or-miss proposition, as with any vegetable seed started this way. But Autoflowering Cannabis seed is relatively expensive. To insure more certainty in germination, two other methods are suggested.
The first is to drop a few seeds into a glass of warm water. After 12 hours, start checking the seeds. As they absorb water, they will split open, revealing a tiny bit of white taproot. By the end of 24 hours, you should notice this happening to all your viable seeds. It is time to plant (but only after “rolling” or otherwise applying mycorrhizal fungi to the root).
A second method begins by putting the soaked seed on a damp, unbleached paper towel. (Some skip the 24-hour soak in a glass of water, but don’t for your first couple of attempts.) Cover these seeds with a second damp towel or fold over the first towel to cover them. Cover the seeds and toweling with a second plate. Alternatively, put the damp towel into a plastic baggie and store this in a dark, warm location.
Once seeds are in the damp towel, wait another 24 hours before carefully checking on them. You can leave seedlings in this setup for up to 5 days, but it is best to plant as soon as there is a discernible root, so root hairs develop in the soil and do not grow into the fibers of the towel.
The argument for soaking is that it lessens the seeds’ exposure to air during germination and this prevents “damping off,” a fungal attack that will kill the seedlings. Unless you live in a humid climate or have had problems germinating seed before, I would not be overly concerned, but providing air ventilation and air movement are good preventative measures.
Always use mycorrhizal fungi, Rhizophagus intraradices, to inoculate the seedling. If you are germinating seed directly in the soil, then roll the seed in the fungal mix first. This will coat the seed with enough propagules of the fungi. The fungi will establish itself in the root and soon start to mine the soil for nutrients to feed the plant.
Autoflowering Cannabis plants grow so fast that applying mycorrhizal fungi may not be as effective as it is with the slower-growing sativa and indica. Nonetheless, the inexpensive cost of the fungi (versus the potential returns) makes its use very worthwhile. And, if you are using a cover crop of sorts, the fungi should help it grow and perform as well.
Your soil should be watered and drained before you plant so that you don’t have to add (much) water right after you plant. Adding water post planting might wash away seed, will change seed depth in the soil, and might wash away some of the mycorrhizal fungi propagules. Just to insure mycorrhizae, make sure you mix the fungal preparation into your soil. This way, new roots will grow into it and be inoculated.
If, after you have grown a plant or two, you feel the need to add organic fertilizers to your soil, then before planting is the best time to do it. If you are using a good soil mix, then your plants won’t need additional nutrients until later in their life cycle, so add nutrients out of the initial root zone: fill the pot ⅓ full, lay down nutrients, and then add the rest of the soil. This will allow the plant’s roots to grow into the nutrients by the time the plant needs them.
When planting a germinated seedling, don’t touch the rootlet, as this may damage the delicate root hairs. Hold the seed by the shell or the cotyledons if they have appeared. Very carefully place the seed (or seedling) in the hole, 25 to 38 mm (1 to 1½ in.) deep. Sprinkle enough soil to fill up the hole.
If the seedling has a long root tip, make an impression with your index finger so you can place the root on its side (but at the right depth). After topping off the planting hole with soil, spray just a bit of water on the hole to gently (and naturally) tamp down the soil, ensuring contact with the seed and the emerging root.
The most difficult aspect of caring for any plant, be it tomato or Autoflowering Cannabis, is watering. Check your plants every day. Keep the water pH at 6.5 and at room temperature.
Too much water and your plants will literally drown at the roots, and the soil food web will be starved of necessary oxygen as well. Too little and your plants won’t be able to feed themselves and maintain cellular turgor (hydrostatic pressure). In addition, the soil food web goes dormant. The rule that guides your watering is to just pay attention.
How much water do you need to give your plant? During active growth, Autoflowering Cannabis can use a lot of water. A good rule of thumb to start with is to use enough water to equal 20% of the size of the container in which your plants are growing. By way of example, if you use a 5 US gallon container (19 liters), the 20% rule would mean that you apply 1 gallon (3.8 liters).
As to when to water, there is no hard-and-fast rule. Do what you do with tomatoes: stick your finger into the soil. You are looking for moist as in a cake, not wet as in a pie.
All in all, the Goldilocks rule applies: you don’t want the soil too wet or too dry. Still, if you want a formula to keep you on the straight and narrow, weigh your pot daily. When its weight drops 20%, water again. Do the finger test before and after, so you will learn to feel when the plant needs water.
While on the subject of watering, most books suggest you keep the humidity at 80% during the seedling stage, about the first 10 to 15 days. This can be accomplished with a humidifier system, but it is better to make a temporary greenhouse over your seedlings with plastic, jars, or whatever it takes. Then, once the plants get into the vegetative growth stage, removing it will lower the humidity. Ideally it should then be between 55 and 70%.
The point of using good soil is to eliminate the need to constantly feed your plants. After a couple of grows, you will have a feel for how they grow and are supposed to look, and if your soil mix is doing the job.
What a blessing for the gardener that Autoflowering Cannabis plants grown in good soil simply don’t need much by way of supplemental nutrients. In fact, use 1/8 to 1/4 strength fertilizer if you have to feed your plants. Too much nitrogen can cause leaf growth at the expense of flower development, which is obviously not great for yields.
Of course, there are limits to how much nutrient matter soil can supply. The first limit is how much of the necessary essential nutrients the soil actually contains. Hence the need for a test. Information is power. I advise you get one, especially if you are using your own blend.
The second limitation is the volume of soil. A large container has more soil for roots and fungi to mine (but can be more difficult to water properly). This is another reason to get good information from the seed supplier, so you will know what size container to use.
The third limitation is the pH in the vicinity of the roots. All gardeners know maintaining the proper pH is critical because if it is not in range, nutrients are locked up, unavailable to your plants. Again, a test is critical. It is the only way to know your soil’s pH.
If your soils test well for nutrients and pH or if you buy a reliable commercial soil mix, you might be able to grow your first Autoflowering Cannabis without ever adding fertilizer. For the first grows, keep a close eye on your plants. There will be a slight dulling of the green seedling as it dashes into growth, but this is normal. A dilute ⅛ strength solution of a balanced organic fertilizer may be in order every other watering.
For the first two weeks, Autoflowering Cannabis plants are incredibly sensitive to feeding. Doing so can actually put the plant into shock. And you do not want to do anything to slow down the establishment of mycorrhizae, which overfeeding can do.
Autoflowering Cannabis plants grow so fast that they initially use lots of nitrogen, and lesser amounts of phosphorus and potassium. Some organic sources of N include seabird and bat guano, as well as blood, fish, and poultry meals. There are lots of liquid organic blends available.
Once the plant starts flowering heavily, phosphorus is the primary element most needed. Phosphorus deficiency results in leaves darkening in color, turning a brownish or purplish blue. You probably do not have to add phosphorus to your soil when growing Autoflowering Cannabis (the Rhizophagus intraradices specializes in seeking and obtaining phosphorus for your plants), but if you do, use good organic sources only. These include fish bonemeal, and colloidal phosphate.
Note that too much nitrogen during the flowering phase will result in lower THC content. By the same token, if you give your Autoflowering Cannabis plants too much phosphorus during the growing stage, the mycorrhizal partnership stops. Delivery of Fe, Cu, K, Zn, and Mn can be impacted.
Potassium deficiency is indicated by an overproduction of side branches, which could be great, but they will be spindly and weak. This is in part because the plant will have trouble taking up Ca, Fe, Mg, Mn, and Zn. Potassium controls the stomata, so a lack of it can cause them to stop working and results in leaf curl. Potassium can be supplied with an application of potash, actually wood ashes. Seaweed and manures also contain K.
Again, you may not ever need to fertilize your plants, but you should know when a plant is in need and what to do about it. The solution is to hit the soil with diluted (⅛ strength) liquid organic fertilizer. Your plants need to respond in a day or two at the most, so solid foods don’t help. A 3-2-4 ratio is suggested by commercial New Breed Seed and is a great starting point for home growers.
Autoflowering Cannabis plants do not need specific photoperiods. Lighting is still extremely important. There are two aspects to consider. The first are the number of hours of light. These plants can obtain CO2 during the day, so they really do not need any darkness. You can grow yours under 24 hours of light. Many insist this is how to get the most from Autoflowering Cannabis and takes advantage of their special ability to flower regardless of the hours of light or dark versus their cousins which flower only after nights start getting longer than days.
Having grown some of these plants at 15 hours of light, I can tell you that is not enough. In fact, around 18 seems like a minimum, and more surely does not hurt. The theory of 24 hours makes sense, but something in me suggests giving the plant a few hours of rest. Experiment, but for your first grows, go with 20 to 24 hours.
Outdoors, grow your plants in full sun. Just remember that if started indoors, you have to harden off your plants to survive the wind and UV rays of the outdoors to prevent sun and wind damage. Keep your plants in the shade for a few days and then gradually move them into full sun over the next week.
Next, consider the intensity and coverage of light. Keep plants as close to the light source as possible without burning them. Expose the entire plant (or collection of them) so as to give maximum exposure to all the growing tips. This is where reflectors come in handy as does a reflective coating to walls, floors, and ceilings.
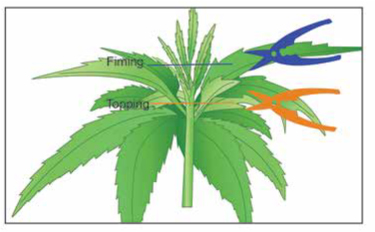
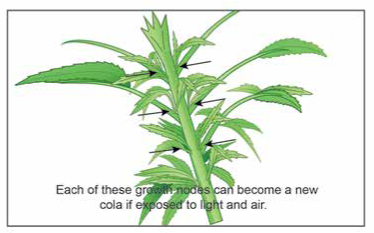
Commercial growers have discovered that training the branches of Cannabis to form more colas can greatly increase yields. This is done by pinching back the plant to create more active nodes or by exposing lower nodes to more light.
You may want to train your Autoflowering Cannabis plants, though I don’t suggest it for the first grows. The breeder of your seeds has most probably worked hard to develop a plant that does not need pinching or training to produce enough flowers for an acceptable harvest. Only once you know what to expect (that is, what the plant looks like, how it performs, and the yield produced), should you consider pinching and training Autoflowering Cannabis.
Should you decide to experiment later, there are a few methods of training. Each has its advantages and disadvantages, and it is fun to experiment with them, but again, none of these may be needed.
One thing to keep in mind is that it is a good practice to tuck the large upper fan leaves under side stems. This will expose the lower nodes to better light with noticeable results. It is not really training, as you have to keep doing it.
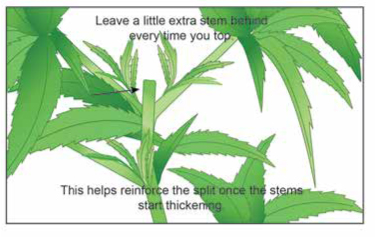
The first and most popular way to train to increase yield is pinching off the plant’s growing tip. This cuts off the supply of auxins (from the apical stem tip) to the lower nodes, allowing the plant’s lateral buds to break dormancy and grow. (To belabor a point, the same thing happens to tomato seedlings.) Each pair of node tips, located on opposite sides of nodes below the pinch, responds. Each tip develops a new stem which will produce its own cola.
Pinching is easy: once a plant has developed 4 nodes (or 5 or 6), simply take off the growing tip. Amazingly, this will cause the seedling to develop 8 (or 10 or 12) new tips. They all grow and develop flowers as each strives to produce seeds.
Usually varieties that have grow time to recover, i.e., the ones that require more days to mature, do best with pinching. Again, look for information in the cultural directions provided with the seed.
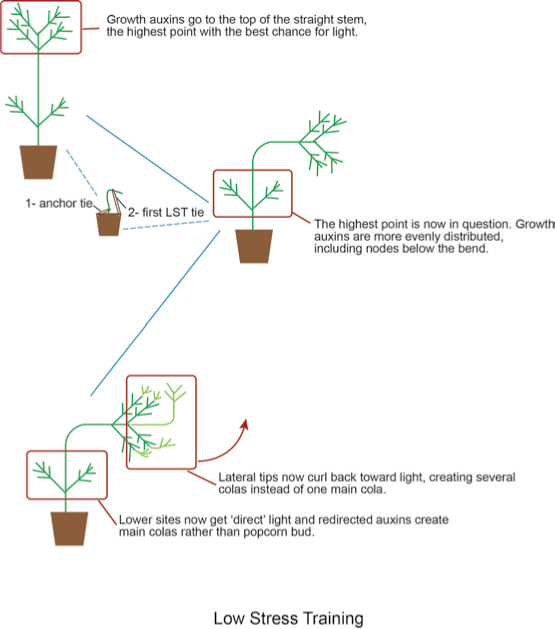
There is a second method to try and increase yields that doesn’t slow the plant’s growth nearly as much, if at all. This is low-stress training, LST. There are several different methods.
One method is to simply tuck the big fan leaves underneath and behind branches and stems. This exposes the flower tips to light. It can be done gently so that the leaves still can serve their function.
Another method is called FIM (for Shucks, I Missed). Instead of taking the whole tip off, only the tip’s leaves are pinched or cut off (which must be why it is comparatively low stress). This causes four colas to form in replacement. If done to shoots at the 3rd or 4th node, you get a very bushy plant. FIMing on Autoflowers, while setting them back during recovery, is not as hard on the plant as is topping. Still, it is not suggested for first grows, even though you might want to experiment later.
Pinching or high-stress training. WINNI CASACOP.
In a much less energy-draining procedure, a plant can be simply bent and twisted, with nothing snipped or cut off (although often plants are pinched first and then trained using a low-stress method). This is like pulling a tomato down. Tomato plants and Cannabis will respond to this treatment in the same way.
Bending a stem confuses the plant as to where the top should be, and it sends auxins to nodes along the stem in an attempt to keep the plant in flowers, as long as the stems don’t start to grow upward again. In the case of Autoflowering Cannabis plants, the idea is to gently pull the plant stems into a more horizontal position so that all its nodes are directly exposed to the same amount of light.
LST Bending method. WINNI CASACOP.
LST methods—There are a couple of established procedures that use low-stress training. The first is known as SCROG or Screen of Green. This consists of placing a net over the plant so it grows into it.
Once a stem starts to grow through the netting, it is pushed back down under the net, bending it horizontally. This causes the auxin movement previously discussed, and new growth from these nodes grows upward through the net.
Another popular method of low-stress training is to train branches using string, yarn, bonsai training wire, or hemp twine (if you don’t think the plants will be offended). Tie the string to the first branch, gently bend it to the side of the container, and secure it there with tape or a binder clip.
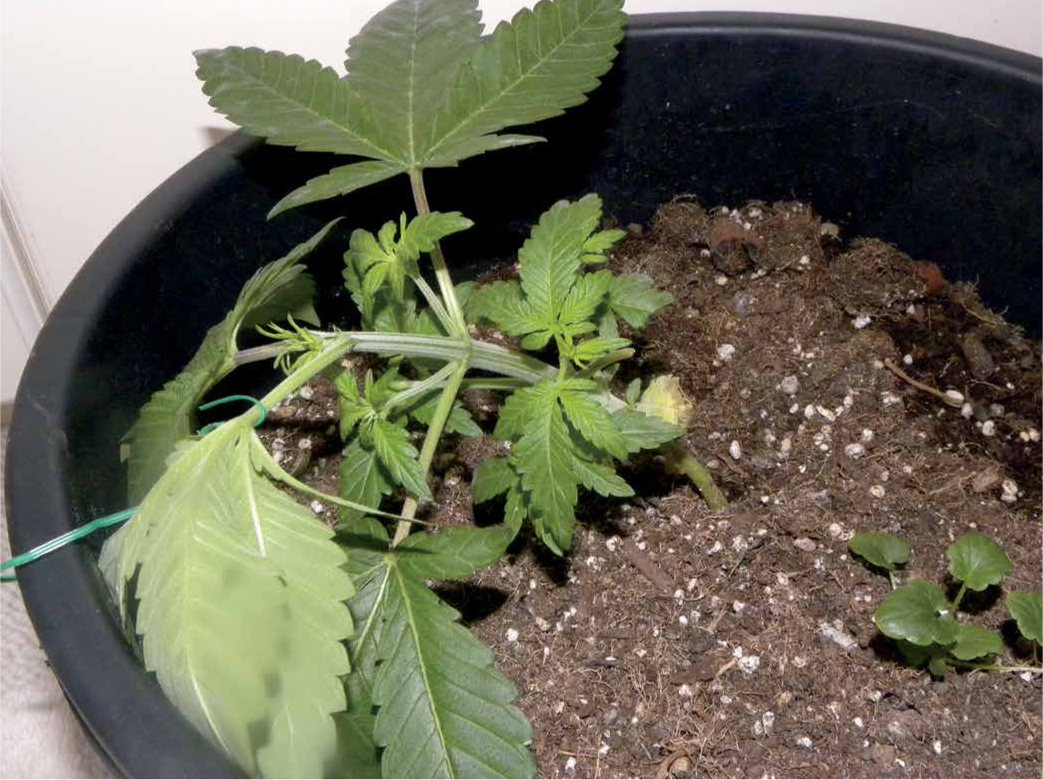
LST Bending by simply attaching to the side of the pot will expose more nodes.
Some growers use pots with holes drilled into the lip and secure the string through these. You should continue to train new branches all the way up to the first week or so of flowering, when the plant will stop elongating.
Circular LST ties the branches down in a circular or spiraling fashion. Not all Autoflowering Cannabis can handle this. It is an easy way to maximize exposure to light and to increase yield to a maximum but may require the removal of a few leaves. It is pretty easy if you know the trick: the plant should be started at the side of the container so it is easier to guide the branches along its edge.

LST Circular training. JUDITH HOERSTING.
After the tip starts growing vertically again (a day or so later), make a second tie down and so on, eventually pulling the branch around the pot. You can clip the branch to the side of the container to help train it. You will end up with a beautiful arrangement and should have great yields, all other things like genetics and lighting conditions being equal.
This is possible because when Autoflowering Cannabis is young, the branches and stems are easy to bend without damaging them. If they do snap, just leave them as they probably will slowly repair themselves.
However, as the plant matures, stems become stiffer and you have to be more deliberate and slower in training. Then it may take a couple of days to pull a branch all the way down. And, because these plants go to flower so quickly, there is a point after which it doesn’t make sense to train any further. Experience will guide you if you decide to engage in training at all.
The advantage to this LST method is that it is simple. It does not require any special equipment. You can also get creative as you learn the way these plants grow.
If you want to train an Autoflowering Cannabis plant, start soon after the emergence of the first set of true leaves. Over time, after you have grown a few crops, you will intuitively know when you can perform LST and what to expect from it.
Again, you may never need to train an Autoflowering Cannabis plant. The plant’s breeder may have taken care of it for you.
Keep an eye on your plants, checking them daily, at least. Keep some notes so you don’t forget. Watch the addition of leaves, the appearance of sex parts, branching, changes in color, speed of growth, and all the other things discussed here.
Look for the pests and plagues that can hit any plant. Don’t let plants dry out. And, if you see a need, then fertilize.
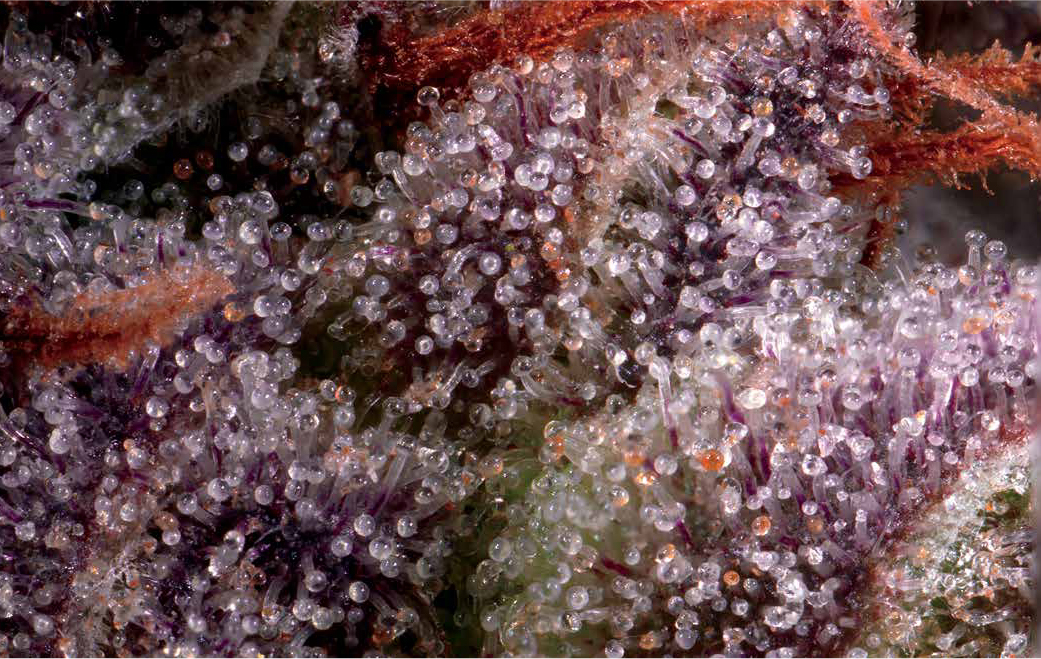
Harvest timing can impact the characteristics of your flowers. Fortunately, there are clear signals given off by Autoflowering Cannabis to indicate the proper time. First, as the wanted compounds accumulate, the liquid in a plant’s trichomes turns milky or cloudy. Then, all the trichomes gradually turn a darker color, best described as honey or amber.
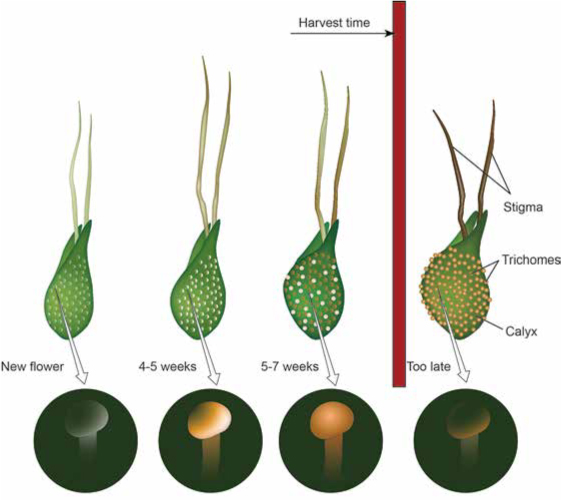
Using stigma and trichomes to determine harvest time. WINNIE CASACOP.
Harvest with early trichome clouding, and the high should be more energetic. Most commercial growers believe that at 70% milky trichomes the high is at its greatest intensity, with the highest amounts of THC. Lots of CBD is produced by the time 60 to 70% of the trichomes are amber, and the high is said to be less energetic and more sedative.
At the same time, as the trichomes color up, the white stigma curl a bit and start to turn brown. These alone are not a reliable indication of time to harvest, however. They can turn brown when touched during the growing process (so don’t touch them, no matter how tempted), and water and cold temperatures can also prematurely brown them. Nonetheless, they can help indicate harvest timing, so you need to watch them.
The trichomes indicate a flower that is ready to harvest. Most are milky. Some are amber. FRED GUNNERSON, SOFRESHFARMS.
All things considered, once 50 to 90% of the stigma are brown, it is time to check out the trichomes with the hand lens. For your first grow, start checking trichomes when 25% of the stigma are brown. Remember not to touch the buds while doing so, if at all possible, as those trichomes are fragile.
It is best to use a magnifying glass or a small hand lens, your cell phone, or the closeup setting or macro lens on a digital camera to gauge trichome and pistil color changes. Finally, there are several inexpensive microscope attachments for your computer that will show your flowers on a screen. Do use some sort of magnification when determining harvestability.
Note that if (God forbid!) a plant continues to mature beyond the point of harvest, trichomes will turn gray and start to fall off. This would be 2 or 3 weeks after the first trichomes cloud up. It is doubtful you will ever let it happen—in any case, you shouldn’t.
Autoflowering Cannabis flowers often do not all ripen at the same time. The flowers closest to the light are ready first, which makes sense. This means you must look at several flowers through magnification when making a harvest decision. It also means you should only harvest the buds that are actually ripe.
Finally, ripeness is in the eye of the user. As you become experienced, you will find that somewhere on the spectrum of trichome and pistil color will be your perfect harvest. Just remember, too early or too late and you are not going to get the maximum benefits of these plants, insofar as cannabinoids and terpenes are concerned.
That’s it. Autoflowers are truly easy plants to grow. Nature and breeders have ensured nothing about it need be complicated or difficult. Now, just grow some. That is the best way to learn how. Go ahead, without fear. Don’t bother to train or pinch the plants. Just provide light, water, and the proper temperature and humidity.
Be ready to add additional nutrients if the plant calls for it. Keep notes. These days, that includes taking lots of pictures with your cell phone or digital camera.
You’ve probably grown tomatoes without much instruction. Let that give you the comfort you need to get growing Autoflowering Cannabis. If you have a problem, treat it just like you would, well, a tomato.
Once you see a female flower or a pollen sac, you won’t forget the way they look, and it will become easier to recognize them in future grows. And once you see how these plants operate, you will automatically (just like recognizing the appearance of their flowers) know what to do. It is just like growing tomatoes, as I keep saying.
Finally, don’t skimp on drying and curing. This is what makes mere ditch weed turn into fine Cannabis. It pays to set up a system and follow it. It takes a bit of patience, and you must not rush things. Oh, and, most important, have fun.