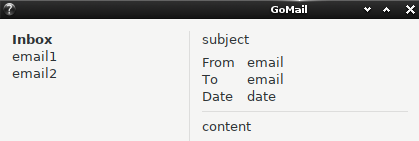
The main layout box of our email client, content, is a horizontal box created with ui.NewHorizontalBox(), which contains the email list on the left (the first item to be appended), a vertical ui.Separator, and the detail view on the right (as it was the list item to be appended). The email list is composed of a ui.Group named inbox, which includes the Inbox title; note that our title label is followed by a series of spaces—this helps to create a more spacious layout in our application. Within this, we have a vertical ui.Box, which has a ui.Label for each of our emails.
As there is no grid layout available, the detail view is composed of various boxes. You can see that the meta box is a horizontal layout of two child instances of a vertical ui.Box: the first containing a vertical box of labels, the second being the list of values that will be filled later—the padding will provide a suitable gap between them.
As with the hello world example, we create a window with the GoMail title, a requested size, and set false for the hasMenu parameter. At the end of the sample, we set the content of the window and Show() it:
window := ui.NewWindow("GoMail", 600, 400, false)
window.SetMargined(true)
window.OnClosing(func(*ui.Window) bool {
   ui.Quit()
   return true
})

list := ui.NewVerticalBox()
list.Append(ui.NewLabel("email1"), false)
list.Append(ui.NewLabel("email2"), false)
inbox := ui.NewGroup("Inbox")
inbox.SetChild(list)

subject := ui.NewLabel("subject")
content := ui.NewLabel("content")
labels := ui.NewVerticalBox()
labels.Append(ui.NewLabel("From "), false)
labels.Append(ui.NewLabel("To "), false)
labels.Append(ui.NewLabel("Date "), false)

values := ui.NewVerticalBox()
from := ui.NewLabel("email")
values.Append(from, false)
to := ui.NewLabel("email")
values.Append(to, false)
date := ui.NewLabel("date")
values.Append(date, false)

meta := ui.NewHorizontalBox()
meta.SetPadded(true)
meta.Append(labels, false)
meta.Append(values, true)

detail := ui.NewVerticalBox()
detail.SetPadded(true)
detail.Append(subject, false)
detail.Append(meta, false)
detail.Append(ui.NewHorizontalSeparator(), false)
detail.Append(content, true)

content := ui.NewHorizontalBox()
content.SetPadded(true)
content.Append(inbox, false)
content.Append(ui.NewVerticalSeparator(), false)
content.Append(detail, true)

window.SetChild(content)
window.Show()
By dropping that code into the same main() wrapper that we used in the hello world application, we can run this user interface to see how the layout works. You should see something like the following screenshot:

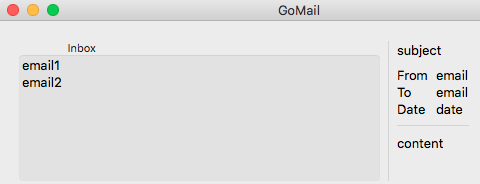
As you can see, we weren't able to use the splitter from the Walk example, but have simulated that look using ui.Separator. Whilst the code is the same, they can behave differently across different operating systems, like the following expanded vertical ui.Box on macOS:

The tree, or list, component on the left is a simple collection of labels at this stage, as there is no standard list component provided. Lastly, we have not rendered the labels in bold. This is possible, but only by using the draw API, which significantly complicates the code. Additionally, the use of drawing can cause parts of the user interface to vary from the loaded platform theme; for this purpose, we have stuck with the standard ui.Label component. In the preceding screenshot, you can see how different platforms have very different layouts at this stage—this will even out as we add more content.