In Chapter 1, Getting Started with Qt Creator, you learned the basic elements of the Qt Widgets designer, including the palette of widgets you can use, the central Edit pane, the tree of objects, and the Property view. The following screenshot shows the Qt Designer again:

Working from left to right, the parts of the screen you see are as follows:
- The Views selector, presently indicating that the Qt Designer view is active.
- The palette of possible widgets you can lay out on your form.
- The form editor, above the connection editor that lets you wire signals and slots between widgets.
- The object tree, indicating all of the objects that have been laid out on the form and showing their parent-child relationships, through the use of nested lists.
- Under the object tree is the Property editor, where you can edit the compile-time properties of any item you select on the form editor.
Let's begin by creating a new Qt Widgets project (click on Qt Widgets Application from the New File or Projects dialog) and naming the project QtGuiCalculator, and then, follow these steps:
- In the Forms folder of the project, double-click on the mainwindow.ui file. The designer will open.
- Drag out a vertical layout from the palette.
- Right-click on the layout and choose Lay out, then choose Adjust Size.... The layout will shrink to a point.
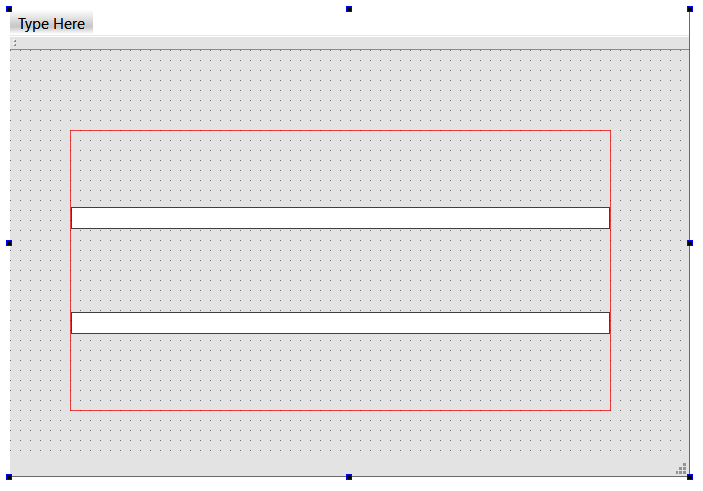
- Drag two line editors and drop them on the vertical layout in the object viewer (the far right pane). You'll see the vertical layout grow, to accept each of the line editors. You should now have something that looks like the following screenshot, where the layout now has two text fields:
- Drag a horizontal layout, and drop it on the vertical layout in the object viewer.
- Drag and drop four Push buttons on the horizontal layout you just added.
- Resize the containing window so that the entire layout shows in the window.
- Rename the buttons plusButton, minusButton, timesButton, and divideButton, using the Property browser in the lower-right area of the screen. As you do so, scroll down to the text property (under QAbstractButton) and give each button a logical label, such as +, -, *, and /.
- Select the top-line input, and name it argument1Input.
- Select the bottom-line input, and name it argument2Input.
The next screenshot shows what you should see in the Qt Designer form editor pane so far. You can also manually arrange the buttons by breaking the layout and positioning them using the mouse, but that typically makes your layout less robust to window resizing and is generally not a good idea. The following screenshot depicts our calculator user interface:

So far, this is pretty straightforward. We used a vertical layout and a horizontal layout to lay out the various controls; this takes advantage of Qt's dynamic constraints on widget layout and sizing. All widgets have minimum and maximum size properties, which are used by layouts to determine the actual size a widget consumes. Some widgets are elastic; that is, they stretch to fill their contents. When specifying the actual size of a widget, you can specify that it takes one of the following values in each of the x and y axes:
- The minimum size of the widget.
- The maximum size of the widget.
- A fixed size between its minimum and maximum.
- An expanding size, expanding to fit the contents of the widget.
Qt provides four kinds of layouts, which you can mix and match, as we just did. You've encountered the vertical and horizontal layouts; there's also a grid layout, which lets you organize things in an m x n grid, and a form layout, which organizes widgets in a manner similar to how the native platform enumerates fields on a form.
Right now, our layout's a little bunched up. Let's add some spacers, to better fill the space in the window, and also, add a button for an about box:
- Drag a vertical spacer and drop it between the input lines, and a second vertical spacer between the horizontal layout that contains the row of buttons and the input line.
- Drag a Push button to the vertical layout, and add a spacer between the bottom line and the Push button.
- Name the last Push button aboutButton, and give it the text About. We'll add an icon later.
The next screenshot shows the application as we've constructed it in the designer. If you click on the Run button, you should see the following:

Now, let's make our result dialog. Right-click on the project and choose Add New...; then, follow these steps:
- In the dialog that appears, choose Qt on the left, and then Qt Designer Form in the middle. Click on Choose.
- Choose a dialog style for your dialog; choose Dialog with Buttons Bottom, and click on Next.
- Name the file resultdialog.ui, and click on Next.
- Click on Finish.
- In the dialog that appears, drag out a form layout. Right-click on the dialog window (not the form layout) and choose Lay out, followed by Lay Out Vertically.
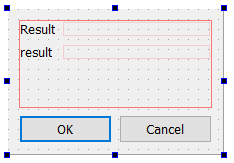
- Add a label to the form layout. Change its text to read Result.
- Drag out another label, and name it result. In the objectName field under Property, change the name to result.
- Adjust the window size so that it's smaller, to make it look better.
You should have a dialog that looks like the following screenshot:
Now is a good time for you to experiment with layouts and spacers, and style the dialog any way you wish. To see how this happens, let's see how to use these resources.