


“ ‘The road to the City of Emeralds is hooked with yellow yarn,’ said the Witch, ‘so you cannot miss it.’ ”
DOROTHY, COWARDLY LION, SCARECROW, AND TIN WOODMAN
L. FRANK BAUM’S THE WONDERFUL WIZARD OF OZ, 1900
MGM Studios wanted to show off its new Technicolor abilities with Dorothy’s ruby-red shoes in the film adaptation of The Wonderful Wizard of Oz, but in his original novel, L. Frank Baum was all about silver.
MATERIALS
• Size E crochet hook
• 6-mm black plastic safety eyes
• Tapestry needle
• Fiberfill
FOR DOROTHY:
• Size B or C crochet hook (for Toto only)
• Worsted-weight yarn in brown, cream, white, sky blue, silver glitter, and straw
• ⅛"-wide white ribbon
• Charcoal-gray worsted-weight yarn, or charcoal-gray embroidery floss
• Big-eye needle
• Black embroidery floss and embroidery needle
FOR COWARDLY LION:
• Worsted-weight yarn in marigold and rust
• Cream felt
• Black embroidery floss and embroidery needle
• Hot-glue gun
FOR SCARECROW:
• Worsted-weight yarn in barley, black, brown, and olive green
• 2 approximately 14"-lengths of thin brown cord or embroidery floss
• Brown thread, optional
FOR TIN WOODMAN:
• Worsted-weight yarn in metallic silver or gray
• Red felt
• 1 small snap fastener
• Gray sewing thread and sewing needle
• Hot-glue gun
NOTES
Work in continuous rounds unless otherwise specified.
Use a size E crochet hook for all characters except Toto. Use a size B or C crochet hook for Toto.
You need only a small amount of silver-glitter yarn for Dorothy’s slippers. If none is available, you can use light-gray yarn and then paint over the finished slippers with silver-glitter fabric paint.
DOROTHY

![]() HEAD
HEAD
Round 1: Starting with brown yarn, sc 5 in magic ring. {5}
Round 2: [Sc 2 in one stitch] 5 times. {10}
Round 3: [Sc 2 in one stitch] 10 times. {20}
Round 4: [Sc 3, sc 2 in next stitch] 5 times. {25}
Round 5: [Sc 4, sc 2 in next stitch] 5 times, changing to cream yarn in the last stitch. {30}
Round 6: Sc 9, sc 2 in next stitch, sc 3, changing to brown yarn. Sc 6, sc 2 in next stitch, sc 9, sc 2 in next stitch, changing to cream yarn. {14 cream + 19 brown = 33}
Rounds 7–9: Sc 14, changing to brown yarn, sc 19, changing to cream yarn. {14 cream + 19 brown = 33}
Round 10: Sc 9, dec 1, sc 3, changing to brown yarn. Sc 6, dec 1, sc 9, dec 1, changing to cream yarn. {13 cream + 17 brown = 30}
Round 11: [Sc 4, dec 1] twice, sc 1, changing to brown yarn. Sc 3, dec 1, [sc 4, dec 1] twice, changing to cream yarn in the last stitch. {11 cream + 14 brown = 25}
Round 12: [Sc 3, dec 1] twice, sc 1, changing to brown yarn. Sc 2, dec 1, [sc 3, dec 1] twice, changing to cream yarn in the last stitch. {9 cream + 11 brown = 20}
Round 13: [Sc 2, dec 1] twice, sc 1, changing to brown yarn. Sc 1, dec 1, [sc 2, dec 1] twice. {7 cream + 8 brown = 15}
Fasten off and tuck in the end. Attach eyes between rows 8 and 9 (three rows below the hairline), approximately 6 stitches apart.

![]() HAIR
HAIR
Cut six 9-inch strands of brown yarn. Make two pigtails following the instructions opposite, using 3 strands of yarn for each pigtail. Using white ribbon, tie off the pigtails with bows.
Stuff head firmly with fiberfill.
With brown yarn, make bangs following the instructions on pages 17–18.
TUTORIAL: PIGTAILS
This cute hairstyle in real life is even cuter on your amigurimi!
1 Cut six 9-inch-long strands of yarn (three for each side of the head). Using a tapestry needle, thread one strand through a single stitch on the side of the head, one row below the hairline.


2 Thread a second strand of yarn through the head one stitch over and one row down from the previous strand. Thread a third strand one stitch over and one row up from the previous strand.
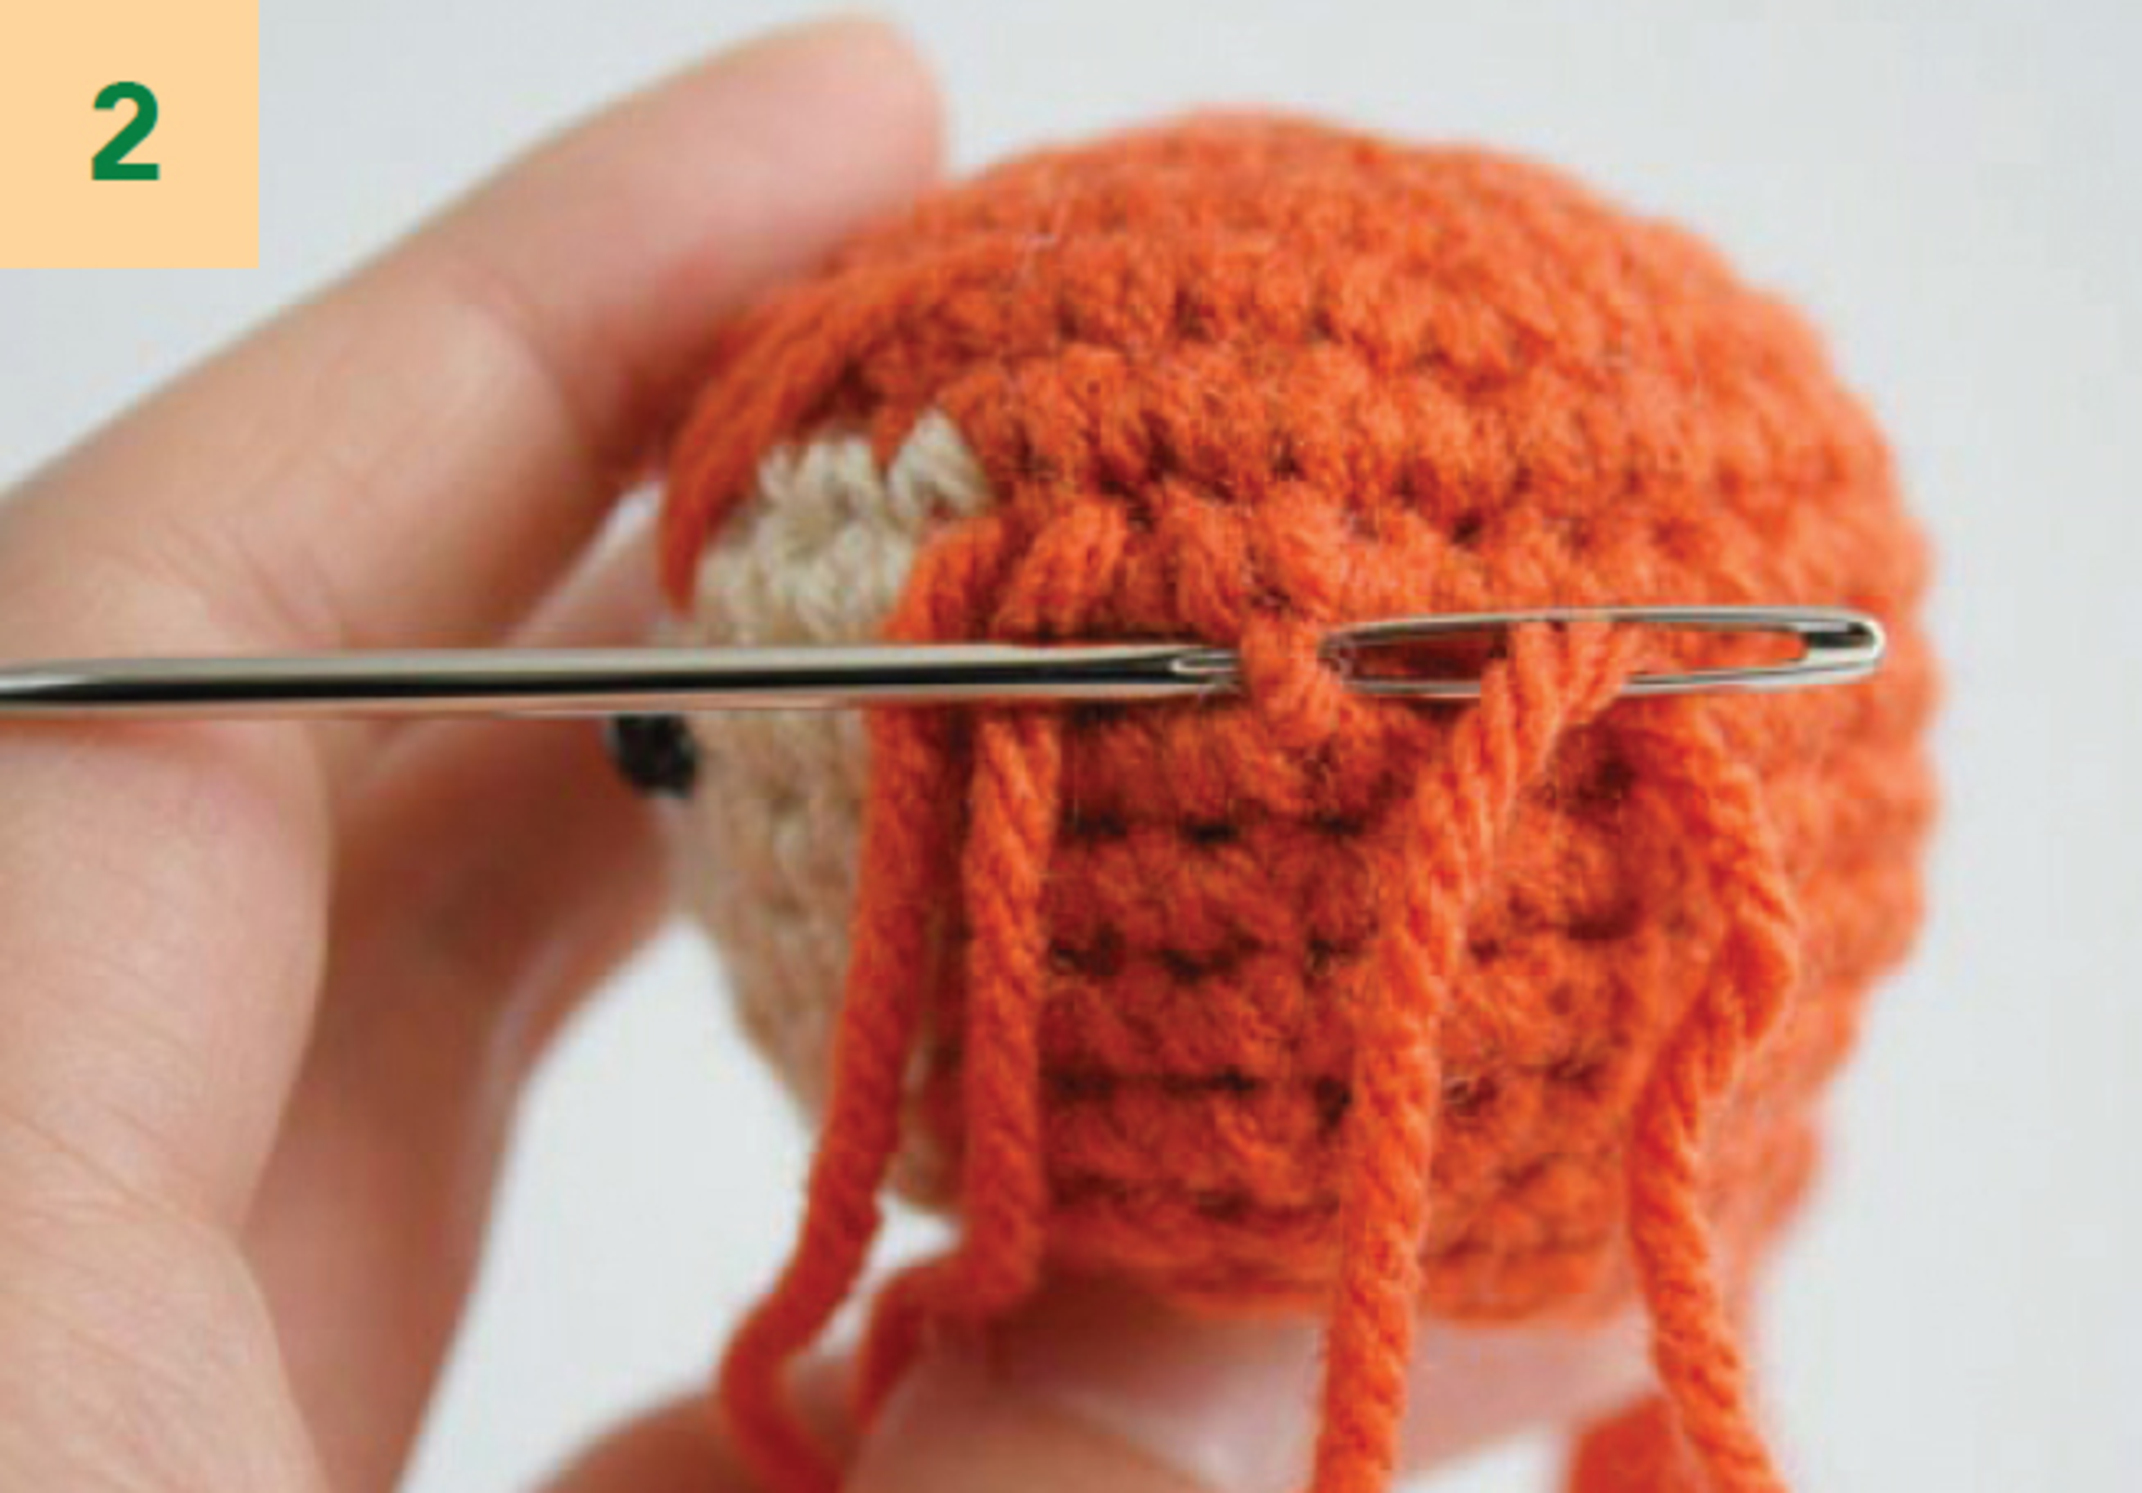

3 Braid the pigtail to your desired length. Tie off braids and trim excess.


![]() BODY
BODY
Round 1: Using white yarn, sc 5 in magic ring. {5}
Round 2: [Sc 2 in one stitch] 5 times. {10}
Round 3: [Sc 1, sc 2 in next stitch] 5 times. {15}
Round 4: [Sc 2, sc 2 in next stitch] 5 times. {20}
Rounds 5–8: Sc 20. {20}
Round 9: [Sc 2, dec 1] 5 times. {15}
Fasten off and leave a tail for sewing.
Hold the body upside down and, using sky-blue yarn, create a surface chain between rounds 7 and 8 of the body, two rows from the open end, for a total of 20 stitches. (See here for surface chain instructions.)
Then use sky-blue yarn to crochet along the surface chain:
Round 1: Sc 20. {20}
Round 2: [Sc 3, sc 2 in next stitch] 5 times. {25}
Round 3: Sc 25. {25}
Round 4: [Sc 4, sc 2 in next stitch] 5 times. {30}
Round 5: Sc 30. {30}
Fasten off and weave in the end. Stuff the body firmly with fiberfill and sew it onto the head.

![]() ARMS (MAKE 2)
ARMS (MAKE 2)
Round 1: Starting with cream yarn, sc 5 in magic ring. {5}
Round 2: Sc 5, changing to white yarn in the last stitch. {5}
Rounds 3–4: Sc 5. {5}
Fasten off and leave a tail for sewing. Sew onto Dorothy’s body.

![]() LEGS (MAKE 2)
LEGS (MAKE 2)
Round 1: Starting with silver-glitter yarn, sc 5 in magic ring. {5}
Round 2: Sc 5, changing to cream yarn. {5}
Rounds 3–4: Sc 5. {5}
Fasten off and leave a tail for sewing. Using white yarn, sew a line of backstitches along the color change between silver-glitter and cream yarn to create a sock line. Sew onto Dorothy’s body.

![]() DRESS STRAPS (MAKE 2)
DRESS STRAPS (MAKE 2)
Using sky-blue yarn, ch 9 and fasten off, leaving a tail for sewing. Sew onto the body starting from the waistline of Dorothy’s dress at the front, continuing over the shoulder, and finishing at the waistline at the back of her dress.

![]() BASKET
BASKET
Round 1: Using straw yarn, sc 6 in magic ring. {6}
Round 2: [Sc 2 in one stitch] 6 times. {12}
Round 3: In back loops only, sc 12. {12}
Round 4: Sc 12. {12}
Sl st and ch 8 to make the basket handle. Fasten off and leave a short tail for sewing. Sew the end of the chain to the other side of the basket to attach the handle. Weave in the end. Using a short length of straw yarn, sew the center of the basket handle to the end of one of Dorothy’s hands, with the open side facing forward so Toto will be visible if placed in the basket. Tuck in the end.

![]() TOTO’S HEAD AND BODY
TOTO’S HEAD AND BODY
Round 1: With half-strands of charcoal-gray yarn or strands of charcoal-gray embroidery floss, sc 6 in magic ring. {6}
Round 2: [Sc 2 in one stitch] 6 times. {12}
Round 3: Sc 12. {12}
Stuff the head with a small amount of fiberfill or scrap yarn.
Round 4: Dec 6. {6}
Round 5: In front loops only, [sc 2, sc 2 in next stitch] twice. {8}
Round 6: Sc 8. {8}
Round 7: [Sc 3, sc 2 in next stitch] twice. {10}
Fill with a small amount of fiberfill or scrap yarn.
Round 8: In back loops only, dec 5. {5}
Fasten off and close the piece using a big-eye needle.

![]() TOTO’S SNOUT
TOTO’S SNOUT
Round 1: With half-strands of charcoal-gray yarn or strands of charcoal-gray embroidery floss, sc 4 in magic ring. Sl st. {4}
Fasten off and leave a tail for sewing. Sew onto the head using a big-eye needle. With black embroidery floss and an embroidery needle, embroider a small nose onto the snout using overlapping straight stitches. Sew two French knots on each side of Toto’s snout to make his eyes.

![]() EARS (MAKE 2)
EARS (MAKE 2)
With half-strands of charcoal-gray yarn or strands of charcoal-gray embroidery floss, ch 3, then crochet the following:
Row 1: Starting in the 2nd ch from the hook, hdc 1, ch 1. Sl st in the front two loops of the previous hdc. Sl st in the next ch. {1}
Fasten off, leaving a tail for sewing. Gently fold ears in half along the midline and sew onto the head with a big-eye needle. Tuck in the ends.

![]() FRONT LEGS (MAKE 2)
FRONT LEGS (MAKE 2)
With half-strands of charcoal-gray yarn or strands of charcoal-gray embroidery floss, ch 4, then crochet the following:
Row 1: Starting in the 2nd ch from the hook, sc 3. {3}
Fasten off, leaving a tail for sewing. Sew onto the front of the body directly below the head using a big-eye needle. Tuck in the ends.

![]() HIND LEGS (MAKE 2)
HIND LEGS (MAKE 2)
With half-strands of charcoal-gray yarn or strands of charcoal-gray embroidery floss:
Round 1: Sc 3 in magic ring. Sl st to finish off the round. {3}
Fasten off, leaving a tail for sewing. With a big-eye needle, sew legs onto the bottom of the body, offset to the sides to put Toto in a sitting position. Tuck in the ends. Now Dorothy can tote him in her basket!


COWARDLY LION

![]() HEAD
HEAD
Round 1: With marigold yarn, sc 5 in magic ring. {5}
Round 2: [Sc 2 in one stitch] 5 times. {10}
Round 3: [Sc 2 in one stitch] 10 times. {20}
Round 4: [Sc 3, sc 2 in next stitch] 5 times. {25}
Round 5: [Sc 4, sc 2 in next stitch] 5 times. {30}
Round 6: [Sc 9, sc 2 in next stitch] 3 times. {33}
Rounds 7–9: Sc 33. {33}
Round 10: [Sc 9, dec 1] 3 times. {30}
Round 11: [Sc 4, dec 1] 5 times. {25}
Round 12: [Sc 3, dec 1] 5 times. {20}
Round 13: [Sc 2, dec 1] 5 times. {15}
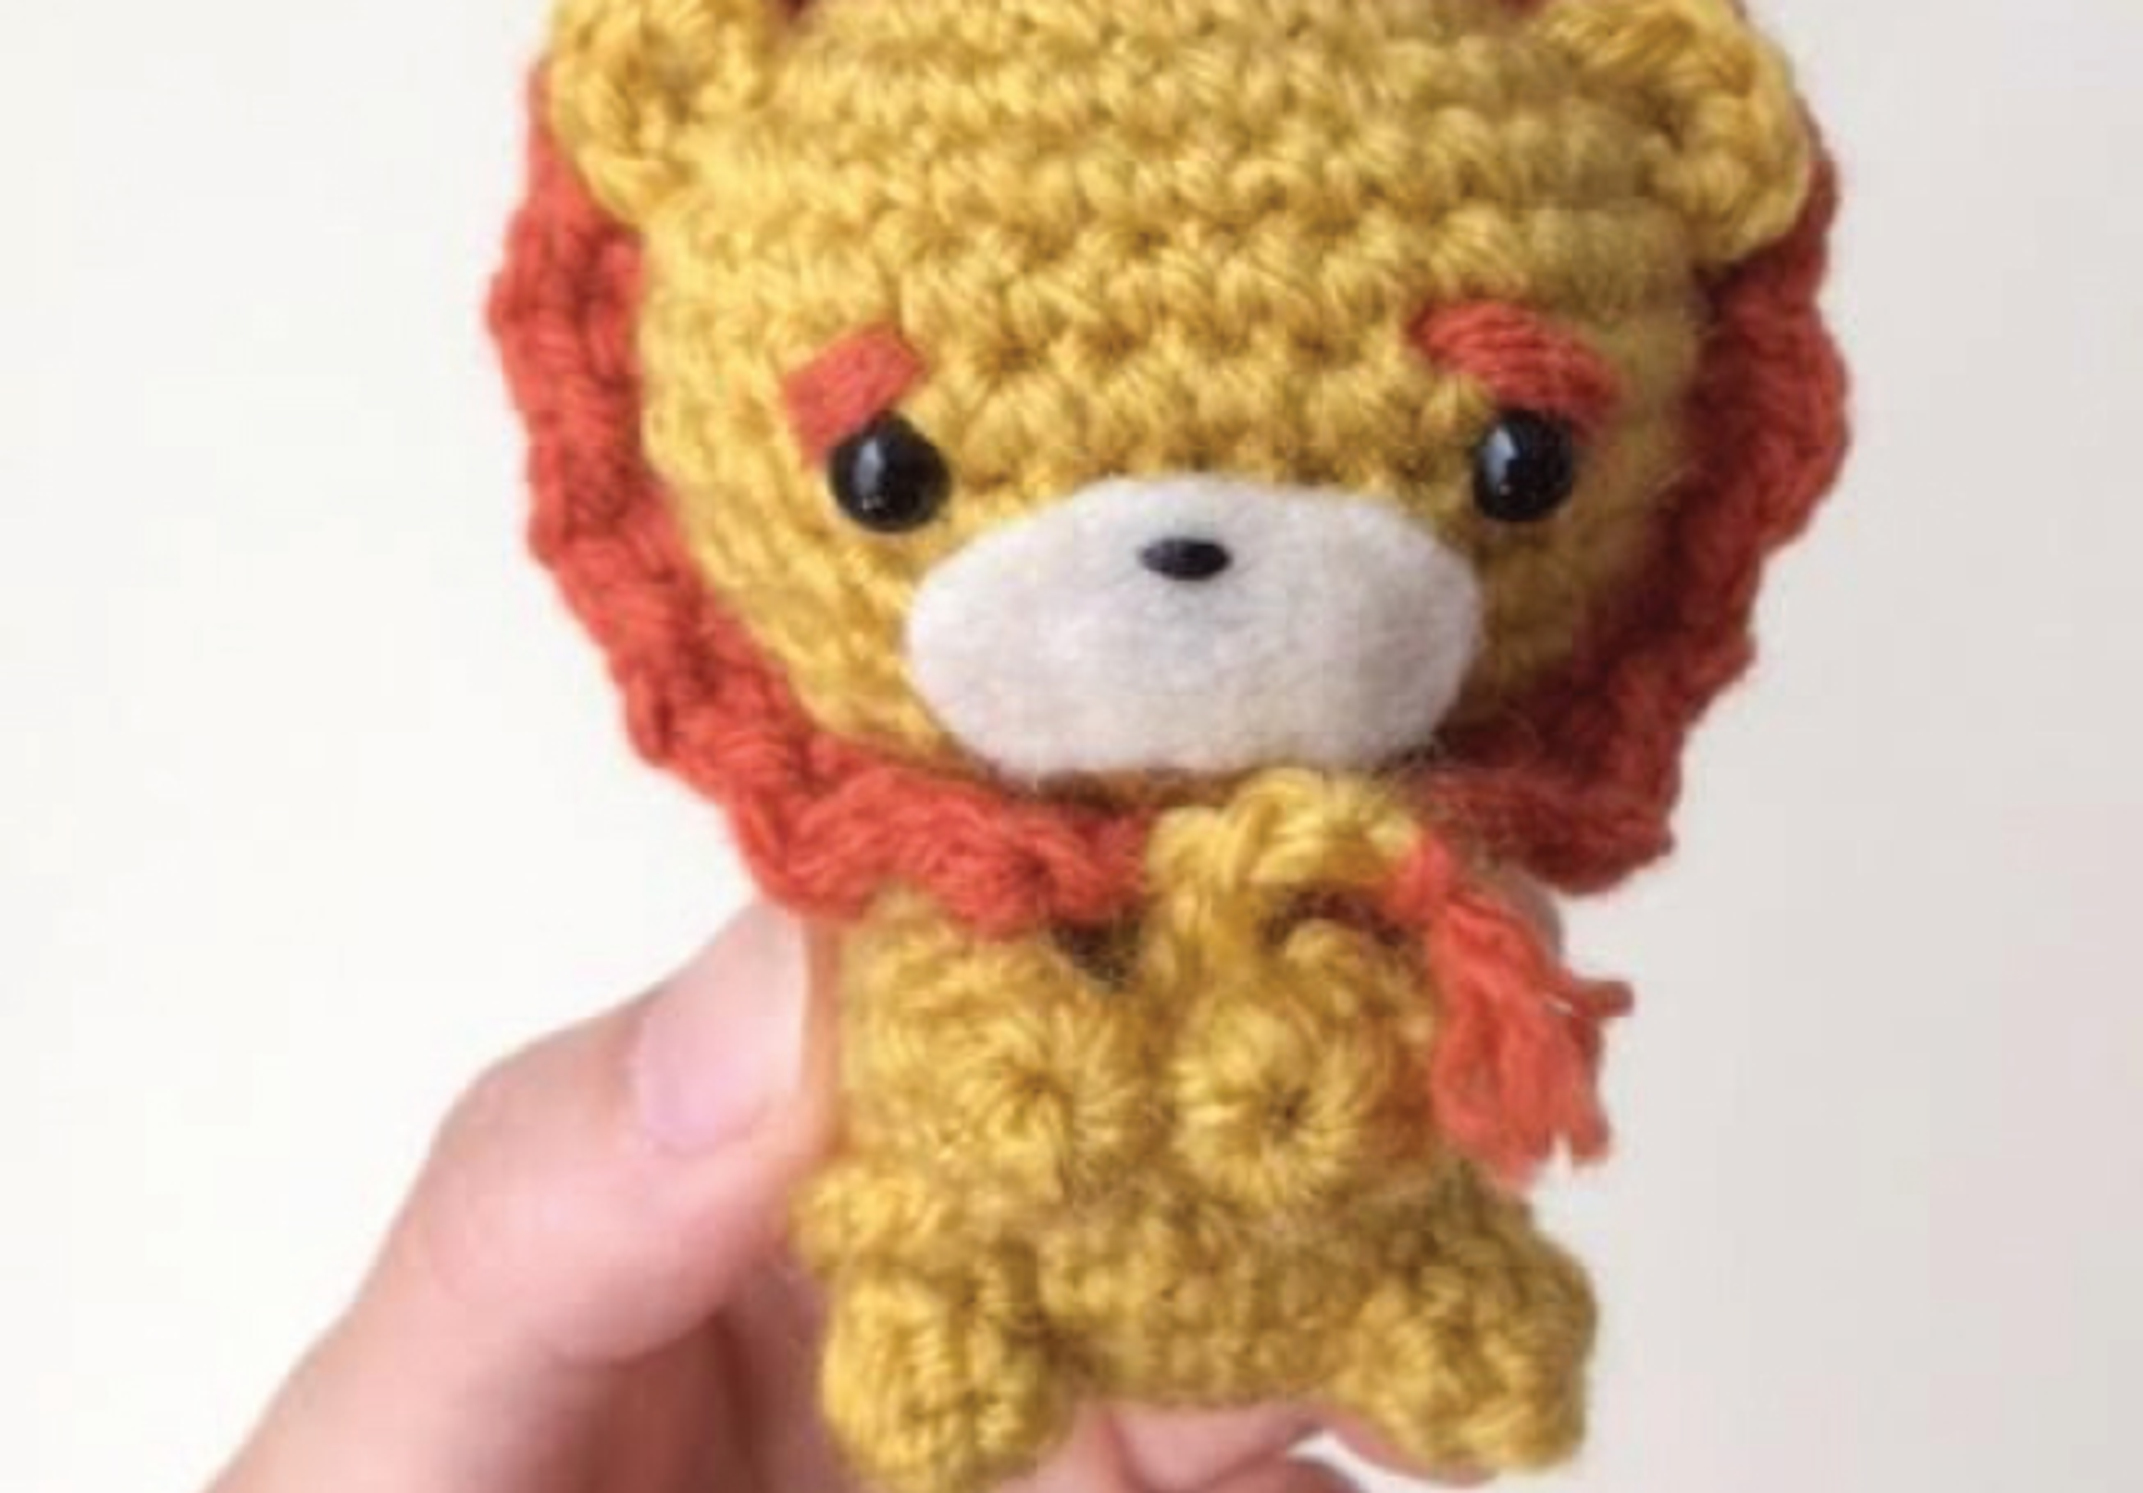
Fasten off and tuck in the end. Attach eyes between rows 8 and 9, approximately 6 stitches apart. Stuff head firmly with fiberfill. Cut a bean shape out of cream felt to make a snout, and use black embroidery floss and an embroidery needle to embroider a nose on the felt using overlapping straight stitches. Hot-glue the snout onto the face. With rust yarn and a tapestry needle, sew two worried eyebrows over the eyes using overlapping straight stitches.

![]() EARS (MAKE 2)
EARS (MAKE 2)
With marigold yarn, ch 2, then crochet the following:
Row 1: Starting in the 2nd ch from the hook, sc 4 in one stitch. {4}
Fasten off and leave a tail for sewing. Sew onto the head.

![]() MANE
MANE
With rust yarn, ch 35. Then crochet the following:
Row 1: Starting in the 2nd ch from the hook, [(sc 1, hdc 1, sc1) in one stitch, sl st] 17 times.
Fasten off, leaving a tail for sewing. Set aside until the head has been sewn to the body.

![]() BODY
BODY
Round 1: With marigold yarn, sc 5 in magic ring. {5}
Round 2: [Sc 2 in one stitch] 5 times. {10}
Round 3: [Sc 1, sc 2 in next stitch] 5 times. {15}
Round 4: [Sc 2, sc 2 in next stitch] 5 times. {20}
Rounds 5–8: Sc 20. {20}
Round 9: [Sc 2, dec 1] 5 times. {15}
Fasten off, leaving a tail for sewing. Stuff firmly with fiberfill, then sew onto the head. Sew the mane around the lion’s head, taking care to fasten it behind the ears.

![]() ARMS (MAKE 2)
ARMS (MAKE 2)
Round 1: With marigold yarn, sc 5 in magic ring. {5}
Rounds 2–4: Sc 5. {5}
Fasten off and leave a tail for sewing.

![]() LEGS (MAKE 2)
LEGS (MAKE 2)
Round 1: With marigold yarn, sc 6 in magic ring. {6}
Round 2: Sc 6. {6}
Fasten off and leave a tail for sewing.
Sew the arms and legs to the body, with the legs facing forward and offset to the sides so the lion is sitting. Using a short length of marigold yarn, sew his two front paws together to have him wringing his hands in anxiety.

![]() TAIL
TAIL
Using marigold yarn, ch 22, then fasten off, leaving a tail for sewing. Weave the other end into the chain.
Using a small amount of rust yarn, tie a cow hitch knot (see here) to the woven end of the chain and fray the ends to make the end of the tail. Sew the other end of the tail to his bottom.

SCARECROW

![]() HEAD
HEAD
Round 1: With barley yarn, sc 5 in magic ring. {5}
Round 2: [Sc 2 in one stitch] 5 times. {10}
Round 3: [Sc 2 in one stitch] 10 times. {20}
Round 4: [Sc 3, sc 2 in next stitch] 5 times. {25}
Round 5: [Sc 4, sc 2 in next stitch] 5 times. {30}
Round 6: [Sc 9, sc 2 in next stitch] 3 times. {33}
Rounds 7–9: Sc 33. {33}
Round 10: [Sc 9, dec 1] 3 times. {30}
Round 11: [Sc 4, dec 1] 5 times. {25}
Round 12: [Sc 3, dec 1] 5 times. {20}
Round 13: [Sc 2, dec 1] 5 times. {15}
Round 14: In front loops only, [sc 1, sc 2 in the next 2 stitches] 5 times. {25}
Round 15: [Sc 3, sc 2 in the next 2 stitches] 5 times. {35}
Fasten off and tuck in the end. Attach eyes between rows 8 and 9, approximately 6 stitches apart. Stuff the head firmly with fiberfill.

![]() HAT
HAT
Round 1: With black yarn, sc 3 in magic ring. {3}
Round 2: In back loops only, sc 3. {3}
Round 3: [Sc 2 in one stitch] 3 times. {6}
Round 4: [Sc 1, sc 2 in next stitch] 3 times. {9}
Round 5: Sc 9. {9}
Round 6: [Sc 2, sc 2 in next stitch] 3 times. {12}
Round 7: Sc 12. {12}
Round 8: [Sc 3, sc 2 in next stitch] 3 times. {15}
Round 9: Sc 15. {15}
Round 10: [Sc 4, sc 2 in next stitch] 3 times. {18}
Round 11: Sc 18. {18}
Round 12: [Sc 5, sc 2 in next stitch] 3 times. {21}
Round 13: Sc 21. {21}
Round 14: [Sc 6, sc 2 in next stitch] 3 times. {24}
Round 15: [Sc 7, sc 2 in next stitch] 3 times. {27}
Round 16: [Sc 8, sc 2 in next stitch] 3 times. {30}
Round 17: [Sc 9, sc 2 in next stitch] 3 times. {33}
Round 18: [Sc 10, sc 2 in next stitch] 3 times. {36}
Round 19: In front loops only, [sc 1, sc 2 in the next 3 stitches] 9 times. {63}
Round 20: [Sc 4, sc 2 in the next 3 stitches] 9 times. {90}
Fasten off and weave in the end. Using a length of black yarn and a tapestry needle, sew the hat onto the head. Fold down the tip of the hat.

![]() BODY
BODY
Round 1: Starting with brown yarn, sc 5 in magic ring. {5}
Round 2: [Sc 2 in one stitch] 5 times. {10}
Round 3: [Sc 1, sc 2 in next stitch] 5 times. {15}
Round 4: [Sc 2, sc 2 in next stitch] 5 times. {20}
Round 5: Sc 20, changing to olive-green yarn. {20}
Rounds 6–8: Sc 20. {20}
Round 9: [Sc 2, dec 1] 5 times. {15}
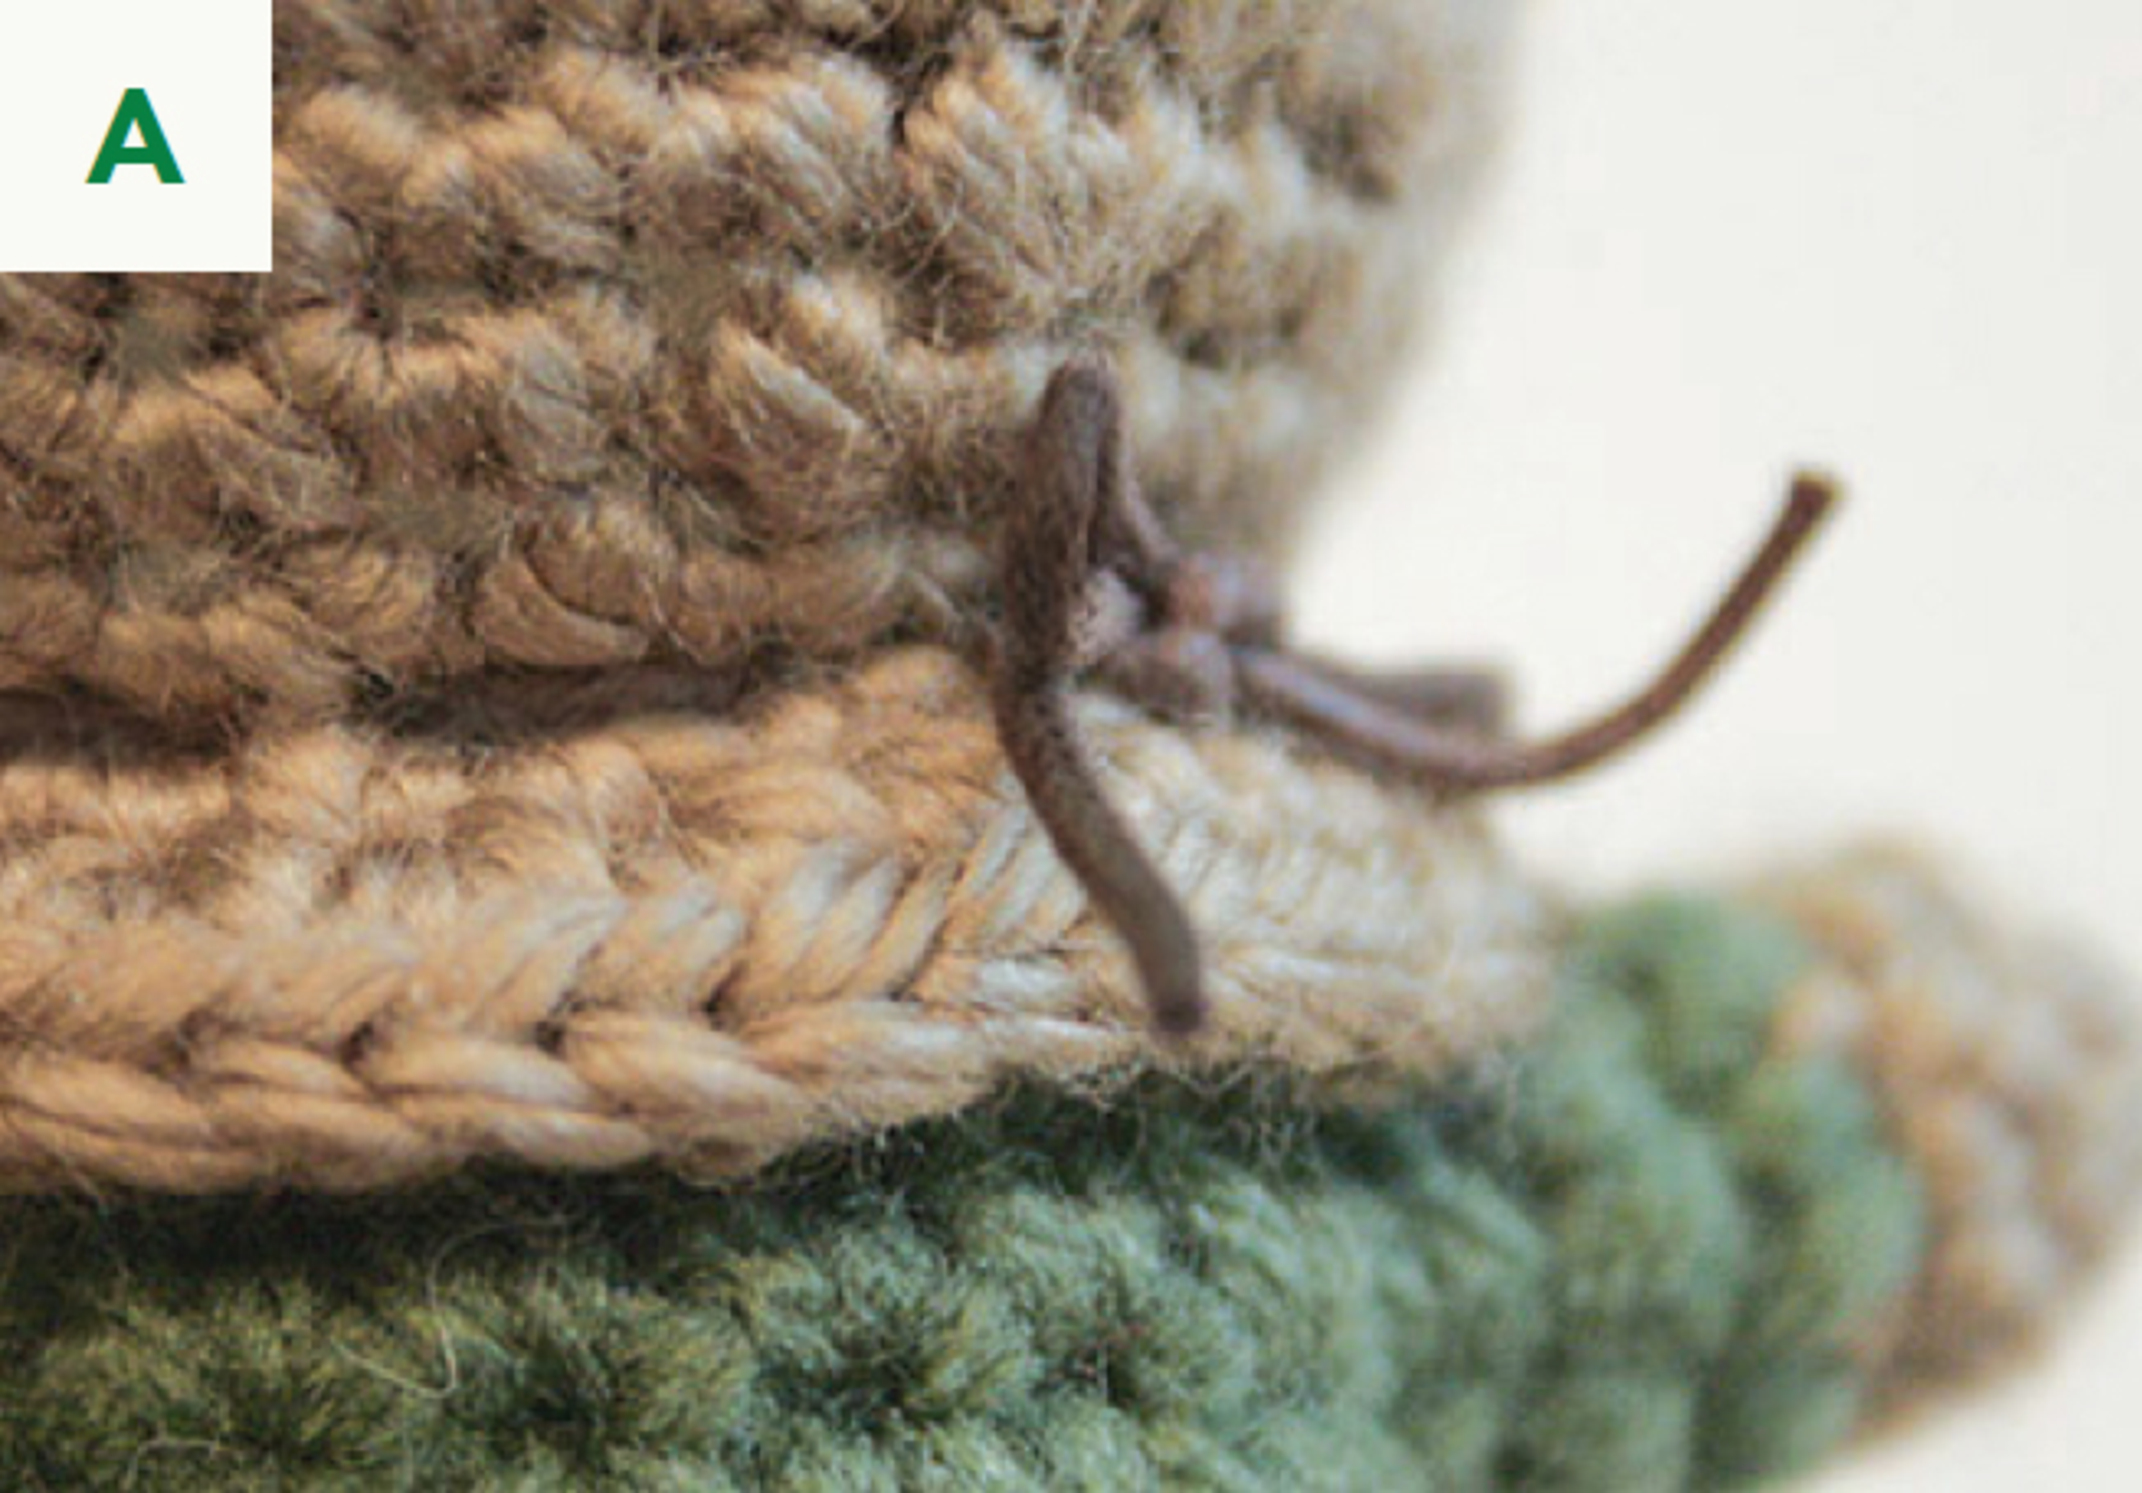
Fasten off, leaving a tail for sewing. Stuff body firmly with fiberfill and sew it to the head using a whipstitch, aligning the stitches with the back loops from round 14 of the head. Thread a 14-inch length of brown cord or embroidery floss around the scarecrow’s neck and tie it in a bow. Trim excess (A).

![]() SHIRT HEM
SHIRT HEM
Hold the body upside down and, using olive-green yarn, create a surface chain starting at the point where the color change between the brown and olive-green yarn begins. {20} (See here for more on surface chains.) Then continue to use the olive-green yarn to crochet the following along the surface chain:
Round 1: Sc 20. {20}
Fasten off and weave in the end.
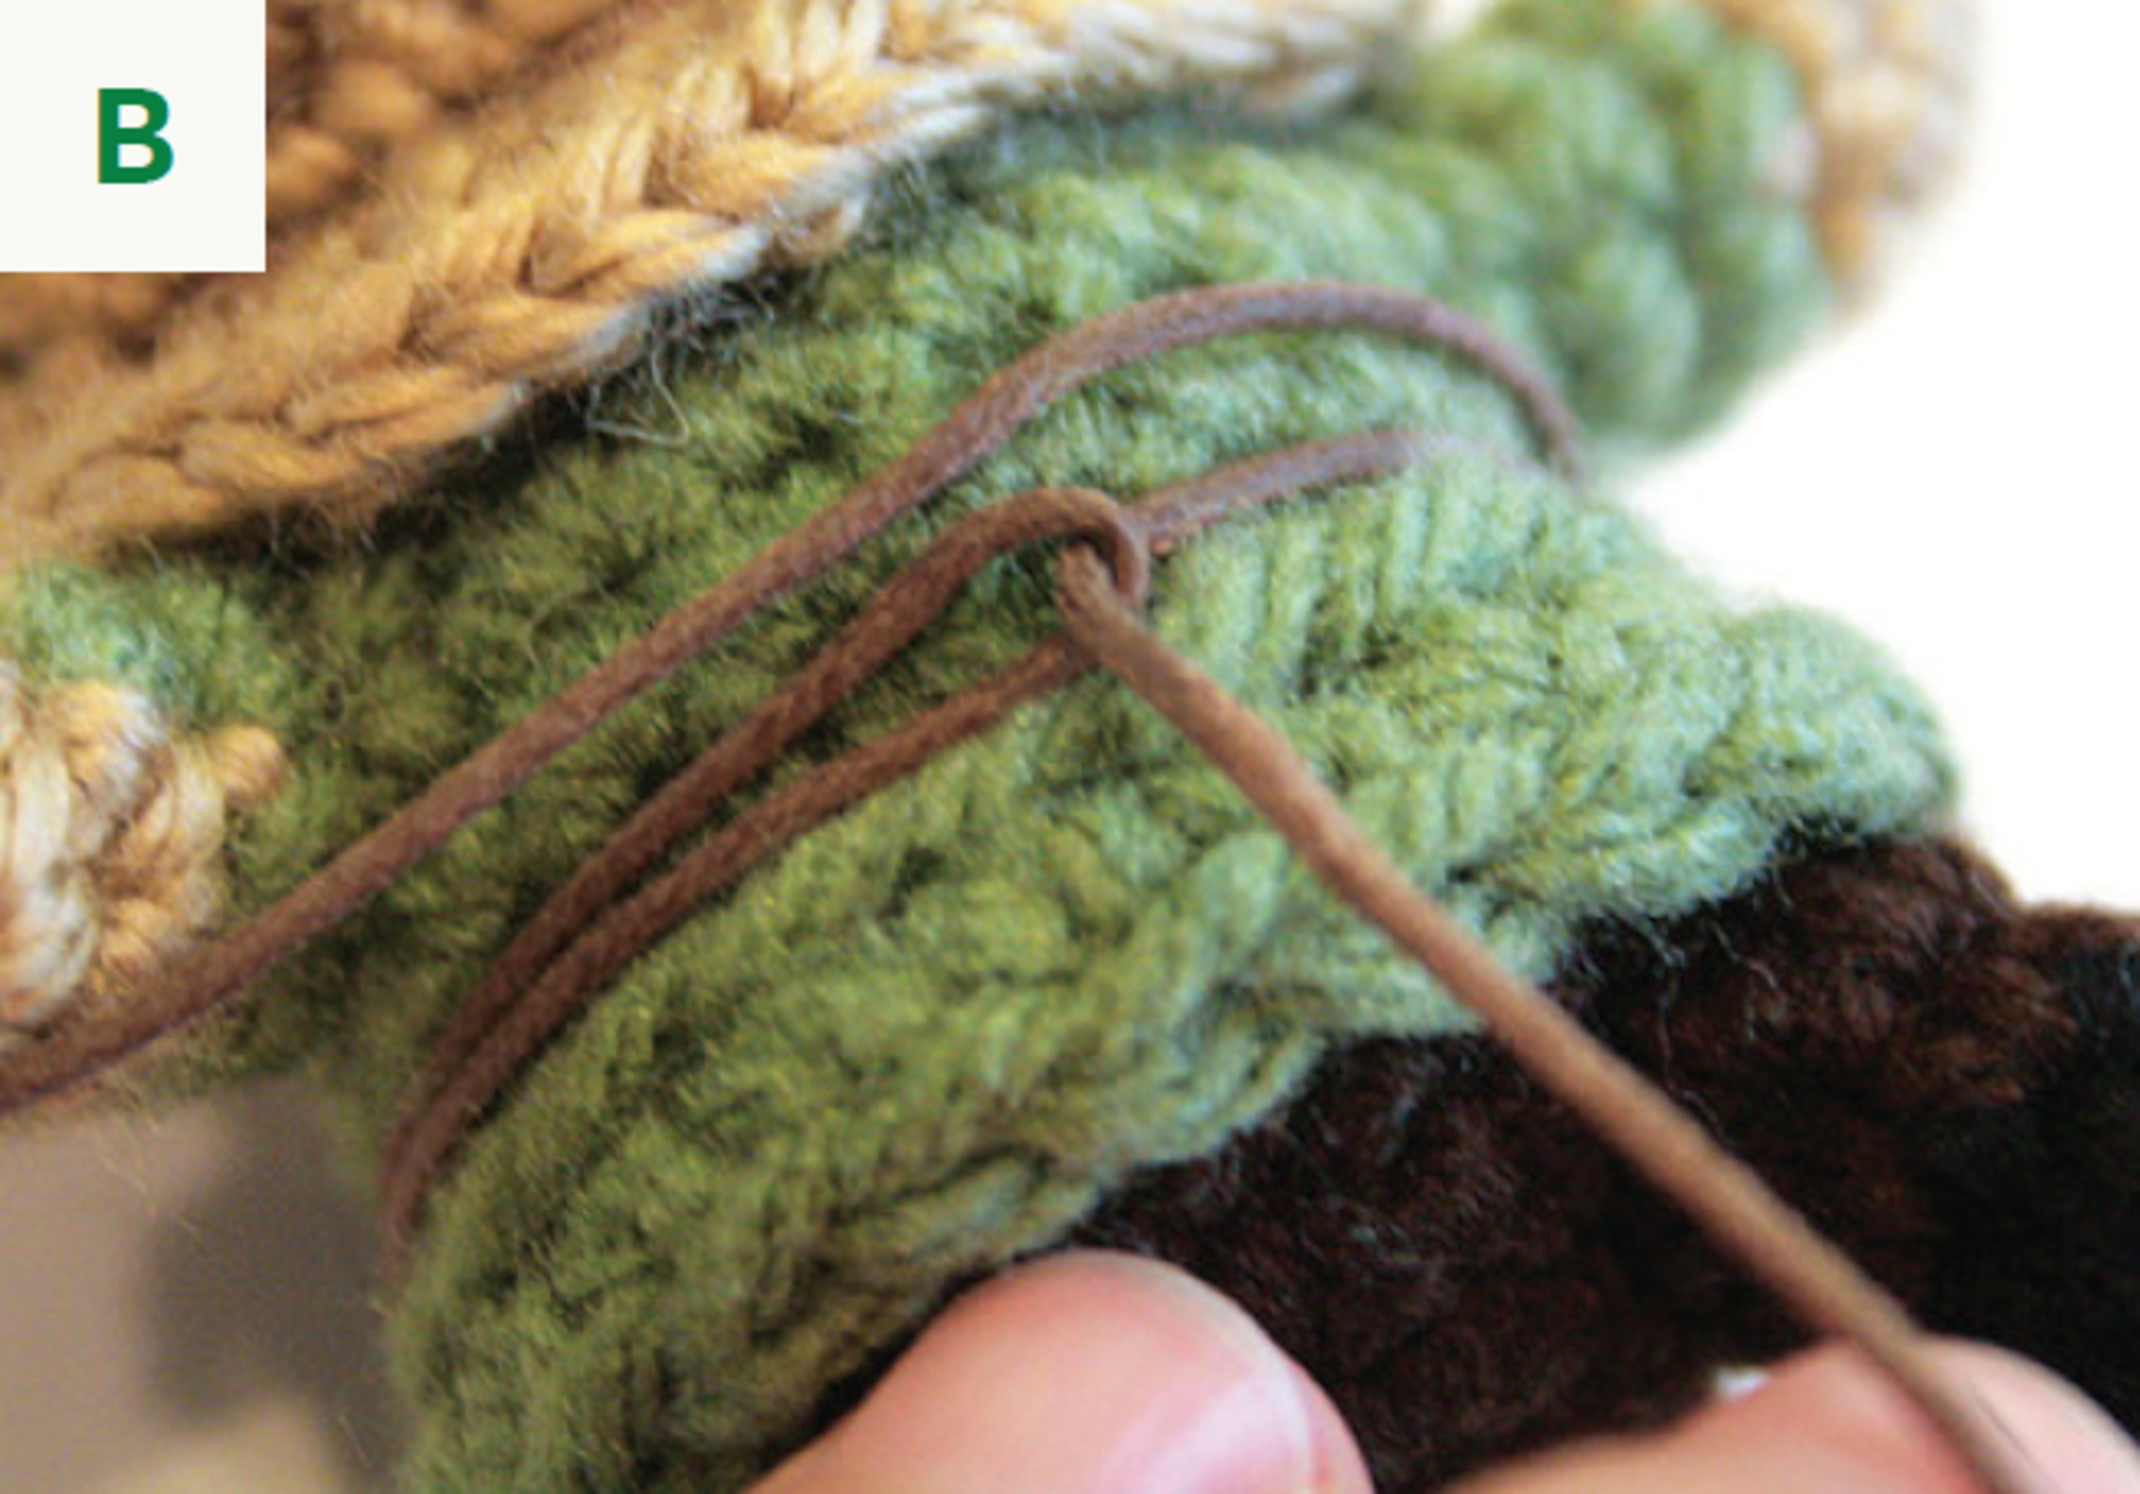
Fold a 14-inch length of brown cord or embroidery floss in half and wrap it around his waist. Pull one of the loose ends through the loop and tie the ends in a simple knot (B). Trim excess. Optional: Secure the belt to the waist with a few stitches of brown thread.



![]() ARMS (MAKE 2)
ARMS (MAKE 2)
Round 1: Starting with barley yarn, sc 6 in magic ring. {6}
Round 2: Sc 6, changing to olive-green yarn. {6}
Rounds 3–4: Sc 6. {6}
Fasten off, leaving a tail for sewing. Sew arms onto body.

![]() LEGS (MAKE 2)
LEGS (MAKE 2)
Round 1: Starting with black yarn, sc 6 in magic ring. {6}
Round 2: Sc 6, changing to brown yarn. {6}
Rounds 3–4: Sc 6. {6}
Fasten off, leaving a tail for sewing. Sew legs onto body.
TIN WOODMAN

![]() HEAD
HEAD
Round 1: With silver yarn, sc 5 in magic ring. {5}
Round 2: [Sc 2 in one stitch] 5 times. {10}
Round 3: [Sc 1, sc 2 in next stitch] 5 times. {15}
Round 4: [Sc 2, sc 2 in next stitch] 5 times. {20}
Round 5: [Sc 3, sc 2 in next stitch] 5 times. {25}
Round 6: [Sc 4, sc 2 in next stitch] 5 times. {30}
Round 7: In back loops only, sc 30. {30}
Rounds 8–13: Sc 30. {30}
Round 14: In back loops only, sc 30. {30}
Round 15: [Sc 4, dec 1] 5 times. {25}
Round 16: [Sc 3, dec 1] 5 times. {20}
Round 17: [Sc 2, dec 1] 5 times. {15}
Fasten off and weave in the end. Attach eyes between rows 9 and 10, approximately 6 stitches apart. Set aside; do not stuff head until the funnel hat has been sewn on.

![]() FUNNEL HAT
FUNNEL HAT
Round 1: With silver yarn, sc 6 in magic ring. {6}
Round 2: In back loops only, sc 6. {6}
Round 3: Sc 6. {6}
Round 4: In front loops only, [sc 2 in one stitch] 6 times. {12}
Round 5: [Sc 3, sc 2 in next stitch] 3 times. {15}
Round 6: [Sc 4, sc 2 in next stitch] 3 times. {18}
Round 7: [Sc 5, sc 2 in next stitch] 3 times. {21}
Round 8: [Sc 6, sc 2 in next stitch] 3 times. {24}
Round 9: [Sc 7, sc 2 in next stitch] 3 times. {27}
Round 10: [Sc 8, sc 2 in next stitch] 3 times. {30}
Round 11: [Sc 9, sc 2 in next stitch] 3 times. {33}
Sl st and ch 8. Fasten off, leaving a short tail for sewing. Sew the end of the chain onto the cone of the funnel to create a small handle.
Using silver yarn, sew the funnel hat onto the head, sewing along round 10 of the funnel and in the back loops of round 7 of the head. This will give the funnel hat a lip. While you sew it on, lightly stuff the hat with fiberfill to hold its shape. Stuff head with fiberfill, again taking care not to stuff too firmly so that it retains its cylindrical shape.

![]() BODY
BODY
Round 1: With silver yarn, sc 5 in magic ring. {5}
Round 2: [Sc 2 in one stitch] 5 times. {10}
Round 3: [Sc 1, sc 2 in next stitch] 5 times. {15}
Round 4: [Sc 2, sc 2 in next stitch] 5 times. {20}
Round 5: [Sc 3, sc 2 in next stitch] 5 times. {25}
Round 6: In back loops only, sc 25. {25}
Rounds 7–12: Sc 25. {25}
Round 13: In back loops only, sc 25. {25}
Round 14: [Sc 3, dec 1] 5 times. {20}
Round 15: [Sc 2, dec 1] 5 times. {15}
Fasten off, leaving a tail for sewing. Stuff body with fiberfill, taking care not to overstuff so that it retains its cylindrical shape. Sew onto the head using a whipstitch.

![]() ARMS AND LEGS (MAKE 4)
ARMS AND LEGS (MAKE 4)
Round 1: With silver yarn, sc 6 in magic ring. {6}
Round 2: In back loops only, sc 6. {6}
Rounds 3–5: Sc 6. {6}
Fasten off, leaving a tail for sewing. Sew arms and legs onto body.

![]() CHEST PLATE
CHEST PLATE
Using silver yarn, ch 6, then crochet the following:
Row 1: Starting in the 2nd ch from the hook, sc 5, then ch 1 and turn. {5}
Rows 2–4: Sc 5 across, ch 1, and turn. {5}
Fasten off, leaving a tail for sewing. Weave in the starting end. Position the chest plate on the front of the body and sew it to the body on one side to make a flap. Weave in the end. Position a small snap on the opposite side of the “hinge” of the chest plate. With sewing needle and thread, sew one part of the snap to the inside of the chest plate and the other piece to the body opposite the first piece. Cut a small red heart out of felt and carefully hot-glue it to the chest, where it will be covered by the chest plate when the plate is closed.
Optional: For extra charm, embroider an outline of straight stitches along the edge of the heart with embroidery floss.


