CHAPTER 3
Sharing Your MacBook with Others
Create a User Account
A user account is a group of settings that controls what a user can do in OS X. By creating a separate user account for each person who uses your MacBook regularly, you can enable users to have their own folders for documents and to use the settings they prefer. You can also use the Parental Controls feature to apply limitations to the actions a user can take.
When initially setting up your MacBook, you create an administrator account that you can use to configure OS X. You can also create a non-administrator account for yourself for day-to-day use.
Create a User Account
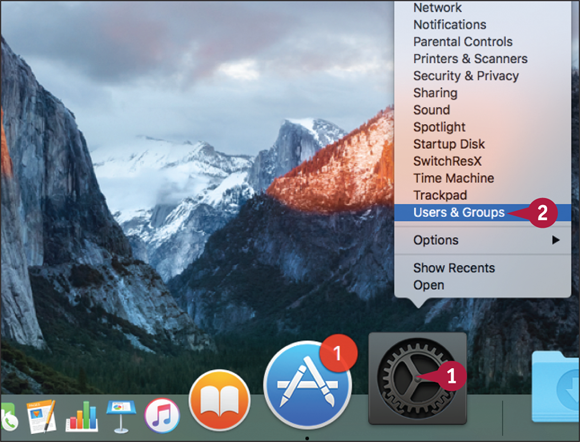
 Press
Press  + click System Preferences (
 ) on the Dock.
The contextual menu opens.
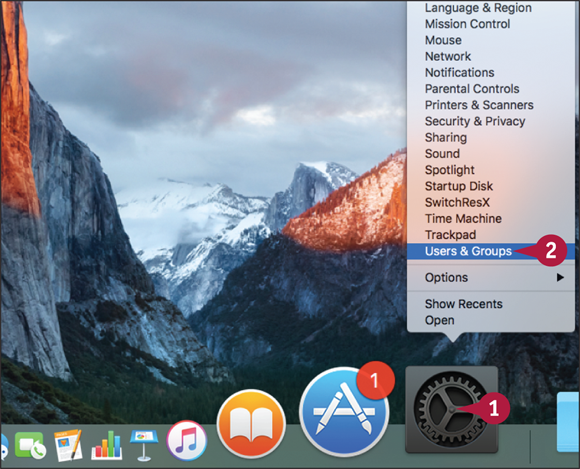
 Click Users & Groups.
Note: You must use administrator credentials to create another account. The easiest way to do this is to use an administrator account; you can also provide an administrator name and password from another account. To check whether you are an administrator, see if your account shows Admin in the Users & Groups pane.
The System Preferences window opens.
The Users & Groups pane appears.
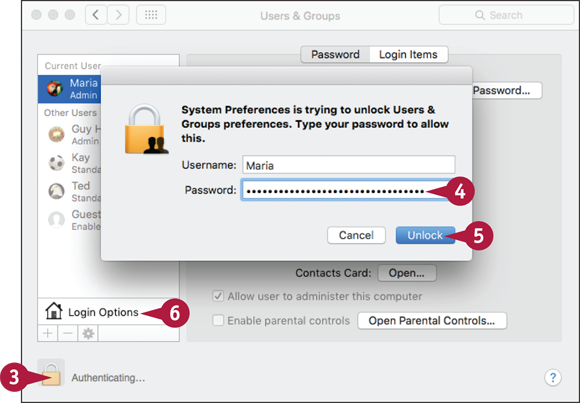
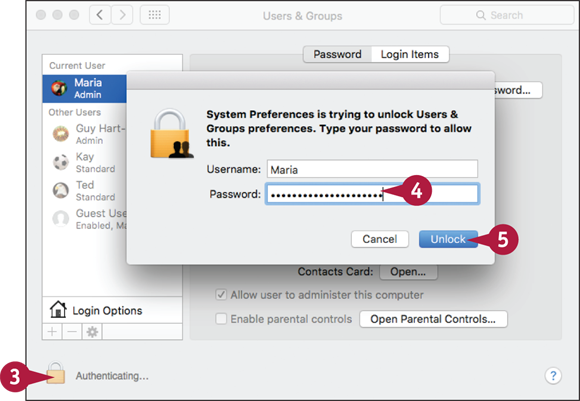
 Click the lock icon (
 ) to unlock System Preferences.
System Preferences displays a dialog asking you to type your password or an administrator name and password.
 Type your password in the Password field.
 Click Unlock.
System Preferences unlocks the preferences ( changes to  ).
).
 Click Add (
 ).
).
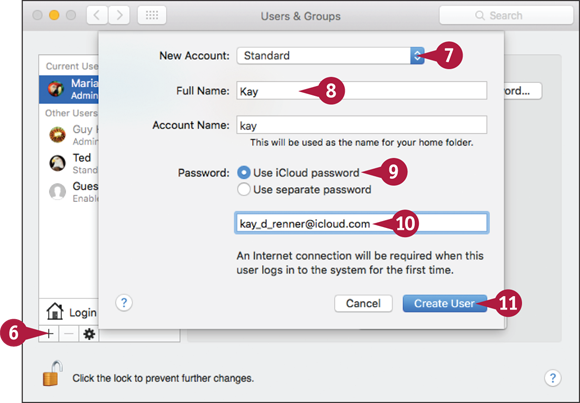
The New Account dialog opens.
 Click New Account (
 ) and then click Standard.
 Type the user’s full name, such as Kay or Kay Jones, and account name, such as kay.
 Click Use iCloud password (
 changes to
  ) to make the user log in using her existing iCloud password.
 Type the user’s iCloud e-mail address in the box.
 Click Create User.
The New Account dialog closes.
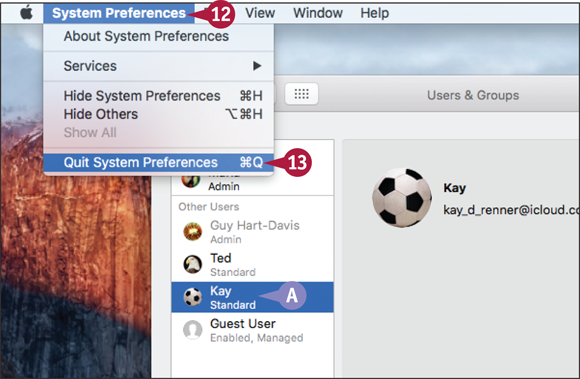
 The new account appears in the Other Users list.
 Click System Preferences.
The System Preferences menu opens.
 Click Quit System Preferences.
The System Preferences app closes.
Configure Your MacBook for Multiple Users
OS X includes a feature called Fast User Switching that enables multiple users to remain logged in to your MacBook at the same time. After you enable Fast User Switching, another user can log in either directly from your OS X session or from the login screen. Your OS X session keeps running in the background, ready for you to resume it.
You can enable the Guest User account to give a visitor temporary use of your MacBook without creating a dedicated account.
Configure Your MacBook for Multiple Users
Press + click System Preferences () on the Dock.
Note: You can click Apple ( ) and then click System Preferences to open the System Preferences window. Then click Users & Groups (
 ) to display the Users & Groups pane.
The contextual menu opens.
Click Users & Groups.
The System Preferences app opens and displays the Users & Groups pane at the front.
Click the lock icon ().
System Preferences displays a dialog asking you to type your password.
Note: If you are using a standard account or managed account, the dialog prompts you to provide administrator credentials.
Type your password or credentials.
Click Unlock.
System Preferences unlocks the preferences ( changes to ).
Click Login Options.
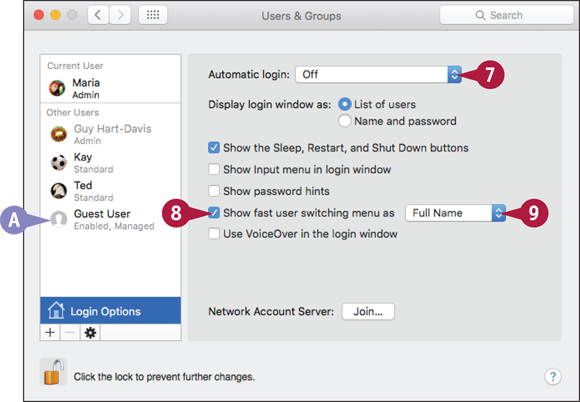
The Login Options pane appears.
Click Automatic login () and click Off to ensure that whoever logs in must use his own user account.
Click Show fast user switching menu as ( changes to
  ).
).
Click Show fast user switching menu as ().
Guest User is a special account you can use to enable someone to use your MacBook temporarily without creating a dedicated account.
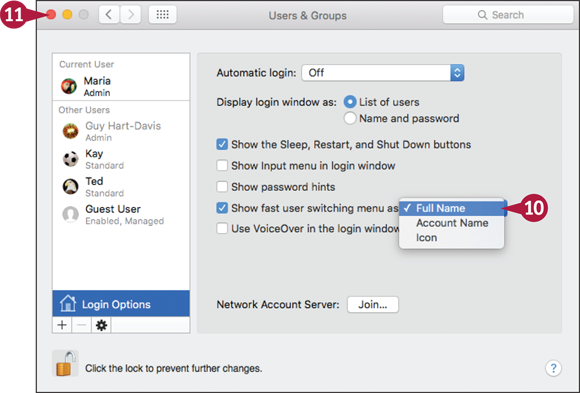
Click Full Name to show usernames, click Account Name to show account names, or click Icon to show icons.
Fast User Switching is now enabled.
Click Close ( ).
).
The System Preferences window closes.
Note: Fast User Switching uses more memory and resources, so it can make your MacBook run more slowly. If your MacBook runs too slowly, try turning Fast User Switching off. For some MacBook models, you may also be able to add RAM to improve performance.
Share Your MacBook with Fast User Switching
With Fast User Switching enabled, multiple users can remain logged in to OS X on your MacBook. Only one user can use the keyboard, trackpad, and screen at any given time, but each other user’s computing session keeps running in the background, with all her applications still open.
OS X automatically stops multimedia playing when you switch users. For example, if another user is still playing music in iTunes when you switch to your user account, iTunes stops playing the music.
Share Your MacBook with Fast User Switching
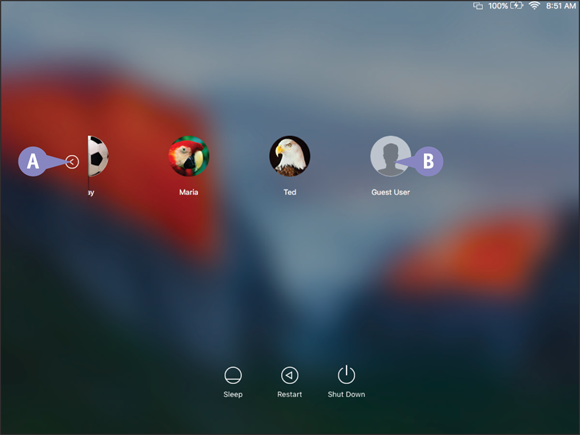
Log In to the MacBook
You can click the scroll buttons,  and
and  , to scroll the list left or right, respectively. Alternatively, move the pointer over the list and swipe left or right with two fingers on the trackpad.
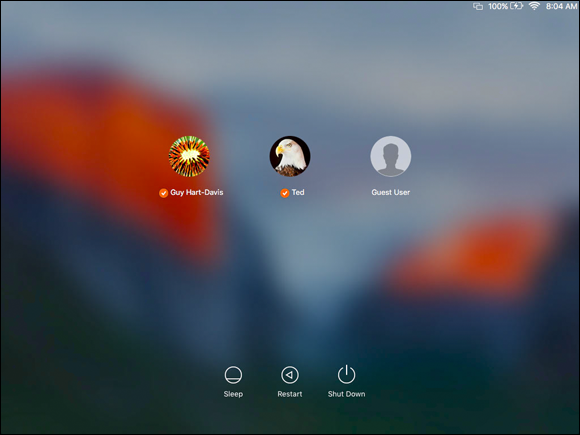
On the login window, click your username.
 If you have enabled the Guest User account, a guest can click Guest User to log in.
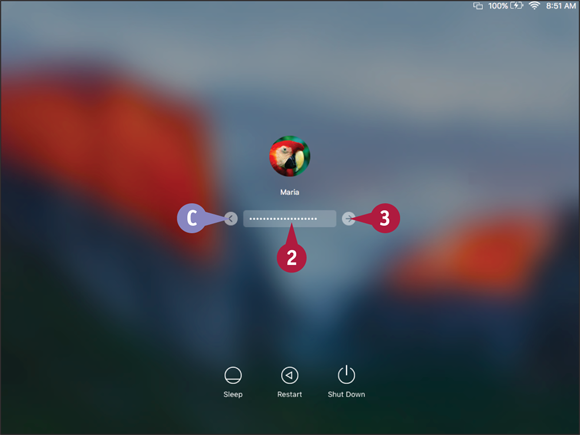
OS X prompts you for your password.
 You can click Back (
 ) to return to the login window if you need to log in using a different account.
Type your password.
Click Log In ( ).
).
Your desktop appears.
Display the Login Window
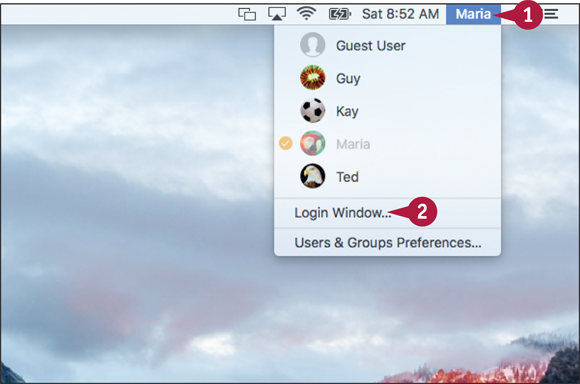
When you are ready to stop using the MacBook, but do not want to log out, click your name, account name, or icon on the menu bar.
The Fast User Switching menu opens.
Click Login Window.
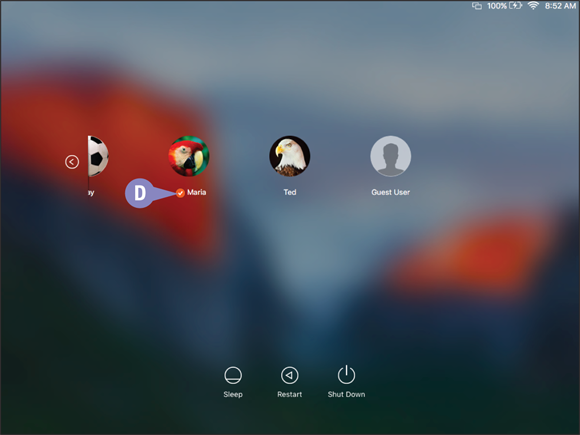
The login window appears.
 Your username shows a check mark icon (
 ), indicating that you have a session open.
Any of the MacBook’s users can log in by clicking his username.
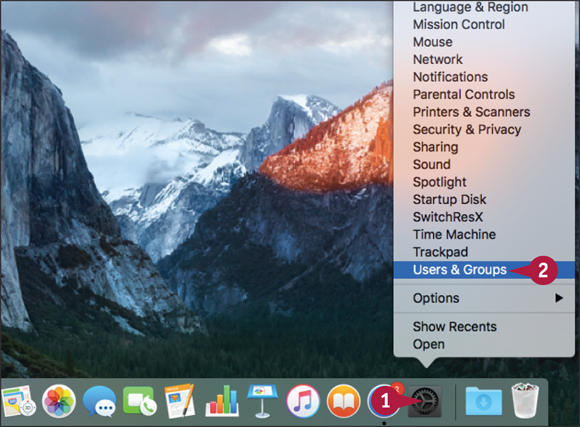
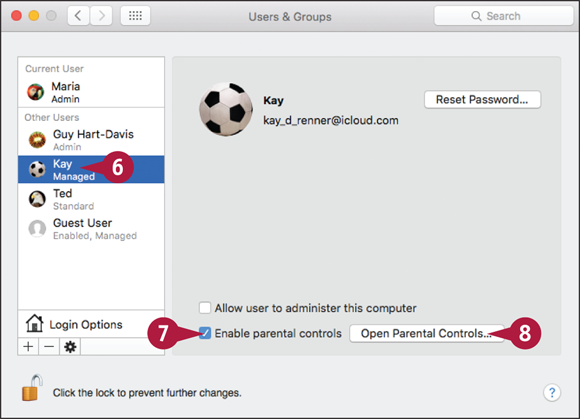
Turn On Parental Controls for an Account
OS X’s parental controls enable you, as an administrator, to limit the actions that a particular user can take on the MacBook. For example, you can prevent a user from running certain apps, allow her to chat only with specific people, or prevent her from using the MacBook at night.
You can apply parental controls to any standard account. You can then choose the specific settings the account needs. Later, you can review logs of the actions the user has taken.
Turn On Parental Controls for an Account
Press + click System Preferences () on the Dock.
Note: Alternatively, you can click Apple (), click System Preferences to open the System Preferences window, and then click Users & Groups () to display the Users & Groups pane.
The contextual menu opens.
Click Users & Groups.
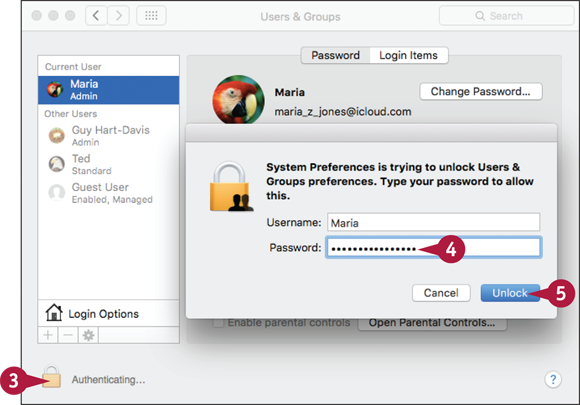
The System Preferences app opens the Users & Groups pane at the front.
Click the lock icon ().
System Preferences displays a dialog asking you to type your password.
Note: If you are using a standard account or managed account, the dialog prompts you to provide administrator credentials.
Type your password or an administrator’s credentials.
Click Unlock.
System Preferences unlocks the preferences ( changes to ).
Click the account to which you want to apply parental controls.
The settings for the account appear.
Click Enable parental controls ( changes to ).
Note: When you click the Enable Parental Controls check box, the user type under the username in the list of users changes from Standard to Managed.
Click Open Parental Controls.
The Parental Controls pane opens.
You can now choose parental control settings, as explained in the next five sections.
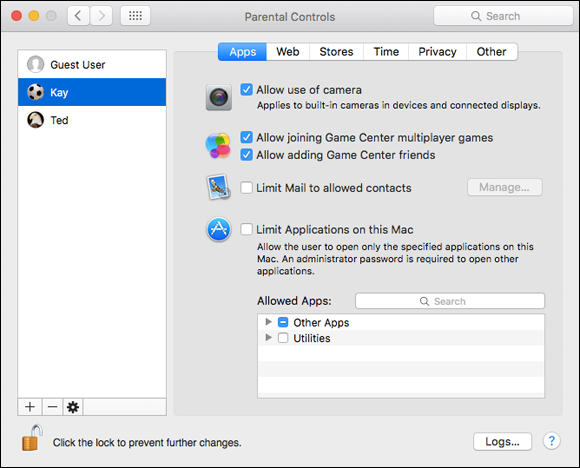
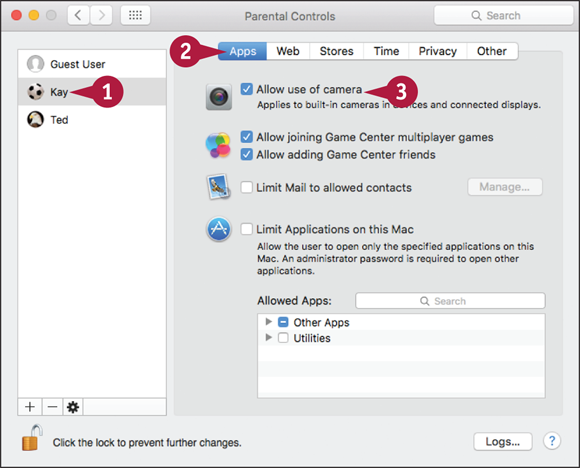
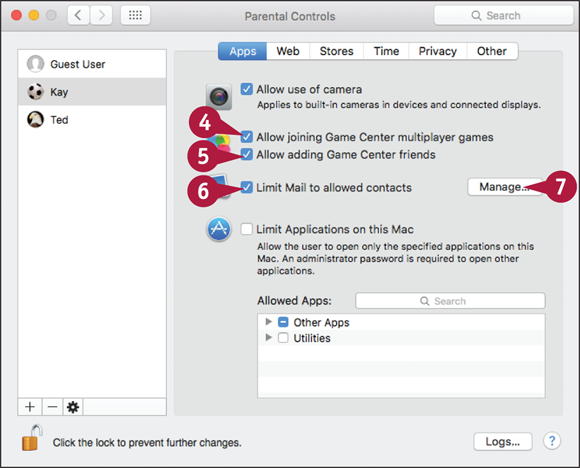
Control What Apps a User Can Run
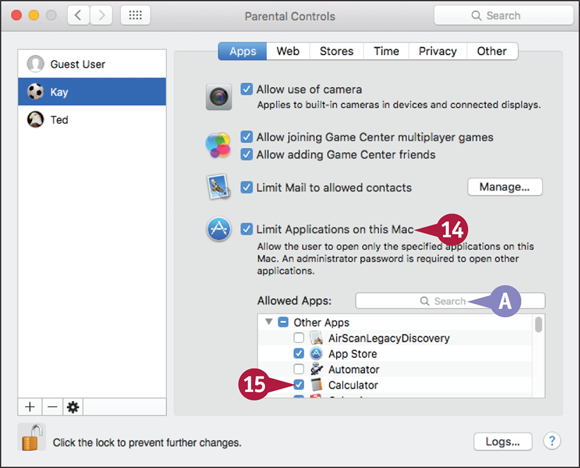
OS X’s parental controls enable an administrator to limit the apps a managed user can run. For example, you can control which apps are available to a user. If you do not allow the user to play certain games, you can make those games unavailable. You can also disallow use of the MacBook’s camera.
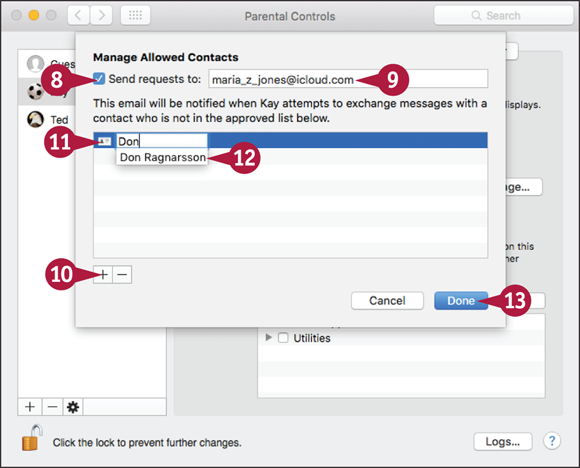
You can limit a user’s contacts for e-mail using the Mail app. In Game Center, you can control whether the user can join multiplayer games and add friends.
Limit Website Access for a User
OS X’s parental controls enable an administrator to limit the websites a managed user can access. You can either set Safari to limit access to adult websites or allow a user access to only the websites on an approved list. This limiting of access works only for Safari, not for any other browsers, so you should use the Apps parental controls to make Safari the only web browser the user can run. You should also prevent the user from installing apps.
Limit Website Access for a User
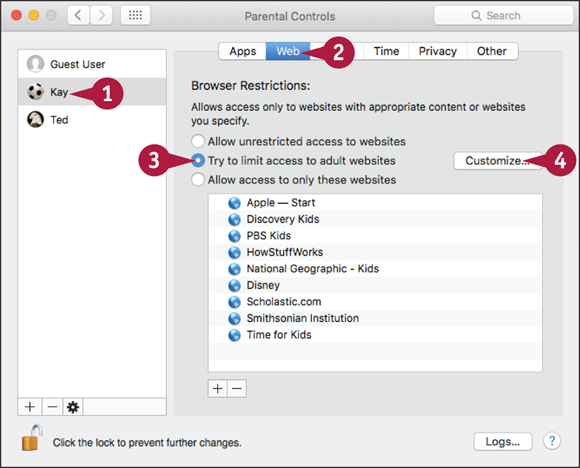
Display the Web Pane and Specify Allowed and Blocked Sites
In the Parental Controls preferences pane in System Preferences, click the user account for which you want to limit website access.
Click Web.
The Web pane appears.
In the Browser Restrictions area, click Try to limit access to adult websites ( changes to ) if you need to prevent the user from accessing adult websites.
Click Customize.
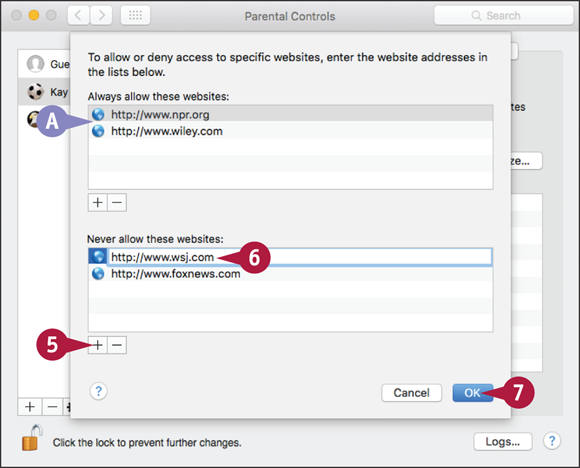
The Customize dialog opens.
Click Add ().
A new entry appears in the Never Allow These Websites box.
Type or paste the web address to disallow and press  .
.
You can also add permitted addresses to the Always Allow These Websites field.
When you finish adding addresses, click OK.
The Customize dialog closes.
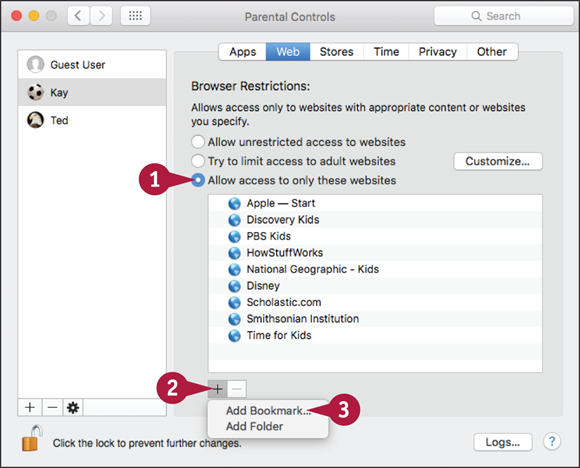
Allow Access to Only Specific Websites
To allow only certain websites, click Allow access to only these websites ( changes to ).
To add a site, click Add ().
The Add pop-up menu opens.
Click Add Bookmark.
Note: You can click Add Folder on the Add pop-up menu to create a folder. You can then drag permitted websites into the folder to organize them.

A dialog opens for adding a website.
In the Website Title box, type a descriptive name for the website.
In the Address box, type or paste the website address.
Click OK.
The website you added appears in the list.
To remove a site, click it and then click Remove ( ).
).
Note: When you permit a user to visit only certain websites, those sites appear on the Bookmarks bar in Safari.
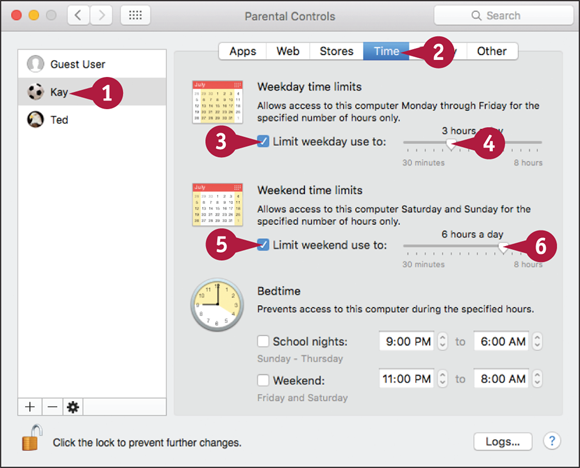
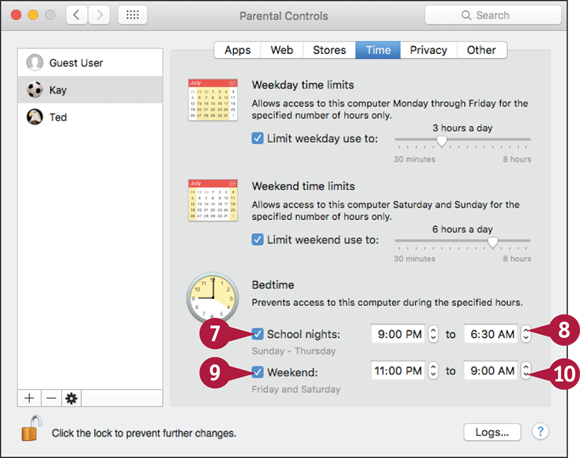
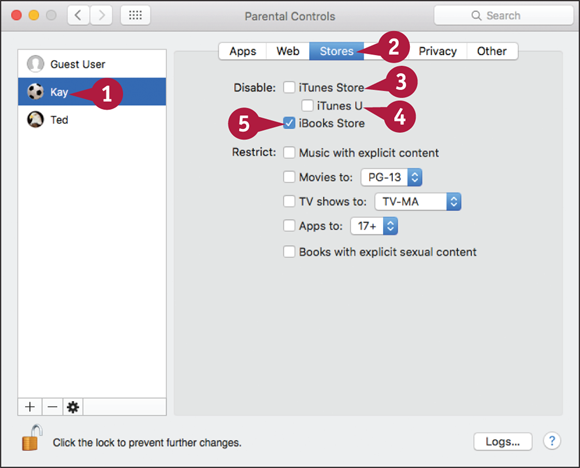
Set Store Restrictions and Time Limits
OS X’s parental controls enable an administrator to disable a managed user’s access to the iTunes Store and the iBooks Store. As an administrator, you can also restrict explicit music and books, and you can set ratings limits for movies, TV shows, and apps.
You can also set time limits for a managed user’s access to the MacBook. You can set the permitted number of hours for weekdays, set permitted hours for weekends, and specify “bedtime” hours for school nights and for weekend nights.
Set Store Restrictions and Time Limits for a User
Choose Privacy Restrictions for a User
OS X’s parental controls enable you, as an administrator, to choose settings to protect a managed user’s privacy. You can choose which apps can request access to potentially sensitive information, such as the MacBook’s location, and files, such as contacts and photos. You can also control which services the user and his apps can change and which they cannot change.
Choose Privacy Restrictions for a User
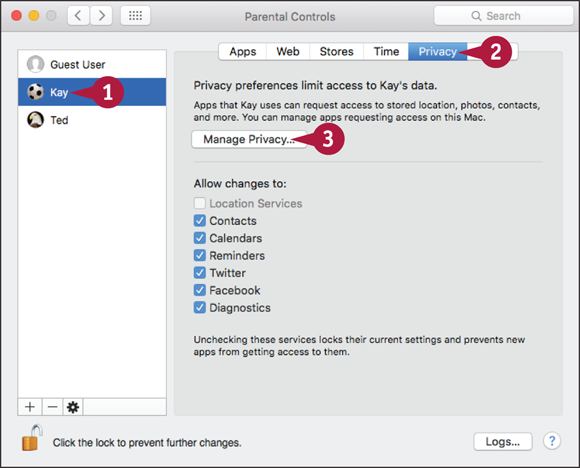
In the Parental Controls preferences pane in System Preferences, click the user account for which you want to choose privacy settings.
Click Privacy.
The Privacy pane appears.
Click Manage Privacy.
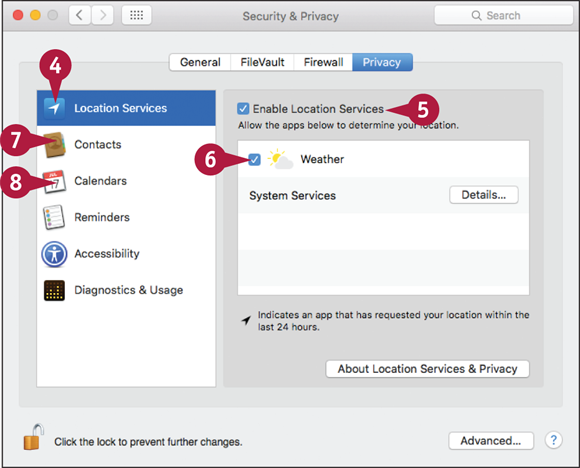
The Privacy pane in Security & Privacy preferences appears.
Click Location Services.
The Location Services preferences appear.
Click Enable Location Services to enable () or disable () the feature.
If you enable Location Services, click each app in the list to enable () or disable () its use of Location Services.
Click Contacts and choose which apps can access contacts.
Click Calendars and choose which apps can access calendars.

Click Reminders and choose which apps can access reminders.
Click Accessibility and choose which apps can control your MacBook.
Click Diagnostics & Usage.
Click Send diagnostic & usage data to Apple to enable () or disable () sharing diagnostic and usage data.
Click Share crash data with app developers to enable () or disable () sharing apps’ crash data with their developers.
 Click Back (
 ).
).
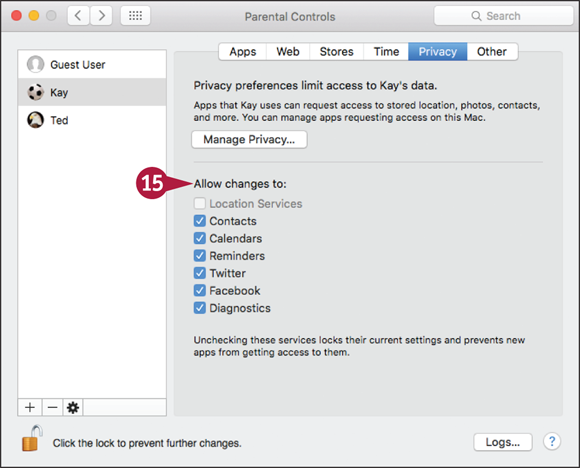
The Privacy pane in Parental Controls preferences appears again.
 In the Allow Changes To list, click to clear the check box () for each app or service that you want to prevent the user from changing.
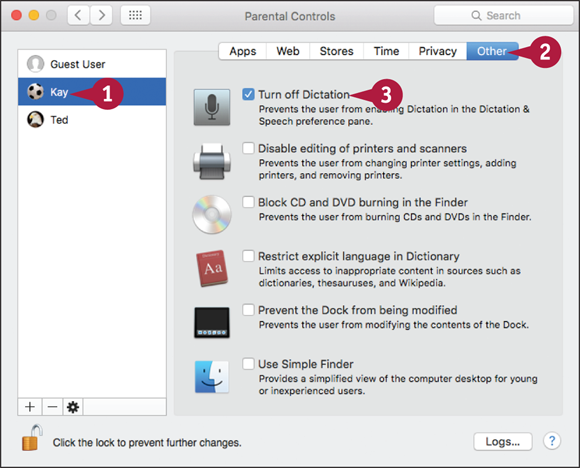
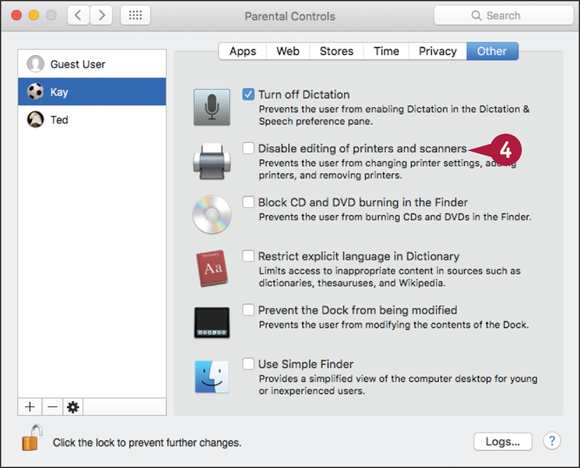
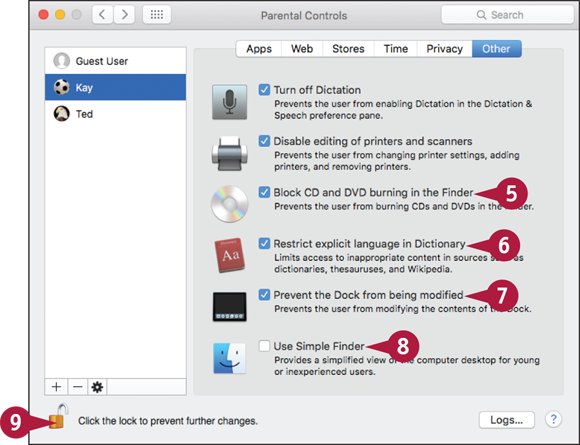
Apply Other Restrictions to a User
The Other pane in Parental Control preferences enables an administrator to apply six other types of restrictions.
First, you can disable the Dictation feature. Second, you can prevent the user from changing printer and scanner settings. Third, you can prevent the user from burning CDs and DVDs with the Finder. Fourth, you can hide explicit language in the Dictionary app. Fifth, you can prevent the user from modifying the Dock. Sixth, you can turn on Simple Finder for any user who finds the OS X interface too complex.
Review a User’s Actions
After you, as an administrator, enable parental controls for a managed user, OS X logs the actions the user takes with the controlled apps and features. You can review the logs of a user’s actions to see what the user has done and what he has tried to do. Using this information, you can decide whether to tighten or loosen the parental controls. You can review the parental control logs either from your MacBook or from another Mac.
Review a User’s Actions
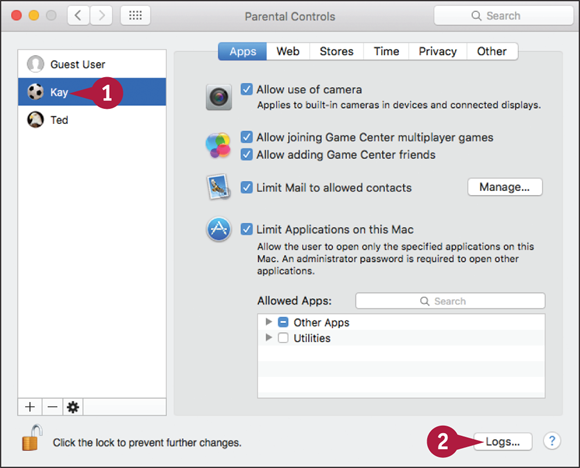
In the Parental Controls preferences pane in System Preferences, click the user account for which you want to review actions.
Click Logs.
The Logs dialog opens.
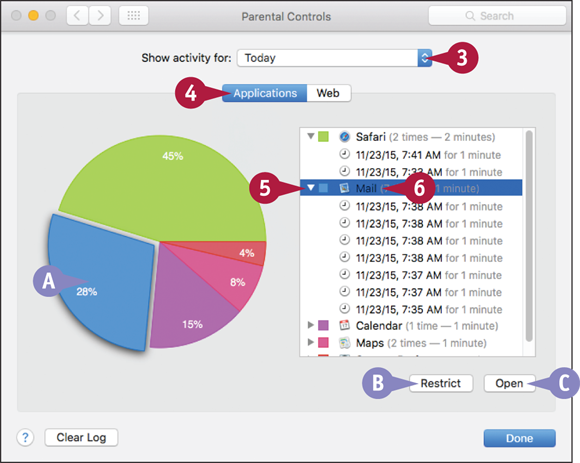
Click Show activity for () and then click the length of time you want to review, such as Today or One Week.
Click the button for the log you want to review. For example, click Applications.
The Applications log appears.
Click Expand ( ) to expand a collapsed category, or click Collapse (
 ) to collapse an expanded category.
Click an app.
The app’s section in the pie chart moves outward.
You can click Restrict to restrict use of the app.
You can click Open to open the app — for example, to see what it does.
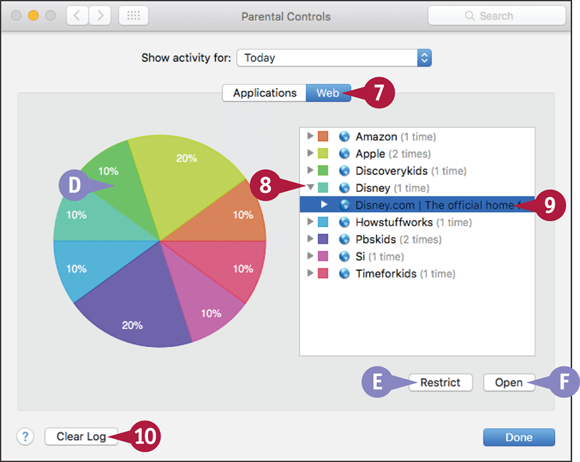
Click the button for another log. For example, click Web.
The Web log appears.
The pie chart shows colored slices representing the websites.
Click Expand () to expand a collapsed category, or click Collapse () to collapse an expanded category.
Click a website.
 You can click Restrict to block the website.
 You can click Open to open the website in Safari.
When you finish reviewing a log, click Clear Log.
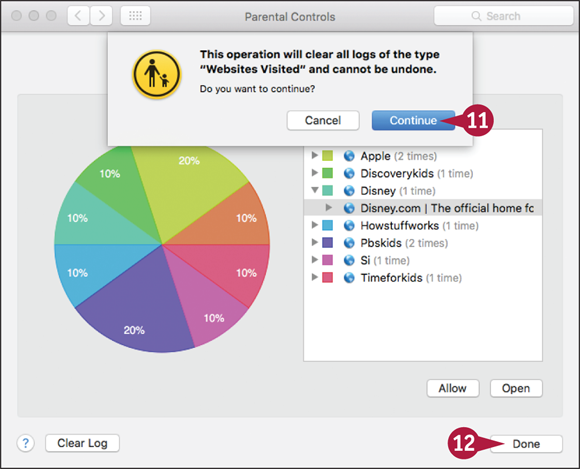
A dialog opens to confirm you want to clear the log.
Click Continue.
System Preferences clears the log.
When you finish reviewing all the logs, click Done.
The Logs dialog closes.
 ) and start typing an app’s name to locate the app quickly.