CHAPTER 12
Networking and Protecting Your MacBook
Transfer Files Using AirDrop
OS X’s AirDrop feature enables you to transfer files easily via wireless between your MacBook and nearby Macs or iOS devices via drag and drop. Activating AirDrop in a Finder window shows you available Macs and iOS devices, and you can drag a file to the Mac or iOS device to which you want to send it. Similarly, nearby Macs and iOS devices can send files to your MacBook via AirDrop, and you can decide whether to accept or reject each file.
Transfer Files Using AirDrop

Send a File via AirDrop
 Click Finder (
 ) on the Dock.
A Finder window opens.
Note: If AirDrop does not appear in the sidebar, click Go on the menu bar and then click AirDrop. If AirDrop does not appear on the Go menu either, your Mac is not compatible with AirDrop.
 Click AirDrop (
 ).
).
The AirDrop screen appears.
 Click Allow me to be discovered by.

The pop-up menu opens.
 Click No One, Contacts Only, or Everyone to specify which people’s Macs and iOS devices can see your MacBook via AirDrop.
 Press
Press  +
+  .
.

A second Finder window opens.
 Arrange the Finder windows so you can see both.
 Click and drag the file to the icon for the Mac or iOS device you want to send it to.
The Mac or iOS device prompts the user to accept the file.
If the user accepts the file, the Finder sends the file to the recipient.
Note: If the Mac or iOS device declines the file, the Finder displays a dialog telling you so.

Receive a File via AirDrop
When someone sends you a file via AirDrop, a dialog appears on-screen.
Click the appropriate button:
 Click Accept & Open to save the file and open it for viewing.
 Click Decline to decline the transfer.
 Click Accept to save the file so you can use it later.
If you accept the file, your MacBook receives the file.
If you click Accept & Open, your MacBook opens the file in the default application for that file type, if it has a default application. You can then work with the file.
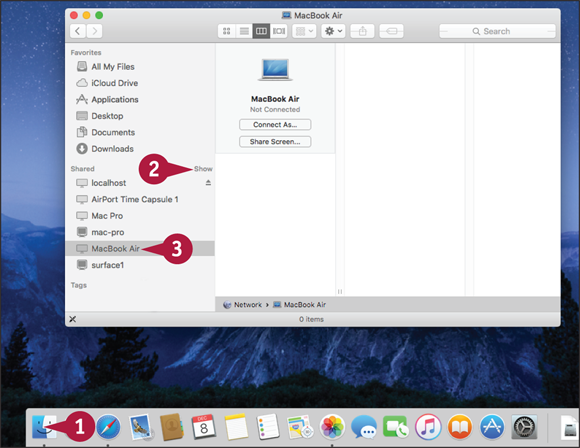
Connect to a Shared Folder
OS X enables each Mac to share folders with other computers on the same network. You can connect your MacBook to other Macs and work with the files in their shared folders.
The user who sets up the sharing can assign other users different levels of access to the folder. Depending on the permissions set for the folder, you may be able to view files in the folder but not alter them, or you may be able to create, change, and delete files in the folder.
Connect to a Shared Folder
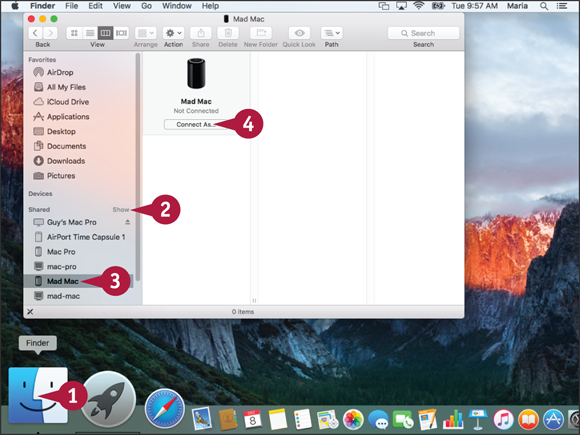
Click Finder () on the Dock.
A Finder window opens.
If the Shared category is collapsed, position the pointer over it, and then click Show to expand it.
Click the computer that is sharing the folder.
Click Connect As.
The Connect As dialog opens.
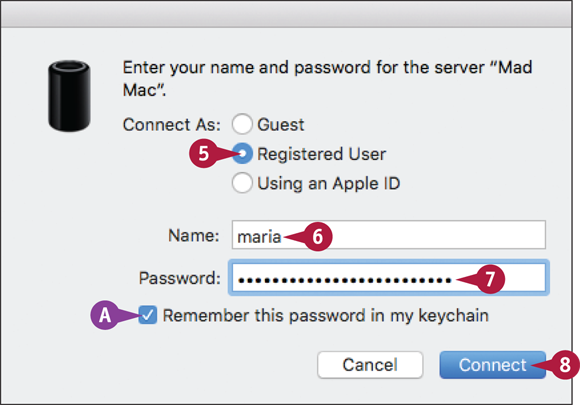
Click Registered User ( changes to
  ) if you have a user account on the Mac. Click Using an Apple ID ( changes to ) to log in via your Apple ID. Otherwise, click Guest ( changes to ) and go to step 8.
Type your username or Apple ID.
Type your password.
You can click Remember this password in my keychain ( changes to
  ) if you want to store your password for future use.
 Click Connect.
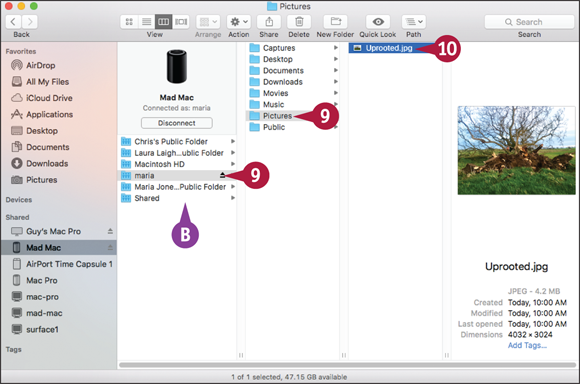
The Connect As dialog closes.
The shared folders appear.
Note: The shared folders you see are the folders you have permission to access. Other users may be able to access different folders.
 Click the folder whose contents you want to see.
 Work with files as usual. For example, open a file to work on it, or copy it to your MacBook.

 When you finish using the shared folder, click Eject (
 ) next to the computer’s name in the Shared list.
Your MacBook disconnects from the computer sharing the files.
You can also click Disconnect to disconnect from the sharing computer.
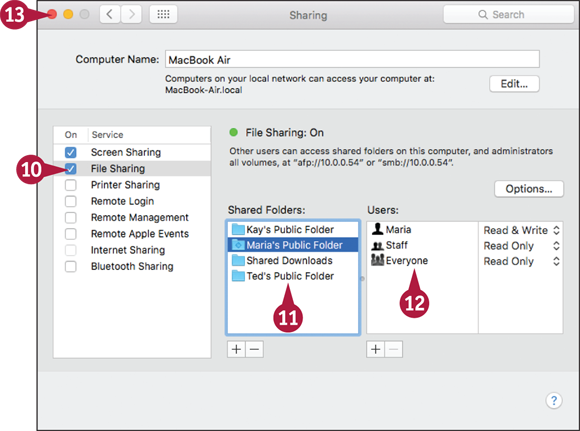
Share a Folder
OS X enables you to share folders on your MacBook with other users on the network. When you share a folder, you control what other users can access it. You can set different levels of permission for different users, such as allowing some users to change files while allowing other users to view files but not change them.
To share a folder, you configure the File Sharing service in Sharing preferences. System Preferences sets up sharing for Macs automatically. You can configure sharing for Windows users manually.
Share a Folder
Press  + click System Preferences (
 ) on the Dock.
The contextual menu opens.
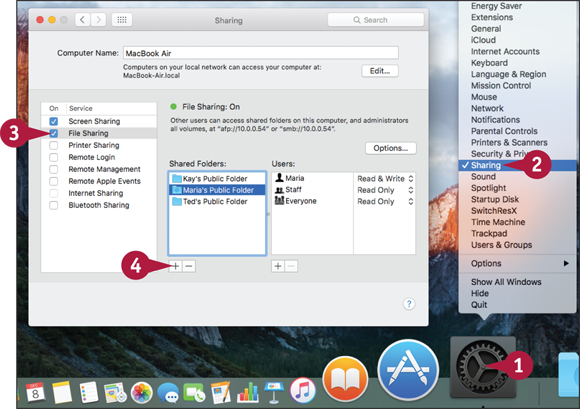
Click Sharing.
System Preferences opens and displays the Sharing pane.
Click File Sharing ( changes to ).
System Preferences turns on file sharing.
Click Add ( ) under the Shared Folders box.
A dialog for choosing a folder opens.
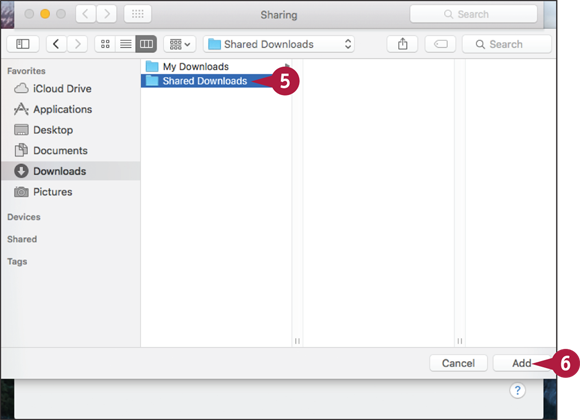
Click the folder you want to share.
Click Add.
Note: Each user account includes a Drop Box folder into which other people can place files and folders but whose contents only you can see. To access this folder, click Finder () on the Dock, click Go on the menu bar, and then click Home. Click or double-click Public, depending on the Finder view, and then click or double-click Drop Box.
The dialog closes, and the folder appears in the Shared Folders list.
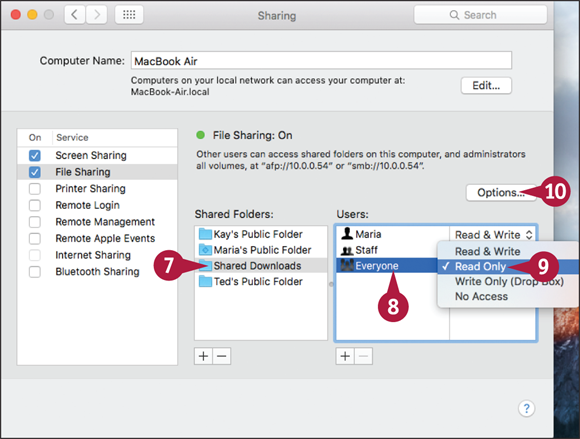
Click the folder.
Click Everyone.
Click Permissions ( ) and select the appropriate permission. See the tip for details.
If you need to configure sharing for Windows users, click Options. Otherwise, go to step 16.

The Options dialog opens.
Click Share files and folders using SMB ( changes to ).
 Click On for a user ( changes to ).
The Authenticate dialog opens.
 Type the user’s password.
 Click OK.
The Authenticate dialog closes.
 Click Done.
The Options dialog closes.
 Click Close (
 ).
).
System Preferences closes.
Connect to a Shared Printer
OS X enables you to connect to shared printers on the network and print documents to them. By sharing printers, you can not only enable each computer to print different types of documents as needed but also reduce the costs of printing.
To use a shared printer, you first set it up on your MacBook using Printers & Scanners preferences. After you set up the printer, you can access it from the Print dialog just like a printer connected directly to your MacBook.
Connect to a Shared Printer
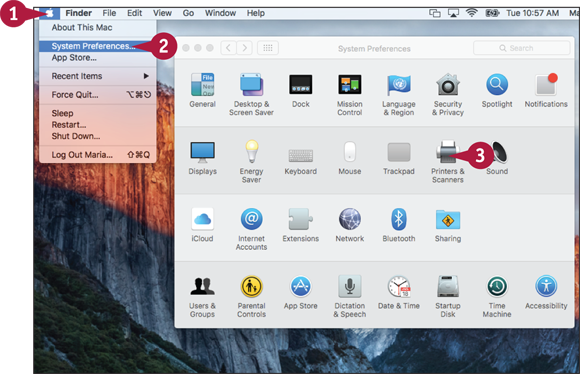
Click Apple ( ).
).
The Apple menu opens.
Click System Preferences.
The System Preferences window opens.
Click Printers & Scanners ( ).
).
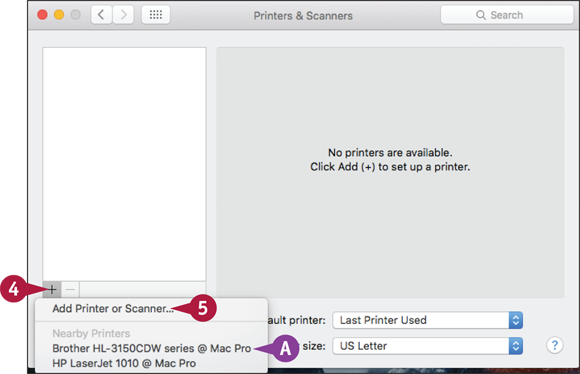
The Printers & Scanners pane appears.
Click Add ().
If the printer appears on the pop-up menu, you can click the printer and go to step 9.
Note: If no printer or scanner is available on the network, the pop-up menu does not appear. Instead, the Add dialog appears. Go to step 6.
Click Add Printer or Scanner.

The Add dialog opens.
Click Default ( ).
).
Click Windows ( ) to see printers shared by Windows PCs on the network.
The Default pane appears.
Click the printer.
You can change the name shown in the Name box.
 You can change the location shown in the Location box.
Click Add.
The Add dialog closes.

Note: If System Preferences prompts you to download and install software for the printer, click Download & Install.
The printer appears in the Printers & Scanners pane.
Click Default printer () and click the printer to use as the default. Your options are Last Printer Used or one of the printers you have added.
Click Default paper size () and click the default paper size, such as US Letter.
Click Close ().
System Preferences closes.
Share Your MacBook’s Printer
OS X’s Printer Sharing feature enables you to share a printer connected to your MacBook with other computers on your network. You can choose what users can print on the printer and block other users from accessing the printer.
To share the printer, you turn on the Printer Sharing feature in Sharing preferences, specify the printer, and set permissions for using it. Permitted users can access the printer from the Print dialog on their computers any time your MacBook is running.
Share Your MacBook’s Printer

Click System Preferences () on the Dock.
Note: If System Preferences () does not appear on the Dock, click Apple () to open the Apple menu and then click System Preferences.
The System Preferences window opens.
Click Sharing ( ).
).

The Sharing pane opens.
Click Printer Sharing ( changes to ).
OS X turns on Printer Sharing and displays the Printer Sharing preferences.
Click each printer you want to share ( changes to ).
OS X makes the printer available to everyone by default.
To control who can use the printer, click Add ().

A dialog for selecting users opens.
Click the user you want to add.
Note: To select multiple users, click the first, and then press + click each of the others.
Click Select.
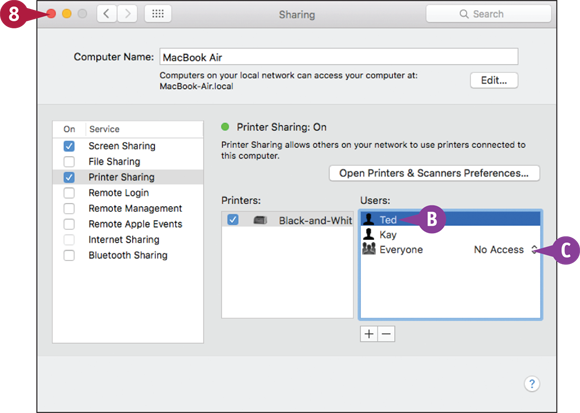
Each user appears in the Users list.
OS X automatically changes the Everyone item from Can Print to No Access.
Click Close ().
System Preferences closes.
Connect Remotely via Back to My Mac
OS X’s Back to My Mac feature enables you to connect one Mac remotely to another Mac across the Internet. You can use Back to My Mac either to use your MacBook to control another Mac remotely or to use another Mac to control your MacBook. Back to My Mac lets you view the remote Mac’s screen and control the Mac.
Back to My MacBook requires you to have set up iCloud on both the remote Mac and the Mac you use to connect.
Connect Remotely via Back to My Mac

Turn On Screen Sharing and File Sharing
Click Apple ().
The Apple menu opens.
Click System Preferences.
System Preferences opens.
Click iCloud ( ).
).

The iCloud pane opens.
Click Back to My Mac ( changes to ).
Click Details.
Note: The Details button does not appear if file sharing and screen sharing are already turned on. If you need to configure sharing, click Show All and then click Sharing to display the Sharing pane.
The Details dialog opens.
Click Open Sharing.

The Sharing pane opens.
Click Screen Sharing ( changes to ).
The Screen Sharing controls appear.
Click Only these users ( changes to ).
Verify that the list shows the users who will need to connect. You can click Add () to add a user or Remove ( ) to remove a user.
Click File Sharing ( changes to ).
The File Sharing controls appear.
Verify that the Shared Folders list shows the folders you want to share.
Verify that the Users list shows the users who will need to connect. You can click Add () to add a user or Remove () to remove a user.
Click Close ().
System Preferences closes.
After enabling Back to My Mac on both the remote Mac and the local Mac, you can use Back to My Mac to connect remotely across the Internet.
You use the Sharing section of a Finder window to establish the connection. The remote Mac’s desktop appears in a Screen Sharing window on the Mac you are using. You can control the remote Mac using the mouse and keyboard, enabling you to work much as if you were sitting at it, although screen updates appear more slowly.
Use Screen Sharing via Back to My Mac
Click Finder () on the Dock.
A Finder window opens.
If the Shared category is collapsed, position the pointer over it and click Show to expand it.
Click the Mac to which you want to connect.
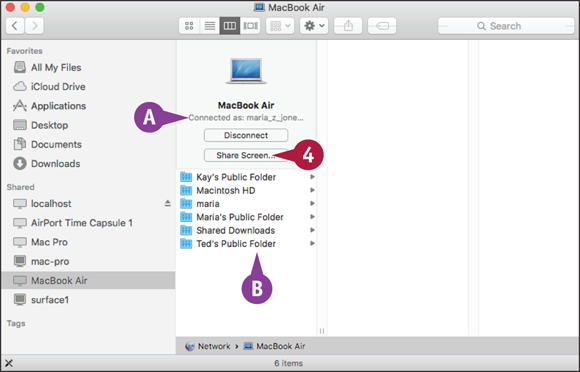
Finder establishes the connection.
The remote Mac’s shared folders appear.
Click Share Screen.
A Screen Sharing window opens, showing the remote Mac’s desktop.
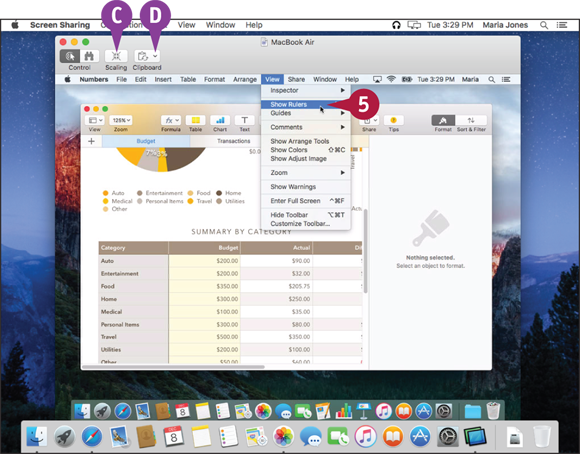
Work on the remote Mac using normal techniques.
Click Scaling ( changes to
  ) to scale the remote screen to the window.
To transfer data via the clipboard, click Clipboard ( ) and click Get Clipboard or Send Clipboard.
Note: Click View on the menu bar and then click Enter Full Screen to view the remote Mac full screen.

End Your Screen Sharing Session
Click Screen Sharing.
The Screen Sharing menu opens.
Click Quit Screen Sharing.
The Screen Sharing window closes.
Turn Off Automatic Login
OS X enables you to set your MacBook to log in one user account automatically, bypassing the login screen. Automatic login is convenient if you are the only person who can access your MacBook, but it is more secure to disable automatic login so each user must log in.
To enable or disable automatic login, you use the Login Options pane in Users & Groups preferences. You must have an administrator account or provide administrator credentials to change these options.
Turn Off Automatic Login
Press + click System Preferences () on the Dock.
The contextual menu opens.
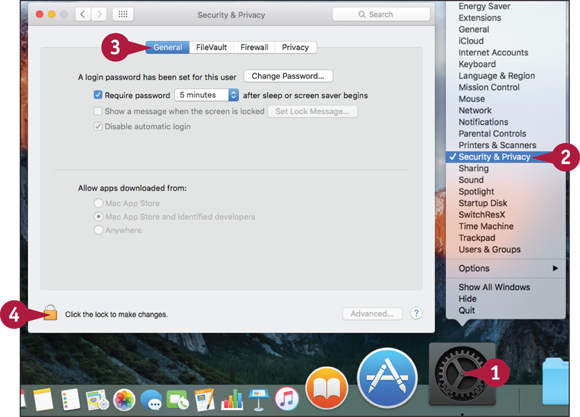
Click Security & Privacy.
System Preferences opens and displays the Security & Privacy pane.
Click General.
The General pane appears.
Click the lock icon ( ).
).
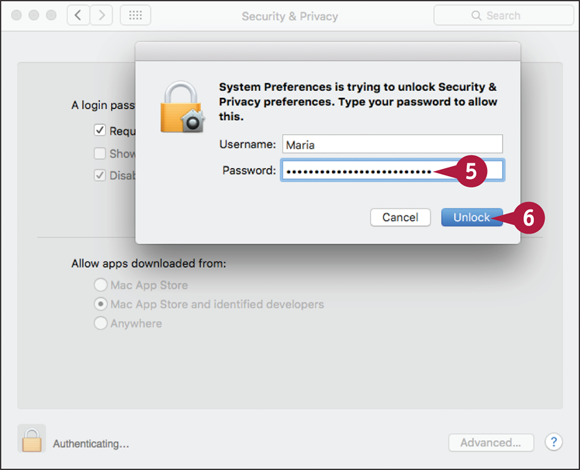
The authentication dialog opens.
Type your password.
Click Unlock.

System Preferences unlocks the preferences ( changes to  ).
).
Click Disable automatic login ( changes to ).
For greater security, click Require password N seconds after sleep or screen saver begins ( changes to ).
Click the pop-up menu () and click immediately or a short time: 5 seconds, 1 minute, or 5 minutes.
Click Advanced.
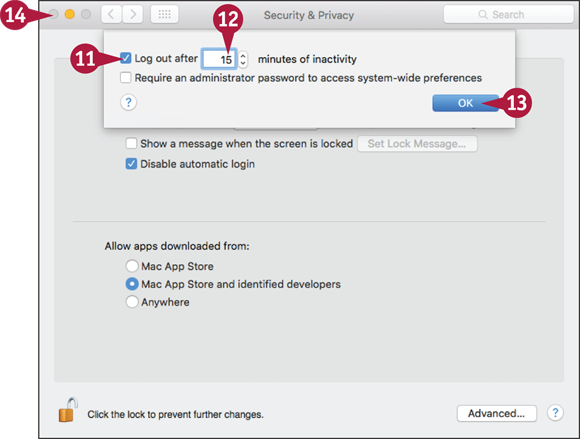
The Advanced dialog opens.
Click Log out after N minutes of inactivity ( changes to ).
Click the text box and enter the period of inactivity.
Click OK.
The Advanced dialog closes.
Click Close ().
System Preferences closes.
Enable and Configure the Firewall
OS X includes a firewall that protects your MacBook from unauthorized access by other computers on your network or on the Internet. OS X enables you to configure the firewall to suit your needs. To configure the firewall, you use the Firewall pane in Security & Privacy preferences.
Even if your Internet router includes a firewall configured to prevent Internet threats from reaching your network, you should use the OS X firewall to protect against threats from other computers on your network.
Enable and Configure the Firewall

Press + click System Preferences () on the Dock.
The contextual menu opens.
Click Security & Privacy.
System Preferences opens and displays the Security & Privacy pane.
Click Firewall.
The Firewall pane appears.
Click the lock icon ().
The authentication dialog opens.
Type your password.
Click Unlock.
System Preferences unlocks the preferences ( changes to ).
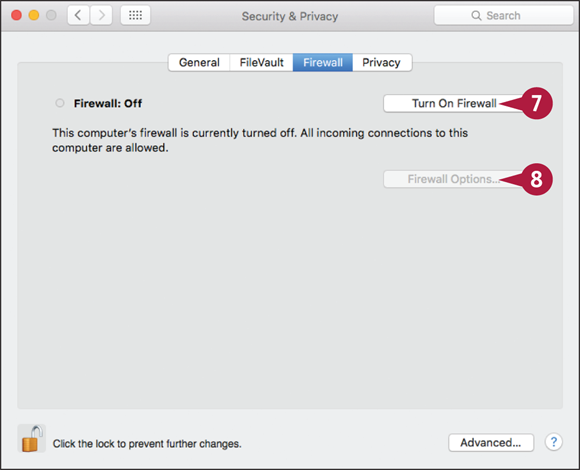
If “Firewall: Off” appears, click Turn On Firewall.
The firewall starts, and “Firewall: On” appears.
Click Firewall Options.
The Firewall Options dialog opens.
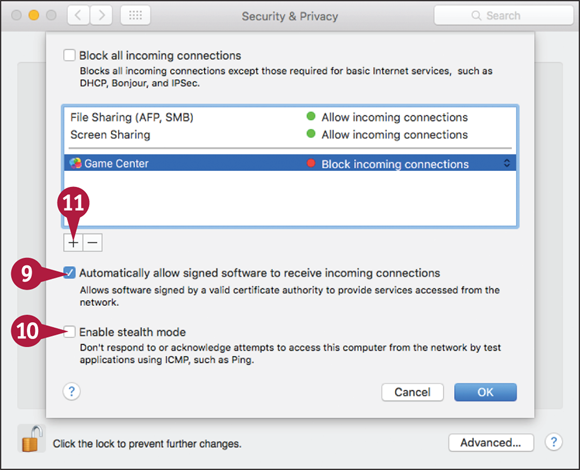
Click Automatically allow signed software to receive incoming connections ( changes to ) if you want to prevent your MacBook from accepting connections automatically across the network.
Click Enable stealth mode ( changes to ) if you want to prevent your MacBook from responding to network test applications.
To allow incoming connections to a particular application, click Add ().
The Add dialog opens.
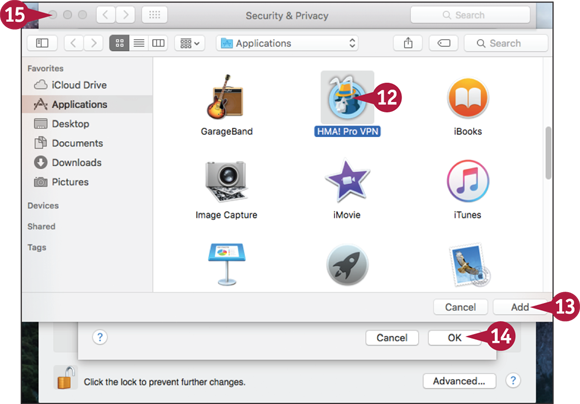
Click the app.
Click Add.
System Preferences adds the app to the list.
Click OK.
The Firewall Options dialog closes.
Click Close ().
System Preferences closes.
Choose Privacy Settings
The settings in the Privacy pane in Security & Privacy preferences enable you to control which apps can request access to potentially sensitive information, such as the MacBook’s location, and files, such as contacts and photos. You can also specify whether to send diagnostic data and usage data to Apple, to help it improve OS X and its apps, and whether to share app crash data with the developers of the apps in question.
Choose Privacy Settings

Press + click System Preferences () on the Dock.
The contextual menu opens.
Click Security & Privacy.
System Preferences opens and displays the Security & Privacy pane.
Click Privacy.
The Privacy pane appears.
Click the lock icon ().
The authentication dialog opens.
Type your password.
Click Unlock.

The controls in the Privacy pane become enabled.
Click Location Services.
The Location Services preferences appear.
Click Enable Location Services to enable () or disable () the feature.
If you enable Location Services, click each app in the list to enable () or disable () its use of Location Services.
Click Details.

The Allow System Services to Determine Your Location dialog opens.
Click Safari & Spotlight Suggestions to enable () or disable () Safari and Spotlight Suggestions determining your location.
Click Show location icon in menu bar when System Services request your location to enable () or disable () the icon appearing in the menu bar.
Click Done.
Click Contacts and choose which apps can access contacts.
Click Calendars and choose which apps can access calendars.
Click Reminders and choose which apps can access reminders.
 Click Accessibility and choose which apps can control your MacBook.
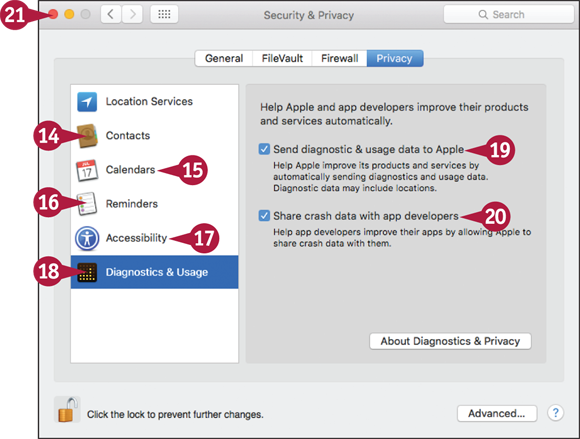
 Click Diagnostics & Usage.
 Click Send diagnostic & usage data to Apple to enable () or disable () sharing diagnostic and usage data.
 Click Share crash data with app developers to enable () or disable () sharing apps’ crash data with their developers.
 Click Close ().
System Preferences closes.
Install and Use Antivirus Software
OS X includes a built-in antimalware app called XProtect that helps protect your MacBook against malware — malevolent software — hidden in incoming files, such as files you download or that others send you. It is a good idea to augment this protection by installing and running antivirus software. You can buy and download antivirus software from the App Store, buy it on a disc from a physical store or by mail order, or download it from a website. Some antivirus apps are free; others are pay software.
You install the antivirus software in a similar way to other apps. However, after installing the antivirus software, you may need to restart your MacBook.
Choose Antivirus Software
You can choose from a wide range of antivirus apps to protect your MacBook. Some apps provide only features for scanning files for viruses, whereas other apps are complete security suites. You will likely want protection against malware, malevolent software, which includes viruses; Trojan-horse programs that hide harm in a program that seems helpful; and rootkits, which try to build secret entry points into your computer.
Protection against spyware programs, adware programs, and infected websites is useful, too. Features designed to detect phishing messages may also be helpful, but you may find that Mail’s Junk Mail feature and your own evaluation give you more consistent results.
When choosing an antivirus software package, assess your needs and decide whether you need a full-blown security app or simply an antivirus app. Bear in mind that the larger the antivirus or security app, the more likely it is to cause your MacBook to run more slowly, because most antivirus and security apps need to run all the time to keep your MacBook safe.
Download and Install an Antivirus App

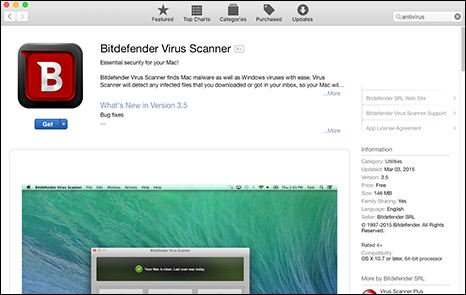
The App Store enables you to browse a wide range of antivirus apps. You can examine detailed descriptions of each app’s features, see user ratings, and read user reviews.
To download and install an antivirus app from the App Store, first click App Store ( ) on the Dock. If the App Store icon does not appear on the Dock, click Launchpad (
 ) on the Dock and then click App Store () on the Launchpad screen.
Click in the Search box in the upper-right corner of the screen, type antivirus, and press  . The App Store app displays a list of results. You can click a result to display the details screen for the app.
To buy an app, click Get for a free app or the price button for a pay app. For either type of item, click Install App. If the App Store app prompts you to sign in, type your password and click Sign In. The App Store app then downloads the app. When the download finishes, OS X installs the app automatically.
You can buy antivirus apps in stores or download them from the websites of antivirus companies. Before downloading any app from a website, verify that the app is genuine and that it gets good reviews — if not, it may be dangerous.
Run Your Antivirus App and Update It If Necessary
After installing your antivirus app, run it by clicking Launchpad () on the Dock and then clicking the app’s icon on the Launchpad screen.
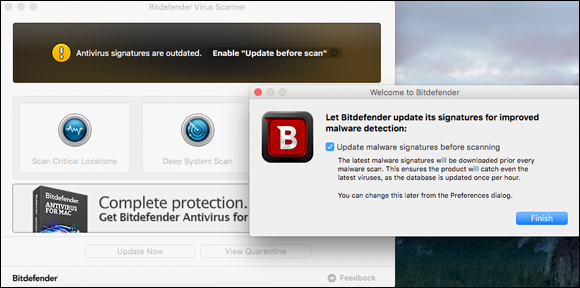
When you first run an antivirus app, it may prompt you to update its virus signatures or malware signatures. If this happens, give the command for proceeding with the update. For example, in Bitdefender Virus Scanner, select () the Let Bitdefender update its signatures for improved malware detection and then click Finish.
Scan Your MacBook with Your Antivirus App

Many antivirus apps run continuously in the background, automatically monitoring what happens on your MacBook. Other apps you run as needed; for example, if you suspect that your MacBook has contracted malware, you can run a scan to detect and remove it.
Most antivirus apps enable you to choose which areas of your MacBook to scan and how deeply to scan them. For example, in Bitdefender Virus Scanner, you can click Scan Critical Locations to scan important locations and folders such as the main Library folder and the main Applications folder; click Deep System Scan to scan your MacBook in depth; or click Scan a Custom Location to specify the location you want to scan.
What effect running a deep scan has on your MacBook’s performance depends on the antivirus app and on your MacBook’s configuration. But in general, it is best not to use your MacBook for intensive computing tasks while running a deep scan. Instead, set a deep scan running when you are planning to leave your MacBook for a while.
Recognize and Avoid Phishing Attacks
Phishing is an attack in which someone tries to make you provide valuable information such as bank account numbers, login names, passwords, or credit card numbers. After acquiring this information, the phisher either uses it directly — for example, withdrawing money from your bank account — or sells it to criminals.
Mail and Safari help protect you against phishing. Mail scans your incoming messages and marks any that may be phishing. Safari enables you to check a website’s digital certificate to make sure it is valid.
Recognize and Avoid Phishing Attacks
Recognize a Phishing E-Mail Message
In Mail, open the message.
Look for signs of phishing:
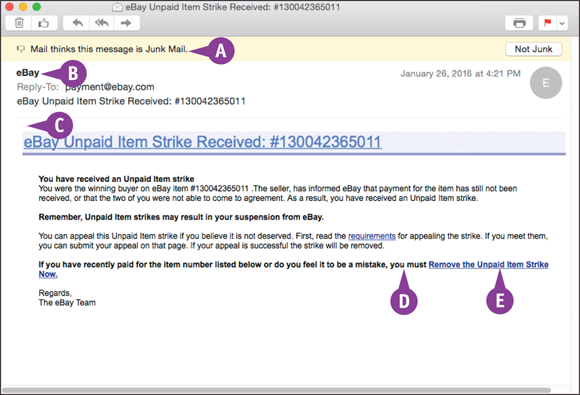
Mail has detected suspicious signs in the message.
The message does not show your name as the recipient.
The message has a generic greeting, such as Dear Customer, or no greeting at all.
The message claims you need to take action, such as clearing a security lockout or reenabling your account.
 The message contains links it encourages you to click.

Position the pointer over a link but do not click.
 A ScreenTip appears showing the address to which the link leads.

Connect Securely to a Website
Click Safari ( ) on the Dock.
Click the address box.
Type the address of the website and press .
Click the padlock icon ( ).
).
Note: Safari displays the padlock icon when you have connected securely to a website. The address of a secure connection starts with https:// instead of http://. You can view the full address by clicking the address box.
A dialog opens.
Click Show Certificate.
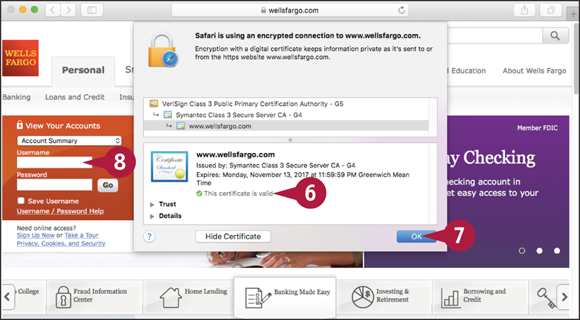
The dialog expands, showing the details of the digital certificate that identifies the website.
Verify that the certificate is valid.
Click OK.
The dialog closes.
If you are convinced that the website is genuine, log in to it.
