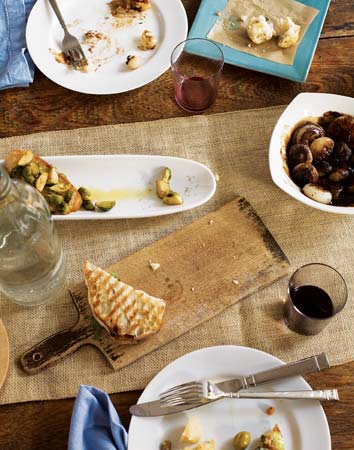
THE QUINTESSENTIAL ITALIAN SNACK FEST, ANTIPASTI CAN BE as simple as a few cheeses, some sliced meats, a handful of olives, and bread. The casual elegance of an antipasto selection should seem almost like an accident, as though it were the easiest thing in the world to set out an array of savory snacks for friends who just dropped in, or for family before the main meal begins. The more antipasto tables you prepare, the more practiced you will become. Your repertoire becomes established, and you become known for those rice balls or those fried olives. Serve a broad array or a few carefully curated items. Antipasti are personal and should always reflect the style of the host.
ORANGE-SCENTED OLIVES
SUPPLI
PANINI OF BUFFALO MOZZARELLA AND ALMOND-HERB PESTO
HARD-BOILED EGGS WITH ANCHOVY DRESSING
SALAD OF ENDIVE, CURRANTS, AND SABA
BALSAMIC-GLAZED CIPOLLINE
ROASTED BEET GREEN GRATIN
ROSEMARY PINE NUT SHORTBREADS
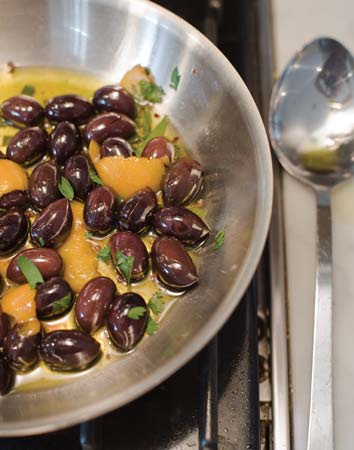
ORANGE-SCENTED OLIVES
Embellish olives just a little and they seem a world more special. Here they are warmed with the aromatic skins of oranges. The oil in the skin imbues the olives with a citrus scent, a hint of sweetness, and a splash of fabulous color.
2 oranges
1 cup olive oil
Pinch of red pepper flakes
1 quart assorted olives, mixed or your favorite type
1 tablespoon fresh oregano leaves
MAKES 1 QUART
- Use a sharp knife to peel the skin away from the oranges, from top to bottom, in wide swaths, leaving as much of the pith behind as possible. Snack on the oranges and put the strips of skin into a small saucepan. Combine the olive oil and the red pepper flakes. Pour into the saucepan and press the skins down to submerge.
- Heat the oil and the skins over a low flame until warm, about 3 minutes (test with your finger—the oil should be almost hot). Remove from the heat, cover the pot, and let the skins steep in the oil for 10 minutes.
- Add the olives and half the oregano leaves, stir gently, and replace the lid. Serve the olives that day, garnishing with the remaining oregano leaves, or store them, covered, in the refrigerator for up to 5 days. Bring to room temperature or warm gently over a low flame before serving.
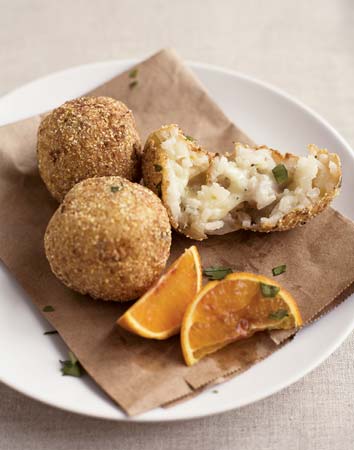
SUPPLI (RICE BALLS)
From the Italian snack hall of fame, rice balls are traditionally made with leftover risotto. I find that there’s never any leftover risotto, so I make a dedicated batch the day before. The risotto rests in the refrigerator overnight, making it easy to handle when forming the rice balls. Make sure your risotto is well seasoned with salt and pepper, as that will be the foundation of seasoning for the rice balls.
½ cup polenta or yellow cornmeal
1 cup all-purpose flour
2 eggs
3 cups Basic Risotto (recipe follows), chilled
½ cup finely chopped fresh parsley
4 ounces Italian fontina, cut into cubes
6 cups vegetable oil
Coarse sea salt
SERVES 4 TO 6
- Combine the polenta and the flour in a shallow bowl. Lightly beat the eggs in another shallow bowl. Set both bowls aside.
- Combine the chilled risotto and the parsley in a bowl, stirring them together with a fork. Using your hands, form the risotto mixture into golf-ball-size balls. Poke a hole into each rice ball and insert a cube of fontina into it, then close the rice around the cheese. As you form them, set the rice balls on a tray lined with parchment.
- Pour the oil into a Dutch oven (the oil should be about 3 inches deep), and heat it over a medium-high flame to 360°F.
- While the oil is heating, dip each rice ball first into the beaten egg, and then into the polenta mixture. Return them to the parchment-lined tray.
- When the oil has reached 375°F, use a slotted spoon to lower 3 or 4 rice balls into the pot. Cook, turning them occasionally, until they are golden brown on all sides, 4 minutes. Use the slotted spoon to transfer them to a clean paper-towel-lined tray to cool and drain. While they’re still hot, season the rice balls with crunchy sea salt. Repeat with the remaining rice balls, maintaining the oil temperature at 375°F.
ADD-INS Risotto is an opportunity to personalize your cooking—add what you love in complementary quantities and combinations. The easiest approach is to cook and season your additions separately, adding them to the rice at the end to heat them: shellfish, such as shrimp or lobster; vegetables, such as asparagus, wilted radicchio, or zucchini; or mushrooms of the season offer a variety of ways to present this well-loved dish. Make sure all of your add-ins are cut to approximately the same size, and go for a balance of flavors and textures.
BASIC RISOTTO
This recipe is a master plan—a blank slate of risotto. It will serve 2 after you hold 3 cups aside for the rice balls.
MAKES 6 CUPS
7 cups liquid (half water, half wine, or all chicken or vegetable stock)
¼ cup extra-virgin olive oil
2 cups diced onions
Salt
Pepper
¼ cup water
2 cups Arborio rice
2 tablespoons unsalted butter
1¼ cups grated Parmigiano-Reggiano
- In a medium saucepan, heat the liquid over a medium flame. Keep it warm but don’t allow it to simmer.
- In a large Dutch oven, heat the olive oil over a medium-high flame until it is hot but not smoking. Add the onions, salt, and pepper, and cook, stirring occasionally, until the onions are translucent, about 8 minutes. Add the water to the pot and continue cooking the onions until the pot is almost dry, about 4 minutes. Add the rice and stir to combine with the onions and to lightly toast the grains in the hot oil, about 2 minutes.
- Begin adding the hot liquid, 1 cup at a time, to the rice. Stir in each addition, allowing it to be nearly absorbed before adding the next cup. The heat under the risotto should be high enough to cause the stock to gently simmer. When all of the liquid has been added and absorbed, taste the rice. It should be creamy and tender. If it isn’t, add more liquid. This process may take as long as 45 minutes.
- Add the butter to the risotto and then gradually add the grated Parmigiano-Reggiano, stirring to incorporate it.
- If you plan to make rice balls, spread 3 cups of the risotto on a tray and allow it to cool to room temperature. Then refrigerate it overnight.
Vegetable oil is able to take the high heat of deep-frying without breaking down. “Greasy” food is the result of a low frying temperature. A crust should form around the rice balls to prevent the oil from permeating the rice. This happens at 360°F. Use a candy or deep-frying thermometer to maintain the correct temperature.
PANINI OF BUFFALO MOZZARELLA AND ALMOND-HERB PESTO
When you crave fresh flavors in the middle of winter, this usually does the trick. The Almond-Herb Pesto provides a bright accent of citrus against the silky buffalo mozzarella. This is a great plan-ahead sandwich: Make the pesto and the oven-roasted tomatoes the day before, and present fresh and magnificent sandwiches minutes after you hear the words “I’m hungry.”
FOR THE ALMOND-HERB PESTO
1 cup plus 3 tablespoons extra-virgin olive oil, plus more if needed
1 garlic clove
Zest of 3 large oranges (scant ½ cup), grated on a Microplane
2 tablespoons fresh orange juice
½ teaspoon salt
2 cups flat-leaf parsley leaves
2 tablespoons fresh thyme leaves
½ cup Parmigiano-Reggiano
1½ cups Marcona almonds, roughly chopped
3 tablespoons butter, softened
FOR THE OVEN-ROASTED TOMATOES
2 Roma tomatoes, thinly sliced
¼ teaspoon salt
¼ cup balsamic vinegar
TO MAKE THE PANINI
4 ciabatta rolls, domed tops sliced off, rolls sliced in half horizontally
8 ounces buffalo mozzarella
MAKES 6 PANINI
- Prepare the Almond-Herb Pesto: In a blender or a food processor, combine the olive oil, garlic, orange zest, orange juice, and salt. Pulse or blend until smooth. Add the parsley and thyme in small handfuls and pulse to combine. When all of the herbs have been incorporated, transfer the mixture to a bowl and add the Parmigiano-Reggiano, almonds, and softened butter, mixing well to combine. The olive oil should form a 1-inch layer above the pesto when it settles. If this is not the case, add more olive oil as necessary. Store, covered, in the refrigerator for up to 3 days. Bring to room temperature before using.
- Prepare the Oven-Roasted Tomatoes: Preheat the oven to 275°F.
- Spread the tomatoes on a parchment-lined baking sheet. Season them with the salt and then drizzle with 2 tablespoons of the balsamic vinegar. Bake for 20 minutes, then drizzle the remaining 2 tablespoons balsamic vinegar over the tomatoes and bake for 20 minutes more. The tomatoes should appear concentrated but still retain a shade of their fresh texture. The tomatoes can be covered and refrigerated for up to 3 days.
- When you are ready to make the panini, preheat a panini grill to high.
- Spread a thin layer of pesto on both the top and bottom halves of the rolls. Arrange the buffalo mozzarella in a thin but complete layer over the bottom halves. Top the mozzarella with 4 slices of oven-roasted tomatoes and then 2 tablespoons of the pesto. Cover with the top halves of the rolls.
- Grill the sandwiches until the bread is browned and the interior is warmed, 3 minutes.
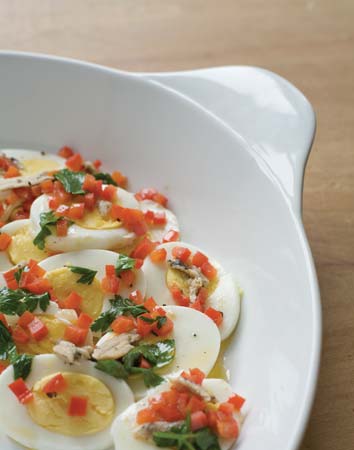
HARD-BOILED EGGS WITH ANCHOVY DRESSING
The world’s most perfect food, hard-boiled eggs are simplicity itself; everyone can cook them, they are almost always on hand, and they are utterly satisfying. Add to that a kicky anchovy dressing and a few slices of bread, and you’ve got a dish that is disarmingly basic yet sophisticated.
7 eggs
½ cup olive oil
½ red bell pepper, seeded and diced
½ yellow bell pepper, seeded and diced
2 garlic cloves, smashed
3 anchovies, packed in oil
2 tablespoons roughly chopped flat-leaf parsley leaves
Sea salt
Freshly ground black pepper
SERVES 6
- Cook the eggs (see Chapter 1 for an alternate method): Place the eggs in a large pot of water, set it over medium heat, and bring to a boil. When the water begins to boil, remove the pot from the heat and let the eggs sit, undisturbed, in the hot water for 8 minutes.
- Remove the eggs from the water, peel them, and slice them into rounds with an egg slicer or a sharp knife. Arrange the slices on a platter.
- Make the dressing: Heat the olive oil in a sauté pan until it is hot but not smoking. Add the diced peppers, garlic, and anchovies. Gently heat the oil, infusing it with the flavors, for 7 to 10 minutes. Remove the pan from the heat, discard the garlic cloves, and add the parsley leaves. Stir well.
- Pour the dressing over the egg slices. Finish with a generous sprinkling of sea salt and freshly ground black pepper.
SALAD OF ENDIVE, CURRANTS, AND SABA
Think of saba as a coulda-been balsamic vinegar. The must of the trebbiano grape (that’s the juice and the pulp but not the skins) is cooked down to a syrup. If this syrup was aged in the traditional way, it would become balsamic vinegar. As it is, saba is lighter and sweeter than balsamic. Just the thing with the pleasantly bitter bite of endive and the tang of goat cheese.
¾ cup pine nuts 3 heads Belgian endive, halved lengthwise and cut across into ½-inch-wide strips
2 cups lightly packed arugula
1 cup currants
½ cup extra-virgin olive oil
¼ cup saba
1 tablespoon club soda
Salt
Pepper
One 8-ounce log of fresh goat cheese, cut into 12 slices
SERVES 4
- Preheat the oven to 250°F. Spread the pine nuts on a baking sheet and toast them in the oven until they are lightly colored and fragrant, about 3 minutes (they can burn quickly; if they begin to blacken, discard and start again). Remove from the oven and let cool.
- Combine the pine nuts, endive, arugula, and currants in a mixing bowl.
- Whisk together the olive oil, saba, and club soda. Season with salt and pepper. Dress the salad and toss to lightly coat the ingredients. Divide among four shallow bowls.
- Top each salad with 3 slices of goat cheese and an additional dribble of saba before serving.
BALSAMIC-GLAZED CIPOLLINE
Serve these as part of an antipasto—they’re delicious with sliced meats or alongside a cool, crisp salad. For sit-down dinners, they’re excellent with roasted meats (particularly pork). They even make a regular appearance on my Thanksgiving table.
2½ pounds cipolline onions (or pearl onions)
2 tablespoons butter
2 tablespoons olive oil
1 cup balsamic vinegar
½ cup water
MAKES 4 CUPS
- Bring a large pot of water to a boil. Meanwhile, cut an “X” into the root end of each onion. Drop the onions into the boiling water and cook for 2 minutes, then transfer them to a colander.
- When the onions are cool enough to handle, peel them.
- In a large straight-sided sauté pan over a medium-high flame, heat the butter and the olive oil until hot. Add the onions and lightly brown them, about 10 minutes. Add the balsamic vinegar and the water, and cook, stirring occasionally, until the onions are tender, 15 to 20 minutes. Use a slotted spoon to transfer the onions to a bowl.
- Simmer the cooking liquid over a high flame until about ½ cup remains, about 15 minutes. Pour this over the onions.
- Serve warm or at room temperature.
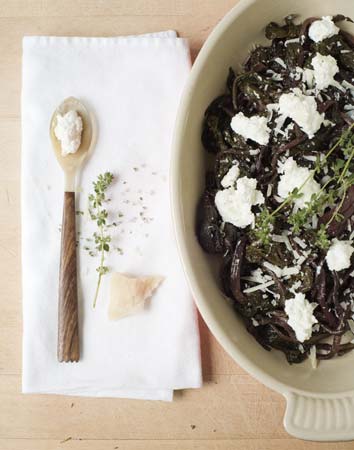
ROASTED BEET GREEN GRATIN
Ah, the praises of beet greens, carrot tops, and fennel fronds—sung by many who insist that all that greenery be kept, used, and even celebrated. Well, here’s one way to use the deeply flavorful and, yes, healthy leaves that are attached to your deeply flavorful and healthy beets. Use the vegetables for Red Beet Salad with Pistachios and then keep the greens in the crisper drawer to make this earthy gratin.
The greens get slow-roasted and then tossed with cheese to become a gratin. The slow-roasting takes two hours and can be done the day before.
2 bunches beet tops
¼ cup water, plus more if needed
¼ cup olive oil
1 tablespoon sea salt
Freshly ground black pepper
½ cup finely grated Parmigiano-Reggiano
½ cup fresh ricotta
SERVES 4 TO 6
- Preheat the oven to 200°F.
- Spread the beet greens on a rimmed baking sheet. Pour the water over them, and then the olive oil. Season the greens with the sea salt and 1 teaspoon freshly ground black pepper. Toss with your hands to moisten the leaves.
- Slow-roast the beet greens for 2 hours, tossing them with tongs every 30 minutes. If the pan gets dry, add a few tablespoons of water to keep it moist. The volume of the beet greens will decrease by more than half. They will be limp, dark, and moist when they’re done. (The greens can be roasted up to a day in advance and refrigerated until you’re ready to make the gratin.)
- Preheat the oven to 400°F. If you have a separate broiler, preheat it too.
- Place the roasted beet greens in a 12-inch oval gratin dish. Add the grated Parmigiano-Reggiano and season with 3 turns of a pepper mill. Toss to combine. Dot the top of the gratin with the ricotta. Bake for 10 minutes to thoroughly heat the ingredients.
- Finish the gratin under the broiler until it browns and bubbles, about 1 minute. Serve hot.
ROSEMARY PINE NUT SHORTBREADS
Shortbread can take on any number of personalities. This one, flavored with two of the big tastes of Tuscany, is comfortable with either tea or wine, and a few put out after a meal are always appreciated. The cookies can be baked, cut, and then frozen in plastic wrap for a few weeks. Otherwise, store the cookies in an airtight tin with a sprig or two of rosemary to make them even more aromatic. This recipe can be doubled and baked in two batches.
¼ cup pine nuts
8 tablespoons (1 stick) unsalted butter, cut into chunks
½ cup confectioners’ sugar
1 tablespoon chopped fresh rosemary leaves
¼ teaspoon sea salt
1 cup all-purpose flour
MAKES 16 COOKIES
- Preheat the oven to 350°F.
- Spread the pine nuts on a foil-lined cookie sheet and lightly toast them in the oven for 3 minutes. (Pine nuts burn easily. If they begin to brown, discard and start again.) Set the nuts aside to cool.
- Melt the butter in a medium saucepan over medium heat. Remove the pan from the heat and stir in the confectioners’ sugar, rosemary, pine nuts, and salt. Stir in the flour to form a dough.
- Use your fingers to spread the dough into an ungreased 8-inch square baking pan. Bake until lightly golden and firm, 20 minutes.
- Cool the pan on a baking rack for 2 minutes, and then use a sharp knife to cut into 16 squares. Let the cookies cool completely in the pan before removing them with a small offset spatula.