


Pathfinding is a skill that sets Scouts apart from almost everyone else. To be able to navigate yourself and your companions efficiently, confidently and accurately through all terrains in all weathers can literally be a lifesaving skill. And it’s not just a skill for the Arctic or the Amazon. When you’re living in the field, you are always susceptible to the elements, and being able to navigate effectively can mean the difference between the success of an expedition and its failure.
Anyone who is going out into the field should do what they can to hone their own pathfinding techniques rather than relying on the skills of others. The chances are that you’ll be going into unfamiliar terrain and when that happens, every person is a potential unit of one. Groups get separated, injuries occur. What if you’re the only person fit enough to go and find help? As a Scout it could be down to you, and you alone, to navigate everyone away from danger.
COMPASS AND MAP WORK
The compass is one of the oldest navigational tools known to man. People have been using them for hundreds of years – even before they even knew why they worked, realizing only that they did work.
How compasses work
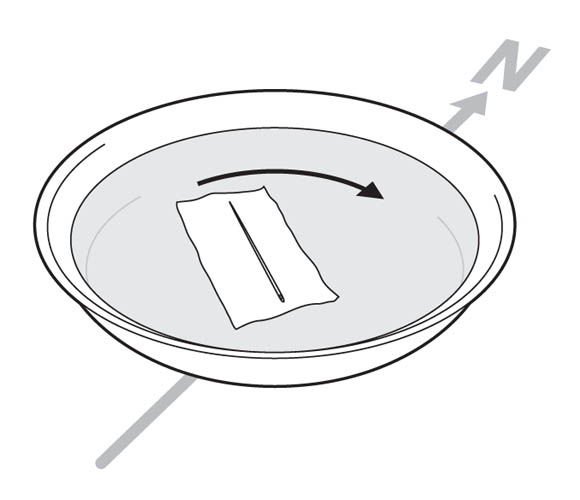
It’s very easy to make your own version of one of those early compasses, and it will teach you a lot. All you need are some needles, some wine-bottle corks, a bar magnet and a bowl of water. Using one end of the bar magnet, stroke a needle in the same direction several times. This will magnetize the needle. Stick the needle lengthways through the centre of a cork and then float the cork in the bowl of water. Do this with several needles and corks and you’ll find that they all point in the same direction: north to south.
Anyone who has played around with magnets knows that the opposite ends – or poles – attract, while the same polarities repel each other. The compass made from a needle in water is doing exactly the same thing. The earth has its own magnetic field. One end of the magnetized needle is being attracted towards one end of the Earth’s magnetic polarity – what we call magnetic north – while the other is being repelled.
Bearings
A bearing is the direction of a point in relation to north. If we used the points of a compass to describe where something is, we’d be rather limited – vaguely saying that something is to the north-east could actually mean that it’s anywhere between north and east. This is not very helpful. Instead, we divide the directions into 360 degrees, with north at 0 degrees, as shown.
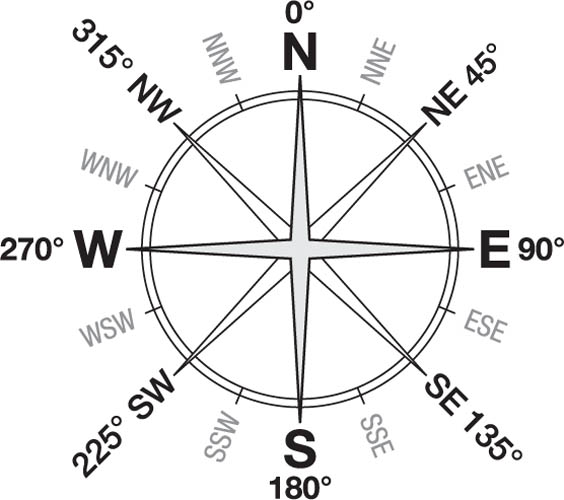
In this way, saying that our direction lies at, for example, 13° or 228° from our current position gives us a much more accurate way of describing which way we need to travel.
The two norths and magnetic variation
There is a problem with using magnetic north as a reference point for navigation: it changes. Drastically. Geologists have discovered that the Earth’s magnetic field has in fact reversed its polarity several times during the planet’s history and nobody really knows why. We also know that magnetic north drifts. It’s currently somewhere over northern Canada. It is important to remember therefore that magnetic north is not a precise position, but rather a general area where the lines of the earth’s magnetic force converge.
If our maps are going to be of any use whatsoever, they need to be drawn in relation to a fixed point, not a general area that moves anyway. The fixed point that cartographers use is the North Pole. In navigational terms, this is referred to as true north.
So here’s the problem: north on your map is not the same as north on your compass. To add to our difficulties, here’s a confusing scenario to consider. Imagine you’re standing with a compass in a field in England, facing true north. Your compass, pointing to magnetic north, will be going off at an angle. Now imagine that you’re standing between the North Pole and magnetic north, facing towards true north. Your compass will be pointing behind you, at a completely different angle to how it was in England. From this, we learn that the difference between magnetic north and true north changes according to where you are on the Earth’s surface.
This difference between true north and magnetic north is called magnetic variation and it changes with time. If you’re going to use a compass accurately, you need to know the magnetic variation of your position. A good map should tell you. As I write this, I’m looking at an Ordnance Survey map, which states, ‘Magnetic north is estimated at 3°35’ west of grid north for July 2006. Annual change is approximately 09’ east’. (Grid north is a third kind of north, but in the UK it is so close to true north that it makes little difference.) This tells me everything I need to know to use the map and compass together. If your map does not tell you the magnetic variation of your position you can look it up on the following website: www.ngdc.noaa.gov/geomagmodels/Declination.jsp
All you need now is the latitude and longitude of your position. It goes without saying that you should be doing these calculations before you set off on your trip.
In the pages that follow, you will need to adjust for magnetic variation. Sometimes this involves adding the magnetic variation; other times it involves subtracting it. You might want to remember this rhyme, which is taught to the armed forces so they can easily remember whether to add or subtract the magnetic variation:
Grid to mag[netic]: add | Mag[netic] to grid: get rid
This works when you have magnetic variation to the west. If the variation is to the east, the sums get reversed.
Types of compass
There are a number of different types of compass. For our purposes, the best is a Silva type.
This kind of compass has a needle set in liquid that stops it from flickering too much, a fixed baseplate and a dial with bearing degrees marked round it that can be rotated so that you can set a bearing and allow for magnetic variation.

How to use a map and compass together
There are six basic skills you need to master when learning to use a map and compass together. To start with, they may seem complicated, but with practice they’ll become second nature.
HIDDEN DANGERS
It’s very important that you learn to understand and use magnetic variation. It might sound small, but for every 3° of variation that you forget to add on, you’ll be 50 metres off course for each kilometre you travel. When you’re trying to get to shelter or safety, the consequences of this can be very severe indeed.
The needle of a compass will always point to the strongest magnetic source it can detect. Nine times out of ten this will be the Earth’s magnetic field but, sometimes, local magnetic sources can skew the reading. These magnetic sources can be man-made (watches, underground pipes and railway lines can all have magnetic fields); or they can be natural (some rocks, for example, can be magnetic if they contain metallic ores). Take readings regularly, and if you suspect that something is affecting your reading, move position slightly and take a new one.
IMPROVISING IN THE FIELD
You can make an improvised compass using a sewing needle. Magnetize the needle by rubbing it against your hair several times, making sure you rub it in the same direction each time. Lay the needle on a leaf or a piece of paper, and float it on a puddle or a bowl of water. It should align itself in a north-south direction. To tell which is north and which is south, observe the position of the sun: before midday it will be in the east; after midday it will be in the west. Remember that the magnetic charge of the needle will only last for a short time – you’ll need to recharge it by rubbing it on your hair again if you want to repeat the process.
TRAINING EXERCISES
It’s crucial that you know how to use your compass and map before setting out into the field. Stuck in the middle of nowhere with the mist coming down and rain forecast is not a good time to start learning. Put your hands on a Silva type compass and an Ordnance Survey map of where you live and start training. It doesn’t even matter if you live in the middle of a city: the principles are still the same, and learning how to navigate around fixed obstacles (like city centres!) is a very valuable exercise.
Following a bearing
This is an essential navigation technique. If you can see your destination, you can use your compass to work out which bearing it is on. Then, as you’re walking towards it, you can constantly check that you’re walking in the correct direction, even if you lose sight of your destination. When you’re out in the field, it’s surprising how often this happens: you might lose daylight, mist or rain could obscure your vision, or the lie of the land could change and obscure your view. To follow a bearing, follow these steps.

TRAINING EXERCISES
You can practise taking and following a bearing with a friend. Agree on a starting point, then one of you decide on a bearing, say 47°. Walk along that bearing for an agreed number of paces, then drop a coin on the floor. Tell your friend the bearing you followed and the number of paces you took, and see if they can locate the hidden treasure. If they manage it, the coin is theirs!
Setting a map
If you’re using a map in unfamiliar territory, you need to ensure that your map is ‘set’ – pointing in the right direction. To do this, you need to know the magnetic variation for the area. A good map should indicate this; if it doesn’t, make sure you know what it is before you set out.

HIDDEN DANGERS
When you know the bearing you need to follow, write it down. Tired feet and a weary brain aren’t conducive to good memory skills!
BEAR’S SECRET SCOUTING TIPS
When you’re following a bearing, check it regularly – it’s very easy to stray off course. Each time you check it, locate a landmark along that bearing, walk to the landmark then check the bearing again.
Setting a compass
If you have a map and can pinpoint where you are and where you want to go, this is how to set your compass so that it will keep pointing you in the correct direction.

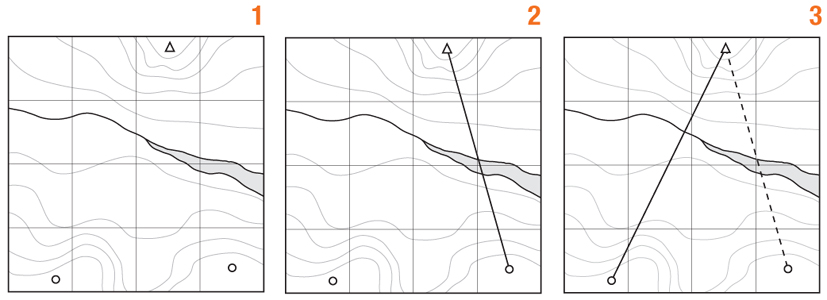
Plotting on a map the exact position of a landmark you can see
The technical name for this is intersection. It is a tried and tested army technique for locating enemy positions, targets and danger areas.
Back bearings
Getting to your destination is often only half the job. Sometimes you need to get back again. If you’ve been plotting your route by taking bearings, it’s useful to know that you can reverse the process by using back bearings. Having travelled 200 paces from A to B at a bearing of 60°, you can return from B to A by travelling 200 paces at a bearing of 240°.
To work out a back bearing, you need to perform the following calculation:
If your original bearing was less than 180°, add 180° to calculate the back bearing.
If your original bearing was more than 180°, subtract 180° to calculate the back bearing.
Don’t worry if you forget this formula. You’ll know if you’ve done it wrong because you’ll end up with a back bearing of less than 0° or more than 360°, which doesn’t make sense.
Plotting your exact position on a map
The technical name for this is resection. If you’re in the field with a map and compass and you know your general area but not your exact position, it’s possible to plot exactly where you are using back bearings.

Obstacles
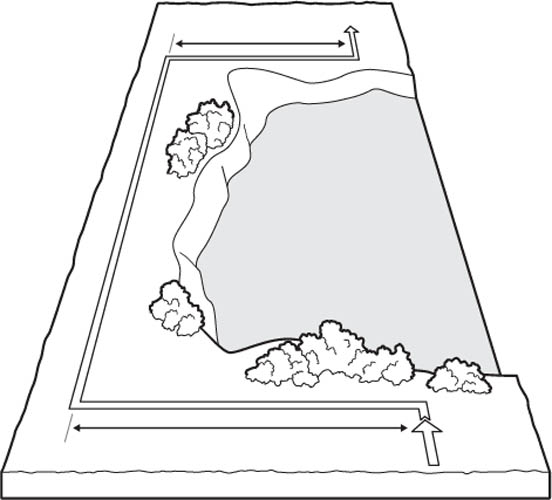
In theory, you should be able to navigate directly to your destination using a map and compass. In practice, unfamiliar terrain is less obliging than that. It’s more than likely that when you’re following a bearing, you’ll come across some obstacle – a ditch, perhaps, or a cliff face – that you have to navigate around. It may be that you can do this by sight; but often you can’t, so you need to learn this technique.
Face your bearing. Now turn 90° in whichever direction appears most convenient. Walk in that direction; counting the number of paces you take. Once the obstacle is passed, turn 90° so that you are parallel to your original bearing. Walk forwards and, when you can, perform another 90° turn so that you are walking back to the line of your original bearing. Count the original number of paces. Perform one more 90° turn and you should be back on course.
READING MAPS
In the UK, we are lucky to have a source of extremely high-quality maps made by the Ordnance Survey. Not all maps are this good, so you need to make sure you can get the most out of them. To do this, you need to follow a few simple guidelines.
Most maps will have a legend, or key. You should study it closely. A good map will contain a huge quantity of very detailed information, but if you don’t know what all the symbols mean you can never use them to their full advantage.
Once you have read and understood the legend, you need to check the age of the map so that you can work out the current magnetic variation.
Finally, you need to establish the scale of your map, and make clear in your head the meaning of all the contour lines.
Scale
Scale is a ratio of size. The larger the scale of your map, the more detailed it will be. The scale of the map you choose depends on what you’re using it for. For example, a detailed, large-scale map would be totally useless to a fighter pilot who would zoom across the area it shows in seconds. By the same token, a soldier on the ground would find a small-scale aeronautical map just as useless because it would not give the level of detail he needs.
All maps will clearly tell you what their scale is, and for pathfinding purposes a map scale of 1:50,000 is suitable; 1:25,000 is fantastic (the smaller the numbers in the ratio, the more detailed the map).
A scale of 1:50,000 means every one unit on the map is equivalent to 50,000 units in real life. Another way of thinking of it is 2cm to 1km – 2cm on the map is equivalent to 1km in real life. Or simpler still, 1 box is 1km (this also applies for 1:25,000 maps). Once you know the scale of your map, you can judge distances more easily.
Some compasses have scale rules along the side of the base plate, which convert distances from common scales into real-life distances. This saves you having to do the calculation for yourself.
Contour lines
Maps are flat. The surface of the earth isn’t. How, then, does a map describe altitude?
Contour lines are lines on a map that join areas of equivalent height. On a 1:50,000 map they are normally drawn at 10-metre intervals; on a 1:25,000 map they are normally drawn at 5-metre intervals. On a good map, some of the contour lines will give elevation figures (see example here).
You’ll soon get used to interpreting contour lines at a glance. The rule of thumb is that lots of them close together indicate a sharp incline; if they’re more spaced out, the incline is gentle; and if there are none, the terrain is flat. As you get more experienced with maps, you will start to recognize certain geographical features according to the shape of the contour lines.

ROUTE SELECTION
More often than not, you’ll have a specific route in mind with a fixed starting point and destination. If this is the case, it’s important that you study the map well before you leave. Even if you’re part of a group where the responsibility for navigating lies with somebody else, you should spend time with a map beforehand and understand the route that you’re going to take.
Embarking on a trek with no idea of the route you’re going to take is a bad idea. Preparation is key. When you’re planning a route, there are several things you should take into consideration.
Unless you’re setting out specifically to challenge yourself, you should always choose the route that offers the least resistance in terms of geography. Gentle slopes, established paths and natural waterways will all make your expedition potentially less perilous.
TIME AND DISTANCE
How far you’ve travelled, and how far you’ve yet to go, are important things to know. In these days of road signs and speedometers, they are also things we are used to knowing when we’re out in the car for the day. So surely it’s the same in the field, right?
Unfortunately not – measuring distance by foot on varied, undulating terrain is notoriously difficult. Maps will give you an idea of distance as the crow flies, but this will not take into account hills, valleys and other obstacles. An approximation is the best you’re likely to get. Having said that, there are situations when approximations of distance and time are not only useful, they’re essential.
I remember once on SAS selection searching out a small checkpoint tent on the top of a very exposed, boggy plateau during a windy, snowy winter’s night. I had been walking for 17 hours and I was cold, wet and hungry. It was the last checkpoint I needed to locate before heading off the mountains back to the trucks. Visibility was down to almost nothing as I huddled in a peat crater to study the map. My objective was only 250 metres away, but I knew that if I got it wrong I could be up there for hours, staggering around in vain in such low visibility. I took longer than usual to calculate an accurate bearing, along with magnetic variation and pacing. I counted the steps religiously and at the end of the pacing I slipped down a boggy bank and actually landed on top of the tent I had been aiming for. I thought, good job, Bear! The directing staff inside the tent, however, were less than impressed when a size-11 boot ripped through the flap!
There are various methods that we use to measure and approximate distance and time in the field.
Naismith’s Rule
Naismith’s Rule is a rule of thumb that will give you a rough idea of how long a route, or section of a route, is likely to take. It was worked out by William Naismith, a Scottish mountaineer, at the end of the nineteenth century and is still used today.
Naismith’s Rule states that you should allow one hour for every 5 kilometres going forward, and add an extra half an hour for every 300 metres of ascent. So, a hike of 15 kilometres with an ascent of 500 metres should take about 4 hours.
There are, of course, all sorts of variables that will affect this – your general fitness levels, the weight of your pack, the ruggedness of the terrain and weather conditions are always big factors. Lots of people have tried to make Naismith’s Rule more accurate with all sorts of complicated charts and tables, but the truth is that everyone’s a bit different. The more you hike, the better you will become at judging how long it will take you to cross different types of terrain: Naismith’s Rule can serve as a starting point for your own personal formula, so test it and adjust it to fit your stride and level of fitness. You should also remember that groups tend to travel less quickly than individuals because they can only go as fast as their slowest member.
Using our eyes to judge distance
When we look at an object in the distance, the line of sight from each of our eyes converges.
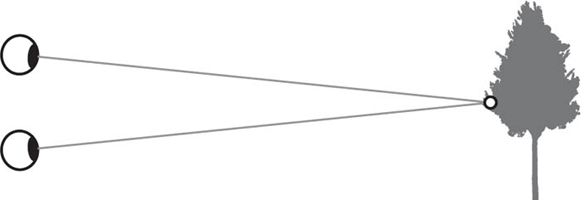
Our brains learn that when our eyes are converged at a particular angle, that angle is associated with a certain distance. (If you’ve ever watched a baby trying to grab a toy, you’ll see that at first they’ll be clumsy and unable to do it. That’s because his or her brain has not yet learned the distances associated with the convergence of their lines of sight.)
There are various environmental factors, however, that encourage our brains to play tricks on us. These can make distances appear closer or further away than they actually are. If you want to judge distances effectively in the field, you need to be aware of the following factors.
Things appear closer than they are when:
Things appear further away than they are when:
Bracketing
Bracketing is a military technique that is used to pinpoint distance. When artillery shells are fired at an enemy position, the distance between the artillery and the target is often unknown, or at least only known approximately. In instances such as this, the artillery will fire beyond the target, then short of the target. These two parameters will give them an idea of where they should finally aim.
The same technique can be used for non-military purposes. While it might not be possible to judge a distance precisely, it is often possible to estimate that the point you are aiming for is, for example, no less than 800 metres and no more than 1 kilometre away. Then, if you walk for more than about a kilometre without reaching your intended point, you know you’ve gone wrong.
Another bracketing technique is to use your ‘no less than’ and ‘no more than’ figures to estimate an actual distance. So, if something is no closer than 800 metres and no further than 1 kilometre, you can take the average of these two figures and say that your object is about 900 metres away.
Similarly, if you are plotting a course, it’s a great help if you can think of your path as travelling between landmarks, rather than insisting on strict point-to-point navigation. A path lined with prominent features is quicker and easier to follow than a pre-set straight line.
Bracketing is an incredibly useful technique because it takes away the need for precision, which is something you can rarely achieve in the field.
Units of measure
If you’re like most people, you probably find it difficult to estimate distances in terms of metres. Even if you do feel confident enough to describe a landmark as being, say, 200 metres away, there’s no guarantee that the person you’re describing that to will be able to judge exactly what it means. User measures are another military way of getting round this problem by describing distances in terms of common objects – football pitches or swimming pools, for example. For many people ‘two football pitches’ is a more meaningful approximation than ‘about 200 metres’.
Remember, when you’re approximating distances in the field, there’s no prize for mathematical accuracy. It’s far better to describe things in a way people can easily understand.
Appearance method
A third army technique for judging distance is the appearance method, where the amount of detail you can see on a person tells you roughly how far away from you that person is.
At 100m the person can be seen clearly
At 200m the colour of their skin is just identifiable, all other details clear
At 300m the body outline is clear, most other details are blurred
At 400m the body outline is clear, all other details blurred
At 500m the body appears tapered, the head is indistinct
At 600m the body is wedge-shaped, the head cannot be seen


These distances will, of course, change according to a person’s eyesight and how clear the view is.
Pacing techniques
If you know the average length of your pace, you can use it to approximate distances. To work out your pace, take 100 paces along a distance you know you can calibrate, like a sports track. Divide that distance by 100 to give you the average length of one pace. Do this several times and take the average of your results. You will then know roughly how far you walk with each step.
My preferred method is to walk, say, 100 metres and count the number of paces you take. Repeat this several times and take the average of the number of paces. You now know roughly how many paces you take to cover 100 metres.
Of course, there are plenty of problems with this technique. When you’re in the field, your pace length is determined by the territory: you’ll take smaller steps up a rocky slope than you will over a flat field. But it’s worth knowing your pace length. You never know when it will get you out of trouble.
BEAR’S SECRET SCOUTING TIPS
Keeping track of the number of paces you’ve taken can be a real problem, especially if you’re measuring reasonably long distances – the smallest distraction will make you forget your pace count. You can use a pedometer, a mechanical device that swings a pendulum every time you take a step, and then keeps count. However, these are very unreliable in the field. An army technique is to use a pacer – you’ve probably seen them being used when air stewards count the number of people on a plane. With every ten paces, you make one click on the pacer, which records the number of clicks you’ve made – ten clicks means 100 paces. Or you could fill one pocket with small stones. Each time you reach 100 paces, move one stone to your other pocket. That way you’ve got a fixed reminder of how far you’ve come. Alternatively, use a line of beads on a string like an abacus.
Bear Drinks Tea For Breakfast
My final tip when it comes to navigating using a map and compass is this: you need to rely on a combination of many different factors to give you accurate information. Don’t just rely on your bearing. The main factors you should rely upon are bearing, distance, time, features and backdrop. I have a mnemonic to remember this: Bear Drinks Tea For Breakfast.
Bearing – what bearing should I be following?
Distance – how far is my next destination?
Time – how long, using Naismith’s Rule, should I take to reach my next destination?
Features – what prominent features or landmarks should I see en route (such as a canal on my left or a wood on my right)?
Backdrop – what will I reach or see that will tell me I have overshot my destination? (For example, if I’m starting to go downhill, I must have come too far.)
These are the main principles that I use to navigate, and they have saved my skin many a time!
GLOBAL POSITIONING SYSTEMS (GPS)
GPS was initially developed for military purposes by the United States Department for Defense, and GPS products are an essential part of a Special Forces soldier’s kit. Nowadays, of course, they’re commonplace – people have them in their cars and even on their phones. These clever little machines use satellites circling the earth. The unit requires a clear ‘sight’ of at least three of these satellites in order to triangulate the user’s position. GPS is getting better on an almost daily basis. There are now even ‘deep probe’ GPS units, designed to work even through a thick canopy in the jungle – a potential lifesaver for troops on ops in such terrain.
GPS can be incredibly useful. If you have a GPS device, and it doesn’t take up too much room in your pack, by all means take it. However – and I can’t stress this enough – you should never rely on GPS to the detriment of your basic navigational skills. Too many things can go wrong with them: if your GPS device goes down and you don’t know how to navigate out of unfamiliar territory, you’re in trouble. This is a good example of technology being a great bonus, but a lousy replacement for well-honed fieldcraft skills.
NAVIGATING BY THE STARS
Navigating by the stars – astronavigation – is one of the oldest navigation methods known to man. It’s easy to see why. The stars were there before maps and compasses, and a long time before GPS! Astronavigation was traditionally used by sailors who, in the absence of fixed markers in the middle of the ocean from which to take bearings, would use the moon and a total of 57 navigational stars to find their way.
If you look up into the sky on a clear night in the countryside where there is no ambient light to spoil your view, the number and clarity of the stars can be breathtaking – in my opinion it’s one of the highlights of being in the wilderness. It can also be a bit daunting: with so many stars up there, how will you ever learn which ones will lead you in the right direction? And don’t they move anyway?
Astronavigation can certainly be a very in-depth study. But a small amount of knowledge can be a big help if you’re navigating at night because you can use the stars to determine direction. Which stars you use depends on which hemisphere you’re in.
The northern hemisphere
In the northern hemisphere, the most useful star is the North Star (Polaris). If you walk towards this star, you will always be heading north; and from that you can work out the other directions.
Contrary to popular myth, the North Star isn’t the brightest star in the sky. It is, however, easy to locate if you learn to recognize three constellations: Ursa Minor (the Little Dipper), Ursa Major (the Big Dipper or the Plough) and Cassiopeia.
The North Star is the final star in the handle of the saucepan shape of Ursa Minor.

However, it is not always possible to see Ursa Minor. If this is the case, you need to look for Ursa Major and Cassiopeia.
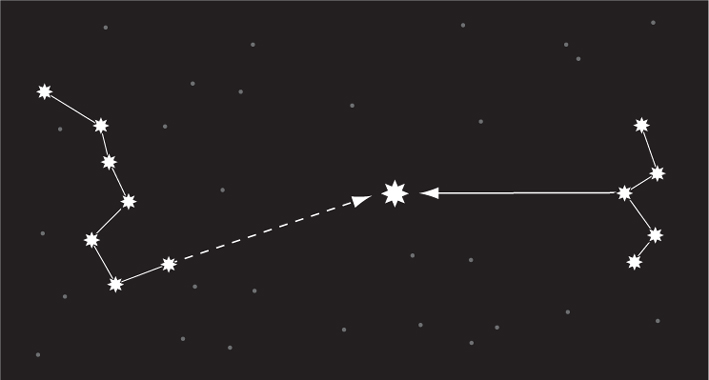
If you draw a straight line from the two stars at the end of Ursa Major’s ‘bowl’, you will come to Polaris. It is about four times the length between the last two stars of Ursa Major along the same line of direction. Cassiopeia looks like a wonky W or M on its side. If you follow a line straight out from the centre star of Cassiopeia, you’ll reach Polaris. It’s about halfway between the two constellations.
BEAR’S SECRET SCOUTING TIPS
If you’re at the North Pole, Polaris will be directly above you. And because the earth’s axis is constantly changing, so the star directly above the North Pole changes. This means that Polaris has not always been the North Star, nor will it always be. In time, the star Gamma Cephei will become closer to the pole than Polaris and so will become the North Star. You don’t need to worry about that too much, however – it won’t happen for another thousand years!
The southern hemisphere
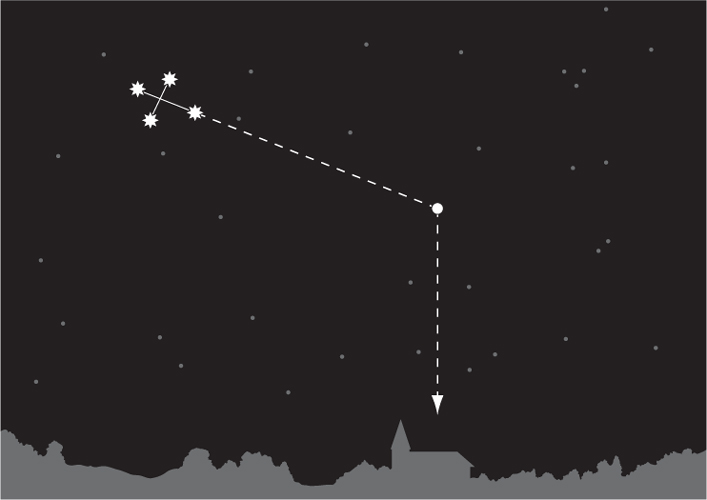
Polaris can’t be seen from most of the southern hemisphere, so there you need to use a different constellation, the Southern Cross. This will help you work out which way is south.
Imagine extending the long axis of the Southern Cross to five times its length. From this imaginary point in the sky, follow a vertical line down towards the earth. The direction from where you are to that point on the ground will be south.
What if it’s cloudy?
Astronavigation depends – obviously – on being able to see the stars. If the sky is totally clouded over, there’s not much you can do. If, however, there is only partial cloud, you can still work out if a particular star is in the north, south, east or west by observing its movement through the sky. Take two sticks, the rear stick needs to be shorter than the front one; place them in the ground one behind the other and about 60cm apart. Line the two tips up with your star so that you are looking at all three at once along the same line. Continue observing. After a while, the star will have moved in relation to the two static tips.
In the northern hemisphere:
In the southern hemisphere, this is reversed:
If the star doesn’t move at all, you’ve lucked out: that’s the North Star!
NAVIGATING BY THE SUN
Solar navigation, like astronavigation, is a time-honoured method of finding your way. There are two methods of doing this: the staff method and the watch method.
The staff method
This method works in northern temperate zones (from the Tropic of Cancer to the Arctic Circle) and southern temperate zones (from the Tropic of Capricorn to the Antarctic Circle).
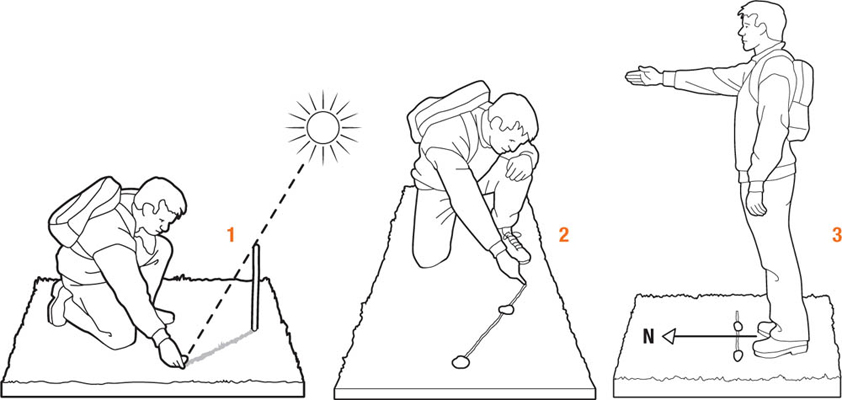
Find a straight stick about a metre long and stick it in the ground where it will cast a definite shadow. Mark the point where the tip of the shadow falls (1). Wait for about 15 minutes. The shadow will move. Mark the tip of the second shadow. Draw a line from the first mark to the second mark and about 30cm beyond (2). Stand with your left foot on the first point and your right foot on the second (3).
If you are in a northern temperate zone, you are now facing approximately north; in a southern temperate zone you are facing approximately south.
The watch method
This is a handy method of getting a rough direction, but it’s not as accurate as the staff method. The closer you are to the equator, the less accurate it is.
To orientate yourself using your watch, you need to make sure it is telling the accurate local time. If a daylight-saving hour has been added, you need to wind the watch back an hour.

If you’re in the northern hemisphere, lay your watch flat with the hour hand pointing towards the sun. A good way of doing this is by laying it on a flat surface, then putting your eye at the same level of the watch. Now, draw an imaginary line from the centre of the watch that bisects the angle between the hour hand and the figure 12 on the dial. This direction is south.
In the southern hemisphere, you need to point the figure 12 on your watch towards the sun, then bisect the angle between the hour hand and 12 o’clock. This direction is north.
WEATHER LORE
First, a caveat: predicting the weather is a complicated business. Professional weather forecasters have all manner of complicated equipment and computer modelling systems, and sometimes (in fact, quite often) even they get it wrong.
Having said that, nature can give you some pretty hefty clues about what the weather’s about to do. You just need to learn how to interpret these clues. It’s an essential skill in the field: getting caught in bad weather can be more than inconvenient. It can be life threatening.
I was caught out recently in a lightning storm in one of the most volatile weather places in the USA – the Black Hills of Dakota. The thunder and lightning and lashing rain were so ferocious that it was impossible to hold a conversation, even shouting. Only 30 minutes earlier there had been a gentle breeze and sunshine. Like an idiot, I had been having a nap! Hey, we can’t always get it right…
Clouds
It doesn’t take a great deal of insider information to recognize a big heavy storm cloud. We’ve all seen them. If you know a bit more about other clouds and their behaviour, however, you’re going to be a lot better at predicting the weather.
When looking at a cloud, there are two things you need to determine: its height and its shape. There are three levels of cloud:
There are three principle cloud shapes:

If you can tell the height and type of cloud, you can predict with a certain degree of accuracy what type of weather you can expect.

Wind
Wind can be unpredictable and difficult to interpret. Different areas have their different prevailing winds and they are affected by the arrival of warm and cold fronts. In temperate regions, however, there is a rule of thumb called the crosswinds rule. Stand with your back to the wind and look for medium-level or high-level clouds. If, in the northern hemisphere, they are moving from left to right, you can expect bad weather; if they’re moving from right to left, you can expect the weather to improve. In the southern hemisphere, reverse these directions.
Interpreting wind speeds
Ships on the open sea are particularly susceptible to strong winds, but historically there was a problem with describing these winds: one man’s gentle breeze could be another man’s strong breeze. In the nineteenth century a British admiral called Sir Francis Beaufort set about trying to standardize the way people describe wind speeds. The Beaufort Scale is still in use today.

Wind-chill factor
The wind can have a huge effect on how warm it actually feels. The wind-chill factor is the apparent temperature warm-blooded creatures feel during windy conditions. If you look at the table overleaf, you’ll see the sort of effect it has. So, if you’re planning an expedition and the forecast is for wind, don’t ignore it: it can have a big effect on the route you take and how long your expedition is likely to last. I have learned that in cold, wet weather, it is rarely the cold or wet that kills you. It’s the wind that does the damage. Cold and wet is one thing – add wind into the equation and you have a potentially lethal combination. Be aware of that and act accordingly – get protection from the wind as soon as you can.
Wind Chill Index

Old wives’ tales
It might seem a bit odd talking about these after the scientific precision of the Beaufort Scale and the wind-chill index. But most of these old sayings have some basis in fact; and they’ll be a lot more use to you in the field where you often have to make speedy decisions based on brief observations of the conditions around you.
EMERGENCY SIGNALS
Most of us have mobile phones these days and could easily use them should we need to alert people to the fact that we are in danger. It would be foolish to underestimate their importance as an emergency signalling device. If you have a mobile phone, you should take it with you.
However, much like GPS units, you shouldn’t rely on your mobile. Batteries run out and in much of the terrain you’re likely to find yourself, network coverage will probably be patchy. So, you need to know how to send up distress signals using traditional methods that have stood the test of time.
Fire is the most effective means of signalling. A triangle is the international distress signal, so in extreme survival situations people are recommended to build three fires to attract the attention of overhead aircraft. However, if you’re on your own it is often too difficult to keep three fires going; and in any case, for most purposes one big, blazing fire is more effective than three smaller ones.
When you’re building a signal fire, you need to make it burn as fast and as hot as possible. This will give off the maximum amount of light during the hours of darkness, and a thick plume of white smoke during the day – use wet leaves or green wood for smoke. (Smoke signals, of course, are only effective on calm days: high winds, rain or snow will disperse the smoke.) If you can get your hands on spruce trees or birch bark, you’ll find that these will burn extremely well. Just make sure you’re careful to keep the fire under control.

Real-life campfire story
The ability to read a map and use a compass is fundamental to scouting and soldiering. If you can’t get somewhere, you can’t do whatever it is you intended to do in the first place. But just being able to read and interpret a map and compass is only part of the story: you need to be able to read the ground, the weather and all the signs of nature as well.
Even before Baden-Powell formed the Scout movement, he recognized the importance of map-reading as one of the key skills all good Scouts and soldiers should have. He recalled the lead-up to the Boer War when, before hostilities broke out, he was sent out on a reconnaissance of the passes of the Drakensberg Mountains in South Africa. After a lot of map-to-ground study, Baden-Powell realized that there were a number of discrepancies in the maps they had. He reported this discovery, knowing that it was strategically of vital importance; but its value was not recognized at the time and when the Boer War did break out his corrections to the maps had not been recorded. To make matters worse his advice against holding the town of Ladysmith – based on his knowledge of the area – was ignored and the British suffered a disastrous defeat during the subsequent siege.
From that day on, Baden-Powell insisted that all his troops and, consequently, all Scouts, should have a thorough understanding of maps, compasses and map-reading. More importantly, they should be able to use that knowledge effectively.
The subject of map-reading, or at least the accuracy of an individual’s map-reading, is the reason for many a joke between soldiers – if anyone’s navigation is ever in doubt, they are not allowed to forget it in a hurry! I recall one incident when a patrol was on a training exercise in the desert. They were tasked to put in an OP (Observation Post) overlooking a small village. A local helicopter pilot was engaged to insert them. When briefed, he assured the patrol commander that he knew the bridge over a wadi – a dry riverbed – that was marked on the map. In reality, however, he dropped them off at a bridge that was 20 kilometres north of the intended drop-off point, because it looked the same and they were ‘in the area’! As you can imagine, this particular pilot’s navigation skills were not trusted again. Luckily, no real harm was done, other than the troops having a very tiring walk that lasted all night, but the patrol was glad of their navigation skills as they made their way to the correct drop-off point.
Such a mistake can sometimes be far more dangerous. All too frequently the emergency services are called out to rescue people on mountain and moor who have misinterpreted the map and got themselves hopelessly lost. A good Scout should never be the reason for such an incident. Learn how to navigate, practise as often as you can and you won’t become an emergency-service statistic or, even worse, a casualty that has succumbed to the elements.
Anybody can achieve basic proficiency at map and compass work, and it can literally save lives. GPS makes our lives even easier, but never forget the basics. Finally, whenever you do go out with your friends to practise, always tell someone when and where you are going, your intended route and, very importantly, when you expect to return. Remember: always trust your compass not your instincts. The compass is always right – unless you are a soldier who has not made the route in time on SAS selection, in which case the excuse is always that the compass was wrong!