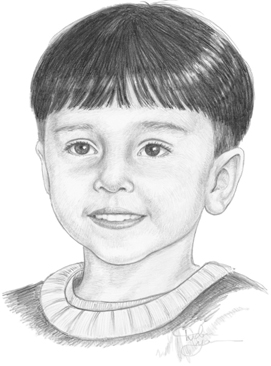
Replicating Dark Skin Tones
When depicting dark skin tones, pay attention to the value of the skin tone and how it compares with the values of the features; for example, when the skin is dark, the lips need to be shaded even more heavily. In addition, look for differences in features that indicate ethnicity or race, such as the nose, lips, or eye shapes and the hair color or texture.
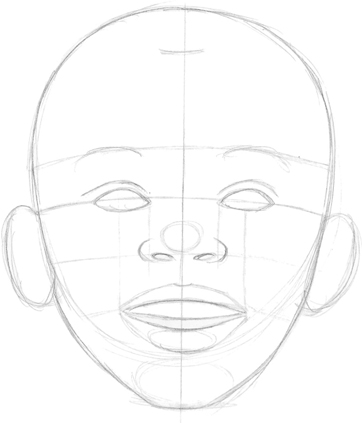
STEP 1 With a 2B pencil, I block in the basic head shape and place the features, following the guidelines. I draw the almond-shaped eyes, wide nose, and full lips, accurately depicting the features as I see them. Then I block in the teeth and indicate the hairline, eyebrows, and ears.
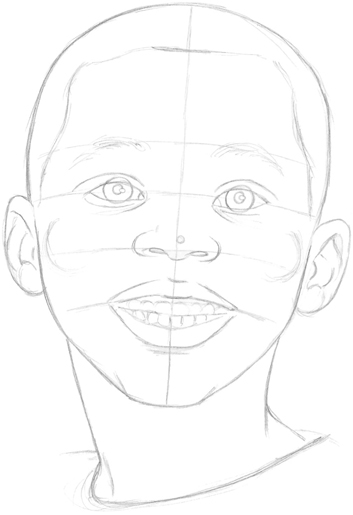
STEP 2 Still using the 2B pencil, I sketch in the curved neck and define the chin. Then I develop the eyes and use short, quick lines to draw the eyebrows. Next I start defining the ears and teeth. Then I block in the hairline and the neckline of the shirt.
STEP 3 Next I shade the nose, neck, and top lip, trying to make the lip appear full. I shade the nostrils relatively darkly so they will stand out against the dark skin. Using quick, circular strokes, I start to render the short, curly hair. Then I detail the eyebrows and eyes and define the neckband of the shirt.
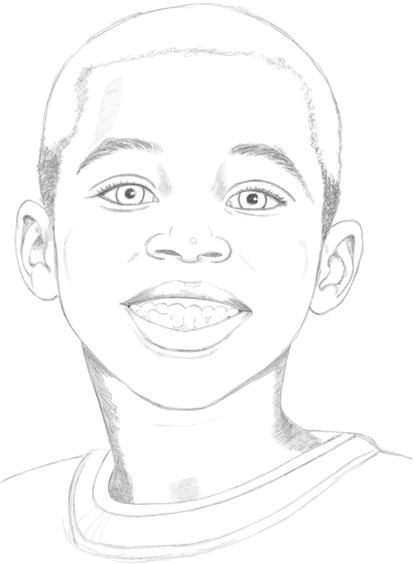
STEP 4 Using strokes that follow the shape of the mouth, I continue shading the lips; then I shade the gums, carefully working around the teeth. I make sure the lips and gums won’t contrast too sharply with the skin, because if they’re too dark they’ll look unnatural. Next I build up the coarse hair with more circular strokes. Then I move to the neck, using horizontal lines that curve with the shape of the neck. Notice how these lines overlap and blend into the shading that was applied in step 3.
STEP 5 Now I apply a light layer of shading over the entire face, always varying the direction of my strokes as necessary to follow the shapes of the different planes. The shading is starting to round out the face, which has looked a bit flat up to this point. I’ll add more shading later to make it appear even rounder and fuller.
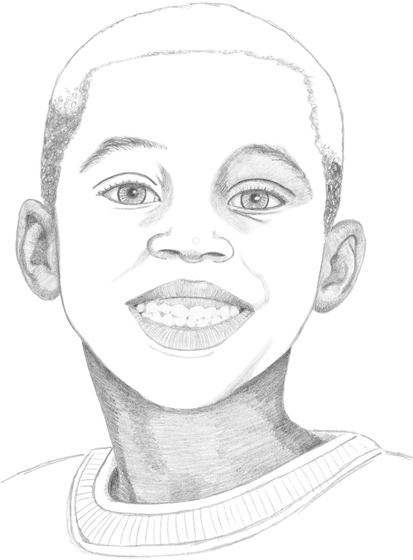
STEP 6 I continue shading the face, making the sides of the forehead a bit darker and leaving the middle area lighter to show where the light hits. Then I darken the nose, leaving a white highlight on the tip. I also refine the shirt, curving the strokes as they go around the back of the collar. Next I further shade the lips to accentuate their fullness, then pull out a highlight on the top lip with a kneaded eraser. Finally I go back and soften the transitions between values by very lightly blending them with a kneaded eraser.