
1 Visit the college during the school year on a day with a regular class schedule.
Visiting during holidays, homecoming, or other times when students are away or not in their normal routine will not give you an accurate picture of everyday life at the school.
2 Observe the students.
• Are the students walking energetically to class while talking animatedly, or are the few students in sight wandering aimlessly?
• Are the students bright-eyed, with glowing complexions, or are they red-eyed, with a pasty pallor?
• Are the students carrying armfuls of books and notebooks, or are they carrying surfboards and coolers?
• Are the students eagerly seeking out professors after class and in the cafeteria, or are the students ducking into doorways and under tables to avoid professors?
• Are students in class paying attention and taking notes, or are they wearing headphones, reading the newspaper, or dozing?
3 Evaluate the facilities and surroundings.
• Compare the number of books in the library to the number of seats in the stadium.
• Compare the number of flyers promoting free lectures to the number of flyers promoting spring break getaways.
• Compare the number of nearby art galleries to the number of nearby hair salons.
• Compare the number of nearby bookstores to the number of nearby bars.
• Compare the number of students wearing T-shirts with the school logo to the number of students not wearing any shirt.
• Compare the number of ads in the school newspaper offering “Students Available to Tutor” to the number of ads offering “Research Papers Written—Any Topic.”
• Compare the number of times you hear chamber music to the number of times you hear sirens from emergency vehicles.
4 Select your school accordingly.
 Assess the school’s location.
Party schools are often those farthest from urban centers: Such a location necessitates that all social activities occur on campus or in campus-adjacent locations, and therefore there are parties daily due to the lack of other entertainment opportunities. Cities with a warm climate and good beaches are also home to party schools, as many students opt for surfing, sun-bathing, and pitchers of margaritas over class.
Count the number of bars, liquor stores, fraternities, and sororities on or near campus.
The more plentiful the watering holes and Greek organizations, the more likely the students are to party.
Look for schools with successful sports teams.
Schools with particularly winning sports programs are likely to offer many months of pre- and post-game victory parties. Avoid schools with losing records or sparsely attended games, and those with teams that usually lose the homecoming alumni game.

Interview the school’s administrators and alumni.
Talk to the school’s local boosters (ask the admissions office for names) about their memories of social activities at the school. If more than three of them recount stories of drinking at 6 A.M. or have no memory of college at all, the school is most likely a party school.
Visit the school on a Thursday.
A good party school will have multiple parties raging on this night. Walk the campus and listen carefully for whoops, yells, and loud music. Look for students staggering, talking loudly, or vomiting in the bushes, all of which are signs of raucous social activity. Enter a fraternity or sorority party. Gatherings without alcohol and centered around a knitting circle or a discussion of nineteenth-century English poetry indicate a college that does not measure up.

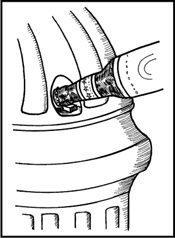
1 Hold the bottle you wish to open upright in your nondominant hand.
Grip the neck of the target bottle, placing your index finger over the back edge of the cap.
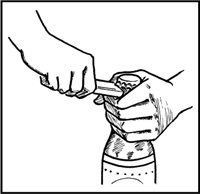
2 Hold the second bottle horizontally around the label.
Grip this bottle, the opener, as though shaking hands with the bottle.

3 Fit the shallow ridge found at midcap of the opener bottle under the bottom edge of the cap of the bottle you wish to open.
By using this ridge, and not the bottom of the cap, you will not risk opening the second bottle in step 4.
4 Using the opener bottle as a lever, press down and pry the cap off the target beer bottle.
5 Enjoy.
Hold both bottles end to end perpendicular to the ground, with the crimped edges of the caps together, locking them in place. Pull. Be careful, however, as either or both bottle caps could come off.

1 Grip the bottle in your nondominant hand.
Make a fist around the top of the bottle so that your thumb overlaps your index finger and the web between your thumb and index finger sits in the groove under the cap.
2 Fit the bottom of the lighter under the teeth of the cap.
Position the lighter so that it rests on the middle knuckle of your index finger.
3 Press the top of the lighter down and toward the bottle.
Use the index finger on your dominant hand to provide resistance.
4 Pry off the cap.
If necessary, turn the bottle and repeat.
1 Put the teeth of the bottle cap against the edge of a table.
The cap should be on top of the table edge; the bottle should be below the table. Do not attempt on a soft wood or antique table.
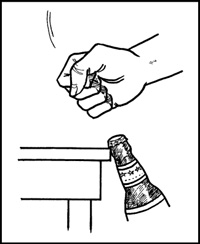
2 Use your fist to hit the bottle.
The bottle will take a downward trajectory, and the cap will pop off.
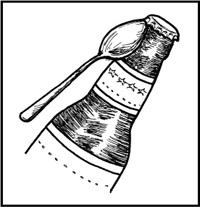
1 Place the implement under the bottle cap, as high as it will go.
2 Pry off the cap.
Slowly go around the cap and lift up each crimped area with the tool, similar to opening a can of paint.
3 When the cap starts to move, fit the tool higher up under the cap and remove it.
1 Unfasten your belt buckle.
If your pants are in danger of falling down, sit.
2 Pull the “tooth” of the buckle to one side.
3 Fit the cap into the buckle so that one edge is wedged against the buckle.
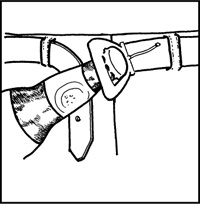
4 Pry off.
Pull the bottle slowly. A quick tug may result in a spill.
5 Refasten your belt.
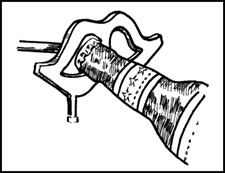
1 Fit your bottle into the lock.
Place the head of the bottle into the recession in a doorframe into which a deadbolt slips, so that the cap fits against the notch in the lock’s frame.

2 Pull up slowly.
The bottle cap should pop right off.
1 Look for an arrow on top of the hydrant labeled “open.”
2 At the end of the arrow, locate the recess between the screw and the nut.
3 Insert the cap into the recess.
4 Press down slowly on the bottle until the cap comes off.
1 Place the cap between the shoe and the blade.
Hold onto the bottle with your dominant hand. If you are wearing the skate, use the hand opposite the skate to open the bottle.
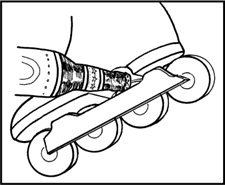
2 Pull up slowly on the bottle and pry off.
Quickly right the bottle to avoid spilling.
1 Hold the stick of the bridge in one hand and a beer bottle in the other.
Do not attempt to open over the pool table.
2 Position the cap inside the opening of the bridge.
Fit the cap snugly against the edge.
3 Press down on the bottle.
Slowly increase the pressure until the cap loosens. Right the bottle immediately to prevent spillage.
1 Locate a newspaper, snack, or soda vending machine.
An older soda machine might actually have a bottle opener.
2 Place the cap in the coin return.
Wedge the cap against the top of the opening.

3 Press down slowly until the cap is removed.
Be Aware
Never drink from a bottle with broken or chipped glass.
1 Plan to carry your date only for a short distance.
Your destination should be a nearby couch, taxi, or bed. Do not attempt to carry him a long way.
2 Prepare to lift.
Bend your knees and place your stronger arm under your date’s back and the other under his knees. Your arms should go all the way under and across his body.
3 Begin to lift your date.
Use the strength of your legs and knees, holding them close to your body and keeping your back straight. Do not lift with your back.
4 Stand up quickly.
In one continuous motion, rotate your date’s body so that your stronger arm guides him over your opposite shoulder. The motion should be like tossing a sack of potatoes. His upper body should be hanging over your back, his lower body hanging over your front. Steady him with your other hand.
5 Walk to your destination.
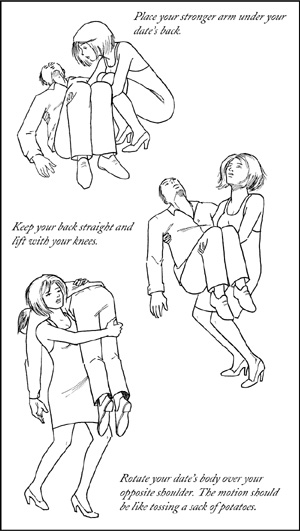
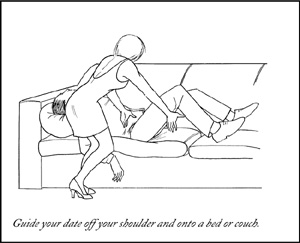
6 Lower your date.
Bending your knees and keeping your back straight, guide your date off your shoulder and onto a bed or couch or into a chair.
1 Do not panic.
Evidence of your partner’s name exists somewhere nearby. Your task will be to find it before she awakens, or before she starts any sort of meaningful conversation.
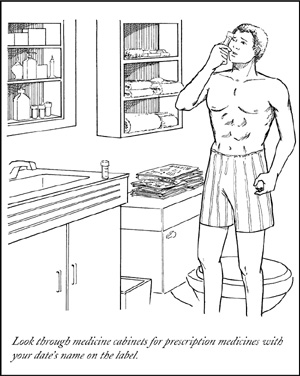
2 Get up and go to the bathroom.
The bathroom is a normal place to visit first thing in the morning, and it is also a place where you might discover her name.
3 Look through the medicine cabinet for prescription medicines with her name on the label.
4 Sort through magazines, looking for subscription labels with her name and address.
5 Go through a wastebasket to find discarded junk mail addressed to her.
6 Return to the bedroom.
If she is awake, ask her to make coffee for you. Use the time alone to search the bedroom for evidence. Look for: wallet, checkbook, ID or name bracelet, photo album, scrapbook, business cards (a stack of cards, not just one), or luggage labels. If she is sleeping, look for these and other items throughout the house.
Try to find at least two items with the same name to be certain that you have identified her, unless the name on one item rings a bell.
1 Use terms of endearment when addressing her.
Do not guess at her name. Acceptable terms of endearment are:
• Honey/Sweetie/Cutie
• Darling/Baby/Sugar
• Beautiful/Handsome/Gorgeous
2 Unless you are certain you have ample time, do not go through her belongings.
If your partner is showering, you can count on having at least a few minutes of privacy to search through her belongings. Otherwise, do not risk it—it would be far more embarrassing to be caught searching through her possessions than to admit you cannot remember her name. (She may be in the same predicament.)
3 Ask leading questions while making small talk.
Fishing for information is risky and can backfire by calling attention to what you are trying to do. However, if you feel you can pull it off, try to trick her into revealing her name:
• While getting dressed, pull out your own ID and ask her if she thinks that your hair is better now or in the picture. Laugh about how silly you used to look. Ask her if she likes the picture on her license. (She may think that you are checking her age.)
• Ask her if she ever had a nickname. She might say, “No, just [Name].”
• Ask her how she got her name.
4 As she is leaving, give her your business card and ask for hers.
If she does not have a business card, ask her to write her vital information on yours. Tell her you may want to send her a little surprise. Do not forget to send something later in the week and make sure that you spell her name correctly.
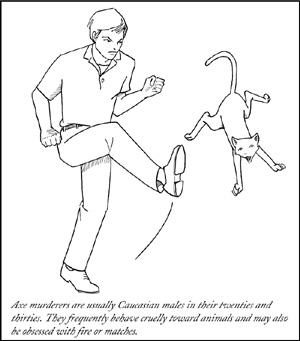
1 Watch for the following:
• A Caucasian male in his twenties or thirties
• Obsession with fire or matches
• Cruelty to animals
• History of bed-wetting
• Sexually abused as a child
• Middle-class background combined with loner behavior
• Difficulty maintaining relationships
An individual who exhibits more than three of these traits may be dangerous.
2 Trust your intuition.
Your instinct is a powerful weapon. If something feels wrong, it probably is.
3 Check him out officially.
Obtain his social security number and investigate him. Call the Federal Prison Locator Service (202-307-3126) to determine if he was ever incarcerated. Many online companies can aid in financial reports or tracking down previous addresses. You may also want to enlist the services of a private detective.
4 If you discover grounds for suspicion, break off the relationship immediately.
Be clear and definite about your decision. Return all of his belongings and gifts. Do not make promises to keep in touch. Be straightforward and kind, and talk only about yourself and why the relationship no longer works for you. Do not blame him. Try not to make him angry.
5 Take steps to maintain your safety.
• Carry a cell phone.
• Install a home security system.
• Change your phone numbers.
• Stay near populated, well-lit areas.
• Apprise a friend or relative of your concerns.
• Document any strange or unusual happenings.
• Take a personal safety/self-defense class.
1 Look at her (or his) hand.
Compare the length of your date’s fourth and second fingers. Most men have ring fingers that are conspicuously longer than their index fingers, whereas most women have ring fingers that are close to the same length. Testosterone levels likely account for the greater length.
Also take notice of the amount of hair on your date’s knuckles, hands, and forearms. Most men will have visible, dark hair (or signs of recently removed hair) on their hands and wrists, and sometimes knuckles.
2 Be suspicious of baggy clothing.
Your date may be trying to conceal a telltale bulge.
3 Look for an Adam’s apple.
Most men have a bump in the middle of their throat. Most women do not.

Men’s shoulders tend to be broader than their hips, while women’s hips and shoulders tend to be closer to the same width. Do not be fooled by shoulder pads.
5 Follow your date up a flight of stairs.
Take note of how she (or he) moves while ascending. Men tend to walk in a more “straight ahead” motion with minimal “wobbling” back and forth. Women tend to sway a bit from side to side, due to the position of their pelvises. Women also tend to lean forward slightly.
Be Aware
• Look for at least three of these characteristics before you draw conclusions about your date’s gender, then make your plans accordingly.
• Voice is not always a good indicator of gender—a low voice may simply be the result of hard living.
1 Recognize the traits of a pickup artist.
Is your suitor overly charming and quick with cash? Does he appear to have an immediate connection with you? Is he scanning the room while talking to you? Is he calling you familiar or condescending names such as “honey,” “sweetie,” or “babe”?
2 Do not accept drinks.
Letting a pickup artist buy you drinks will encourage him and make him feel he is entitled to your attentions.
3 Keep personal information to yourself.
Do not give him your name, and do not tell him where you live, who you are waiting for, or any other detail or insight into your personal life or plans.
4 Make it clear that you are not interested.
Be direct and forceful. If he persists, you may have to become rude or leave. If you make it obvious that nothing is going to happen that evening, he’ll move on to other prospects.
5 Turn away and ignore him.
Talk to a friend or the person sitting on the other side of you. The pickup artist likes the chase most of all— put a stop to the chase and he will look elsewhere.

• The Elbow Knock: Use this technique if you are seated at a bar or table. Notice where glasses and plates are located on your table. Turn around to talk to a friend, or simply look away, and position your elbow. As you turn back, sweep your elbow into any glasses or plates on the table, knocking them into his lap or onto his shirt.
• The Hair Flip: While standing facing your suitor, bring your hand up to adjust your hair. Do this quickly so that he tips his glass toward his body and his drink spills all over him.
• The Time Check: While standing next to your would-be suitor, hold your drink in the hand of your watch arm. Say, “Is it time yet?” Then turn your wrist to look at your watch, thereby spilling the drink on the pickup artist.
7 Apologize insincerely.
1 Speak firmly.
Keep your voice low and your sentences short. All communications should be in the imperative. Explain that you are going to perform the Heimlich maneuver.
2 Tell your date to stand up and stay put.
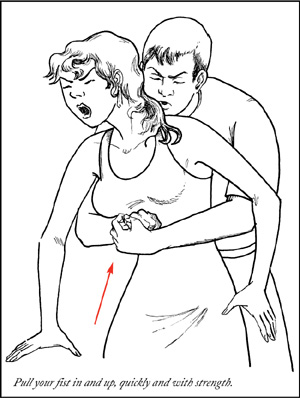
3 Hug your date from behind.
Put your arms around your date and make one hand into a fist.
4 Place your fist in your date’s solar plexus.
The solar plexus is the first soft spot in the center of the body, between the navel and the ribs.
5 Place your other hand, palm open, over your fist.
6 Tell your date to bend forward slightly.
If your date does not respond, push on the upper back and repeat, “Lean forward.”
7 Pull your fist in and up.
Use force and a quick motion. This will push out the residual lung gas under pressure, clearing any obstructions from the trachea.
8 Repeat steps 3 through 7 several times if choking persists.
9 After several unsuccessful attempts, instruct your date to bend over the back of a chair.
The top of the chair should be at the level of your date’s hips.
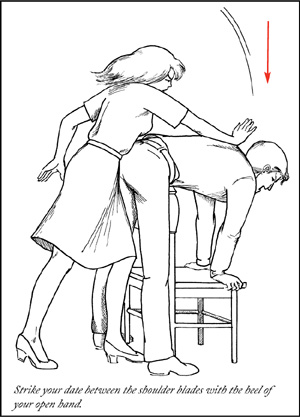
10 Strike your date between the shoulder blades with the heel of your open hand.
The blow generates gaseous pressure in a blocked airway and, with a head-down position, sometimes works when the Heimlich does not.
• If the choking is noiseless—or if your date raises her hands to her throat—then the air passage may be completely blocked and you must proceed quickly.
• If your date is coughing or gagging, you simply need to be polite, smile sympathetically, and offer water when the choking is over. Water does nothing for choking, but it gives the choker some time to regain dignity.
• In most cases, the first thrust of the Heimlich maneuver will dislodge the choked item from the trachea. Once the choking is over, your date will need some time to recover: a sip of brandy, a quiet moment. Do not rush your date to the emergency room; in most cases, there is no need to go to the hospital after the blockage has been removed.
1 Limit your lactose intake during a date.
Many people suffer from an inability to digest milk sugar, or lactose. Colon bacteria ferment the milk sugar, forming a gas that creates a bloated feeling. Keep your intake to less than half a cup at a sitting, and avoid dairy products before your date.
2 Eat a small meal.
Eating a huge dinner on a date is a sure-fire way to precipitate gas.
3 Avoid gas-forming foods.
Bacteria ferment the indigestible carbohydrates in beans, broccoli, cabbage, and other vegetables and fruits into gases.
4 Drink peppermint tea.
Replace an after-dinner drink with a cup or two of peppermint tea. This herb may give you some relief from the gas discomfort that follows a meal.
5 Emit the gas in private.
As a last resort, head to the bathroom. If you feel bloated but are unable to pass gas easily, you can facilitate the emission of gas as follows:
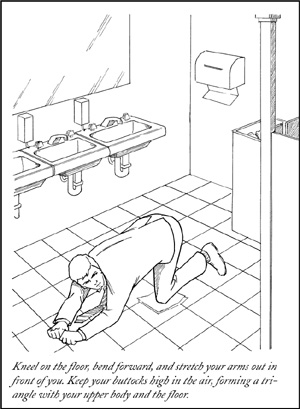
Place paper towels on the floor. Kneel on the towels, bend forward to the floor, and stretch your arms out in front of you. Keep your buttocks high in the air, forming a triangle with your upper body and the floor. This position will force out the unwanted gas and relieve the pressure.
• On average, humans produce ¾ of a liter of gas daily, which is released 11 to 14 times a day.
• Men typically produce more gas than women because they consume more food.
No two digestive systems are alike. Experiment with foods to determine which ones affect you most. In the meantime, exercise caution around the following high-risk items:
• Beans (particularly baked beans)
• Borscht
• Broccoli
• Brussels sprouts
• Cabbage
• Carbonated beverages
• Cauliflower
• Chili
• Cucumbers
• Fatty foods
• Fresh fruit
• Grains and fiber, especially pumpernickel bread
• Gum
• Onions
• Oysters
• Salads (green)
Do not tell colleagues.
Do not discuss any aspect of your relationship with anyone at work, even close friends. Avoid telltale references, such as, “When we were at the movies last night ...” Do not play guessing games with co-workers, such as, “I’m going out with someone from the office but you’ll never guess who.”
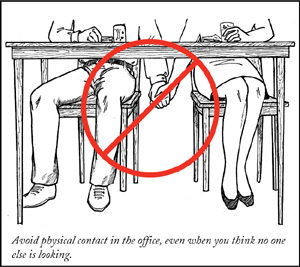
Resist physical contact at the office.
Avoid all physical contact, including kissing, hand-holding, hugging, casual touching, and back rubs, even if you think you are alone. Maintain at least a foot of personal space between you and the person you are dating.
Send gifts to the home.
Do not have flowers, candy, clothing, or other personal items sent to the office, even with an unsigned card: People will begin asking questions.
Do not use company e-mail to send personal notes.
Many employers monitor e-mail messages, and even deleted messages are stored. It is also too easy to send an e-mail to the wrong person or to “everyone.”
Avoid long or excessive lunch dates.
While it is acceptable for colleagues to eat together, extended or repeated outings may attract notice. Maintain the lunch routine you practiced before you started dating your co-worker.
Avoid arriving and departing together.
Unless you are in a car pool with others, stagger your arrival and departure times.
Use discretion.
At company picnics or parties, or at off-site meetings, do not drink excessively, dance intimately, or openly display affection with your office significant other.
• Most office romances begin in the spring.
• Dating more than one person from the same company at the same time is not a good idea.
Do not break up at work.
Emotions can be difficult to hide, and people can act irrationally when they are upset. The workplace, especially in a cubicle but even in a private office, is a poor choice of location for a confrontation. Avoid breaking up over lunch hour, as well.
Break up over a long weekend.
Choose a time when your partner will have several days to heal before having to see you at the office. Try to be sensitive to his or her feelings, however: Do not break up just before the other person leaves on an extended vacation.
Be prepared for the worst.
A bad break-up may require you to transfer or even resign, particularly if you are dating someone above you in the office hierarchy. Ending a relationship with someone who reports to you could lead to a charge of sexual discrimination.
Do not immediately begin dating someone else at work.
Your new relationship may be hurtful to your ex, if you are spotted. You may also gain a reputation for being opportunistic or desperate.
Do not discuss personal feelings or emotions with your ex while at work.
If you want to check on how your former lover is doing, call at home.
Be Aware
No matter what you call it—fishing off the company pier, mentoring the intern, kissing company cousins, refilling the toner, mergers and acquisitions—office romances are dangerous.
1 Pay attention to your surroundings.
If you are prone to spilling things or tripping over rugs, move slowly and carefully. Present an image of confidence and poise.
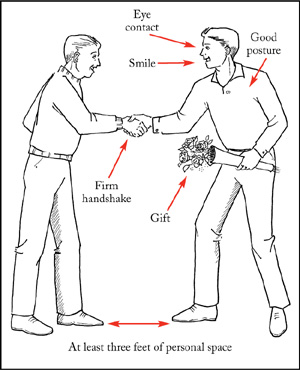
2 Greet them with a firm, but brief, handshake.
A weak handshake is a turnoff, but so is squeezing too hard. Shake hands so that the entire hand is clasped. Let go of the hand after a few pumps. Maintain eye contact.
3 Do not kiss or hug the parents unless they make the first move.
If they offer air kisses, fine, but never kiss a potential in-law on the mouth. If they opt to hug you, do not retreat from it.
4 Call them “Mr.” and “Mrs.” unless they ask you to address them by their first names.
This shows respect. Do not shorten or change their names or call them “Mom” or “Dad.”
5 Give them personal space.
Allow at least three feet of space between you during conversation.
6 Show poise.
Be positive, good natured, and relaxed. Smile, but not continuously: if you look happy all of the time, something’s not right. Remember that good posture projects confidence and successfulness. Walk, stand, and sit up straight. Speak loud enough to be heard.
Do not pretend to be someone you are not. People can spot a fake a mile away. Do not try too hard to make an impression. At the same time, do not act too familiar—no winking, shoulder punching, or joking. Follow their lead.
8 Send a note or card the next day.
Mention how nice it was to finally meet them and that you look forward to seeing them again. If you stayed at their house for a while, thank them for an enjoyable visit.
Be Aware
Practicing the following social graces can help make a favorable impression:
• Ring the doorbell once only. Do not lean on the bell or pound the door.
• Turn off your cell phone and pager.
• If invited to dinner, bring wine, flowers, or dessert, even if they say not to.
• Wait to be invited inside, and wait to be seated. Do not sit down before they do.
• Pet the dog or cat.
• Compliment them on only one or two things: the view, the couch, a painting, the flowers—don’t overdo it.
• Do not spend too much time in the bathroom (and do not go too often).
Ask family members to pay for specific expenses.
Have numbers ready to justify costs. If you sense resistance, threaten to elope or to have the reception at a seedy nightclub. For grandparents, offer upgrades at the reception in exchange for funding, such as seating at a table far from the band, their food served first, or wider cushioned seats.
Register for wedding ceremony and reception components.
Instead of a bridal registry for china, crystal, and silver, register for floral arrangements, liquor for the reception, the band, limousine service, and each course of the meal.
Hold a raffle.
Offer the guests a chance to buy tickets to win the wedding dress, a ride in the limo, or a chance to join the honeymoon.
Wash guests’ cars.
Hire a student at a low hourly rate to sell expensive car washes to the guests as they attend the ceremony and reception.

Sell your belongings on Internet auction sites.
Check to see which items you’ve registered for have been bought, or estimate which items you are sure to receive, and sell them online. The buyer will send payment, and, after the wedding, you send the sold item.
Procure sponsors.
Strike a deal with a local company. Agree to place its logo on the invitation, wedding dress, tuxedo, or cake. Have the band leader announce each song with, “This song has been brought to you by the good people at [name of company].” Hang company banners around the altar and behind the bandstand. Allow the company to set up a kiosk at the ceremony and reception site to dispense information, key chains, and other swag.
Sell incentive packages to investors.
Offer a percentage of wedding gifts, naming rights to kids, occasional dinners at your home, an invitation to the wedding (with preferred seating), the first dance with the bride/groom, and, for enough money, the opportunity to give away the bride.
Take deep, measured breaths.
Inhale through your nose and exhale through your mouth. Deep breathing will calm you and prevent hyperventilation brought on by crying.
Stare at inanimate objects.
Focus on floral arrangements, your clothing, or the floor.
Recall trivial details.
Try to remember the color of your childhood blanket, or the make and model of all the cars you have owned. Attempt to say the alphabet or the months of the year backward.
Stand up straight.
Crying will cause you to bend forward and make your head and shoulders shake. Concentrate on good posture: Keep your back straight and your head held high to combat the physical effects of your emotions.
Crying at weddings tends to be contagious and mutually reinforcing. Do not look at others who are crying or you may lose control.
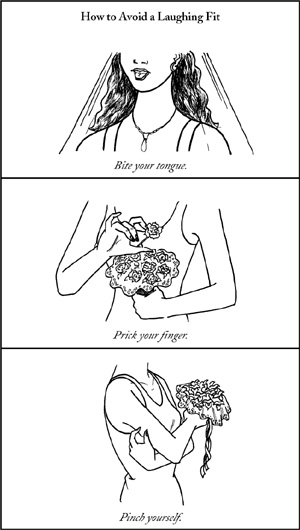
Bite your tongue.
Bite down on your tongue hard enough to cause pain but not so hard that you cause bleeding or other injury.
Prick your finger.
Using the pin from your boutonniere or a thorn from a rose in your bouquet, quickly stick the pad of your thumb to cause pain. Put pressure on the pricked area for several minutes to avoid bloodstained clothing.
Pinch yourself.
The skin on the back of the upper arm is very sensitive. Squeeze a small section of skin between the thumb and index finger of your opposite hand. Release quickly to avoid a bruise.
Think about how much the wedding costs.
1 Inhale through your mouth.
2 Hold your breath.
4 Swallow three times slowly.
5 Exhale.
6 Repeat.
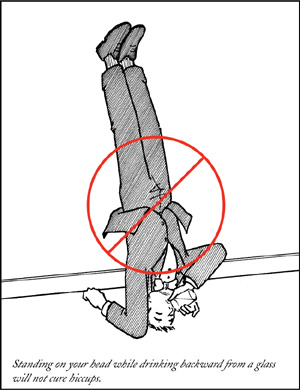
Swallow a flat (nonheaping) teaspoon or one paper packet of sugar in one quick gulp. Do not use a sugar substitute. Do not use salt.
Alter your stance.
Flatulence is more audible with the legs and buttocks close together. Shift your position so your feet are approximately 3 feet apart.
Sit down.
Shift the blame.
Look disapprovingly at a nearby guest or member of the bridal party. Do not look accusingly at your betrothed.
Be Aware
• Avoid introducing excess gas into your system. Do not smoke, chew gum, or drink carbonated beverages, and avoid beans, broccoli, cabbage, cauliflower, onions, and dairy products (if lactose intolerant) just before the ceremony.
• Chew activated charcoal tablets before the wedding. The charcoal will absorb odor caused by intestinal bacteria. Do not chew briquettes.
1 Smooth out rough edges with confectioners’ sugar or chopped coconut.
2 Reconstruct with icing or whipped cream.
Damaged portions of a white cake may be built up and out using small amounts of buttercream or whipped cream. Apply with a spoon or butter knife. For a cake with chocolate frosting, mix slightly melted chocolate with confectioners’ sugar to form a paste, then spread over the damaged area and cover as above.
3 Hide damage to the side of the cake with paper doilies.
Cut several long strips from a paper doily: The strips should match the height of the damaged layer. If necessary, use clear tape on the side that will be touching the cake to connect multiple sections. Wrap the doily around the layer and secure with small dabs of frosting. Remove the doily before serving.
4 Use fruit or nonpoisonous flowers to hide repairs.
Roses, pansies, and daisies are all nontoxic and attractive. Avoid lilies of the valley, calla lilies, and wisteria, all of which are poisonous. Place two or three large strawberries over damaged areas, with several others around the cake to visually balance the repair.
1 Set aside any undamaged layers from the dropped cake.
2 Replace damaged layers.
Depending on the shape of the cake, locate rectangular or round boxes that approximately match the size of the damaged layers. Hat boxes work well for round cakes.
3 Place real cake layers on box layers.
4 Poke wooden skewers or thin dowel rods through all the layers.
Cover holes with frosting. The rods will prevent the layers from sliding, especially in warm weather.
5 Cover exposed sections of boxes with frosting as you would an actual cake.
Add flowers or other flourishes to match the existing cake.
6 Prepare to move the cake directly after cutting.
Once the first cut has been made, the cake should be taken immediately into the kitchen and the real layers sliced sparingly.

• If the top layer of a tiered cake is damaged beyond repair, completely remove it and all support pillars, then repair remaining sections, making the next-to-the-top layer the top.
• If time permits, the caterer or pastry chef could bake or purchase a last-minute sheet cake. Serve that instead.
1 Make highly visible efforts to quiet your child.
Passengers and flight attendants will not be as upset with you if they think that you are doing everything you can. Talk to your child, sing to him, and bounce him; offer him a bottle, pacifier, or food; rock him; walk him up and down the aisles; distract him with the air safety card, airsickness bags, or in-flight phone. Do everything you can think of to calm your baby, and do it loudly and noticeably.
2 Create confusion and distraction.
If your child has not quieted down, act crazy. Cross your eyes; make the “beebeebeebeebeebeebeebee” sound by moving your finger up and down between your lips; sing, preferably an aria, at full volume—do anything you can to distract your child from his tantrum. Then soothe him using more traditional methods.
3 Do not panic if your child will still not calm down.
Remember that this is only a moment in time, and that no matter how many nasty looks you are getting from fellow passengers, you are doing the best you can.
4 Use drugs and alcohol.
Certain over-the-counter drugs can be administered in an emergency situation. Cold or allergy medicine for children, in particular, works well and usually causes drowsiness and a calming feeling. However, the medication may take half an hour or longer to take effect, and it frequently produces the opposite effect on children, speeding them up. The alcohol is for your consumption, in appropriate doses.
5 Use the lavatory.
If your child still will not calm down, retreat to the lavatory with him until he exhausts himself. Hold the baby in front of the mirror and say, “There’s another baby in the room!” or pretend that you are “walking downstairs” by moving back and forth in the lavatory, stooping lower with each step.
6 Bribe fellow passengers for forgiveness.
Offer free drinks, extra bags of snacks, earplugs, and reimbursement for dry-cleaning expenses.
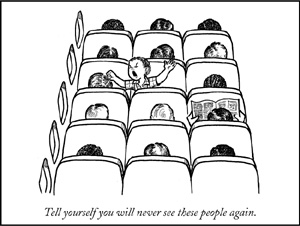
7 Remind yourself that you will never see these people again.
Repeat.
Be Aware
• First-class and business-class passengers usually have less tolerance for screaming babies.
• Do not pretend you do not know the child. Laws regarding child abandonment and neglect are more troublesome than annoyed passengers.
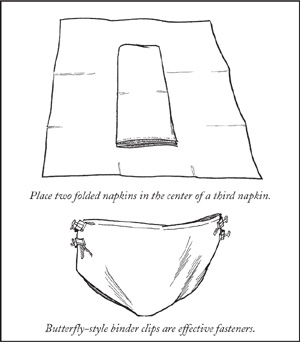
1 Ask the flight attendant for several cloth napkins.
Cloth napkins make an excellent temporary diaper.
2 Fold two cloth napkins into rectangles.
3 Place the two folded napkins (the liner) in the center of a third cloth napkin (the diaper).
4 Secure as you would a normal cloth diaper.
Effective fasteners include safety pins, bobby pins, hair clips, or butterfly-style binder clips. Use for short periods only, since the starch in the napkins may irritate the baby’s skin.
Be Aware
The following items should not be used in place of a diaper:
• Silk scarf
• Wool blanket
• Suede jacket
• Baseball cap
• Straw hat
• Flotation device
1 Line the seats with a large bath towel or sheet.
The cover will protect the back seat and expedite cleanup later.
2 Leave early.
Start a long trip early—before dawn—to assure that kids will be sleepy and will nap for the first few hours of the ride. If they awaken at or near rush hour, pull over to avoid traffic and get a break from driving.

3 Bring along a few key items, but only what you really need.
Essential items include snacks, games, open-ended creative toys, and passive entertainment devices (such as CD players and portable DVD players).
4 Make frequent stops.
Do not expect small children to sit still for more than an hour or two at a time. Make frequent rest stops to switch drivers, stretch, throw a ball, run around, and use the bathroom. These stops also serve to fend off carsickness and keep the driver alert.
1 Pull over.
Find a spot with adequate coverage, usually in the form of bushes or thick trees, that is a safe distance from the road.
2 Exit the car away from the road.
Leave the door open to further block visibility. Take tissues or napkins with you, if available.
3 Select a position behind a tree or bush.
Position your child 180 degrees from view of oncoming traffic. In general, boys should pee facing downhill, while girls should pee facing uphill.
4 Assess the weather conditions.
Assess the direction of the wind, and position your child to pee with it.
5 Assemble a “human shield.”
If there is little or no coverage, line up other members of the family to form a “human shield.”
6 Keep quiet.
Do not speak to the family member who is attempting to go. It may be distracting and will only prolong the stop and the trip.

1 Interview at the beginning or end of the day.
Arrive early for your morning interview and observe the workers as they arrive. Slouching, pouting, and dejected expressions indicate low morale. Note whether workers acknowledge the receptionist with a smile and a greeting or are oblivious to the receptionist. With an interview at the end of the day, observe if large numbers of workers leave promptly at quitting time, which may indicate a bored, clock-watching staff. Large numbers of people working late, however, may indicate that employees are overworked and deadlines are unrealistic.
2 Examine the bathrooms.
Are the bathrooms clean? Is there enough toilet paper? Are paper towels strewn about the floor? Lack of attention to these small details may indicate a lack of respect for the workplace and lack of attention to larger details.
3 Monitor the air quality.
Does the work area have natural light and outside air? Is the environment quiet? Is the air too hot or too cold? Are there any rancid or chemical smells? Is smoke billowing from any vents or machinery? Are workers sniffing or sneezing frequently? All of these are indicators of poor air quality or a “sick” workplace.

4 Look for signs of a troubled workplace.
• Lack of personal photos on desks—only motivational images of rowers and bears catching salmon
• Droopy eyelids obscuring the whites of the workers’ eyes
• Multiple sandwiches (partially eaten) and cans of soda at workstations
• Employees sleeping, doodling, or fist-fighting at meetings
• Employees with their foreheads on their desks, fists pounding the desktops
• Outdated or no-longer-manufactured candy in the vending machine
• Brown water in the cooler
• Flickering or humming fluorescent lights
• Music playing through speakers in the ceiling
• “Warning: Hazardous Waste” signs
• Groups of workers whispering
• Individual workers whispering to themselves
• Groups of workers silently praying
• Office layout based on slave ship rather than feng shui
• Carpet stains that could be coffee, could be blood
If you observe three or more of the above danger signs, you may have discovered a nightmare workplace.
5 Evaluate.
Is this the job for you?
Restaurant interviews focus on your service experience, knowledge of standard service customs and procedures, and familiarity with a wide range of food items. You also are judged on your overall appearance and general demeanor.
Wear:
• Tuxedo
or
• White blouse with black skirt (below the knee)
Do Not Wear:
• Ripped jeans
• Facial hair (except a groomed mustache)
• Dark-colored nail polish
• Lots of jewelry (limit is a watch, a wedding band and/or engagement ring, and a pair of stud earrings)
• Table crumber
• Worm (waiter’s corkscrew)
• Matches or a lighter
• Cover (one person’s dinner—derives from a single dinner plate with metal cover)
• Gooseneck (gravy boat)
• Eighty-sixed (the item is gone/finished)
• Bring-back (an unsatisfactory dish returned to the kitchen)
• Weeded (when you are attempting to serve too many tables at once)
• One fancy French wine appellation, perfectly pronounced
• American banquet trays should be carried in the left hand, leaving the right hand free to pick up service items and open doors. (Doors in restaurants in the United States swing out and have hinges on the right.) Your left hand should be flat, palm up, thumb toward your body, under the center of the bus tray, with the tray resting on your shoulder.
• You should be able to carry 10 covers at once.
• Stack the covers on the banquet tray as follows: One stack of two plates at each oblong end of the tray, one stack of three plates directly over your left shoulder, and one stack of three plates just beyond it.
• Hold cocktail trays at waist level, for beverages.
• Never put empty dishes and glassware together on the same banquet tray.
• Serve food from the left, drinks from the right. In the United States, all food items should be served from the left, using the left hand, left foot in toward the table. Drinks should be poured and items cleared from the right, using the right hand, right foot in. (French restaurants and exclusive hotels may use “modern French service,” with all items served and cleared from the right.)
• Do not look at drinks as you carry them on a tray—it is easier to maintain a steady hand if you are not watching the liquids shift.
• Offer job references from out-of-town restaurants. Say, “I worked for years at Chez Louis in Chicago.” If pressed for the name of a person, add, “Unfortunately, the restaurant never reopened after the fire and I don’t know how to reach the owner/manager anymore.”
Applying for a CEO job is a lengthy process and will require multiple interviews. Be prepared for several face-to-face meetings with the human resources department, senior management, and board members.
Wear:
• Navy or beige suit, white shirt, and a solid or wide-striped tie
or
• Navy or beige jacket and skirt or a pantsuit or dress (for less conservative companies)
• Expensive-looking watch
• Shined shoes
Do Not Wear:
• Bow tie or clip-on necktie
• Loud-print blouse
• Open-toed shoes
• Pastels
Do Not:
• Remove your jacket during the interview
• Have dirty fingernails
• Leather portfolio
• Ultra-expensive fountain pen
• Cigar clipper
• Putter (collapsible)
• Credit cards and large bills—no coins or bills smaller than $20
• Gross margin (the difference between sales revenue and the cost of the goods sold)
• Book value (the value of all the assets)
• EBITDA (earnings before interest, taxes, depreciation, and amortization)
• Buy-in
• Buy-out

• Re-conceptualize
• Re-energize
• Right-size
• Ask about the company’s challenges over the next 6 to 12 months, its business plan or model, and whether it is in “growth” mode.
• Focus your questions on the business as a whole, the marketplace, or the global economy rather than on the details of the job.
• To prepare, read books on good grammar and writing style rather than business books. People are always more impressed with someone who communicates clearly, effectively, and correctly. Use spell-checking software whenever you draft a cover letter or resume.
• Be sure to ask about the number of stock options available to you, as well as their “strike price” (the price at which you can exercise them).
• When asked about your hiring strategy, say, “To hire people smarter than I am.” Presidents like hearing this—it makes them trust you.
• Always negotiate for a higher salary and better benefits than offered—presidents will be more comfortable placing the business in the hands of a bulldog.
Driving a forklift requires specialized skills and lots of practice, so mention that you have operated a “fork” or “stacker” at many previous job sites.
Wear:
• Clean T-shirt
• Work boots
• Baseball cap
Do Not Wear:
• Loafers or flip-flops
• Necktie
• Collared shirts other than flannel
• Short pants
• Lunch box/cooler
• Work gloves
• Cigarettes or chew
• Multipurpose tool on belt
• Towmotor, high-low, stacker, truck (slang forklift names)
• Forks, carriage, mast/upright, load backrest (important parts of the forklift)
• Cage/DOG (for Driver’s Overhead Guard)/ ROPS (pronounced “ropes,” Roll-Over Protection Structure)
• The primary fork controls on a forklift are the lift-lower, the tilt forward-back, and the side shifter.
• A fork has a transmission selector (forward, reverse, neutral), steering wheel, parking brake, and accelerator and brake pedals. Most units are now automatic, and these may also have a separate inching pedal to the left of the brake pedal that slips the transmission and moves the forklift very slowly. The inching pedal may also be built into the brake pedal itself: Depress it slowly for inching, fully for braking.

• Mention that you have handled concrete blocks and paper rolls. Add that you have used 2,000- to 10,000-pound units (these refer to the forklift’s lifting capacity, not the weight of the unit itself ), as well as units equipped with paper-roll clamps.You might also say that you’ve handled “your fair share” of four-wheel sit-downs, walk-behinds, and pallet trucks.
• Ask about the number of trailers and the number of pallets you will be expected to handle per day (fewer is better).
• Since most people who operate forklifts are not licensed to do so, don’t worry that you do not have a license to show.
Brain surgeons train for as long as eight years after medical school, so you should be, or appear to be, at least 34.
Wear:
• Suit and tie
or
• Blouse and skirt
Do Not Wear:
• White lab coat or scrubs
• Stethoscope around your neck
• Surgical loupe. Loupes are worn like glasses or over glasses and provide strong magnification during surgery. They are custom-fitted and all brain surgeons have them. Borrow a pair, or carry an empty loupe case. The case should be wooden with a surgeon’s name engraved on a metal template. Keep the name on the template obscured. If you cannot borrow an actual loupe or case, substitute a wood case about 10 inches long by 5 inches wide. Do not wear surgical loupes on a chain around your neck, as you would reading glasses or sunglasses.
• Do not carry other surgical instruments.
• Do not carry medical charts.
• Surgical drill (for drilling into bone)
• Deep brain stimulation (abbreviated DBS, targets particular areas of the brain with electrical pulses)
• Spinal instrumentation (implantation of permanent therapeutic devices in the spine)
• Ask about the hospital’s type of operating microscope and its image-guidance system. Also ask about the strength of the magnet in the hospital’s MRI (magnetic resonance imager).
• All brain surgery begins with either drilling or sawing through the cranium.
• Interviewers will want to know about papers you have published in well-known medical journals. Mention that you are awaiting publication in Neurosurgery (frequently called the “red journal”), the Journal of Neurosurgery (known as the “white journal”), and are expecting a book contract.
Shoe sales has become a much less service-oriented business in recent years, so involved and caring sales-people are hard to find. Make sure you appear to be friendly with a ready smile and that you are well dressed.
Wear:
• Conservative suit and tie
or
• Tasteful blouse and skirt
• Socks
• Clean, shined shoes, without scuffs
Do Not Wear:
• Sneakers
• Flip-flops
• Heavy cologne or perfume
• Brannock Device (the metal foot measurer)
• Slippage (either toe or heel)
• Trees (short for “shoe trees”)
• A good fit should leave ¼-inch of room between the big toe and the tip of the shoe. There should be no slippage.
• Shoes with four or five eyelets will take a 36-inch lace, while athletic shoes will generally take a 40-to 45-inch lace.
• If the patron needs a half-size larger but it is not available, substitute a “wide” style of the lower full size (i.e., a 7 wide for a 7½).
• Shoes that will be worn on a daily basis should be fitted at the end of the day, when the feet have expanded.
• “Toe length” refers to the total length of the foot.
Mention current weather or temperature, time of day, day of week, month, season, or approaching holiday, and wait for comment. Other subjects of common experience include popular television programs, local sports teams, and the state of being tired. If silence continues, stare at elevator walls or floor until it reaches your destination. Exit immediately.
The Control Freak will attempt to micromanage your every task and responsibility.
Bombard him with information.
Copy him on every e-mail even remotely involving him or his area of responsibility. Leave towering stacks of reports and copies of all correspondence on his desk. Include him in the most mundane meetings and discussions. You may be able to short-circuit his control mechanism with the sheer volume of data.
Solicit his opinion, but control the options.
If you must leave a decision up to your boss, offer the solution you favor and two or three lame options— ridiculous or unworkable possibilities that will direct him to choose your course of action. Using phrases such as “You’ve probably already thought of this” and “I tried to put myself in your shoes when I worked on this” will help you gain favor.
Remain calm and pleasant.
When your boss interferes with your work or second-guesses your decision, do not become defensive or combative. Say, “How ridiculous—I should have thought of that. Thank goodness I included you!” and then lead your boss back to your position, while encouraging him to think you’re following his guidance.
Continue to do your job.
Bide your time. Your boss may ultimately believe that he’s shown you the way and he can now go on to help others.
The Buddy will generally attempt to blur the lines between employee and supervisor, soliciting personal information and seeking inclusion as though you are the best of friends. Include the Buddy in small ways, but keep your distance.
Invent a hobby.
Avoid sharing intimate details of your real life by inventing a hobby, which you can discuss with her in minute detail. Your fictional toothpick sculptures or love of steam locomotives will become of great interest to the Buddy and can serve as the basis of your “friendship.” Movies, restaurants, and sports are also safe, impersonal topics to raise.
Offer social invitations you know she can’t accept.
Invite her to lunch on a day you are certain she has another appointment. Ask her out for a drink with “the gang” after work on the night she always goes to her yoga class, or when she will be away on business. Be aware that she may proffer invitations in return, which easily can be evaded by inventing a nightly class of your own.
Avoid hugs.
If she attempts to throw a friendly arm around you, fake a sneeze. Blame allergies rather than perfume, which she can change. Your “allergies” can then also become a topic of friendly conversation.
The Workaholic has lost all sense of perspective, and has sacrificed his life to his job. He will expect the same of you.
Present evidence of the real world.
Replace all calendars he sees with ones depicting tropical retreats, ski slopes, or other vacation locales. Litter the office with travel brochures, and purchase office subscriptions to food, travel, and entertainment magazines. E-mail him regularly with weather updates of distant cities.
Discuss family at every opportunity.
Show him pictures of your family. Show him pictures of his own family. If even your most distant relative has bought a car, won a part in a school play, or suffered a toothache, offer these stories in careful detail—perhaps they will trigger recognition that he, too, has a wife, sister, uncle, or son.
If he has ever discussed a personal interest, become obsessed with it.
Pounce on any non-work-related subject in the hope of rekindling his own passion. Discuss popular subjects and pastimes to spark some vestigial interest. Try baseball, politics, food, music, and celebrity gossip. Avoid even juicy office gossip, since that will lead him back to work-related issues.
His jokes are always bad.
Be prepared.
Steel yourself for the punchline. If you are unable to determine if the punchline has been delivered, watch your boss for response cues such as a long pause or an expectant grin.
Determine the nature of the required reaction.
A secure boss will be satisfied with a friendly groan and head shaking, while an insecure boss will require a more elaborate show of amusement and appreciation. Respond accordingly.
Fake amusement.
THE SHOULDER SHAKE—Smile, cover your mouth with one hand, and shake your shoulders up and down. This is especially good for puns.
THE AMUSED CHUCKLE—Smile, look directly at your boss, and say, “Heh, heh, heh.” This is a versatile, all-purpose laugh response.
THE GENUINE GUFFAW—Smile broadly, then let out a single, loud “Ha!” Slap your thigh in amusement. If seated, slap your knee.
Change the subject immediately.
Do not give him the chance to “tell you another one.”
Be Aware
Be on guard for other styles of bad boss behavior, and prepare to take quick action:
• THE SUPREME DELEGATOR
Always willing to accept all of the credit but none of the blame, the Supreme Delegator is really setting up others to take the fall. Although she tries to cloak her behavior in an air of confidence, the Supreme Delegator has very low self-esteem and fears that she will fail.
From the moment a project is handed off to you, through all the key decisions, to the final action, make sure you advise your boss—in writing—of all key decisions and plans. Keep copies. Do not be afraid to proceed as you think best, but be prepared for your boss to disavow all knowledge of the details should there be a problem.
• THE YES/NO MANAGER
This boss is ever-increasingly bored with meaningful information, intelligent discussion, and any complexity. He wants every decision reduced to an overly simplified YES or NO.
Present an executive summary, with several alternatives for action. Attach the full report with well-reasoned, well-documented arguments for each point. If asked for your recommendation, give it orally.
• THE PASSIVE-AGGRESSIVE BOSS
The Passive-Aggressive Boss puts things off, then complains at the last minute that he has not had enough time. The boss can then blame those above or below him for doing a bad job.
Be firm with deadlines and set them in writing. Involve others in the process when possible. These co-workers can then serve as witnesses to any mis-behavior on your boss’s part.
• THE INDECISION MAKER
This boss ascended to power by a fluke—he can’t actually make a decision himself. He needs input from three or four different sources in order to feel comfortable in his own shoes.
Present any question to your boss as if you’ve taken an informal survey. Include information from any key employees he’d want to hear from.
• THE ALL-BUSINESS-IS-PERSONAL MANAGER
The All-Business-Is-Personal Manager has a seriously dysfunctional life outside of work, and thus cannot ever really separate business life from personal life. He will take everything personally. He has nothing but work to cling to, so make your work time with him enjoyable. One bad day can ruin a whole relationship.
The Talker just won’t shut up.
Look busy.
Free time means chat time to the Talker. Leave paperwork handy on your desk, and spreadsheets or other documents open on your computer at all times. When the Talker approaches, stare at the task intently and pretend not to notice his arrival.
Evade and deflect.
Say, “I’d love to hear more, but I’ve got to finish this by [fifteen minutes from now].” Or, rise from your desk and say, “Oh my gosh, I’ve got to go to that meeting.” As you walk away, suggest that another co-worker has expressed interest in whatever is on the Talker’s mind and aim him in that direction.
“Yes” the conversation to death.
Talkers are often of the life-is-a-struggle type, for whom everything is a hardship, and they must convince you of this. As the Talker’s tale unfolds, keep agreeing with the Talker, but be sure you do not ask a question or volunteer information. After five flat agreements (“Yes . . . yes, I see.”) the Talker should count this as adequate confirmation and wander off.
Avoid showing emotion.
Do not be cheerful around the Talker, as this may make her dejected and even more talkative. Do not be sad around the Talker, since this may encourage him to top your tale of woe with his own.
The Kiss-Up craves approval mostly from the boss, but will also seek approval from you.
Congratulate her on her dedication and achievements, no matter how dubious:
“You’ve sure got a way with a spreadsheet,” “It’s not everyone who’d work five straight weekends,” or “You make the best coffee.”
Get her to do some of your own work as well.
Suggest that this is a good way to further bring her talents to the boss’s attention.
Avoid her during restructuring.
During times of management turmoil or when the chain of command is uncertain, the Kiss-Up may become disoriented or hostile. Give her a wide berth.
TMIs have no boundaries and no shame. Every unsettling piece of personal information is worth sharing with you.
Avoid TMIs on Mondays.
The weekend will provide him with an abundance of ammunition for inappropriate personal tales. By Tuesday or Wednesday, he may have expended the most harrowing of these stories on fellow workers.
Do not get on an elevator with a TMI.
If you see a TMI waiting for an elevator, take the stairs. If you are already inside the elevator, feign some activity—a forgotten wallet, pocketbook, or keys—that will provide an excuse for your quickly exiting to retrieve the item.
Maintain a buffer of at least two co-workers between the TMI and yourself at any company party or off-site function.
If the first co-worker bolts, you will still have time for evasive maneuvers as the TMI engages the second.
Say, “Thanks for sharing.”
Upon the completion of a long and sordid tale—his tapeworm, his night on the town, or his dream about the boss—say “Thanks for sharing.” Without further comment or response from you, the TMI will move on to seek a more appreciative audience.
While sharing many of the characteristics of the TMI, the Gossip specializes in spreading too much information about other people.
Beware the signs.
A sure sign of a hopeless (but amateur) gossip is someone who proceeds a statement with, “I shouldn’t be telling you this but . . .” or, “I promised I wouldn’t tell anyone but . . .” Apply the techniques for avoiding a TMI, on page 344, to save yourself from a gossip who wants to tell you everything.
Bait and switch.
Offer outrageous stories about yourself in order to stun and distract him from prying into your true private life. With a serious expression, tell the Gossip that you were locked in the monkey cage at the zoo all weekend and had the time of your life; or that you accidentally sent a very revealing personal photo via e-mail to all the executives in the company. The juicier the story, the better. When he asks, “Is that true?” say, “I’m sorry, I can’t talk about it anymore.”
1 Relax.
Try to see the first tee as any other shot in the round. Do not make significant changes in your tempo. Try not to rush any aspect of your pre-shot routine or swing. Ignore comments from the crowd waiting to play, or pressure from the starter to speed up.
2 Warm up.
Thoroughly stretch in whatever way increases blood flow to your body and feels good. Take as many practice swings as you need.

3 Release the tension in your body.
Identify where the tension is, consciously tighten that area of your body, and then consciously relax that area while noticing the difference. Take a deep breath—in through your nose and out through your mouth— before you hit.
4 Be mindful.
Tune in to your feelings prior to your first swing. Are you nervous? Anxious? Steeped in self-judgment? Be aware of these negative feelings and the consequences of them on your body. Recognize that these feelings often get in the way of your true golf swing and game. Replace those feelings with positive energy. Choose to feel competent and content. Remember a time when you played your best. Generate these thoughts until you are ready to hit the ball.
5 Be confident about your abilities and expectations.
If you hit the ball 200 yards 80 percent of the time, you will most likely hit the ball 200 yards this time. This does not mean that you should not strive for your personal best throughout the game. Recognize that the first tee is a starting point on which you are building a solid foundation for your day’s golf game.
6 Select the club with which you feel most comfortable.
This may not be your driver. Use a long iron or three wood if your driver is not your best club off the tee.
7 Follow a routine for addressing the ball.
Keep to an established pattern of how you walk up to the tee, how many practice swings you take, how you set your stance, and at what moment you start your swing. This routine is especially important on the first tee.
8 Do not overanalyze your swing.
Your muscle memory will complete the swing for you if you cease to over-think it. Do not over-swing in an effort to hit the ball farther.
9 Focus.
Choose a single location on the fairway and aim at that spot.
Be Aware
• Spend time on the practice tee prior to hitting off the first tee. Go through six to eight clubs in your bag—start with wedges (they are easy to swing) and work your way up to woods. Visualize hitting off the first tee on your last 10 to 12 practice drives.
• Golf is the culmination of physical, emotional, and mental preparedness. It is a game that begins and ends in both the body and the mind of the golfer. The first tee is the initial setting where you need to understand and accept the interrelation of these three elements.
Cheating at golf is so pervasive it seems to be part of the game: even people playing alone do it. There are mulligans off the tee, gimmies on the green, and lots of ways to get an unfair advantage in between. Here are a few of the most common scams and how to recognize and defeat them.
While searching for a ball lost in the woods, the player drops another ball that he has been carrying and falsely announces to the group that he has found his original ball. He has saved himself a penalty stroke and has positioned the ball as he pleases. A variation on this play is to find a stray ball, claim it, hit it, and move on quickly.

1 Make a mental note of the markings on your opponent’s ball at the start of the round.
Notice color, scratches, brand, and number.
2 Always help to look for a missing ball, and keep an eye on your opponent as well.
Two people searching also speeds up play.
The cheat gently taps her ball with a foot or the club, gaining a more favorable position.
1 Stand near your opponent so that you can see the ball at all times.
2 Always watch your opponent, and, more important, let her know that she is being watched at all times.
Subtle comments about her technique, her attire, or the nuances of her address will let her know she’s being carefully observed. You do not have to stand by her side all day long, but put yourself in a position where you can see any errant moves. Being under constant surveillance makes most people less inclined to bend the rules.
3 Note how much of the ball is visible as you approach it, and mark its position in relation to nearby objects, such as roads, trees, and traps.
As the cheat goes to take the shot, the amount of the ball that is visible to you, even at a distance, should not change. Watch also for substantial changes in the ball’s location; some players do not stop at simply tapping the ball to improve the lie.
On a hole on which everything went wrong, she drops a few strokes from the score before announcing or recording it. She realizes that most opponents will lose track at around eight or nine strokes, and may not question such a total for fear of embarrassing themselves or the player.
1 Keep score carefully yourself.
2 Ask for a careful account of each stroke after every hole.
Be supportive of your golfing companion. When she has a difficult hole, tell her to hang in there, that it happens to the best, and so on—but when the hole is complete, ask her to recap the hole in a friendly, sympathetic manner.
Though he has hit his ball out of bounds, into the water, or in any other situation where penalty strokes are applicable, he tries to take only one penalty stroke where two are warranted.
1 At the completion of the hole, ask for a clear account of the score and applicable penalty strokes.
2 If there is any debate, be courteous, but firm.
If the scoring remains unresolved, take it up with the club pro at the end of the round.
Someone who has a five handicap introduces himself to a group of strangers and announces a higher handicap. After shooting a 78, he claims that it was the round of his life, and is somewhat sheepish about taking everyone’s money.
1 Take out your own USGA handicap card as you are having the discussion about handicaps.
Tell the stranger that you have all agreed to show each other your cards before starting.
2 At the end of nine holes, assess where this individual stands.
If it is clear that things are not what they appear, demand an adjustment in his stated handicap. If he balks, play the back nine, but state that the competition or bet is off. If someone you just met dumps the front nine, scoring above his alleged handicap, be cautious about increasing (“pressing”) a bet on the back nine. It could be a setup.
Be Aware
• Keeping an opponent honest requires you to be observant and to hold everyone accountable for his or her strokes as the round unfolds. This may seem tedious at times, and may cause some odd interactions with your opponents. You must decide what is more important to you: interpersonal relations or winning.
• Cheating can occur even when there is no betting or competition between players. A player seeking to claim a new course record or his own personal best score can seek to shave strokes from the scorecard. You can decide how involved you want to be.
1 Determine the level of danger.
If a golfer is waving a club around angrily or drunk-enly, or is exhibiting undue hostility, it may be necessary to act quickly to restore order and safety.
2 Try to talk him down.
Speak calmly, keeping your tone even and your voice low. Do not make sudden gestures or movements. Remind him that it’s only a game. Tell him to take a few deep breaths.
3 If he threathens to strike, quickly move into the center of the potential swing.
As he draws the club back to swing at you, approach him at an angle that will bring you to the center of the club. Try to remain close to his body. You are much more likely to be injured by the outer end of the club.
4 Grab the club.
At the top of his swing, or just as the club starts to descend, step close to him and, using one or both hands, clutch the club tightly near the grip. Pull down, staying close to him, until you can wrap your arm around the club. Hold the shaft with your armpit while keeping a firm grasp on the club’s grip.
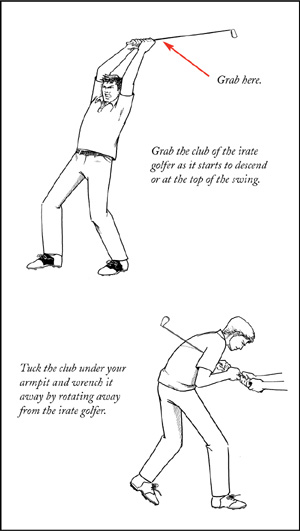
Maintaining your hold, rotate your body around, away from the golfer’s face. This maneuver should give you the leverage you need to wrench the club out of his grip. Pull with just enough force to free the club from his grasp.
6 Step back quickly, and be prepared for him to continue to be angry and to flail.
If necessary, use the club to keep him away from his bag, where he might obtain a second weapon.
7 If necessary, call for help.
Seek the assistance of your fellow golfers to help defuse the situation.
8 Continue to talk to him until he calms down.
Be Aware
It is always advisable to make all possible attempts to avoid physical confrontation. Your first choice should be to ignore and walk away from an irate golfer. Your next choice should be to use verbal skills to calm the golfer by speaking in low tones and showing understanding. Become physical only as a last resort, to avoid greater injury to yourself or others.
1 Examine your behavior.
A golf addict is a person whose life is controlled by golf. You may think you have a problem with golf, but still not think that you are an addict. Ask yourself these questions. The total number of questions that you answer “yes” to is not as important as how you honestly feel about yourself as you answer these questions:
• Do you golf regularly? Do you feel empty inside if you cannot golf at your usual time?
• Do you ever golf alone, or watch golf alone?

• Have you ever substituted one club for another, thinking that one particular club was the problem?
• Have you ever cheated to obtain a better score?
• Have you ever lied to get into a golf course of which you were not a member?
• Has your job, family life, or school performance ever suffered from the effects of golf ?
• Have you ever been arrested as a result of golf ?
• Have you ever lied about the fact that you are playing, or about how much you play?
• Do you put the purchase of golf equipment ahead of your other financial responsibilities?

• Have you ever suffered a golf-related injury?
• Do you continue to golf despite the fact that you are never satisfied with your performance?
• Does golf interfere with your sleeping or eating?
• Does the thought of not being able to play golf terrify you?
• Do you feel it is impossible for you to live without golf?
2 Admit that you have a problem, and that you need help.
You are not responsible for your disease—but you are responsible for your recovery. You can no longer blame people, places, and courses for your addiction.


3 Admit to one other person that you have a problem.
This person will help you wean yourself off the game. This person should not be a regular in your foursome.
4 Reduce the amount of golf you play.
Going cold turkey may be difficult—first, reduce by half the number of times you play a week. Then cut that amount in half the following week, and so on. Replace golf with other activities to take your mind off the withdrawal you may experience. Make it a point to play other sports, go to the movies with your family, and watch alternate programming on Sunday afternoons.
5 Make direct amends to everyone you’ve harmed emotionally or physically as a result of your addiction.
This will help you to “own” your disease, and also allow others to help you when you need it.
6 Watch yourself carefully—and be willing to forgive a relapse.
Many addicts relapse at some point during recovery. If you fall back into your old ways, admit it to yourself first, then to others who can assist you in finding your way again.
7 Do not be afraid to ask for help when you need it.
Your golf pro may be able to direct you to others who have been through what you are dealing with. Form a support group. Therapists may also give you perspective. (Note: Sports therapy is physical therapy, not mental therapy.)
8 Remember that no one is perfect.
Seek the ability to change the things you can, and to accept the things you cannot change. Realize that you may never be able to play golf again without risk of a relapse. There is more to life than golf. But then again, relapses can always be cured.
1 Do not douse with water.
Oil and water do not mix: Water will cause the burning oil to spatter and spread the fire. Do not move the burning pan to the sink.
2 Turn off the stove.
3 Put on an oven mitt.
Large mitts are the safest option. If barbecue mitts— those that cover the forearm—are available, use for added protection.
4 Find a lid that fits the pan.
A lid that is slightly larger than the pan will also work.
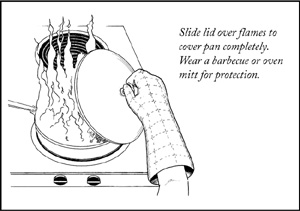
5 Hold the lid at an angle toward the fire.
Do not try to lower the lid directly onto the pan or you risk burning your arms. Keep your face and chest as far from the flames as possible.
6 Slide the lid onto the pan and hold it in place until the pan cools.
The pressure from the heat and flame can force a lid off the pan. Hold it securely in place.
7 Do not lift the lid.
Lifting the lid will add oxygen and feed the fire. Take the lid off only when the pan has become noticeably cooler.
8 If no lid is available, use baking soda.
Dump a large amount of baking soda on the grease fire to extinguish it quickly. Avoid using baking powder, which can cause the fire to flare.
Be Aware
• Do not use a dry chemical extinguisher to try to put out a grease fire. It is not effective, and the force of the compressed chemical agent can splatter burning material and spread flames.
• Never leave cooking oil to heat unattended: Flames may develop quickly.
1 Cool the burned area.
Immediately run cold water over the burned area for several minutes or until the injury site is cool.
2 Dry the burned area gently.
Blot the injury site using a clean, dry towel or sheet.
3 Check for blistering.
If the blisters are small, pop them with a sterilized pin and remove dead skin using scissors. (Wiping the tip of a pin in alcohol or heating it in the flame from a match will adequately sterilize the pin.) If there are no blisters and the burn is less than one inch across, apply burn cream and a sterile dressing.
4 Cover severe burns.
If the burn is larger than one inch across or is very blistered, cover it with a clean, dry sheet or towel and seek medical attention promptly.
Be Aware
• Infection is the main risk. Signs of infection include fever or local warmth, increased redness around the burned area, increased soreness, red streaks, swelling, or drainage of pus.
• Do not apply oily or greasy substances such as petroleum jelly or butter to the wound. These popular but misguided burn remedies are detrimental to the healing process.
1 Assess the size and nature of the fire.
Quickly determine if the source of the fire is electrical, and observe how large an area of the tree is burning. A fire larger than the size of a small waste-basket cannot usually be contained, even with a home extinguisher. If the fire is that large, evacuate the building and call the fire department from a cellular phone or a neighbor’s house.
2 If the fire is small and not electrical, douse it or smother it.
Extinguish the fire with a bucket of water or a multi-purpose (Class ABC) fire extinguisher, or smother it with a wet blanket.
3 If the fire is electrical, use a fire extinguisher.
Do not throw water on an electrical fire. Use a multi-purpose (Class ABC) home fire extinguisher.
4 When using a fire extinguisher, stand with your back toward an exit, six to eight feet from the fire, and Pull, Aim, Squeeze, Sweep (PASS).
Pull the release tab, aim at the base of the fire, squeeze the lever to release the pressurized chemicals, and sweep from side to side as you slowly move closer to the fire.

5 If the fire is still spreading, exit the house.
Evacuate the building quickly. Do not attempt to save ornaments, Christmas presents, or other valuables.
1 Select a fresh tree.
A dry tree is a major fire hazard; to get the freshest tree, cut it yourself. If you purchase a precut tree, run your hand down a branch to make sure it is not dry and shedding needles. Test the tree by bending a needle: If it snaps, the tree is too dry.
2 Leave the tree in a bucket of water overnight.
Place the tree in the stand the next day. Water it daily.
3 Place the tree at least three feet away from a fire-place, radiator, or other heat source.
4 Unplug tree lights when not in use.
Do not leave the lights on during the day, when you go to bed, or when you leave the house.
5 Do not place lit candles on or near a tree.
If tradition requires candles, use specially weighted sconces that do not tip over. Do not add electric tree lights or other electric equipment to or around the tree (such as a train set), in the event that water must be thrown onto the tree. Do not leave the tree unattended.
If Hanukkah arrives and you are without a menorah or candles, you will have to make your own.
You will need 2 cups flour, 1 cup salt, 1 cup water, 9 nuts or washers (at least ½ inch in diameter), a large mixing bowl, and at least three hours.
1 Preheat the oven to 200° F.
2 Mix the flour and salt together in the large bowl.
3 Add water.
Slowly pour water into the mixture and stir until it becomes the consistency of dough. If it is too dry, add more water; if it is too wet, add more flour.
4 Roll the dough into a strip about 12 inches long, 1 to 2 inches wide, and 2 inches thick.
5 Cut a 1-inch piece off one end and press it into the center of the strip.
The center area will be raised slightly: It will hold the Shamos candle, which is used to light the other candles.
6 Add the nuts to the dough.
Press the nuts into the dough, four spaced evenly on each side of the Shamos holder. Place the ninth nut in the raised center portion. The nuts should be pushed in so that part of the nut sticks up above the top of the dough. The nuts are the candle holders.
7 Bake.
Place the menorah on a baking sheet, and place in the oven. Bake for about two hours. The menorah is ready when the dough becomes hard. (You can air dry the menorah instead of baking it; allow two to three days for hardening.)
8 Let cool.

You will need a baking dish or bowl and sand, dirt, rice, or gravel.
Fill a 2-inch-deep (or deeper) bowl with sand, dirt, rice, gravel, or other nonflammable material.
Stick the appropriate number of candles in the dish each night (placing the Shamos on a slightly elevated mound) to create a makeshift menorah.
Be Aware
Do not make a menorah out of wood. Hanukkah candles must be allowed to burn down completely, and wood presents the risk of fire.

Do not lie.
If you receive a gift you simply detest, do not complicate the situation by lying. Do not praise the gift and say that you’ve always wanted one: The giver may later wonder why you are not using the gift or why it is not displayed in your home—or you may get something similar next year. If you receive an awful sweater, say something neutral like, “I love sweaters.” If the giver is still not convinced that you like the present, try it on; you may also be able to offer another partially true compliment: “What a perfect fit!” If you receive as a gift something you already own, you do not need to advise the giver. Say, “I love this [thing]. How did you know?”
Thank the giver for the thought, not the gift.
Say, “How thoughtful of you” or “Thanks for thinking of me” or “I can’t tell you how much this means to me.”
Do not overpraise the gift or the giver.
Keep your thanks simple and brief.
Determine where the gift was purchased.
If there was no gift receipt, check the packaging, label, and tags for a store name. If you cannot determine where it was purchased, ask the giver appreciatively: “Where did you ever find this?” Note the name in order to return the gift later.

Regift it.
Unwrap the gift completely to make certain that it does not contain a hidden card, monogramming, or other giver- or recipient-specific identification. Rewrap it in fresh wrapping materials.
Be Aware
Regifting can be risky. You may later be embarrassed if you do not know where the gift you gave was purchased. Some regifts, particularly distinctive ones, may make the rounds (see “How to Repurpose a Fruitcake,” facing page) and end up being regifted to the original giver, a situation you may find hard to explain.
Turn the fruitcake into another dessert.
Do not serve the fruitcake as is. Slice it very thin, tear the pieces apart, and use them in an English trifle, a dessert made with alternating layers of cake (née fruitcake), custard, whipped cream, and, sometimes, fresh fruit. Serve in a deep glass bowl (often called a trifle bowl).
Use the fruitcake as a doorstop.
Fruitcakes are very hardy and will last for years. Use the fruitcake to prop open a door.
Use the fruitcake to prevent your car from rolling.
When parked on a hill, wedge the fruitcake under the downhill side of a rear tire. In your garage, position the fruitcake on the floor as a tire stop to prevent the car from hitting the garage wall.
Use the fruitcake as a dumbbell.
A good-size fruitcake may weigh several pounds. Incorporate it into your exercise routine, holding it firmly for arm curls, or squeezing it between the feet for leg lifts.
Use the fruitcake in a carnival game.
Collect fruitcakes and stack them vertically in a pyramid. Using tennis balls, try to knock down the fruitcakes in five throws.

Set up two fruitcakes either horizontally or vertically, depending on the size of the books.
Use as art.
Bolt a fruitcake to a painted board, frame it and hang it on your wall, or simply place it on a pedestal. Position the fruitcake in a well-lit area.
Use the fruitcake as compost.
Fruitcakes are made of (mostly) organic material, and make good fertilizer. However, it may take several years for the fruitcake to decompose.
1 Slice it thin.
Cut the fruitcake into narrow slices—no more than ⅜ inch—while the cake is cool. Place the slices on a serving platter, cover, and allow to come to room temperature.
2 Check the knife.
After cutting, the blade should be somewhat sticky and slightly colored. If the knife does not have to be wiped with a damp cloth after each cut, the cake is too dry, and a healthy dollop of whipped cream will be necessary. If the knife is heavily streaked with cake ingredients after cutting, the fruitcake has not been baked long enough and may need to be repurposed.
Cover with lots of ice cream and whipped cream. Wash the fruitcake down with strong black coffee, Irish coffee, brandy, or a hot toddy.
4 Swallow without chewing.
Cut the slice into small pieces. Swallow each piece whole, as you would a vitamin. If chewing is necessary, use your molars, not your front teeth or incisors, and try not to touch the food with your tongue, which has all your taste buds.
Be Aware
• Do not be fooled by a gift of a “Yule cake,” “Christmas ring,” or “dried fruit bread”—these are just other names for a fruitcake.
• If the fruitcake is very dark in color, it contains lots of molasses and corn syrup, making it exceedingly sticky, thick, and dense. The heavier the fruitcake, the more candied fruit and dark molasses it has. The darker or heavier the fruitcake, the more difficult it will be to swallow.
• A light-colored fruitcake is a good sign; the cake has plenty of batter and light corn syrup.
• Fruitcake should be stored in a cool place, such as a refrigerator or cellar. If kept cool and in a tin, the cake will last for at least a year, and you can give it as a present the following Christmas.
1 Wear newer shirts and pants.
Garments (especially shirts) that have been laundered repeatedly are smaller than their original sizes. These items may also have loose buttons that might be ejected during a meal.
2 Choose dark-colored garments.
Lighter colors are less forgiving visually, while darker colors tend to obscure bulges.
3 Move your collar button.
Many men carry extra weight in the neck and jowls. Remove and reattach your collar button, moving it to the very edge of the collar tab. Wear a standard tie (not a bow tie) to hide the alteration.
4 Wear suits.
Suits are very effective for hiding pounds. They even out lines and offer structure to the body shape. Choose a dark-colored suit with a boxy shape rather than one cut narrow through the chest and waist. Shoulder padding is slimming, and is a must to balance the hips. (Broad shoulders help to create the ideal inverted triangle physique.) A suit jacket is also effective for hiding a large rear end: Choose a jacket with side vents/slits for extra room and comfort.
5 Move pants to below the belly.
Do not attempt to hike pants up and wear them high on the waist: This will result in an unsightly bulge, the pants may not close properly, and they will be too short in length. Wear them low on the hips, and use a jacket or loose-fitting shirt to conceal the gut.
6 Use the proper belt notch.
A belt should be worn in the third or fourth notch. Buy a longer belt rather than moving to a lower notch.
Be Aware
• Avoid fitted, knitted, polo-type tops, such as golf shirts. These garments accentuate what you want to hide.
• Avoid horizontal stripes, which widen your appearance.
• Avoid suits with a center vent in the back, which tends to ride on the rear end rather than fall over it.
1 Choose classic-fit trousers and tunic shirts and blouses.
Even if a bit tight, these garments will fit better and look more appropriate than severely cut items. Blouses can be worn untucked, but only if they are cut straight across the bottom and not high on the sides. If you carry extra weight in your hips, avoid narrow-leg pants; instead opt for classic or wide leg styles.
2 Use safety pins on pants with side and rear closures.
Safety pins can be used to extend the waistband and may even be used in a chain of two or three. Wear a long jacket or over-blouse to hide the pins; take care in windy conditions.
3 Pick structured garments.
Jackets and cardigan sweaters that have a structured shape—even without you in them—hide pounds. Look for jackets that have shoulder pads, back seams that curve, and tapered sleeves. Unlike the boxy suits men should wear, women’s suits should be tapered, giving the appearance of a slimmer waistline.
4 Layer tops and use tops as shirt-jackets.
Blouses that are too tight when buttoned can be worn partially unbuttoned over a round-neck or turtleneck knit top. Leave the over-blouse unbuttoned down to a button above the waist; tuck the top and blouse into your skirt/pants for a slimming layered look. Add a jacket, or wear the blouse completely unbuttoned as a shirt-jacket if it is cut straight across the bottom.

5 Choose monochromatic ensembles.
Wear dark suits, or pair a black skirt or pants with a black top or blouse. To maximize the slimming effect of dark, monochromatic ensembles, keep the darkest garment on the bottom. Place lighter shades of the same hue near your face.
6 Wear bright colors properly.
To wear bright colors and still look thin, pair them with dark neutrals. Wear black pants/skirt with a brightly colored blouse or knit top, topped off with a black jacket. Or choose a red jacket with a black top and black pants/skirt.
7 Draw attention to the face with striking accessories, stylish hair, and tastefully applied makeup.
Be Aware
• Avoid clingy knits and spandex. These materials keep no secrets and tend to draw the eye to bulges. Lycra creates some stretch in a garment and is far more forgiving than spandex.
• Before the holidays, purchase a few blouses and two pairs of dark pants that are one size too big. Wear them before the holidays and people will think you’ve lost weight. After the holidays, they will fit perfectly.
• Avoid drawing attention to the waist with flashy belts over large shirts.
Turn out the lights.
As soon as you hear or see the carolers coming down the street, douse the lights. A dark house may deter them from stopping, since they will think no one is home. Turning out the lights belatedly—after they have arrived at your door—will send a strong message, but carolers are frequently very determined.
Turn up your music.
Without opening your door, play CDs at high volume. Speed metal and 1970s rock are likely to be in a different key than the carolers, who will be unable to stay in tune, become discouraged, and depart. If you are listening to Christmas music, shut it off immediately, or they may be encouraged to sing along.
Answer the door in a robe or towel.
Embarrassed, the carolers may simply leave. Nudity (even partial) may offend them and make them unable to sing. Call to another person inside the house (real or imaginary), “I’ll be right back.”
Answer the door holding a telephone.
Shout, “I can’t hear you! There are carolers singing!” into the mouthpiece until the carolers move on.
Tell them you would like to make a small donation, and that you enjoy their singing—from a distance.
Request songs they will not know.
The song repertoire of the caroler is generally quite shallow. Good choices to stump the carolers include “Adam Lay Ybounden,” “Riu, Chiu,” and “The Zither Carol.”
Send them to someone else.
Smile and point to the house of a stranger or a neighbor you dislike, and say, “My friend over there really loves carols!” A house that is lavishly decorated for the season will prove irresistible to them.
Request “Deck the Halls.”
Every verse ends with “Fa La La La La, La La La La,” which is easy to remember.
Just join in.
Carolers are irrepressible: If you are lost (or off-key), they will simply sing louder to drown you out.
Listen for the chorus.
Most carols have a repeating section, or chorus. Listen for it, and then sing only that part.
Move to the back of the group, then move your mouth soundlessly as they sing.
Be Aware
• Do not attempt to discourage carolers by stating that you are Jewish: You will get “Light the Menorah,” “The Dreidel Song,” “Sunrise, Sunset,” or another menu of ethnic songs.
• Do not tell carolers that you don’t celebrate Christmas: You are likely to hear “Frosty the Snowman,” “Sleigh Ride,” “Jingle Bell Rock,” or a litany of secular holiday songs.
• Do not attempt to avoid carolers by going to the bathroom; they will be waiting when you return.
1 Keep a glass in your hand.
If others think you are being festive and uninhibited, you are much more likely to receive a kiss. Even if you are not drinking, always hold a partly full glass of champagne.
2 Hug people.
As the clock strikes midnight, begin hugging everyone around you.
3 Select a desirable person.
As you are hugging, look for an attractive person who you would enjoy kissing and who might kiss you. If a person is not randomly kissing others, he or she may be less likely to kiss you.
4 Begin your approach.
Act casual, but keep your destination in view. Slowly move toward your chosen one, hugging everyone on the way.
Do not appear to be “lining up” to kiss this person. Time your arrival precisely as the person releases the previous reveler.
6 Yell first, then hug.
Yell “Happy New Year!” as you move in. Hug, embrace, then pull away slightly.
7 Kiss.
Keep your mouth closed, pucker slightly, and plant the kiss.
Kiss a pet.
Dogs are generally agreeable and have relatively clean mouths. Cats are usually well groomed but are more passive and tend to get rather than give. Keep your mouth closed.
Kiss yourself.
Find a mirror, pucker up, lean close, and kiss. Keep the lips slightly parted. Do not attempt to use your tongue. Wipe the mirror clean after you have completed your kiss. You may also try kissing the back of your hand.
Kiss a celebrity.
Watch a favorite movie or show on television and kiss the screen when an appealing star has a close-up.

Wipe the screen first to remove static electricity and dust, and wipe the screen after to remove any evidence.
Hug a pillow.
Full-body pillows are more satisfying.
Call a friend on the phone.
After you wish your friend a happy New Year, give the telephone mouthpiece loud, smacking kisses. (This works less well with cellular phones.)
