
Skill Level
![]()
Finished Measurements
26 inches × 34 inches
Materials

• Red Heart Amore medium (worsted) weight polyester yarn (3½ oz/198 yds/100g per skein):
3 skeins each #6316 chamomile and #6724 peaceful
• Size I/9/5.5mm crochet hook or size needed to obtain gauge
Gauge
4 sc = 1 inch; 4 rows = 1 inch
Pattern Notes
In diagonal Waterfall crochet, every row is worked in single crochet and the chain spaces are offset by 1 stitch. The stitch name begins with a “d” to indicate that it is worked on a diagonal. The stitch can slant either down and to the left or down and to the right. The instructions are the same for both. To compensate for the diagonal, a stitch will be skipped and 1 of the chains in the chain space will be worked. Watch for them in the instructions.
Please refer to photos when working as needed.
Special Stitches
See Waterfall Crochet Appendix & Tips for more details on sts.
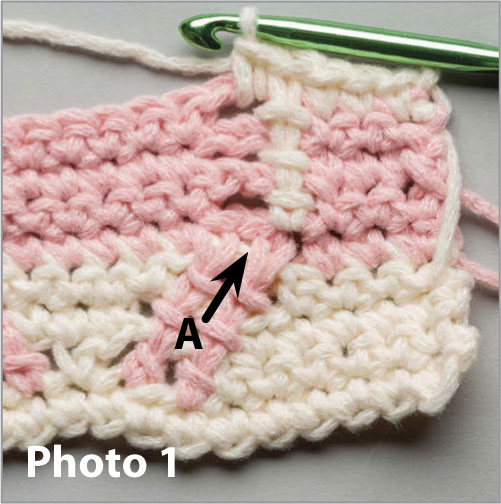
Waterfall single crochet (Wsc): This is worked the same as working a sc into the ch sp (see photo 1). The instructions will say Wsc over next st. The corresponding ch sps and st below are sk.
Note: The corresponding st below is the Wch1 (see A on photo 1) worked between the dW4st.
Diagonal Waterfall chain-1 (dWch1): This is worked the same as making a ch-1 sp (see photo 2). The instructions will say Wch1 over next st. The corresponding ch sps and st below are sk (see A on photo 2).

Note: In subsequent rows the corresponding st below will be a dWch1 or Wsc.
Diagonal Waterfall over 4 rows and into st (dW4st): (insert hook in next ch sp, yo, pull lp to front of work) 3 times (see photos 3 & 4),

insert hook in corresponding st, turn piece to view back of st,
Note: The st will be worked off the hook viewing the back of the st. This is because the yarn has been carried down the back of the work as lps have been added to the hook.
yo, pull lp through st (see photo 5),

(yo, pull lp through 2 lps on hook and ch sp) 3 times, turn to view RS of piece, pull last lp (see A on photos 6 & 7) on hook a little extra to compensate for the diagonal,

yo, pull through last 2 lps on hook (see photos 8 & 9).

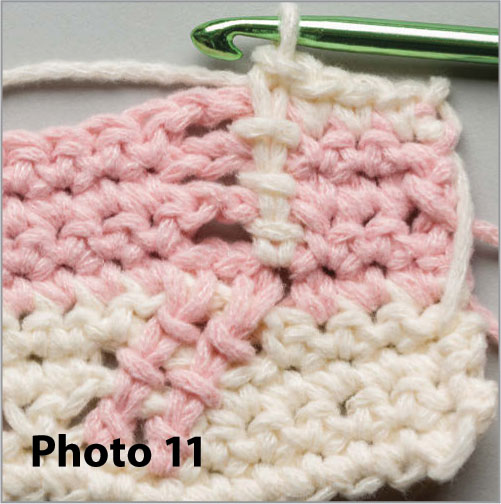
Waterfall over 4 rows and into st (W4st): (insert hook in next ch sp, yo, pull lp to front of work) 3 times (see photo 10),

insert hook in corresponding st (see A on photo 10), turn piece to view back of st,
Note: The st will be worked off the hook viewing the back of the st. This is because the yarn has been carried down the back of the work as lps have been added to the hook.
yo, pull lp through st, (yo, pull lp through 2 lps on hook and ch sp) 3 times, turn to view RS of piece, yo, pull lp through last 2 lps on hook (see photo 11).
Blanket
Multiple of 16 plus 20 chs.
Row 1: With chamomile, ch 100, sc in 2nd ch from hook, sc in each ch across. (99 sc)
Row 2: Turn, ch 1, sc in each of first 6 sts, ch 3, sk 3 sts, sc in next st, ch 3, sk 3 sts, (sc in each of next 9 sts, ch 3, sk 3 sts, sc in next st, ch 3, sk 3 sts) across to last 6 sts, sc in each of last 6 sts.
Row 3: Turn, ch 1, sc in each of first 5 sts, ch 3, sk next st and next 2 chs, sc in next ch, sc in next st, sc in next ch, ch 3, sk next 2 chs and next st, (sc in each of next 7 sts, ch 3, sk next st and next 2 chs, sc in next ch, sc in next st, sc in next ch, ch 3, sk next 2 chs and next st) across to last 5 sts, sc in each of last 5 sts.
Note: Each color is worked 4 rows. Alternating between chamomile and peaceful, change to next color at the end of every 4th row.
Row 4: Turn, ch 1, sc in each of first 4 sts, ch 3, sk next st and next 2 chs, sc in next ch, sc in each of next 3 sts, sc in next ch, ch 3, sk next 2 chs and next st, (sc in each of next 5 sts, ch 3, sk next st and next 2 chs, sc in next ch, sc in each of next 3 sts, sc in next ch, ch 3, sk next 2 chs and next st) across to last 4 sts, sc in each of next 3 sts, changing to next color (see How to Change Color in Last Stitch), sc in last st. Drop (do not fasten off) previous color (it will be picked up in 4 rows).
Row 5: Turn, ch 1, sc in each of first 3 sts (see photo 12),

[sk next st (see A on photo 13), dW4st—see Special Stitches in next st (see B on photo 13),

dWch1—see Special Stitches over next st, dW4st in next st (see photo 14),

sc in 3rd ch of ch-3 sp (see A on photo 15), sc in each of next 5 sts, sc in first ch of ch-3 sp (see B on photo 15),

dW4st in next st, dWch1 over next st, dW4st in next st, sk next st (see A on photo 16),

sc in each of next 3 sts] across (see photo 17).

Row 6: Turn, ch 1, sc in each of first 3 sts, (ch 3, sk 3 sts, sc in each of next 7 sts, ch 3, sk 3 sts, sc in each of next 3 sts) across.
Row 7: Turn, ch 1, sc in each of first 3 sts, (ch 3, sk ch-3 sp, sc in each of next 7 sts, ch 3, sk ch-3 sp, sc in each of next 3 sts) across.
Row 8: Changing to next color in last st, rep row 7 (dropped color will be picked up in 4 rows).
Note: For all rem W4st and dW4st sts in this pattern, work into the tops of the previous row of W4st or dW4st sts.
Row 9: Turn, ch 1, sc in each of first 3 sts, [W4st (see Special Stitches) in next st, Wsc (see Special Stitches) over next st, W4st in next st, sc in each of next 7 sts, W4st in next st, Wsc over next st, W4st in next st, sc in each of next 3 sts] across.
Row 10: Turn, ch 1, sc in each of first 3 sts, (ch 3, sk 3 sts, sc in each of next 7 sts, ch 3, sk 3 sts, sc in each of next 3 sts) across.
Row 11: Turn, ch 1, sc in each of first 3 sts, (sc in next ch, ch 3, sk next 2 chs and next st, sc in each of next 5 sts, ch 3, sk next st and next 2 chs, sc in next ch, sc in each of next 3 sts) across.
Row 12: Turn, ch 1, sc in each of first 4 sts, sc in next ch, ch 3, sk next 2 chs and next st, sc in each of next 3 sts, ch 3, sk next st and next 2 chs, sc in next ch, (sc in each of next 5 sts, sc in next ch, ch 3, sk next 2 chs and next st, sc in each of next 3 sts, ch 3, sk next st and next 2 chs, sc in next ch) across to last 4 sts, sc in each of next 3 sts, changing to next color, sc in last st (dropped color will be picked up in 4 rows).
Row 13: Turn, ch 1, sc in each of first 5 sts, sc in first ch of ch-3 sp, dW4st in next st, dWch1 over next st, dW4st in next st, sk next st, sc in next st, sk next st, dW4st in next st, dWch1 over next st, dW4st in next st, sc in 3rd ch of ch-3 sp, (sc in each of next 7 sts, sc in first ch of ch-3 sp, dW4st in next st, dWch1 over next st, dW4st in next st, sk next st, sc in next st, sk next st, dW4st in next st, dWch1 over next st, dW4st in next st, sc in 3rd ch of ch-3 sp) across to last 5 sts, sc in each of last 5 sts.
Rows 14–121: [Rep rows 2–13 consecutively] 9 times.
Note: For a longer project, continue to rep rows 2–13.
Rows 122–132: Rep rows 2–12. At end of last row, fasten off dropped color.
Border
Turn, ch 1, sc in each of first 5 sts, sc in first ch of ch-3 sp, dW4st in next st, dWch1 over next st, dW4st in next st, sk next st, sc in next st, sk next st, dW4st in next st, dWch1 over next st, dW4st in next st, sc in 3rd ch of ch-3 sp, (sc in each of next 7 sts, sc in first ch of ch-3 sp, dW4st in next st, dWch1 over next st, dW4st in next st, sk next st, sc in next st, sk next st, dW4st in next st, dWch1 over next st, dW4st in next st, sc in 3rd ch of ch-3 sp) across to last 5 sts, sc in each of next 4 sts, for corner, 3 sc in last st, turn to work side (see photo 18),

sc evenly across to corner, 3 sc in corner, turn to work in ends of sts (see photo 19),

working over end, sc in each st across to corner, 3 sc in corner, turn to work side (see photo 20),

working over ends and carried yarn, sc evenly across to corner, work 2 more sc in corner, join with sl st in top of first sc (see photo 21). Fasten off. ![]()
