4 Cultivating Mushrooms
Mushroom cultivation is, along with keeping livestock and growing plants, an important branch of our production on the Krameterhof. I began to work with mushrooms some time ago. Mushrooms were one of my most important sources of income in the 80s. In Lungau and the neighbouring areas I sold button, oyster, shiitake, and king stropharia mushrooms and many other kinds with great success. However, the atomic disaster in Chernobyl in 1986 suddenly changed the situation. Despite the fact that our mushrooms were obviously not contaminated, overnight it became impossible to sell them. This hard economical blow caused me a number of sleepless nights. In hindsight, it does, however, make clear what the consequences of extreme specialisation for a business can be. There will always be unforeseeable events, with unexpected outcomes, to which only the few with enough flexibility and versatility can adapt. Specialisation, on the other hand, creates only risk and dependence.
General
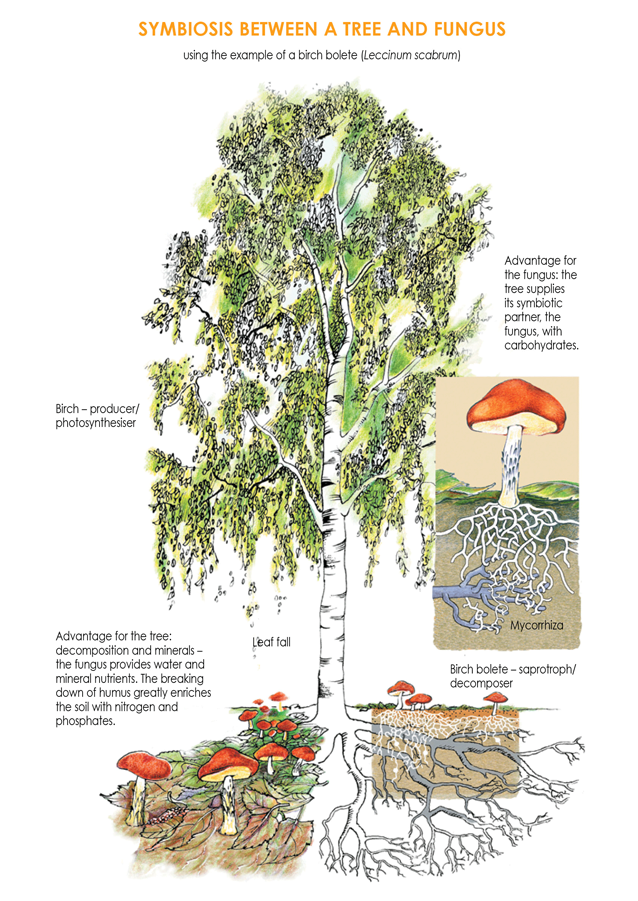
Fungi are not plants; instead they belong to a separate kingdom. They are one of the most important decomposers (saprotrophs) in the soil. They convert accumulated biomass into nutrients that plants can absorb. Without them the cycle of nature could not function. Anyone who wants to understand the way that fungi live and function must first understand their structure. The widespread opinion is that fungi only consist of the parts that can be seen above ground, in other words the cap and stem. In reality, a mushroom is nothing other than the fruiting body of a fungus and can be likened to an apple on an apple tree. The fungus consists of the much larger and mostly hidden mycelium, which is composed of thread-like cells (hyphae). If you compare the fungus to an apple tree, the mycelium corresponds to the trunk, branches and roots. Fungi, unlike plants, cannot produce organic material from inorganic material (mineral nutritive salts) for themselves. They do not contain chlorophyll and therefore cannot photosynthesise. This means that, like animals, they need nutrients from organic material (from the substrate), which are absorbed by the mycelium. Many fungi also develop mycorrhizae and form symbiotic associations with plants. The fungus’ hyphae colonise the ends of the plant’s roots, take over a part of the plant’s nutrition and help the plant to absorb water and mineral nutrients. Nitrogen and phosphates are also made more easily accessible to the plant by the decomposing activity of the fungus. The fungus also profits from the symbiosis, because the plant supplies it with the products of photosynthesis (principally carbohydrates).
Many plants form symbiotic associations because of their inherent advantages. If a plant does not have access to its specific symbiotic partner, it will grow poorly. Frequently poor soil or unfavourable climatic conditions are blamed, whereas it is usually enough just to incorporate a little soil from the plant’s natural environment. The previously stunted plant will now thrive, because it has access to its symbiotic partner. These basic concepts are needed to understand the way mushrooms are cultivated. The majority of cultivated mushrooms require a substrate of either wood, compost or straw.
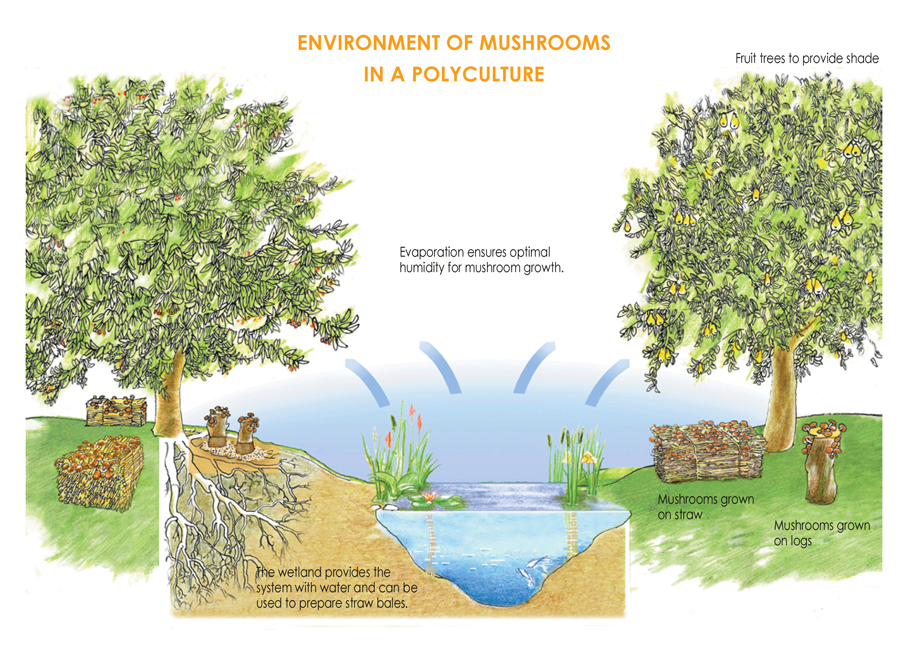
Mushrooms that live in symbiosis, such as ceps (Boletus edulis) or chanterelles (Cantharellus cibarius), require their symbiotic partner in the form of forest trees in addition to a forest floor as a substrate.
If you understand what mushrooms need and the best ways in which to fulfil these needs, you will quickly achieve success in growing mushrooms. Mushroom cultivation does not require a large amount of space. It is possible to grow enough mushrooms for your own consumption on just a 2m2 balcony. For farmers, mushroom cultivation can also make for a lucrative source of income with minimal costs and work. Before growing mushrooms on a large scale, however, it is important to gather experience and cultivate different kinds of mushrooms on different substrates. After some time spent experimenting, you will be able to use your experiences profitably.
Health Benefits
Mushrooms have long been recognised as not only a healthy food, but also as a form of medicine. This is why indigenous mushrooms like the honey fungus (Armillaria mellea) have been used as a laxative for centuries. The giant puffball (Calvatia gigantea) and agarikon (Laricifomes officinalis) mushrooms were also used to staunch bleeding. However, this old knowledge has mostly been lost.
Now that Asian medicine with its natural remedies has become so popular, mushrooms are once again being considered as a medicine. One of the most interesting East Asian medicinal mushrooms is the shiitake mushroom (Lentinula edodes). This mushroom is not only a very popular delicacy because of its excellent flavour, but its healing effect is astonishing. Its ability to lower cholesterol has already been demonstrated in medical studies; it is also effective against colds and strengthens the immune system. Moreover, it has been scientifically confirmed that the shiitake mushroom has a positive effect in the treatment of cancer. Although probably the most interesting thing about this medicinal mushroom is that it can be cultivated almost anywhere and with very little effort. Shiitake cultures grow on sycamore logs on the Krameterhof up to a height of 1,500m above sea level.
There are also a number of other medicinal mushrooms, which can easily be grown on the Krameterhof. For example, the Judas’ ear fungus (Auricularia auricula-judae), which can be used to treat nausea or to lower blood pressure, or the lingzhi mushroom (Ganoderma lucidum), which is used to treat sleeping disorders and strengthen the immune system.
Mushrooms are also a healthy food. Their high fibre content is known to aid digestion. They are also low in calories and rich in vitamins and minerals, which means they are often used in diets. Mushrooms are best eaten fresh, but they retain much of their flavour and nutrients when they are dried. They also make very good tea. Mushroom tea is very good at preventing and treating illnesses and for detoxification.
The Basics of Mushroom Cultivation
Most mushrooms need wood, straw or compost as a substrate. Mushrooms that grow on wood or straw are by far the easiest to cultivate, because wood and straw are already complete substrates. Compost mushrooms like button and field mushrooms (Agaricus spp.) or shaggy ink caps (Coprinus comatus) are, conversely, much more difficult to cultivate, because they need a specific mixture of compost made from straw or dung (usually horse manure). Producing the substrate requires specialist knowledge and is usually too laborious to be used on a small scale. This is why I limit myself to cultivating mushrooms that can be grown on wood or straw. Most of the particularly tasty and healthy mushrooms belong to this group anyway. You will not need any specialist knowledge to be able to cultivate these mushrooms successfully.
Only uncontaminated raw materials should be used to grow culinary and medicinal mushrooms. Mushrooms can absorb harmful substances and retain them. For this reason you should be especially careful when using straw or compost as a substrate. If the straw or manure has been produced conventionally it is, in my opinion, unsuitable for cultivating organic mushrooms. Even wood can contain harmful substances. Trees near busy roads, motorways or industrial areas usually contain large amounts of heavy metals. These harmful substances accumulate in the bark and make the logs unusable for mushroom cultivation.
Growing Mushrooms on Wood
The fact that most mushrooms that grow on wood are cultivated in almost exactly the same way makes growing them much easier. Any differences are usually just limited to slight preferences in terms of log size, type of wood, temperature and humidity. If possible the mushroom culture should be started in spring, because this gives the mycelium enough time to colonise the wood and remain safe from frost damage. The mycelium can still grow at low temperatures, but quick colonisation occurs best at temperatures around 20˚C. If the fungus has the chance to grow deep into the wood through the summer, then low temperatures and frost will not be able to harm it. There are, however, different temperature preferences for producing fruiting bodies. For instance, shiitake mushrooms prefer temperatures between around +10˚C and +25˚C. Enoki mushrooms (Flammulina velutipes), on the other hand, produce fruit at low temperatures in late autumn. This is why it is always important to cultivate different kinds of mushroom, so that you will have a yield over an extended period of time. Many different kinds of mushroom are suited to being grown on logs. Some of the most common ones are listed below.
Mushrooms for Growing on Wood
All of the mushrooms listed grow on the Krameterhof on hardwood. The oyster mushroom varieties listed (Pleurotus sp.) can also be cultivated on straw. Fruiting body production occurs in most of these varieties from a temperature of at least 10˚C. Only the enoki mushroom fruits from temperatures of 2˚C. The black poplar mushroom, on the other hand, grows fruiting bodies from around 15˚C. All of the oyster varieties, especially the king oyster mushroom, grow best when the humidity is high.
• Shiitake
The shiitake mushroom (Lentinula edodes) is one of the most interesting of the culinary and medicinal mushrooms with its excellent flavour and many proven healing properties (cf. ‘Health Benefits’). It can also be cultivated on narrow logs or branches. Shiitake mushrooms can be eaten raw, or they can be used to make tea.
• Oyster Mushroom
Oyster mushrooms (Pleurotus ostreatus) are excellent culinary mushrooms and are very easy to cultivate. Although they are not particular about the kind of wood they are cultivated on, they grow especially well on beach, maple and elm.
• King Oyster Mushroom
King oyster mushrooms (Pleurotus eryngii) are very popular because of their excellent flavour. Their thick fleshy stems are very versatile. They can be grown like oyster mushrooms.
• Golden Oyster Mushroom
Golden oyster mushrooms (Pleurotus citrinopileatus) can be recognised by the way they grow in large yellow clusters. They are excellent culinary mushrooms. They can also be cultivated in a similar way to other oyster mushrooms.
• Sheathed Woodtuft
These small mushrooms (Kuehneromyces mutabilis) grow in clusters. They have a very intense flavour which means they are used predominantly as culinary mushrooms in sauces and soups. Sheathed woodtuft mushrooms are particularly undemanding in terms of cultivation.
• Nameko
This excellent culinary mushroom (Pholiota nameko) is also known as the Japanese sheathed woodtuft. Its requirements are similar to the sheathed woodtuft.
• Enoki
The enoki mushroom (Flammulina velutipes) is also known as the winter mushroom, because it bears fruit in autumn and winter. It is used as a culinary mushroom and for flavouring sauces and soups.
• Black Poplar Mushroom
Like the sheathed woodtuft, it is very aromatic and is mostly used for adding flavour to dishes. The black poplar mushroom (Agrocybe aegerita) requires much higher temperatures. It prefers softwood (poplar and willow).
• Judas’ Ear
The Judas’ ear fungus (Auricularia auricula-judae) is popularly used in Asian cuisine. It is also a popular medicinal fungus. Judas’ ear prefers to be cultivated on elder, but it also grows well on other kinds of wood.
Substrate
For wood cultures I generally use whole logs as a substrate. It is also possible to use a substrate mixture of sawdust and other plant material, although using a mixed substrate involves a little more work and is a bit more risky. For this reason, growing cultures on natural wood is much better for beginners. In addition, the wood is used in its natural form, which saves the work of processing it, which can be considerable. Logs have the additional advantage that they take up far less space than other substrates. They also improve the look of any garden. It is important that only hardwood is used for the mushroom species specified above, although in my experience out of all the hardwoods, wood from stone fruit is the least suitable for mushroom cultivation. The duration and yield of the crop differs greatly depending on whether hardwood (beech, oak etc.) or softwood (poplar, willow, alder, birch etc.) is used. Mushrooms colonise softwood much more quickly, which leads to an earlier yield. However, softwood logs also decompose more quickly, so the yield is much more short-lived. Cultures on softwood can grow through and give a yield in just six to twelve months. Hardwood usually requires twice that time, but the yield lasts substantially longer. Naturally, the duration and size of the yield also depends on the size of the log and the length of the growing season. For instance, I have cultures growing on hardwood at a height of 1,500m that have been cropping for over ten years. As a rule, under good conditions you can expect a total yield of 20 to 30 percent of the weight of the wood. This can be very profitable, because financially low quality wood like firewood can be used for mushroom cultivation. In the long run, hardwood generally gives higher yields than softwood.
One of the most important factors for success when growing mushrooms in this way is using fresh and healthy wood. It must under no circumstances have been previously colonised by other fungi. They will displace the cultivated mushrooms and the crop will fail. This is why I use freshly cut wood whenever possible. It is also advisable to cut off a slice of wood from each end of the log before inoculation. This will reduce the danger of colonisation by other fungi. Wood that has been stored for more than half a year is probably no longer suitable. Tree stumps are an exception: they should be inoculated once they have stopped sprouting. These stumps can still reject mycelia. You can recognise healthy wood by it not having any dark or rotten areas. The cut surface must be light in colour and firm. The wood must contain enough moisture for the mycelium to grow through properly. Freshly cut logs have the best levels of moisture; if you use older logs, you will need to soak them for a while to reach the required moisture levels.
As hardwood can be used in practically any form, there is almost no limit to the types of culture you can try. This means that, for instance, logs used as short term slope supports can also be used to grow mushrooms on at the same time. Tree stumps in the garden can easily be broken down with the help of mushrooms. The mushrooms will make the garden look more pleasant, as well as giving a good crop. As shorter logs are much easier to manage, I generally use logs with a length from half a metre to a metre and a diameter of at least 20cm for growing mushrooms. These logs also take less time to colonise and therefore give an earlier yield.
Mushroom Spawn
In order to inoculate the log, in other words to introduce the fungus into the log, you will need healthy mushroom spawn. Mushroom spawn is nothing other than mycelium, because mushrooms reproduce vegetatively (asexually) as a rule. Inoculation using spores (sexual reproduction) is rare, because the probability of failure is too great. Although the sheathed woodtuft mushroom (Kuehneromyces mutabilis) and enoki mushroom (Flammulina velutipes) are an exception to this; they are easy to propagate by placing ripe caps on the ends of moist logs and tree stumps (they prefer softwood: poplar and willow). If the spores find the right conditions, they will germinate and the fungus will colonise the whole log. This method does, however, take much longer than vegetative propagation. Naturally, all mushrooms can be propagated using spores. As it does not take much time or cost much money, you should definitely try it. However, if you only have a few logs available, inoculation is a much safer choice. Mushroom spawn is usually available from specialist mushroom shops as spawn plugs or grain spawn. Spawn plugs consist of wooden plugs or dowels that are inoculated with the appropriate mycelium, whereas grain spawn consists of mycelium growing on grain. It is important for the spawn to be healthy. The mycelium of cultivated mushrooms is white. If there is a change in colour, then this is a sign of mould. Also, a musty smell means that the spawn is either contaminated or has expired. The spawn should be used as soon as possible, because it can only be stored for a limited time.
•Propagating Spawn Yourself
You can create and propagate mushroom spawn yourself with a little practice. Of course, propagating with spawn is a learning process, so you might not get the results you want on your first attempt. The majority of failures stem from careless work and the mould associated with it. Spawn plugs are not as susceptible to mould as grain spawn or substrate spawn, which makes them a suitable method of propagation for beginners. If you want to make more spawn plugs, all you need are plugs or dowels. They must be soaked and boiled to reach the required moisture levels and to rule out contamination by rival fungi. The boiled plugs then go into a clean plastic bag. Once they have cooled, add a few inoculated spawn plugs or some grain spawn. The bag is then turned over so that the opening is at the bottom. This way the right amount of air can get in without the danger of contamination becoming too great. After about a month, the plugs will be fully colonised and ready for inoculation. It is also possible to wrap boiled dowels in a piece of clean cotton cloth with some mushroom spawn. The wrapped up dowels can then be placed in a flowerpot to keep them moist; storing the substrate on soil keeps it wet, while excess water can drain away. This prevents water from building up and the dowels should be fully colonised in roughly one month.
Creating and Maintaining the Culture
To inoculate a log with mushroom spawn, you will need either to drill a hole or cut a section out of it. The method used will depend on the type of spawn available. With spawn plugs, a hole is drilled into the log and the plug is inserted. It is important to achieve good contact between the plug and the wood, so the holes should be only a little larger than the plugs. When you are inoculating you should use plenty of spawn. The plugs should be distributed evenly around the log to ensure that it is colonised quickly. It is also a good idea to seal the holes again after inoculation; you can do this by pushing a fresh piece of branch into the hole and cutting the excess off. Now the fungus is protected and it can colonise the log quickly.

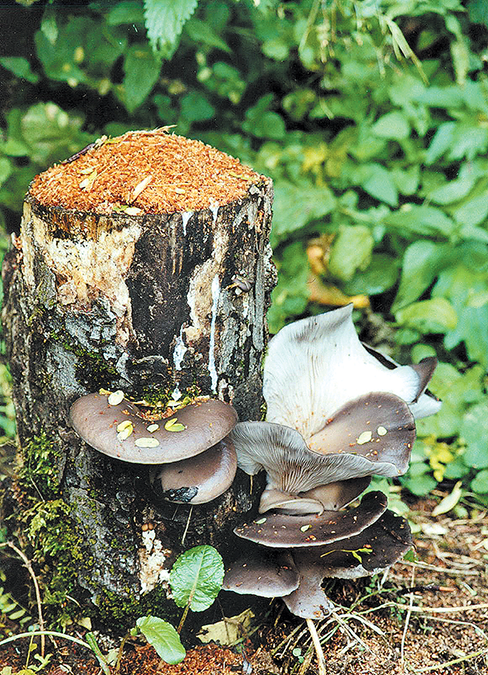
Another method is ‘notched inoculation’. This is where a saw is used to make notches in the log in either one or two places depending on its length. The notches should have a depth of over half the diameter of the log, however, it must retain its structural integrity, which is why I make the notches using a chainsaw (see photo). These notches are then filled with grain or substrate spawn. Next, I cover the notches with plastic sheeting or adhesive tape. This is necessary to prevent the mycelium from drying out or from being contaminated by mould. Covering the notches also prevents the fungus from being eaten. This is a good idea, because slugs, snails, birds and mice like to eat mushroom spawn as well as cereal grain.
To reiterate, as mushrooms require a steady temperature and moisture level for good growth, I place the culture in an area with plenty of shade. The inoculated logs are stored closely together. To help prevent them from drying out I cover them with leaves and jute bags. The best temperature for mycelial growth for these mushrooms is around 20˚C; at lower temperatures the mycelium takes longer to colonise the log. However, temperatures of over 30˚C should be avoided, because they can kill off the mycelium. It is best to start the mushroom culture in spring or early summer, because the mycelium needs two to three months to work its way far enough into the wood. After this time, the fungus is safe from frosts. The duration of the colonisation phase depends on the temperature, moisture and the size and type of wood (hardwood or softwood). Although, as a rule, it takes between six and twelve months. After just a few weeks, you can find out if the inoculation has been a success. If the white mycelium is establishing itself in the inoculated area, then the mushroom culture is healthy. As soon as the mycelium can be seen in the notch, the fungus has colonised the log.
Oyster mushroom (Pleurotus ostreatus)
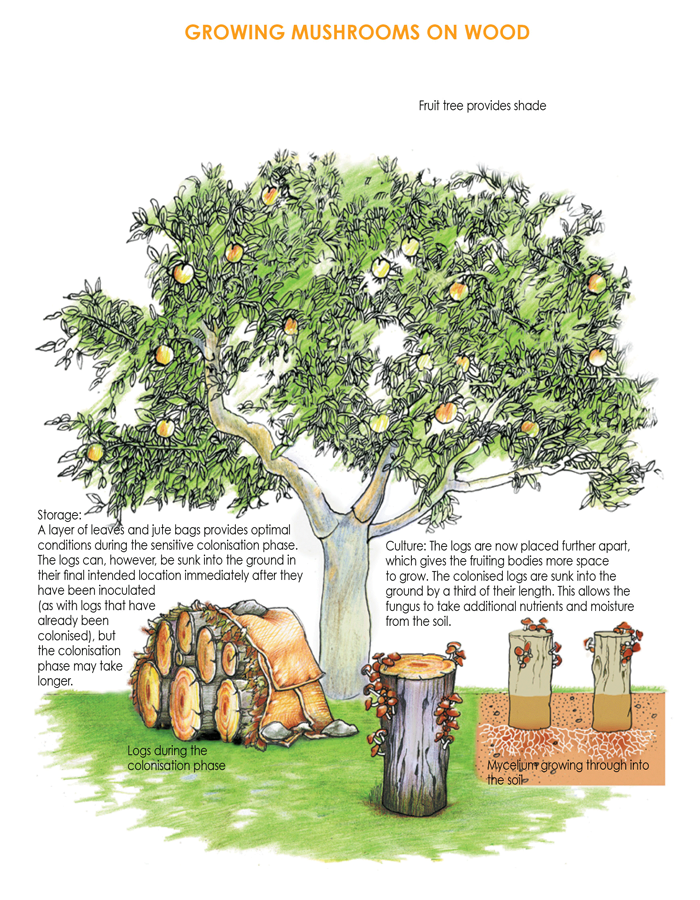
Once the log is colonised, I sink it into the ground by a third of its length in its direction of growth (the thicker end should be at the bottom). The space between the logs must be large enough so that the mushrooms growing on the outsides of the logs can be harvested properly. Sinking the log into the ground is very important for the success of the culture and means that it will need little maintenance. This also allows the fungus to obtain moisture and nutrients from the soil; helping to prevent the log from drying out and reducing the amount of work required to maintain the culture to a minimum. If you pull one of these logs out of the soil after a few weeks, you will discover that the mycelium has already grown through into the soil. Fruiting bodies have even been known to spring up around the log. However, the main source of nutrients will still come from the log itself.
If humidity levels are high enough and the temperature is correct, I can soon expect a yield. The culture usually crops a number of times a year. Mushrooms generally appear near the inoculation area and on the outside of the log. If the mushroom culture is in the correct environment, it will need practically no further care apart from maintenance of moisture levels. It can remain in the same place and will not require any special protection over the winter.
Tips
If, after a few years, there has still not been a crop and the mycelium has not grown through well, this means that the conditions for fruiting body growth are not optimal. ‘Dormant’ logs can, however, be activated by soaking them for a few hours and striking them with a mallet or rock. The moisture and the shaking stimulate fruiting body growth. This method generally has the desired effect. I discovered this phenomenon when I first began to cultivate mushrooms and some of my cultures were not successful. After waiting for a while I decided to dispose of them. I took what I supposed to be useless logs on my tractor to one of the wetlands and tipped them all in the shallow water near the bank. I wanted the logs to at least provide hiding places for young fish and crayfish. They also made the shallows of the wetland more attractive. When I came back to the microclimate after a few weeks, almost all of the logs were covered in oyster mushrooms. I could scarcely believe my eyes and tried to find the reason for the ‘resurrection’ of my cultures. What happened? The logs were most likely dormant from lack of moisture. The bumpy ride on the tractor and being tipped into the pond not only shook them thoroughly, but also saturated them with water. In addition, the hollow around the wetland is naturally much more humid as a result of evaporation. All of these factors worked together and led to this unexpected success.
Another common problem is browsing. Humans are not the only creatures who like to eat mushrooms; animals do as well. On the Krameterhof the non-indigenous Spanish slug (Arion vulgaris) particularly likes to eat mushrooms. Slugs and snails can do a great deal of damage. This damage often remains unnoticed, because there are never any mushrooms left. On the Krameterhof we do not have any problems with these pests, because we have plenty of help from pigs, ducks and toads. These helpers reduce the number of slugs and snails to a harmless number. If you do not have such helpers available, there are always long-established household remedies. One of these remedies is to put down a protective ring around the culture. Make the ring from a mixture of wood ash, sawdust and slaked lime. It is important to keep it dry at all times, so that it forms an unsurpassable barrier. A further possibility is a line of fresh grass cuttings. This line must be kept wet. It will attract slugs and snails and they will lay their eggs in this inviting environment. After a few days, turn the line over and leave the eggs in the sun. This method can drastically reduce the number of offspring, because the eggs dry out and are sensitive to UV light. Further information on slugs and snails can be found in the section ‘Helpers in the Garden and Regulating “Pests”’.
Growing Mushrooms on Straw
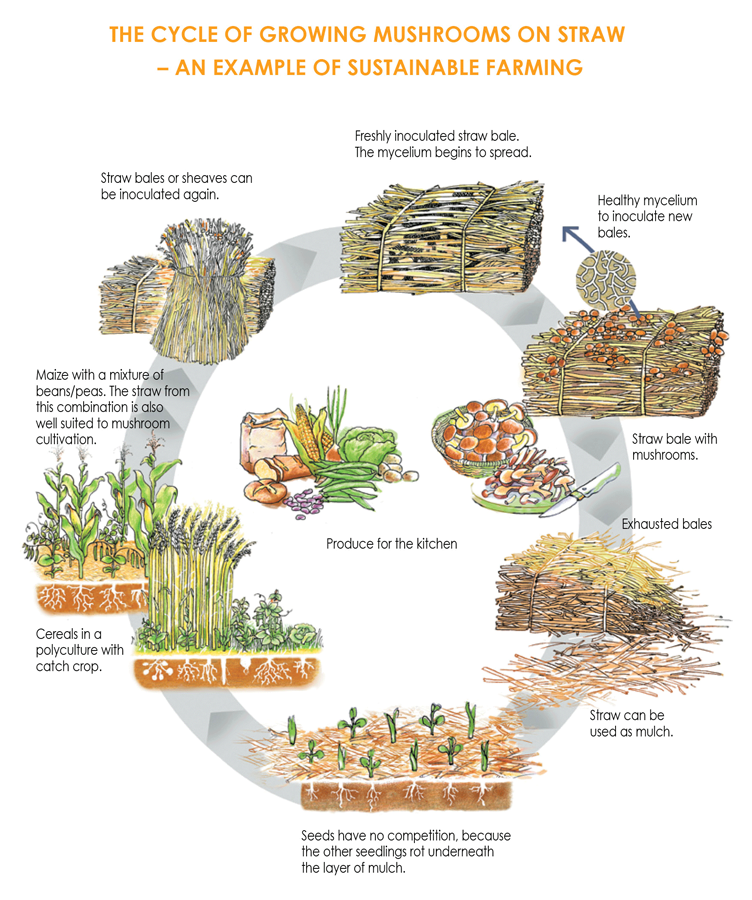
These days straw is often a waste product. In areas where cereals are grown you can all too often see it being left to rot in enormous piles in fields. However, this ‘surplus’ biomass can be made good use of. Straw can, for example, be used as a building material for mudbrick buildings. It can also be used as mulch and it is an ideal substrate for mushroom cultivation. Many kilograms of mushrooms can be grown on one small straw bale with very little effort. The mushrooms also help to turn the slowly rotting straw into valuable humus in just a short period of time. So many of these so-called waste products are untapped resources, which could be made use of in the future. In a functioning agricultural system there is no waste, everything can be brought back into the cycle of nature. Sustainability is the highest priority here. With minimal work, growing mushrooms on straw can be made into a lucrative additional source of income for farmers. They can also be grown easily in any small garden for small-scale consumption.
Mushrooms for Growing on Straw
All of the previously mentioned oyster mushrooms (Pleurotus sp.) are suitable for growing on straw. Another variety of mushroom that can be cultivated very well on straw is the king stropharia mushroom (Stropharia rugosoannulata). From a distance this mushroom looks similar to a cep. It is an excellent culinary mushroom and can be grown without any difficulty. It requires temperatures of over 10˚C for growing fruiting bodies. Its requirements for humidity are, however, much lower than those of oyster mushrooms, which makes king stropharia mushrooms a little less work to maintain.
Substrate
In principle, any kind of straw can be used for cultivation. There are, however, a few basic requirements that the substrate must fulfil. It is particularly important that the substrate is healthy and in good condition. As I have previously mentioned with regard to growing on wood, cultivated mushrooms are very sensitive to competition. Straw that has already been contaminated by other fungi is unsuitable and cannot be used for cultivation. Healthy straw can be recognised immediately without any specialist knowledge; it should be a natural golden yellow colour, must not have any spots of mould or dark areas and must not smell musty.
Small compressed straw bales are the easiest to work with, because they can still be transported easily when they are wet. For me it is essential that the straw comes from organic farms. Conventionally grown straw is not suitable as far as I am concerned, because it might have been treated with or contaminated with herbicides, insecticides, fungicides, chemical fertilisers and other chemicals such as growth regulators. For this reason, you should use straw that has been organically grown.
In addition, straw provides the main source of nutrients for the fungus, which will absorb and retain any harmful substances present. This is yet another reason why conventionally grown straw is not suitable for producing food. Finally, the chances for success for a culture of this kind are much lower with non-organic straw, because it is usually treated with fungicides. Fungicides are used to fight fungi. Logically, a substrate treated in this way is not ideal for mushroom cultivation. The slightly higher price for organically grown straw is worth it in any case.
Since these mushrooms, as I have already mentioned, break down organic materials (saprotrophs), straw is not the only available option. They can be grown just as well on reeds, shredded garden waste or many other substrates. However, these altrenative substrates are not as easy to work with and it will require a little experimentation from time to time to get the correct composition for a successful crop.
Mushroom Spawn
Straw cultures can also be inoculated using either substrate spawn or plug spawn. The one you choose is, in the end, a matter of personal preference. The requirements in terms of spawn quality are the same as those for mushrooms being grown on wood. Spawn propagation also works in the same way. There is, however, another method to prolong the life of a straw culture. To do this I remove some mycelium from a healthy bale that has been well permeated and introduce it into a new bale. The mycelium will usually spread from a permeated to a fresh bale with only a brief period of contact. This way I save myself not only the effort of buying new mushroom spawn every year, but also the task of inoculation.
Creating and Maintaining the Culture
One of the most important criteria for the success of a culture is for the substrate to have high enough moisture levels, so the initially dry straw must be thoroughly soaked. To do this I leave the bales for a number of days in a container filled with water. Submerging the bales fully not only helps me to achieve the required level of moisture, but under these conditions the bales also begin to ferment slightly. This makes it easier for the mycelia to colonise them. Then I put the bales out for a day or so to allow the excess water to drain away. Once this is done, the straw fulfils all the requirements for inoculation. Next the bales are brought to their final location. As with log cultures, this should be a place with plenty of shade.
On the Krameterhof I use my wetlands to soak straw bales. I then place the mushroom cultures on the banks. This saves long journeys and the high level of evaporation from the nearby water ensures an optimum level of humidity. In addition, this makes it easy to water the culture during dry spells.
When positioning the bales, you should make sure that there is enough space between them, because mushrooms will grow over the entire bale. Next it is time to inoculate the bales. If you are using substrate spawn, you should make a number of holes in the bales with a stick. These holes should reach at least as far as the middle of the bale. Now fill the holes with spawn and close them again by pushing the straw together. If you are using plug or dowel spawn, you should push them into the bales in an even distribution. The plugs should also be pushed in as far as the middle of the bale.
With both methods it is important to use plenty of spawn, because a large amount of evenly distributed spawn is needed for quick colonisation. The more rapidly the bales are colonised, the less likely it is that other fungi will contaminate the culture. In a single straw bale, I inoculate in approximately eight to ten places. As I have already mentioned, the length of time it takes for colonisation depends a great deal on the temperature. The optimal temperature for mycelial growth for mushrooms growing on straw is a little over 20˚C. If the cultures are inoculated in spring or early summer, you can expect a yield in roughly three months. Cultures inoculated in autumn, on the other hand, will not produce a crop until the next spring. Well-permeated straw bales are not normally sensitive to frost. You can easily recognise a well-permeated bale by the white pleasant-smelling mycelium of the cultivated mushroom that has grown through the straw. You should also make sure to leave cultures that are inoculated in autumn enough time to colonise.
Straw cultures require little additional maintenance. You only need to check the bales regularly to make sure that they are moist enough. It is not a problem if the straw dries out for a few centimetres around the outside of the bale as long as the middle is still wet. Often people well-meaningly overwater mushrooms. Although the mycelium requires moisture, it is still susceptible to ongoing dampness. If the bales are going to be left outside exposed to the elements, they can be covered during heavy or long periods of rain. I leave all my straw cultures outside throughout the year, however, without any additional protection against the weather. The bales can, of course, be covered with brushwood to offer protection over the winter months.
The yields usually occur in phases, provided that the humidity and temperature levels are high enough for the type of mushroom in question. For this reason, the culture’s yield depends not only on the size of the substrate, but also on environmental factors. Straw cultures have a life span of between one and two years. Afterwards, the bales are worn out and can be used as fertiliser or mulch.

King stropharia mushrooms on a straw bale in the second year.
Tips
Worn out bales make excellent mulch. They can also be used in the garden as organic fertiliser. When doing this it is not uncommon for mushrooms to suddenly appear in the vegetable patches.
Cultivating Wild Mushrooms
Over the years, I have made numerous attempts to propagate and create cultures of ceps (Boletus edulis), chanterelles (Cantharellus cibarius), birch boletes (Leccinum scabrum) and a number of other mushroom varieties with great success. These mushrooms live in symbiosis with forest trees. In order to cultivate them, you must provide them with the correct location and symbiotic partner. On the Krameterhof this always occurs in a mixed culture, because the various tree species complement each other not only from an ecological point of view, but also in terms of mushroom cultivation. Spruce trees (Picea abies) are, in fact, an important symbiotic partner for ceps and chanterelles on the Krameterhof, however there are usually very few mushrooms to be found in spruce monocultures. A mixed forest is not only more stable; the humus composition is also better. Pine needles rot very slowly on their own and, in the long run, contribute to the acidification of the soil. Even the balance of water in mixed forests is better and this, in turn, plays a large role in good mushroom growth.
There are many factors that are responsible for a successful culture. Fulfilling them requires a very close observation of natural cycles. This means that cultivating these mushrooms is still not commercially viable to this day.
I would like to explain my method of cultivating wild mushrooms using birch boletes as an example. First I create the correct growing environment. To do this I might plant young birch trees on a terrace. Afterwards, I introduce the mycelium into the soil between the young trees. Obtaining the mycelium in the first place is somewhat more difficult. To do this I need an area where birch boletes are already growing. To obtain fresh mycelium, I use a substrate mixture of my own and spread it around the growing fruiting bodies. This substrate consists of forest soil and sawdust soaked in liquid manure made from different symbiotic plants.
I spread the substrate when the first mushrooms appear and leave it there for the length of the growing season. I check to see if the mycelium has grown through by carefully examining the substrate for fine white mycelial threads. The substrate can then be introduced at different depths in the soil around the birch trees that were planted in the spring or around birch stumps that are still living and producing shoots. It is also possible to carefully place the substrate directly in the hole when planting trees. If this is done correctly and the conditions are favourable, fruiting bodies can grow as soon as the next year.
Another very good and simple way to propagate mushrooms is to collect ripe fruiting bodies (with ripe spores) and to put them in a loose-weave bag (jute or onion bag). The bag can then be hung up to dry. It is important that it hangs in a well-ventilated area, so that it can dry out properly. Once the mushrooms have dried out, I walk around the area striking the bag lightly with a stick. This distributes spores throughout the area. Wherever they find a suitable place to germinate, new mushrooms will develop. When doing this you should pay attention to the direction of the wind, otherwise you will very quickly find yourself standing in a fine cloud of mushroom spores. You can also hang the bag on a tree branch, where it will be protected from the rain. A spruce with wide, overarching branches, which is growing in an elevated location, is best for this. The wide-reaching branches protect the bag of mushrooms from the rain effectively and the high elevation allows the spores to be well distributed by the wind. If you make a simple device to hit the bag, then there is practically no work left for you to do. A piece of metal to catch the wind, with a strip of wood nailed to it to hit the bag, will perform the job well. The wood will be pushed by the wind and will continue to strike the mushroom bag, which will release spores that will in turn be carried by the wind. With this method I can easily increase the number of mushrooms on my land. It also means that we find mushrooms in the most unlikely places on the Krameterhof.
Many things are possible with wild mushroom cultivation, and there are many areas that have not yet been investigated. Experimentation is, as always, the most important thing. As soon as you begin to work in this area and attempt something new, you will start to understand the causal relationships. In my experience, you will not have to wait long for your first successes.
In the media a method of harvesting mushrooms is being recommended that, in my opinion, is completely wrong. According to this method, the mushrooms should be cut (the stem is removed), cleaned and the remaining parts of the mushroom should be left behind. On my tours and at my lectures people regularly ask me if this is the best method. In response I must explain some basic facts about harvesting mushrooms: we gather and eat the unripe fruiting bodies of fungi, because the ripe ones are inedible. So, because of this false information from the media, the unripe mushrooms are cut and the rest of the mushroom is left there to rot. The mould spreads very easily in the areas of the fungus damaged by harvesting. Within one to two years the entire mycelium is contaminated and damaged, and the mushrooms disappear.
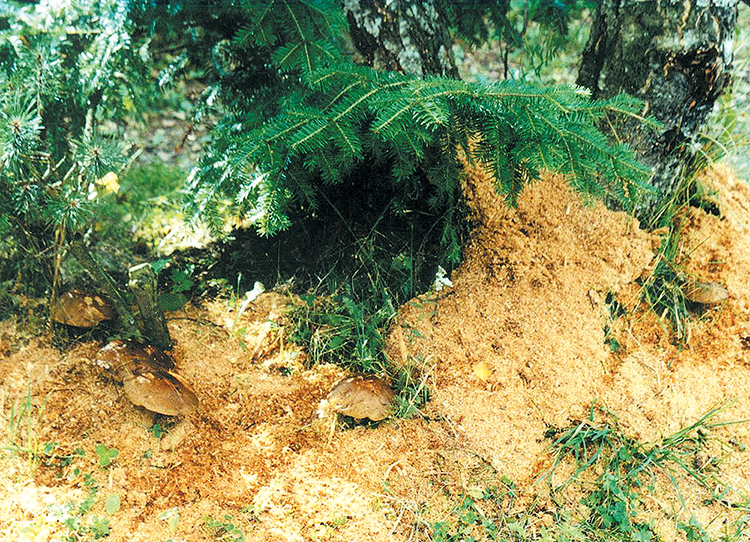
Substrate of sawdust around birch boletes (Leccinum scabrum).
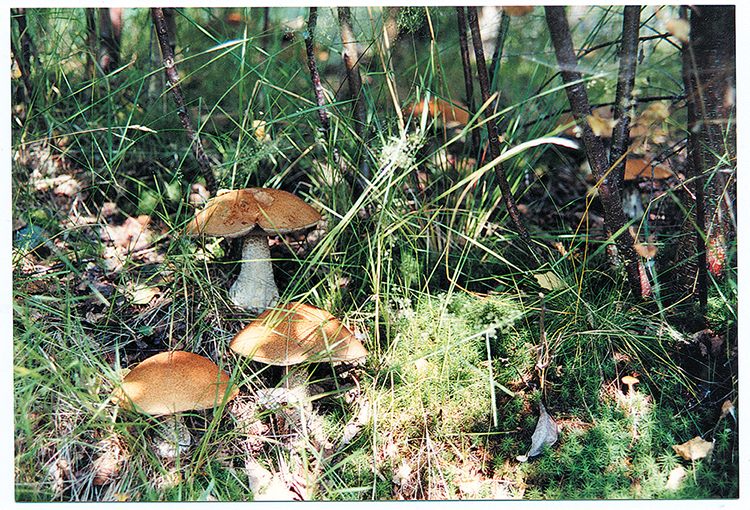
Birch boletes (Leccinum scabrum) introduced on an island with birch trees.

I observed this effect for the first time in my youth when I grew a variety of cultivated mushrooms such as shaggy ink caps and button mushrooms. It would be much the same if I peeled an apple and threw the peel back in the apple barrel when it was full. The mould would spread and all of the apples would begin to rot. Although almost everyone knows this, many people do not stop to think when they are picking mushrooms and they destroy many good mushroom sites without realising. It would be acceptable simply to pick the mushrooms and clean them at home. If it is absolutely necessary and the mushrooms cannot be gathered so easily, they should at least be cut close to the ground. Then the damaged area should be covered with forest soil, so that the fungus can repair itself. The mycelium will recede and, under good conditions, it will quickly grow new fruiting bodies. As false information about harvesting mushrooms is being spread with such insistence, I get the impression that the intention is to continue to suppress wild mushrooms, so that imported cultivated mushrooms can replace them.