
This chapter enables students to perform many of the asanas that are important to maintaining their health. Not all possible asanas are included. It is feasible, with correct instruction, to adapt many of the asanas. This can be done by attending classes conducted by certified Iyengar instructors, many of whom are familiar with adaptive yoga. It is the intent of this book to illustrate the possibilities and to give a well-rounded series of asanas addressing many of the symptoms that we experience. The chair series requires chairs that have been altered to be safe props.
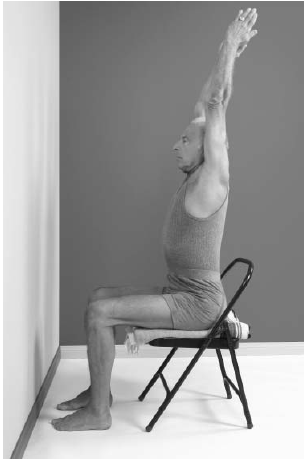
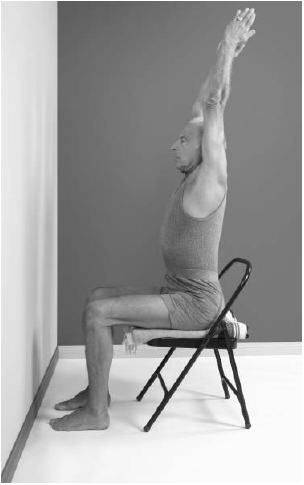
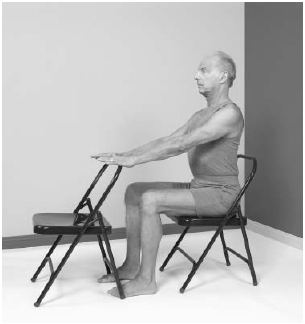
Arms-Above-the-Head Pose
1. Start by putting a strap around your hands. The strap stabilizes the arms to connect the movement of the arms with the breath.
2. Start the movement by bringing your shoulder blades back against the backs of the ribs, stabilizing the shoulder blades. The instructor can put his hands against the shoulder blades, supporting the chest from behind.
3. Stretch the arms forward with an inhalation; raise the arms in line with the center of the ears.
The chest and throat and essential parts of the breathing apparatus are already open considerably. By keeping the thumbs gently
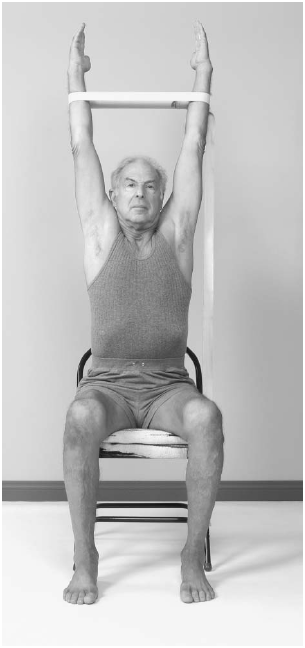
on the top of shoulder line, the instructor allows and helps the neck and cervical spine to rise with inhalation.
4. The student brings the arms out, so that the center of the biceps comes to the center of the ears.
5. Take in a breath in this position.
If this is not attainable, then any position, for example with the arms spread farther apart, or not quite totally overhead, is perfectly all right, as long as the arms are above the heart. This will still achieve part of the same purpose.
6. Bring the arms forward and down as you exhale. Rest the hands on top of the thighs.
This pose improves posture and maximizes the capacity of the lungs while extending the shoulders’ range of motion.
Forward Bend Pose
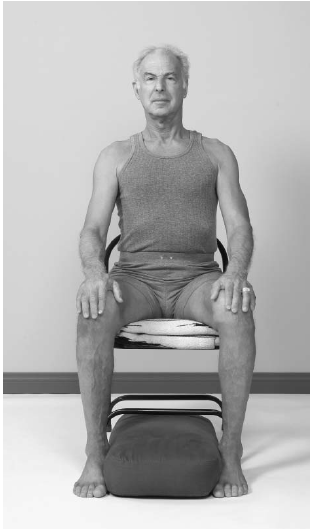
It is important that in this energizing pose, a variation of Uttanasana, or extreme forward bending pose, that you adjust yourself to the chair. Each of us has a difierent body style. Some people need to place a folded blanket under their feet. If you are tall, then a folded blanket can be placed under the buttocks on the seat of the chair.
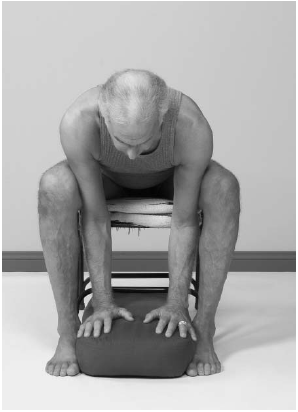
It is important that the knees are as close to parallel and in line with the hip joints as possible. Any position that you find yourself taking is perfectly all right, as long as it is close to the one pictured. It will begin to achieve the same purpose.
1. Sitting upright in the chair, place your hands over the knees to allow the spine and the central nervous system to be calm and relaxed.
2. Remove the hands from the knees, and with an exhalation, press the thumbs firmly into the hips joint. With an inhalation, stretch and extend the spine away from the hips.
3. On an exhalation, place the hands either on the floor or on a bolster with the hands inside the legs.
4. Remain in this position for several breaths, attempting to initiate the breath from the lower back, moving it around the ribs to the chest.
5. To return to a sitting position, place your hands on the tops of your knees, press down, and with an inhalation press the torso up to an upright position. Sit quietly, and then move to the next asana.
This pose fiushes and irrigates the kidneys, liver, and spleen and reduces stomach discomfort. The heartbeat slows, and the spinal nerves are rejuvenated. The pose often reduces depression, and students that are easily excited frequently become calm and cool, with a sense of well-being. Visual acuity often improves.
Downward-Facing Dog Pose
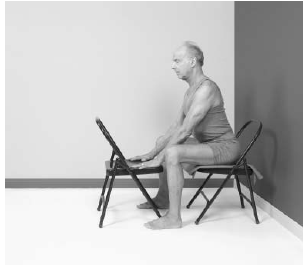
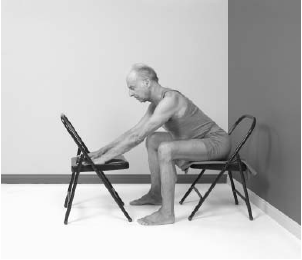
1. Place a chair securely against a wall. Be sure that it is in alignment.
2. Secure your safety belt, if you need one. 3. Put your feet directly under the knees, as you place your hands onto the seat of the second chair.
4. On the inhalation, raise the top of the head, keeping the chin parallel to the floor.
5. Release the shoulders away from the ears, and exhaling, push the chair forward and press the hips back.
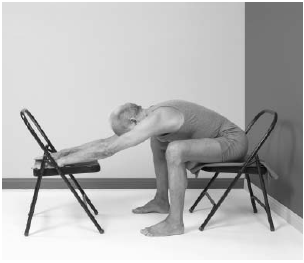
6. On the next exhalation, push the chair farther forward, to bring the arms in line with the ears.
7. Continue to press the hips back, press the heels down, lift the inner elbows, and press the palms and fingers firmly into the chair seat.
8. Try to move the breath from the low back around the ribs, into the front of the sternum, allowing the abdomen to remain soft and free of pressure.
9. Upon taking 5 inhalations and exhalations, return to an upright position, place the hands on the top of the legs, and breathe evenly and slowly.
This pose aids digestion, reduces gas, tones the lower back muscles, relieves discomfort from long periods of sitting, realigns the thoracic spine, and reduces tension in the shoulders and neck. It can be used to reduce stress and anxiety by calming the frontal brain
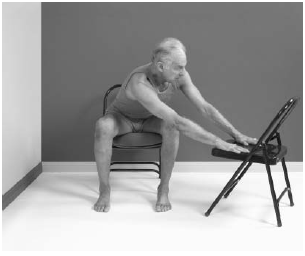
Downward-Angled Hero Pose
1. Place a chair against a wall to insure that it is in alignment. Be sure the safety belt is in place if needed.
2. Move a folding chair to the left, to the side of the knee.
3. Place your hands on the seat of the chair, keep the knees in alignment with the hips, stretch the right arm slightly more than the left, and retain the right hip pressure into the chair seat.
4. On an exhalation, push the chair diagonally to the left. Hold the position and breathe smoothly and evenly for 5 breaths.
5. Return to the sitting position as you inhale.
6. Lift the crown of the head, sit quietly, and then repeat to the other side.
This pose aids digestion, tones lower back muscles, and realigns the thoracic spine, neck, and shoulders. It also boosts circulation
for the liver, kidneys, spleen, pancreas, intestines, heart, and lungs, allowing more oxygen to flow toward the brain. It stimulates the bowel to empty.
CHAIR ADHO MUKHA SVANASANA AT WALL
Downward-Facing Dog Pose
1. Place the chair facing the wall, so that the knees are near to it, with the feet directly under the knees.
2. Raise the arms either from directly in front of you or, if shoulder joint stiffness requires, bring the arms out to the side.
3. Turn the palms up and raise the arms vertically, in line to the ears, or as close to vertical as possible.
4. Place the hands up on the wall as high as possible, keeping the arms in line with the ear canals.
5. Open the outer edges of the armpits. 6. Rest the forehead on the wall, allowing the eyes to drop into the cheekbones.
7. Press the hips back into the chair seat, and lift the bottom edge of the sternum away from the pubis, to permit the diaphragm to drape softly out to the sides of the rib cage.
8. Extend the fingers away from the palm of the hand, breathing normally for 5 breaths.
9. Lift the head, move the arms out to the side of the torso, and turn the palms up to rotate the shoulder blades inward, supporting the back and ribs.
10. Rest the palms on the thighs and breathe evenly.
This pose releases tension in the low back. It opens the chest and lungs so they take in more oxygen; tones the upper back, shoulders, and neck; relieves tightness in the muscles of the scalp; and continues to aid the digestive process. It increases flexibility in the hip joints, helps elimination of the bowels, and relieves pressure on the prostate gland. The pose also relieves pressure around and in the female reproductive organs. This is one of the essential asanas for those using a wheelchair or walker.
Sun Salutation
This is an adaptation of the classic Sun Salutation, which pose is to completely enhance the breathingively reaches into most areas of the physical body, providing an opportunity to develop coordination of the breath with a measured movement of the limbs and torso. This series of asanas is usually used as a warmup to a practice session.
Caution: Resist the temptation to press the tongue against either the roof of the mouth or the lower palate. Keep the breath even and without effort. Try to move smoothly from one position to the next without hesitation. Remember, practice is the key to success.
1. Begin by bringing your hands up to rest in front of the heart, with the upper arms lifted parallel to the floor. Press your fingers together firmly, pointing slightly away from the chest.
2. Bring your feet to rest under the knees. Distribute the weight from the balls of the big toes, across the sole of the foot, with the outer edge of the foot drawing back to the middle of the heel.
3. Keep the knees in line with the hip joints.
4. Extend the arms forward at the width of the shoulders, the palms facing each other. If there is a shoulder joint problem, extend the arms out to the side, with the palms facing up.
5. On the inhalation, bring the arms even with the center of the ears.
6. With the next inhalation, place the hands on the wall, stretch the arms up, retain your hips back, keeping the head parallel to the biceps.
7. Hold for 3 even breaths. 8. With an inhalation, slip the hands down to shoulder height, draw the wrists up and the shoulders down.
9. At the same time, move the right leg back outside the legs of the chair, and drop the right knee toward the floor. If the knee does not reach the floor use a folded blanket or bolster. If possible, pull the knee back into line with the hip joint.
10. As you advance the left leg forward, grip both hands under the knee, and with an exhalation pull the leg up sharply toward your chest.
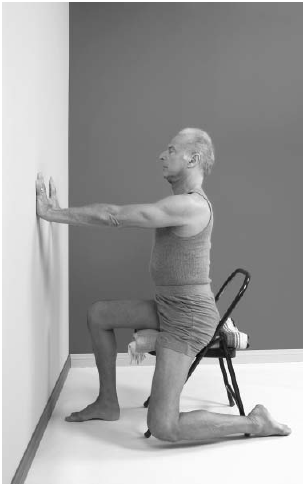
11. With an inhalation, place the leg on the floor beside the other leg.
12. Lift the back waist, and try to bring the inhalation into the side chest.
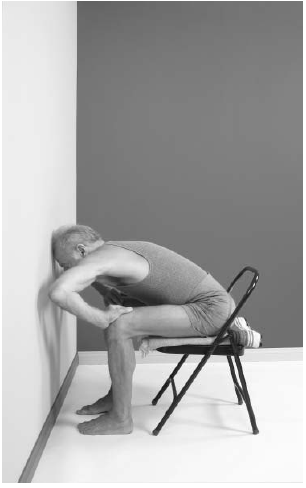
13. On the exhalation, place your hands on top of the knees and press the elbows forward, as you rest your forehead against the wall.
14. On the exhalation, drop the arms outside the legs, letting the entire area of the shoulder girdle drape downward.
15. Hold for 3 breaths. 16. With an inhalation, bring your arms up and press your hands on top of the knees. Press down to bring the torso and then the head to a vertical position.
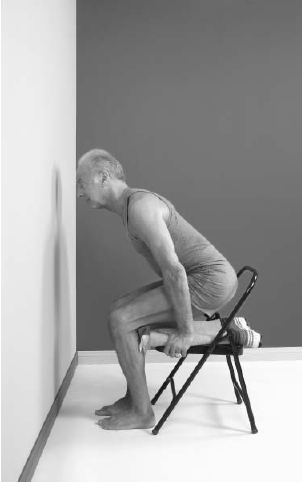
17. Grip the sides of the seat of the chair and thrust the buttocks back. Push down firmly on your hands to lift the buttocks at least 3 inches from the seat of the chair.
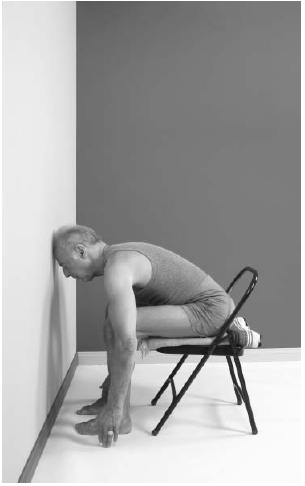
18. Hold for 3 breaths. Then on an exhalation, sit down, swing the arms forward, and place the hands firmly against the wall at shoulder level again.
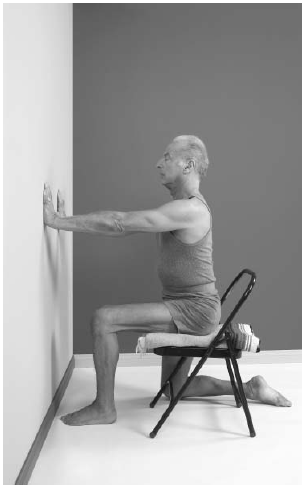
19. Set the right leg back, and drop the knee to the floor in line with the hip joint. If a prop is being used, continue to use it as before.
20. Draw the leg forward with both hands under the knee, pulling the knee sharply toward the chest with an exhalation. Then as you inhale, place the leg together with the other leg.
21. Raise the arms up again toward the ceiling, parallel to the ears.
22. Bring your arms down, and as your hands become even with the forehead, bring the palms together into Namaste at the heart.
23. Sit quietly. Breathe smoothly and evenly for at least 30 seconds. Observe your breath and the balance of the body. Observe any changes in the spinal column, chest position, and softness of the shoulder girdle, and allow the eyes to gaze forward. Release any tension in the forehead or temples. This series can be repeated several times, alternating from right to left.
This series can be used to energize and also to calm the nervous system, depending On the intent of the practice. It increases flexibility, range of motion, and circulation in the limbs, particularly the legs. When you sit for long periods of time with little or no movement, blood tends to pool in the lower limbs, causing edema and other conditions. This pose helps to reduce the swelling. Digestion improves, elimination can become regular, and breath improves in volume, timing, and placement. It contributes to a general feeling of contentment and accomplishment, all of which are positive feedback.
Warrior Pose II
1. Sit in the chair.
2. Move the hips to the left so the left buttock is slightly off the left of the chair. Then move the right leg as far as possible to the right, with knee bent at a right angle, as pictured.
3. Extend the left leg as far as possible.
4. Stretch the arms out to the sides, parallel to the floor.
5. Take a breath and stretch out to each side, until the pull connects the shoulders and the shoulder blades to the elbows to the wrists and to the insides of the fingers.
6. Proceed with the inhalation, bringing the belly closer to the spine and opening into the sternum.
7. Press firmly down into the seat of the chair and down in the heels with both feet.
8. Breathe into the chest, and if possible move the navel to the left.
9. Use more strength in the left arm and the left leg. Press the outer left foot to the floor, including the inner skin of the big toe.
10. Hold for 3 to 5 breaths, charging the chest with the inhalation and exhaling into the legs.
11. Bring the legs together.
12. Bring the arms down toward the hips and rest them, palms down, on top of the thighs. Sit erect and quietly for 3 breaths.
13. Now repeat the movement to the other side.
This pose strengthens the leg muscles, relieves cramping in the calves and thighs, brings flexibility to leg and back muscles, and revitalizes the abdominal organs.
Warrior Pose I
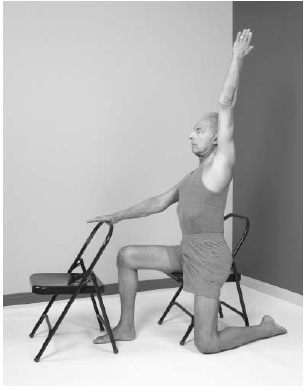
1. Sit upright in the hindmost of 2 chairs, with the back of the torso away from the support of the chair. Place both feet directly under the knees, feet facing straight ahead.
2. Place a blanket under your hips if you are tall and under your feet if you are short.
3. Draw the left leg back to bring it into alignment with the left hip. If the knee does not touch the floor, place a folded blanket under the knee to stabilize the posture.
4. Rest the outer edge of the right palm on the back of the forward folding chair, and lift the back waist, together with the sternum, on an inhalation.
5. Raise the left arm up, until it is even with the ear and in line with the bent knee, or whatever is possible. If there is a balance
problem, keep one hand on top of chair, and when doing the pose on the other side, raise the same arm as the leg that is bent to the floor. If there is no balance problem, both arms can be raised on the inhalation.
6. Press the buttocks down into the chair seat. This tones the mid back muscles to counteract effects of sitting for long periods of time in a soft, rounded back support.
The flexion of the bent leg on the folded blanket encourages additional blood flow into the pelvic cavity.
7. Return to the original sitting position with an exhalation, sit quietly for a few moments, and then repeat to the other side.
After completing both sides of the asana, remain sitting as much as possible away from the back of the chair.
This pose helps to develop deeper breathing by expanding the chest. It relieves stiffness in shoulders, neck, and back and strengthens the ankles and knees. In most instances there is an improvement in the sense of balance and more stamina in the legs and arms.
Extended Triangle Pose
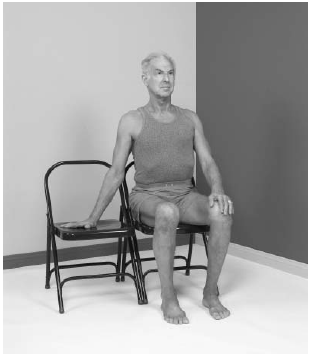
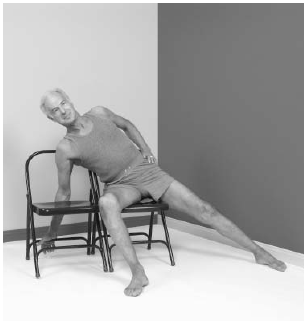
1. Sit upright in the chair, with a safety belt around the waist if necessary.
2. Bring a second folding chair to your right side.
3. Place a folded sticky mat with the folded edge even to the edge of the chair seat on the right.
4. Bring your right leg to the right side of the chair as best you can, while keeping the foot flat to the floor.
5. Move your left leg to the left as much as the chair permits.
6. Move your hips to the left as much as possible, and lean over to place the right elbow on the sticky mat on the chair seat.
7. Take a few breaths, and then place your left hand on your left hip, dropping the elbow backward. This will enable you to open the chest and stimulate the abdominal organs.
8. Lean back against the chairs. They will support your shoulders, chest, and hips.
9. With an inhalation, stretch the left arm into the air in line with the right shoulder.
10. Take a few breaths. Then maximize the weight on the right hand and forearm, press down on the right elbow, and return to an upright sitting position. Breathe quietly.
After the pose to this point has become comfortable and can be done securely, then add a new level of challenge.
1. Using the same procedure as before, when you exhale and lean to the right, instead of resting the elbow on the chair seat, clasp the horizontal bar that supports the front of the chair.
2. Clasping the bar with the right hand, place your left hand on the hip and drop the elbow backward to open the chest cavity. Breathe into the upper ribs and chest area.
3. Do not distort the ribs in order to place the right hand on the bar. Instead, place the hand parallel to the seat of the chair in order to maintain the alignment of the spine and rib cage.
4. With an inhalation, raise the left arm in line with the right shoulder and the right arm.
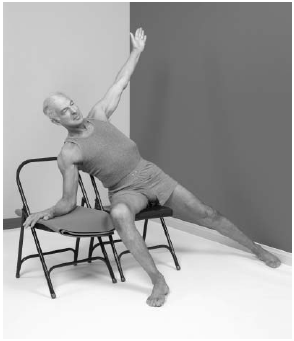
5. Hold the position for 3 to 5 breaths, and then reach out the left hand and arm firmly to the left, and press up into a sitting position. Remain seated quietly before continuing to the left.
This pose creates a dynamic change in circulation in both the pelvis and the torso. Kidney function is stimulated. The digestive system is also stimulated, together with the elimination process. Tension in the spinal
column and surrounding muscles is lessened. The lower back and pelvis are realigned, thereby counteracting effects of long periods of sitting. The legs are toned, and the ligaments and tendons are revitalized.
Chair Backbend
Pose I
1. To start, roll a sticky mat into a tight roll. This can be achieved by opening the sticky mat and folding over one end about a foot.
2. Sit up as much as possible away from the back of the chair. The buttocks should be in the middle of the seat.
3. Lean back to make sure that the bottom edges of the shoulder blades are supported against the back of the chair.
4. Sit up and insert the rolled sticky mat behind you parallel to the spine and supporting the neck and the back of the head.
5. Press the feet into the wall, with heels 3 inches away from the wall and toes up on the wall, with knees slightly bent.
6. Firmly interlock your fingers in front of you. Then if possible place your hands behind your neck, with the little fingers on the occipital bone and the thumbs coming around to the side of the throat and resting on the collarbone.
7. Bring the elbows close to the ears and point them up to the ceiling.
8. Allow the head to rest in the palms, as you press your feet into the wall.
9. Gently release your head into your hands, with the sticky mat supporting the neck and back of the skull.
10. Gently rest your eyes into your cheekbones; do not press your tongue into the upper palate or the lower jaw.
11. Breathe gently, allowing the breath to move up into chest cavity. After 3 to 5 breaths, bring the head up first on inhalation, then stretch the arms up and forward.
13. Sit quietly, and allow the breath to rise into the chest again.
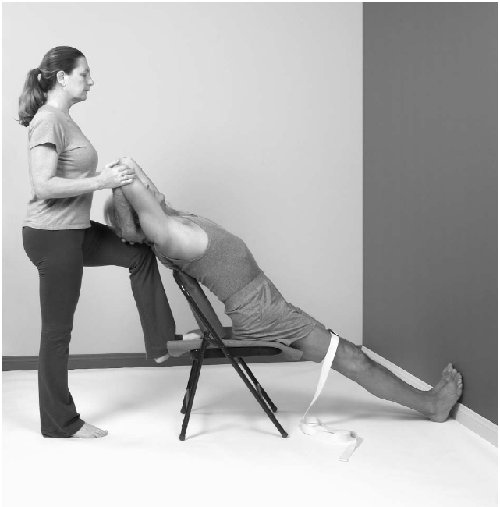
Notice that the assistant has braced one leg at the back edge of the seat of the chair,
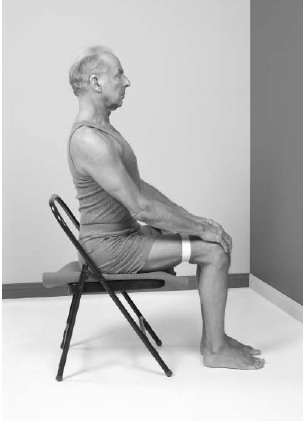
pressing the knee gently into the mid back. Hands are on the elbows, with the thumbs rotating the bicep outward and lightly lifting the arms up parallel to the ears. Caution: There should be no gripping or tightening of the throat.
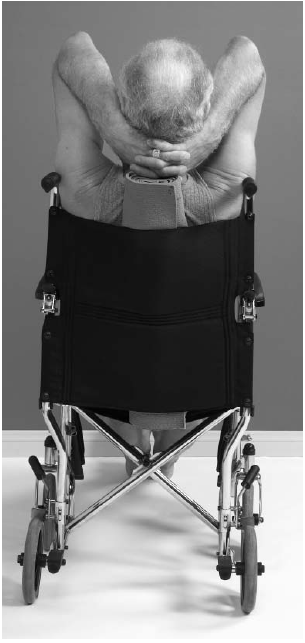
Pose shown in wheelchair
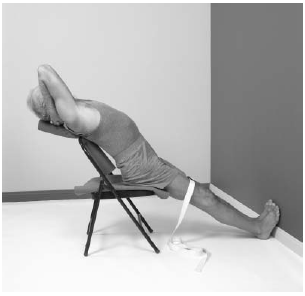
This pose greatly relieves lower back issues. The diaphragm is released from the constant pressure of resting against the abdominal organs. Digestion is improved by realigning and stretching the intestinal tract. And as digestion improves, so does elimination. The chest area is enhanced by correcting the forward slump of the shoulders. Neck and shoulder discomfort is reduced.
Pose II
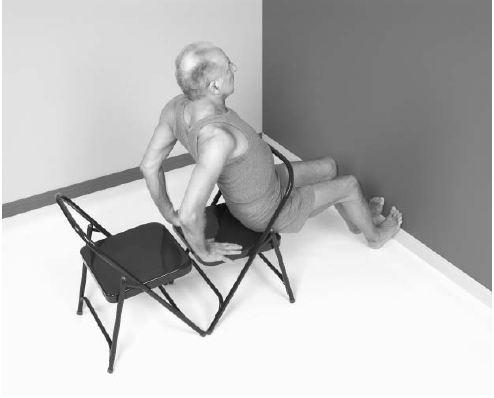
1. Sit in the first chair, your legs extended through the second chair toward a wall.
2. Slide forward but continue holding the first chair seat. Retract the elbows back away from the rib cage.
3. Place your sacrum at the edge of the second chair closest to the wall.
4. Put the heels close to the wall; rest your toes on the wall. Lie back with your elbows on the seat of the first chair. Grip the sides of the seat of the chair and lower your torso.
5. Keep your head forward, until you are lying on both chair seats.
6. Adjust the first chair to fully support the head and the neck. If possible, bring your arms through the supports of the first chair back.
7. Keep the hands and arms parallel to the ears.
8. Press the top of your thighs firmly toward the floor, and stretch your arms and legs any amount. If the shoulders are too wide, the arms can be extended outside the chair back supports.
9. Keep the weight of the eyes resting lightly under closed lids in the cheekbones.
10. Hold for 5 to 10 breaths. Bend the knees. Withdraw the buttocks to the middle of the second chair.
11. Move the first chair away from the hips. Lower your hands as close as possible to the buttocks.
12. Press down firmly and sit up reasonably quickly.
13. Cross your arms on the top of the second chair.
14. Sit up straight and breathe evenly and quietly. It is recommended that seated twists follow the backbends.
This pose releases any tension in the spine, completely revitalizes the muscles of the upper torso, stimulates additional circulation to many organs, tones and
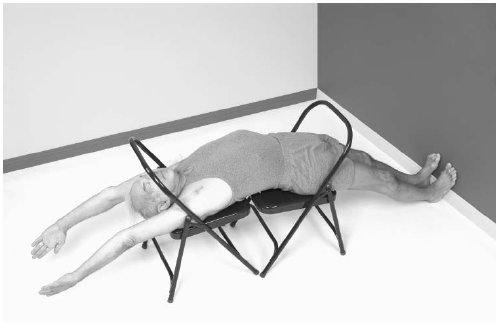
strengthens the arms and legs, and creates additional flexibility in the shoulder and pelvic girdles. It brings joy and lightness to the body and spirit and is stunningly effective in lifting the weight of depression and anger.
SEATED JATHARA PARIVARTANASANA
Chair Lateral Twist
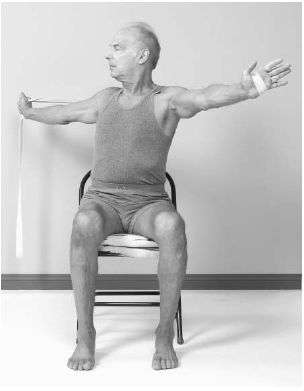
1. For a variation on this pose, take the strap and again make a small loop and lace it into the right thumb, with the instructor stabilizing the arms by supporting the wrist bones.
2. The practitioner turns the abdomen first then the sternum and then the shoulders.
3. Keep your nose in line with the sternum, so there is no tightening of the clavicle, shoulder blade, ears, face, or eyes.
4. The inhalation comes as you untwist back to the center and then turn again to the other side, starting at the navel or the center of the abdomen.
5. Keep the legs firm, turn the chest with the shoulders, hold the arms horizontally, and breathe comfortably. Again the breath comes in from the base of the nostrils and out of the tip of the nose, reaching into your center with the force of each breath.
Upper extremity strength and thoracolumbar muscular and joint mobility are improved with this posture. It simultaneously calms and ivigorates.
